Flash is everywhere. It is used for animated ads, online applications, and recently has become very popular for video. Time magazine named you Person of the Year for 2006 because individuals, rather than corporations, are starting to control content. YouTube, which is powered by Flash, has pioneered this concept.
In this chapter, we look at Flash CS3 and see how it can be used for everything from traditional animation to interactive applications. Flash is an exciting development environment that can be learned and used by everyone from casual designers to hardcore developers.
Flash, like the other CS3 applications, greets you with a welcome screen that gives you quick access to creating new documents and opening a range of template files. These features are also accessible directly from the File, New submenu.
By default, you are given the choice of creating everything from a Flash File (ActionScript 3.0) to a Flash Project (which is a collection of Flash and media files). Perhaps counterintuitively, you should always start with a Flash File (ActionScript 2.0) until you are fully familiar with the application and its advanced features. ActionScript 2.0 gives the best balance of features and functionality. Going with the newer ActionScript 3.0 format locks you out of features such as behaviors, which are very helpful for beginners.
If you’re targeting a specific device, or know you want to make a specific type of Flash application, you might want to check out the templates, shown in Figure 9.1.
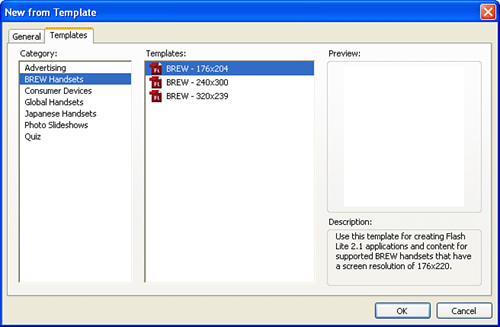
With many handsets now supporting Flash, you can actually choose a template for and build an application that runs on someone’s cell phone! For the purposes of this chapter, however, we’ll just assume that you’ve chosen a default Flash File (ActionScript 2.0) and not a template.
The key to understanding Flash is always knowing where you are. You’re given the power to edit everything: static graphics, animations, buttons, and more. It’s easy to become disoriented about exactly on which element you’re working. Let’s start by taking a tour of the primary elements of the Flash workspace:
The stage—. The visual workspace. Any graphics placed in this area are visible to the user.
Tools panel—. Contains all the many drawing tools in Flash, including those you can add later (by selecting Edit, Customize Tools Panel).
Timeline panel—. Contains the sequence of images that make an animation. The Timeline can also include many layers of animations. This way, certain graphics can appear above or below others, and you can have several animations playing simultaneously.
Properties panel—. The Properties panel, as you’ve learned in other CS3 applications, gives you the controls over any selected object.
Library panel—. The Library panel contains assets that you can store and reuse in your animations.
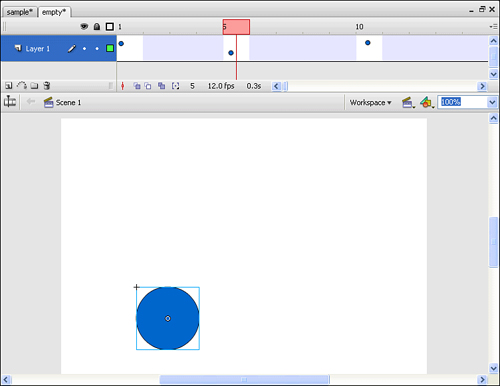
The white rectangle in the center of Flash’s workspace is called the stage. Text, graphics, photos—anything the user sees—goes on the stage, seen in Figure 9.2. The elements you add are the “actors,” and the stage is where they will perform!
Think of the stage as the canvas on which a painter paints or the frame in which a photographer composes pictures. Sometimes you’ll want a graphic to begin outside the stage and then animate onto the stage. The gray area around the outside of the white area is off the stage. You can see the off-stage area only when the View menu shows a check mark next to Pasteboard. (Selecting this option toggles between checked and unchecked.) The default setting (Pasteboard checked) is preferable because it means you can position graphics off the stage.
The stage is quite simple. It is your visual workspace and where most of your animation work takes place. However, two important concepts are worth covering now: stage size and zoom level. By default, the stage is a rectangle that is 550 pixels wide by 400 pixels tall. Later you’ll see how to change the width and height of a movie. However, the specific dimensions in pixels are less important than the resulting shape of the stage (called the aspect ratio). The pixel numbers are unimportant because, when you deliver a Flash movie to the Web, you can specify that Flash scale to any pixel dimension while maintaining a crisp appearance.
Aspect ratio is the ratio of height to width. Any square or rectangular viewing area has an aspect ratio. For example, television has a 4:3 aspect ratio—that is, no matter how big a standard TV screen is, it’s always three units tall and four units wide. 35mm film has an aspect ratio of 3:2 (such as a 4″×6″ print), and high-definition television (HDTV) uses a 16:9 ratio. Most computer screen resolutions have an aspect ratio of 4:3 (640x480, 800x600, and 1024x768). You can use any ratio you want in a web page; just remember that the portion of the screen you don’t use will be left blank. A wide-screen ratio (as wide as 3:1, like film) has a much different aesthetic effect than something with a square ratio (1:1).
A Flash movie retains its aspect ratio when it scales, instead of getting distorted. For example, you could specify that a Flash movie in a web page scale to 100% of the user’s browser window size. You could also scale a movie with the dimensions 100×100 to 400×400.
Not only can you deliver a Flash movie in any size (because Flash scales well), but while working in Flash, you can also zoom in on certain portions of the stage to take a closer look without having any effect on the actual stage size.
The Zoom control is located at the top right of the stage below the Timeline. This control provides one way to change the current view setting. Other ways include selecting View, Magnification and using the Zoom tool (the magnifying glass button in the Tools panel).
If the entire stage is not visible, you can view the other parts of the stage in one of two ways: by using the standard window scrollbars on the right and bottom or by using the Hand tool. The Hand tool is best accessed by simply holding down the spacebar. Go ahead and hold down the spacebar; then click and drag. You’re panning to other parts of the stage without actually moving anything. It’s important to understand that the Hand tool only changes your view port onto the whole stage. The best thing about using the spacebar to select the Hand tool is that it’s spring loaded—that is, the Hand tool is active only while you hold down the spacebar.
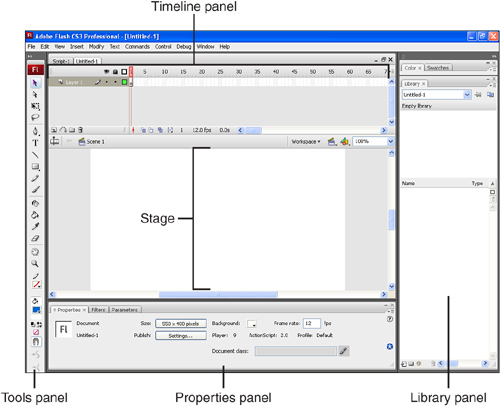
Additional interesting tools are available from the View menu, including grids, guides, and snap settings. Select View, Grid, Show Grid. Behind all the graphics onstage, you see a grid (which the user won’t see in production). The grid can help you line up graphics perfectly. Notice that you can also select View, Grid, Edit Grid to edit the color and spacing of the grid.
Guides are just like the grid, except you drag them into place where you want them. First, select View, Rulers. Now you can click either ruler and drag toward the stage to create and put into place a single guide. You make vertical guides by dragging from the left ruler, and you make horizontal guides by dragging from the top ruler. To remove the guides, drag them back to the ruler. As with the grid, you find the option to edit the guide settings—as well as a way to lock the guides in place—by selecting View, Guides, Edit Guides. Figure 9.3 shows the stage with a grid, rulers, and several guides active.
The Tools panel is the panel with which you will likely become most familiar. Any time you create or edit anything on the stage, you need to have one tool selected from the Tools panel. By default, the Tools panel is a vertical column located on the left of your screen.
Although the Tools panel is used primarily to draw on the stage, it’s also used to edit what you’ve already drawn. Shown in Figure 9.4, the Tools panel provides controls for editing, selecting, and coloring your content.
The Tools section enables you to create graphics and text (via the Line, Shape, and Text tool), edit graphics (via the Eraser tool and Paint Bucket tool), and simply select graphics (via the Selection tool, Subselection tool, and Lasso tool). The color selector near the bottom gives you control over the color of objects drawn. At the very bottom of the panel are context-sensitive options that modify how certain tools work. Depending on which tool is selected, you might not see anything in the Options section.
We’ll look more closely at some of these tools later, but there is no harm in selecting and trying them out now!
The Timeline contains the sequence of individual images that make up an animation. When the user watches your animation, he sees the images on Frame 1 followed by Frame 2, and so on. It’s as if you took the actual film from a conventional movie and laid it horizontally across the screen, with the beginning on the left and the end toward the right.
Like many other windows, the Timeline can be moved around so it floats just about anywhere on your screen (use the panel menu in the upper-right corner of the Timeline). If you want, you can dock the Timeline under the stage—or nearly anywhere else you want. People who have the hardware to support two monitors have even greater flexibility in the way they organize their workspace. If you completely close the Timeline to make more space (which is possible only when it’s floating), you can always get it back by selecting Window, Timeline.
When you start to create animations, the Timeline includes many visual clues to help you. For example, you can quickly see the length of an animation simply by looking at the Timeline. Also, Flash uses a few subtle icons and color codes in the Timeline; this way, you can see how the animation will play.
In the Timeline, a red marker indicates which frame is currently being viewed. This red current-frame marker can be in only one frame at a time—the frame you’re currently editing. Initially, you’ll find that you can’t move the current-frame marker past Frame 1 unless your file has more frames. You’ll have plenty of opportunity to do this later; for now, just realize that the red marker indicates the current frame. If it helps, imagine a time machine. You can visit any moment in time, but you can visit only one moment at a time.
In addition to frames, the Timeline lets you have as many layers as you want in animations. As is the case with other drawing programs, objects drawn in one layer appear above or below objects in other layers. Each layer can contain a separate animation. This way, multiple animations can occur at the same time. By using layer names and special effects, you can create complex animations. Figure 9.5 shows the Timeline and layers of a finished movie.
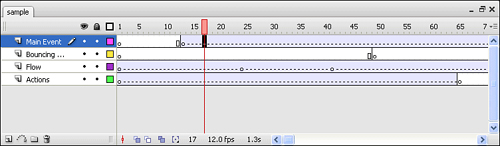
One important concept is that you can be in only one layer at a time. That is, if you draw or paste graphics, they are added to the currently active layer. The current layer is the layer with the pencil icon, as shown in Figure 9.5. You can just single-click another layer to make it the active layer (notice that the pencil moves to the layer you click). The key here is to always pay attention to what layer you’re currently editing. For example, if the current layer is locked, you won’t be able to affect it at all. Since the Flash Layers panel is virtually identical to that of Photoshop (and Illustrator/InDesign), please refer to Chapter 6, “Using Adobe Photoshop CS3.”
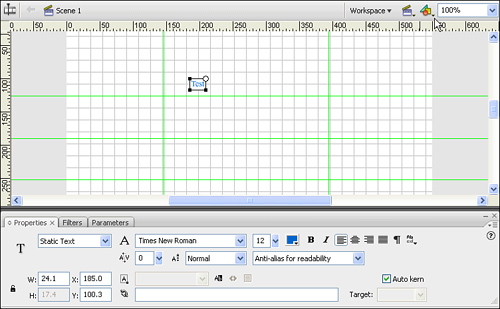
As in the other CS3 applications, the Properties panel displays properties of the currently selected object so you can make adjustments. For example, when you select a block of text, the Properties panel lets you view and change the font face and size. When you select a filled shape, you can adjust the fill color of that shape.
For example, in a new file, you can select the Text tool, click the stage, and then type a few words. At the bottom of the screen you’ll see the attributes for the text within the Properties panel, as shown in Figure 9.6.
The Library is the best storage facility for all the media elements used in a Flash file. Media placed in the Library can be used repeatedly within a file, and—regardless of how many times you use those media—it doesn’t significantly add to the file size! For example, if you put a drawing of a cloud in the Library, you can then drag 100 copies of the cloud onto the stage (making a whole sky full of clouds), but deep inside the Flash file, only one cloud exists. Using the Library is one way you can keep Flash movies small.
In practice, the Library is used in two basic ways: for editing and for maintaining (or accessing) the Library’s contents. You might need to edit the contents of one Library item (called a symbol), and when you do, you are editing the contents of the Library. You might also need to access the Library to simply organize all the contents or to drag instances of the symbols into a movie. In such a case, you are maintaining the Library (as opposed to editing its contents).
A symbol is the name for anything—usually something visual, such as a graphic shape—you create and place in a file’s Library. Although different types of symbols exist, the idea is that by creating a symbol, you’re storing the graphic once in the Library. After it is in the Library, the symbol can be used several times throughout a movie without having a significant impact on file size.
An instance is one copy of a symbol used in a movie. Every time you drag a symbol from the Library, you create another instance. It’s not a copy in the traditional sense of the word because there’s only one master and each instance has negligible impact on file size. Think of the original negative of a photograph as the symbol and each print as another instance. You’ll see that, like photographic prints, instances can vary widely (in their sizes, for example).
Let’s review the other panels and what they contain. You’ve already seen the primary tools you’ll be using for your work, but there are other useful features as well. Keep in mind that you can rearrange panels—so if your system doesn’t match exactly, someone has probably been customizing things a bit. You can return to the default workspace by choosing Window, Workspace, Default from the menu.
Many panels are hidden initially. If you don’t see one of the groups listed here, look under the Window menu. Following are the other panels you might find useful:
Color—. Used to set line and fill colors and styles for objects created in the stage.
Swatches—. A collection of reusable colors and color palettes. You can add your favorite colors here.
Filters—. Special effects that you can add to movie clips, text, and other objects within the stage. These are similar to (but not as varied as) filters within Photoshop and other graphics applications.
Parameters—. Similar to the Properties panel, but used to set the attributes of the screen during playback.
Info—. Just like the Info panel in Photoshop, this panel shows the position of the cursor, the size of the current selection, and the color located under the cursor.
Transform—. Gives quick access to tools for stretching, skewing, and rotating objects in the stage.
Components—. Used to access user interface elements (buttons, progress bars, and so on) for use within Flash applications.
Components Inspector—. Similar to the Properties panel, but for user interface components. It enables you to set attributes for the selected component.
Accessibility—. Set common accessibility attributes for a given object to make it accessible to the visually impaired.
History—. If you’ve used History to fix some boo-boos in Photoshop, you’ll recognize the History panel immediately. The History panel contains a list of all the changes you’ve made to the document. You can immediately back up to any state that the document has been in since it was last saved. The History panel can hold 100 changes by default. You can reset this value (Undo Levels) in the General section of the Flash preferences, accessed by choosing Edit, Preferences or pressing Command-U/Control-U.
Scene—. A way to create unique animations with individual timelines within a single Flash file. Just like a feature length movie might be divided into scenes, you can divide an animation into scenes. The name of the current scene is always shown at the top of the stage.
Strings—. Can be used to store strings that are used in an application. Multiple language strings, for example, could be stored here and accessed to create a multilingual presentation in a single file.
Web Services—. Define web service URLs that can be accessed by your Flash applications. Web services are applications that provide specific information back to a calling program, such as returning weather data.
Actions—. Used to attach and edit ActionScript (the programming language behind Flash) to objects and animation frames.
Behaviors—. A library of prewritten ActionScripts that can be immediately used to apply complex behaviors to your onscreen objects.
Common Libraries (Buttons, Classes, Learning Interactions)—. Libraries of commonly used components that can be added and used in your documents. Unlike Components, these are prestyled, ready-to-go elements.
Debug Panels (Debug Console, Variables)—. Used to find errors in your Flash ActionScript code and monitor the value of variables during execution of the program.
Now that you know where things are, let’s learn a bit about the graphics tools available in Flash. We’ll then review the terminology of animation, and then get started making a simple animation.
Most everything you do in Flash starts with a drawing on the stage. Sometimes, you’ll want a graphic to start off the stage and then animate into view. Drawing off the stage requires that you have the Pasteboard selected with a check mark in the View menu. I recommend you leave this setting checked, but you should realize that the gray area around the outside of the stage is offstage and does not appear in your finished movie. The stage is the white rectangular area.
Your drawing tools should appear, by default, on the left side of the screen, as shown in Figure 9.7. If the tools aren’t visible, you can access them by selecting Window, Tools.

The following sections look at how to draw with these tools. Keep in mind that whereas some tools (such as the Pencil and Brush tools) let you create artwork, others (such as the Selection and Zoom tools) simply help you modify or view your artwork. If you’ve used Illustrator, you’ll feel at home here.
Both View tools—Hand and Zoom—have no effect on artwork. You simply use them to help you see your artwork.
To zoom in to critically inspect or change the artwork in the stage, click to select the Zoom tool (it’s the one that looks like a magnifying glass). Notice that, as with many other tools, when you select the Zoom tool, additional buttons appear in the Options section of the toolbar. You should see two more magnifying glasses appear in the Options area: Enlarge (+) and Reduce (–).
To zoom in or out, just select the appropriate option, and then click the stage. Another way to zoom is to click and drag. You see a rectangle as you drag, and when you let go, that rectangle defines the viewable portion of the stage.
You always see the current zoom level displayed in the pop-up menu at the top right of the stage. If you click the Zoom control pop-up menu, you can return to 100%. Another quick way to return to 100% is to double-click the Zoom tool (not the Enlarge or Reduce option, but the main Zoom tool’s magnifier).
The Hand tool is another non-modifying view tool that helps you navigate the stage without using the scrollbars. To use the Hand tool, simply select it, and then click and drag within the stage area to move your current viewing location.
Although the View tools prove very useful, they can’t change a file. To create artwork in Flash, you have to add to an image, change something you’ve already drawn, or remove some or all of what you’ve drawn. In the following sections, you’ll see how to add to your artwork. This naturally gives you something to change or remove later. Let’s go through each tool individually and then analyze how they can all be used together.
Two tools are available for just drawing lines: the Line tool and the Pencil tool. (To be fair, the Oval and Rectangle tools draw lines, but they also draw fills, as you’ll see in the “Painting Fills” section later.) Lines can be given a stroke color, stroke width, and stroke style.
To draw a line, select the Line tool, which draws straight lines. When your cursor is on the stage, it changes to crosshairs. Click and drag to create a line. You might notice a dark ring that sometimes appears while you drag. This is Flash’s way of assisting you while drawing by letting you know when your line is at a 45 degree increment or you’re approaching an intersection with another object. In the case of the line, you’ll find drawing perfectly horizontal and vertical lines to be easy when the Snap to Objects option is selected from the View menu.
To set the stroke width or stroke color of lines before you draw them, make changes in the Properties panel when the Line tool is selected. If you want to change the stroke attributes of a line you’ve already drawn, first select the Selection tool and then click once to select the line. When the line is selected, you can use the Properties panel to affect its attributes.
Another way to draw is with the Pencil tool. As you’d expect, the Pencil works like a pencil! Click and drag in the stage area and a line is drawn as you drag.
Three useful options for the pencil tool are
Straighten—. The Straighten option attempts to straighten what you draw using, well, straight lines. If you’re trying to draw a polygonal shape, this is the mode you want.
Smooth—. The Smooth option can come in handy if you find that your hand-drawn images look too jagged. It automatically smoothes out images that you draw.
Ink—. Finally, the Ink Pencil Mode setting draws almost exactly what you draw. Flash adjusts what you draw to reduce the file size.
The Properties panel affects lines drawn with the Pencil tool in the same way it affects those drawn with the Line tool.
One attribute in the Properties panel you might want to experiment with is the stroke style. The pop-up menu shows a visual representation of each style. Solid (the default) is similar to Hairline, but Hairline effectively sets the stroke height to the lowest number possible.
When the Pencil or Line tool is selected, the Custom button on the Properties panel provides a way for you to create your own custom stroke styles. The dialog box that appears after you click the Custom button lets you control several attributes of your own custom stroke styles.
In Flash, there are two components to any shape you draw: lines and fills. Some shapes are just lines (as you saw in the previous section), but some shapes are just fills (as you’re about to see), and some shapes contain both.
A line has no thickness—only applied stroke attributes. A fill, on the other hand, has a left side, right side, top, and bottom. You can think of lines as the candy coating on an M&M and fills as the chocolate center (if that helps).
The two tools to create fills are the Brush tool and the Paint Bucket tool. To see how these work, it’s easiest to just try them out.
First, let’s look at the Paint Bucket tool. Create a few freehand circles using the Pencil tool—make sure they are complete circles without any gaps.
Next, select the Paint Bucket tool. Notice that the Options section has buttons for Gap Size and Lock Fill.
If you click with the Paint Bucket tool in an empty part of the stage, nothing happens. The Paint Bucket tool fills closed shapes with the selected fill color (the swatch next to the small paint bucket in the Colors section of the toolbox). It also changes the fill color of any fill already created. Change the Gap Size option to Close Large Gaps. Adjusting the Gap Size option should enable you to fill all your circles—even if they were not totally closed.
Now let’s look at the Brush tool. Select it and try drawing a line. Because you’ve used the Brush tool, it’s really a fill (not a line), despite the fact that it might look like a line.
To change the fill color of a brush stroke, use the color swatch in the Properties panel, or just click in the stroke with the Paint Bucket tool to replace the fill.
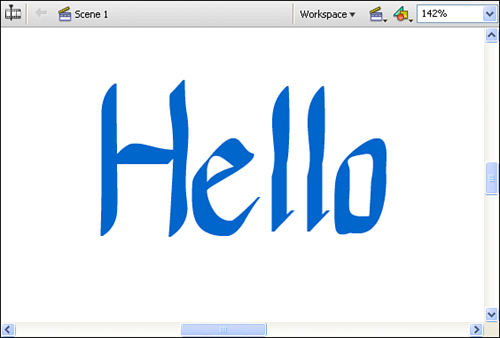
The Brush tool’s Options area is definitely one you’ll want to explore. The two pop-up menus that appear to be the same are actually quite different. The Brush Size option controls the brush’s tip size. On the other hand, the Brush Shape option controls the brush’s tip shape. For example, you can have a calligraphy look with the angled tip, as shown in Figure 9.8.
Brush Mode, another option, is very interesting and worth investigating. Depending on the mode type, the brush can be limited to only painting within or behind other shapes. It can even be constrained to affect only the current selection.
When or the Rectangle tool, you create a shape using both a line and a fill. These shapes have a fill and a stroke, with all the attributes set in the Properties panel. You can actually draw an oval or a rectangle that has no fill by changing the fill to no color (the white square with a red line through it).
Similarly, you can create a shape without a stroke by changing the stroke color to no color. These tools are pretty self-explanatory. One tool option to take note of is the Round Rectangle Radius setting. If this setting is selected before you draw, it makes all rectangles you draw have rounded corners.
There are two fundamental components to the shapes you create—lines (or strokes) and fills—and each has a different set of tools. The Oval tool and Rectangle tool can create both strokes and fills at the same time. To create a new fill or affect one that’s onscreen, you use the Brush tool or Paint Bucket tool. You can create lines using the Pencil tool or the Line tool, and you can change their characteristics using the Ink Bottle tool.
The Pen tool is primarily used to draw lines, but anytime you use it to draw a closed shape, the shape is filled automatically.
By simply clicking with the Pen tool, you can add sharp anchor points on straight lines. An anchor point is a point on a line or path that “ties” the object to the artboard. The Pen tool can also draw curves. Instead of just clicking to create a point, you can click and drag to create a curve. The direction in which you drag creates what will become a tangent to your curve. The distance you drag determines how gradual or extreme the curve will be—this is a Bé]zier curve and is one of your primary tools in Illustrator. I’d recommend practicing drawing with the Illustrator tools to become more familiar with the art tools in Flash.
To create text, you simply select the Text tool, click, and start typing. You can modify the font, color, and style of what you’ve typed after you create it. Modifying your text after it’s typed, although counterintuitive, is usually your best approach because it enables you to fine-tune the appearance within your artwork.
Creating text in Flash is both easy and more sophisticated. Let’s try a few of the tools and see how they work.
Select the Text tool, click the stage, and then type a few words. This click-and-type technique expands the margin for the block of text to the exact width of whatever you type. A circle that appears at the upper-right corner of the text block indicates that the margin will automatically adjust in this way (see Figure 9.9).
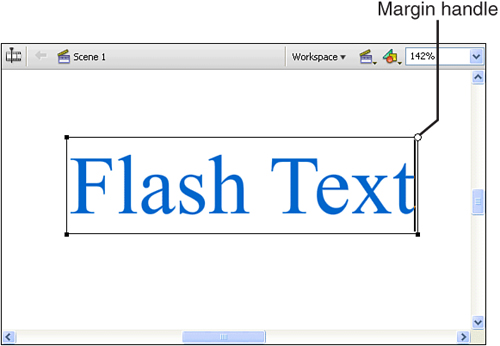
To adjust margins, click and drag the circle. It changes into a square to indicate that the margins are fixed. You can double-click the square margin control to restore the automatic margin adjustment (that is, to make it a circle again).
Now that you have some text in the block and have set the margins, let’s review some attributes that can be modified. Click the Selection tool to stop editing the text. Your text block should become selected. (If it isn’t, just click it once, and a rectangle appears around it.)
With the block selected, use the Properties panel to make modifications, as shown in Figure 9.10. You’ll find these options easy to understand and use. They are very similar to most word processing tools.
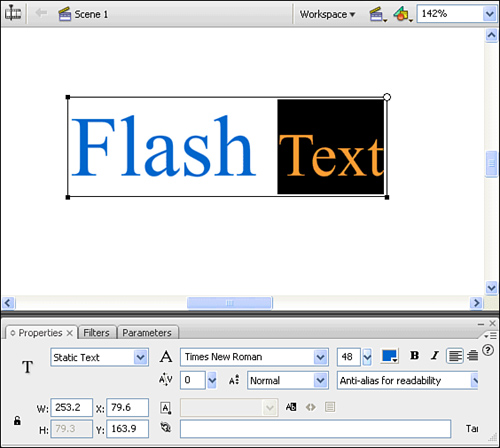
Properties are applied to the entire block of text (if it is selected), or, if you prefer, just select individual words or sentences to have finer grained control over the text’s appearance.
Now that you’ve seen how to create lines, fills, shapes (with both lines and fills), and text, it’s time to explore how to modify them. The process is simple. You select the object you want to modify using the Selection tool and then you modify it. Selecting exactly what you want to modify is actually the most challenging part.
The two basic selection tools are the Selection tool and Lasso tool. The Subselection tool (the white arrow) is for selecting and editing individual anchor points (in the same way the Pen tool created them). Again, if you’ve used Illustrator, this should be very familiar to you.
The Selection tool is used to select an object by clicking it once. The key to the Selection tool is that the cursor changes to tell you what will happen when you click, such as resizing, moving, and reshaping. You can try this tool by adding objects to your document and then moving the cursor around the perimeter of the objects.
Another way to select an object is to marquee it. With the Selection tool selected, click outside the object and drag until you’ve drawn an imaginary rectangle that surrounds it entirely. When you let go, anything within the rectangle (presumably your object) becomes selected.
Sometimes the arrangement of other shapes onscreen makes the marquee technique difficult or impossible. Another tool you can use to make selections is the Lasso tool. Select the Lasso tool and then click and drag around a shape to select it. The Polygon Mode option for the Lasso tool makes the tool act almost like the Pen tool. Select the Polygon Mode option, and click and let go. Then click and release in a new location to extend the selection. Continue to extend the selection and then double-click when you’re done.
Finally, you can decide to select just a portion of a shape. Suppose you want to chop off the top of the circle. You can use either the Lasso tool or the marquee technique with the Selection tool to select the portion desired.
You use the Selection tool to employ the marquee technique. If you click and drag an object, it moves or bends. However, when you click the stage where there are no objects, you see a rectangle appear while you drag (this is the marquee). You can draw that rectangle around other objects, and they will be selected when you let go. Using this marquee technique to select objects is often easier than clicking to select objects.
One what you’ve drawn is to simply change the color. For example, the Paint Bucket tool can change a fill’s color, and the Ink Bottle tool can change a stroke (its color and other attributes). This works fine when you make the effort to first select the fill color, for example, and then select the Paint Bucket tool and click a fill to change it. Sometimes, however, you want one fill to match the color of another. The Eyedropper tool enables you to sample a color from an object that is already onscreen.
The Free Transform tool is your key to advanced modifications. Basically, you just have to select an object with the Free Transform tool active. Four options appear any time you use the Free Transform tool and have an object selected. You can also find these options by selecting Modify, Transform.
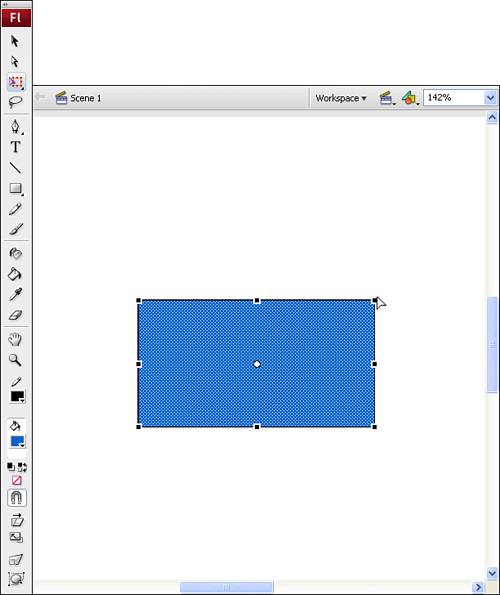
Use the Rectangle tool to draw a square. Select the Free Transform tool and double-click the center of the square to select it entirely.
At this point, none of the four options at the bottom of the Tools panel should be selected (see Figure 9.11). This means you’re in Free Transform mode, and if you have a steady hand, you can rotate, scale, or distort the shape.
Explore the possibilities by rolling your cursor over the square handles at the corners and sides of the shape—but don’t click yet. Depending on where you move your mouse, the cursor changes to indicate its action. A line with two arrows for Scale, a circular arrow for Rotate and two parallel lines for Skew. Additionally, if you hold down Ctrl, the corners make the cursor change to the Distort option.
Free Transform mode can be really touchy, so let’s access the options individually using the option buttons at the bottom of the Tools panel. Select your object, then select the Scale option.
The selected object shows square handles in the corners and on the sides. The cursor changes when you roll over these handles. The corner handles enable you to scale both width and height equally and at the same time. The side handles let you change just width or just height. Click and drag a handle to change the scale. Notice that this version of Scale (compared to Scale in Free Transform mode) can maintain your shape’s proportions (horizontally and vertically).
Next, make sure the square is still selected and select the Rotate and Skew option in the Tools panel. Now the corner handles rotate; side handles skew. Roll your cursor over the handles to see the cursor change.
Click and drag a corner handle and notice that you can rotate the square. Actually, if the default Snap to Objects option is selected (that is, if the magnet button is pressed in), the object snaps into place at 45° angles.
For our next trick, choose the Distort option. Drag the shape by the handles on the corners to distort. It turns out that the Selection tool can create the same effect as Distort, but only when the shape itself has a corner to grab. Without this Distort option, making a distorted ellipse would be nearly impossible. Finally, try holding down the Shift key when you distort (by dragging a corner handle). This way, you can distort two sides evenly.
Finally, the wildest of transformation options is Envelope. To best understand this option, draw a new square, select the Free Transform tool, and click the Envelope button. When your shape is selected, you see many handles. Move the square handles to “influence” the shape. It’s as though the shape tries to touch all the squares, even if they’re pulled out to one side. The circle handles are like the tangents created when you draw using the Pen tool. They control the rate at which a shape bends to reach the square handles.
After you draw a shape, you can at any time smooth or straighten what you’ve drawn. The Smooth and Straighten options are available when the Selection tool is selected. The process is quite simple: You select a shape and click either Smooth or Straighten. Clicking repeatedly continues to smooth or straighten whatever is selected.
By selecting View, Snapping, Snap to Objects (or clicking the magnet button in the Tools panel when the Arrow or Free Transform tool is active), you can draw perfectly round circles, perfectly horizontal or vertical lines, and much more. The visual clue that Snap to Objects is helping you is the dark ring that often appears next to your cursor while you drag. When you see that ring, you know Flash is trying to help you draw.
You might already know from using other software that holding the Shift key constrains your cursor similarly to Snap to Objects. But Snap to Objects can do much more. In addition to helping you draw perfect shapes, Snap to Objects also enables you to connect two shapes. It’s much more than simply making two shapes touch—they actually become bonded. In Flash, unless two shapes have been snapped together, they might look connected when they actually aren’t.
If you start using Flash without understanding the basics of animation, you might be a bit overwhelmed. To get a better grasp of how Flash tools work, you’ll need to get a few definitions under your belt.
At its most basic, animation is a series of still images. Each image is called a frame. In movies, frames are the individual pictures on the film itself. In Flash, frames are the little rectangular cells in the Timeline. They’re numbered at the top of the Timeline, and every fifth frame is gray; the rest of the frames are white with a gray outline. The Timeline displays all the frames, but normally you can look at the contents of one frame at a time. (Later you’ll see how the Onion Skin option can help you view multiple frames.) The red current-frame marker can be in only one place at a time—the frame you’re currently viewing. You don’t draw into a frame on the Timeline—you draw onto the stage. The current-frame marker indicates the frame whose contents are currently onscreen. Figure 9.12 shows the Timeline in its initial state. Until this movie’s duration is extended, you can’t move the red current-frame marker past Frame 1, and only Frame 1 is enclosed by a solid white box with a hollow circle.

By default, a Timeline is initially one frame long. The current-frame marker is unmovable at that point because it can be placed only in a frame of an animation, and so far the animation has only one frame. When a longer animation is loaded (or created!), the timeline extends. The current-frame marker moves to where you click; be sure to click in the numbered area toward the top of the Timeline—not in the cells, otherwise you’d end up switching layers as well as the current frame.
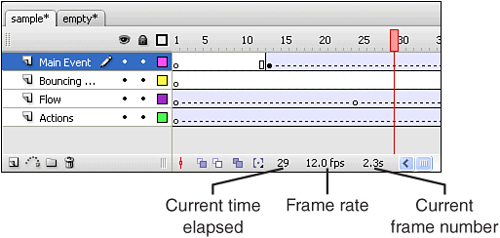
Another timeline technique is to click and drag the current-frame marker in the number area. As you drag, you see a quick preview of the animation. This technique is called scrubbing. The preview you’re given is dependent on how fast you scrub. Naturally, the frame rate is locked when the user watches an animation. If you select Control, Play or just press Enter, you see this animation play at its correct frame rate. To stop, press Enter again. You should also notice the status area near the bottom right of the Timeline. The three numbers are the current frame number, the frame rate, and the current time elapsed (see Figure 9.13).
Frame rate is the rate at which frames are played back for the user, measured in frames per second (fps). A frame rate of 30 fps means that 30 frames are displayed every second. It is easy to confuse frame rate with speed, but they’re not necessarily the same. If an entire animation uses 10 frames at 10 fps, it might look identical to the same movement using 20 frames if the frame rate is set to 20 fps. Both of these animations take 1 second to finish.
The current frame number (on the left) indicates the location of the red current-frame marker. It changes while you’re playing or scrubbing, reflecting that you can be in only one frame at a time. The frame rate (the middle number) normally indicates the frame rate for the movie on which you are working. However, the number shown can be reduced if, after you play the movie, Flash estimates that it can’t actually keep up with the requested frame rate. It’s not entirely accurate, but it does provide a good estimate. Double-click this number to open the Document Properties dialog and adjust the Frame Rate field accordingly.
Current time (the third number) indicates how long it takes to reach the frame you’re viewing from the start of the movie. For example, how long it takes an animation to play 50 frames depends on the frame rate. At 24 fps, it should take about 2 seconds. At 12 fps, it should take about 4 seconds. The duration of the movie is based on the frame rate.
The numbers in the status area are very important. When you design an animation, you should pick a frame rate and stick to it. When you change the frame rate, you’re changing it for the entire movie. For example, say I have an animation of a character walking, running, jumping, and sitting still for a few seconds. If the portion where he’s walking is too slow and I try to speed it up by increasing the frame rate, that portion might look better. But then the character will run extra fast, his sitting time will go by more quickly—everything will be faster! It’s best to leave the frame rate alone and find another way to increase the speed.
There are ways to change the effective speed. Suppose you have an animation of an airplane moving across the sky. You need to decide the effective speed of the airplane according to the size of the airplane and how much sky you’re showing. If you move the airplane all the way across the screen in 36 frames, you can’t determine whether that’s the right speed unless you consider the frame rate. At 12 fps, the airplane takes 3 seconds to move across the sky.
Effective speed is how fast something seems to move. Actual speed, in comparison, is absolute and can be measured. If an animation uses 12 frames (at 12 fps), the elapsed time of 1 second is the animation’s actual speed. The viewer’s psychological impression determines effective speed. Therefore, you can use illusions to increase or decrease an animation’s effective speed. If a lot of action and changes occur in those 12 frames, it’s effectively fast. If only one slight change occurs, the effective speed is slow. If you extend the animation to take 240 frames, the airplane takes 20 seconds to complete the motion and effectively appears slow because very little is changing from frame to frame. You’ll learn how to do these things later, but for now, it’s only important to understand how the frame rate and the number of frames affect the effective and actual speeds.
To put the animation you’re about to embark upon into perspective, let’s compare some traditional animation media. In a motion picture, the frame rate at which the images appear is 24 fps. Even at this relatively slow rate, you don’t notice the moments when the screen is black. Television plays at 30 fps.
In computer animation, the screen doesn’t blink between frames, but you do have a choice about what frame rate to use. Technically, the user’s monitor will flicker as much or as little as she has it set to flicker, but in any case, it will be much faster than an animation’s frame rate. In computer animation, frame rate affects how frequently the onscreen graphic changes or, conversely, how long it pauses before advancing to the next frame. In practice, if you go much below Flash’s default setting of 12 fps, your user will start to notice jumpiness, and if it’s much higher than 36 fps, it might not perform well on all machines. Remember that traditional movies use 24 fps and look quite smooth.
It might seem that you should always crank up the frame rate as high as you can, which would address the problem of jumpiness. However, it’s not that easy. First of all, more frames can mean that your movie has a bigger file size. Also, it often requires a computer that can display images quickly. If your user’s machine can’t keep up, it slows down the animation and makes it jumpy.
A keyframe is simply a frame in which you establish exactly what should appear on the stage at a particular point. A keyframe might include an image, or it might be blank. A blank keyframe is still a keyframe; it’s just one in which nothing appears on the stage.
In traditional film animation, every frame is a keyframe—that is, something new appears onscreen each frame. In Flash you can make every frame a keyframe, but you can also take some shortcuts. If the first keyframe occurs on Frame 1 and the next keyframe doesn’t occur until Frame 10, there won’t be any changes onscreen during Frames 2–9. The keyframe in Frame 1 establishes what will appear in Frame 1, and it doesn’t change until the keyframe in Frame 10, which establishes what appears then. This is totally appropriate for something that doesn’t need to change every fraction of a second.
Establishing a keyframe is simply a matter of clicking the cell in the Timeline exactly where you want a keyframe to occur. After you click a single cell in the Timeline, select Insert, Timeline, Keyframe (or, better yet, press F6). A couple things happen when you do this. Flash places a keyframe in that frame (indicated by either a solid or hollow circle), and it copies the stage content from the previous keyframe. If at the previous keyframe you have nothing on the stage, a blank keyframe is inserted. If at the previous keyframe you have something drawn on the stage, that shape or symbol instance is copied onto the stage at the new keyframe. This can be convenient because a keyframe gives you a chance to specify both when you want an onscreen change to occur and what the onscreen contents should change to. Often you want just a small change. Creating a keyframe enables you to start with a copy of the previous keyframe’s content instead of redrawing it from scratch.
Whatever you draw in a keyframe continues to be displayed until the Timeline arrives at the next keyframe (blank or otherwise). If keyframes are placed one after another, the screen changes with every frame. If the frame rate is 10 fps, you see 10 keyframes in 1 second.
However, keyframes don’t have to occur one after another. If you insert keyframes at alternating frames, changes appear five times per second (at 10 fps). For any frames between keyframes, you see the content of the previous keyframe, either an image or a blank screen. Say you want a box to appear onscreen and remain still for 1 second before it moves. In one keyframe you draw a box, and then 10 frames later (1 second at 10 fps) you insert a new keyframe in which you can move the box to a new location.
You can put whatever you want in keyframes. The space between two keyframes effectively “holds” the onscreen contents from the first keyframe. Alternatively, you can tell Flash to interpolate the change in a process called tweening. For example, suppose that in one keyframe there is an airplane on the left of the stage. The next keyframe shows the airplane on the right side of the stage. Flash can calculate how to move the first image to the second.
Tweening smoothes out a big change by breaking it into little steps. If a circle at the bottom of the screen jumps to the top of the screen 1 second later (at 10 fps), the change appears abrupt. If the two frames are tweened, you see the circle move a little bit (about 1/10 of the total distance) 10 times. The coarse movement is smoothed out with small changes in the in-between frames. Flash calculates these tweened or interpolated frames so you don’t have to do all the work.
Tweening really is as simple as drawing two frames and making Flash tween the difference. You’ll learn more about tweening later in “Advanced Animation Through Tweening.” For now, you just need to realize that Flash will help you by doing some of the tedious work.
Now that you’re ready to create a movie, you’ll need to create a new Flash file, (File, New, Flash File [ActionScript 2.0]). You’ll also need to specify a few far-reaching settings early in the creation of any movie. Most of these are found in the Document Properties dialog box, shown in Figure 9.14, which you access by selecting Modify, Document or double-clicking the bottom of the Timeline (where you see 12.0 fps). You should access the Document Properties dialog box now so you can experiment with a few of its settings. (Notice that most of the same settings appear in the Properties panel if you click the stage or otherwise deselect all objects.)
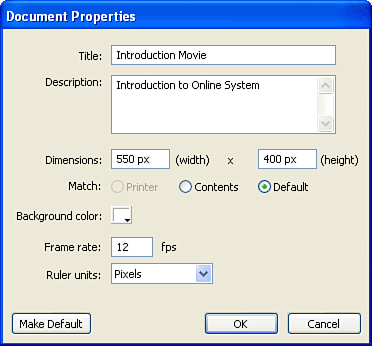
First of all, you need to ensure that Ruler Units is set to Pixels. This is the standard unit of measurement in multimedia and web pages. It’s important to set Ruler Units to Pixels because this affects several other dialog boxes (including the Info panel). Next to Background Color, you should see a white swatch that, when clicked, enables you to change the stage color. This isn’t actually as useful as you might think because at the time you publish a movie to the Web, you can specify any background color you want and it overrides this setting. Feel free to change the background color any time you want. Maybe gray will be easier on your eyes, or black will make selecting white graphics easier. I often use a bright red background just so it’s super clear while I’m editing. Do whatever you want—not only can you change this setting later, but it also affects only the stage color while you’re editing.
Two other Document Properties dialog box settings are important to establish early in any project: Frame Rate and Dimensions. Frame Rate specifies the rate—that is, how many frames per second—at which Flash attempts to play. I say attempts because some of your users might not have a computer fast enough to keep up, so Flash just can’t display the specified number of frames in a second. Flash will not exceed the frame rate you specify, but it could get bogged down and not keep up. Dimensions are only important to the degree that they affect the aspect ratio of your stage, as discussed at the start of the chapter, in “The Stage.” You need to decide up front on the shape for your stage (sorry, it can’t be round). Do you want a wide-screen CinemaScope look, or do you want a square stage? You might even want a vertical rectangle if, for instance, you were building a button bar to appear on the left side of a web page. You need to consider this early on because the stage shape influences how you position graphics and changing it later makes for a lot of repositioning.
People often confuse frame rate with speed, which is more of a visual effect. Animators can use tricks to make something appear to speed across the screen even while using a very low frame rate. For example, if you see a picture of a car on the left side of the screen and then a fraction of a second later, it’s on the right side of the screen, which can tell your brain that the car is moving fast. However, such a trick requires only two frames—and at a frame rate of 4 fps, the second frame appears only a quarter second after the first! Frame rate—that is, how many chunks into which each second is broken—controls the visual resolution. Four frames per second can look “chunky”—each change occurs only four times per second. However, 30 fps (equivalent to the frame rate of TV) is such a fine increment that you’re not likely to see the steps between discrete frames (although, of course, that’s what’s really happening). By the way, you can still move a car across the screen in a quarter of a second by using 60 fps—it would just involve 15 frames.
As a beginning animator, one of the easiest things for you to do is create a frame-by-frame animation. If you’ve ever made a flip-book, you already know how to make a frame-by-frame animation. Each page in a flip-book contains a slightly different image so that when you fan through all the pages, the image is animated. That’s basically what you can do in Flash. However, instead of drawing something different on each page of a book, you simply draw a different image in each keyframe of the Flash Timeline. This is a very involved form of animation because it doesn’t use any of the features like tweening built into Flash.
Imagine that you want to make a walking stick figure. This is done, quite literally, by drawing each frame of the walking animation.
You could accomplish this easily by following these steps:
Draw a stick man by using only lines.
Single-click just to the right of the keyframe dot in Frame 1 of Layer 1—that is, click in the second frame of Layer 1.
Select Insert, Timeline, Keyframe to insert a keyframe in Frame 2 with a copy of the stick man graphic.
Make sure that you are editing Frame 2. You should see the red current-frame marker in Frame 2. If it’s not there, click in Frame 2 of the Timeline.
Make a slight change to the figure, such as bending a leg of the stick man slightly or changing an arm position to look like it’s swinging.
To preview what you have so far, use the scrub technique. Grab the red current-frame marker and drag it back and forth.
To create the third frame, click in Layer 1 right after Frame 2 and select Insert, Timeline, Keyframe to copy the contents of Frame 2 into the new keyframe in Frame 3.
Make another slight change to the figure. You now have three frames of animation.
Continue to insert keyframes, one at a time. Make an edit to each new frame to keep the arms and legs moving.
This can continue for as long as you want. Keep in mind that Disney’s traditional animators made feature-length movies like this!
There are three ways to watch an entire animation: scrubbing, playing, and testing. Scrubbing the red current-frame marker is a good way to preview as you work. The only problem with scrubbing is that the speed isn’t consistent—it is only as smooth as you scrub. To play an animation, you select Control, Play; use the Play option on the Controller toolbar; or press Enter. However, as you’ll see later (when creating buttons the user can click, special effects layers such as masks, and animating using movie clips), playing a movie doesn’t always show you exactly what your viewers will see, so I strongly recommend that you avoid previewing by using Play. The best way to view an animation is by selecting Control, Test Movie.
Test Movie exports a .swf file into the folder where your file is saved, names this file the same as your file but with a .swf extension, and then launches the Flash Player program so you can view the results. You’ll see how this works when you first save your source .fla file into a new, empty folder. After you use Test Movie, the folder contains an additional .swf file.
The frame-by-frame animation technique is simple. You just put a keyframe on each frame. An entirely different image appears on each frame—sometimes drastically different, sometimes only slightly different. The beauty is that you can put anything you want in one keyframe because it doesn’t matter what’s in the other keyframes.
Although frame-by-frame animation is a simple concept, it can be a lot of work. Imagine conventional animation, in which an artist must draw each frame even when only a slight change is necessary. It’s detailed, meticulous work and, unfortunately, it’s not really any easier in Flash, although Flash provides functions such as Undo that help. You need to realize that this technique is for situations that require it—such as when you’re working with something that has lots of details, such as an animation of someone walking. No other Flash animation technique gives you this level of control to change each frame.
Just because frame-by-frame animation is a lot of work doesn’t mean you can’t use a little help. One way to make the process a little easier is by changing the Frame View setting. In Figure 9.15 you can see the Timeline pop-up menu. If you select Preview, each frame in the Timeline is displayed as it appears on the stage. Figure 9.15 shows an animation with Frame View set to Preview. Preview lets you see all the frames of the animation without actually stepping through them. The Preview in Context setting draws the preview in the correct proportions (including blank whitespace).
Some of the greatest helpers for frame-by-frame animations are Flash’s Onion Skin tools. Flash’s Onion Skin feature allows you to edit one keyframe while viewing as many frames before or after the current frame as you want.
Click the Onion Skin button (second from the left) at the bottom of the Timeline (see Figure 9.16). Select Large from the Timeline’s pop-up menu. With Onion Skin turned on, you can place the red current-frame marker on any frame you want and edit that frame, and then you see a dim view of the other frames in the animation. Which frames appear depends on where you position the Start Onion Skin and End Onion Skin markers. These markers can be difficult to grab when you try to move them; I often find myself accidentally grabbing the current-frame marker. It’s easiest to grab the markers when Timeline View is set to Large.

You would probably turn on Onion Skin while creating an animation (instead of after it’s done).
To change how many frames are seen at a time, you can move the Start and End Onion Skin markers. By default, the markers are set to Onion 2, meaning you can see two frames ahead and two behind. You can move the markers to several preset positions from the Modify Onion Markers pop-up menu (the rightmost Onion Skin button at the bottom left of the Timeline).
Modify Onion Markers has several preset options:
Always Show Markers—. This option leaves a faint version of the markers visible in the Timeline even after you turn off Onion Skin.
Anchor Onion—. This option locks the two markers where they are, no matter where the red current-frame marker is.
Onion 2—. This option sets the markers to two frames ahead and two frames behind.
Onion 5—. This option sets the markers to five frames ahead and five frames behind.
Onion All—. This option moves the Start Onion Skin Marker to Frame 1 and the End Onion Skin Marker to your last frame.
Before we finish with Onion Skin, let’s look at two remaining features: Onion Skin Outlines and Edit Multiple Frames (found immediately to the right of the Onion Skin button). You can choose either Onion Skin or Onion Skin Outlines, but not both. Onion Skin Outlines displays the other frames within the Onion markers as outlines instead of as dim images. Outlines can be helpful when the dim view makes images difficult to distinguish.
Edit Multiple Frames is quite interesting. In the previous example, you used onion skinning to see the contents of surrounding keyframes, but you were editing only one frame at a time—the current frame. You could move the stick man’s leg close to the faded image in the previous frame without affecting the previous frame. Edit Multiple Frames lets you edit the contents of all the frames within the Start Onion Skin and End Onion Skin markers. Generally, Edit Multiple Frames is useful for editing a finished animation rather than for creating an animation because it is difficult to narrow your focus to a single frame. However, when you want to return to an animation and move the contents of every frame, Edit Multiple Frames is invaluable. In this situation, you just turn on Edit Multiple Frames, select Modify Onion Markers, Onion All, select everything on the stage (or press Ctrl+A), and move everything anywhere you want.
There’s no rule that says you must put a keyframe in every frame. If your frame rate is left at the default 12 frames per second (fps) and every frame is a keyframe, the image changes 12 times per second. This might be unnecessary, and it becomes a lot of work when you consider the total number of frames you must draw. What if you don’t always want the images to change every 1/12 second? Incorporating pauses is the answer—and it’s very easy.
To incorporate a pause, you just follow a keyframe with a non-keyframe frame. If you want a 1-second pause (and you’re running at 12 fps), you just follow your keyframe with 12 frames.
There are two ways to create pauses, either as you’re making an animation or after you’ve made one. To incorporate a pause while creating an animation, you either insert a keyframe or insert frames (by pressing F5 or selecting Insert, Timeline, Frame) farther down the Timeline than the next frame.
Creating a pause is slightly different when you want to edit an animation you’ve already created. To insert a pause (or increase one that already exists), you click the keyframe you want to pause and select Insert, Frame. This effectively pushes out everything that appears later in the Timeline.
Creating an animation frame-by-frame can be a lot of work because you have to draw every frame yourself. With tweening, Flash fills in the blank frames between two keyframes. Flash has two types of tweening: motion tweening and shape tweening. Motion tweening animates clip properties such as location, scale, rotation, color, and alpha values. Shape tweening morphs one shape into another.
A basic motion tween is very easy to produce. For example, try animating a circle, making it move across the stage smoothly with only two keyframes:
In a new file, draw a circle on the stage.
Select the entire circle and choose Modify, Convert to Symbol (or press F8). Name it something appropriate, such as Circle, leave the type set to the default Movie Clip, and click OK.
Click 30 or more frames down in the Timeline and select Insert, Timeline, Keyframe.
Click on the keyframe in Frame 1; the red current-frame marker moves to Frame 1. Position the circle on the left side of the stage.
Click in the last keyframe and notice that the red current-frame marker moves to that frame. Position the circle on the right side of the stage.
Try scrubbing. The animation looks pretty abrupt. The circle stays on the left side for 29 frames and then jumps to the right side. To make the movement smoother, you can use tweening to have Flash take care of the in-between frames.
Set tweening in the beginning keyframe, in this case in Frame 1. Select the keyframe in Frame 1 and then observe the Properties panel. When a frame is selected, the Properties panel contains a Tween pop-up menu.
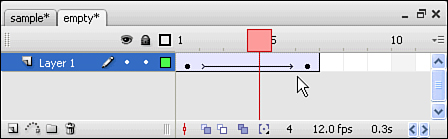
Select Motion from the Tween pop-up menu. Leave all the default settings, as shown in Figure 9.17. That’s all you do! Notice in Figure 9.18 that Flash has drawn a blue background and arrow in the Timeline to represent the interpolated frames—those between two keyframes.
Select Control, Test Movie (or press (Cmd-Enter) [Ctrl+Enter]) to see what happens.

You should, at this point, see how multiple keyframes with tweening could be used to create complex animations using the full suite of Flash graphics tools. In this example, we discussed a bouncing ball, but the complexity is up to you. Let’s look at some more things we can do with tweening.
Each symbol you use from your library is a separate instance. Instances can be positioned in different locations, scaled to different sizes, rotated differently, and have their color effects set differently. There are six ways in which instances can be varied: position, scale, rotation, skew, color, and alpha. Flash can tween changes in all these properties.
A problem with letting Flash do tweening for you is that the result looks like a computer did it—it’s almost too perfect. For example, the bouncing ball from the preceding example moves down at the same rate as it moves up, and the entire animation plays at the same rate.
Flash has a way to address the fact that some kinds of motion accelerate while others decelerate: the Ease In and Ease Out effects. Because every tween is between only two keyframes, you only have to think of two keyframes at a time. Easing in (think “ease into animation”) means that the motion starts off slow and speeds up at the end. Easing out is the opposite—the object starts by going fast and then slows down at the end of its motion.
To add an Ease In effect, just select the first keyframe in a tween animation, then, within the Properties panel, set the Ease slider (a good starting value is 50). Repeat this same action with the final keyframe in the tween animation to ease out of the animation.
Shape tweens are fun because they look really cool and they’re easy to create. Compared to motion tweens, they look more dynamic because every attribute—including the shape—animates. Basically, all you do is draw a shape or shapes in two keyframes and set the tweening in the first keyframe to Shape. For example:
In a new file, draw a circle on the stage in Frame 1. (No need to convert anything to a symbol because the object changes in every frame anyway.)
Insert a keyframe later in the Timeline. This will be the end of the tween, and it will match the beginning. Select this frame.
Delete the circle and draw a square.
Return to the first keyframe and set Tween in the Properties Panel to Shape.
Run the movie and you’ll see the circle smoothly transform itself into a square! Cool, huh?
It’s rare that all of the content you want to include in a Flash file will be generated entirely in Flash. You might want to include external graphics, sounds, or even embed entire movies. Each of these tasks is performed in a very similar manner, and we’ll look at this process now.
You’ve seen how you can create sophisticated custom graphics very quickly in Flash. Despite how powerful Flash’s graphic creation tools are, eventually you might want to import graphics created elsewhere. Two good reasons for this are to use photographic images or use existing graphics (instead of re-creating them from scratch).
The easiest way to incorporate other graphics into Flash is to import them from a file. It’s as simple as selecting File, Import, Import to Stage (or Import to Library, if you want the graphic to be available in the Library, but not added to your current scene).
Choose All Image Formats from the Files of Type pop-up menu (it’s called Enable in the Mac OS version of Flash). This enables you to browse your file system, showing only the files that Flash can successfully import.
Depending on the file type you choose, additional options may be available to you. With Illustrator documents, for example, you can turn pages into keyframes or scenes. Flash just needs to know how you want to handle pages. All the options are fairly easy to interpret and can be controlled during the import process.
Drawing applications, Flash included, typically deal with one of two types of graphics—vector or bitmap. Vector graphics are defined by their shape rather than a group of pixels—these graphics are usually illustrations or technical drawings. Bitmap graphics, on the other hand, are defined by setting colors for a group of pixels—one at a time. Bitmap graphics are what you get when you take a picture with your digital camera, for example.
If you import a bitmap graphic into Flash, you’ll find that you don’t have as many options as you do with vector formats. You can’t zoom in without the object getting fuzzy, and you can’t resize or reshape it cleanly. You may also be limited in the effects that can be applied to the graphic.
Flash provides a built-in tool to convert a bitmap to a vector graphic. To do this, select the object and select Modify, Bitmap, Trace Bitmap. The Trace Bitmap dialog box appears, shown in Figure 9.19.

The Trace Bitmap dialog box has several options:
Color Threshold—. When you’re tracing an image, Flash tries to lump areas of the bitmap into single shapes. The Color Threshold option specifies how different two colors can be (in RGB values) and still be considered the same. If you set this option to a high number, you end up with fewer colors and fewer areas.
Minimum Area—. This option specifies the smallest area Flash will create. For a very detailed image, this number should be set rather low, unless you want a mosaic effect.
Curve Fit—. This option affects how closely straight and curved areas will be copied. Using the Very Smooth end of the Curve Fit scale is like having a very large pen with which to draw a shape in one quick movement. If you could use a fine pencil and as many strokes as needed, that would be like the other extreme, Pixels or Very Tight.
Corner Threshold—. This option determines whether corners are left alone or removed.
Click OK (or Preview to see what’s going to happen), and within a few seconds, a vector version of the image appears in your stage. Keep in mind that the original graphic is still in the Library if you need to go back to it!
Two basic steps are involved in getting audio into a Flash movie. First, you need to import the sound. Then, you need to decide where and how to use it. This is similar to importing graphics. When you import a sound, it’s stored in the Library like an imported bitmap. But a sound is not quite a symbol. Rather, the item in the Library contains all the individual properties of the particular sound.
Flash can import digital audio in a variety of file formats, including the popular MP3 and WAV formats.
As with the graphic formats we looked at earlier, select File, Import, Import to Stage. Choose All Sound Formats from the Files of Type pop-up and then select an audio file to import.
After you select an audio file and click OK in the Import dialog box, you won’t see (or hear) anything different. However, the sound has been imported and now resides in the Library. Just open the Library panel to see it. Now that the movie contains the sound file, you can use the sound.
Now that you’ve imported sounds into a movie, you can explore how to make them play at the correct times. There’s really only one place you can use sounds in Flash: in keyframes. (One exception is adding sounds dynamically by using the Sound object in the ActionScript language.) If you want a sound to play whenever the user places his or her cursor over a button, you still need to place the sound in a keyframe—it’s just a keyframe in the button.
Now that you know sounds go in keyframes, you need a way to put them there. When you select a keyframe, the Properties panel provides a way to control what sounds play when you reach the selected keyframe. Flash provides other clues for you to “see” where sounds have been placed. For example, if your Timeline is long enough, you’ll see a waveform (a picture of a sound) for the sounds being used.
However, using the Properties panel is the best way to see which sounds have been added to which keyframes. But just like any other panel, the Properties panel displays only the sound used in the selected keyframe.
When you have the Properties panel reflecting sound for the intended keyframe, you can decide exactly how the sound should play. The most fundamental choice you need to make for each use of a sound is its Sync setting. This controls exactly how a particular instance of the sound will play—or, more specifically, the priority of the sound compared to the visual elements in the animation.
Event—. This is the default setting and, generally, the best performance choice, especially for sound effects and other incidental sounds. When Event is chosen, sounds will start to play when the keyframe is reached and keep playing until they’re done. Event sounds might not coincide with visual elements the same way on everyone’s machine. Sounds don’t play more slowly or quickly (that would make them sound funny), but a machine with slower graphics performance might take longer to display visual elements.
Start—. This setting is almost the same as Event, except that multiple instances of the same sound are prevented. With Event, a sound can be layered on top of itself, similar to singing a round. Start, on the other hand, plays a sound if it’s not already playing.
Stop—. This setting is a bit different—it’s for when you want a specified sound to stop playing. For example, if you import a sound called Background Music and have it playing (by whatever means), when a keyframe is encountered that has the same sound (Background Music) set to Stop, just that sound will stop. Any other sounds already playing will continue. This can be confusing because you use the Properties panel to specify the sound (just as when you want the sound to play), but you specify it as the particular sound you want to stop. Think of Stop as “stop this sound if it’s playing.”
Stream—. This setting causes the sound to remain perfectly synchronized with the Timeline. Because, again, you can’t have sounds playing slowly if the user’s machine can’t draw frames quickly enough, with this setting, Flash will skip frames to keep up. Stream sounds start playing when the first frame is reached and continue to play as long as there is space in the Timeline.
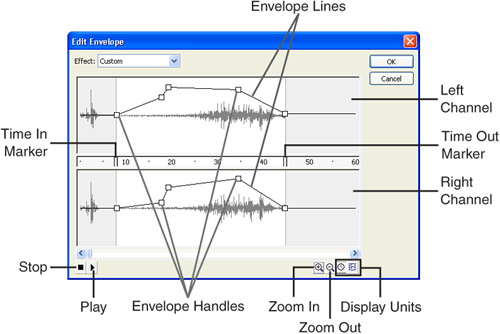
The Properties panel provides some fancy effects you can apply to a selected sound. In the pop-up menu next to Effect are effects such as Fade In and Fade Out, as well as Fade Left to Right and Fade Right to Left. To understand and customize these settings further, you can either select Custom from the list or click the Edit button on the Properties panel to access the Edit Envelope dialog box, shown in Figure 9.20, which lets you select from prebuilt panning effects or create your own.
Here are additional details for the Effect settings that you can modify in the Edit Envelope dialog box:
Left Channel/Right Channel—. These panes display different wave forms if your original sound was stereo. Even if you use only mono sounds, you’ll get the left and right channels so you can still create panning effects. In the case of mono, the same sounds will come out of each speaker—you’ll just be able to modify the volume of each.
Envelope lines—. These indicate the volume level at any particular time in the sound. When the line is at the top, the sound plays at full 100% volume. (Some audio tools are different because they use the middle to indicate 100% and anything higher to indicate amplified or boosted sound, but this is not the case in Flash.) If the envelope line is getting higher as you move to the right, the volume will increase.
Envelope handles—. These are like keyframes within sound. If you want the envelope lines (indicating volume) to change direction, you need to insert a handle. All you need to do is click anywhere on a line, and a handle will be inserted. No matter which channel you click, a matching handle is placed in the other channel. A handle in one channel must match the moment in time (left to right) of the handle in the other channel. However, the volume (height) can vary between the two.
Time In marker—. This marker lets you establish the starting point of a sound. You’re effectively trimming the extra sound (or silence) at the beginning of the sound file. You’re not telling the sound to start any later, but the sound you hear will begin wherever the Time In marker is placed.
Time Out marker—. This marker lets you trim extra sound off the end of a sound file. Often you’ll have a moment of silence at the end of a sound file, and even if you don’t hear anything, it still adds to the file size. You can get rid of it by moving the Time Out marker to the left. You won’t actually destroy the source sound in your Library, but when you export the movie, the unused portions of the sound won’t be used (so your file stays small).
Stop/Play—. This option lets you preview all the settings you’ve made. This is important because although the waveform can let you “see” a sound, you ultimately want to judge the effect of a sound with your ears.
Zoom In/Out—. This option lets you zoom out so a large portion of the sound (130 seconds max) fits in the current window or zoom in for a close up to control precisely how you place the Time In/Out markers or envelope handles.
Display Units (Time or Frames)—. This option simply changes the units displayed (in the center portion) from time units (seconds) to frame units. Time is not as useful as frames when you want to match sound to a particular frame (where something visual occurs). If the display shows a peak in the music at one second, you have to use frame rate to calculate exactly to which frame that translates. With the display set to Frames, Flash does the calculations for you.
The Properties panel has an option to either let you specify how many times a sound repeats or have the sound loop forever.
Some sounds loop better than others. Basically, a sound that loops well ends the same way it starts. There’s an art to making sounds loop. Although importing a large song and using the Time In and Time Out markers to establish a nice looping sound is possible, it isn’t easy. More likely, you’ll have to find a sound already prepared by an audio engineer. A professionally prepared sound can loop so seamlessly that you can listen to it and not even notice it’s looping; it will just sound like it’s endless.
In the not-too-distant past it was impossible to find a website that could display video and ensure that the majority of your viewers could see it. With the inclusion of video support in Flash and the advent of services like YouTube, that has obviously changed.
Importing video into Flash is really no more involved than importing other media types, such as sound or graphics. It really is as easy as selecting File, Import, Import to Stage (or Library), and then selecting a video.
Again, as with the sound and graphic files, you can limit your selection to supported video types by choosing All Video Formats from the Files of Type/Enable pop-up menu.
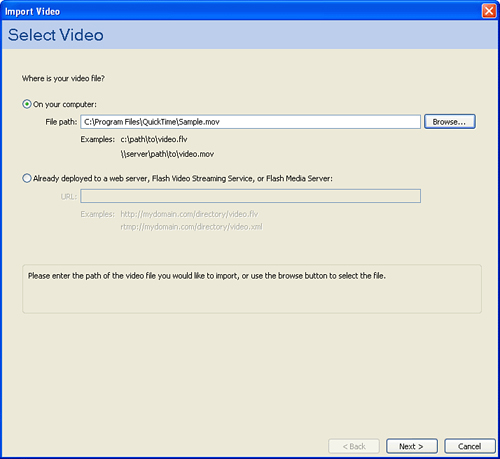
After you’ve selected the video file and clicked OK, the first of a four-step Video Import dialog box appears, asking where the video file is located. Chances are, you’ve already picked the file so you can immediately click Next, as seen in Figure 9.21. If you want to use a file off of a remote server, you can click the Already Deployed radio button and provide a URL to the remote video.
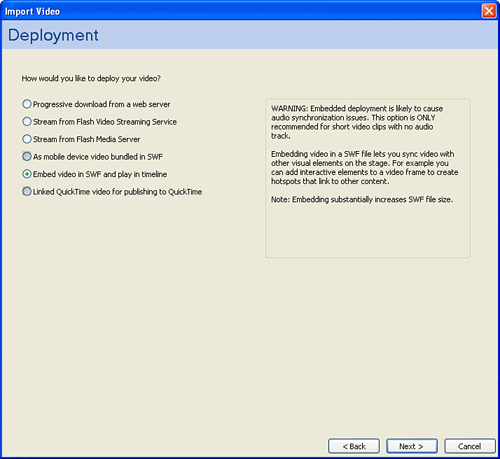
In the second step, seen in Figure 9.22, you choose how you will be deploying the video. You can choose to deploy it as everything from a standalone progressive download from a web server; to a streaming service, such as YouTube; to Flash-supported mobile devices; or you can embed the video in your existing Flash file for playback in the Timeline. This option is probably what you want, unless you’re simply interested in creating standalone video files.
Assuming you’re embedding the video, click Next to access the Embedding settings, shown in Figure 9.23.
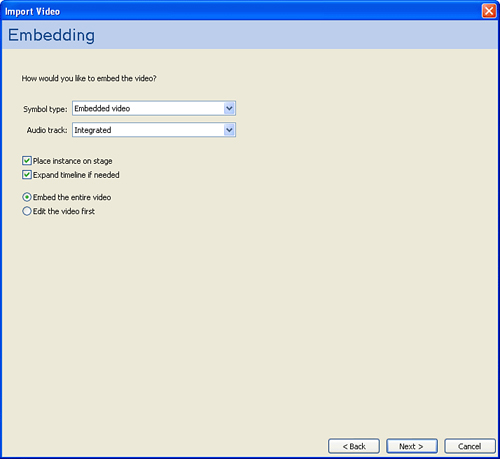
Three primary symbol types can be used for embedded video:
Embedded Video—. Ties the movie to your existing Timeline. This is most likely the embedding type you want.
Movie Clip—. Movie clips maintain their own internal timeline that is separate from the main Flash Timeline.
Graphic—. Movies embedded with the graphic symbol type cannot be manipulated with ActionScript (which we’ll be using shortly). This is probably not the option you want.
You are also given the option of importing the audio track as integrated or separate. An integrated audio track is tied directly to the video as it was when it was imported. If you choose to separate the tracks, the audio can be manipulated independently of the video.
If you want to choose which part of the video to import, click the Edit the Video First radio button, otherwise choose to Embed the entire video. You’ll probably find that it’s easiest to use a dedicated movie editing package to edit your video prior to importing it than to use Flash’s editing options.
Click Next (Continue on Mac OS) to continue to the final step. The last step in the import process lets you set video compression as well as other advanced settings, such as cropping. Although there are dozens of settings, the easiest approach to this part of the process is to choose an appropriate profile using the Flash Video Encoding Profiles pop-up menu, as seen in Figure 9.24.
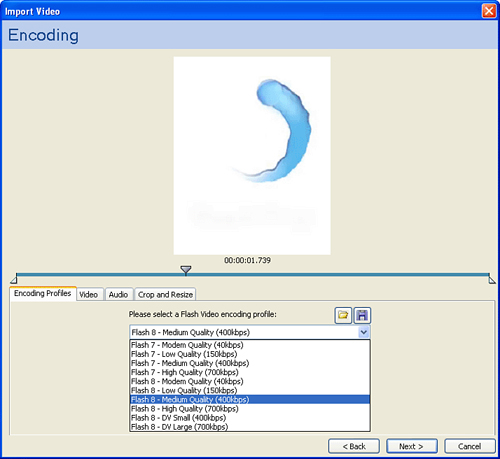
The higher the quality of the profile, the more bandwidth the client will need to display the video smoothly.
Click Next/Continue to finish the import process. It may take several minutes to import your video, depending on the size. After it is complete, you should be back in Flash, with the video you just imported in your Library (or, depending on your selection, already on the stage).
To embed a video, you can drag videos from the Library to the stage. If the video exceeds the current length of the Timeline, you’ll see a dialog box that asks if you want to extend the Timeline to accommodate the video’s total number of frames.
There is a penalty in both file size and performance for using video. If your users are going to be viewing the material over slow connections, incorporating video might not be the best option.
In addition, most of the interesting things you can do with video require some level of ActionScript—such as programmatically starting and stopping video, playing video after certain actions, and so on. Although we’ll look briefly at this topic in the section “Using ActionScript and Behaviors to Create Nonlinear Movies,” comprehensive ActionScript is beyond the scope of this book.
You’ve learned how to create basic drawings and simple animations in Flash, so we can move on to what’s possibly the most compelling attribute of Flash: interactivity. A plain linear animation can be quite powerful on its own. When you add interactivity, though, the users are engaged. They become part of the movie. In this section and the next, you’ll learn how to add interactivity to movies.
The most straightforward way to add interactivity is by adding buttons. This way, users can click buttons when they feel like interacting—maybe they want to stop and start an animation at will. Or maybe you would like them to be able to skip ahead past an introduction animation.
Creating a button is no more difficult than making a new symbol and choosing a button behavior. To do this, draw any shape you want. Click Modify, Convert to Symbol and, when prompted (as shown in Figure 9.25), provide a name for the button and select the button type.
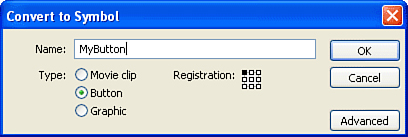
If you test your movie, you’ll notice that your mouse cursor now changes when you place it over the button.
Making a button looks easy, doesn’t it? Even though you did make a button in the preceding task, it probably falls short of your expectations in two general ways: It doesn’t look like a button and it doesn’t act like a button. (Currently nothing happens if you click the button while testing the movie.) We’ll address the issue of making the button do something in the next section, “Using ActionScript and Behaviors to Create Nonlinear Movies.” For now, though, let’s look at how the button itself can be made more interactive.
To work with buttons, you must first understand the states that a button can have: Up, Over, Down, and Hit.
The up state contains the visual look of the button in its normal state. Over contains the look for when the user hovers his cursor over the button. Down is how the button looks when the user clicks it. Hit is a special state in which you place a visual representation of what portion of the button you intend to be clickable. This is what the user must “hit” in order to see the over and down states.
Follow these steps to create states for the button:
Open the Library panel and double-click the button you created. You’re now in the master version of the button symbol.
You should also notice that this symbol has four frames named Up, Over, Down, and Hit (see Figure 9.26). They are still four frames—they just all have names. Into each frame, you can draw how you want the button to appear for various states.

The hit state is never visibly seen by the user. It defines where the user must position her cursor to show a button’s over state or where she must click to see the button’s down state. Imagine that you had a doughnut-shaped button. If you didn’t set a hit state, the user wouldn’t be allowed to click anywhere in the hole. However, if you inserted a keyframe and drew a solid circle (no doughnut hole) in the Hit frame, the user could click anywhere within the solid circle. This can also be useful when you want a small button but you don’t want to frustrate the user by requiring her to have the precision of a surgeon. You should strive to make the hit state big enough to easily click even if that means that it’s bigger than the button itself.
Flash’s programming language is called ActionScript. Like any programming language, ActionScript lets you write instructions that your movie will follow. Without ActionScript, your movie will play the same way every time. If you want the user to be able to stop and start the movie, for example, you need ActionScript.
The topic of scripting is very deep. We can’t cover it all in this book. Rather, we’ll cover the basic concept as well as look at typical applications for scripting. This way, you’ll build a good foundation on which to grow at your own pace. If you want to learn more about ActionScript, you may want to look at Sams Teach Yourself Flash MX ActionScript in 24 Hours.
Scripting is nothing more than writing instructions. Each instruction tells Flash to do something very specific. For example, it tells Flash to “play,” “stop,” or “set that movie clip’s alpha to 50%.” By keeping each piece of ActionScript very specific, you can easily piece together more advanced instructions. But at the core, each “sentence” (or line of code) is a single instruction.
All your ActionScript is typed into the Actions panel. Open the Actions panel and follow along as we explore. Select Window, Actions, and make sure you fully expand the panel, as seen in Figure 9.27.
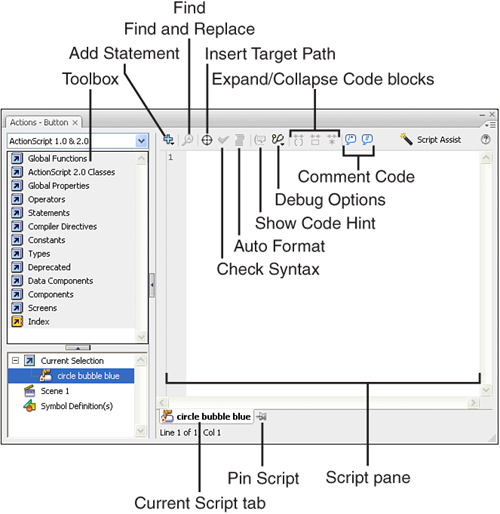
The Actions panel has the following features:
Toolbox—. The Toolbox list provides access to all installed actions. It is organized like folders.
Script pane—. In the Script pane, your actions appear in order of execution.
Current Script tab—. The Current Script tab indicates which script is currently being edited. Compare this to how the Properties panel shows you the currently selected instance.
Pin Script—. The Pin Script button adds a tab for a particular script so you don’t have to first select the object or layer into which you want to add a script. Normally, the Actions panel acts like other panels—always reflecting the settings for the currently selected item (in this case, the script for the selected keyframe or object, such as a button).
Options toolbar—. The Options toolbar includes the following buttons:
Add Statement—. This button, which I call the “plus button” throughout the rest of this book, pops up a menu that provides the same script elements found in the Toolbox. The menu also shows the key combination for each script that has one.
Find and Find and Replace—. These buttons let you search scripts as you would in a word processing program.
Insert Target Path—. This button helps you address specific objects, such as particular clips. You’ll learn that scripts can apply to individual clips (say you want to play or stop just one clip—you have to target that particular clip). This button helps you specify a target clip.
Check Syntax—. This button ensures that your ActionScript has no errors. (This won’t guarantee that the movie will behave as you had in mind—only that you have no show-stopping errors.)
Auto Format—. This button cleans up your code by adding indentation where appropriate. This makes it much easier to read.
Show Code Hint—. This button retriggers the code-completion helper that appears as a ToolTip to help you complete ActionScript (when Flash knows what you’re about to type).
Debug Options—. This button enables you to add and remove break points—where you purposefully make Flash pause on a specified line of code so you can investigate how it’s playing (or, most likely, not playing the way you expected). You can also add and remove breakpoints by clicking in the gutter to the left of any line of code. You’ll see a red dot appear to the left of the line of code.
Expand/Collapse Code Blocks—. Expand and collapse related chunks of code to clean up the display.
Comment Code—. Add and remove comments from blocks of ActionScript code.
Syntax is unique to each programming language. Every piece of ActionScript has a very specific syntax that must be followed. As an analogy, consider how every email address has to have the form name@domain.something or it won’t work. Flash has no mercy for invalid syntax—you’ll see errors appear in the Output window until you resolve the errors. Even after you perfect the script, the movie might not play exactly as you had in mind. Luckily, there are plenty of ways to ensure that your scripts have perfect syntax.
You can easily add an action from the Toolbox by double-clicking or dragging it to the right side of the Actions panel (the Script pane). You can build a complex set of instructions, one line at a time. A statement is a code sentence that uses only words from the ActionScript language.
Again, actions are instructions. Flash will follow each line of code in sequence. Some actions are complete pieces of instruction, with no additional modifications on your part. For example, you can add a stop action, and when Flash encounters it, the playback head will stop advancing. However, many actions require that you provide additional details (called parameters). For example, the action gotoAndPlay (which goes to a frame and starts playing) requires that you provide the additional detail about to which frame number or frame label you want to go.
The easiest way to understand ActionScript is by performing some actions and using parameters. You’ll see that some actions are quite simple. The following example is a quick exercise that uses actions and parameters to make the last few frames of an animation loop. After you complete it, we’ll step back to analyze what you did in the example:
In a new file, use the Text tool to create a text block containing the word Welcome. Make sure the text type is Static in the Properties panel. Select the block and convert it to a symbol. Make it a movie clip and name it Welcome Text.
Position the movie clip instance in the center of the screen, and insert one keyframe at Frame 20 and another at Frame 30.
Move the current-frame marker to Frame 1 and move Welcome Text all the way off the stage to the left. Set motion tweening for both Frame 1 and Frame 20. In Frame 20, use the Properties panel to make the tween rotate one time clockwise on its way from Frame 20 to Frame 30. Test the movie. Notice that the whole movie loops over and over. Instead of leaving the animation as is, you’re going to make the rotation part (from Frame 20 to Frame 30) loop forever.
You can add actions to any keyframe, but instead of mixing scripts with your animation, you can just make a whole new layer exclusively for actions. Name the single existing layer Animation and then choose Insert, Layer and name the new layer Actions. Make sure the current layer is Actions (you’ll see a pencil next to the layer’s name in the Timeline). Select Frame 30 in your Actions layer, insert a keyframe (by pressing F6), and then access the Actions panel. You’re going to set an action to execute when the playback head reaches Frame 30.
To insert a
gotoAndPlayaction, select Global Functions, Timeline Control and then double-clickgotoAndPlay. You should see agotoAndPlayaction added to your script in the Script pane on the right (see Figure 9.28). Because this action requires parameters, a code hint appears to help guide you. If it goes away, just click inside the parentheses followinggotoAndPlayand click the Show Code Hint button.You always type parameters inside the parentheses. In this case, type 20 because that’s the frame number to which you want to go and play. Therefore, the finished action in the script area should read
gotoAndPlay(20);.Test the movie (don’t just play in the authoring environment). It plays once, and then every time it gets to Frame 30, it goes back to Frame 20 and plays again.
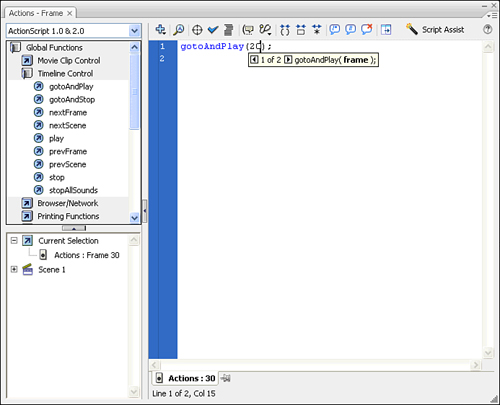
As easy as the preceding example was, there is one thing in particular that could make it better. Consider the amount of work involved if you changed the location of the keyframes. For example, what if the second keyframe (Frame 20) had to move to Frame 25? Of course, the initial tween would take longer to play, and the rotation would be quicker, but the loop would also stop working properly. To fix it, you would need to remember to edit the action in Frame 30 so that it read gotoAndPlay(25);. You would have to repeat this fix every time you changed the location of the keyframe where the rotation starts.
Naturally, there’s a better way. Instead of making the destination of gotoAndPlay an explicit frame number, you can change the parameters to make the destination a named frame label, which will be the same for the frame no matter where it is located in the Timeline.
To set a frame label, simply click the frame in the Timeline, and then view the Properties panel. In the Frame field, type in a name that makes sense for what you’re doing. In the previous script, for example, you might have named Frame 20 “LoopStart.”
After a frame is named, it can be referred to in actions by that name. The gotoAndPlay(20) that we used previously could be changed to simply gotoAndPlay(“LoopStart”).
You just saw how placing one action in a keyframe and changing its parameters makes the playback head jump to a different frame. Step back a second and consider what else you’ve learned. Actions are instructions that you want Flash to follow. Actions do things. You can modify actions by changing their parameters. This is all good information; however, if actions are instructions, exactly when does Flash follow those instructions?
The answer depends on where you put the actions. You can put actions both in keyframes and on any object type, such as button instances, movie clip instances, and components. In the preceding example you placed an action in a keyframe. In that case, the action was executed (that is, the instruction was followed) when the playback head reached that frame. If you put an action in Frame 10, it would not be followed until the playback head reached Frame 10.
With an action in a keyframe, the user doesn’t do anything but wait for the playback head to reach the appropriate frame to see the action happen. Although this isn’t exactly interactivity, it’s quite powerful. For example, often it’s useful to place a stop action in the first frame so the movie initially appears paused and won’t play until a play action is encountered (usually when the user clicks a button). Another example might be when you want to stop in the middle of an animation. All you need is a keyframe and a stop action. There are many more types of keyframe actions, which are good for when you want something to happen at a certain moment in the animation—not just when a user clicks.
Putting an action in a keyframe causes the action to execute when that frame is reached. However, putting an action on an instance of a button makes the action execute when the user clicks the button. The decision of whether to put an action in a keyframe or a button is simple. If you want an action to occur when a particular frame is reached, put it in a keyframe. If you want an action to occur when the user acts (for example, when he clicks a button), put the action in an instance of the button.
Keyframe actions are pretty straightforward: You just assign them to keyframes. Button actions, however, require that you specify to which mouse event you want the action to respond. Do you want the action to respond when the user presses the button or when the user releases the button? Maybe you want the action to execute when the user rolls over the button. This level of detail gives you the power to make an action perform exactly as you want.
Mouse events are specific situations that refer to exactly how the user is interacting with a button. For example, one mouse event is press and another is release. When you specify to which mouse event you want an action to respond, you are specifying exactly when the action is to execute. Only in actions attached to objects do you need this extra level of specificity because actions in keyframes simply execute when the keyframe is reached. All mouse events include the word on followed by the actual event name in parentheses (for example, on(press)).
Again, the best way to see how mouse events work is to try it out. Let’s add to the preceding example buttons that enable the user to stop and continue the animation while it plays:
Either use the file created in the previous examples or make a new file with a motion tween over several frames (make sure you can see something moving while the animation plays).
Insert a new layer for the buttons. You don’t want to place buttons in the layer that has the animation; that would affect the tween. Name the new layer Buttons.
Into the new Buttons layer, draw a rectangle that will become a button. Select it, and then convert it to a symbol. Name it MyButton and make sure the type is set to Button.
You’re going to need two buttons, so either copy and paste the instance that is already on the stage or drag another instance of the MyButton symbol from the Library onto the stage in the Buttons layer. Apply a Tint color style to each instance—one red (for Stop) and one green (for Play). You do so by selecting the button instance on the stage and using the Properties panel to select Tint from the Color pop-up menu and then selecting a color and percentage.
Give each button a memorable instance name (for instance, Green and Red). Use the Properties panel to set the instance names.
Now you need to attach an action to each button individually. Select the red button and access the Actions panel. The tab should read Red and have an icon of a button. This way you know you’re editing the script for that button instance. Click the plus button and select Global Functions, Timeline Control, Stop.
Unlike a keyframe action, which can appear as a single line of code, a button action requires at least two extra lines of code: one before and one after the main script so the script is wrapped inside an event. Think of the main script (in this case,
stop()) as the meat of a sandwich, but it’s not complete without pieces of bread above and below the code. Any code attached to a button has to be surrounded by anonevent. Therefore, place your cursor in front of thesinstopand then type the following:on(press){Then press Enter.
Click after the last line of code (that is, after
stop()), press Enter, and type this:}
The resulting script looks like this:
on(press){
 stop();
}
Notice that you should indent the second line for clarity. This is a very good habit to adopt. You can always clean up your code by pressing the Auto Format button in the Actions panel.
The preceding steps go through every last detail. If you know you’re going to be adding code to a button, you can start by defining the event and then coming back to actions. For the green button, you’ll do just that. Select the green button and open the Actions panel. Confirm that the green button appears in the current script tab at the bottom of the Actions panel. Next find the
onaction in the Toolbox, under Global Functions, Movie Clip Control, On. Insert it into your code and notice not only that both pieces of bread appear (theon(){and}), but that a list pops up, from which you can select thepressevent. Go ahead and double-clickpress.As for the action of this script, you have to be sure to place it between the two curly braces. Click at the end of Line 1 and press Enter. Now add the
playaction found under Global Functions, Timeline Control, Play.Test the movie, and you’ll find that when you press the buttons, the movie will play and stop.
For almost all interactive elements you create in Flash, you’ll always need both parts: the event and the actual actions. In the case of scripts placed in keyframes, you don’t specify any events because keyframe scripts are executed when Flash reaches the correct frames.
You’ve seen how to place actions in keyframes and on button instances. Most of the actions you’ll encounter are likely to fall into one of those two cases. However, there’s a third place where you can attach actions: in instances of movie clips. It’s a little confusing because, unlike with buttons, you can put actions inside a master movie clip in the Library. However, the rule that you can only put actions in keyframes, button instances, and movie clip instances remains—so if you put any actions inside a movie clip, you have to put them in one of those three places (keyframes, nested buttons, or nested clips) inside the clip. We’ve already discussed putting actions on buttons and in keyframes—and those techniques will work inside master movie clips. But now you’re going to see how actions can also be placed on instances of movie clips.
Actions on movie clips are powerful. It would get complicated to fully explore this feature now, but you can do an exercise that gives you a taste. These steps show you how to attach actions right onto clip instances:
Create a movie clip that contains several frames and some kind of animation inside the clip (so you can see whether it’s playing).
Place this movie clip on the stage and test the movie (to verify that it’s animating). Your main Timeline should have only one frame.
Back in Flash, select the instance of the movie clip on the stage and open the Actions panel. (Confirm that you have the movie clip selected by looking at the current script tab.)
In the Toolbox insert
onClipEvent, which is listed under Global Functions, Movie Clip Control. The code and code hint appear.Like buttons requiring that you use
onevents, clips require that you useonClipEventevents. Select or typeload. This event will trigger when the clip first loads.Between the two curly braces insert a
stopaction. The resulting code so far should look like this:onClipEvent(load){ stop(); }Feel free to type it by hand, but be sure to type it exactly.
You will add two more actions that respond to the
mouseDownandmouseUpevents. For this example, when the user clicksmouseDown, the movie clip should start to play. When the user stops clicking (that is, whenmouseUpoccurs), the movie clip should stop. You can add all that to the script for the selected clip. The separate events, however, must appear as independent sandwiches (well, starting and ending curly braces). To add the additional actions, click once after the closing curly brace and then press Enter. Either type or use the Toolbox to add two more events so that the entire script now looks like this:onClipEvent(load){ stop(); } onClipEvent(mouseDown){ play(); } onClipEvent(mouseUp){ stop(); }Test the movie. It’s sophisticated, despite the simplicity of the script. Go back and reread the script (in the Script area of the Actions panel) attached to the movie clip instance.
There are a few important things to note about the preceding example. First, the movie clip events mouseDown and mouseUp respond to any mouse click—not just to clicks on the movie clip itself. If you want something that responds to clicks right on a graphic, using a regular button is easier.
Also, the actions you attach to a movie clip instance apply only to that instance. It might be more explicit if you precede stop() and play() in all cases in the preceding example with this., as in this.stop() and this.play(). This makes more sense when you think about it because it means just that one movie clip will stop or play. You can prove this to yourself several ways. Drag another instance of your movie clip from the Library (and don’t attach any actions to this instance). When you test the movie, the stop and play actions apply to (or “target”) only the clip with the actions attached.
Finally, this example shows that you can write code to respond to various events (in this case, load, mouseDown, and mouseUp). For each one, you have the two pieces of bread plus the meat in the middle. What I haven’t mentioned yet is that you can stack the sandwich with many layers of meat. That is, for one event, you can trigger several lines of code. For example, when the mouseDown event occurs, you could have a sound start playing in addition to triggering the play() action. As long as you put your code between the two curly braces, one event can trigger as many lines of code as you want. (This is also true with buttons and on events.)
The basic things to remember are that just as with buttons, actions on movie clip instances are wrapped inside events. Buttons respond to the on event, whereas movie clips respond to the onClipEvent. Finally, actions attached to movie clip instances affect only the particular instances to which they’re attached.
You have enough of the basics of scripting down to move on to behaviors. Behaviors are intended to make programming easier for novices, but in my opinion, you’ll get a lot more out of them if you understand what they’re doing. Behaviors simply insert several lines of ActionScript in one swoop. For scripts that require you to specify parameters, the behavior will prompt you for data. Another interesting feature of behaviors is that even after you’ve inserted a complete script, you can come back and make edits to it without touching the code. That is, you can use the Behaviors panel as your interface to edit the underlying code.
Because Behaviors are inserting ActionScript, be sure to keep your Actions panel open and watch what occurs in the Actions panel as you make changes—this will help you understand what is going on in your project and may give you some additional insight into ActionScript syntax.
Open the Behaviors panel, which should resemble Figure 9.29.
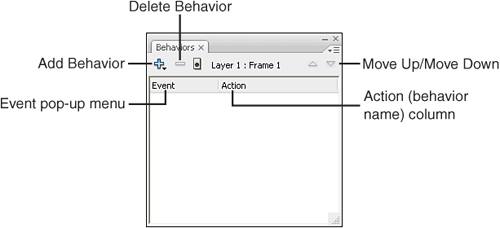
The Behaviors panel has the following features:
Add Behavior—. You always select a behavior to add by clicking the Add Behavior (plus) button. This reveals a hierarchical menu of all installed behaviors.
Delete Behavior—. The Delete Behavior button lets you remove a behavior. Alternatively, you can just select and delete any row containing a behavior that you want to remove.
Move Up and Move Down—. These buttons let you reorder multiple rows of behaviors (you can add more than one).
Event—. The Event pop-up menu enables you to specify a trigger for any added behavior.
Action column—. The Action column simply presents the name of any added behavior.
The whole idea of the Behaviors panel is that it will insert the ActionScript code for you. Most behaviors prompt you for additional details so parameters can be set. Also, if you need to re-edit a behavior, you can do it through this panel. Actually, you can tweak any behavior by editing the resulting code by using the Actions panel. If you edit the code through the Actions panel, however, you not only potentially break it, but the Behaviors panel can’t access code after you’ve changed it.
Whereas the gotoAndPlay action jumps the playback head to another frame, getURL jumps the user to another web page. If you’re familiar with how a hyperlink works in HTML, you should know that getURL is the same thing. With gotoAndPlay, you need to specify as a parameter the frame to which you are navigating. With getURL, you need to specify to what URL you want to navigate.
URL stands for uniform resource locator and is the address for any web page. If you want to use the getURL action to jump to a website, for example, you need to know the URL.
The following example teaches you how both getURL and the Behaviors panel work. You’ll build a hyperlink in this example. Here are the steps:
In a new file, create a Button symbol called
myButtonand place an instance on the stage. Give this instance the namego.With the button instance selected, open both the Actions panel and the Behaviors panel (by pressing Shift+F3). Move the Actions panel to the side because you’re only going to use it to watch what’s happening behind the scenes.
Make sure the button is selected by ensuring that you see
myButton, <go>in the Behaviors panel.Click the plus button in the Behaviors panel and select Web, Go to Web Page. Into the URL field that appears in the dialog box, type in the URL of your favorite website (including the “http://” part). (Leave the Open In option set to the default, _
self.)Test the movie. Or, better yet, select File, Publish Preview, Default or press (Cmd-F12) [Ctrl+F12] so you can watch this in a browser. Just click the button in the Flash movie and, if you’re connected to the Internet, you’ll hyperlink to the page whose address you entered.
You can see that the ActionScript produced by the preceding example is the same as if you had created it using the steps in one of the earlier examples. That is, you can also select getURL in the Actions panel list under Global Functions, Browser/Network. The getURL action is nearly the same as gotoAndPlay(), except that the parameter needs to be a URL. If you want to change the event that triggers this behavior, click in the Event field (by default set to On Release) in the Behaviors panel, and you can select from the other events available to buttons, as Figure 9.30 shows.

You can also change the destination URL by double-clicking in the Action column in the Behaviors panel. That redisplays the dialog box that appeared in the first place. You can actually do all these modifications (change the event, change the URL, and even delete the whole behavior) through the Actions panel. You get the same results either way.
Behaviors are simply a tool that guides you through ActionScript. But they can become more trouble than they’re worth, especially when you know exactly what you want to do. Sort of like cookie cutters, they’re great for holidays, but sometimes you just have to use your fingers and shape the cookie yourself.
Flash’s Publish feature makes the process of preparing a movie for the Web a snap. Just select File, Publish. Publish will not only export a .swf file, but it will also create the HTML file that’s necessary.
The HTML file specifies where the Flash movie (that is, the .swf file) is located and how to display it onscreen. This is almost the same as how it specifies a static image, such as a .gif or a .jpg. In the case of the .jpg or .gif image, additional information can be included—parameters such as the height and width of the image. Similarly, the HTML referring to a .swf file can include parameters such as width, height, whether the movie loops, whether it should be paused at the start, and more.
If you want to set these sorts of options manually before you publish, simply choose File, Publish Settings. From this dialog, shown in Figure 9.31, you can control how the Flash animation is embedded in the web page as well as control whether aspects of the Flash .swf file generate themselves, such as compression, sound quality, and password protection.
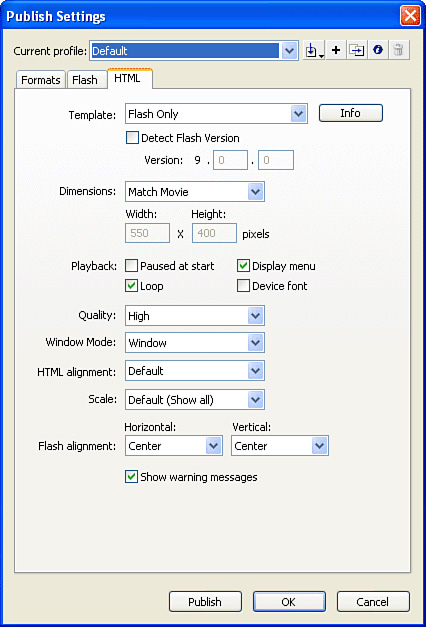
Of course, you can always take your finished .swf file and use it directly in Dreamweaver CS3, so don’t feel like you’re stuck with the HTML files generated by this publication process.
Flash is a large application development environment with everything from drawing tools to a full programming language. It can take years to master, but almost guarantees a ton of fun along the way.
In this chapter you learned how to find your way around Flash; create graphics; create frame and tween-based animations; import sounds, graphics, and movies; and even add interactive elements through ActionScript. As Flash continues to grow in popularity and power, you’ll find that this foundation of skills will help you develop the next generation of Internet applications.