Creating a Data Table

One popular way to maintain data in Excel is by creating a table. A table describes one type of object, such as orders, sales, or contact information. Structurally, a table consists of a header row, which contains labels describing the data in each column, and data rows, which contain data about a particular instance of the table’s subject. For example, if you use a table to store your customer’s contact information, you could have a separate column for the customer’s first name, last name, street address, city, state, postal code, and telephone number. Each row in a table would contain a particular customer’s information.

Before Excel 2003, the program didn’t have a formal way of dealing with data tables. In Excel 2003 the programming team introduced lists, which were the precursor to tables, but lists didn’t have the full range of features realized with Excel 2007 data tables.

Create a Data Table

  1. Type your table headers in a single row.

  2. Type your first data row directly below the header row.

  3. Click any cell in the range from which you want to create a table.

  4. On the Home tab, click Format As Table.

  5. Click the desired table style.

  6. Verify that Excel identified the data range correctly.

  7. If your table has headers, select the My Table Has Headers check box.

  8. Click OK.

    Create a Data Table

    Tip

    Tip

    You can display the Create Table dialog box by clicking any cell in an existing cell range and pressing Ctrl+L.

Add Data to a Data Table

Follow either of these steps:

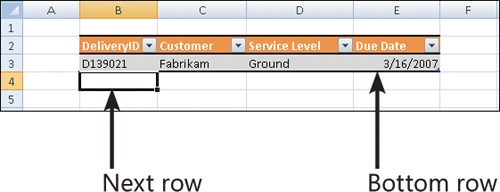
  1. Click the cell at the bottom right corner of the data table and press Tab to create a new table row.

  2. Type data into the cell below the bottom left corner of the data table and press Tab. Excel will make the new row part of the data table.

    Add Data to a Data Table

    Try This!

    Try This!

    Display a data table that takes up more than one screen vertically and scroll down the workbook page. When the table’s header row reaches the top of the screen, it freezes in place, but the data rows continue scrolling. Now you don’t have to remember which column is which; the labels are right there!

Rename a Data Table

  1. Click any cell in the table.

  2. On the ribbon, under Table Tools, click the Design tab.

  3. In the Properties group, type a new name for your table and press Enter.

    Rename a Data Table

Resize a Table

  • Drag the resize handle at the bottom right corner of the table to add or remove table rows or columns.

    Resize a Table

Select a Table Column

  • Click the header of the column you want to select.

    Select a Table Column

Caution

Caution

Be sure not to click the filter arrow at the right edge of a table’s column header; doing so displays the column’s filter options which, although useful, don’t enable you to select the entire column.

..................Content has been hidden....................

You can't read the all page of ebook, please click here login for view all page.
Reset
18.191.189.23