
When you link two tasks, you create a task dependency or task relationship between them. In the most common link type (finish-to-start), as soon as a predecessor task finishes, its successor task can start.
Tasks don’t have to be in the same project to be linked. You can have external links. An external predecessor is a task in another project that must be finished (or started) before the current task can start (or finish). Likewise, an external successor is a task in another project that cannot start (or finish) until the current task is finished (or started). Creating task relationships with external tasks like these is also referred to as cross-project linking.
To link tasks between different projects, you temporarily consolidate the project, link the tasks, and then discard the consolidation. To do this, follow these steps:
Open both projects.
In either of the two projects, on the View tab, in the Window group, click New Window.
Under Projects, select the two projects that you want to link.
Use the Ctrl or Shift key to select them both at the same time.
In the View list, click the name of the view in which you want the consolidated projects to appear.
The Gantt With Timeline view is the default.
Click OK.
The two projects are temporarily consolidated into one.
Click the task in the project you want to make the external predecessor.
Scroll to the task in the other project that you want to become the external successor.
When you find the task, hold down Ctrl and click the task.
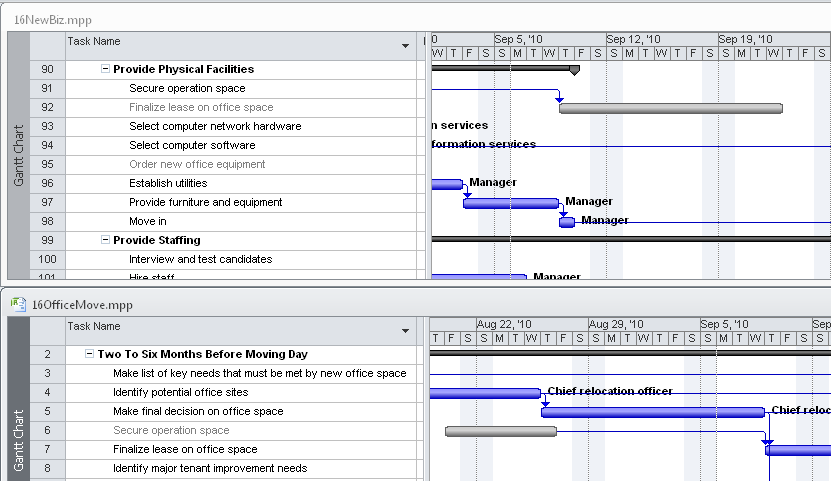
Now both the predecessor from one project and the successor from the other project are selected, as shown in Figure 16-6.
On the Task tab, in the Schedule group, click Link Tasks.
The tasks are linked with a finish-to-start task dependency. You can change the dependency type later.
Close the consolidated project without saving it.
Review the two projects that are still open. You’ll see that they now have external predecessors and external successors, as shown by the gray tasks in both projects. (See Figure 16-7.) By default, table text, Gantt bars, and Network Diagram nodes of external predecessors and successors are formatted in gray.

As you can with regular predecessors, you can change the link type from the default finish-to-start to any of the other three link types (finish-to-finish, start-to-start, or start-to-finish). You can also enter lead time or lag time. Use the Predecessors tab in the Task Information dialog box to do this, as follows:
Display the project containing the successor task to the external predecessor.
In the Task Name field, double-click the successor task to the external predecessor.
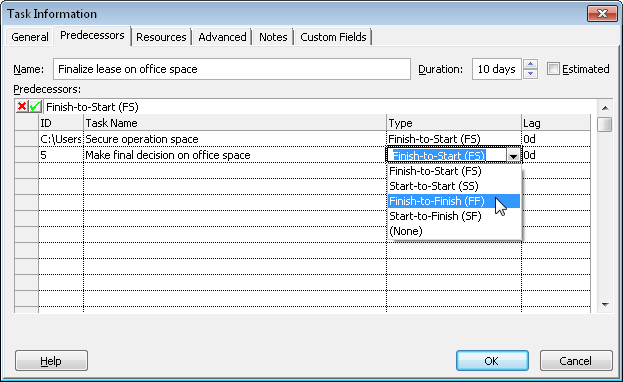
In the Task Information dialog box, click the Predecessors tab.
The path to the external task appears in the ID field, the name of the external task appears in the Task Name field, and the Type and Lag fields are editable. (See Figure 16-8.)
To change the task dependency to a type other than finish-to-start, click the entry you want in the Type field.
To enter any lead or lag time for the dependency, enter the value in the Lag field.
Lag time is entered as a positive number, and lead time is entered as a negative number.
Note
For more information about task dependencies in general, including lead and lag time, see Establishing Task Dependencies.
You can see your external links in the different views throughout your project. Whether they’re external predecessors or external successors, by default external tasks are shown in gray type. External tasks are also represented with gray Gantt bars and gray Network Diagram nodes.
If you double-click an external task, the project containing that task opens, and the task is selected. You can then review its task information and current schedule. The other project is still open, and you can return to it by double-clicking the corresponding external task in the second project.
Note
If you don’t want external tasks to be visible in your project, you can hide them. On the File tab, click Options, and then click Advanced in the left pane. Under Cross Project Linking Options For This Project, clear the check boxes labeled Show External Successors and Show External Predecessors. By default, this setting applies only to the current project. If you have other projects open, you can choose to which of the open projects the setting should apply.
You can review details about all links within your project. On the Project tab, in the Properties group, click Links Between Projects. The External Predecessors tab in the Links Between Projects dialog box, shown in Figure 16-9, shows information about all external predecessors. Likewise, the External Successors tab shows information about all external successors.
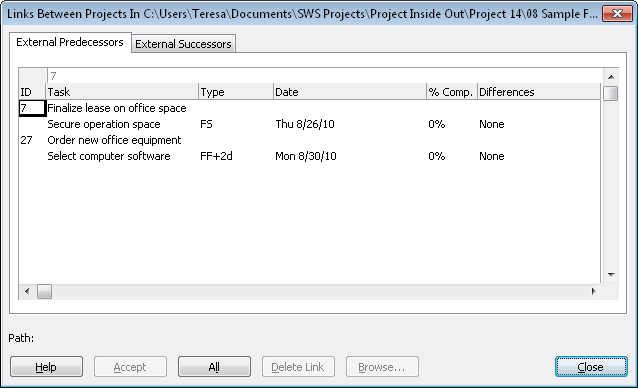
Figure 16-9. The Links Between Projects dialog box shows the pairs of externally linked tasks. It also shows the link types, finish dates, current percentage complete, and any available updates.
The top task in the pair shows the task name in the current project. The bottom task in the pair shows the externally linked task name in the other project, along with the link type, finish date, percentage complete, and any differences since the last time the two projects were synchronized.
To see the path and name of an external task, click its name in the Task field of the Links Between Projects dialog box. The path and name appear at the bottom of the dialog box.
Another way to review information about cross-project links is to add the External Task field or the Project field to a task table. You can also sort, group, or filter by one of these fields.
The External Task field, which is a Yes/No (Boolean) field, simply indicates whether the task is external. The Project field contains the name of the project to which this task belongs. For external tasks, the Project field also contains the full path. (See Figure 16-10.)
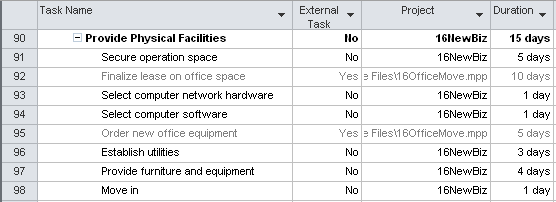
Figure 16-10. You can add the External Task or Project fields to a task table to provide information about your cross-project linking.
To add a field to a task table, first click the column heading next to where you want to insert the new column. On the Format tab, in the Columns group, click Insert Column. In the temporary drop-down menu that appears, type ex to scroll quickly to the External Task field or type pr to scroll quickly to the Project field. Click the field name to insert it into the new column.
Whether you add the External Task or Project fields to a table or not, you can sort, group, or filter by these fields. This capability can be handy when you want to see all your external tasks together.
Note
For information about sorting, grouping, or filtering by a particular field, see Rearranging Your Project Information and Chapter 28.
By default, the Links Between Projects dialog box appears whenever you open a project file that contains external links that have changed since the last time you opened the file. The Differences field alerts you to any changed information, such as a changed name, schedule change, or new progress information, as you can see in Figure 16-11.
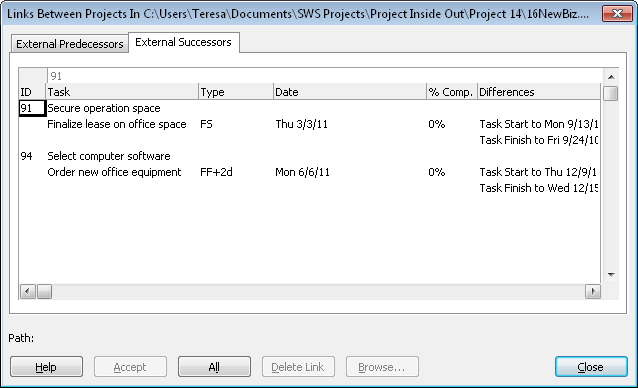
Figure 16-11. The Links Between Projects dialog box appears when you open a project whose external links have changed, and the change is noted in the Differences field.
To incorporate a change from an external task into your project plan, follow these steps:
If necessary, click Project, Properties, Links Between Projects to open the dialog box.
If you open a project file after one of its external links has changed, the Links Between Projects dialog box appears by default.
In the Links Between Projects dialog box, review the change in the Differences field.
Click the name of the task that has changed, and then click the Accept button.
To incorporate changes to multiple external links all at once, click the All button.
When you finish accepting changes, click the Close button.
If you click the Close button without accepting the changes, the changes are not incorporated into the project. As long as there are differences between the linked task information in the two projects, this dialog box appears every time you open the project.
You can modify the way differences between projects are updated, as follows:
Open the project containing external links.
On the File tab, click Options, and then click Advanced in the left pane.
Under Cross Project Linking Options For This Project, clear the check box labeled Show Links Between Projects Dialog On Open.
If this check box is cleared, the Links Between Projects dialog box does not appear when you open the project. Whenever you want to synchronize information between the two projects, you need to open the Links Between Projects dialog box and then accept the differences.
If you want to automatically update external task changes in your project, select the check box labeled Automatically Accept New External Data.