
You can take the use of embedded objects one step further—by linking them to their source. With a dynamic link between source and destination, your linked object is updated whenever the source changes, so the linked information is always up to date. When linked, the source and destination information are the same file, rather than separate copies of one another, which is the case when they are not linked. The advantage of linking objects is that you don’t have to worry about maintaining multiple copies of the same information. When you change the original file, those changes appear anywhere that file is linked. The disadvantage is that it’s more difficult to distribute file with links. If your recipients do not have access to the source file, you must remember to send the linked files along with the file that contains the links. Depending on where your recipients save the files, they might have to rebuild the links.
Creating a link to embedded objects is as easy as selecting a check box when you’re embedding the object, whether it’s a fragment you’re inserting using the Paste Special dialog box or an entire file you’re embedding using the Insert Object command.
Be aware that when you link information between Project 2010 and Excel, you always need to know the current location of the linked file and its update status. Links change automatically if you rename a linked file or move it to a new folder on the same drive. However, if you move a linked file to a different computer, the link is broken.
In Project 2010, you can link an Excel worksheet fragment or chart. To do this, follow the steps in Embedding Copied Excel Information in a Project 2010 File. In the Paste Special dialog box, select the Paste Link option.
If you want to link an entire Excel file, follow the steps in Embedding an Entire Excel File in a Project 2010 File. In the Insert Object dialog box, select the Link check box.
You can also copy worksheet cells and link them to Project 2010 table cells. The values look as though they were originally typed in Project 2010, but they are actually linked to Excel data. To link worksheet cell data in a Project 2010 table, follow these steps:
In Excel, select the first column of information to be linked in Project 2010, and then, on the Home tab, in the Clipboard group, click Copy. By copying and pasting one column at a time, the Excel columns don’t have to be in the same order as the Project 2010 columns. In addition, the paste links will remain in place even if the columns in the Excel worksheet change or move.
In Project 2010, display the view, and then click the cell that is to become the anchor cell for the linked information.
This anchor cell becomes the location of the first cell of data selected in Excel.
On the Task tab, in the Clipboard group, click the down arrow below the Paste button, and then click Paste Special.
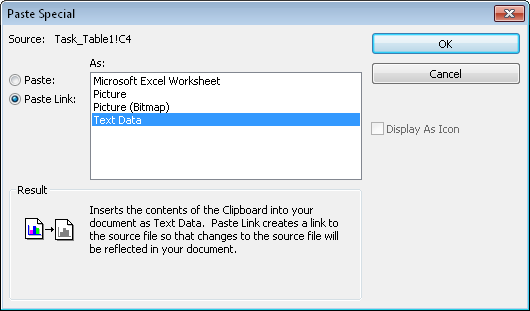
In the Paste Special dialog box, click the Paste Link option.
In the As box, click Text Data. (See Figure 18-10.)
If you select Microsoft Excel Worksheet, an object of the selected cells is embedded and linked, rather than flowing the values into the table cells as text.
Click OK.
The linked information appears at the selection point in your project. When changes occur in the information in the source application, this project file reflects those changes.
Repeat steps 1 through 6 for each column in Excel that you want to link to a column in Project 2010.
In Excel, you can link to an embedded Project 2010 file. To do this, follow the steps in Embedding an Existing Project 2010 File in Excel. In the Object dialog box, select the Link To File option.
You can also copy a set of table cells in Project 2010 and link them to Excel worksheet cells. The values look as though they were originally typed in Excel, but they are actually linked to Project 2010 data. To link Project 2010 table data to Excel worksheet cells, follow these steps:
In Project 2010, select the table data to be linked to Excel.
On the Task tab, in the Clipboard group, click Copy.
In Excel, click the cell that is to become the anchor cell for the linked information.
This anchor cell becomes the location of the upper-left cell of the data selected in Project 2010.
On the Home tab, in the Clipboard group, click the down arrow below the Paste button, and then click Paste Special.
In the Paste Special dialog box, click the Paste Link option.
In the As box, click Text.
If you select Microsoft Project Document Object, an object with the selected project data is embedded and linked rather than flowed into the table cells as text values.
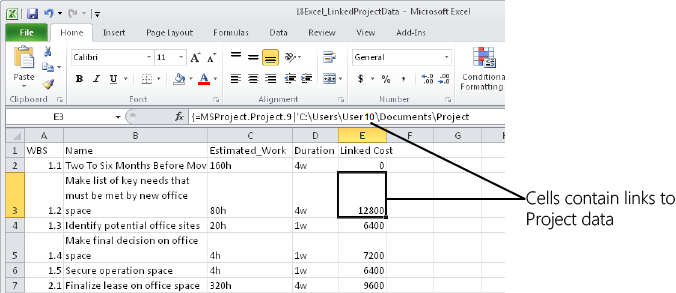
The linked information appears at the worksheet selection. (See Figure 18-11.) When changes occur to the data in the project plan, those changes appear in the linked data in Excel.
After you have linked information in Microsoft Project or Excel, you can manipulate the information in a couple of ways. You can edit the source information and then accept updates from the source in the destination file, or you can review a list of all linked information in the file and then redirect or break the link if needed.
If you edit the value in a cell that is linked to a source object, the link breaks. If you try to change a value in an array of linked cells, you’ll see a message that you can’t change part of the array. In both cases, this behavior protects the integrity of the information in the source file.
If you link an entire file, you can double-click the linked object to launch the source file in the source application so you can make the changes you want. When you finish updating the source, click Save, and then return to the destination application to see the changes reflected there.
Caution
Double-clicking a linked object to launch the source file in the source application is different from working with an unlinked embedded object. When you work on an unlinked embedded object, you are working with a copy of the information, not the source file. With linked information, you always need to work in the source because the source updates the destination through the link.
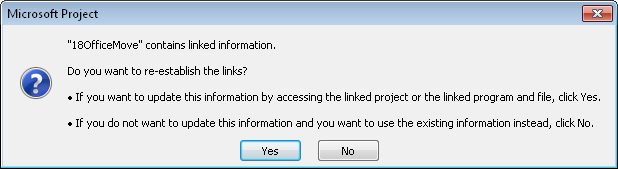
In both Project 2010 and Excel, when you open a file that contains links, by default you see a dialog box prompting you to update the file by using the links. In Project 2010, click Yes (see Figure 18-12) to re-establish the links and update any information that has changed since the last time you opened and updated this file. The dialog box in Excel includes an Update and Don’t Update button. Click Update to re-establish links in the Excel file.
Because the Edit Links command is not on the Project 2010 ribbon by default, the easiest way to access the command is to add it to the Quick Access Toolbar. In Project 2010, to review and repair links in your project, follow these steps:
On the Quick Access Toolbar, click Edit Links.
The Links dialog box appears, showing all links existing in your project file.
If you know that linked data has changed and you want to update the link immediately, select a link, and then click Update Now.
Showing and Hiding the Update Link Prompt
In Project 2010, you can turn off the Update Link alert so you don’t see it each time you open the project containing links. The Edit Links command is not on the ribbon by default, but you can add it to the Quick Access Toolbar or to a custom group on the ribbon. If you add the command to the Quick Access Toolbar, on the toolbar, click Edit Links. In the Links dialog box, be sure to select the link, and then select the Automatic option so that the links update automatically.
Note
You can also add the Insert Object button to a custom group in the ribbon. For information on how to do this, see Customizing the Project 2010 Ribbon.
In Excel, if you do not want to see the Update Link alert each time you open the workbook, on the File tab, click the Excel Options button at the bottom of the menu. In the Excel Options dialog box, click Advanced. Scroll down to the General section, and then clear the check box labeled Ask To Update Automatic Links. Click OK.
You can further specify when you want the Excel alert to appear. To open the Edit Links dialog box, on the Data tab, in the Connections group, click Edit Links. Select a link, and then click Startup Prompt. In the Startup Prompt dialog box, choose an option to automatically update links without prompting, leave the links as they are without prompting to update, or let the user choose whether to display the alert.
If the location of the linked workbook has changed, update the location information in the project by clicking Change Source.
In the Change Source dialog box, click Browse to locate the file.
To break the link with the source application, click Break Link.
When you break a link, the information remains in the project file as a separate embedded object. You can still view and edit the Excel information; it’s simply no longer linked.
To review and work with links in Excel, follow these steps:
In Excel, open the workbook containing the links.
On the Data tab, in the Connections group, click Edit Links.
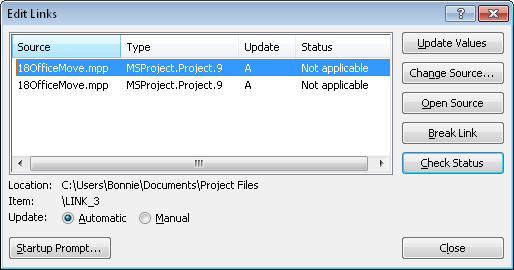
The Edit Links dialog box appears, showing all links existing in the workbook. (See Figure 18-13.)
If you want to update a link immediately, particularly if you have set a link to be updated manually, select it and click Update Values.
If the location of the linked project has changed, click Change Source, and then update the location information in the workbook.
To break the link with the source application, click Break Link.
When you break a link, the project information remains in the workbook file as a separate embedded object. The link disappears from the list, but you can still view and edit the project information; it’s simply no longer linked.
Note
If you create a link to another Excel file or to a file built with another Microsoft Office application, you can check the status of the link by clicking the Check Status button. When you first open the Excel file, the status for the link shows up as Unknown.
When you click the Check Status button, you might see a status of “Warning: value not updated” to remind you to update values. Or, you might see a status of “Source open” to inform you that the source file is open and might be edited.
However, if the link is to a Project 2010 file, the status shows as “Not applicable.” In this case, clicking Check Status does nothing.