
YOU and your project team might need more methods for collaborating and sharing files than are afforded by Microsoft Project 2010 as a standalone program. Yes, you can share project files and convert views to PDF. Indeed, you can exchange project information with Microsoft Word, Excel, Visio, Outlook, and other programs. However, you might feel you need a greater level of workgroup collaboration—a way by which you can share project files and task lists in a central location with users who don’t use Project 2010. You might want to make task assignments and receive progress updates that can be synchronized with the main project file.
In your case, the whole enterprise project management solution with Microsoft Project Server 2010 and Microsoft Project Web App might be overkill, especially because you’re working with a smaller team and you’re certain you won’t need to synchronize more than one thousand tasks. You need an in-between solution.
New in Project 2010 is the ability to upload and synchronize a project file to a SharePoint site; this might just be that middle ground you’re looking for.
With SharePoint, organizations can create web-based solutions for workgroup collaboration. A team can use SharePoint to create a website to share information with others on the team, create a document library, publish reports, track issues and risks, and create and track project tasks lists.
Two products are available: Microsoft SharePoint Foundation 2010 and Microsoft SharePoint Server 2010. SharePoint Foundation 2010 is the new version of Microsoft Windows SharePoint Services and provides the basic infrastructure for SharePoint Server 2010. While SharePoint Foundation is designed for smaller organizations as an entry-level solution, SharePoint Server is the full-featured business collaboration platform. The workgroup collaboration features for synchronizing project schedules and task lists between Project 2010 and SharePoint sites are available in both SharePoint Foundation and SharePoint Server.
With Microsoft Project Standard 2010, you can save a project file to a SharePoint Server or SharePoint Foundation site. Microsoft Project Professional 2010 takes it much further, giving project managers the ability to do the following:
Publish a Project schedule to a SharePoint project tasks list.
Create a project from a SharePoint project tasks list and convert it to a Project schedule.
Synchronize schedule information in the SharePoint tasks list and Project schedule.
Receive progress updates on task assignments from team members, and synchronize those updates into the Project schedule.
SharePoint 2010 gives you the ability to create a project tasks list, which is a mini-Gantt chart complete with task names, start dates, due dates, and more. Team members who are part of the workgroup using the SharePoint site can be assigned to tasks in the tasks list.
Project managers and team members can work with their project tasks list in SharePoint. Project tasks lists can also be synchronized with Project 2010 for integration with a project schedule. In this way, team members can help create task information that becomes part of a larger project schedule. The project manager and the team can assign tasks to the appropriate team members, and then together, they can track progress and keep each other updated.
Note
The SharePoint steps in the procedures throughout this chapter are based on default SharePoint site settings. Your SharePoint site might be extensively customized and therefore commands might be in different places. If you can’t find a command or window referenced in any of these procedures, check with your SharePoint administrator.
To create a project tasks list in SharePoint, follow these steps:
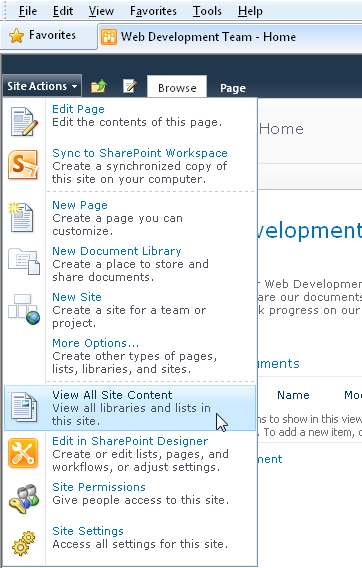
On your organization’s SharePoint site, click Site Actions, View All Site Content.
Alternatively, you can click Lists, and then click Create.
The Site Actions menu is often in the upper-left corner of the SharePoint window, as shown in Figure 21-1.
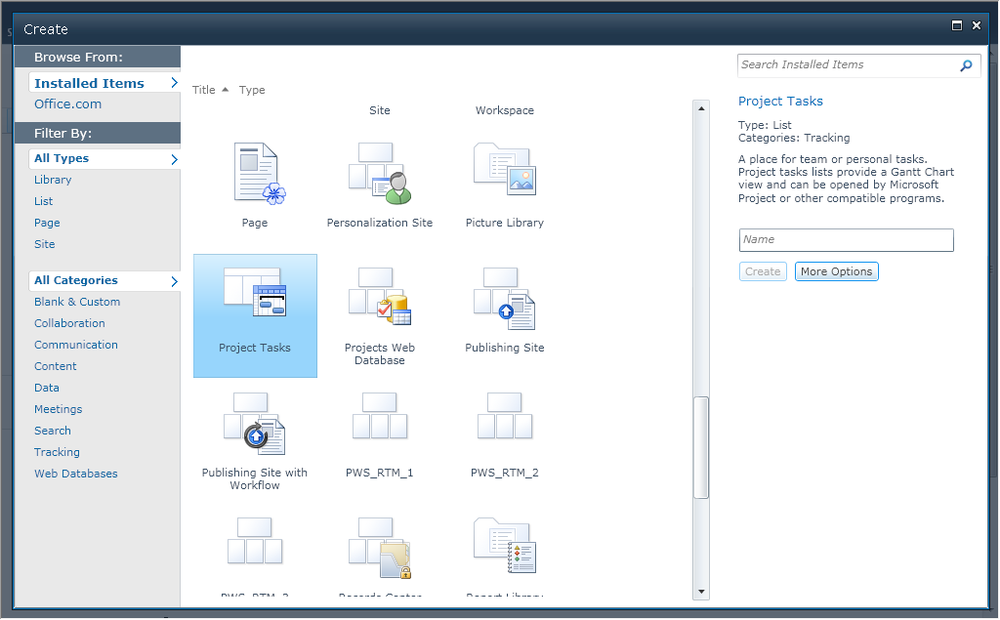
Near the top of the All Site Content page, click the Create button.
The All Create dialog box appears, showing all content types available to be created, including library, list, page, and site items.
Scroll down in the Create dialog box, and then click Project Tasks.
The right pane shows a description of the Project Tasks content type, as shown in Figure 21-2.
In the right pane, type a name for your new project tasks list in the Name box, and then click Create.
Note that the name will appear in the left pane under Lists for the site. The name also becomes part of the web address for the project tasks list page. Although you can change the name of a list, the web address always remains the same.
The new project tasks list is created and appears as a new window, as shown in Figure 21-3.
Click in the Title field, type the first task name, and then fill in any of the other fields you want. Click in other cells or press the Tab key to move to other cells. Press Enter to move to the next row and enter the next task name.
As you enter start dates and due dates, symbols and Gantt bars appear in the chart area of the Project Tasks view. (See Figure 21-4.)

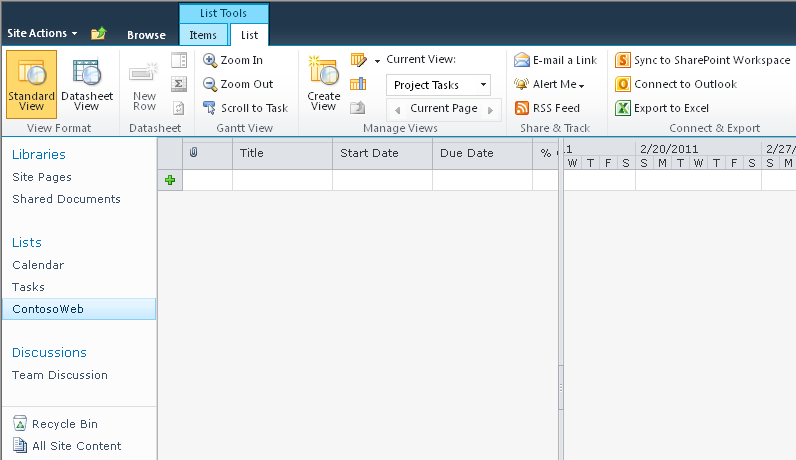

By default, you can review the project tasks list in the standard Gantt-like view or in the Datasheet view. You can also customize the view or create an entirely new view that meets the needs of the team and the project.
You can use SharePoint features to link tasks and create a hierarchy of summary tasks and subtasks. You can connect with Microsoft Outlook for reminders and alerts and integrate with SharePoint Workspace through Microsoft Office.