Project 2010 represents a dramatic step forward in the product’s evolution. This is evident from the introduction of user-controlled scheduling and workgroup collaboration features in the desktop version of the product, all the way to the fully realized project portfolio management system in the enterprise version. The way projects are scheduled has made a sizable shift, and in some cases this new approach is much more than just a departure, because it contradicts the way project managers have used previous versions of Microsoft Project. Many new features provide more flexibility and user control, but with that flexibility is needed knowledge of consequences in various aspects throughout the project life cycle.
This section is the first step, providing an overview of the new features throughout Project 2010. As you gain more experience with the features and processes described in this and succeeding chapters, we hope that you’ll learn how best to approach the product’s new paradigm and tap into the power of the “new Microsoft Project” and use it to your advantage as you manage your projects effectively.
As in previous versions of Microsoft Project, there are two editions of Project 2010: Project Standard and Project Professional. Both versions can be used as a standalone desktop project management application for a single project manager, although Project Professional has a few more features available than Project Standard. Furthermore, with the implementation of Project Server for enterprise project management, a host of additional features becomes available in Project Professional.
Throughout the different configurations of Project 2010, you’ll see new features and significant improvements in the following areas:
Controlling the project schedule
Analyzing and troubleshooting the schedule
Collaborating on project details
Viewing project information
Working with commands and tools
In Project 2010 enterprise project management, you’ll see additional changes in the following areas:
This section summarizes the new features in Project Standard, Project Professional, Project Server, and Project Web App. Cross-references indicate where these features are explained in detail elsewhere in this book.
A major highlight of the new version of Project Standard is the introduction of manually scheduled tasks, which provide more freedom and flexibility when creating a project. New ways to share information, including the use of SharePoint and PDF, provide for better collaboration among team members. You can highlight and focus on the most important tasks and phases using the new Timeline. Making commands easier to find and use, the Office ribbon is now part of Project 2010. The many Microsoft Project menus and toolbars are now a thing of the past.
You now have more choices when it comes to how tasks are created and scheduled:
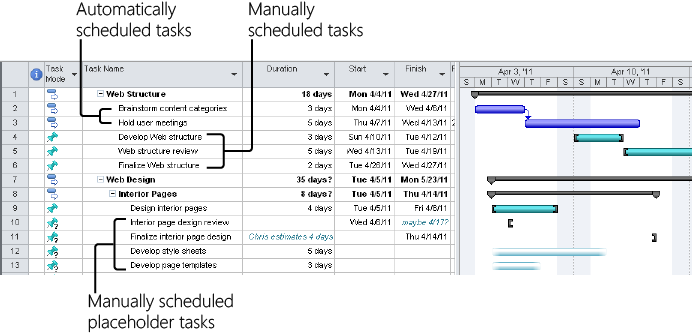
Manually scheduled tasks. You can select whether the tasks in a project are scheduled manually or automatically, as shown in Figure 1-4. With manually scheduled tasks, you can enter durations, start dates, and finish dates without having those entries recalculate other aspects of the schedule. You can enter notes in the duration and date fields. You can even leave those fields blank, as placeholders, until you have more information. You can still designate other tasks in the same project as automatically scheduled tasks, and you can convert manually scheduled tasks to automatically scheduled tasks. This gives you greater flexibility and lets you control the schedule, which can be particularly beneficial in the beginning stages of a project and for phases that are further out and have many unknowns.
Figure 1-4. Tasks can be automatically or manually scheduled, depending on the needs of the project and the information currently available.
Note
For more information, see Manually Scheduling Tasks.
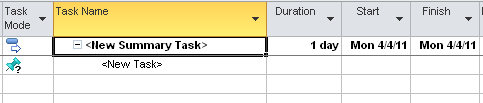
Top-down summary tasks. In past versions of Microsoft Project, you could create a summary task only by making subtasks out of tasks beneath it. You can still do this in Project 2010, but you can also now create a summary task out of the gate. You can insert a summary task above an existing task, or you can create a summary task at the end of the task list. In the latter case, a new subtask is automatically added beneath the new summary task, as shown in Figure 1-5.
Note
For more information, see Organizing Tasks into an Outline.
In Project 2010, tools are at your disposal to help you see why a task is scheduled the way it is and to alert you to possible scheduling conflicts down the road.
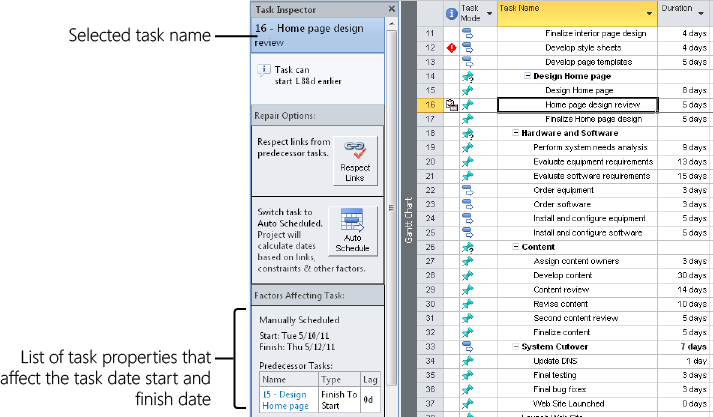
Task Inspector. This tool lists all the scheduling factors that drive how a task is scheduled, as shown in Figure 1-6. Such factors might include whether the task is manually or automatically scheduled, its duration, any dependency links, date constraints, resource calendars, overallocated resources, and so on. In some cases, the Task Inspector provides solutions to current or potential scheduling problems.
Note
For more information, see Reviewing the Factors That Affect Task Scheduling.
Schedule warnings and indicators. If Project 2010 detects a condition in the schedule that is causing a current or potential schedule conflict, a visual cue appears in the task information at the point of the problem. You can click that visual cue to get more information, and then use the Task Inspector to see more details and resolve the problem.
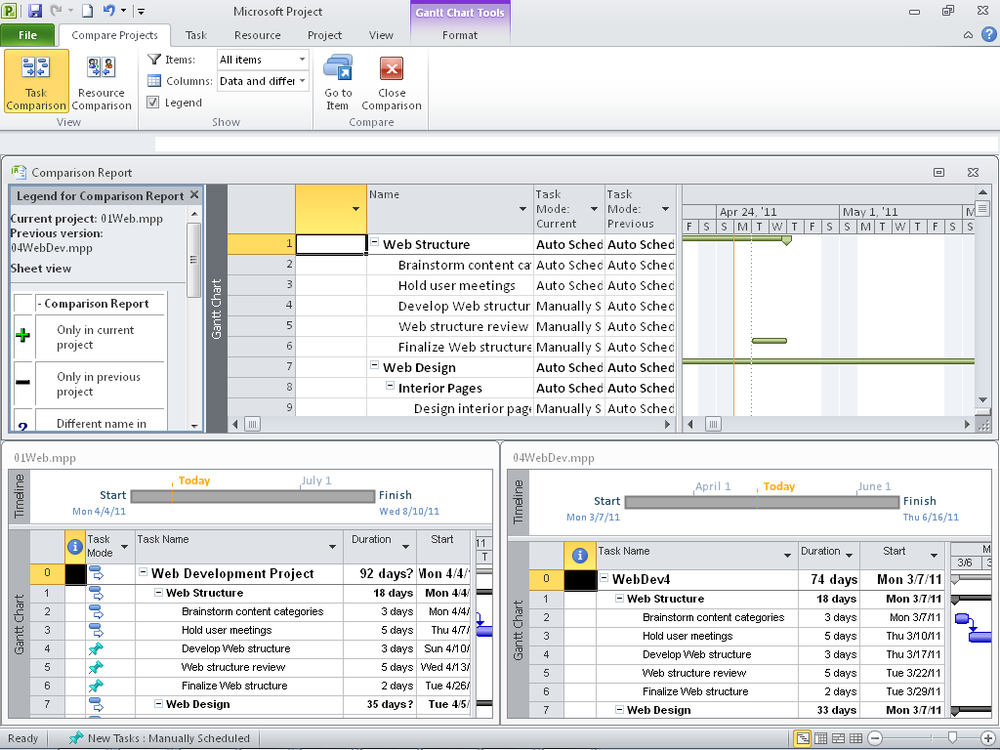
Compare project versions. In previous versions of Microsoft Project, the Compare Projects feature was an add-in. Now it’s built in to Project 2010, and provides a comprehensive view that shows differences between two projects, line by line, as shown in Figure 1-7. This can be useful in a variety of situations—for example, when building a new project and taking input from several sources, or when you’ve based a new project on an existing project and you want to compare detailed information between the two.
Note
For more information, see Comparing Project Plans Side by Side.
Project collaboration among team members and other stakeholders is always an essential component to effective project management. Project 2010 adds new functionality with its integration with SharePoint. Project 2010 also lets you copy and paste information between applications and provides additional file formats to add to its set of robust collaboration features.
Save to SharePoint. You can facilitate more collaboration by saving (although not synchronizing) a project file to a site created with SharePoint Foundation or SharePoint Server.
Note
For more information, see Inside Out: Save a project to SharePoint by using Project Standard 2010.
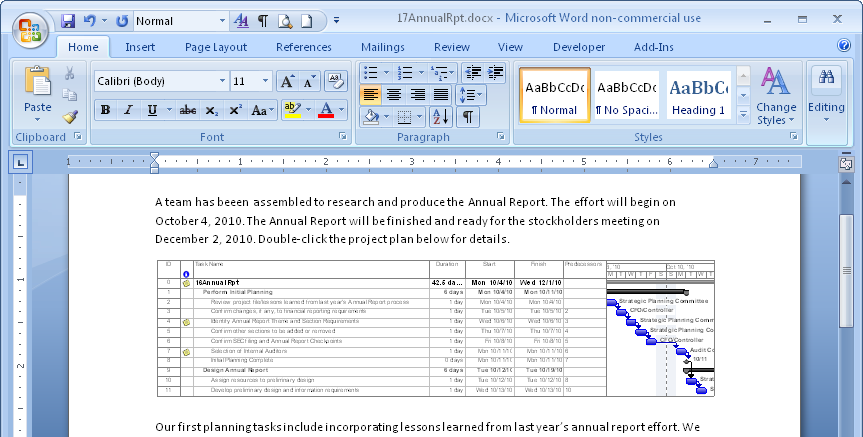
Enhanced copy and paste to other applications. When you copy and paste information from Project 2010 into another Microsoft Office application such as Microsoft PowerPoint or Excel, outline levels, column headings, and formatting are maintained as they were in the project file, as shown in Figure 1-8. There’s no longer any guesswork about where and how information is pasted, and no reformatting has to be done. You just paste, and the information looks as it did in your project file.
Figure 1-8. Paste information from Project 2010 into Word, and the outline levels, column headings, and formatting look just as they did in the project plan.
Note
For more information, see Copying from Project 2010 to Another Application.
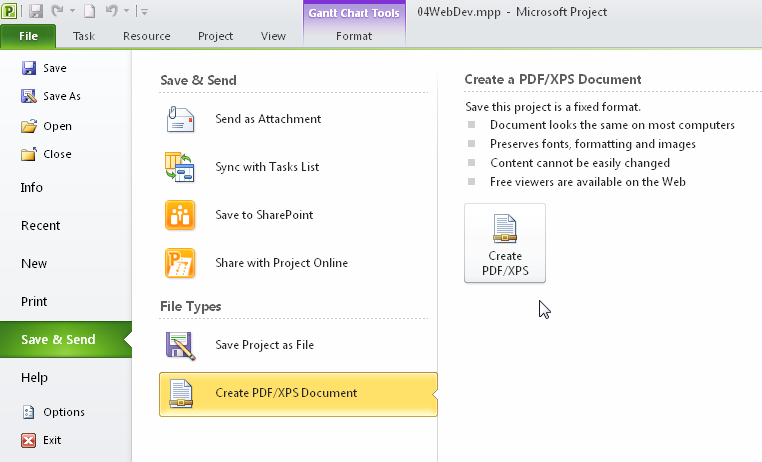
Save to PDF/XPS. You can save a project view or report as a PDF (Portable Document Format) or XPS (XML Paper Specification) file without needing to install any other program, as shown in Figure 1-9. With either of these formats, you can be sure that your file preserves its original formatting and is not editable. The files are also easy to open and read on any computer. This is especially important because you can’t assume that everyone who needs to see your project information has access to Project 2010.
Figure 1-9. Save a view as a PDF or XPS file to ensure that it looks exactly as you intended when your recipients open the file on their computers.
Note
For more information about PDF and XPS, see Working with Common Cross-Application File Formats.
Backward compatibility. Project 2010 readily opens files created in previous versions of Microsoft Project. This means that a converter is not necessary to open files created in earlier versions.
Scalable 64-bit compatibility support. Project 2010 is offered as a 32-bit or 64-bit installation. The 64-bit compatibility provides improvements in performance, which is particularly helpful for project managers who regularly work with very large projects or complex structures of master projects and subprojects.
The new Timeline lets you see key phases or tasks, keeping you focused on the big picture. If you’re familiar with Excel, you’ll like how text wraps and columns are added in any sheet view. There are new ways to zoom, draw, and color elements in your plan.
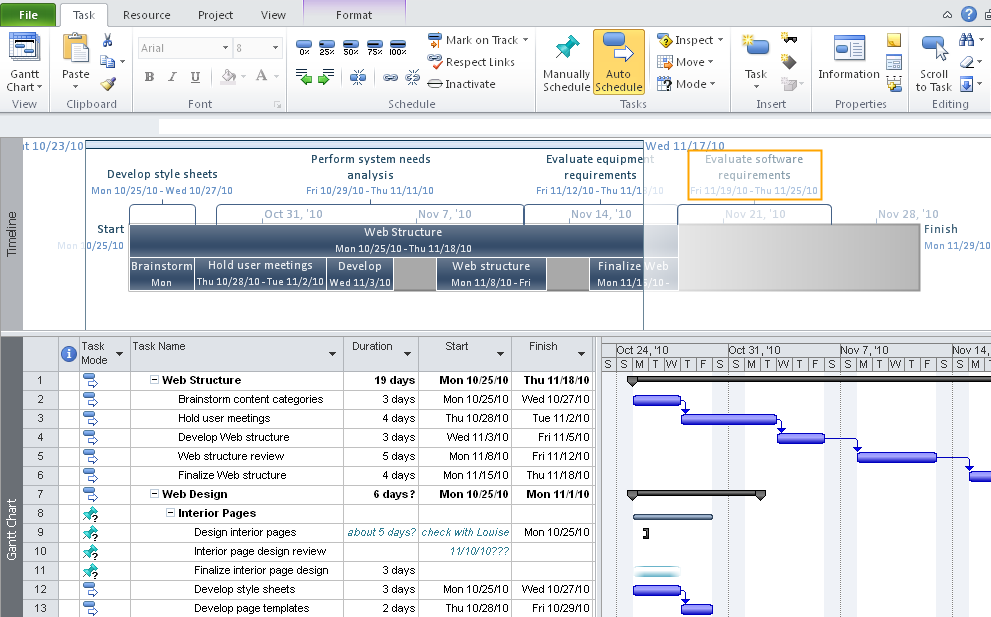
Timeline view. You can see the highlights of your entire schedule or review specific dates and deadlines with the new Timeline, available at the top of every view throughout the project plan, as shown in Figure 1-10. You can select which tasks, phases, or milestones to include in the Timeline, making it easy for you to control the content and present the most relevant information for your own everyday reference or for your audience. With its rich formatting and visual effects, the Timeline is a prime candidate for copying and pasting into other applications, like Outlook, PowerPoint, or Visio, for sharing key project information with stakeholders.
Figure 1-10. Use the Timeline to view the highlights or milestones you want to keep at the forefront.
Note
For more information, see Highlighting Tasks with the Timeline.
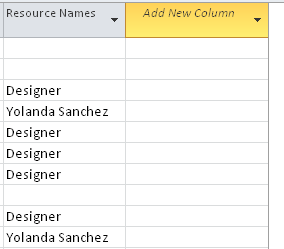
Add new columns quickly. Every table throughout Project 2010 includes a blank column into which you can simply enter data without first defining the column’s data type, as shown in Figure 1-11. This provides for a more intuitive way to add new columns, especially columns for custom project information.
Note
For more information, see Hiding and Showing Columns.
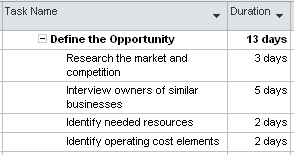
Text wrap. Row heights now adjust automatically to display the full contents of a cell, as shown in Figure 1-12. This makes it easy to see all the information in a cell, especially Task Name or Resource Name cells, with minimal column adjustments.
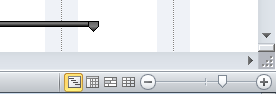
Zoom slider. You can use the Zoom slider in the lower-right corner of the Project 2010 window to zoom the timescale of a time-based chart in or out, as shown in Figure 1-13. This makes working with the Gantt Chart or Resource Usage view so much more convenient.
Expanded color palette and formatting. More colors are now available for bar styles, font colors, and backgrounds. Gantt chart color schemes can help personalize your project, and the new drawing tools help you emphasize important schedule details.
Note
For more information about the drawing tools, see Marking Up a Schedule with Drawing Tools.
Like the other Microsoft Office applications, Project 2010 now incorporates the ribbon, Quick Access Toolbar, Backstage view, and context-sensitive right-click menus and toolbars. These all make working with Project 2010 more familiar and intuitive, and allow power users to work even faster.
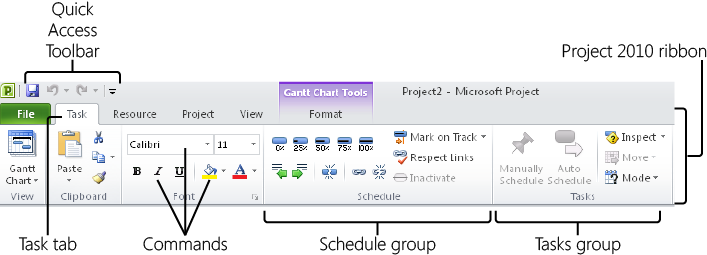
Ribbon interface. Part of what’s known as the Office Fluent user interface, used throughout Microsoft Office, the ribbon is now integrated into Microsoft Project. Instead of arranging commands in drop-down menus and toolbars, the ribbon arranges commands logically in tabs and groups and presents them graphically, as shown in Figure 1-14. The ribbon can change dynamically depending on which view of the project plan you’re showing.
Note
For more information about the ribbon, see Using the Project Ribbon.
Quick Access Toolbar. The Quick Access Toolbar is another aspect of the Fluent user interface. This toolbar is always present in the upper-left corner of the Project 2010 window, and it can be customized with your most frequently used commands.
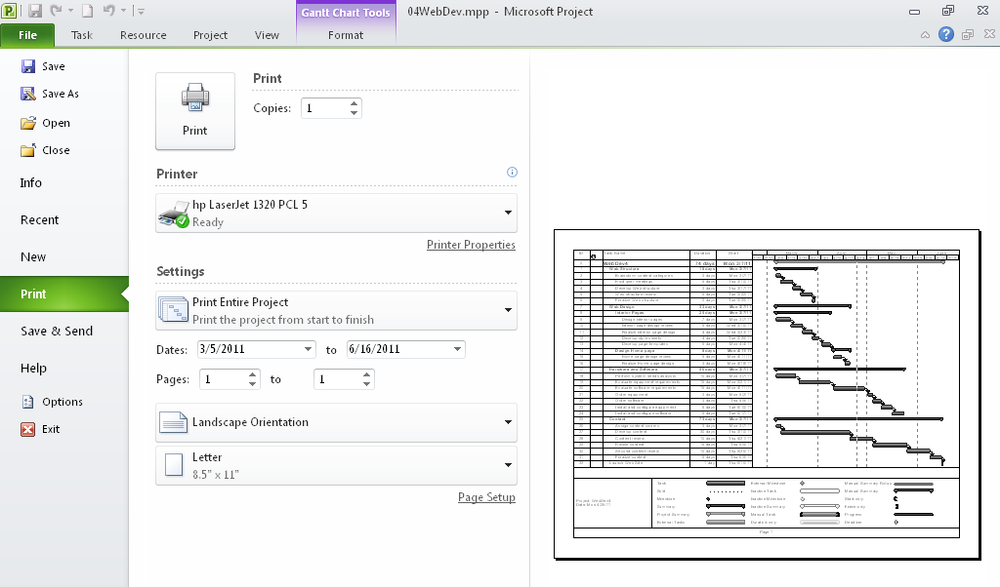
Backstage view. Tools, templates, and program options are available in the new Backstage view. The Backstage view is where you save and print files, create new project plans or open existing ones, and set your program preferences and options. It’s also where you go to get Help about Project 2010. Figure 1-15 shows the Print Backstage view.
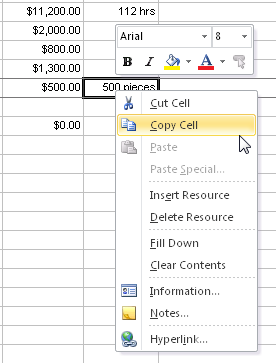
Context sensitive menus and mini-toolbars. You can quickly find the most commonly used commands in a particular context with a well-placed right-click on the Project 2010 window. In most places, a menu appears that shows commands that apply to the area or content where you clicked. In some places, a mini-toolbar also appears to provide even more context-sensitive options. (See Figure 1-16.)
Project Professional 2010 includes all the new features of Project Standard 2010. In addition, Project Professional 2010 includes features for managing resource teams and deactivating tasks.
You can look at your schedule in different ways by using the Team Planner, by synchronizing project workgroup information in SharePoint, and by inactivating and reactivating tasks in Project Professional 2010.
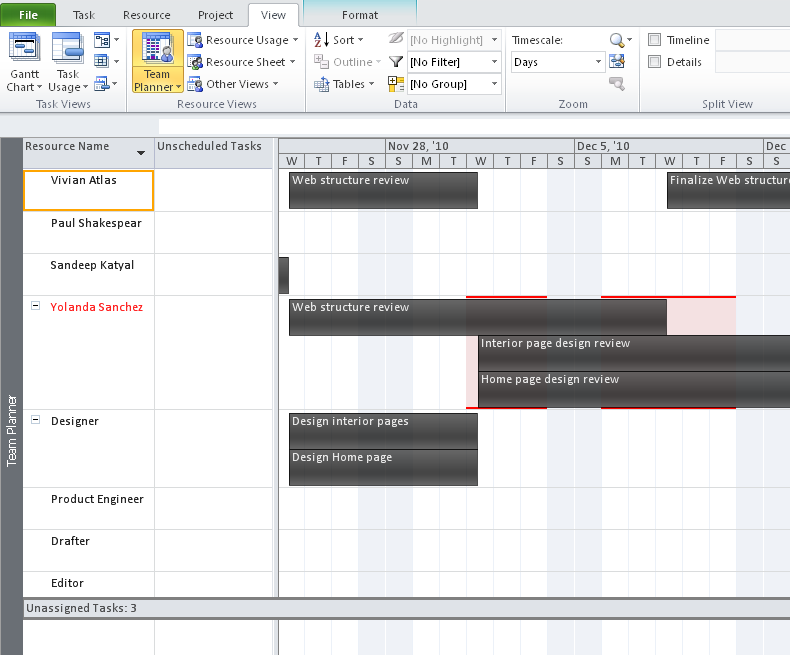
Team Planner. Visually arrange the scheduling and assignment of tasks along a graphical timeline by using the new Team Planner view. You can assign tasks, reassign tasks, or reschedule tasks to when resources are available by dragging and dropping on a resource timeline grid, shown in Figure 1-17. Use the Team Planner view not only to rearrange tasks and assignments, but to understand how much resources are underworked or overworked or where tasks are bunching up.
Note
For more information, see Reviewing Assignments with the Team Planner.
SharePoint integration for workgroup collaboration. With Project Standard 2010, you can save a project file to a SharePoint site. Project Professional 2010 takes this further with the ability to publish a project schedule to a SharePoint task list. You can also create projects from a SharePoint task list or convert a list into a Project 2010 schedule. Either way, the schedule information in SharePoint and Project 2010 are synchronized. In addition, you can receive task updates from team members, and those updates are also synchronized.
Note
For more information, see Chapter 21.
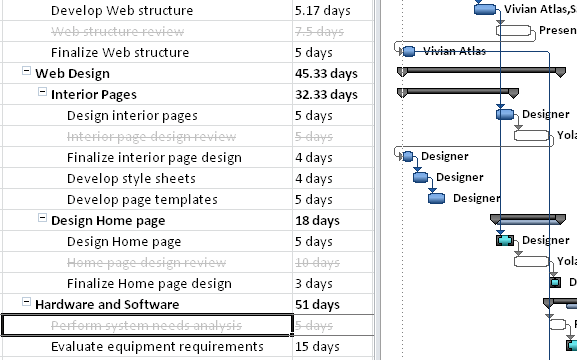
Inactive and active tasks. You can remove tasks from the active schedule while still keeping the task information intact in the project plan. By making tasks inactive, you can run what-if scenarios to see the impact of removing tasks. If you decide to keep those tasks in the plan, you can reactivate them with a single click. The information for inactive tasks is dimmed, as shown in Figure 1-18, and is removed from the schedule calculations. Reactivated tasks have their information recalculated in the schedule as they were before they were made inactive. Keeping inactivated tasks in the project plan is also a good way to record scope cuts, which can be useful information for project archives and future projects.
Figure 1-18. Inactivated tasks still show as “ghost” images in your project plan. You can reactivate them later if needed, or just keep them for archival purposes.
Note
For more information about deactivating tasks, see Changing Project Scope.
In Project Server 2010 and Project Web App, a multitude of new features work together to facilitate portfolio analysis and decision making, project scheduling, resource management, and reporting. Built on the Microsoft SharePoint Server 2010 platform, this provides complete start-to-finish enterprise project management (EPM) and project portfolio management (PPM) solutions on a single server, with a familiar and consistent user interface.
Project portfolio management (PPM) encompasses the methods by which an organization can analyze, prioritize, and maximize proposed projects, and then execute the selected projects while being ever mindful of the overall progress, cost, and resource utilization throughout. The objective of project portfolio management is to achieve the ideal mix of projects that can enable the organization to achieve its strategic goals.
Integrated project and portfolio management. In Project 2007, the portfolio management features were handled on a separate, add-on server platform. In Project 2010, project portfolio management functionality is now completely integrated with enterprise project management in the Project Web App user interface. The result is a common and interconnected user experience throughout the entire project portfolio management life cycle.
Demand management system. The heart of the project portfolio management capabilities implemented in Project Server 2010 is the demand management system. In this context, demand management is the system for selecting project proposals against the organization’s strategic business objectives, and then governing the execution of selected projects against a defined workflow that ensures the fulfillment of key indicators at identified checkpoints in the project life cycle. Different enterprise project categories can be defined and associated with a workflow, a project, and a template.
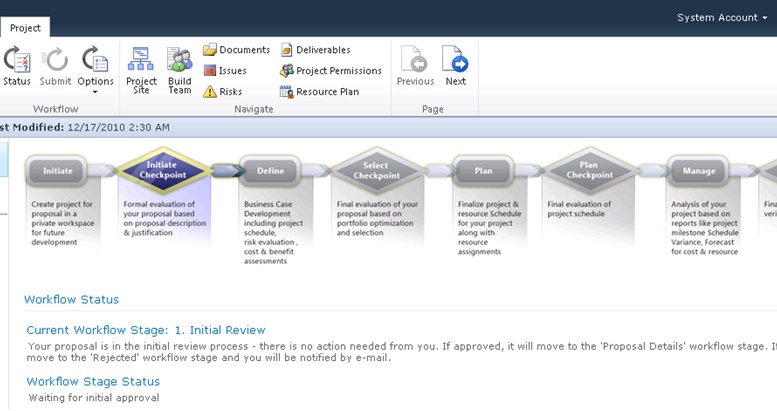
Workflow configuration. As a major component of the demand management system, the workflow defines each step in the life cycle of a project. In fact, the workflow essentially implements the demand management system. The portfolio manager can configure all aspects of the workflow to reflect the characteristics of the organization and to ensure the appropriate level of governance. The workflow typically begins with the initial project proposal and includes all approval steps along the way, through to project selection, execution, and closure. The project manager can track the status of the project in all the steps of the workflow. You can use the Project Web App workflow module to define one or more workflows for the different categories of projects in your organization, as shown in Figure 1-19. New enterprise custom fields provide the flexibility that portfolio managers need to customize their workflows.
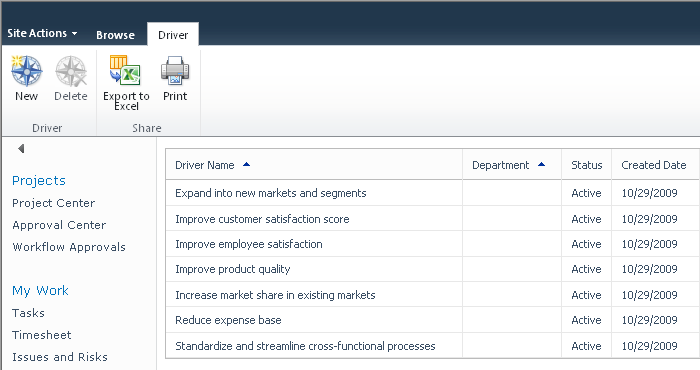
Business driver definition. The identification and prioritization of key business objectives or development areas for an organization is another significant component of the demand management system. Examples might include increasing profit, expanding into new markets, or increasing customer satisfaction. The portfolio manager and others in the leadership team can objectively weigh and prioritize proposed projects against business objectives and more quickly come to a consensus about which projects have the most merit and have the most potential for fulfilling the organization’s strategic goals. As shown in Figure 1-20, Project Web App includes an intuitive visual interface for defining and prioritizing business drivers.
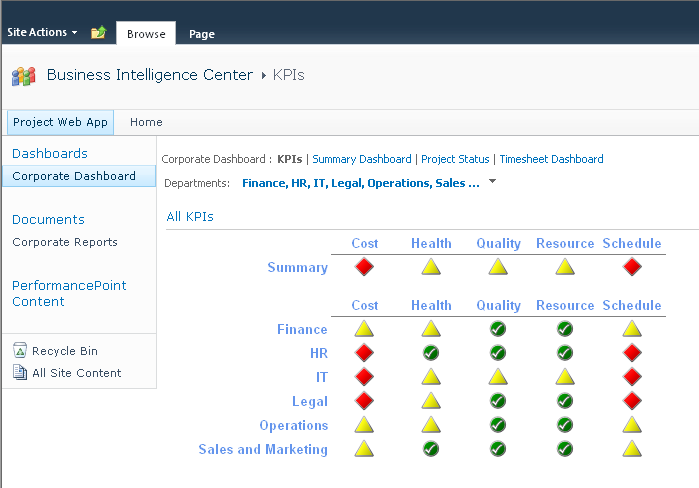
Portfolio analysis tools. In Project Web App, portfolio managers and executives can use business drivers, the optimizer, and planning tools to analyze the projects in the portfolio. They can see which projects hit the target for key business drivers and can analyze which projects are best meeting the business drivers for that function, within given cost and resource constraints. They can optimize portfolios based on different filters, such as strategic value, financial value, resource utilization, and risk. As shown in Figure 1-21, the views and user interface in Project Web App provide flexibility and perspective and, therefore, can improve project portfolio decision making.
Figure 1-21. In Project Server 2010, visibility and reporting of key performance indicators are now available.
Note
For more information about project portfolio management and demand management, see Chapter 27.
Project managers can now use Project Web Access to edit projects in ways similar or identical to editing projects in the Project Professional user interface. As a result, updating project information is more intuitive and efficient and can be performed wherever project managers have a web browser and Internet access. In addition, a new resource capacity planning feature set makes it possible to maximize resource utilization across the organization.
Schedule creation and update. Project managers can build a new schedule and also make simple edits and updates from within Project Web App. In addition, change highlighting and multiple-level undo features are also now available in Project Web App.
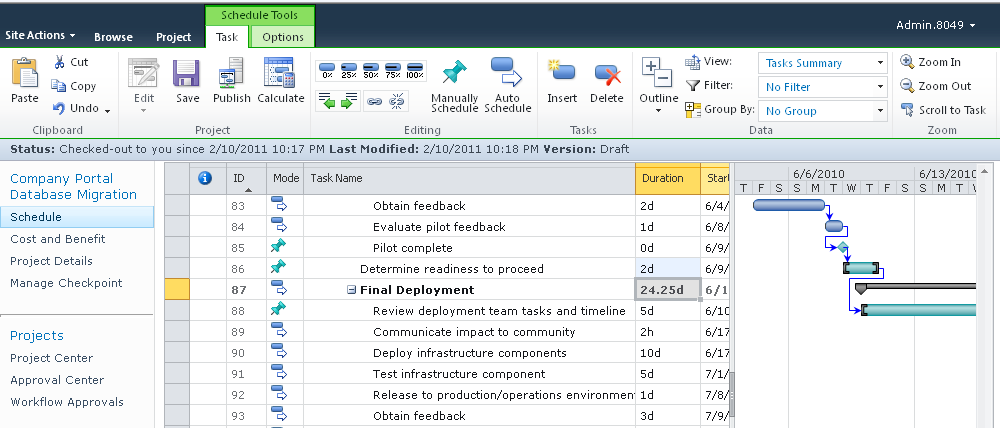
More robust projects in Project Web App. Project managers can now create projects with more than 100 tasks, a previous limitation in Project Server. Project managers can also assign multiple resources, define task hierarchy in outlines, and set dependencies with task links, all working in Project Web App. (See Figure 1-22.)
Manual or automatic task scheduling. As in the Project 2010 desktop version, in Project Web App, project managers can now choose whether tasks are scheduled manually or automatically. With manually scheduled tasks, you can set durations, start dates, and finish dates without having those entries recalculate other aspects of the schedule. With automatically scheduled tasks, you can have Project 2010 calculate dates and durations as before. You can have a mix of manually and automatically scheduled tasks, and you can convert one to the other.
Resource capacity planning. Project and portfolio managers can view resource capacity across the organization, ensuring maximum resource utilization. This provides insight into demand and availability of generic resources over time. Projects can be rescheduled to maximize resource utilization while maintaining the set schedule dependencies. What-if scenarios regarding staffing levels can be modeled and compared.
Note
For information about managing project schedules and doing resource capacity planning using Project Server 2010 and Project Web App, see Chapter 24.
In Project 2010, time and task progress tracking, status reporting, approvals, and Microsoft Exchange Server integration have been improved.
Time reporting enhancements. If teams prefer, task status and timesheet updates can be unified by enabling single entry-mode through a consistent yet flexible user interface. This can save time for team members as well as project managers.
Note
For more information about submitting task status updates and timesheets, see Logging Time by Using Timesheets.
Consolidated approval center. The new Approval Center provides a convenient all-in-one location for managers to approve and incorporate task status and timesheet updates.
Delegate approvals. With the enhanced user delegation features, you can easily delegate task status and timesheet approvals to another individual, such as a resource manager or team lead.
Note
For more information about approving task status updates and timesheets, see Exchanging Task Progress Information.
Exchange Server integration. Team members can choose to receive and update their task status and other notifications through Microsoft Outlook or Outlook Web App. Project tasks are shown as Outlook tasks grouped by project name. No Outlook add-in is required.
Note
For more information about working with task updates and notifications through Outlook, see Working with Project Tasks in Outlook.
You can now easily create reports and dashboards through the reporting layer built on the Microsoft Business Intelligence platform through SharePoint Server. Through the Project Web App interface, you can use these tools to better visualize and track key project performance indicators.
Highly customizable. The reporting and dashboard functionality is highly customizable. With the ability to set up summary and detail project information exactly as you need, you can more quickly respond to changing conditions in projects and portfolios.
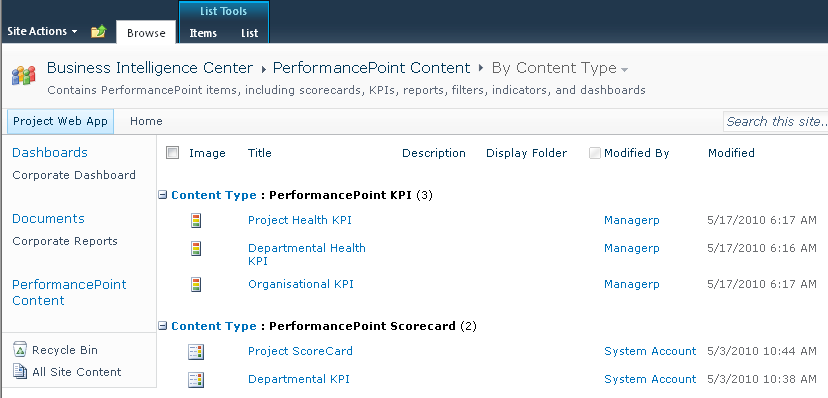
PerformancePoint Services. PerformancePoint, part of the Microsoft Business Intelligence platform, gives you a dashboard designer with a variety of indicators. (See Figure 1-23). Create different dashboards for different purposes and audiences to help you effectively monitor and present portfolio performance.
Office reporting services. In addition to PerformancePoint Services, you can use Excel Services, Visio Services, PowerPivot for Excel 2010, and SQL Reporting Services to publish information from a Microsoft Office application.
Predefined report templates. You can choose from a variety of predefined report templates that reflect project reporting best practices. Examples include reports on key performance indicator by department, project costs, resource capacity, issues and risks, workflow chart, and more.
Note
For more information about creating and using reports and dashboards, see Analyzing and Reporting on Project Information.
With Project Server 2010 built on the SharePoint Server 2010 platform and the adoption of the ribbon in Project Web App, users experience a more consistent user interface as they move between Project Professional 2010, other Microsoft Office applications, and other SharePoint sites to work in Project Web App.
Built on SharePoint Server 2010. Project Web App uses the familiar SharePoint Server interface. In addition, SharePoint enterprise search makes it easy to find project information, including tasks, resources, documents, and more. In addition, teams can be connected and communication enhanced through the use of all the capabilities of SharePoint. This includes wikis, blogs, discussion forums, My Sites, document libraries, and more.
Ribbon interface. In Project Web App, the menus and toolbars have been replaced with the ribbon for easier access and grouping of major functions. As shown in Figure 1-24, commands are logically arranged in tabs and groups that are presented graphically and dynamically, depending on which area of Project Web App you’re working in.
Note
For more information about the ribbon, see Using the Project Ribbon.
Microsoft Visual Studio Team Foundation Server. Through interoperability with Visual Studio, the world of application development can be easily connected with that of project and portfolio management.

Project server administration functions are simplified in Project Server 2010 and Project Web App. User setup, Project Web App configuration and customization, and security features are centralized for project and portfolio administration.
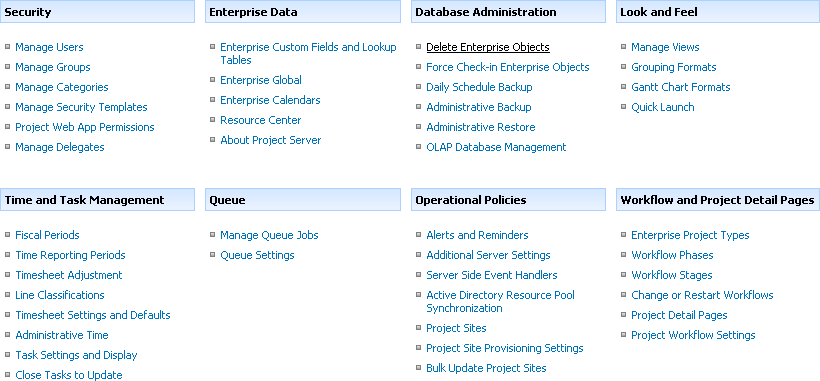
Centralized project server administration. The server settings console provides all project server administration functions in one centralized location for both project and portfolio management capabilities, as shown in Figure 1-25. This includes everything from setting up users and their permissions to setting up project workflow settings.
Project access permissions. Within the Project Web App Permissions function, project managers can expand on what the security model allows to create and modify resources and set basic view permissions to better control who has the rights to view or edit projects.
Delegate users. With enhanced delegation, users can identify colleagues to act as their delegate when needed. The project server administrator no longer needs to set up delegation rights between users.
Custom enterprise fields. Project server administrators and portfolio managers can use custom enterprise fields to customize enterprise project templates the way they’re needed throughout the organization. With the custom departmental fields, users in specific departments can focus on their own data, filtering out information that doesn’t apply to them. With these custom departmental fields, enterprise project types, resources, and custom fields can be associated with specific departments to maintain the relevancy of project data.
Administer reporting cubes. Through the improved interface for working with reporting cubes, project server administrators and portfolio managers can easily add, edit, copy, refresh, and delete reporting cubes.
Enhanced customization and scalability. To extend functionality and integrate project information with other applications, Project Server 2010 uses the applications programming interface (API) called the Project Server Interface (PSI). With the PSI, you can access the properties of objects such as Project, Task, and others, and thereby integrate information between your project server and other organizational systems that interact with project management processes, such as accounting, procurement, or human resources. In Project 2010, enhancements to the PSI provide for easier customization to Project Server and Project Web App. Customization is also enhanced by SharePoint Server 2010 and Visual Studio 2010.
Note
For information about the Project Server Interface, refer to the Project 2010 Software Development Kit (SDK), available on the Microsoft Developer Network (MSDN) at msdn.microsoft.com/en-us/library/ms457477.aspx.
Hosted Project Server solutions. Through one of several Microsoft Project partners, you can access and configure web-based hosting for your enterprise project management solution. Through a third-party hosting provider such as Project Hosts, you can speed up enterprise project management deployment for your organization and reduce your IT infrastructure costs.
Note
For more information about third-party hosting partners, see Analyzing Your Project Server Requirements.