
If you customize elements—such as tables, views, fields, or filters—in one project, you will probably want to use those elements in new projects. Some customized elements are stored in the project in which you create them, whereas others are stored in the global template. In either case, you can copy elements to other projects or templates by using the Organizer. If you want a customized element available to every new project, use the Organizer to copy the element to the global template. In addition, you can use the Organizer to rename or remove elements from a project or template.
Note
For information about using the global template, see Working with the Project Global Template. To use the enterprise global template, see Standardizing Enterprise Project Elements.
The Organizer includes tabs for almost every type of customizable element in Project 2010 (custom formulas belong to the custom fields in which you define them). By clicking a tab, you can see the elements of that type that are available in two project files. These project files can be active projects or templates, so you can copy customized elements between active projects or from a project to a template, or you can restore the original element from a template to a project.
Copying Elements to the Global Template Automatically
By default, Project 2010 automatically copies new views, tables, filters, and groups to the global template, so they are available to other Project files. This setting works well when you don’t share your global template with others and you use the same customizations in all your projects. However, if you do share your global template with other project managers, you might not want to copy your new elements to the global template.
To change this setting, on the File tab, click Options. In the Project Options dialog box, click Advanced in the left pane. Under Display, clear the check box labeled Automatically Add New Views, Tables, Filters, And Groups To The Global. When you clear this check box, you must use the Organizer to copy new customizations to the global template.
You can copy, delete, or rename the following customizable elements:
To open the Organizer, on the File tab, click Info, and then click Organizer. An Organizer button to open the Organizer dialog box is also available in the following dialog boxes:
More Filters
More Groups
More Tables
More Views
Custom Reports
No matter which type of element you copy, the procedure is the same. You choose a source file that contains the element you want to copy, choose a destination file into which you want to copy the element, and then copy the element.
Follow these steps to copy an element from a project to the global template:
Open the project that contains the element you want to copy.
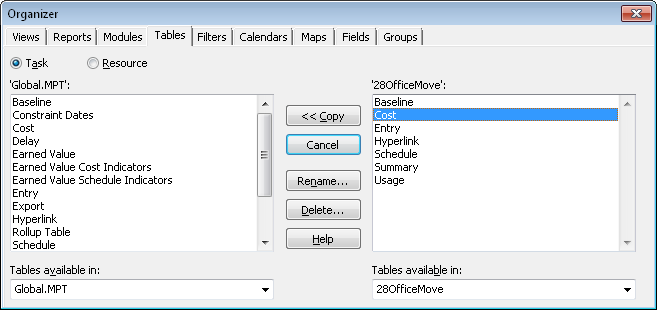
On the File tab, click Info, and then click Organizer to open the Organizer dialog box, shown in Figure 28-33.
Click the tab for the type of element you want to copy.
In the <Element> Available In box on the right side of the dialog box, click the project that contains the element you want to copy.
<Element> stands for the name of the current tab. The <Element> Available In box lists all open projects.
Click the name of the element you want to copy from the list of elements on the right side of the dialog box.
Click Copy.
If an element with the same name already exists in the global template, Project 2010 asks you to confirm that you want to replace the element in the global template. Click Yes to replace the element in the global template with the one from the source project.
If you do not want to replace the element, click Rename and then type a new name. When you click OK, Project 2010 copies the renamed element to the global template.
To copy an element between two projects, do the following:
Open both the source and destination projects.
On the File tab, click Info, and then click Organizer.
Click the tab for the type of element you want to copy.
In the <Element> Available In box on the right side of the dialog box, click the source project.
In the <Element> Available In box on the left side of the dialog box, click the destination project.
Click the name of the element you want to copy from the list of elements on the right side of the dialog box.
Click Copy. If an element with the same name already exists in the destination, Project 2010 asks you to confirm that you want to replace the element in the destination project. Click Yes to replace the element in the destination project with the one from the source project.
To copy the element with a different name, click No. Then click Rename and enter a new name.
Although customized elements can simplify your work, extraneous elements in projects and templates can be distracting. When you copy a customized element to the global template, you no longer need it in the project in which you created it. Similarly, if you create a customized element by accident, you can remove it using the Organizer. To do this, follow these steps:
Open the project that contains the element you want to delete.
If you want to delete a view, you must first apply a different view.
If you try to delete the view that is currently displayed, Project 2010 warns you that the view is in use. Switch to a different view and then you can delete the view.
On the File tab, click Info, and then click Organizer.
Click the tab for the type of element that you want to delete.
In the <Element> Available In box on the right side of the dialog box, click the project that contains the element you want to delete.
<Element> stands for the name of the current tab.
Click the name of the element you want to remove from the list of elements on the right side of the dialog box.
Click Delete. In the confirmation box, click Yes to delete the element.
You can use the Organizer to rename customized elements. For example, you should rename a customized element in your project if you want to copy it to the global template without overwriting the original element in the global template. You can’t rename some built-in elements. For example, fields are renamed in the Custom Fields dialog box.
Do the following to rename a customized element:
Open the project that contains the element that you want to rename.
On the File tab, click Info, and then click Organizer.
Click the tab for the type of element that you want to rename.
In the <Element> Available In box on the right side of the dialog box, click the project that contains the element you want to rename.
<Element> stands for the name of the current tab.
Click the name of the element in the list of elements on the right side of the dialog box.
Click Rename.
The Rename dialog box appears.
Type the new name for the element.
If you forget that changes you make to a table in a view modify that table’s definition, you might customize a standard table accidentally. You can reverse the changes you made, but if you made a lot of changes before you realized your mistake, it’s easier to restore the standard table. You can restore standard elements by using the Organizer to copy them from the global template to your active project.
Note
You can’t restore a table if it appears in the current view. Either switch to a view that does not use that table or right-click the Select All box (the blank cell above the ID numbers) and click another table name on the shortcut menu.
Follow these steps to restore a standard element:
Open the project to which you want to restore a standard element.
On the File tab, click Info, and then click Organizer.
Click the tab for the type of element that you want to restore.
In the <Element> Available In box on the right side of the dialog box, click the project to which you want to restore the standard element.
<Element> stands for the name of the current tab. The global template appears on the left side of the dialog box by default.
Click the name of the element you want to restore in the list of elements in the global template on the left side of the dialog box.
Click Copy. When the confirmation dialog box appears asking you to confirm that you want to replace the element in the project, click Yes.