
To run a macro, select it from the list of available macros in the Macros dialog box, as follows:
On the View tab, in the Macros group, click Macros.
In the Macro Name list, click the name of the macro you want to run. (See Figure 30-3.)
Click the Run button.
The macro runs according to the steps you recorded in that macro.

It’s certainly easy enough to press F8 and then select and run your macro. However, you can make your macro more readily accessible by assigning a keyboard shortcut or by adding a command to the ribbon. Either of these methods can be handy for macros you use fairly often.
Key commands such as Ctrl+C are the oldest and most common shortcuts to access software features, especially for displaying dialog boxes or performing some quick action. Unfortunately, as more and more keyboard shortcuts are assigned to software features, fewer of these simple combinations are left for macros.
In Project 2010, a keyboard shortcut for a macro must be a combination of the Ctrl key and a letter. Because Project 2010 has many built-in keyboard shortcuts, the only letters available for macro shortcuts are A, E, J, M, Q, T, and Y.
Note
If you use other letters, such as Ctrl+B or Ctrl+C, that are already used by the software, you don’t get an error message, and it appears that you’re allowed to use them. However, the keyboard shortcut is not applied to your macro, and it retains its original coding; for example, Bold for Ctrl+B or Copy for Ctrl+C.
You can assign a keyboard shortcut to a macro when you record it, as described in Creating Macros. You can also assign a keyboard shortcut to a macro any time after you create it by using the Macro Options dialog box.
Follow these steps to open the Macro Options dialog box:
On the View tab, in the Macros group, click Macros.
In the Macro Name list, click the name of the macro you want to modify.
Click the Options button.
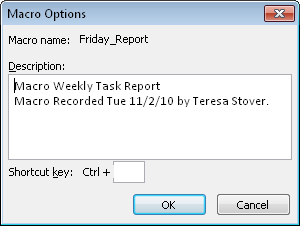
The Macro Options dialog box appears, as shown in Figure 30-4.
In the Shortcut Key box, type the letter you want to use.
You can also edit the macro description if you want.
You can add a macro as a command on the ribbon. This can be very convenient, especially if you don’t care to rely on your memory and want the macro always at your fingertips. By placing a macro on the ribbon, you can:
Forget the keyboard shortcut.
Display the name of the macro as part of the button.
Add it to a custom group on any tab (or a custom tab), and group it with other related commands.
Because the commands in existing groups are fixed, you can add a macro command only to a custom group you create. However, that custom group can be on an existing tab, such as the Task tab or the View tab, or you can create a custom tab instead.
To create a custom group on the ribbon, follow these steps:
On the File tab, click Options.
In the left pane of the Project Options dialog box, click Customize Ribbon.
In the Customize The Ribbon box, make sure that Main Tabs is selected.
In the Main Tabs box, click the plus sign next to the tab where you want to add your custom group.
The tab expands to show the existing groups on that tab.
In the expanded list of groups, click the name of the group after which you want to add your custom group.
Click the New Group button below the list.
New Group (Custom) appears below the group you selected, as you can see in Figure 30-5.
With New Group (Custom) still selected, click the Rename button below the list.
The Rename dialog box appears, showing a gallery of buttons.
In the Display Name box, type the name you want for your custom group, and then click OK.
Ignore the buttons in the gallery for now. You’re just creating the group name.
If you want to change the position of the custom group, click its name, and then click the up or down arrow until it’s located where you want.

After you create a custom group, you have a place to add your macro. To add a macro to a custom group on the ribbon:
Be sure the Project Options dialog box is still open.
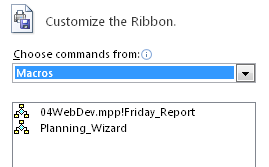
In the Choose Commands From box, click Macros.
All macros available from the project global template or from the current project plan are listed. (See Figure 30-6.)
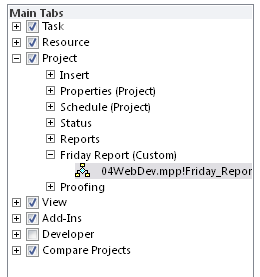
In the Main Tabs box on the right, click the name of the custom group to which you want to add the macro.
In the Macros list on the left, click the name of the macro you want to add to custom group, and then click the Add button.
The macro name appears under the custom group name, as shown in Figure 30-7.
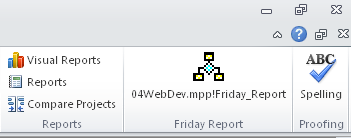
Navigate to the tab where you added the custom group that now contains your macro.
You’ll see your macro name and the generic macro icon in your custom group. (See Figure 30-8.)
When you add a macro to a custom group, you initially see the generic macro icon and the name of the macro. To change to a different icon or display name for the macro, follow these steps:
On the File tab, Options.
In the left pane of the Project Options dialog box, click Customize Ribbon.
In the Customize The Ribbon box, make sure that Main Tabs is selected.
In the Main Tabs box, expand the appropriate tab and custom group where your macro resides.
Click the name of the macro whose icon or name you want to customize.
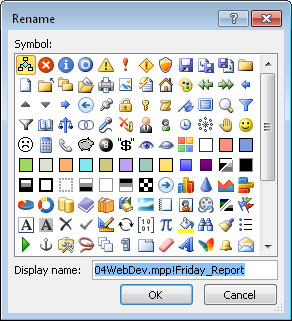
Below the tab listing, click Rename button.
The Rename dialog appears, as shown in Figure 30-9.
If you want to change the icon shown for your macro, find and click the icon you want.
If you want to change the display name of the macro, type the new name in the Display Name box.
Click OK in the Rename dialog box, and then click OK in the Project Options dialog box.
Navigate to the tab where you added your macro.
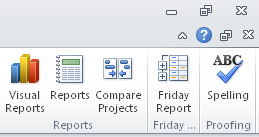
You’ll see that the macro name or icon has been updated according to your specifications. (See Figure 30-10.)
Note
For more information about customizing the ribbon, see Customizing the Project 2010 Ribbon.