
Have you ever thought you were making a simple change to a task, only to find out it caused an unexpected change to several surrounding tasks? You might just increase a duration, change a task link, or add a date constraint to one task, and you find, much to your frustration, that undesirable ripple effects have happened throughout the project.
Such ripple-effect changes happen in your schedule whether tasks are scheduled automatically or manually. With automatically scheduled tasks, it’s important that Project 2010 provide you with needed information when it recalculates aspects of your schedule, or when you have choices as to how a change is to be interpreted in your schedule. With manually scheduled tasks, you need to know when a scheduling change you enter might cause a conflict or ambiguity that will be problematic.
This is where Project 2010 feedback information comes in handy. The change highlighting and Task Inspector pane both provide information to help you see exactly what is changing in your schedule and to help you make the decisions appropriate for your project.
Note
For more information about changing your schedule, see Chapter 10.
When you change a duration in a task that’s in the middle of a series of linked finish-to-start tasks, that one task’s change in duration will affect the start and finish dates for all of its successor tasks.
Likewise, other changes you might make to a task’s schedule—such as a task dependency or a start date constraint—can affect other tasks that are linked with a dependency to this task. To be sure you see the impact of these kinds of changes on the rest of your schedule, by default the changed cells are temporarily filled with a background color, as shown in Figure 6-22.

Figure 6-22. See the ripple effects of scheduling changes you make by reviewing the highlighted cells in a task sheet.
This change highlighting shows only in sheet views such as the Gantt Chart, the Task Usage view, or the Resource Sheet. There is no change highlighting for graphically-oriented task views such as the Calendar view or Network Diagram.
The change highlighting remains in effect until you make the next edit that affects scheduling, at which time the highlighting shifts to those cells affected by the new change. The last set of change highlighting is cleared when you save the project.
By default, change highlighting is light blue. To change the color of change highlighting, follow these steps:
Display the view whose change highlighting color you want to change.
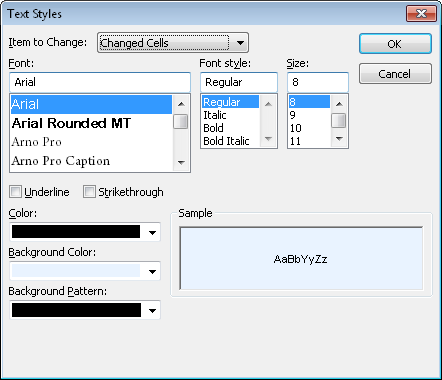
On the Format tab, in the Format group, click Text Styles.
In the Item To Change box, click Changed Cells, as shown in Figure 6-23.
In the Background Color box, select the change highlighting color you want.
If you also want to change the background pattern, select one in the Background Pattern box.
Note
If you don’t want to use change highlighting, you can turn it off by adding the Display Change Highlighting command to the ribbon.
Note
For information about adding commands to the ribbon, see Customizing the Project 2010 Ribbon.
When you first create your project schedule, you start by entering a project start date and setting up a project working times calendar. You add tasks to the project, and then you add scheduling information about those tasks, such as task duration, dependencies, constraints, and task calendars.
In a project made up of automatically scheduled tasks, Project 2010 takes this information and calculates the schedule of each task to ultimately build the full project schedule, complete with start dates and finish dates. Because you’ve entered this other information, you’re freed up from having to figure out the start dates of each task yourself.
In a project made up of manually scheduled tasks, Project 2010 takes a mostly hands-off approach and lets you manage the scheduling. However, it still makes educated guesses about your expectations, based on the schedule information you’ve entered. For example, if you enter a start date of Monday, November 1, and a duration of 2 days, Project 2010 will fill in a finish date of Wednesday, November 3.
If you’re contemplating a change to a task schedule, particularly if you’re trying to shorten the schedule of a particular task, a group of tasks, or the entire project, it’s tremendously helpful to understand which of these scheduling factors were instrumental in determining the start date of the tasks. You can see this easily by reviewing the Task Inspector.
The Task Inspector shows factors responsible for controlling the start and finish dates of the selected task and also indicates whether the task can start any earlier. (See Figure 6-24.)
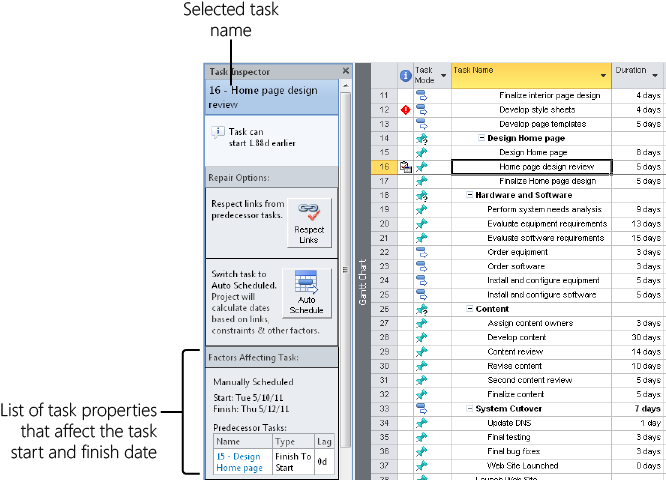
Figure 6-24. Show the Task Inspector to see a list of the factors responsible for setting a task’s start and finish dates.
You can inspect any task in your project. A task might have just a single factor, or it might have three or four. Examples of common task drivers are:
Project start date
Project calendar
Predecessor tasks
Constraint date
Resource calendar
Task calendar
Actual start date
To inspect a task and its scheduling factors, follow these steps:
Display any task view, such as the Gantt Chart, Task Usage view, or Network Diagram.
Click the task whose scheduling factors you want to see.
On the Task tab, in the Tasks group, click Inspect.
The Task Inspector appears in the left pane. The upper portion of the Task Inspector lists any opportunities for shortening the schedule. Below, under Factors Affecting Tasks, the task properties responsible for the task’s scheduling are listed—for example, whether it’s manually or automatically scheduled, the start and finish dates, the predecessor tasks, the project start date, and so on.
You can click the name of a predecessor task to go to that task in the view and see the scheduling factors for that task. You can click the name of a calendar listed in the Task Inspector to open that calendar in the Change Working Time dialog box.
Keep the Task Inspector open while you click different tasks and review their task drivers. When you’re finished inspecting tasks, click the X in the upper-right corner of the pane to close it.
Seeing Scheduling Feedback on Assigned Tasks
Another source of feedback in Project 2010 are the indicators and option buttons that appear when you edit the project plan in certain ways, such as:
Changes to resource assignments
Changes to start and finish dates
Changes to work, units, or duration
Deletions in the Name field
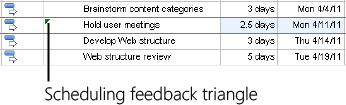
When you make these kinds of changes, a green triangle might appear in the corner of the edited cell of a sheet view such as the Gantt Chart or Task Usage view.
When you move your mouse pointer over the cell containing the feedback indicator, an option button appears.

Click the option button. A message explains the scheduling ramifications of your edit. The message usually gives you the opportunity to change the edit so that the result is closer to your expectation.
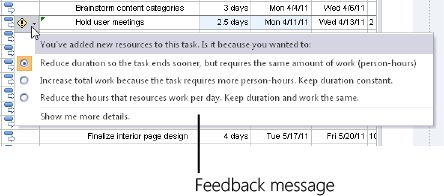
An indicator and button usually appear after a potentially ambiguous edit and provide choices to ensure that you understand the schedule ramifications of the change you’re making.
Note
For more information about using the indicators and option buttons for scheduling feedback, see Changing Resource Assignments.