
It’s likely that many of your work resources will work full-time on your project. However, you might have many others who don’t, for example:
Resources who work part time.
Resources who work part time on your project because they’re being loaned from another group.
Multiple individuals or machines (work resources) that perform the same function.
A resource who will work full-time on your project until October, at which time she will be shared half time with another project that is ramping up then.
All of your work resources will take company holidays off, and most of them will take vacations and other days off throughout the year.
In Project 2010, you can account for these different types of resource availability and working times to schedule resources most effectively and accurately for your project.
The basis of setting the availability of resources on the project is the resource’s working time calendar, also simply known as the resource calendar. Each work resource has an individual resource calendar, which is initially based on the project calendar. You can customize each resource calendar as necessary to reflect the individual resource’s specific working times and days off. Because the resource calendar indicates when a resource is available to work on assigned tasks, it affects the manner in which tasks are scheduled.
Note
For more information about the project calendar, see Setting Your Project Calendar.
Note
If you’re working with enterprise projects and enterprise resources, the calendars are set by the project administrator. In this case, your ability to assign different calendars to resources might be limited.
As soon as you create a resource, the project calendar is assigned by default as the resource’s working time calendar. To view a resource’s working time calendar:
Display the Resource Sheet or other resource view.
Click the resource whose working time calendar you want to view.
On the Resource tab, in the Properties group, click Information.
You can also simply double-click a resource to open the Resource Information dialog box.
On the General tab in the Resource Information dialog box, click the Change Working Time button.
You can also open the Change Working Time dialog box from the ribbon. On the Project tab, in the Properties group, click Change Working Time.
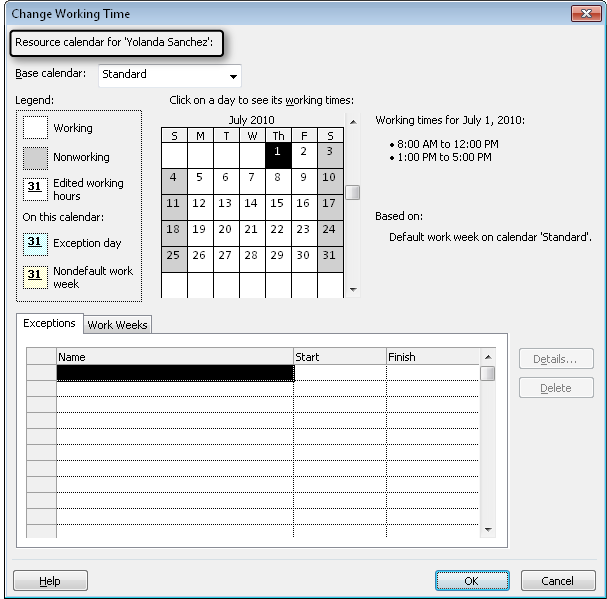
The working time calendar for the selected resource appears, as shown in Figure 7-11. The resource calendar is identical to the project calendar until you change it.
To see the working times for a particular day, click the date in the calendar thumbnail. The working times for that day appear to the right of the calendar.
To see the working times and days off for a typical week, click the Work Weeks tab. Be sure that the [Default] row is selected, and then click the Details button. In the Select Day(s) box, click the day of the week to see the working times in the grid to the right. When you are finished, click OK or Cancel.
Click OK or Cancel in the Change Working Time dialog box, and then click OK or Cancel in the Resource Information dialog box.
Project 2010 comes with three base calendars: Standard, Night Shift, and 24 Hours. These base calendars are like calendar templates that you can apply to a set of resources, a set of tasks, or the project as a whole.
You can apply the base calendar you want for a resource. If most of your team work a standard 8:00 A.M. to 5:00 P.M. day shift, you can keep the Standard calendar as the basis for their working time calendar. If others on your team work a graveyard shift, you can apply the Night Shift base calendar to those resources. To change which base calendar is applied to a resource, follow these steps:
In the Resource Sheet or other resource view, double-click the resource whose base calendar you want to change.
On the General tab in the Resource Information dialog box, click the Change Working Time button.
In the Base Calendar box, click the name of the base calendar you want to use as the basis of the current resource’s calendar.
Click OK in the Change Working Time dialog box, and then click OK in the Resource Information dialog box.
You can change an individual resource’s calendar to reflect a different work schedule from others on the project team. For example, most everyone on your team might work Monday through Friday, 8:00 A.M. until 5:00 P.M. But suppose one team member works just three days a week, and another team member works weekend nights. You can change their resource calendars to fit their actual work schedules. This way, their assigned tasks will be scheduled only when they’re actually available to work on them.
A resource might need an alternative work week specified for a particular period of time. One example might be a trainer working a combination of day, swing, graveyard, and weekend shifts throughout the next two weeks to train individuals on those shifts.
You can also update resource calendars to reflect team member work week exceptions such as vacation time, personal time off, sabbaticals, and so on. Updating the resource calendars helps keep your schedule accurate.
Note
For more information about changing base calendars, including specifying the normal work week, alternative work weeks, one-time calendar exceptions, and recurring calendar exceptions, see Modifying a Base Calendar.
If you find you’re making the same modifications to individual resource calendars repeatedly, you might do well to create an entirely new base calendar and apply it to the applicable resources. If you have a group of resources who work a different schedule—for example, a weekend shift or “four-tens”—create a new base calendar and apply it to those resources.
Note
For details, see Creating a New Base Calendar.
When you create a new base calendar, it becomes available in any of the three calendar applications: project calendar, task calendar, or resource calendar. To apply the new base calendar to a resource, follow these steps:
Display the Resource Sheet or other resource view.
Double-click the resource to whom you want to assign the new base calendar.
In the Resource Information dialog box, click the Change Working Time button.
In the Base Calendar field, select the base calendar you want to apply to the selected resource.
Make any additional changes to the calendar as needed for this resource.
These changes apply only to the selected resource; they do not change the original base calendar.
Suppose that your team includes three full-time resources, one half-time resource, and another who is available three days each week or 60 percent of the time.
You can specify this kind of resource availability by setting the resource’s maximum units, which you might also think of as resource units.
By definition, the full-time resources are each available at 100% max units. The half-time resource is available at 50% max units. The other part-timer is available at 60% max units. When you assign resources to tasks, those tasks are scheduled according to that resource’s availability and indicates the point when the resource is considered overallocated.
But 100 percent or 50 percent of what, you might ask? The max units setting is multiplied by the availability shown in the resource calendar of working time and days off to determine the maximum level of availability of this resource for this project. If a resource calendar reflects a 40-hour work week, then 100% max units means a 40-hour work week for this project, while 50% max units means a 20-hour work week for this project. (See Figure 7-12.)

Figure 7-12. Given the same 40-hour-per-week resource calendar, a 100% max units resource works 8 hours per day, and a 50% max units resource works 4 hours per day.
Likewise, if a resource calendar reflects a 20-hour work week, then 100% max units means a 20-hour work week while 50% max units for this resource is a 10-hour work week. Again, max units play against the resource calendar. Figure 7-13 illustrates the schedules for these two scenarios.

Figure 7-13. Given the same 20-hour-per-week resource calendar, a 100% max units resource works 4 hours per day, and a 50% max units resource works 2 hours per day.
Here’s another scenario: suppose that you have three engineers, two architects, and four drafters, all working a full-time schedule. Instead of naming them individually, you decide you want to name your resources by their functions and consolidate them into a single resource representing multiple individuals. You can do that with max units as well. The three engineers together are available at 300 percent, the two architects at 200 percent, and the four drafters at 400 percent.
If you have three full-time drafters and one half-time drafter, your Drafter resource is available at 350% max units.
To enter max units, simply type the percentage in the Max. Units field in the Resource Sheet. (See Figure 7-14.) The default for the Max. Units field is 100%.

Now suppose that your staffing plan specifies that you’ll start the project life cycle needing four drafters. After three months, you’ll need only three drafters. Two months later, you’ll need only one. To specify variable resource quantity or availability over time, follow these steps:
In the Resource Sheet, double-click the resource whose maximum units you want to adjust.
The Resource Information dialog box appears. Make sure the General tab is displayed.
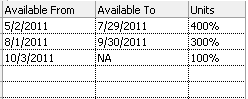
In the Resource Availability table, enter the first date range for the resource’s first max units specification.
That is, enter the beginning date in the first Available From field, the ending date in the first Available To field, and the max units that will be available during those dates in the Units field. For example, in the first row enter 5/2/11 under Available From, enter 7/29/11 under Available To, and enter 400% under Units.
In the second row, enter the second date range for the resource’s max units specification.
For example, enter 8/1/11 under Available From, enter 9/30/11 under Available To, and enter 300% under Units.
Continue in this manner until your entire resource availability specification is set.
For example, enter 10/3/11 under Available From, leave NA in the Available To field, and enter 100% under Units. (See Figure 7-15.)
NA in the Available From field indicates that there is no start date to the availability. Likewise, NA in the Available To field indicates that there is no set end date to the availability. NA is the default availability specification.
Note
By default, max units are expressed as a percentage. You can represent them as a decimal if you prefer. On the File tab, click Options, and then click Schedule in the left pane. In the Schedule section, in the Show Assignment Units As A box, select Decimal. Now, instead of 100%, one full-time resource is shown as having 1 max unit.
Note
You can enter max units with varying availability and a customized resource calendar for equipment resources just as you can for human resources. Both equipment and human resources are considered work resources. Setting equipment working times and availability can help account for other projects using the same equipment at different times and can schedule downtime for preventive maintenance.