In this chapter, you will:
Learn when a section break is (or is not) required
Discover tips for simplifying section formatting
Learn how to easily manage section breaks, headers, and footers
Harried by headers? Frustrated with footers? Is your page orientation disoriented, or your footnote numbering failing to number?
From page borders to watermarks to text columns to page orientation, section formatting can be one of the easiest components to manage in Microsoft Word documents. Ironically, it’s also one of the most common areas where people get frustrated.
If you’re among the many Microsoft Word users who has ever experienced stress from section breaks, headers and footers that appeared to change against your will, page orientation that refused to change at all, or any other section formatting foibles, now is a good time to take a deep, cleansing breath. There’s a reason, and a simple solution, for just about any of the aforementioned issues.
One of the quickest and most common ways to overcomplicate your document formatting is to use too many section breaks. Remember, a section break stores the formatting for the section that precedes it. So, every break you insert is another set of formatting you add to the document.
That’s not to say that using section breaks is bad. Like many features, section breaks are a useful, simple, and stable solution when used properly. After all, the ability to change page layout formatting for just part of the document is an essential component of most complex documents, and even some that aren’t so complex. So, don’t hesitate to use section breaks in any instance where you know they’re the simplest solution for the task.
So, when is a section break necessary? Table 11-1 tells you when a section break is required to change the formatting for just part of the document.
Table 11-1. Features that require section breaks
A section break is required | A section break might be required |
|---|---|
Page margins | Headers, footers, and watermarks (in Word for Mac 2011 Publishing Layout view, this is known as Master Pages) |
Page orientation | Restarting footnote, endnote, and line numbering |
Paper size | |
Paper source (that is, printer tray) | |
Vertical alignment of the entire page | |
Page borders | |
Page, footnote, or endnote number format | |
Text columns |
The items in the second column of Table 11-1 are most definitely section formatting, but they offer some options that don’t require a section break, as follows:
There are four types of headers and footers, and each section can display as many as three of those. Note also that watermarks are included in Table 11-1 because they are inserted on the header and footer layer, so they’re part of headers and footers.
Note
See Also To figure out when to use a different type of header or footer instead of adding a new section, see Using Headers and Footers, later in this chapter.
Footnote, endnote, and line numbering can all be restarted either by page or by section. Note, however, that suppressing line numbering for a portion of the document requires a section break.
If it isn’t listed Table 11-1, it doesn’t require a section break in Word. Here are some common examples of unnecessary section break use:
When you just need to start a new page, do not use a section break. Use a page break or Page Break Before paragraph formatting. Page breaks and section breaks are never interchangeable. A section break adds a set of formatting to the document; a page break is nothing but a nonprinting character and stores no formatting.
To access page breaks in Word 2010, on the Page Layout tab, in the Page Setup group, click Breaks (or press Ctrl+Enter). In Word 2011, on the Layout tab, in the Page Setup group, click Break. Page Break Before formatting is paragraph formatting (available on the Line And Page Breaks tab of the Paragraph dialog box). Because it’s formatting (rather than a formatting mark), you can include it in a paragraph style, so it’s often more efficient and easier to use than inserting a page break.
Note
See Also Look at the sidebar that follows this list, Page Breaks vs. Page Break Before Formatting, for more information on working with page breaks and Page Break Before formatting. For tips about using font and paragraph formatting to manage page layout, also check out Chapter 7.
Starting a new multilevel list or list style never requires a section break. This is paragraph-level formatting.
Inserting a table or a graphic object never requires a section break.
Inserting reference tables, such as tables of contents or indexes, never requires a section break. The reason you’ll often see section breaks before or after reference tables is that it’s common to use unique page number formatting for pages containing reference tables (such as lowercase roman numerals). It’s the page number format change, not the reference table itself, that requires the section break.
Note
In versions of Word for Windows prior to Office 2003, a section break was required to change document protection settings for just part of the document, but that is no longer true. However, in Word for Mac, a section break is still required in this case.
In addition to the preceding examples, people often use section formatting where a simpler solution exists. Consider the following cases:
If you need text in multiple columns on a portion of the page, but the text does not need to wrap from one column to the next, a table is a simpler solution than text columns, because a table requires no section breaks.
If you need to change margins for just a few paragraphs, changing paragraph indents is much simpler than changing page margins. Indents are paragraph formatting, so they can be stored in a style. And paragraph formatting never requires a section break.
In a contrasting example, say that a table is too wide for a portrait page. In that case, using a section break to change page orientation for the page containing the table is most likely the best solution (unless the content of the table can be reduced in size without affecting readability). If you instead took a screenshot of the table and then pasted it back into the document as a picture so that you could rotate it on its side, that would be a far more complicated solution than a simple section break.
On the Home tab or Page Layout tab, in the Paragraph group, click the dialog launcher to open the Paragraph dialog box. (In Word 2011, on the Format menu, click Paragraph).
On the Line And Page Breaks tab, click Page Break Before.
Notice that when you apply Page Break Before formatting (or any pagination options from the Line And Page Breaks tab), a small black square appears outside the left margin on any paragraph to which this formatting is applied (when formatting marks are displayed in your document). This formatting mark (or nonprinting character) indicates that pagination formatting is applied.
Note
See Also As introduced in Chapter 1, and discussed in detail in Chapter 6, the simplest solution is always best. Though you should never put anything in the document that doesn’t need to be there (such as an unnecessary section break), don’t be afraid to use the capabilities of the software. For more on how to determine the simplest solution for a given task in Word, see Chapter 6. For more tips on when using Page Break Before versus page break characters is the best approach, see Chapter 7.
Rule number one: when you’re working with section breaks, work with formatting marks visible. If you can’t see section breaks, you can’t manage them effectively. To turn on formatting marks, on the Home tab, in the Paragraph group, click the paragraph icon. (In Word 2011, the paragraph icon is available on the Standard toolbar.)
Note
In Word 2010, you can also use the keyboard shortcut Ctrl+* to toggle formatting marks on and off. However, note that the asterisk on the number keypad does not work for this shortcut.
When viewing formatting marks, a complete section break looks like Figure 11-1.
Because there are different types of section breaks (as discussed in the section Understanding Section Break Types, later in this chapter), the break type (such as Next Page, shown in Figure 11-1) might vary, but your section breaks will otherwise look like Figure 11-1. For Word 2011, the only difference in the appearance is that formatting marks appear in blue.
People often complain that they tried to change page orientation, paper size, or other section formatting for part of the document, but the formatting they changed was applied to the wrong part of the document. This behavior is not a bug. If it has happened to you, your insertion point was simply in the wrong section of the document.
Note
It’s also helpful to keep track of which section you’re currently working in by viewing the section number on the Status bar. If you don’t see Section: # toward the left side of the status bar, in Word 2010, right-click the Status bar and then click Section to add this option. In Word 2011, this feature automatically appears on the Status bar.
Keep in mind that section breaks can be partly or entirely hidden after a paragraph mark when you’re viewing the document in Print Layout view. A partially hidden section break might look something like Figure 11-2. The section break in this case is the double line that follows the paragraph mark.
If you can’t see section breaks easily, view the document in Draft view. Section breaks (as well as page and column breaks) always appear fully across the page in Draft view. When working with section formatting, you might find it helpful to switch back and forth between Draft view and Print Layout view. You can see section breaks clearly in Draft view and the page layout formatting that those breaks enable in Print Layout view. In addition to using the View tab or the view shortcuts on the Status bar to switch between these views (View menu or Status bar options in Word 2011), you can use the keyboard shortcut Ctrl+Alt+P (Command+Option+P in Word 2011) to change your view to Print Layout, and Ctrl+Alt+N (Command+Option+N) to change your view to Draft.
Keeping an eye on your section breaks, however, is just one component of keeping section formatting simple. The key to managing sections easily is to understand how section formatting is stored.
A section break stores the formatting for the section that precedes it. So, if a section break is deleted, section formatting applied to the section that preceded that break will change to match whatever section formatting is stored in the next available break. Note that in a single-section document, section formatting is stored in the last paragraph mark.
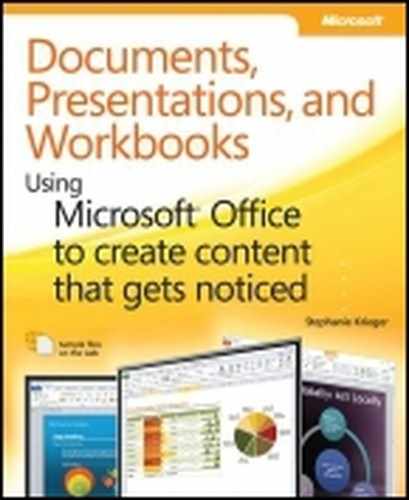
Take the sample pages shown in Figure 11-3, for example. As you can see, Section 1 of this two-section document uses portrait orientation and Section 2 uses landscape orientation. If the section break between these sections is removed, will the entire document become portrait or landscape?
If you answered landscape, you’re correct. When you delete the section break that follows the portrait section, you delete the portrait orientation setting that was stored in that section break. The pages that were in the section before the break become part of the next section (the only remaining section, in this case) when the break is deleted.
Caution
Before deleting any section break, take note of all differences in section formatting between the sections before and after the break. Remember, after you delete a break, all section formatting in the section that precedes the break will change to the formatting saved in the section that follows the break.
To change any section formatting, simply place your insertion point directly before the location where you want the change to start and then follow these steps:
On the Page Layout tab (the Layout tab in Word 2011), in the Page Setup group, click Break(s) and then click the section break type that you need. Because most section formatting changes require a new page (such as page orientation or headers and footers), Next Page is the most frequently used section break type.
Place your insertion point anywhere after the section break. Then, change the section formatting you need to change.
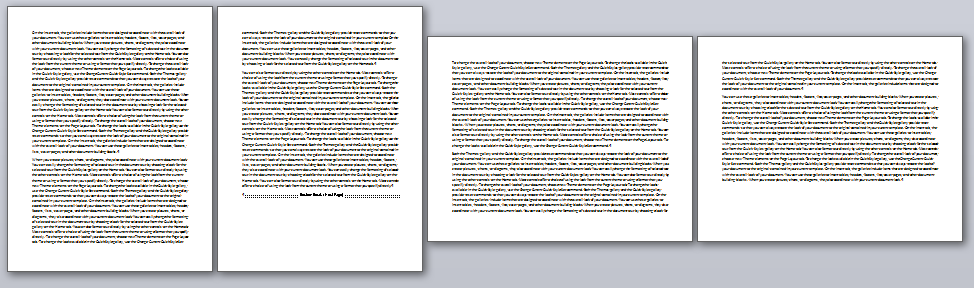
There are four types of section breaks, as listed in the portion of the Breaks gallery shown in Figure 11-4. Further information about each section break type is provided in the list that follows.
A Next Page section break, as mentioned earlier, is the most common type of section break. This break starts the new section on a new page.
A Continuous section break starts the new section immediately after the break.
Though section formatting that requires a new page will still start on the next page when this break type is used, for best results use Next Page section breaks for this kind of formatting. For example, if you use a Continuous section break in a document that uses Different First Page headers and footers, the different first page header or footer will not appear in a new section at all because the first page of that section is not a complete page. Continuous section breaks are most often used with the text columns feature.
Odd Page and Even Page section breaks start the new section on a new page, but they force that section to start on either an odd or an even page, respectively.
These options are designed primarily for book-style formatting, such as where you might want each new chapter to begin on a righthand (odd) page. To learn more about creating book-style formatting, see the section Simplifying Book-Style Page Layout, later in this chapter.
As explained earlier, a section break stores formatting for the section that precedes the break. However, information about the type of section break is stored in the section that follows the break. This is because the type of section break actually refers to the way the section after the break starts, known in Word as Section Start type.
So, to change the section break type for an existing section break in your document:
Place your insertion point after the break you want to change. It can be anywhere in the section that follows the break.
On the Page Layout tab, in the Page Setup group, click the dialog launcher to open the Page Setup dialog box, and then click the Layout tab. (In Word 2011, on the Format menu, click Document, and then click the Layout tab.)
In the Section Start list, change the setting to the break type you want. For example, to change a Continuous break to a Next Page break, select Next Page as the Section Start type and then click OK.
As introduced earlier, a Word document contains four types of headers and footers. In addition to the regular header and footer, your document has options for First Page, Odd Page, and Even Page headers and footers.
Note
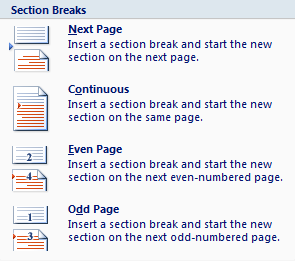
Unique first-page formatting is also available for page borders, as you can see in the Apply To list on the Page Borders tab of the Borders And Shading dialog box, shown in Figure 11-5. Selecting First Page Only or All Except First Page does not affect the Different First Page header and footer setting.
The quickest way to edit or add a header or footer is to double-click in the header or footer area while working in Print Layout view. (In Word 2010, you can also right-click in that area for the options to Edit Header or Edit Footer. And, in Word 2011, you can access the Header And Footer settings from the View menu.)
Note
In addition to creating your own header and footer content, you can also select a formatted Header or Footer from the applicable building block gallery (called the document element gallery in Word 2011). Find header and footer building blocks on the Insert tab in Word 2010 and the Document Elements tab in Word 2011. At the bottom of the galleries in Word 2010, get another entry point for editing the header or footer, as well as access to additional building blocks, on Office.com.
If you’re creating templates in Word 2010, these building blocks can be particularly useful because you can create and save your own building blocks so users can easily coordinate elements of content such as headers and footers. But whether you’re working in Word 2010 or Word for Mac 2011, the built-in building blocks show off some features you might want to take advantage of (such as controls that enable you to automatically populate document content) and some you might want to avoid (such as using floating objects where simpler solutions exist).
Note
See Also To learn about working with document building blocks, see Chapter 12.
Aligning Content in the Header or Footer
When you have your insertion point in a header or footer, notice that the Header and Footer paragraph styles still contain the antiquated center and right tab stops. The problem with these tab stops is that, if you change the margins or page orientation, the tabs do not move. So, for example, a center tab that’s centered in the page between default left and right margins is no longer centered when you change the margins. To keep your formatting as clean and easy as possible, remove these tab stops from the styles in the document template so you don’t have to fuss with them in new documents.
Note
See Also Get help for updating template styles in Chapter 8.
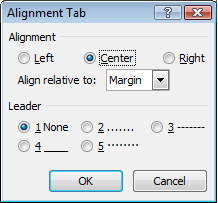
The Header & Footer Tools Design tab in Word 2010 has an option called Insert Alignment Tab, which enables you to use tab characters to center and right-align text. These characters keep the text centered or right-aligned when margins or orientation change. When you use alignment tabs, you see no tab stop on the ruler or in the Style Inspector. But you can’t include alignment tabs in paragraph styles, because they are nonprinting characters, not formatting. (Note that the ScreenTip for the Insert Alignment Tab feature incorrectly states that the feature adds a tab stop.)
The upside to using alignment tabs is that, if you have sections with different margins or orientation that include headers or footers using Link To Previous, the content will be correctly aligned for each section without turning off Link To Previous and independently aligning content. But because alignment tabs aren’t stored in a paragraph style like formatting or visible on the ruler, the downside is that they might be a bit confusing to document editors.
To insert an alignment tab, click Insert Alignment Tab, select your preferences from the options shown in Figure 11-6, and then click OK. A tab character will be added at your insertion point. When you’re using alignment tabs, it’s particularly important to remove the default center and right tabs to avoid user confusion.
If you don’t need to link headers and footers between sections with different orientation or page margins, using a simple table to left-, center-, or right-align content on the same line in a header or footer is still the simplest and best solution. In a table, you can position content in left, center, and right cells independently—both horizontally and vertically—for more flexibility. And you can set the table to 100% of the active window so that it automatically adjusts to changes in margins, page size, or orientation. A table is also a well-known object type that users can easily edit.
Note
SeeAlso For help setting up tables for use in headers and footers, see Chapter 9.
Note that the Alignment Tab feature is available only from the Header & Footer Tools Design tab. However, you can add it to your own Ribbon or Quick Access Toolbar if you want to use this feature outside the header and footer. Also note that alignment tabs are not available in Word for Mac 2011, but Word 2011 does support the feature (that it, it displays content correctly) when you open a document that contains alignment tabs.
As you might already know, an automatic page number is a field code—dynamic content that enables it to display the correct page number on each page. You can specify formatting for page numbers by section (such as number format, and whether to restart or number continuously throughout the document) and you almost always place page numbers in the header or footer so that the correct number appears on each page. Simple, right?
Page numbering certainly can be simple, but there are also a couple of best practices you can employ to help keep them that way.
Because a page number is just a field code, you can format it just like any text. So, the best way to insert a page number into your header or footer is just to insert the field code itself.
To do this in Word 2010, on the Header & Footer Tools Design tab, in the Page Number gallery, point to Current Position and then select from the simple formats that add just the page field with or without text at the insertion point.
To do this in Word 2011, on the Header & Footer tab, under Insert, click Page Number.
The Page Number gallery in Word 2010 provides a variety of options, but be careful when making your selection. Some of these options place the page number field inside a floating graphic object when it’s not needed, causing you more work than necessary. The only time you need a page number to sit in a text box is when you need it to be outside the header and footer portion of the header and footer layer (such as to appear as a page tab that’s vertically centered outside the left or right margin). For example, to simply place a page number outside the left or right margin in the header or footer, using a negative paragraph indent in the header or footer style (or a negative indent on a table that resides in the header or footer) is a simpler solution than having to position and manage a floating object.
Similarly, the Insert Page Numbers dialog box in Word for Mac 2011 places the page number in a text frame—a floating object that is completely unnecessary, because the page number simply sits by default on the text baseline in the header or footer. Text frames can greatly complicate your work and are best to avoid even when you’re working in Publishing Layout view, where everything is a floating object. To insert a page number when working in Publishing Layout view, on the Insert menu, click Field and then select the Page field. (Note that your insertion point must be in a text box to access the Field dialog box.)
Note
See Also For tips on when to use text boxes versus paragraph formatting or tables, as well as information that addresses key issues with text frames, see Chapter 10.
Regardless of how you insert page numbers, customize page number formatting through the Page Number Format dialog box, where you can change number format, set numbering to restart or continue with each new section, or set a specific Start At value for the active section. To access this dialog box in Word 2010, at the bottom of the Page Number gallery, click Format Page Numbers. In Word 2011, at the bottom of the Insert Page Number dialog box, click Format.
When you need a unique header or footer just for the first page of a document or section of a document, you usually don’t need to add a section break. On the Header & Footer Tools Design tab (the Header And Footer tab in Word 2011), in the Options group, just click Different First Page. This option gives you an additional header and footer for just the first page of the active section.
Tip
Though it’s not technically necessary to add a section break when you need a unique header or footer for just the first page of a document or section, consider your content. If the first page of the section is clearly separate content (such as a single-page chapter of a book), it might be more logical to use a section break rather than the Different First Page option. In the example given here, that single-page chapter could grow longer, in which case the first page header and footer would no longer be a good solution. Additionally, if you have section breaks between most chapters, you might prefer to put one here as well for consistency, to make the formatting more intuitive to other editors.
Similarly, when you need different headers and footers for odd and even pages (such as book-style formatting that requires headers and footers to appear on the outside of all pages), find the Different Odd & Even Pages option directly below Different First Page in the Options group on the Header & Footer Tools Design tab (or the Header And Footer tab in Word 2011). Unlike Different First Page, however, Different Odd & Even Pages can be enabled or disabled only for the document, not for individual sections.
Note that the Odd Page header and footer and the regular header and footer are actually one and the same. When Different Odd & Even Pages is enabled, the regular header and footer content becomes Odd Page header and footer content. If this option is disabled, Odd Page header and footer content becomes the regular header and footer content.
You can identify the type of header or footer that’s active by the name on the tab that appears at the bottom of headers and the top of footers in Word. For example, in Figure 11-7, the insertion point is inside a First Page header.
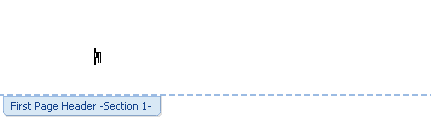
Notice that the tab indicates the type of header or footer. In documents containing more than one section, such as in the example shown in Figure 11-7, the tab also indicates the section number.
Note
There’s a labeling error on the Header And Footer tab in Word for Mac 2011 that warrants mention. In the Navigation group on that tab, the Next Section and Previous Section buttons actually mean next or previous header or footer. These buttons are the same as the Next and Previous buttons on the Header And Footer toolbar in previous versions (as well as the Next and Previous buttons on the Header & Footer Tools Design tab in Word 2010), moving one header or footer at a time through the document.
The Link To Previous feature, which also appears on header and footer tabs as Same As Previous, has been the scourge of many a document. As it happens, this feature has no bugs; there’s nothing at all wrong with it. But if you don’t understand what it’s doing, it is quite likely to drive you mad.
Here’s the theory: just because you start a new section doesn’t mean you want a new header or footer. It’s common to need the same header and footer throughout a document that contains several section breaks for reasons such as page orientation or page border changes. So, to save you work, headers and footers default to be linked. That way, if you change the header in one section, it automatically changes in every connected section where Link To Previous is enabled.
Here’s the reality: you forget that Link To Previous is enabled, and you change the header or footer for the new section. So, the change is also made in the previous section, and you might not even realize it until later, when all of your headers and footers are a mess.
Note
Word 2011 Publishing Layout view is an exception to this rule. New masters are not linked to previous by default. However, the option to link them is available on the Layout tab in Master Pages view.
So, what do you do? You make it a habit to check for the Same As Previous notation on the header or footer tab. In Word for Mac 2011, this information appears on the same tab that tells you the type of section break and the section number, as addressed earlier and illustrated in Figure 11-7. In Word 2010, Same As Previous, when it is enabled, appears on a separate tab on the right side of the header or footer, as shown in Figure 11-8.

But there’s a catch. Just because the active header or footer doesn’t show the Same As Previous notation doesn’t mean that the next header or footer isn’t linked to the one you’re about to change. For example, Figure 11-8 shows a header linked to the previous section. If you were to look at the header of Section 1 in that document, it would not indicate a link to previous (because there is no header before Section 1), but changing that header would change the one you see in Figure 11-8.
To keep things simple, before making changes to headers and footers in a multisection document, always make it a habit to scroll through headers and footers both before and after the existing header and footer to check for Same As Previous.
Also note that newly added sections, or newly added headers and footers within sections, will always have Link To Previous enabled. So, if you turn off Link To Previous throughout your document and later add a new section, be sure to once again check for Link To Previous before making header or footer changes.
Caution
Keep in mind that Link To Previous is managed separately for each header and each footer. If you turn off Link To Previous for a given header, the corresponding footer is not changed.
Note
Companion Content When working on a long document that requires unique headers and footers for most sections, you can use a macro to turn off Link To Previous throughout the document as a nice timesaver. You can download a document containing this macro and others from the Chapter23 sample files folder available online at http://oreilly.com/catalog/9780735651999.
Managing book-style page layout often seems more complex than it is, simply because Word offers several options that serve the same or similar purposes. The main differences between book-style and standard page layout are allowances for binding and two-sided printing. Specifically, pages that are printed on two sides and bound may require additional space between the margin and the binding edge, and they may have unique header and footer requirements for facing pages.
The unique header and footer requirements can be resolved using the Different Odd & Even Pages setting discussed earlier in this chapter. Table 11-2 explains the options available to accommodate binding.
To access these options in Word 2010, on the Page Setup tab, in the Page Setup group, click the dialog launch icon to open the Page Setup dialog box. Find these options on the Margins tab of that dialog box. Mirror Margins and Book Fold are available on the Multiple Pages list; Gutter is provided as part of the margin options.
To access these options in Word 2011, on the Format menu, click Document. On the Margins tab of that dialog box, you see a check box for Mirror Margins and see the Gutter option in the margin settings. The Book Fold option is not available in Word 2011.
Table 11-2. Page setup options to accommodate binding
Option | When and how to use it |
|---|---|
Gutter | When a document is bound, it might require additional space beyond the margin on either the left or top edge to accommodate the binding. This space is called the gutter. Word provides Gutter and Gutter Position options where you can set the width of the gutter and specify its position to be the left or top edge of the page. Note that there is no difference in resulting behavior between increasing the left or top page margin and adding a gutter. |
Mirror Margins | This option changes your left and right page margins to inside and outside margins, so that facing pages have equal margins inside (by the binding) and at their outside edges. Note that using a gutter with facing pages will automatically position the gutter at the inside page edge. Though the majority of options in the Page Setup dialog box (the Document dialog box in Word 2011) can be changed for individual sections, this option (and other options on the Multiple Pages list in Word 2010) applies to the entire document. |
Book Fold | Similar to Mirror Margins, Book Fold is an option in the Multiple Pages list in Word 2010 and can be set only for the entire document. Book Fold also changes margins from left and right to inside and outside. However, this option reorders pages for printing based on a folded booklet binding. When you select Book Fold, you must specify the number of pages in the booklet. Word then reorders the pages as needed to print correctly for folded binding. |
Note
If you use Office 2010 and you need to create booklet-style documents for complex book fold layouts, you might find Microsoft Publisher 2010 to be a simpler solution for this type of document.
Note
Companion Content For an introduction to some key features of Publisher 2010, see “Should I Consider Microsoft Publisher for My Document?”, available in the Bonus Content folder as part of the online companion content for this book, at http://oreilly.com/catalog/9780735651999.
As mentioned earlier, watermarks reside on the header and footer layer. A watermark usually uses the space between the header and footer, though it can use the entire space of the header and footer layer. A watermark in this context is simply content that sits behind the body of the document and is typically washed-out so as not to obscure the content.
The best advice for creating a watermark in Word 2010 or Word 2011 is not to use the Watermark feature. Whether you use the Watermark gallery in Word 2010 or the Printed Watermark dialog box (called the Insert Watermark dialog box in Word 2011), any text watermark uses the legacy version of WordArt, which has far more limited capabilities than the current version. Additionally, if you need more than one watermark in your document, whether text or image, you might find the task daunting, to say the least. And there’s just no reason for it to be that difficult.
To create a watermark, just insert a text box or image on the header and footer layer, apply any formatting you need, rotate the object if desired, and position it behind text. Because the object will be anchored to the header or footer, it becomes part of that header or footer—meaning that applying a different first page or different odd and even header or footer, or a new section, gives you the opportunity to have a different watermark if you choose.
Note
See Also For help placing text boxes and images to use as watermarks or for other uses in your document, see Chapter 10. To learn about working with the new WordArt (also called text effects) in Word 2010 and Word 2011, see Chapter 7. To learn about improved picture formatting tools, such as the ability to adjust the qualities of an image (as you might when setting it as a watermark), see Chapter 5.