In this chapter, you will:
See what’s new in PowerPoint for creating presentations
Understand the evolution of PowerPoint design templates
Learn about the relationship between themes and masters
Get best-practice tips for creating documents that live in PowerPoint
Discover ways to simplify working with masters and layouts
Understand how to effectively create, customize, and use slide layouts
Learn to effectively manage slide elements from text to embedded Word tables
Find tips for managing and sharing slides
Microsoft PowerPoint has come a long way in recent years. The previous release (for both Windows and Mac OS) introduced a tremendous amount of new functionality (such as themes and customizable slide layouts, just for starters), giving you more power over your presentations and more flexibility. Today, PowerPoint 2010 and PowerPoint for Mac 2011 bring further advances, ranging from multimedia tools to slide show formatting to technologies that simplify both working with and presenting to others.
So, if the program is that fabulous, why are you still frustrated?
If you are, have no fear—it’s not just you. Of course it’s good to have more options and better tools. But they’re not always intuitive at first glance, especially when there is a lot of change all at once. Sometimes it just feels easier to do what you’ve always done and disregard the new stuff or do everything manually. But then you just keep getting frustrated because, well, PowerPoint can’t read your mind.
Fortunately, it doesn’t have to be that way. Using the tools provided for the task is almost always the best way to go, and it doesn’t have to take a great big learning curve to get there.
Yes, I am a die-hard PowerPoint fan. This program is cool, powerful, fun to use, and it just keeps getting better. But, like any software program, it’s also not perfect. So, the PowerPoint chapters of this book will show you how to make the most of key features that will simplify your work and give you the power you need to create incredible presentations. They’ll also give you a heads-up about the occasional pitfall.
To begin, this chapter is where you’ll find the nuts and bolts. We’ll look at core concepts for how the pieces of a presentation fit together—from theme to master to layout to slide. And we’ll explore best practices for how to work with each of these elements to create exactly the presentations you want.
Note
See Also In the three chapters that follow, learn about working in PowerPoint with presentation graphics (Chapter 14), multimedia (Chapter 15), and creating great slide shows (Chapter 16).
If you’re coming to Microsoft Office 2010 or Office for Mac 2011 from Office 2007 or Office 2008 for Mac, you might already be familiar with the enormous amount of change that occurred in those releases, and all you need to know in this section is what’s new for the current release. But if you’re coming from an earlier version of PowerPoint on either platform, the heading of this section might seem a bit misleading. That is, the list provided here will appear very short relative to all the changes you see.
Either way, stick around. Major features like themes and customizable layouts that were added in the last release are covered in this chapter. But because there is a lot that’s brand-spanking-new to everyone, this section provides a quick introduction for features applicable to this chapter that were first introduced in PowerPoint 2010 and 2011.
Note
This is far from a complete list of new features for PowerPoint 2010 or PowerPoint 2011. New and improved features for presentation graphics, multimedia, and slide shows are covered in the chapters that follow. This chapter is concerned specifically with features for creating and managing slide presentations.
Some of the most common frustrations about working with others have been addressed in this release, with the addition of some impressive technology and some simple, handy tools:
When you save your presentations to the cloud—either in a Windows Live SkyDrive folder or a Microsoft SharePoint 2010 library—you can take advantage of new coauthoring capabilities. Among other things, this feature enables you to simultaneously edit the same presentation with other people who are using PowerPoint 2010 or PowerPoint 2011.
Note
See Also To learn about saving your files to the cloud and what you can do with them when you get there, including an introduction to the free Windows Live SkyDrive, see Chapter 2. In that chapter, also find help for getting started with coauthoring and learn more about this technology as well as other important tools you’ll find online, such as PowerPoint Web App.
The new Slide Sections feature is simple and can be very useful, particularly when you’re working on a presentation with others. It enables you to organize slides within a presentation into groups that you name. Use it to simplify tasks, such as assigning slides to individuals on a group project or quickly printing a set of related slides.
Note that Microsoft Word enthusiasts shouldn’t get too excited about this feature’s poorly chosen name, lest you risk being disappointed. Slide sections have no relationship to what you know as sections in Word. The sections tool in PowerPoint doesn’t manage any formatting. It is solely about helping you keep your presentations organized.
Note
See Also Learn more about slide sections in the section Managing Slides, later in this chapter.
The Compare And Merge feature is back in PowerPoint for Windows in this release (after a hiatus in the previous version) and new to PowerPoint for Mac. This feature enables you to compare two presentations and review the differences to accept or reject changes.
Note
See Also Learn more about working with the Compare And Merge feature in the section Managing Slides, later in this chapter.
One exciting new exclusive feature in PowerPoint 2010 is a multimedia feature, but it’s really about giving you an easy (and pretty slick) way to share your presentations, so it warrants a mention here. The new Create A Video feature quickly creates a video of your presentation that includes media playback, animations, transitions, and (if you choose) your narrations, timing, and use of the new laser pointer tool (also a PowerPoint 2010 exclusive). Just tell PowerPoint to do its thing and then get back to work while it creates the video in the background.
Note
See Also For more about this tool, see Chapter 15. And for more on slide show tools such as narrations, timing, and the laser pointer, see Chapter 16.
Note
Unfortunately, the slightly sad Save As Movie feature in PowerPoint 2011 isn’t new, and it isn’t the same as the Create A Video tool in PowerPoint 2010. Save As Movie doesn’t include your narrations, and isn’t compatible with much of your media or the snazzy new and improved animations and transitions. For information about various presentation sharing options, see Chapter 15.
You might already know that you can save your slides as pictures in both PowerPoint for Windows and PowerPoint for Mac. That feature creates a folder containing an image file for each slide. But PowerPoint 2010 introduces one more nice little exclusive with Save As Picture Presentation. This feature saves a copy of your presentation with each slide as a full-slide picture in a new PowerPoint presentation file. It’s a fast and easy way to share slides that you don’t want edited.
To access this feature, click the File tab, click Save & Send, and then click Change File Type. PowerPoint Picture Presentation is available under the heading Presentation File Types.
A handful of new and improved tools are designed to help simplify tasks when you’re creating presentations.
Drag shapes and pictures on a slide, layout, or master, and see dynamic guides appear to tell you when the object is aligned to others. This feature, known as smart guides, is new to PowerPoint 2010 and still around in PowerPoint 2011.
This tool is mentioned here because it can save a lot of time when you’re editing slides or presentation designs. But keep in mind that it’s just for times when you need to create one-off slide content or design elements for layouts and masters. This feature is not designed to work with placeholders, so it’s not a tool for most of your work with customizing layouts or when you’re manually editing the position of on-slide content that resides in a placeholder.
Note
See Also Get tips for working with smart guides in Chapter 14.
PowerPoint 2010 introduces the single document interface (also known as SDI), which gives you a completely independent PowerPoint window for each of your open presentations. So, for example, if you work with multiple monitors, you can play back a slide show for one presentation on one monitor while editing slides for another presentation on the other.
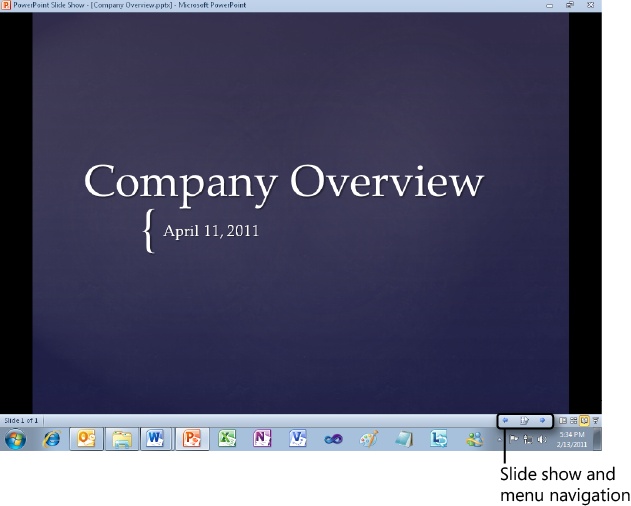
PowerPoint 2010 also gives you an exclusive view of your presentations with the new Reading view. This view is designed for those times when you want to see exactly what your slide show will look like when you play it back, while retaining access to your other programs and open presentations.
As you see in Figure 13-1, the Status bar in Reading view gives you basic slide show tools along with access to other PowerPoint views, while playing back your slide show within the individual presentation window.
Themes give you a lot of power to customize your documents, presentations, and workbooks, and make it easier for just about anyone to create better content. They give you a single set of formatting to use across Word, PowerPoint, and Excel. And they enable you to update the formatting of an entire document, presentation, or workbook with just a click. But you probably already know all of that.
Note
See Also If you didn’t already know all of that, check out Chapter 5 for a detailed introduction to themes before continuing here.
In this chapter, we’re concerned with how themes relate to your PowerPoint presentations. Themes were born in PowerPoint and their core still resides there. You can choose whether to make use of a theme in Word or Excel (but you should have a really good reason if you choose not to). But the same can’t be said for PowerPoint, because the theme underlies the basic structural elements of a PowerPoint slide.
To put it a different way: if you are the id to your presentation, the theme is the ego. Disregard the ego, and havoc will surely ensue.
So, before we get to the guts of working with features like slide masters and custom layouts, this section takes a look at underlying concepts such as the central relationship between themes and masters. Even if you’re not usually the type to take apart the car to understand how it runs, give it a try in this case. Sure, you could skip forward to learn about the mechanics of customizing masters, layouts, and slides. But understanding the concepts that control how the pieces fit together can simplify many (if not most) of the tasks ahead.
In versions of PowerPoint prior to 2007 for Windows and 2008 for Mac, there were design templates. Back then, you applied a design template to a presentation (or to specified slides in a presentation) to change the appearance of the slide master, including the following elements:
Slide background
Graphics on the master
Size and placement of placeholders on the master
Layout of the title slide (called a title master back then)
The fonts and text formatting used in the master (such as font size and bullet style)
Color scheme (you could have more than one color scheme option for a slide master)
A color scheme in earlier versions contains eight colors, including those designated for use with text, backgrounds, shadows, object fill, accent, hyperlink, and followed hyperlink. The hyperlink and followed hyperlink styles do double-duty as accent colors in objects such as charts.
If you worked in those earlier versions, you might recall often using the Blank or Title Only slide layouts because you couldn’t customize individual slide layouts at all. And you might recall other features less than fondly, such as the old MS Graph charts, which were ugly, cumbersome, and inserted as embedded objects on your slides. Those charts took on the last four colors in your active color scheme as the first four chart series fill colors and used standard color variations thereafter. If you tried to customize chart colors and then later needed to update the chart, you probably found MS Graph to be more than a little bit finicky about keeping your customizations.
The beauty of the design template lay in the idea that if you switched to a different design template, content for which you’d actually utilized the slide master and color schemes would update automatically to take on the new design. But that swapping behavior was a great concept with a fairly weak implementation, because you were often compelled to disregard the master and color scheme to get the look you needed.
Then, along came themes. Themes take the concept of swappable design elements and add the power and flexibility of customization. When used in PowerPoint, the theme includes the fonts, colors, graphic effects, and Background Styles gallery options that are also available for themes when used in Word and Excel. Additionally, a theme in PowerPoint includes one or more slide masters.
Note
Remember that the Background Styles gallery that you know for slide backgrounds in PowerPoint is not actually a PowerPoint-exclusive element of themes. That feature is also available in Office 2010 as a set of additional theme fills for shapes in PowerPoint, Word, and Excel.
With the exception of graphic effects and a gallery of slide background options, that sounds an awful lot like the presentation designs from earlier versions, right? Not exactly.
The thing that makes themes so far superior to the legacy design templates is their flexibility. Because you can customize so many elements of a theme’s appearance—particularly slide layouts—you’re not compelled to do your own thing and ignore the master, color scheme, or other formatting. So, when you need to update the theme in a presentation, it actually can be one-click easy.
A slide master now includes a set of customizable layouts. The built-in layouts you customize, as well as custom layouts that you add to the master, are included when you save that master in a theme.
Each slide master can have unique sets of theme colors, fonts, graphic effects, and Background Styles gallery options.
As addressed in Chapter 5, a theme color set consists of 12 colors, including 2 text colors, 2 background colors, 6 accent colors, and 1 color each for hyperlink and followed hyperlink. Additionally, the theme color palettes across PowerPoint, Word, and Excel provide a range of tints and shades for the text, background, and accent colors.
Notice that theme color sets are where you get a lot more flexibility and more options that enable you to stick with the theme tools provided. For example, the six accent colors are used as object fills, such as for the first six series of Excel charts (now natively available in PowerPoint, of course) or the objects within a SmartArt graphic. What’s more, additional chart series use tints and shades of your six accent colors. And if you choose to customize chart colors, just as with customizing any Office Art graphic, your customizations hold.
If you talk to people who work only in Word or Excel, they’ll probably tell you that a complete theme consists of a set of colors, fonts, and graphic effects. If you talk to people who work only in PowerPoint, they’ll likely tell you that a complete theme consists of those three things, plus the slide master, layouts, and Background Styles gallery options. As it turns out, both answers are right and wrong.
Every Office 2010 and Office 2011 Word, Excel, and PowerPoint file includes an underlying file named theme1.xml, which provides colors, fonts, and graphic effects (the last of which also incorporates the Background Styles gallery options).
If you were to crack open the XML for a theme file itself (as shown in Figure 13-2), you’d see a theme folder that contains subfolders for the slide masters and slide layouts, as well as a subfolder named theme that contains the theme1.xml file.
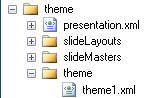
So, essentially, a complete theme (that is, a .thmx file) includes the core theme elements (the theme1.xml file) and the PowerPoint slide design (in other words, the slide master and layouts).
Note also, however, that each slide master can have its own set of core theme elements, as mentioned earlier. So, if a theme includes multiple masters, it might also include multiple theme files.
Note
If you want to explore under the hood, note that if there are multiple theme files stored in one theme or one PowerPoint presentation, they are consecutively numbered—such as theme1.xml, theme2.xml, and so on.
Note
See Also For information about customizing themes, including customizations that can be done only under the hood, see Chapter 5. To learn how to start exploring the XML underlying your documents, see Chapter 24.
The relationship can seem a bit circular in nature—a theme includes one or more slide masters, but each slide master can be related to a different theme. But it’s actually pretty simple. Just keep the following in mind:
A theme can include multiple slide masters.
Each slide master can be related to its own set of core theme elements.
Therefore, a complete theme can include multiple sets of core theme elements—one for each slide master it contains.
However, just because a theme can include multiple masters doesn’t mean it should. Customizable slide layouts dramatically reduce the need for multiple masters in the same presentation (and thus in the same theme). So when might you still need multiple masters in a presentation or in a theme?
You need unique theme fonts for use with just specific layouts.
Keep in mind that you need a unique master for this scenario only if the fonts for the specified layouts should be theme-aware. If fonts for a specific layout should always remain the same (that is, there isn’t a reason for those fonts to change when a new theme is applied), you can directly apply unique fonts to specific layouts without them being part of the theme.
You need unique theme colors for use with just specific layouts.
Just as with fonts, if colors that you need to apply to specific layouts won’t benefit from being theme-aware, just directly apply them to content on the layout; you don’t need to create a separate master to get a separate set of theme colors. But with colors, this concept goes a step further.
You actually can have multiple sets of theme colors attached to the same master, and included in the same set of core theme elements. The feature is called Extra Color Schemes, but the catch is that the only way to add them is through the XML.
For example, if you’ve opened a legacy presentation in a version of PowerPoint that contains themes, you might have noticed that each color scheme that was included in the legacy presentation appears in the Theme Colors gallery. PowerPoint imports them using the Extra Color Schemes feature.
However, if you need unique theme colors for specific layouts and either you don’t want to venture under the hood and into the XML, or you want the unique colors to be the defaults on specific layouts (so that users don’t have to apply the correct set of colors), then a separate master with its own set of theme colors is the way to go.
Note
See Also If you’ve tried to work with legacy presentations in a recent (theme-enabled) version of PowerPoint, you’ve probably also noticed that those color schemes don’t import as you might expect. Learn more about converting legacy presentations in the sidebar A Note About Legacy Presentations, later in this chapter.
You need unique theme effects or a unique gallery of slide background options for specific layouts.
Are you sure about this? If you need more variations of graphic effects in a single presentation than you can fit in a theme effects set, consider consulting a designer or a presentation coach. Unless there is a darn good reason for using a completely different set of theme effect styles for different slide types, it’s probably not a good idea. Graphic effects can be very cool, but unless you want your presentation to be about graphic effects, use them consistently and sparingly.
You need a unique design and overall layout for multiple slide layouts.
Not necessarily. If a single layout needs a unique design, that’s what customizable layouts are for. And even if a handful of layouts need the same background graphics, for example, or title placeholder positioning, customizing the layouts is likely to make your theme much more usable than asking the user to contend with multiple masters.
Caution
If you’re getting the impression that you should avoid the use of multiple masters, you’re right. Although this feature is a strength in terms of its flexibility for PowerPoint, and there are occasions when it’s helpful, it’s often a usability nightmare. Particularly if you are creating themes, templates, or presentations for others to use—and in situations where presentations are likely to be edited by multiple parties—consider whether there is a simpler solution that will be easier for others to manage.
Note
See Also Learn more about the strengths and weaknesses of multiple masters in the section Exploring the Master–Layout Relationship, later in this chapter.
Tip
If you always (or usually) use the same theme for your presentations, you can set it as the default so that new presentations automatically use your preferred theme. To do this in PowerPoint 2010, just right-click your preferred theme and then click Set As Default Theme.
To do this in PowerPoint 2011, first apply the theme that you want to use as the default. Then, on the Themes tab, click the arrow beside the Save Theme command and then click Set Current Theme As Default.
Note
See Also For help creating your own themes, see Chapter 5.
The secret to PowerPoint presentations that are easy to create, edit, and manage is this: PowerPoint is easy. Really, that’s it. PowerPoint provides the tools to make your work simple and straightforward. Just use the available tools, and most of the time you spend in PowerPoint can be downright pleasant—quick, simple, and painless—and the presentations you create may be far better than you expect.
But there’s a catch (c’mon, you knew there would be). If you don’t use the available features—if you insist on using workarounds and overcomplicated solutions rather than learning to use the tools that PowerPoint benevolently provides—it just might make you miserable. It may even seem as if PowerPoint is laughing as it watches you dig yourself in forever deeper.
So, don’t tempt it. No matter how many shiny new capabilities it adds, PowerPoint is set in its ways. That’s because—despite how much personality a software program may appear to have—it is still a software program. This is not The Matrix (I hope), but you are the only member of the You + PowerPoint team that has the ability to compromise.
Just use the features the way they’re designed to be used, and you and your presentation will get along swimmingly. That doesn’t mean making cookie-cutter presentations at all. In fact, once you understand the rules, you can often find creative ways to bend them to take your presentations further. There is no spoon.
First and foremost, whether you are creating a slide presentation or using PowerPoint for a print document such as a pitch book, remember that PowerPoint is best at compartmentalized content that can make use of masters and layouts. If you need a lot of text to flow from one page to the next (such as for a report), or need many complex pages with content such as multiple financial tables, your document will almost certainly be easier to create in Word.
A good rule of thumb: use PowerPoint as a home for your document when you can answer yes to at least one of these questions:
Will the document be delivered as an on-screen presentation?
Do you need to use slide masters for any purpose other than what you can do with paragraph styles and the header/footer layer in a Word document?
Do you need to use slide layouts for any type of page layout that you can’t accomplish as easily (or more easily) with styles and/or tables in a Word document?
Once you determine that your document belongs in PowerPoint, consider the following:
With few exceptions, if the slide layout you’re using doesn’t fit the layout you need, don’t use it. Either customize a layout or, for single-use layouts, use the Blank or Title Only slide layouts and do your own thing.
However, the layouts are there for a reason and can substantially reduce your work. What’s more, a presentation full of slides that don’t use layouts with placeholders is sure to be a struggle, at best—so, please don’t misinterpret the preceding bullet point as an instruction to disregard layouts.
Use theme-ready elements, including colors, fonts, and slide backgrounds, unless you intentionally want specific formatting to remain even if the theme changes.
Use slide masters and layouts. If you have to place the same item on more than one slide, ask yourself whether you could use a master or layout instead to accomplish what you need in one step rather than many.
Use the Align, Distribute, and Order tools (as well as smart guides, mentioned earlier) to position content precisely. Nudging and guesswork defeats the purpose of using PowerPoint and will never give you the best results. When you use the available drawing tools, it takes almost no time to position content perfectly.
Note
See Also The arrange tools (align, distribute, and order options) and smart guides are addressed in Chapter 14.
Watch file size carefully. PowerPoint provides features to help you minimize file size even when you need a wealth of graphics and media in your presentation, such as the ability to compress pictures or to paste them in a variety of formats (using Paste Special). And, in PowerPoint 2010, you have a new tool to compress media files. One of the most common causes of PowerPoint document corruption is bloated file size.
Note
See Also For information about new and improved picture tools on both platforms of Microsoft Office, see Chapter 5. To learn about working with video and audio in Office 2010 and Office 2011, including compression tools, see Chapter 15 And for help with managing picture file size versus quality for presenting on screen, see the sidebar Determining The Right Picture Resolution for Your Presentation later in this chapter..
If a task feels like a lot of work, stop doing it. Take a moment to consider whether there’s a way to make it easier, because there probably is. And, because making it easier means using the right tool for the task, it’s also likely to improve your results. To learn about how to choose the best picture resolution for your presentations, see the sidebar Determining The Right Picture Resolution for Your Presentation, later in this chapter.
For example, pay attention to AutoCorrect actions (such as automatically fitting text to a placeholder), and set your defaults to the result you most often want (such as turning off AutoFit for body text). You have many options for working effectively with AutoFit, so don’t continually fight with it—you won’t win. For help with this example, see the sidebar What Can I Do to Stop Font Size from Automatically Changing? later in this chapter.
If you’re thinking that the preceding list isn’t much help if you don’t know whether you’re using the referenced features effectively, you’re absolutely right. But the information you need to answer those questions is available in this and the referenced chapters, so keep reading.
It’s common to forget that a PowerPoint presentation is a document, but it is. So, understanding the elements that can appear on the page, and how a given element may appear under different circumstances (such as on screen or in print), can simplify your work considerably.
In this section, we’ll look at how slide layout and page setup can affect your presentation.
This heading refers to the way that placeholders behave in slide layouts. The idea behind placeholders (such as the title and subtitle placeholders on a title slide) is to provide the size and positioning (and in some cases, the formatting) for slide content so that all you have to do is drop the content into place.
The problem that often arises is when people use slide layouts that don’t really fit the content or layout they need, and they adjust the size or formatting of placeholders on individual slides. Of course, the entire purpose of placeholders is to help you keep layout and formatting consistent. So, when the layout is reset, manual customizations—such as text formatting, and size and positioning of objects—are lost.
Working with placeholders is much easier since the previous release, when layouts became customizable. You can now customize placeholders on any layout or create your own placeholders to get exactly the size and position you need. The important thing is to take the extra step to go into the slide layout to make your change, rather than making the change on each individual slide.
Note
See Also Learn when to customize the master versus the individual layout, and how to customize layouts, in the section Managing Masters and Layouts, later in this chapter.
Of course, there are exceptions to what you can set up on the slide layout or in the slide master. When you need custom formatting—such as direct font formatting on just a few words in a text placeholder, or a border around a content placeholder—how can you avoid losing those customizations?
When you need to reset a placeholder position on a slide, you can use either the Reset option (in PowerPoint 2011, this is called Reset Layout To Default Settings) or reapply the active layout from the Layout gallery. Reset behaves the way that reapplying a layout used to behave (prior to the days of customizable layouts and themes); that is, all customizations are lost, and the slide is reset to use only the positioning and formatting that appear on the slide layout. However, if you instead simply reselect the active layout (just click the thumbnail for the layout you need in the Layout gallery), your placeholders return to their prescribed size and position, and all custom formatting remains. To use these options:
In PowerPoint 2010, on the Home tab, in the Slides group, find both the Reset option and the Layout gallery. These options are also available when you right-click a slide or a slide thumbnail in the Slides pane.
In PowerPoint 2011, on the Home tab, in the Slides group, click Layout to access the Layout gallery. Find the option Reset Layout To Default Settings at the bottom of the gallery.
So, what happens when you need text or objects to have a custom size or position on just one individual slide? Don’t move or resize placeholders on individual slides—use custom objects.
When you insert a text box (either a traditional text box or a WordArt text box) from the Ribbon, rather than using an existing text or content placeholder, you get a custom object that isn’t affected by changes in slide layout. Keep in mind, however, that custom text boxes don’t have the formatting that’s preset in placeholders (such as several levels of bulleted text), so you’re on your own in terms of formatting your custom text.
You can, however, customize default text box formatting for a presentation, template, or theme. To do this, select a text box that contains the formatting you want to use as your default (text formatting is included in the settings), right-click, and then click Set As Default Text Box.
In PowerPoint 2010, insert a text box from the Insert tab. Or, on the Home tab, in the Drawing group, text box is the first available option in the Shapes gallery.
In PowerPoint 2011, insert a text box from the Home tab.
When you place other object types (such as a picture, table, diagram, or chart) from the Insert tab onto a slide that has an empty placeholder designed for that content type, your new object is automatically placed in that empty placeholder and sized accordingly. If the slide contains similar placeholders, but they already have content, using the Insert tab to insert an object will insert the custom object you need without attaching it to a placeholder.
Of course, when you need a custom object, the goal is to avoid attaching it to a placeholder so that it isn’t affected by changing, reapplying, or resetting the layout. So, when you need objects to be independent of placeholders, the easiest thing to do is usually to use the Blank or Title Only layout, as mentioned earlier. However, if you need a custom object on a slide that has empty placeholders, there are easy workarounds, as follows:
Insert the object into the empty placeholder. Then, select and cut the object (Ctrl+X or Command+X), and then paste (Ctrl+V or Command+V). The object will be pasted back on the slide, but it will sit on top of the placeholder rather than using the placeholder. If you move the pasted object, you’ll see that the empty placeholder remains.
One important limitation to the preceding workaround is that, if you inserted a picture into an object placeholder and PowerPoint cropped it automatically, cutting it actually cuts only the visible portion of the image. This means that when you paste it back in, you paste the cropped version without cropping information retained. So, even resetting the image won’t return the cropped portion.
Instead, you can cut the empty placeholder, insert the image, and then paste the placeholder back. Or, just insert the object onto any blank slide and then cut and paste the object onto the slide where you need it. When you paste an object onto a slide that has an empty placeholder (rather than inserting the object), the placeholder is ignored.
What Can I Do to Stop Font Size from Automatically Changing?
The AutoFormat As You Type options, which AutoFit body or heading text to placeholders, are enabled by default (and in most of the built-in themes). But, when AutoFit takes action, a SmartTag appears outside the bottom-left corner of the text box, from which you can disable it. Click the arrow to expand the SmartTag options, and you’ll see something like Figure 13-3.
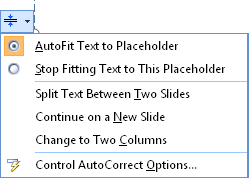
Figure 13-3. AutoFit options for the content placeholder on a slide using the Title And Content layout, shown in PowerPoint 2010.
The options you see in the AutoCorrect SmartTag depend on the type of placeholder, the slide layout, and your AutoCorrect settings. The options to split text between slides, continue on a new slide, or set the placeholder to two columns are available only in built-in layouts with a single body content placeholder (such as Title And Content), but are available whether or not you have AutoFit enabled for body text.
You can use these SmartTags to affect individual placeholders only. Or, click Control AutoCorrect Options and then click AutoFormat As You Type for a list of options, including (at the bottom of the list) the options to AutoFit title text and body text to placeholders (in PowerPoint 2011, the option controls only body text).
Note that you can also access these options in PowerPoint 2010 in the Options dialog box, on the Proofing tab. In PowerPoint 2011, find these options in the Preferences dialog box, on the AutoCorrect tab.
Once you turn off AutoFit for title or body text, the AutoFit SmartTags for applicable placeholders will no longer contain the options to AutoFit text to the placeholder or stop fitting text to the placeholder. However, you’ll still see the SmartTags that provide access to the AutoCorrect Options dialog box.
Of course, these AutoFit settings are how you control what happens when you’re working on a presentation (and the AutoCorrect Options approach affects only your work on your computer). If you’re the one creating a presentation, template, or theme for others to use, and you prefer to keep placeholders from using AutoFit, you might want to change those settings in the master layer, so that they affect all slides that are created based on an applicable master or layout. Find the option Do Not AutoFit on the Text Box tab of the Format Shape dialog box. When you apply this setting to a placeholder on a master or layout (you must do this from the Slide Master view, not from a placeholder on an individual slide), it affects any slides that use that master or layout.
Now that you know the options, here’s the recommendation: it’s usually a good idea to keep AutoFit enabled (annoying though it may be) and use the SmartTags to disable the setting where needed. Even if you don’t want AutoFit to change your font size, seeing the changes made by AutoFit is a good indication that your slide contains too much text or needs a different type of layout.
Note
See Also For more information about using the right layout for your content and the types of content that make effective slides, see the section Creating Effective Slides and Layouts, later in this chapter.
There’s not a lot to be concerned about when it comes to PowerPoint page setup—which doesn’t refer to page layout, of course, but typical page setup considerations like paper size and orientation.
But the few issues that warrant mentioning on this subject also happen to be common sources of frustration (or at least confusion): understanding slide size and orientation options, and working with headers and footers.
Have you joined the widescreen, HD revolution yet, or are you still creating standard shows? At the time of this writing, standard slide shows still appear to be the most common, but the proliferation of widescreen, HD projection screens seems to be occurring at a pretty quick pace. So, by the time you’re reading this, that statement might already seem out-of-date.
The default new presentation size is still the standard 4:3 aspect ratio, landscape slide. If you want a widescreen presentation, you have options for 16:9 and 16:10 resolution. So, what’s the difference between them?
The 16:9 widescreen is the standard resolution for HDTVs and is pretty common as the resolution in digital cameras. It’s the square of the standard resolution (that is, 42:32), resulting in a ratio of approximately 1.78 (width to height).
The 16:10 widescreen is the standard resolution for computer widescreen displays. It’s a ratio of approximately 1.6.
If you don’t know which type of display you need for your presentation, just go with the one you prefer. If your choice doesn’t match the display exactly, you’ll see black bars like the “letterbox” you get when watching an even wider cinema resolution on your HDTV. (Personally, I prefer 16:9, but note that you do get a bit more vertical space on your slides with 16:10.)
When formatting a presentation that will be printed, pay particular attention to the width and height measurements in the Page Setup dialog box (shown in Figure 13-4).
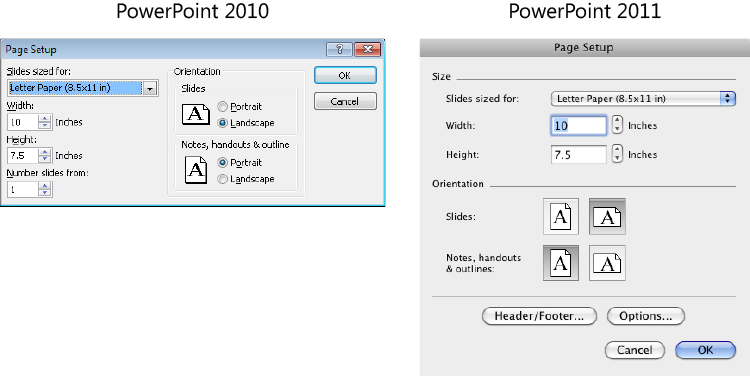
Notice that, when set to letter-sized paper (8.5 by 11 inches), the page width and height are both 1 inch smaller than the indicated slide size. The difference between width and height settings versus the slide size setting happens regardless of the size you select. PowerPoint builds the margins into the page size, so what you see on screen doesn’t include page margins.
This is important if you’re using PowerPoint for a document that will be delivered in print, because what you see on screen is not actually the full page size. In part, this is useful, because if you have objects that bleed to the edge of a slide, they’ll still print on printers that can’t accommodate bleeds. However, when you need to print a true bleed or otherwise need to use the full paper size, you have two options.
In the Page Setup dialog box, change the Height and Width settings to the paper size you need. For example, for a landscape, letter-sized page, type 11 as the Width setting and 8.5 for the Height setting. (If your default unit of measurement is something other than inches, adjust the preceding measurements accordingly.)
When you change the measurements, the Slide Sized For setting changes to Custom.
Alternately, if you just want to use more of the page when printing, but want to retain the standard slide size setting for on-screen use, use the Scale To Fit Paper setting.
In PowerPoint 2010, click the File tab to open Backstage view and then click Print. Under the Settings heading, click to expand the Print What list (which defaults to Full Page Slides) and then click Scale To Fit Paper.
In PowerPoint 2011, on the File menu, click Print. Find the Scale To Fit Paper option in the Print dialog box.
Typically, it’s not necessary to use these two options together. For example, if you change the slide size to the full paper size and place objects that bleed off the slide—but Print Preview still doesn’t show the slide bleeding to the edge—your active printer may not accommodate bleeds from PowerPoint, or you might need to change the printer’s settings to print a bleed. You can, however, save a copy of the document as a PDF file (or an XPS document if you work in Office 2010) or print it to a virtual printer to preview the full bleed.
In PowerPoint 2010, click the File tab to open Backstage view, click Save & Send, and then click Create PDF/XPS Document. Or, on the Print tab in Backstage view, change your active printer to a virtual printer such as Send To OneNote 2010.
In PowerPoint 2011, in the Print dialog box, click PDF and then click Save As PDF. Or, in the Print dialog box, click Preview to virtually print the document to the Mac OS Preview application.
When you’re dealing with slide orientation, you usually encounter one of two issues: content being distorted when you change orientation, or the need to have both landscape and portrait slides in a single presentation.
For the first of these issues, see the earlier sidebar, Converting a Presentation to Another Aspect Ratio, for help addressing distortion that happens when content adjusts to a different page height or width. But also consider why you’re changing the orientation.
For example, you might be creating a print document to accompany your presentation, or perhaps you’re creating a portrait version of your company template for other users. Regardless, before you think about just changing orientation, cleaning up distorted objects, and then calling it a day, ask yourself whether the slide layouts in your presentation lend themselves as effectively to the new orientation. Chances are that at least some of them don’t. And neither a slide presentation nor a print document will be visually effective if it’s designed for a different purpose.
Note
See Also For related tips, see the section Creating Effective Slides and Layouts, later in this chapter.
As for the second common orientation issue, you probably already know that you can’t have both portrait and landscape slides in the same presentation. But if you must have both (or rather, provide the appearance of having both), you do have a couple of workaround options:
For text slides in print presentations, you can create custom layouts with rotated text (and rearrange other placeholders, such as footer and page number) to approximate the look of opposite orientation pages. You can also customize the built-in Title and Vertical Text and Vertical Title and Text layouts.
Note
See Also For help doing this, see the section Customizing and Creating Slide Layouts, later in this chapter.
For on-screen presentations, you can link slides between presentations to have both landscape and portrait slides appear in an on-screen show. For help, see following sidebar, I Need to Show Portrait and Landscape Slides in the Same Presentation.
I Need to Show Portrait and Landscape Slides in the Same Presentation
When you need both portrait and landscape slides in an on-screen presentation, just use hyperlinks to get this done in a snap.
Each slide in a presentation behaves like a bookmark within that file. So, you can simply apply a hyperlink from a slide in the landscape presentation to the slide you need in the portrait presentation. Then, add a hyperlink in the portrait presentation to return to the correct slide in the landscape presentation.
Hyperlinks in PowerPoint can be applied to any object, so you can apply the hyperlink to an existing object on the slide or insert a shape to use for the link. (If you don’t want the shape you’re using for the link to appear on screen during your show, you can set both the shape fill and outline to None. If you do that, just be sure you know where the shape is located when you need to click it during your show.)
To add a hyperlink to a slide in another presentation, select the object to which you want to add the link and then do the following:
In PowerPoint 2010:
On the Insert tab, in the Links group, click Hyperlink. Or, press Ctrl+K.
In the Insert Hyperlink dialog box, select Existing File Or Web Page in the Link To options, and then use the Look In options to locate the file to which you want to link.
To link to a specific slide in that file, click Bookmark. Each slide title in the selected presentation is listed in the Bookmarks dialog box.
In PowerPoint 2011:
On the Insert menu, click Hyperlink. Or, press Command+K.
In the Insert Hyperlink dialog box, select Document and then click Select to locate the file to which you want to link.
To link to a specific slide in the selected file, in the Insert Hyperlink dialog box, click Locate. Then, in the Select Place In Document dialog box, click the expander arrow beside the Slide Titles heading to select from all slides in the target presentation.
Once you specify a slide to bookmark, it appears after a pound (hash) sign (#) at the end of the address in the Insert Hyperlink dialog box, as shown in Figure 13-5.
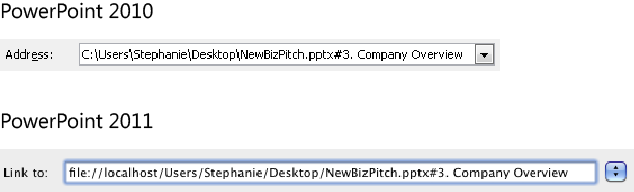
Figure 13-5. The hyperlink to a slide in another presentation on your system includes the file path followed by the pound sign and the target slide title.
Before you’re done with this task, you must also add a hyperlink on the target slide to return you to the correct slide in your original presentation. And remember, don’t click a hyperlink on a slide until you see the insertion point change to the hand icon, which indicates you’re hovering over a link. Clicking a slide in a slide show when you see the default arrow insertion point advances your active show to the next slide.
Customizable slide layouts and the ability to edit footer content directly on slides can sometimes make the best practices for working with header and footer content in PowerPoint seem a bit more elusive. Fortunately, they don’t have to be. The list that follows provides you with key points on using headers and footers in PowerPoint, including how-to tips and what to avoid:
Slides have footer, date, and slide number areas available from the Header And Footer dialog box (accessible from the Insert tab in PowerPoint 2010 and the View menu in PowerPoint 2011). Notes and handouts have a separate set of footer, date, and page number settings available from the same dialog box, and they also have an available header.
You can, potentially, have a separate footer on every slide in the presentation, or on each master and each slide layout.
Although it appears that you can have only one set of header and footer options for all notes and handouts in the presentation, it is possible in PowerPoint 2010 to have one header and footer for your notes pages and another for your handouts. In PowerPoint 2011, notes pages and handouts always share the same header and footer.
Note
See Also For help working with headers and footers in notes and handouts, see the upcoming sidebar Insider Tip: Create Unique Headers and Footers for Notes and Handouts.
Be careful applying footers to slide layouts. Though existing slides that use that layout update automatically to take on the new footer, when you apply that layout to new slides or change the layout of existing slides, the footer will not update automatically. But have no fear: there is a workaround.
Note
See Also For more information, see the sidebar The Footer Doesn’t Update When I Change Slide Layouts, later in this chapter.
If you turn off a footer but don’t delete the content from the footer text box, that content might still reside in your presentation. So, if you share that document, and your recipients open the Header And Footer dialog box, they would still see the content even if it’s set to not appear on the slide.
If you have a footer that is applied only to an individual slide, when you turn off that footer and apply the new setting to the slide, the footer content is deleted from the dialog box. However, if you apply a footer to a slide master or slide layout, the footer is retained in the Header And Footer dialog box, whether you turn it off on an individual slide or on the master or layout where you applied it. This is an important consideration when you’re sharing files electronically. It’s a good idea to ensure that no private or otherwise inappropriate information remains in the Header And Footer dialog box, even if it doesn’t appear on slides. To remove this content, just delete the content in the footer text box before disabling it, and then click Apply To All.
However, when you click Apply To All, note that any unique footer information on individual slides will also be removed.
(To avoid sharing unwanted content, remember to check the Notes Master and Handouts Master as well, if they might have been edited in your presentation.)
Caution
If you use Office 2010 and you’ve come to rely upon the Prepare For Sharing pane on the Info tab in Backstage view to let you know if potentially private content (such as document property information) resides in your file, remember that this pane doesn’t always cover every possibility. Header and footer content in PowerPoint is a good example of potentially hidden content that you have to check for on your own because it is not addressed by those options.
If you use the Fixed option under Date And Time in the Header And Footer dialog box, the privacy issues discussed for footers in preceding paragraphs hold true as well, because you can type anything into the Fixed box that you can type into the Footer box. In fact, if you’re not showing the date and time on your slides but you do need both a header and a footer, using the Fixed option under Date And Time for your header text is an easy workaround, as it works exactly the same as the footer.
Note
Keep an eye on Date And Time when using handouts, because the date appears on handouts by default. To remove it from handouts, you can just delete the date placeholder from the handout master. Or, in the Header And Footer dialog box, on the Notes And Handouts tab, select Date And Time, select Fixed, clear the text in the Fixed text box, and then click Apply To All.
Remember that the footer, date, and slide number text boxes are just placeholder text boxes that you can format and move as needed. For example, if you need a header but no footer, place the footer text box at the top of the appropriate layout or master. However, if you edit the text of the footer directly in the placeholder, the results might not be what you expect.
Editing the placeholder won’t turn on the footer, and the text may not update on your slides as expected if you edit the placeholder on a master. For the most consistent results, format and position the placeholder as needed, but edit its content in the Header And Footer dialog box.
Note
See Also The exception to this rule is the workaround for creating unique headers and footers for notes pages and handouts, addressed in the sidebar Insider Tip: Create Unique Headers and Footers for Notes and Handouts, which follows this list.
To create a footer for all slides that use a given layout or master in a presentation, create that footer when the desired master or layout is active and use the Apply setting in the Header And Footer dialog box to apply it, just as you would when applying a footer to individual slides. Use Apply To All only if you want all slides, regardless of layout or master, to take on those settings.
You can apply Header And Footer dialog box settings to multiple selected slides, regardless of their layout or master. To do this, select the slides in Slide Sorter view in the Slides pane before opening the Header And Footer dialog box. Then, after you change the information in that dialog box as needed, click Apply.
You can access the footer, date, and slide number placeholder text boxes directly on any slide once that content is enabled. So, you can delete them from just one slide without having to go through the Header And Footer dialog box. Note that, if you use the Header And Footer dialog box to reapply the footer, date, or slide number to a slide for which you deleted the applicable placeholder, the placeholder is automatically returned.
As we’ve already discussed, the role of the slide master and slide layouts changed significantly in Office 2007 and Office 2008 for Mac with the introduction of customizable slide layouts. The functionality remains the same in PowerPoint 2010 and PowerPoint 2011, but that makes it no less important to cover in detail. Knowing how to make effective use of slide masters and layouts is an essential key for creating presentations that look professional and are well crafted and easy to manage.
As mentioned earlier, you can still have multiple slide masters in a presentation (when you have a good reason for it).
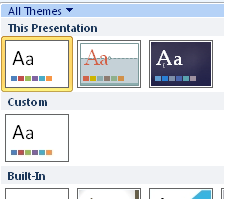
Each master appears in the Themes gallery as a separate theme in the current presentation, as shown in Figure 13-6.
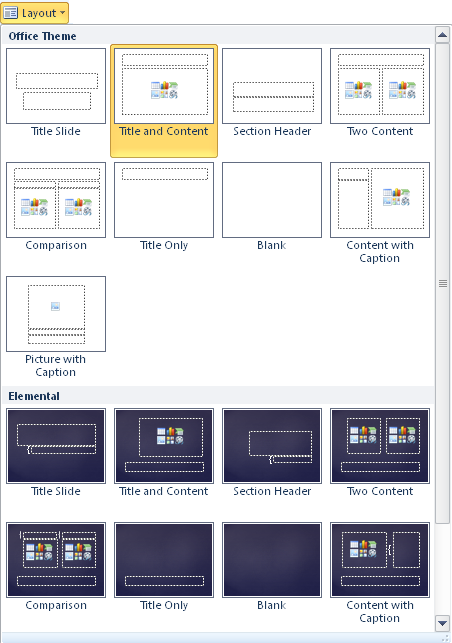
The layouts attached to each master appear in succession in the Slide Layout gallery, as shown in Figure 13-7.
However, because slide layouts are customizable, the need for multiple masters is far less common than it used to be. In fact, when multiple masters appear in PowerPoint 2010 or PowerPoint 2011 presentations, it’s more likely to be a sign of trouble than an intentional design element.
Note
See Also To learn why the commonly used Keep Source Formatting feature is so important to avoid, and how it relates to the accidental proliferation of excess masters in your presentations, see the section Managing Content from Other Presentations, later in this chapter.
When you open Slide Master view, you see the master and each layout attached to it in the Slides pane, as shown in Figure 13-8.
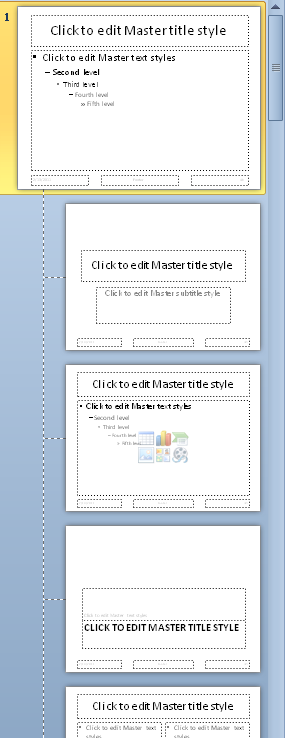
If an additional master existed in the presentation shown in Figure 13-8, it would appear in the Slides pane below the collection of layouts that are attached to the first master, followed by its set of slide layouts.
To easily differentiate between a slide master and a layout, notice in Figure 13-8 that the thumbnail for the master is larger than those of the layouts. In PowerPoint 2010, the master is also numbered (it is not numbered in PowerPoint 2011, but otherwise looks the same). Note also that you can point to any layout in this pane for a ScreenTip displaying its name and indicating whether it is attached to any slides in the active presentation.
To access the slide master and layouts, open Slide Master view. For quick access to Slide Master view, Shift+click on the Normal view shortcut that appears on the Status bar. Alternatively, access this view from the View tab in PowerPoint 2010 or the View menu in PowerPoint 2011.
The following guidelines and best practices for working with masters and layouts assume that you are working in Slide Master view.
Note
If you don’t see the Slides pane (which displays the master and layout thumbnails, as shown in Figure 13-8) when you open Slide Master view, it may just be collapsed. To check, move your insertion point to the very left edge of the PowerPoint window. If the insertion point changes to a double-backed black arrow, just drag to the right to expose the pane. If it does not, click the Normal view icon on the status bar to open the default Normal view (which includes the Slides pane) and then Shift+click the same icon to reopen Slide Master view with the Slides pane exposed.
You can copy, duplicate, or rename any master or layout from the options available when you right-click the thumbnail for that master or layout in the Slides pane. Once you copy a layout or master, you can paste it into the Slides pane in the same or another PowerPoint presentation or template.
When you add a new master to a presentation or template, it contains the default set of 11 built-in slide layouts, regardless of which layouts are attached to other masters in the file.
Think carefully about whether you need to edit the master or a layout. Changes made to the master will affect all of its layouts until an element on a layout is customized. Once you customize any element on a given layout, that element will no longer update when the same element on the master is changed. For example, if you change the format of bulleted text on an individual layout and then change the format for all bulleted text in the presentation from the master, the text levels you edited on the customized layout will not change to reflect those changes from the master.
Caution
When you open Slide Master view in PowerPoint 2010, pay attention to what’s selected before you begin editing. Though it may look like the slide master is in front of you, it’s not! When you open Slide Master view, your active view is the layout attached to the active slide. This is important because, if you make changes to the layout that you intended to make to the master, not only will those changes not be part of the master, but the layout you edited will then be detached from the master for future changes to the customized elements. (Note that this is not the case for Mac users. When you open Slide Master view in PowerPoint 2011, the slide master is active.)
In PowerPoint 2010, the Page Setup group that appears on the Design tab also appears on the Slide Master tab. But don’t be fooled. Paper size, orientation, and slide number Start At value can be set only once for the presentation.
You can rename any layout and delete layouts that are not in use. If you apply a layout to any slide in the presentation, you can’t delete it. However, if you’re creating a presentation, template, or theme for others to use, it’s usually a good idea to retain all built-in layouts.
If you copy a slide from another presentation, and a layout with the same name and the same type and number of placeholders doesn’t exist in your destination file, the original layout will be added to your presentation with elements of its original theme left behind. So, for example, you might not see a use for the Two Content layout in your presentation. But if you delete it and then someone pastes a slide that uses the Two Content layout from a different theme, that layout will be added to your presentation (usually with much of its original formatting) rather than the slide updating automatically to take on the formatting of your theme (as it would do if the Two Content layout still resided in your theme).
Note
See Also For more details, see the section Customizing and Creating Slide Layouts, later in this chapter.
If you delete a built-in layout that you later need, there are a few ways to replace it. As with most tasks for managing slide masters and layouts, the first two options that follow use the Slides pane in Slide Master view:
Create a new, blank presentation and copy the layout you need from that presentation. In the Slides pane in your destination presentation, select the layout that you want to appear before the layout you add, and then paste.
Note that layouts in the Layout gallery appear in the order that they appear in the Slides pane. So, when you add new layouts, add them in the position you want them to appear in that gallery.
Insert a new master into the same presentation, copy the layout you need, delete the unwanted master, and then paste the copied layout as needed.
For either of the preceding options, if you select an existing layout before pasting, the pasted layout will appear immediately after the selected thumbnail, as already noted. Or, you can click between thumbnails before pasting to indicate the exact paste location you want.
If you use Microsoft Visual Basic for Applications (VBA), you can quickly get the deleted built-in layouts back with a single line of code. (If you don’t already use VBA, this very easy timesaver is one example of why you might want to give it a try.)
Note
See Also For details, see the upcoming sidebar, Insider Tip: Replace Deleted or Changed Layouts Using VBA.
In PowerPoint 2010, the Preserve Master setting makes an important difference in behavior when multiple masters exist in your presentation.
When you insert an additional master in Slide Master view, this setting is enabled by default, telling the presentation to retain this master whether or not it is attached to any slides.
If you apply a theme to just selected slides, or paste slides into your presentation and retain their source formatting, the master that is added does not have the Preserve setting enabled by default (so the master disappears if you delete the slides to which it was attached).
The first master in the presentation is not set to be preserved by default. So, if you apply another master to all slides in the presentation, it will be deleted unless you have enabled the Preserve setting.
To enable the Preserve setting for any master, right-click the master in the Slides pane and then click Preserve Master. Or, on the Slide Master tab, in the Edit Master group, click Preserve. When this setting is enabled, you see a pushpin icon to the left of the slide master thumbnail in the Slides pane, directly below the number of the master.
In PowerPoint 2011, the Preserve Master setting is not available. All masters use the default preservation behavior as described under this bullet point.
Caution
There’s a good reason that the first (or only) master in a presentation is not set to be preserved by default: if you have only one master and you choose a different theme, you probably want the new theme to replace the original rather than become an addition to the presentation. Keep in mind that if you apply a new theme (either in Slide Master view or while editing slides), if the active master is set to be preserved, the newly applied theme will be added to the presentation as an additional master.
New layouts that you add to the master, whether you create a new layout or paste it from another master or presentation, take on the current formatting of the master layout by default for background graphics and any applicable placeholders.
In versions of PowerPoint prior to 2007 for Windows and 2008 for Mac, the main text placeholder on the master layout was the object area for all layouts. This is no longer the case. Customizing the size of the text placeholder in the master layout will only affect slides formatted with a single text and content area (such as the Title And Content layout).
If you’re coming to PowerPoint 2010 or PowerPoint 2011 from a version earlier than 2007 for Windows or 2008 for Mac, notice that text and content layouts are now combined. For example, a Title And Content layout can contain either text or objects, such as a table, chart, or diagram. When a content layout is applied to the active slide, either start typing text and the placeholder will behave like a typical text placeholder, or click the appropriate icon in the center of the content placeholder to add the type of content you want. Content type options in addition to text include tables, charts, SmartArt diagrams, pictures, clip art, and media clips (such as video). Point to an icon on the layout for a ScreenTip that indicates the type of content that option will insert.
Note that, if you delete all content from a content placeholder, it again becomes accessible for text or any of the six available object types.
Also note that when you have an empty content placeholder on a slide, you can insert one of the available content types from the Ribbon and it will automatically be added to the placeholder.
Eleven built-in slide layouts appear in a new, default presentation. All of them can be customized. In PowerPoint 2010, however, you may notice that only nine of the layouts appear in the Layouts gallery. The two layouts that contain vertical text are intended for use when you’re editing in Japanese. If Japanese is not an enabled Microsoft Office editing language on your computer, these layouts won’t appear in the gallery. (This is not the case in PowerPoint 2011, where all 11 built-in layouts appear in the Layout gallery by default.)
Note
See Also For help accessing the built-in vertical layouts in PowerPoint 2010, see the sidebar How Can I Use the Vertical Text Layouts in My Presentation? later in this section.
Insider Tip: Replace Deleted or Changed Layouts Using VBA
You don’t have to be a programmer to try this tip. Even if you’ve never seen a line of code before, this is an example of how you as an experienced Microsoft Office user can save time and work more effectively by taking advantage of VBA.
In this case, you can apply any built-in layout to a slide easily by using a single line of code in the Immediate window of the Visual Basic Editor.
If the layout you apply when using this method doesn’t currently exist in your presentation, it will be added as a slide layout attached to the active slide master. So, you can use this method to quickly replace a built-in slide layout that you deleted.
(Also note that if you customize a built-in layout and later want to reset it to the default, one easy option is to delete your customized version and then use this method to replace the default version of that layout.)
To try this tip, with your presentation open in Normal view, select the slide to which you want to apply a layout. Then, do the following:
Press Alt+F11 to open the Visual Basic Editor.
If you don’t see the Immediate window (it appears by default as a pane at the bottom of the Visual Basic Editor), press Ctrl+G (Ctrl+Command+G in Office 2011).
Click into the Immediate window and then type the following:
ActiveWindow.Selection.SlideRange.Layout =
When you type the equal sign, you’ll see a list of available constants representing slide layout types, as shown in Figure 13-9. That is, this list is the available set of built-in layouts. Notice that it includes more items than you see in a new presentation.
Note that the items in this list all begin with the text ppLayout, followed by the layout name. However, this layout name doesn’t always match the name that appears in the Layout gallery. Most notably, layouts that are referred to as Content in the gallery are referred to as Object in this list. So, for example, the Two Content layout is listed as ppLayoutTwoObjects.
Select the layout you want from this list and then press Enter to apply the layout to the active slide.
Press Alt+F11 to switch back to the PowerPoint slide window. If you added a slide layout to the presentation with this action, open Slide Master view to access your newly added layout.

Note
See Also To learn about the fundamentals of VBA, including more about using the Immediate window and explanations of terms like “constants” and their usage, see Chapter 23.
As you probably already know, when you want content or formatting to appear on every slide that uses a given slide master, add that content or formatting to the slide master and it’s automatically added to all slides that use that master.
However, because of customized slide layouts, there are now exceptions to the way in which changes to the slide master may affect the slides that use it. If an element on a slide layout is customized (such as a placeholder inherited from the master layout), that element becomes disconnected from the master and won’t be affected by future changes to that element on the master.
In the interest of doing the least work possible, always add formatting that you want to apply to all, or even most, layouts to the master. You can then remove unwanted additions from any layouts that shouldn’t use them. For example, if you want 9 of 11 layouts to use certain title text formatting, apply it to the master and then just change the formatting of the title on the 2 remaining layouts.
Note
When you add graphic elements (such as a logo) to the master, you can’t access them from individual layouts. Only the master layout placeholders can be edited for individual layouts. But this doesn’t mean you need to add the graphic separately to each applicable layout simply because you don’t want it to appear on all layouts. If a graphic needs to appear in the same size and position on the majority of layouts, you can still insert it on the master. Then, for layouts that shouldn’t take on the graphics from the master, you can hide background graphics for the individual layout.
Note
See Also For help, see the following section, Customizing and Creating Slide Layouts.
Use the following guidelines to help edit and manage slide master formatting:
Each slide master contains five placeholders, including the title, text, date, footer, and slide number. These are known as the master layout elements. If you delete any of these placeholders, they become available to reapply from the Master Layout command (called Master Elements in PowerPoint 2011) on the Slide Master tab.
Note that if you delete a master layout element from the slide master, the corresponding placeholder is not deleted from existing individual slide layouts. However, custom formatting you applied to that master layout element will be removed from the corresponding placeholder on individual layouts. (In fact, formatting may revert to an undesirable default of 18-point, left-aligned text, so take care when you do this to make adjustments as needed.)
However, if you delete a master layout element, new slide layouts that you add to that master will not contain a placeholder for the deleted element.
(Note that the master element known as the text placeholder in PowerPoint 2010 is known as the body placeholder in PowerPoint 2011.)
As mentioned earlier, the main text (body) placeholder defines the main content area for the Title And Content layout (as well as the Title And Vertical Text layout), but it no longer defines the content area for all layouts.
Though five levels of bulleted text appear in the text placeholder of the master layout, you can have up to nine levels. So, if you’re creating a presentation, template, or theme for others to use, it’s a good idea to define formatting for all nine levels.
Note
See Also For help adding the additional four levels and formatting the text and bullets on the slide master (or on any slide or layout), see the section Working with Text, later in this chapter.
Remember that placeholders are not text boxes, even though they look like them. If you add text to the placeholders on the slide master, that text will be ignored.
Note
See Also Also note that you can’t change placeholder text on the master layout. You can, however, change placeholder text in a slide layout to affect what is displayed on slides that use the layout—for details, see the next section, Customizing and Creating Slide Layouts.
When you apply a background to the master from the Background Styles gallery on the Slide Master tab, it’s applied to all layouts attached to that master—even overwriting custom backgrounds applied to individual layouts. However, any existing slides in the presentation that have individual background settings will retain those settings.
With the slide master active, if you select the Format Background option from the Background Styles gallery and customize the background through the Format Background dialog box instead of selecting a theme Background Style gallery entry, the new background is applied to all layouts attached to the master except those that have customized backgrounds.
To apply a background that you customize in the Format Background dialog box to all layouts, including overwriting any custom backgrounds, click Apply To All. Note, however, that this action won’t override custom backgrounds applied to individual slides. To reset individual slides in PowerPoint 2010 so that they take on the master background, with the slide active, on the Design tab, click Background Styles, and then click Reset Slide Background.
Some of what you need to know about customizing layouts was covered under the preceding section, Customizing Slide Masters, because it’s essential to know how masters affect layouts before you begin to customize or create your own layouts. The following list provides additional guidelines, how-to instructions, and best practice tips for customizing and creating your own layouts.
To customize a layout, you must be in Slide Master view. To customize any individual layout, just select that layout from the Slides pane in Slide Master view and then customize the layout as you would customize a slide master.
You can move, resize, or delete any placeholder on any layout. You can also add your own placeholders to any layout. However, for ease of sharing layouts with others and sharing content between presentations, avoid deleting placeholders from or adding them to a built-in layout. When you need a different complement of placeholders on a layout than a built-in layout provides, create a custom layout.
The reason for this is that when you copy slides between presentations that use different themes, built-in layouts with added or removed placeholders are not recognized as the built-in layout.
To insert a new placeholder on a layout, on the Slide Master tab, click Insert Placeholder and then click the placeholder type you want from the options you see in Figure 13-10.
Your insertion point will change to a crosshair. You can then drag to insert the new placeholder at the exact size and position you want.
New text and content placeholders are created with five levels of default-formatted bulleted text—so don’t be concerned if you insert one of those placeholder types and get what looks like much more text than you bargained for. Just delete whatever text you don’t want and format the text as appropriate for your new placeholder. All other types of placeholders come with a title that indicates their type, such as the chart placeholder shown in Figure 13-11.
Note that you can delete the text in a text or content placeholder, but you’ll still be able to add text (up to nine levels) in that placeholder on slides using that layout. And, if you customize the formatting of that text before deleting it, your customizations are retained when you use that placeholder on a slide.
You can also edit or format the text in other placeholder types. For example, you can change the bulleted title “Chart” shown in Figure 13-11 to “Click icon to add a chart” and format it in small, red font. You’ll see the edited text appear with the new formatting in the placeholder on slides that use that layout. However, that text won’t appear in print or in a slide show (just like master layout placeholder text), and it can’t be edited from a slide.
Tip
A quick way to reduce font size when you insert a placeholder that’s too small for the default text formatting is to select the placeholder and then press Ctrl+Shift+< (Command+Shift+< in PowerPoint 2011). As you may recall, this keyboard shortcut reduces font size in Word as well as in PowerPoint text boxes. It also works perfectly in PowerPoint on editable text in any selected object.
As mentioned earlier, notice that you don’t have a title master for each slide master (as you did in versions earlier than 2007 for Windows and 2008 for Mac) because you have access to the Title Slide layout (which is essentially the same thing).
It’s also worth noting that one of the other built-in layouts is called Section Header. This is a nice addition and worth pointing out because title masters in earlier versions of PowerPoint were often used for both title and section divider slides, even when the two slide types required different formatting.
If a layout needs different graphic elements than the master, you can hide all of the master graphics (such as accent shapes or logos) and add your own to the specific layout. To do this, select the layout to customize and then, on the Slide Master tab, in the Background group, click Hide Background Graphics (Hide Graphics in PowerPoint 2011). You’re probably already familiar with using this feature to hide background graphics on individual slides. Having it available to layouts as well often comes in handy.
Note, however, that using Hide Background Graphics on a slide layout applies to the graphics the layout inherits from the slide master. When you use this command on a slide, it refers to the graphics on that slide’s layout.
When you apply this setting to a layout, any objects inherited from the slide master (other than the five master layout placeholders) will be hidden on that layout. However, if the layout shares a background style with the master, that will be retained. To hide only certain graphics from the master layout on an individual layout, apply Hide Background Graphics and then copy the graphics you want from the master onto the applicable layout.
If you hide background graphics, and part or all of the slide background disappears, that background was added to the slide master as a graphic sitting on the slide rather than using a background style. This behavior is desired in some cases—for example, where you might want to use a graphic as an overlay and use the background style to change the background color only.
By default, new layouts that you add will be named Custom Layout, then 1_Custom Layout, 2_Custom Layout, and so on. You can change the name of any layout—and it’s a good idea for ease of use, particularly if others will be using the presentation or template. To rename a layout, right-click the layout thumbnail and then click Rename. Or, on the Slide Master tab, in the Edit Master group (Slide Master group in PowerPoint 2011), click Rename.
Custom layouts that you add become available automatically in the Layout gallery for the presentation or template in which you create them. If you save a custom theme from the active presentation, your custom layouts will also be available as part of that theme. See the section Understanding the Themes–PowerPoint Connection, earlier in this chapter, for more details on saving custom themes in PowerPoint.
As mentioned earlier, layouts appear in the Layout gallery in the order that they appear in the Slides pane while in Slide Master view. You can reorder layouts as desired, but if you are creating a theme or a template, keep one important detail in mind.
When a new presentation is created based on your theme, the first slide in the Layout order is the initial slide that appears in the presentation by default. If you then click New Slide on the Home tab (or use the Ctrl+M shortcut) to add a second slide, the layout for the new slide will automatically be the second slide in the gallery. The automatic layout selection does not continue past the first two slides. It is designed with the idea that the first slide a user typically wants is the title slide, followed by a title and content slide.
So, for example, say that you save your theme to the Themes gallery and then apply it to a new presentation that contains just a title slide. If the Title Slide layout is not the first slide in the Layout gallery for your theme, when you insert a second slide, you will get another title slide. The layout will advance automatically only from the first to the second layout in the Layout gallery, and only for the first and second slides in the presentation.
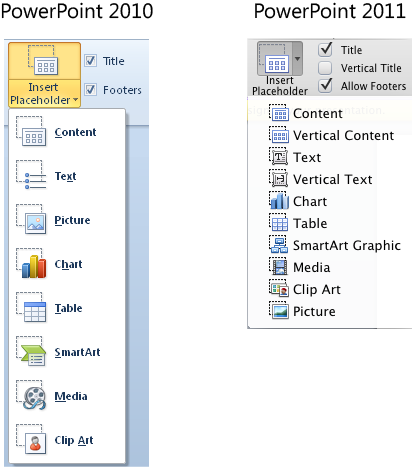

Up to this point, we’ve covered the mechanics of creating and customizing slide masters and layouts. But, before moving on, let’s spend a bit of time discussing what makes an effective slide from a design perspective. The tips in this section don’t apply to presentations you create as print documents. This is about creating slides that capture and keep your audience’s attention, and help get your points across effectively.
When planning your slides, consider the following:
If you’re delivering the slide in person or adding a voice-over, you should display only key points on the slide.
Avoid having slides that repeat the same text you’ll be saying or that will be included in any voice-over. The audience doesn’t need you to read the slides to them, and doing so will usually lose their attention. Instead, use the slides to guide the audience, provide a framework for your presentation, and highlight important points that you want to emphasize.
Keep slides clean and accessible, with text or graphics that are large enough to be seen clearly. Crowded slides are hard to read, and lose the audience’s attention.
For example, if you think you need eight charts on a slide, stop and think about it. Is the audience really going to look at those eight charts? If they do, how much are they going to absorb from all that information? Similarly, if you have so much text on a slide that you have to reduce font size, consider splitting the content onto multiple slides or displaying some of the text content in graphics.
Bullets are boring and don’t grab attention. So, should you avoid them completely? Maybe not, but you can often do better than bullets without extra work.
If you need your text slides to be text slides, consider using different text formatting for different levels (such as a unique font color), instead of bullets, to give your presentation a cleaner feel.
Note
If a text level doesn’t use a bullet, pressing Tab and Shift+Tab won’t work to change the active paragraph to a different level. Instead, on the Home tab, use the Decrease And Increase List Level (called Decrease And Increase Indent in PowerPoint 2011) to change text levels. In PowerPoint 2010, you can also use the keyboard shortcut Alt+Shift+left or right arrow to increase or decrease the text level.
Are you sure you need text slides to be text slides? Remember that you can convert a bulleted list in PowerPoint to a SmartArt diagram in just a couple of clicks. A simple diagram can often make a much clearer statement with more impact than plain, bulleted text—even if it contains the same content, and even if it still uses bullets. In fact, if you want a more professional-looking slide but can’t part with your bullets, note that many SmartArt diagrams are designed to display bulleted text.
The value of a diagram is not just that it adds color or layout to your text, but that the diagram type itself (such as list, process, radial, or hierarchy) can help visually convey your point. For example, compare the two images shown in Figure 13-12. Which would you rather include in your presentation?
Notice that the diagram selected in the second image includes some bullets as well, but the graphical elements both organize the content and help to visually convey the point of the information on the slide.
Figure 13-12. Compare plain, bulleted text to the same information conveyed in a simple SmartArt diagram.
Note
See Also For the full scoop on working with SmartArt, see Chapter 14.
With all of the great design elements at your disposal in Office 2010 and Office 2011, be careful not to let design overwhelm content. As discussed in several chapters throughout this book, when you use formatting effects, use them consistently and sparingly (such as using the same type of gradient across all shapes in a diagram, even if colors in each shape are different).
This also applies to the slide master and layout. For example, just because 10 colors (and several shades of each) are available in your active theme doesn’t mean that you need to use all of them in the presentation (and certainly not all together on one slide). Use clean designs for on-screen presentations to make it easy for the audience to see the slide content clearly.
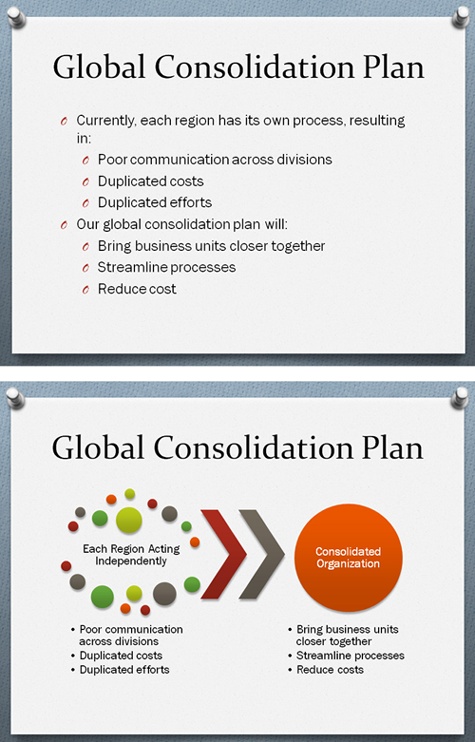
Note
See Also For more on using graphic formatting effects, see Chapter 14. For tips on effective document design, see Chapter 3, and Chapter 4.
In this section, we’ll look at slide elements for creating presentations, including considerations for charts, new text formatting options, tables, and tips for working with embedded objects. We’ll also look at some tools for managing slides, including the new Slide Sections feature and the return of Compare And Merge to PowerPoint for Windows (a brand-new feature in PowerPoint for Mac).
Note
See Also For help working with SmartArt diagrams, shapes, and other Office Art objects in PowerPoint, see Chapter 14.
When you create a chart in PowerPoint 2010 or PowerPoint 2011, you automatically get an Excel 2010 or Excel for Mac 2011 chart (provided that the corresponding version of Excel is installed on your computer). If you’ve worked with charts in PowerPoint in this release or the previous one, you already know that Excel charts are not embedded objects in PowerPoint, but live, editable objects just like shapes or diagrams. Select a chart element, and you’ll get the same Chart Tools contextual tabs that you get in Excel. And, because the chart becomes an active slide element, it automatically takes on the active theme and related formatting.
Note
If Excel is not installed on your system, charts that you create on your PowerPoint slides will still use the MS Graph add-in program used to create charts in earlier versions of Excel.
If you paste a chart from Excel into PowerPoint using the default paste method (Ctrl+V), you’ll now get the same result as if you created the chart in PowerPoint. However, watch out for two issues.
If your Excel chart is a PivotChart, it will become a regular chart when pasted into PowerPoint. PivotChart functionality is not supported in PowerPoint. However, the chart will retain all other formatting and layout settings and remain fully functional.
When you paste a chart from Excel into PowerPoint, you get a linked chart by default. So, if you don’t save the source workbook or it becomes unavailable, the source data will be inaccessible.
When you first paste the chart from Excel into PowerPoint using Ctrl+V, you’ll see a paste SmartTag at the bottom-right corner of the chart. You can click that SmartTag for the option to embed the data in the chart, so that you don’t need the source workbook. However, if you choose to embed the data, just be sure that you know what the source workbook contains, because the entire workbook will be embedded. That means that anyone viewing your presentation electronically will have access to the workbook data.
If you want to embed the information only for the specific chart, choose the embed option. Then, edit the source data for the chart and delete any content you don’t want to be saved with your presentation. Or you can make a copy of the workbook and deleted unwanted elements before pasting your chart into PowerPoint. (Note that this guidance also applies to charts that originate in Excel that you paste into Word.)
Alternately, if you paste the chart as a linked chart and accidentally lose the data, you can paste the chart back into Excel to retrieve that data.
Note
See Also For help working with the Excel charts, see Chapter 20. For help getting back chart data that you’ve lost, see the sidebar How Can I Retrieve Lost Chart Data? in that chapter.
When you work with text in Word, you have styles, of course. When you work with text in PowerPoint, you have masters and layouts to help manage the formatting. So, in keeping with our discussion about managing slides and slide elements, note that the best way to manage the majority of font and paragraph formatting on your slides is to apply it on the master or layouts for consistency and ease of use throughout your presentation.
There are no significant changes to speak of in terms of text formatting in the current versions. But there are nonetheless some important points to keep in mind for making your text easily manageable and optimizing the appearance of the text in your presentations.
If, however, you’re coming to Office 2010 or Office 2011 from a version earlier than the previous, many things are new (all of which are addressed in this section), including multiple text columns in a single placeholder, nine levels of bulleted text, text effects (that is, WordArt that you apply directly in any text box), and more sophisticated font formatting such as character spacing, all caps, and small caps.
For Mac Users
As with many features in this release, the new Ribbon might make it seem like a lot of functionality is new because it’s more accessible. You might not even have noticed it before if you didn’t go digging through menus and palettes. For example, on the Home tab, in the Font group, you have quick access to text effects (among other things), and the options in the Paragraph group on that tab include such features as text columns.
That said, the Format Text dialog box (which is not new) remains a personal favorite (and a feature I wish were available in PowerPoint for Windows as well). This dialog box brings together everything you need for text formatting in one consolidated location, as you see in Figure 13-13.
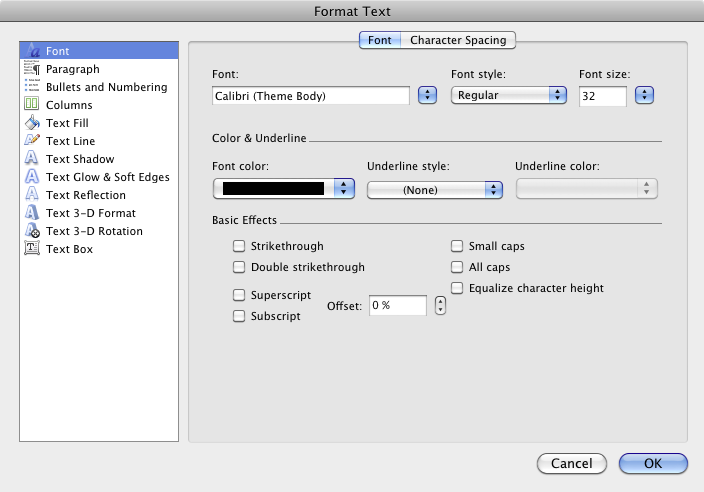
From here, you can access virtually all features for font, paragraph, bullets and numbering, text effects, and text box content formatting. There are several ways to access this dialog box, such as through the Options commands at the bottom of text-related galleries. But you can go straight to it from related commands on the Format menu (such as Font and Paragraph) or when you right-click a selection that contains text.
Windows users, note that you have access to all of these features as well. They’re just divided into a few locations, including the Font, Paragraph, Bullets And Numbering, and Text Effects dialog boxes.
The following best practices focus mainly on managing bullets and numbering across your master and layouts, but also include tips for working with some newer features—such as text columns and (for PowerPoint 2010) the Tabs dialog box—both of which were introduced in the previous version.
Perhaps the most important tip here actually applies to any formatting you do, but is particularly important when it comes to bullets, numbering, and other paragraph formatting: avoid making changes directly on slides. Always work from the outside in (just as you would in a Word document) to help keep your presentation as consistent (and thus, as professional-looking and easy to manage) as possible.
Working from the outside in means that you start by applying any formatting that can apply to the entire presentation (that is, format the slide master), then apply formatting that will apply to all slides using a particular slide layout (format the slide layouts), and only then apply custom formatting as needed to any individual slides. This approach saves you time and effort by helping you do the least amount of work possible. It also makes your presentation easier to manage.
Remember that anything you customize on an individual layout will no longer respond to changes on the master. Similarly, things you customize on an individual slide will not respond to changes on the layout. (Additionally, if you reset the layout for a slide, custom text formatting will be lost.)
Once you have your overall approach down, consider the following to help you handle the details:
To apply formatting to all levels in a text box (such as font or font size), select the bullet for the top level to select all text in the placeholder, or select the placeholder object itself.
To apply formatting to an individual level, such as changing bullets or indents, just click in that level. You can also select the entire paragraph for a level in a placeholder to apply font formatting to that level.
As mentioned earlier, bulleted text layouts have nine levels of text available, even though you only see five by default. Of course, if you need more than five levels of text on a slide, you might want to ask yourself if your document belongs in PowerPoint at all (and hopefully that won’t ever happen in a slide presentation). But if you’re creating a presentation, template, or theme that others will use, it’s important to format all nine levels in case others will make use of them.
To format levels six through nine on the slide master or a slide layout:
Place your insertion point at the end of the level-five paragraph and then press Enter (Return), followed by Tab to demote the new paragraph to the next level.
As mentioned earlier, if the active text level isn’t bulleted, you can’t use Tab and Shift+Tab to change the paragraph to another level. In that case, use the indent buttons on the Home tab or, in PowerPoint 2010, use Alt+Shift+left and right arrow.
Type any text as a placeholder for the level and then repeat this action for the remaining levels.
Format outline levels as needed. Remember that, when you want to make changes to multiple levels at once, you can select the bullet for a higher level to select all the levels that come after it as well.
Caution
There are two important things to keep in mind for the lower levels of your outline. First, when you save a theme after customizing these levels, the placeholder content you add for these levels isn’t saved. Don’t be alarmed—your formatting for all nine levels is still there. Second, font size customization is (frustratingly) not carried over to all slide layouts. For best results, copy the content you add for levels six through nine to every bulleted placeholder on your layouts and confirm that the formatting is as intended for all nine levels, on all applicable layouts. Expect to have to customize the font size on some, such as the Two Content, Comparison, and Content With Caption layouts.
If you change font color for a text level but want the bullet or number attached to that level to remain the original color, set the bullet or number color separately. To do this, click in the level for which you want to set the bullet or number color and then do the following:
On the Home tab, in the Paragraph group, click to expand the bullet or number options and then click Bullets And Numbering. (In PowerPoint 2011, the options when you expand these lists are called Define New Bullet and Numbering Options, respectively.)
You can also access Bullets And Numbering when you right-click. Or, in PowerPoint 2011, access these features in the Format Text dialog box.
Change the color on the appropriate tab of the Bullets And Numbering dialog box.
Regardless of the bullet or number color you want, note that you should not leave the color palette setting at Automatic if you want the color to be different from the paragraph text color. Select the specific color from the palette instead (and remember to select a color from the Theme Colors portion of the palette if you want the bullet or numbering color to be theme-aware).
In the Paragraph dialog box in PowerPoint 2010 (or the Paragraph tab of the Format Text dialog box in PowerPoint 2011), remember that you now (since the previous versions on both platforms) have quite similar indent and spacing options to those you might know from Word. (To access this dialog box in PowerPoint 2010, on the Home tab, in the Paragraph group, click the dialog launcher.)
Find options in that dialog box for paragraph alignment; left, hanging, or first-line indents; spacing before or after the paragraph; and line spacing settings including single, double, exact, and multiple options.
Note that the Before Text indent is the left indent and will behave like a left indent if you set the Special indent setting to None. As in Word, First-Line and Hanging are the options available as Special indents. Paragraph and Line Spacing options work here exactly as they do in Word.
In the Paragraph dialog box in PowerPoint 2010, also notice that you have a Tabs button, which opens a Tabs dialog box (introduced in PowerPoint 2007). Using that dialog box, shown in Figure 13-14, you can set default tab stops (the measurement of 1 shown in this example refers to 1 inch—tab stops are set in your default unit of measurement), set or clear individual tabs, or clear all tabs in the active text box or placeholder.
All of these options work as they do in Word, including the fact that you can edit the default tab stops only from the dialog box (not on the ruler).
This advanced tab functionality is currently exclusive to PowerPoint 2010. However, in both PowerPoint 2010 and PowerPoint 2011, you can still set, move, and remove individual tab stops on the ruler.
To show the rulers (horizontal and vertical) in PowerPoint 2010, on the View tab, in the Show/Hide group, click Ruler. To show the rulers in PowerPoint 2011, on the View menu, click Ruler.
To move an indent or tab stop on the ruler, drag it just as you would on the ruler in Word. However, to drag an indent or tab in smaller increments than your grid setting (0.083 inches by default if your default unit of measurement is inches), hold the Ctrl key while dragging (as opposed to the Alt key in Word).
To remove a tab stop from the ruler, drag the tab stop down off the ruler as you have in the past.
Notice that each outline level’s indents show up separately instead of being crunched together on the ruler at the same time (as they were in versions prior to 2007 for Windows and 2008 for Mac). This makes it easier to adjust indents for individual levels, because you don’t have to use the Ctrl key to drag the indent from one level over another.
Text columns are available in any text placeholder or custom text box. To apply a multiple-column setting, on the Home tab, in the Paragraph group, click the Columns icon and then click the number of columns you want. Click More Columns (Column Options in PowerPoint 2011) to open the dialog box where you can specify the number of columns and set space between columns.
Also notice that columns in PowerPoint are newspaper columns, meaning that content automatically wraps from one column to the next as you add content. There are no column breaks in PowerPoint, so use the columns feature only where it makes sense for your text to automatically wrap to new columns as needed. Otherwise, use separate placeholders (or text boxes) for static columns that you can control independently.
Font formatting finally grew up in the previous releases of PowerPoint for Windows and Mac, with features such as the long-awaited All Caps and Small Caps font attributes, as well as Character Spacing.
Some of these more sophisticated font features, such as those mentioned here, are only available through the dialog box (not on the Ribbon). To access the Font dialog box in PowerPoint 2010, on the Home tab, in the Font group, click the dialog launcher. In PowerPoint 2011, on the Format menu, click Font or use any previously referenced method for accessing the Format Text dialog box.
Of course, formatting fonts is generally simple and straightforward. But a few additional font formatting options warrant pointing out, as follows:
 On the Home tab, in the Font group, notice the Clear All Formatting icon (shown at left). This feature clears font formatting (including text effects) from selected text objects. Alternately, you can use the keyboard shortcut Ctrl+Spacebar for the same results.
Note that the options to expand or condense character spacing work exactly as they do in Word. Though you can change spacing by as little as one-tenth of a point, it usually requires a full point or two to see a significant difference in text spacing (this varies based on point size and selected font). So, condensing a font by just one- or two-tenths of a point can be a good way to fit text without reducing font size, and won’t create much of a visible difference in most cases. However, also keep in mind that some WordArt formatting can have a dramatic effect on text, which might cause character spacing to look different than you expect.
Remember that you can apply WordArt formatting to any text object or any selected text on a PowerPoint slide. Also notice that the terms WordArt and Text Effects (and Text Styles in PowerPoint 2011) are used fairly interchangeably throughout PowerPoint to refer to the same thing. For example, on the Insert tab in PowerPoint 2010 (or on the Home tab, under Text Box in PowerPoint 2011), you see a WordArt option. However, the dialog box for formatting WordArt in PowerPoint 2010 is called Format Text Effects, and the gallery of WordArt on the Format tab in PowerPoint 2011 is called Text Styles.
Note that some WordArt Styles can be applied only to the entire object; this is because some WordArt Text Effects (such as 3-D Rotation or Bevel) can be applied only to the entire object. However, you can select just some text in a text object (such as a text placeholder or a custom text box) and apply Text Fill and Text Outline settings, as well as some Text Effects and WordArt styles.
Note
See Also For more on using WordArt, text effects, or whatever you prefer to call them, see Chapter 14.
Native PowerPoint tables improved greatly in PowerPoint 2007 for Windows and caught up across platform in PowerPoint for Mac 2011. If you use a lot of tables in your PowerPoint presentations, you will probably need to embed tables less often than you did in earlier versions, and that’s terrific.
You can do quite a lot now in your PowerPoint tables, such as selecting multiple cells—or even multiple columns or rows—to apply paragraph and font formatting. Unfortunately, you still have a limitation when working with decimal tabs in PowerPoint tables.
In PowerPoint 2010, you can use the Tabs dialog box mentioned earlier to place a decimal tab in multiple selected cells. (This functionality is not available in PowerPoint 2011.) However, on either platform, decimal tab stops in PowerPoint tables don’t work as they do in Word. That is, they don’t create align decimals even when they are the only tab stop in the cell. You still have to place a tab character (use Ctrl+Tab to do this inside a table, just as you do in Word) to access the tab stop. So, if you need complex financial tables in your PowerPoint presentation, you probably still want to embed that Word table for ease of formatting and editing.
On the other hand, when it comes to typical text tables, native PowerPoint tables now have everything you need. In fact, because tables in PowerPoint have access to the Office Art graphics engine for formatting, native PowerPoint tables are now an easier approach (with more flexible formatting) than embedding that table from Word unless you need formatting for complex financials. In particular, note that the top category of Table Styles in PowerPoint (labeled Best Match For Document—or Best Match For Theme in PowerPoint 2011) pick up the graphic effect formatting for your active theme.
Also note that, if you copy a table from Word 2010, Excel 2010, or Excel 2011 and use the default paste method to paste it into PowerPoint on the same platform (Ctrl+V on Windows and Command+V on Mac), it will paste as a native PowerPoint table. See the Mac sidebar that follows for help getting tables from Word for Mac 2011 to PowerPoint for Mac 2011.
When you insert a table onto a PowerPoint slide from a content placeholder, from the Insert tab, or by pasting it from another program, you get the Table Tools Design and Layout contextual tabs in PowerPoint 2010. In PowerPoint 2011, you have the Tables tab always available, and the contextual Table Layout tab appears when a table is active. Check out these tabs in Figure 13-15.
Figure 13-15. Take advantage of similar functionality that you know from Word tables in PowerPoint 2010 and PowerPoint 2011.
As you see with features such as the ability to control cell margins, PowerPoint tables have come a long way in recent versions.
PowerPoint 2010 users, note the very cool, exclusive Lock Aspect Ratio option on the Table Tools Layout tab. PowerPoint 2011 users, although you see a couple of features that are exclusive to PowerPoint 2010, notice how far PowerPoint 2011 tables have come in this version—you get a lot more flexibility that’s definitely worth a try.
Though Excel charts with embedded data are still native, editable objects on PowerPoint slides, the same is not true for embedded objects from other programs. When you need to embed an object (so that it remains editable in its original program), use the following best-practice guidelines to help simplify your work. (Note that this list focuses primarily on embedded Word tables and Visio 2010 diagrams.)
Default paste behavior when you’re copying objects from Word (or, for Office 2010, from Visio) differs by program and platform:
When you use the default paste method to paste text or tables from Word 2010 to PowerPoint 2010, they paste as native PowerPoint text boxes or tables (respectively).
In Office 2011, text pastes as a text box, but a Word table pastes as a linked Word document object by default.
When you use Ctrl+V to paste a diagram from Visio 2010 into PowerPoint 2010, it pastes as a picture.
To paste content as embedded objects instead so that you can continue to edit them as needed in their source program (and without needing access to the original source file, as you do with a link), use Paste Special.
In PowerPoint 2010, you can access the Paste Special dialog box from the Paste options on the Home tab, or with the keyboard shortcut Ctrl+Alt+V. In PowerPoint 2011, access Paste Special on the Edit menu or with the keyboard shortcut Ctrl+Command+V.
When the object you’ve copied is text or a table from Word, in the Paste Special dialog box, select Microsoft Office Word Document Object. When the object originated in Visio, the Paste Special option to select is Microsoft Visio Drawing Object.
Editing embedded objects is much easier than it has been in the past. Notice that you have the same blue border on embedded Word and Visio objects as you get for Office Art graphics. You can resize embedded objects from within PowerPoint (remember to use the Shift key and size from the corners to retain aspect ratio—as with any graphic object—if dragging to resize) and just double-click to edit the object in its source program.
Of course, as with embedding content in almost any software program, the source program must be installed on your machine for you to edit the embedded object.
As mentioned at the start of this chapter, PowerPoint 2010 and PowerPoint 2011 include two simple but very nice new (or returned) features for organizing and managing slides: Slide Sections and Compare And Merge. Before we get to these features, however, take a brief look at some slide management basics—in particular, using the Slides pane and Slide Sorter view to access and organize slides, or to share slides between presentations.
The Slides pane and Slide Sorter view are interchangeable for many slide management tasks, including moving quickly to a specific slide or reordering slides by dragging them. You can also paste a slide from one presentation into another in either of these locations. Use the following tips to help you work more efficiently when using the Slides pane and Slide Sorter view:
The Slides pane is open by default in Normal view. If you don’t see this pane, place your insertion point over the left edge of the screen until you see a double-backed black arrow and then drag to the right to expand the pane. This pane includes a tab for slide thumbnails, and a tab for an outline of slide titles and any text in text placeholder outline levels. In addition, as addressed earlier in this chapter, when you work in Slide Master view, this pane shows thumbnails for slide masters and layouts.
To open Slide Sorter view, on the View tab (View menu in PowerPoint 2011), click Slide Sorter. Or, click the Slide Sorter view shortcut on the Status bar.
To move to any slide in the presentation, just click that slide in the Slides pane or double-click the slide in Slide Sorter view.
To delete a slide from the presentation, just select the slide in either the Slides pane or Slide Sorter view, and then press Delete.
To add a slide at a specific location, in either Slide Sorter view or the Slides pane, click between slides where you want the new slide to appear, and then press Ctrl+M, or right-click and then click New Slide. If you select a slide before inserting a new slide, the new slide will appear after the selected slide.
To copy or move a slide from one presentation to another, select the slide in either the Slides pane or Slide Sorter view and then copy. In the new presentation, click in the Slides pane or Slide Sorter view at the location where you want the new slide to appear and then paste.
By default, slides take on the destination formatting. If you intentionally want to add the master from your source presentation to the destination presentation, expand the Paste Options that appear immediately after pasting (the paste SmartTag in PowerPoint 2011) and then click Keep Source Formatting.
However, using the Keep Source Formatting feature is by far the most common source of size and stability problems in presentations in my experience, especially when you’re copying content from legacy presentations. This is because Keep Source Formatting adds a master and a full set of layouts every time you use it. So, be very certain that this is your intent before you use it.
Note
See Also For more on the Keep Source Formatting feature, including how to get along without it and save time in the process, see the sidebar Managing Content from Other Presentations, which follows this list.
Notice that you can perform several actions from the options available when you right-click a slide in either the Slides pane or the Slide Sorter, such as adding a slide, deleting or copying a slide, or changing the slide background. In PowerPoint 2010, on the Slides pane, you also have access to the Layout gallery when you right-click a slide.
For most actions in either the Slides pane or the Slide Sorter view, you can select multiple slides at once. As with most selection actions, hold the Shift key to select multiple neighboring items, and the Ctrl key (Command key in PowerPoint 2011) to select non-contiguous items.
Because you can have multiple themes in a PowerPoint presentation (as discussed earlier in this chapter), you can apply a theme to any slide or group of slides. When you have multiple slides selected in the Slides pane or in Slide Sorter view, just click the theme that you want to apply from the gallery. You can right-click a theme in the gallery for the option to apply it just to selected slides, but a regular click will apply it by default when you have multiple slides selected.
If the selected theme isn’t already active in your presentation, a new slide master and accompanying set of layouts will be added to accommodate this theme—so use this capability sparingly.
As introduced early in this chapter, slide sections are a simple and effective tool that enables you to name a selection of contiguous slides for easier collaboration and quick access to portions of your presentation.
To create a section, just select contiguous slides in the Slides pane or Slide Sorter view and then, on the Home tab, in the Slides group, click Section and then click Add Section. As shown in Figure 13-16, you see section names before the section in either the Slides pane or in Slide Sorter view.
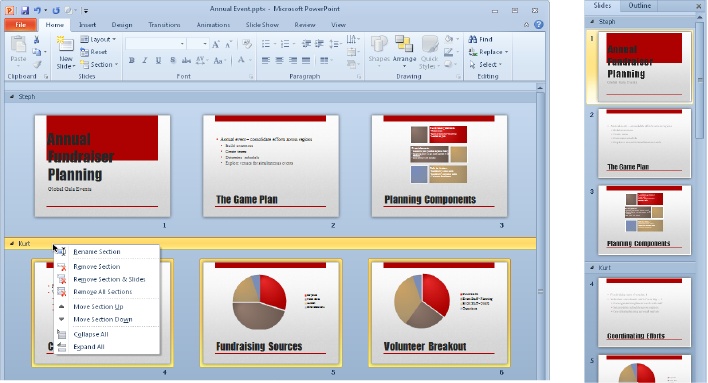
Figure 13-16. Slide sections are visible in both Slide Sorter view and the Slides pane. Right-click a section heading in either location for the shortcut menu you see here in Slide Sorter view.
When you first create a section in PowerPoint 2010, it is untitled. You can access the option to rename the section from the Section menu on the Home tab in the Slides group or when you right-click the section heading, as you see in Figure 13-16.
In PowerPoint 2011, you are automatically prompted to rename the section when you create it, but you can access the rename command at any time.
You can rearrange slides by section, collapse and expand sections for easy navigation, or delete slides by section from the section management tools on the Home tab or in the shortcut menu that appears when you right-click a section heading. In PowerPoint 2010, the Slide Show menu (in an active slide show) also includes the option Go To Section (in addition to the existing Go To Slide feature), and you can print slides by section.
Compare And Merge is a nice way to see changes between two presentations, particularly when you’re working on a presentation with others and want to see what’s changed. It’s not a robust document-comparison tool like the Compare feature in Word, but it will give you a good sense of what has changed between the two versions and let you decide whether to accept or reject changes.
It’s fairly simple and straightforward, but there are a few points that are worth mentioning for ease of use, as follows:
To compare presentations, start with one version open on your screen. It’s a good idea to make a copy before you start because the comparison occurs directly in the open presentation. Then, on the Review tab, click Compare and select the file to which you want to compare the open presentation.
When you start a compare, a Revisions pane (called Compare Changes in PowerPoint 2011) appears on the right side of the screen, as shown in Figure 13-17. Note that no content is added to the open presentation automatically.
In PowerPoint 2010, you also see an icon on the top-right corner of the slide thumbnails in the Slides pane when the slide contains changes. And, when the slide is active, you see icons on the slide itself that you can click to review changes.
It’s common for only the Accept or Reject command on the Review tab to be available at one time. This does not mean that you don’t have the option to accept or reject a change. If it’s available, click Accept to view the changes from the other version on your slide. You then have the option to reject that change and revert to your active presentation’s version of the applicable content.
Notice in the Revisions (Compare Changes) pane that you can also see a thumbnail of what the active slide looks like in the other presentation.
To see this in PowerPoint 2010, click the Slides tab in the Revisions pane.
There are limitations to this functionality, especially when changes have been made to content other than text and theme formatting. For example, changes to a SmartArt diagram will result only in an indicator that the diagram was changed; the detail will not tell you what that change is. However, don’t dismiss this feature so quickly. Remember that you can just accept the change to see the other version on your slide. Then, reject it to return to your original if preferred.
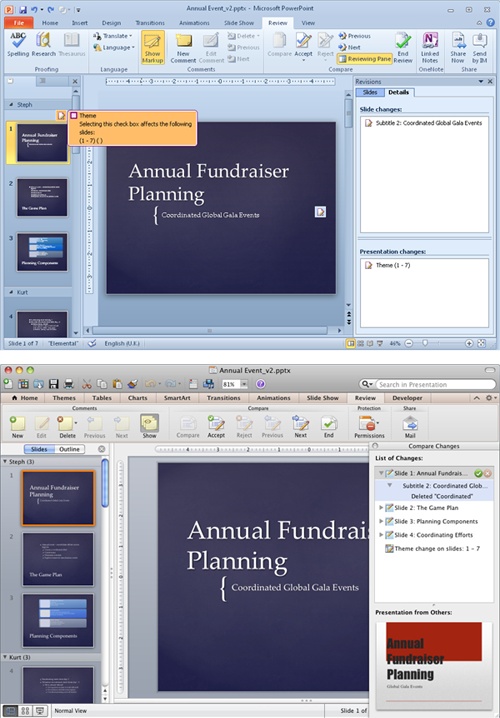
You do need to access separate files to compare for this feature. But if your presentation is saved to a SharePoint library or a SkyDrive folder, you get automatic versioning (in SkyDrive, this becomes active when others make changes to your file; in SharePoint, versioning settings are controlled by your SharePoint administrator). So you can retrieve a previous version, save it as a file, and then use Compare And Merge to compare it to your current version. See the following sidebar, Share Content Like Never Before, for more about presentation sharing and collaboration benefits in the cloud.