In this chapter, you will:
Learn about embedding versus linking media files in your presentations
Understand how to work with a range of video and audio file formats
Explore options for creating a high-quality video of your presentation
Discover a range of new video formatting tools
Learn about editing media in PowerPoint 2010
Get tips for using PowerPoint 2010 media bookmarks to make your presentations more dynamic
Well, its’s about time. No more packaging files to send your presentation to others or show it from a different computer, just because your slide content includes a video or two. No more worrying about maintaining paths for linked video files so that your media will play. If you’re a PowerPoint user, you might already know what I’m about to tell you: we can finally embed video in PowerPoint presentations.
But the story doesn’t stop there. Microsoft PowerPoint 2010 and PowerPoint for Mac 2011 offer tremendous advances in working with media in your presentations; simple details like improved media controls and video formatting tools give you a more professional experience. And some big wins for PowerPoint 2010—such as basic video editing, the ability to play back online videos right from a slide, and the capability to easily create a high-fidelity video of your presentation—are true game-changers when it comes to the level of multimedia presentations you can create.
This is all good news, and you’ll learn about these great new features and others in this chapter. But that’s not all there is to it. There are some limitations to this new functionality, such as the fact that embedded media has limited backward compatibility. So this chapter also takes you through the potential downsides and, where available, their workarounds.
Note that, because most of the functionality covered in this chapter is new or improved, you won’t see a list of new and improved features up front. We’ll just jump right in.
Are you ready? Okay then. Lights, camera, action! (I’ve always wanted to say that.)
When you insert video or audio files onto your PowerPoint slides, they are now embedded by default. So, as long as you deliver your presentation using Office 2010 or Office for Mac 2011, and you don’t need to share the live presentation file for playback with people who are using an earlier version of PowerPoint, you’re all set. Well, almost.
Consider four essential issues when inserting media files:
You must save your files in the Office Open XML Formats (the Office 2010 and Office 2011 file formats, such as .pptx or .pptm for PowerPoint presentations) to embed media. If you embed media and then save your presentation in the legacy formats (such as .ppt, the Office 97 through Office 2004 PowerPoint presentation format), you will see a compatibility warning, and embedded media will be converted to pictures when you save.
Caution
When you are using (or sharing with those who use) PowerPoint 2007 or PowerPoint 2008 for Mac, the embedded media in your PowerPoint 2010 and PowerPoint 2011 presentations will play. If it doesn’t, check Office 2007 or Office 2008 to ensure that the latest updates are installed. However, note that many features you can add to video in the current versions are not supported in prior versions. For example, if you apply a video style, it is not retained while the video is playing back in PowerPoint 2007 or PowerPoint 2008.
This cautionary note is intended only to warn you that playback might not look the same to recipients who are watching the presentation in the earlier version, depending on the options you’ve applied. If you’re sharing the file with other editors who are using the 2007 or 2008 versions, they can edit the presentation and save it in those versions without concern—when you next open the presentation in PowerPoint 2010 or PowerPoint 2011, your media formatting will still be intact.
When you embed a media file, you are actually embedding a copy of that file. This means that when you format or edit the media on your slides, your actions have no effect on the original source file. So, feel free to have fun with the media in your presentations, knowing that you can get the original back (by inserting it again from the original source file) at any time.
Media files, especially video files, are often very large. PowerPoint won’t stop you from embedding a 100 MB video clip on a slide, for example. But don’t expect hundreds of megabytes of media files to play back problem-free during your slide show. And if it seems as though they do, please don’t be surprised when the presentation file itself demonstrates performance problems.
So what can you do? PowerPoint 2010 gives you built-in tools for compressing embedded media files that can often help. But for both Windows and Mac OS users, you can often manage quality versus size with the media file format you select.
Note
See Also For more information, see the Compress Media and Improve Compatibility section later in this chapter.
Both PowerPoint 2010 and PowerPoint 2011 have become more flexible in the media formats that you can insert and playback. For example, you can now embed QuickTime movies in PowerPoint 2010. To insert and play back media in any format, however, the right codecs need to be installed on your computer.
What is a codec? The word is taken from the terms coder and decoder (or compressor and decompressor, depending on who you ask). It’s essentially the format that allows the media file to be coded (or compressed) to create the file, and decoded (or decompressed) to play it back. Each operating system comes with different codec filters built in. For example, in many countries (including the United States), Windows comes with Windows Media Player built in, which provides support for formats including Windows Media files (WMV for video and WMA for audio); Mac OS comes with Quick Time installed, which provides support for formats such as MOV Quick Time movies.
Note
Windows users, note that the media codecs that PowerPoint supports out of the box vary by Windows version. For example, in some countries, Windows Media Player is not installed as part of Windows. But you can still download it for free from http://microsoft.com/downloads.
So, if you try to insert or play back a media file and get an error message, try installing the necessary codecs. For example, if you’re a Mac OS user and want to insert or play back WMV files, download and install the free Windows Media Components for QuickTime (a third-party tool that you can download from either Microsoft’s or Apple’s website); if you’re a Windows user and are unable to insert or play back QuickTime files, download and install the free QuickTime player from Apple. (Note that some codecs for other formats might be available from third parties, and may carry a fee.)
Note
See Also To download the free Quick Time for Windows, visit www.apple.com/quicktime. To download the free Windows Media Components for QuickTime by Flip4Mac, visit www.microsoft.com/downloads/en/details.aspx?FamilyID=915d874d-d747-4180-a400-5f06b1b5e559.
For more about media formats supported in Office 2010, see the Office.com help article “Compatible audio and video file formats in PowerPoint 2010” available at http://office.microsoft.com/en-us/powerpoint-help/compatible-audio-and-video-file-formats-in-powerpoint-2010-HA010336709.aspx?CTT=1. This article provides good background on media file formats, but note that it does not provide complete lists of supported formats. For example, it references extended format compatibility such as Quick Time movies, but does not include them in the list. You may also be able to use formats that are not mentioned in that list at all, such as DivX and H.264, when you have the appropriate codecs.
For a list of media formats supported in Office 2011, see the Office for Mac help article, http://mac2.microsoft.com/help/office/14/en-us/powerpoint/item/de03a4fa-8592-4c98-9a3c-2cbfdb3931d7.
For additional information about working with codecs on Windows, see the Windows 7 help page “Codecs: frequently asked questions” at http://windows.microsoft.com/en-US/windows7/Codecs-frequently-asked-questions.
For additional information about working with codecs on Mac, see the Apple webpage on extending QuickTime at www.apple.com/quicktime/extending/components.html. Note that this is another resource where you can download the Flip4Mac Window Media Components for Quick Time.
To insert a video or audio object from your files:
On the Insert tab, in the Media group, click Video or Audio (as applicable). The Insert Video or Insert Audio dialog box appears.
To embed the media object in your presentation, just select the file you need and then click Insert.
To insert the media object as a link to the source file, click the arrow on the right edge of the Insert button and then click Link To File.
Note
When you insert an SWF file (an Adobe Flash format) into PowerPoint 2010, it is still inserted as a linked object by default and can’t be embedded.
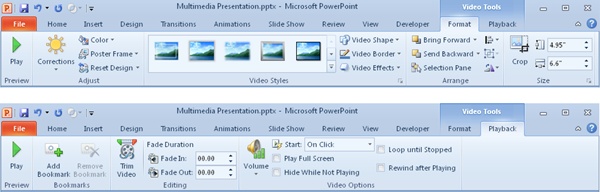
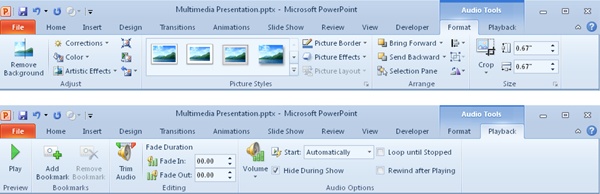
When you select a video in your presentation, the Video Tools Format and Playback tabs become available, as shown in Figure 15-1. When you select an audio object in your presentation, you get the Audio Tools Format and Playback tabs shown in Figure 15-2.
On the Home tab, in the Insert group, click Media for the options to insert a movie or audio file from the Media Browser or from your files.
If you choose to insert the file from the Media Browser, the browser opens to the applicable tab—the Movie Browser or Audio Browser.
If you choose to insert the media from a file, the Choose A Movie or Choose Audio dialog box opens.
Note
The options to insert from the Media Browser or from your files are a bit misleading. The content that you access through the Media Browser is saved in your files. The difference between the two options is that the Media Browser accesses and displays media files such as movies and audio from your applicable media libraries (such as iTunes or iMovie), whereas when you select the option to choose from your files, you manually browse to the location on your system where the media file is saved.
To insert a media object using the Media Browser, just drag the object to your slide. It is automatically embedded.
To insert the media file as an embedded object using the Choose A Movie or Choose Audio dialog box, just select the file and then click Insert.
To insert the media object as a link to the source file, you must insert it using the Choose A Movie or Choose Audio dialog box. In that dialog box, select the Link To File option before you click Insert.
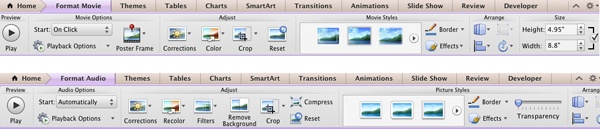
When you select a video in your presentation, the Format Movie tab becomes available. When you select an audio object in the presentation, the Format Audio tab becomes available. Both tabs are shown in Figure 15-3.
Embedding media is a great advance in PowerPoint and certainly the best way to go when your media is a manageable size (or can be reduced to a manageable size) to ensure that performance remains good when you deliver your presentation. But if you need a lot of high-resolution video in your presentation, and compression options are not sufficient (and if that presentation won’t need to travel to many other computers as a live PowerPoint presentation), linking media files can still be a handy way to reduce file size, which can improve playback performance.
Caution
If you use linked media in your presentation and then need to share that presentation with others, making a movie of the presentation might be your best bet. PowerPoint 2010 still includes the Package For CD feature, but it’s a bit diluted from previous versions. PowerPoint 2011 no longer gives you the option to save your presentation as a package.
In PowerPoint 2010, click the File tab, click Save & Send, and then click Package Presentation For CD to access the Package For CD feature. When you do, PowerPoint displays a list of items that will be included in the package. However, the list is not entirely accurate. It says that the PowerPoint Viewer will be included in the package, but that is no longer the case. Instead, when recipients play the CD, it will open to a webpage from which they can download the viewer.
For both PowerPoint 2010 and PowerPoint 2011, when you need to share a presentation just for playback, consider sending it as a video instead. PowerPoint 2010 includes the new, superb Create A Video feature, which creates a full-fidelity video with all of your media playback, transitions, and more. The PowerPoint 2011 Save As Movie feature, however, has not changed in this version. It doesn’t support media playback (among other things), so it’s not a great choice for sharing multimedia presentations. However, you can easily use a third-party application, such as TechSmith’s Camtasia for Mac, where you can also edit and customize the video. Learn about the options for both PowerPoint 2010 and PowerPoint 2011 in the section Create a Video of Your Presentation, later in this chapter.
In previous versions of PowerPoint, if you post a video to a website (such as You Tube) and then want to play it back during your presentation, you need to add a hyperlink on a slide to take you to that webpage for playback. This is still the case in PowerPoint for Mac, but it’s not the end of the world—you can still get to the video and then get back to your presentation pretty easily. But if you’ve needed this functionality in the past, you might have wondered if there was a way to play that video directly from the slide rather than opening it in a browser.
In PowerPoint 2010, you now have the option to insert a video onto your slide from a website and then play it back during your presentation right on the slide—no hyperlinks or browsers involved. To do this:
On the Insert tab, in the Media group, click the arrow at the bottom of the Video command and then click Video From Web Site.
In the dialog box that opens, paste the embed code for the video you want to insert and then click Insert.
If the video can be embedded, the embed code is typically available from the webpage where the video is posted. You might see an embed command on the page, or you might need to right-click the video to see that option, depending upon the site. Just select and copy the embed code when it displays on screen.
Note
If you see a message that PowerPoint cannot use the embed code you have pasted and you know that you copied it correctly, PowerPoint might require a different type of code. There are two types of embed codes available. The correct embed code type to use in PowerPoint starts with the object tag. That is, the word object appears after an open angle bracket: <object… To get this embed code if it is not the one first presented for the video, check whether the page offers an option to use an alternate or old embed code.
Caution
Keep in mind that this feature gives you the ability to insert your videos that are hosted on a website. It does not confer any rights. So, please be cautious and respectful of copyrights when choosing media for your presentation. Just because you can technically embed a video does not mean the copyright on that video allows you to do so for your purposes. For example, a video that someone else owns and posts on a public video site may provide an embed code, but that does not mean the owner has given you the right to use it for your marketing or other commercial content.
When you insert video from a website, keep a couple of additional points in mind:
You must be connected to the Internet, and the video must still be available on the source website for it to play back during your presentation.
Video that you insert from a website can’t be edited like the embedded or linked videos from your files and can’t use some of the new formatting tools. For example, if you apply a video style, that style is not retained while the video plays.
PowerPoint 2010 provides built-in features for compressing the embedded video and audio content in your presentation and improving compatibility for media playback on multiple computers. There are times when the built-in options will do everything you need, so they are great to have. But if you don’t get the results you need, it’s good to understand what these tools do and know your other options.
PowerPoint 2011 doesn’t offer compression or compatibility tools for your embedded media, but a combination of easy-to-use third-party tools and your own good sense can usually get the job done quite well.
In the sections that follow, we’ll look at both the built-in and external options for compressing media and helping to improve compatibility when you share multimedia presentations.
To access these options, click the File tab. If your presentation contains embedded files that can be compressed, the Media Size And Performance group automatically appears on the Info tab in Backstage view, as shown in Figure 15-4.
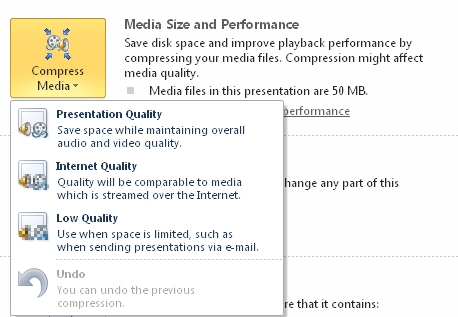
Depending on the file format, original size, and quality of your embedded media, compression options may vary. For example, if you start with a fairly small (lower-quality) video and select Presentation Quality, PowerPoint may indicate that the video is already compressed and no space was saved.
Also depending on the original quality and format of your presentation, compression might reduce quality beyond what is acceptable for your presentation requirements. Fortunately, you can undo your last compression with just a click, as shown in Figure 15-4. However, it’s always a good idea to make sure you have access to the original media file before you compress the copy that resides in your presentation, in case other forces intervene and you need to start fresh. For example, perhaps you think the compression quality is fine, but you send it to your manager, who is unhappy with the results. After you close the file, you can no longer undo the compression.
Note
If you need to compress media and don’t have the original file handy, don’t be concerned. Just save a backup copy of your presentation before you begin altering the media quality.
However, you don’t have to make the decision to accept or undo the compression immediately. Even after the Undo option is no longer available in Backstage view, it might still be available from your undo cache for the active presentation, as long as you don’t close the file. Don’t count on this, but keep it in mind as a possible alternative to panic if the occasion arises. To check whether you can still undo this compression, on the Quick Access Toolbar, click the arrow beside the Undo command. You will see the list of your available undo actions. If the compression action still appears, select all actions up to and including that compression to undo it.
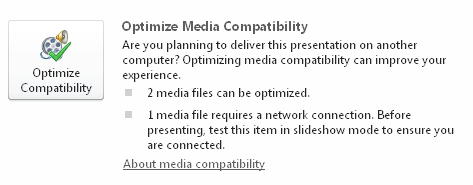
The built-in PowerPoint 2010 feature to optimize compatibility for embedded media is not quite what it sounds like. It optimizes compatibility for sharing with other Windows users. This feature converts your embedded media content to Windows Media file formats (such as .wmv) if the original format is different (such as .mov or .mp4).
If you share with Mac users and they have the Flip4Mac tools installed (discussed earlier in this chapter), no problem. But if you need to share presentations across platforms, just keep in mind what the optimization tool does.
Also note that this feature may compress your file as it converts the format, so if you want to compress and optimize, try optimizing first. Additionally, keep in mind that changing the format doesn’t have to affect quality, but it might. So, review your media after optimizing and before you deliver your presentation.
When media that can be optimized exists in your presentation, the Optimize Media Compatibility group automatically becomes available on the Info tab in Backstage view, as shown in Figure 15-5. Notice that this option appears both for embedded media that can be optimized and for video inserted from a website. For the latter, you see the warning that you must have an Internet connection to play back the media during your presentation.
Note
The About Media Compatibility link in the Optimize Media Compatibility group shown in Figure 15-5 provides more information about the tool as well as some further information on codecs for additional media formats.
If optimizing media negatively affects the quality of your media playback, you can undo the action from the Undo command on the Quick Access Toolbar. Just click the arrow that appears next to the command to see the available undo actions. If the optimize command appears in the list, drag your mouse pointer to select all actions up to and including that action and then click to undo.
If you use Office 2011 or if the built-in tools in Office 2010 don’t do what you need, keep in mind that you have other options. A wide range of third-party tools is available to export media files to other formats and quality settings. And they provide far more granular choices than you get from the PowerPoint 2010 built-in tools.
You can find both free and paid tools available for download. One that I like (it’s not free, but it is free to try) is called 4Media Video Converter Ultimate, and it’s available for both Windows and Mac. Using a tool such as this, you can convert to most formats that would be compatible with one or both platforms of PowerPoint, and be selective about size and quality. Try converting to a range of options to pick the best quality-to-file size ratio for your needs.
Using a media conversion application, along with the information and resources about compatible media file formats and codecs provided in the Embedding and Managing Media section earlier in this chapter, you can pretty easily determine the best media format for your specific needs.
Note
See Also For more information about 4Media Video Converter Ultimate, visit www.mp4converter.net/video-converter.html.
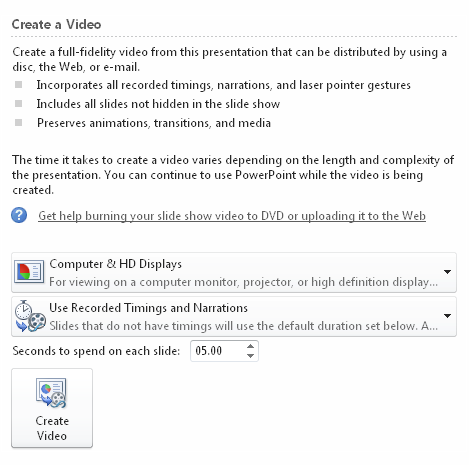
One of the nicest additions to PowerPoint 2010 is the ability to create a high-quality video of your active presentation, complete with media playback, animation, transitions, narration, timings, and even your laser pointer movement. When you select the option to create a video, PowerPoint works in the background, enabling you to continue working on other files.
So, you can upload your presentation video to a website for sharing, email it, burn it to a DVD—in other words use it as you would any video.
To get this done, click the File tab, click Save & Send, and then click Create A Video. As Figure 15-6 shows, you can select the finished size for your video (depending upon how you plan to share it, such as on a computer or on an MP3 player) and choose whether to include your narration and timings.
If you use PowerPoint 2011, the built-in Save As Movie feature is not a solution for saving multimedia presentations, because media playback is not supported. However, a third-party tool such as TechSmith’s Camtasia enables you to create a video of your presentation, where you can include audio and record every action that occurs on the screen.
For both Windows and Mac OS users, there might be occasions when you want to use a tool like this because it enables you to manipulate the video with quite a bit of flexibility and granularity. You can add and edit separate soundtracks, edit the video, and add video effects such as zooming in on a part of the screen at a specific moment.
Note
See Also There are several screen-capture video options out there. I’ve used and like the TechSmith options, which are available for both Mac OS and Windows. Camtasia Studio is the Windows product, and Mac OS users can get Camtasia for Mac. Visit http://www.techsmith.com/camtasia to learn more or download a free trial.
In PowerPoint 2010 and PowerPoint 2011, you can now format videos in your presentation much like you do pictures—only better. The new video poster frame feature also enables you to take formatting further and make better use of the slide area while the video is not playing back.
In the previous versions of PowerPoint for Windows and Mac, you can apply a style to a video object much like you could do to a picture. Those styles look so much like picture styles because they are, in fact, picture styles—even when applied to a video. So, they look great on the slide when the video is not playing. When the video begins to play, however, it pops out of whatever formatting is applied into a standard rectangular video frame.
In PowerPoint 2010 and PowerPoint 2011, you now have video styles that look virtually the same as picture styles. The difference you don’t see, however, is a big one. That style sticks around while the video plays for a much more professional result.
Similarly, you can apply individual video formatting effects (such as reflection or bevel) that look just like the effects that you can apply to pictures. But these, too, will be retained while the video plays. For example, when you apply a reflection to your video, you see the playback in the reflection as well.
You’re probably sensing a theme. The big news for formatting video in PowerPoint 2010 and PowerPoint 2011 is that the formatting you apply stays put during playback, including the following:
All of the formatting tools addressed here are available on the Video Tools Format tab (Format Movie tab in PowerPoint 2011) shown earlier in Figures Figure 15-1 and Figure 15-3. These tabs become available automatically whenever you select a video in your presentation. Keep in mind, however, that these formatting tools will work with embedded or linked video from your files, but not video that is inserted from a website.
Note
See Also Because the formatting tools available to video are essentially the same as the corresponding picture formatting tools, you can get more information about the improved cropping functionality and correction tools such as brightness and contrast in Chapter 5, where the features are addressed for formatting pictures. Formatting effects are part of Office Art formatting, which you can learn more about in Chapter 14.
If you’ve ever printed a presentation that contains a lot of video, only to end up with a collection of slides that are mostly black boxes, this feature will make you very happy. This very simple tool enables you to choose a frame from the video or a picture from your files to apply as a video poster frame—that is, as a picture that displays in the video area while the video is not playing.
So you can help your slides tell a more effective story in print (or when displayed on screen before or after the video plays) with just a few clicks.
To apply a frame from the video as a poster frame:
In Normal view, begin to play the video.
Use the video controls to move to exactly frame that you want use for your poster frame. Then pause the video.
In PowerPoint 2010, on the Video Tools Format tab, in the Adjust Group, click Poster Frame and then click Current Frame.
In PowerPoint 2011, on the Format Movie tab, in the Movie Options group, click Poster Frame.
You will see a message on the video timeline bar indicating that the poster frame has been set.
To apply a picture from your files as a poster frame, you do not need to be playing the video. Just click the Poster Frame command as indicated in the preceding steps and then click Image From File (Picture From File in PowerPoint 2011) to select your image file.
PowerPoint 2010 exclusively offers the option to trim and add bookmarks for audio and video playback.
Trim the start and end points of video and audio playback to include just the part you need. To do this:
On the Video Tools Playback tab (or Audio Tools Playback tab), in the Editing group, click Trim Video (Trim Audio). The video or audio object opens in a separate dialog box.
In the Trim Video or Trim Audio dialog box, you see a timeline with green and red handles to indicate the start and end point of the content, respectively. Drag those handles to trim or specify times in the Start Time and End Time boxes.
Click the play button in the dialog box to preview your trimmed media. When you’re happy with your trim settings, click OK.
You can return to the Trim Video or Trim Audio dialog box at a later date to alter the trimmed portion. However, if you compress a trimmed video, the trimmed portions may be deleted if the trimmed size is smaller than the compressed size. Additionally, if you use the Document Inspector to remove some types of potentially private information from your presentation, trimmed areas are removed. So, before you trim the media, be sure you have a backup copy of the presentation or the original media source files in case you find that you need the trimmed portions at a later date.
Note
See Also To learn about the Document Inspector, see Chapter 3.
Note
In PowerPoint 2010, on the Video Tools Playback tab or Audio Tools Playback tab, in the Editing group, you also have the option to set the video or audio files to fade in and out. Set timing in seconds, to 1/100 of a second in precision.
It’s a great detail for a simple professional touch, and nearly effortless to apply. Note that this feature is completely different from using a fade animation effect on your media object. Animation will fade the object in or out, depending upon your settings. These settings are true video and audio fade that will fade the media in or out as it plays.
Another PowerPoint 2010 exclusive feature enables you to add bookmarks at specific points in video or audio playback. Bookmarks are visible on the timeline while the media plays, so you can just click a bookmark to move to that position.
But bookmarks provide a much more important benefit than a simple pointer for playback. You can use a bookmark to trigger the animation of other objects on your slides. So, for example, you can add text boxes or other objects to the slide to use as captions for specific points in your video. Animate the object to appear and trigger that animation to start automatically when the specified bookmark is reached during playback.
To set a bookmark:
Begin playback on your selected video or audio object while in Normal view.
When you reach the point in the playback where you want the bookmark to appear, on the Video Tools Playback tab (or Audio Tools Playback tab), in the Bookmarks group, click Add Bookmark.
The bookmark appears as a white dot on the timeline. To move to a bookmark during playback, just click it. To delete a bookmark, click it and then, on the Video Tools Playback tab (or Audio Tools Playback tab), in the Bookmarks group, click Remove Bookmark.
After you set a bookmark, it automatically becomes an available animation trigger.
Note
See Also To learn about working with animation in PowerPoint, including how to set an animation trigger, see Chapter 16.