In this chapter, you will:
Discover new and improved slide transitions and transition settings
Explore improved animations and more flexible animation options and tools
Learn how to choreograph animation during media playback using PowerPoint 2010
Get tips for working with the improved Presenter view in PowerPoint for Mac 2011
Explore new and interesting options for setting up and delivering your show
The basics of slide show functionality are largely the same in Microsoft PowerPoint 2010 and PowerPoint 2011 as they were in the previous versions of PowerPoint on both Windows and Mac OS. However, there are some important advances in formatting and features that you can use to make your slide show anything but basic.
Slide transitions have come a long way. In fact, they’re downright cinematic. The quality and flexibility of animations is improved as well. And when you need to deliver your presentation live and remotely, you have an important new option in Broadcast Slide Show.
In addition to new and improved features on both platforms, PowerPoint 2010 gets some nice, new exclusive features, including the ability to trigger animation to start at a specified point during media playback and (insert drumroll here) Animation Painter. The fantastic, long-awaited Animation Painter feature enables you to copy a set of custom animation from one object to another, much like Format Painter lets you copy formatting between objects. And, if you’d like a bit of help making your point during your presentation, you now get a color-customizable laser pointer for use during slide shows.
PowerPoint 2011 users might, understandably, be disappointed about the lack of Animation Painter and media triggers. But you do get an exclusive as well—improvements in Presenter view make it a pretty powerful tool for managing your presentations more easily during the show. Additionally, Mac users get further improvements in animation with a range of advanced, built-in motion path animations similar to those available in PowerPoint for Windows.
As with Chapter 15, most of the focus in this chapter is on what’s new or improved for this topic. So, we’ll skip the What’s New section in this chapter as well and jump right into the good stuff.
In PowerPoint 2010 and PowerPoint 2011, slide transitions are now available from their own Ribbon tab, as shown in Figure 16-1. Accessing and applying transitions is easier with a dedicated Ribbon tab. But the Ribbon is not the big story for what’s new in transitions.
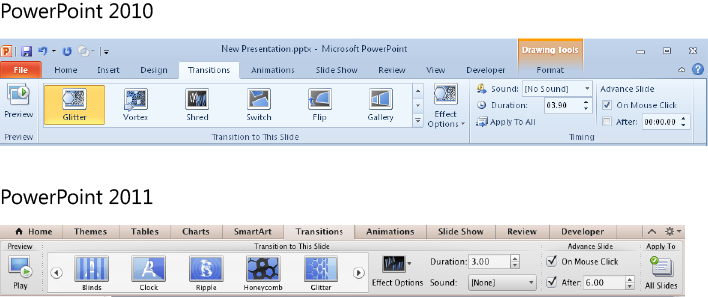
Many new, 3-D slide transitions are available, and they are simply gorgeous. You’ll also notice an improvement in the quality of existing transitions that you might know from earlier versions.
The new 3-D options include transitions for animating the slide itself as well as some that animate just the content on the slide. In Figure 16-2, notice the Subtle, Exciting, and Dynamic Content categories that appear in the Transitions gallery.
Note
The Transitions galleries in PowerPoint 2010 and PowerPoint 2011 include the same categories and same transitions. The thumbnail previews in the PowerPoint 2011 gallery are larger and give you a clearer picture, in my opinion, of what the transition looks like, so Figure 16-2 displays the Mac version of this gallery.
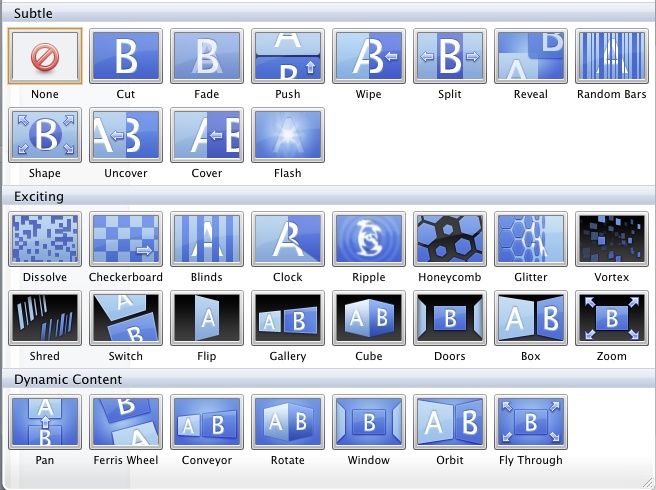
The Subtle category includes basic transitions that you might already know. The Exciting category is a mix of existing, improved, and new transitions, including the 3-D transitions that animate the entire slide, such as the gallery transition shown in Figure 16-3.
Note
Of course, a still image can’t do justice to a dynamic transition such as those you see in the examples in Figures Figure 16-3 and Figure 16-4. Try this feature out for yourself to get the full effect.

The options in the Dynamic Content category make a smooth transition from one slide to the next, while using 3-D effects to animate the transition of the content. For example, take a look at the rotate transition in mid-rotation, as shown in Figure 16-4.
Figure 16-4. The new rotate transition is one of several transitions that use 3-D effects on the slide content.
When working with transitions, keep in mind that what you see in the gallery isn’t everything. That is, most transitions come with options to select the direction in which they move. You can add sounds—either from a selection of built-in sounds or from your own audio files—to accompany transitions. And, in PowerPoint 2010 and PowerPoint 2011, you can now be more specific about the duration of transitions: instead of just specifying slow, medium, or fast you can set the transition speed in seconds to 1/100 of a second in precision. Find all of these settings, along with the option to preview the applied transition on the active slide, on the Transitions tab.
The quality of animations is improved in both PowerPoint 2010 and PowerPoint 2011. Accessing and applying animation is also easier to do with a reorganized Animations tab in PowerPoint 2010 and a new Animations tab in PowerPoint 2011, as shown in Figure 16-5.
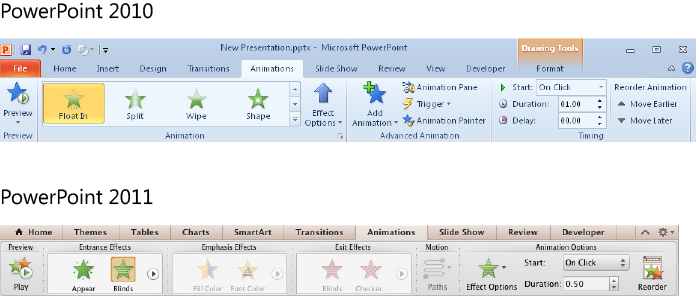
In PowerPoint 2010, if you use the gallery in the Animations group, you can apply just one effect to a selected object. However, you can access the same gallery (shown in Figure 16-6) in the Advanced Animation group, under the Add Animation command, to apply multiple effects to the same object.
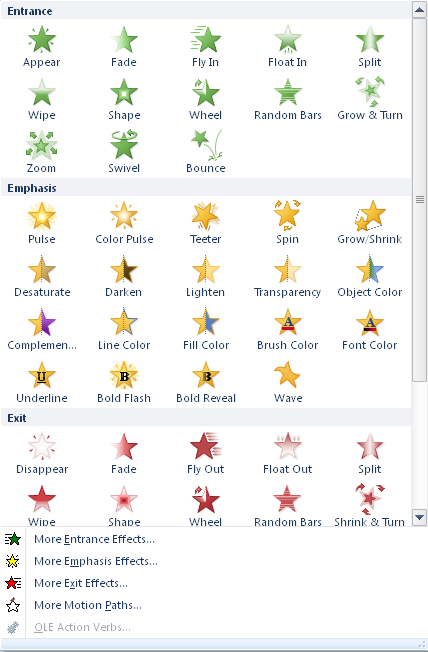
Also notice in Figure 16-6 that not all effects are visible in the gallery. You can select the options at the bottom of the gallery to open a pane that offers additional effects.
In PowerPoint 2011, notice that the Entrance, Emphasis, Exit, and Motion Path categories are separated on the Ribbon (as shown earlier in Figure 16-5). All available effects are accessible from the galleries on the Animations tab. If you apply an effect and then select the object again, applying another effect adds the effect to the set of animations for that object. If you select an animation effect that has already been applied to an object, applying an effect from one of the galleries replaces the selected effect.
Notice on the Animations tab that you also get options for most effects. When you select an effect and then click Effect Options, you see a range of choices. For example:
Regardless of the object type you’re animating, you might see effect options for the size, shape, or direction of the animation.
With bulleted text, you get additional effect options, such as those to animate the text box as one object, all text at once, or by paragraph.
With a SmartArt graphic, additional effect options are similar to bulleted text and include animating as a single object, all content at once, or one object at a time.
With an Excel chart (when the chart is a live, editable chart on the slide), additional options vary by chart type and can include choices such as the ability to animate by series or by element in a series.
On the Animations tab, you can also set the duration, delay, and start method (on click, with previous animation, or after previous animation) for each effect. But there will be times when you’ll want to open the Animation pane (Custom Animation in PowerPoint 2011) for further customization choices.
In the Animation pane (Custom Animation pane) shown in Figure 16-7, you can change the order of effect execution and access additional effect options, such as whether to dim an effect after animation or to add sound to accompany an effect. Also notice the double chevron icon (disclosure triangle in PowerPoint 2011) that appears with some effects. You see this icon when an effect has substeps, such as when you’re animating a SmartArt diagram by individual object. Expand the set of animations to access and customize (or even delete) substeps. For example, you might choose to animate just the connector arrows in a SmartArt diagram and keep the shapes that contain text visible at all times.
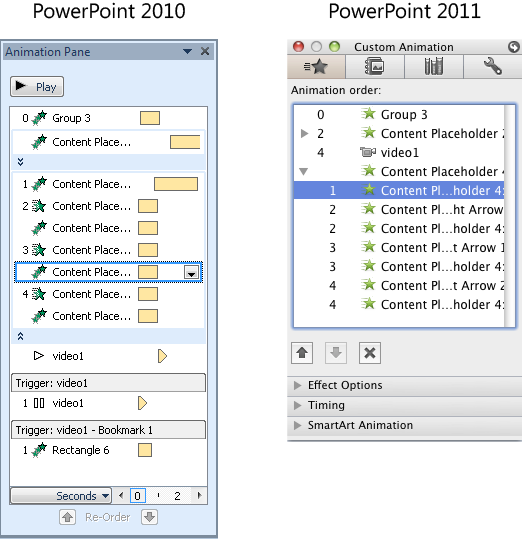
Figure 16-7. The Animation pane in PowerPoint 2010 and the Custom Animation pane in PowerPoint 2011.
Click any effect in the pane to access its options. In PowerPoint 2010, a drop-down arrow appears on a selected effect, from which you can access effect options and timing. In PowerPoint 2011, the effect options and timing for the selected effect appear below the effect list.
The Animation Painter is simple and fabulous. If you use Format Painter to copy text or object formatting, you already know what to expect: Animation Painter enables you to copy custom animation settings from one object and apply them to others. To use this tool:
Select the object containing the set of effects that you want to copy.
On the Animations tab, in the Advanced Animation group, double-click Animation Painter.
Note that you can single-click Animation Painter if you want to apply the copied effects only to one other object. When you double-click it, just as with the Format Painter tool, it locks the tool on so that you can paint the animation you have copied to other objects on the same or different slides, or even in different presentations.
Click the object to which you want to apply the copied animation.
If you single-click Animation Painter in step 2, once you click to apply the animation to your single object, Animation Painter automatically turns off. If you double-click in step 2, press the Esc key to turn off the Animation Painter after you have applied the copied animation to as many objects as you need.
In PowerPoint 2010, you can add bookmarks at specific points in the playback of a video or audio object. Animation triggers give you the ability to trigger animation of another object on the same slide as the media object when the bookmark is reached during playback.
For example, if you want to add callouts to emphasize specific items in the video, just add a bookmark at the point in the video where each item appears. Then, create a callout for each item using shapes or images and set each callout to animate when the applicable bookmark is reached.
Note
See Also To learn how to add bookmarks to media objects in PowerPoint 2010, see Chapter 15.
To set an animation trigger:
After the bookmarks have been set in the media object, select an object to animate with a media trigger.
Select an existing effect on the object (that is, select the number of the effect that appears adjacent to the object) or, on the Animations tab, click to apply a new effect.
On the Animations tab, in the Advanced Animation group, click Trigger and then point to On Bookmark.
If bookmarks exist in media objects on the same slide as the selected object, you see them listed here.
Click to select the preferred bookmark for your trigger.
When an animation effect uses a trigger, you can see the trigger indicated at any time in the Animation pane, as shown earlier in Figure 16-7. Edit triggers on the Timing tab of the Effect Options dialog box. To access this dialog box, select the effect containing the trigger in the Animation pane. Click the drop-down arrow that appears and then click Effect Options.
Be consistent and use animation sparingly. As is the case with slide formatting, slide animations and transitions can overwhelm or distract your audience from your content if used either inconsistently or too liberally.
It’s generally a good idea to use the same or similar transitions from one slide to the next (unless you have content that specifically warrants a unique introduction). For maximum effectiveness, best practice normally dictates the use of consistent, simple animation (if any) to introduce points as you address them. Then, add more unique or flamboyant animation only for major announcements or key hot buttons. Think of it from the audience’s perspective—if your information needs that much dressing up, what’s wrong with it?
Note
Of course, there is an exception to the rule of using animations sparingly. When the content warrants it, you might specifically choreograph animations to tell a story, as exemplified in the previously mentioned Five Rules built-in sample template.
Additionally, always consider who your audience is when deciding what transitions and animation to use. For example, if you’re presenting to your manager’s conservative boss or an unknown potential client, incorporating silly sounds and charts that explode across the screen is probably not the best way to go.
As with any type of formatting for any document, remember that the point of your presentation isn’t to demonstrate how many cool software features you know; it’s about conveying your important information.
Note
The new transitions are beautiful and can be impressive when used well. Of course, that’s only true if they’re seen as they were intended. Many methods for sharing your presentations, including online sharing methods such as the new Broadcast Slide Show feature, don’t support the new transitions or many animations as of this writing. So when you use these features in your presentations and then prepare to share the presentation, be sure you select a sharing method that supports the features you’ve included in your show.
Note
See Also Sharing options and limitations for transitions and animations are similar to those for multimedia presentations. For more information about a variety of sharing options, see Chapter 15. And to learn more about Broadcast Slide Show, see Chapter 2.
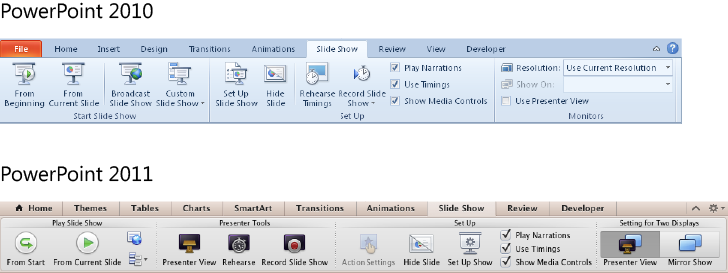
The available options for setting up a slide show are largely the same as previous versions, but how you access some of them has changed. For Office 2010 users, the Slide Show tab is very similar to the same tab in PowerPoint 2007, with the addition of quick access to a few more settings. For Office for Mac 2011 users, the Slide Show tab on the new Ribbon gives you the ability to set up many aspects of a slide show much faster. Figure 16-8 shows the Slide Show tab in both versions.
Note
See Also In both PowerPoint 2010 and PowerPoint 2011, notice the new option on the Slide Show tab to show media controls. To learn about the new and improved media controls, see Chapter 15.
Because of how much you can do for your slide show setup right from the Ribbon in both PowerPoint 2010 and PowerPoint 2011, you may not often need to use the Set Up Slide Show dialog box (Set Up Show in PowerPoint 2011). But it can be handy for a couple of tasks:
Specify whether to run the presentation full screen or in a window.
Set the slide show to loop continuously (for example, when the show will run on an unmonitored kiosk during an event).
In PowerPoint 2010, change the color of the new laser pointer between green, blue, and (the default) red.
In PowerPoint 2011, set the annotation pen color. You can also do this in PowerPoint 2010, but the dialog box isn’t the best option for Windows users for this feature.
In the dialog box, the color options you see for the pen colors coordinate with your active document theme, but the options provided are only part of your theme colors (mapping more closely to the legacy PowerPoint color schemes). In PowerPoint 2011, this is your best option, because selecting the pen color during your slide show will give you only a handful of standard colors that don’t coordinate with your theme. However, in PowerPoint 2010, when you set the pen color during the slide show, you can select from the complete Theme Colors palette. Learn about the slide show menu options later in this section.
Most of the features on the Slide Show tab are very straightforward. But two features can be particularly important when you’re planning a show, so they warrant a mention here: Custom Slide Show and Hide Slide.
When you hide a slide (which you can also do when you right-click a slide in the Slide pane or Slide Sorter view), it doesn’t appear when you deliver the slide show on screen. In the Slide pane, hidden slides appear faded with an exclusion symbol to help you recognize them more easily (and, in PowerPoint 2011, the Slide Pane thumbnails for hidden slides appear in gray-scale). If you need to access hidden slides during a show, you still can—they’re available in the Go To Slide list in the slide options when in Slide Show view.
But it’s easy to forget that slides are hidden if you want to skip them sometimes and use them at other times. So, if you haven’t tried custom shows, you might find them to be a more flexible alternative to hiding slides. When you create a custom show, you can specify which slides to include and in what order. And custom shows are saved with your presentation.
To create a custom show:
In PowerPoint 2010, on the Slide Show tab, click Custom Slide Show and then click Custom Shows.
In PowerPoint 2011, on the Slide Show tab, click Custom Shows and then click Edit Custom Shows.
In the Custom Shows dialog box, you can click New to define a new show, or edit, delete, or duplicate existing custom shows. You can also select a custom show in this dialog box and then click Show to start the slide show. Once custom shows exist in your presentation, when you click Custom Slide Show on the Slide Show tab, they will be listed. Just click one of the entries in that list to start the show.
Caution
Slides you exclude from a custom show are not available in the Go To Slide list in the slide options when in Slide Show view.
One last setup option to mention is setting up slide timings. You can set up automatic timings for your slides on the Transitions tab, in the Timings group (Advance Slide group in PowerPoint 2011), shown earlier in Figure 16-1. From that location, you can specify how long PowerPoint should spend on each slide when you want to advance slides automatically. You can also select options to allow slides to advance on mouse click, automatically based on your timings, or both.
But you can also set up or edit timings using the Rehearse Timings command (Rehearse in PowerPoint 2011) on the Slide Show tab. When you rehearse timings, you enter the slide show and can set, review, and change timings as you watch the slide play.
While you’re in Slide Show view, a menu of slide options is always available from a slide icon on the bottom-left corner of the screen, as shown in Figure 16-9. If you don’t see the icons, just hover your mouse pointer over the area and they appear, including previous and next buttons, annotation pen options, and the slide icon. Alternatively, you can right-click any slide during your show for most of the same options.
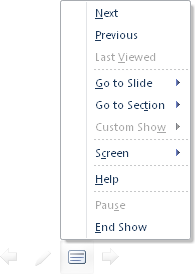
In Figure 16-9, notice that you can now move to a specified slide or slide section in PowerPoint 2010. Although slide sections are a new feature in both PowerPoint 2010 and PowerPoint 2011, the option to navigate through the slide show by section is not available in PowerPoint 2011. Additionally, in PowerPoint 2011, the option to pause the show is only available only from the slide options at the bottom-left corner of the screen, not when you right-click the slide.
Note that the Screen options shown on the menu in Figure 16-9 include the option to go instantly to a black or white screen.
Note
Remember that many keyboard commands are available while you’re in a slide show to help you navigate and manage the show more easily. Press F1 during your slide show (press the question mark key in PowerPoint 2011; don’t include shift) to open a dialog box that lists these commands or click Help on the slide options menu.
To view your slide notes on the same screen from which you’re presenting during a show in PowerPoint 2010 or PowerPoint 2011, you must be using Presenter view. To use Presenter view in PowerPoint 2010, you must have your computer attached to both a monitor and a projector (or multiple monitors), so that you can see Presenter view on one screen and display the show on the other.
Note
In PowerPoint 2010, if your slide notes for any given slide exceed one printed page, all pages will now print. So printing your slide notes when you need easy access to them without Presenter view (or if you want to use notes pages as handouts for your audience) is now much easier to do.
In PowerPoint 2011, Presenter view (formerly called Presenter Tools) is much improved. As in the previous version, you can use Presenter view to rehearse your show because you’re not required to be connected to multiple monitors to use it. It’s also become both breathtakingly beautiful (something those Mac folks do very well) and incredibly well organized, as you see in Figure 16-10.

Note
See Also When you need to present your slide show live and remotely, or you need to share your recorded presentation with others, you have new and interesting options. To learn about how the new Broadcast Slide Show feature enables you to broadcast your show live from your own desk while viewers watch it from almost any web browser (even their phone), see Chapter 2. To learn about a variety of sharing options for your presentations (including the new Create A Video feature in PowerPoint 2010, and limitations of features such as Broadcast Slide Show), see Chapter 15.