In this chapter, you will:
Learn the benefits of working with templates
Explore the types of templates available in Office 2010 and Office for Mac 2011
Learn how to create, save, and share templates
Get best practice tips for creating Word, PowerPoint, and Excel templates
Understand your options for automating templates
Are you ready to take it to the next level? You’re about to begin the part of this book where you have an opportunity to do just that.
Actually, the question isn’t really whether you want to take it to the next level, but how far you want to go. Templates in the Microsoft Office programs can mean everything from a simple document that you reuse to custom functionality that automates the process of creating or customizing documents. In fact, templates today even mean individual document components, such as Quick Style Sets in Word, or formatting components, such as themes that work across multiple programs.
In this first chapter of the templates, automation, and customization part of the book, we’ll examine the options for the types of templates you can create using Microsoft Word, PowerPoint, and Excel in Office 2010 and Office for Mac 2011, and what you need to know to get them done.
Note
Programming coverage begins in the next chapter, but programming options for automating templates are discussed here. Note that the terms automation, extensibility, and programming all refer to using a programming language, such as Microsoft Visual Basic for Applications (VBA) and Office Open XML, which is addressed in later chapters. Also note that the term code is used in this and subsequent chapters to refer to programming code—that is, commands written using a programming language such as VBA. Similarly, the term markup is used when referring to reading or writing Office Open XML content—markup is the common name for XML code.
Because of advances in recent versions of Microsoft Office, templates today are more flexible and can be more powerful than those you might have created or used in the past. You can still create templates for the same purposes as you may have done previously, but you can now also create and share a variety of custom content and custom formatting types as templates. In addition to saving documents as templates in Word, PowerPoint, and Excel, Office 2007 introduced Quick Style Sets and building block templates in Word, custom chart templates in Excel, and your own custom themes for use in all three programs. Office 2010 and Office 2011 make use of all of these same template types and add even more flexibility to some.
Note that some of the newer template types, such as Excel chart templates, themes, and custom SmartArt layouts, have their own file extensions (.crtx, thmx, and .glox, respectively, for these examples). For others, such as building blocks and Quick Style Sets, the type of template you get is determined simply by where you save the file.
Some of the file types mentioned here might not seem like templates as you understand them—such as themes or custom SmartArt layouts (the latter of which is not created from within Microsoft Office, but instead by using Office Open XML)—but they most certainly are. A template is a file that provides precreated elements—whether those elements are boilerplate content, design, layout, formatting, or a combination of these.
You’ll learn a bit about the possibilities for adding automation to templates in this chapter, but how to get it done is addressed in the next two chapters. One of the most significant recent changes regarding automation for templates (in Office for Windows) relates to what you can and can’t customize in the user interface.
Prior to Office 2007 on Windows (and this is still the case for Office for Mac), you could create toolbars and menus for Word, Excel, or PowerPoint directly from the user interface or using VBA. Whether you need to use VBA for these tasks depends upon the program and the type of template or add-in.
As of Office 2007 on Windows, you can save a custom Quick Access Toolbar right from the Options dialog box for any Office Open XML Format document or template. However, customizing the Ribbon requires the use of XML. In Office 2010, although you can customize the Ribbon for a given application from within the Options dialog box, creating a custom Ribbon for an individual document or template still requires the use of Office Open XML.
Note
See Also Learn the basics of Office Open XML in Chapter 24. That chapter also provides additional resources for learning how to customize the Office 2010 Ribbon using Office Open XML as well as using Office Open XML to create custom SmartArt layouts and to customize themes beyond what you can do from within the Microsoft Office programs. Note that most custom themes and SmartArt layouts are compatible with both Office 2010 and Office 2011.
The Ribbon in Office 2011 is not extensible, but if you explore the basics of VBA in Chapter 23, you can find additional resources for Mac users on using VBA to create custom toolbars and menus for your templates.
Note
Although the term Office Open XML refers to the language under the hood of your Office 2010 and Office 2011 documents, remember that the term Office Open XML Formats just refers to the Office 2010 and Office 2011 file types that use the four-character file extensions. For the core file types in Word, PowerPoint, and Excel, the Office Open XML Formats are those that append the three-character file extensions you may know from earlier versions (such as .dot or .xlt) with an x for macro-free templates or an m for macro-enabled templates. For a review of the essentials for using Office Open XML Format files (having nothing to do with programming or advanced tasks), see Chapter 1.
Do you want to create a simple template with some content or formatting to use as the basis for new documents? If so, here’s what you need to know:
Start with the document that you are going to save as a template and add whatever content and formatting you want to include in the template.
Click File and then click Save As (in Office 2010, you can also press Alt+F, A; in Office 2011, press Shift+Command+S).
Select the template type you want from the Save As Type drop-down list (such as .dotx for a Word template, .xltx for an Excel template, or .potx for a PowerPoint template), name your file, and then click Save.
In Office 2011 programs, as well as in Excel 2010 and PowerPoint 2010, notice that your Save In location is automatically moved to the designated user Templates folder when you select a template file type. This ensures that your new template will automatically be available from the template galleries in Office 2011, or the New Workbook or New Presentation dialog box in Office 2010.
In Word 2010, because the default template type (.dotx) can be used for content templates as well as for building block or Quick Styles templates that reside in different locations, your folder location isn’t changed automatically when you select a template file type.
Note
See Also For a list of file paths for different template types, see the section Locate Template Folders, later in this chapter.
You now have a template that can be used as a basis for new documents. To access your new template:
In Office 2010, click the File tab and then click New. In Office 2011, click File and then click New From Template.
Click My Templates. In Office 2010, a dialog box opens displaying your saved custom templates. In Office 2011, your saved custom templates appear directly in the template gallery.
That’s all there is to it.
Wait a minute. That’s not really all there is to it. Though you can create a template that way and be done with it (and you’d be far from alone in doing so), it’s not ideal.
Technically speaking, all it takes to create a template is to save your file in a template file format. But—whether you create templates to simplify document creation, save time, standardize content, or standardize appearance—take a moment to consider how the template will be used and by whom, and put some best practices in place. After all, if the template is not well crafted or intuitive for others to use, it won’t make things simpler, save time, or standardize anything.
The subsections that follow explain the types of templates available in Word, PowerPoint, and Excel, along with some best practice recommendations. Then, the program-specific sections later in this chapter help you identify elements to consider when planning whatever type of template you need.
The most common types of templates, by far, are content templates. A content template simply means a template that contains content you want to reuse. Content templates might contain boilerplate text, graphics, page layouts, and other content, or they might be complete documents that you often need to copy and change. Consider the following examples:
Templates for fax cover sheets, memos, or similar basic business documents may contain your company letterhead and contact information, as well as the heading table in which you enter fax or memo data such as To, From, and Subject.
A template for a report that you submit periodically may contain page layouts set up for the types of content required in your report, as well as some boilerplate text for items that remain largely the same from one report to the next.
A template for a new client presentation may contain several complete slides that you use as-is or customize for each new business pitch.
A project budget template is likely to contain a list of line items to help ensure that you remember to plan for all possible costs. It may be organized into tables with formulas so that you can just add the new numbers for each project and get your calculations automatically.
People often associate design templates with PowerPoint, where a .pot file in versions prior to Office 2007 and Office 2008 for Mac contained slide masters and color schemes to be applied to any presentation. However, a design template actually means any template you use to keep appearance consistent from one document to the next, such as a template that provides custom font or color formatting to match your company’s branding.
For example, a Word template containing letterhead formatting, a logo, and a set of styles might be considered a design template—even though the letterhead information and logo make it a content template as well. Similarly, an Excel design template might include a company logo along with custom table and cell styles.
However, design templates were redefined in Office 2007 and Office 2008 with the introduction of themes. Instead of storing a set of colors or font preferences in an individual template, you now store them in a theme (.thmx) file, from which you can apply them to any Word, Excel, or PowerPoint document or template. For PowerPoint, the theme also contains your slide master, slide layouts, and the slide background styles mentioned earlier (slide background styles can be applied in Word and Excel as well).
Other design elements, such as paragraph styles in Word or a logo in a Word or Excel file, still belong in your individual templates. However, themes integrate with many formatting features that you include in templates, such as styles.
Note
See Also Themes are extremely important tools for formatting Microsoft Office documents. As such, you’ll find information about working with themes in many chapters where themes are integrated with the features being covered. For example, you’ll get more information on theme components in the section Sharing Themes, later in this chapter. However, for the core information about using themes across Microsoft Office and for each program, see the following:
Chapter 5, for a detailed introduction to themes across PowerPoint, Word, and Excel.
Chapter 8, for details about incorporating themes into Word styles.
Chapter 13, for the scoop on working with themes in PowerPoint.
Chapter 14, for more on the way in which theme effects interact with Office Art graphics, including how to use theme effects in your documents.
Chapter 17, for help on using themes in your Excel workbooks.
Creating templates for forms that others complete and return is a bit different from creating a typical content template, because the form’s purpose is to collect information. Forms contain unique layout requirements and might require other settings, such as document protection in a Word-based form template.
If you’re like most people, you probably think of form templates as being created in Word, or perhaps in Excel. However, there is a logic to which program is the best for the form-related task.
Forms can do more than provide a static document into which users can enter information. Before creating your form, think about how that form will be used. For example, consider how the form is delivered to the intended recipient and where the information in that form needs to go (such as into a database). That information can help you determine the best program and best approach for the particular form.
For any form in which the data doesn’t need to be entered into another system, it’s fine to treat the form like a content template and just create it without much concern about how the form data is structured. You might use a basic table with cells as form fields, for example, or you might use content controls in Word 2010 without worrying much about the properties or behavior of those controls beyond what you need the user to see on the screen.
However, before you decide that the data doesn’t need to be entered anywhere else, think twice. If a form is returned on paper—for example, a checklist of services required that someone might complete when dropping off a document in the copy department—you’re probably correct that the form data doesn’t need to be entered anywhere else. But for just about any form that’s delivered electronically, something gets done with the data in that form. Even if you’re only compiling a list from the returned forms, would it save time for that list to be automatically compiled from the form data?
Maybe you’re not creating the form with the intention of putting the returned data into an electronic receptacle, but that doesn’t mean that the information from that form will never need to be electronically entered somewhere else. Consider human resources (HR) performance review forms, for example. Perhaps the HR department simply prints the performance reviews when it receives them and places a hard copy in the employee’s paper file. Is there no information from the form that gets added to an electronic employee record? What if employee records that are currently on paper become electronic in the future? Wouldn’t it be more efficient and cost-effective to create the form in a way that could be easily adapted to extract that information if the need arises?
When you want to be able to extract data from a form automatically, you have a few choices. First of all, the Office Open XML file formats make it much easier than ever to extract data from documents through a few methods. One excellent example is using content controls in Word 2010, where you can bind the control to custom XML data. Then, when the user returns the form, you just need some simple code to extract that custom XML into whatever format you need, such as an Excel table.
Note
See Also To learn about using content controls in Word 2010, including an explanation of data binding and related resources, see Chapter 12. Note that the capability to create content controls is not available in Word 2011, but some types of content controls—including data-bound controls—can be used when they exist in a document that you open in Word 2011.
Note
If you’re creating a form template in Word 2010 that you don’t believe needs to return data automatically, using content controls to structure the form is still a good idea. Doing so ensures ease of use and makes it simpler in the future to adapt those forms for dynamic data if the need arises. Learn more about structural considerations for Word templates in the section Considering Best Practices for Word Templates, later in this chapter.
No question about it, XML is the better way to go, and data binding with content controls in Word makes it about as easy as it can be. However, if you must, you can still use the legacy form controls in Word 2010, or the Form or ActiveX controls in Excel 2010 (or even ActiveX controls in PowerPoint 2010) to create forms (in Office 2011, legacy form controls are available in both Word and Excel). Then, use VBA or more advanced programming techniques (such as managed code written in Microsoft Visual Studio Tools for Office) as necessary to enable the behavior you want from the form controls or to extract data from the completed form.
Because easier and more dynamic options are available today, the legacy form control approach isn’t addressed specifically in this book. Of course, if the simplicity of data binding in Word leaves you pining for the overcomplicated solutions of the past, keep in mind that you can use what you’ll learn later in Chapter 23, as a jumping-off point for anything you want to learn to do with VBA in Microsoft Office.
As mentioned earlier in this chapter, several feature-specific template types are also available. These include building blocks (document elements) and Quick Style Sets for Word; Excel chart templates; and SmartArt layouts (which are available to Word, PowerPoint, and Excel documents).
In Word 2010, you can save custom building blocks into a document template or as a template of just building block entries to be available to any Word document. You cannot save custom building blocks in Word 2011, but if you have custom building block templates or templates that contain custom building blocks, you can access and use them in Word 2011 (where they are known as document elements).
Building blocks can be saved in any Word 2010 template that uses the new Office Open XML Formats (.dotx or .dotm). However, when they’re saved to a document template that you use to create new documents, the building block entries stored in that template are available only to the documents attached to that template. If you save that template in the Document Building Blocks folder instead, any content in that template other than building block entries is ignored, but the building block entries saved in that template become globally available. Additionally, building block entries stored in any global template (such as templates stored in the Startup folder for Word) are available to all documents as long as that global template is loaded.
To create a building block template in Word 2010:
Save a blank Word document as a Word template, using the .dotx file extension. In the Save As dialog box, choose the Document Building Blocks folder as the Save In location.
Note
See Also To get the correct Document Building Blocks (or Document Elements) folder location for your operating system, see the section Locate Template Folders, later in this chapter.
To store building block entries, the file must be saved as a template. You can use the .dotm file extension instead of the .dotx extension, but there’s no reason to allow macros in a template used only for building block entries. Also keep in mind that if you save building block entries to a legacy format template (.dot), those entries can only be added to the AutoText gallery (which doesn’t appear on the Ribbonby default).
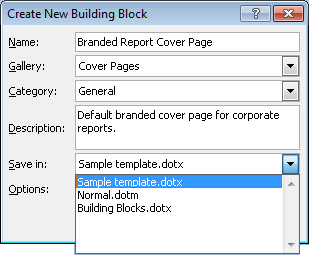
Add building block entries to the new template in one of the following ways:
Select your new template as the Save In location when saving the building block entry, as you see in Figure 22-1.
Move the entry to the new template by editing the properties of that entry. To access the properties of a building block entry, right-click the entry in the gallery where it appears and then click Edit Properties. Or, select the entry in the Building Blocks Organizer and then click Edit Properties.
For a template to be an available Save In option when you save a new building block entry or edit the properties of an existing entry, it must be open in your current Word session, attached to the active document, or installed as a global template.
Note
See Also To learn how to create and save building block entries, see Chapter 12.
Once you have the building block entries you want, save the file and exit Word. The next time you open a new Word session, the Building block entries saved in your new template should appear in their assigned galleries, available to all of your documents.
Alternatively, if you don’t want to exit your Word session, you can just save and close the template and then load it through the Templates And Add-Ins dialog box to make its entries available during your current Word session. The next time you start Word, the template will load normally on its own. To load a template manually, on the Developer tab, in the Templates group, click Document Template. Then, click the Add button, browse to and select your new template, and then click Open. Click OK to close the Templates And Add-Ins dialog box.
Note
Once you’ve saved a template in the Document Building Blocks folder or loaded it as a global template, that template becomes a global building block template, available as a Save In location for any new building block entries. Whenever you add building block entries to a global template, keep in mind that you will be prompted to save changes to that template the next time you exit Word.
In Word 2010 or Word 2011, you can save the set of styles included in the Quick Style list (that is, the styles you want to appear in the Styles gallery on the Home tab) for any active document or template as a Quick Style Set template. To do so, customize the Quick Style list as you want it to appear for the Quick Style Set template (keep in mind that styles added to the Quick Style list will be included whether or not they appear in the Styles gallery), and then do the following.
Note
When you use the shortcut options for adding or removing a style from the Quick Style list (that is, the options that appear when you right-click the style in the Styles gallery or, in Word 2010, the options that appear in the pop-up menu for the style in the Styles pane), the list is referred to as the Quick Styles Gallery. In the dialog boxes where you create or modify styles, it’s called the Quick Style list. Despite the confusion, these terms refer to the same thing: adding or removing styles from the Quick Styles gallery or Quick Style list refers to adding or removing the style from the list of those you want to appear in the Styles gallery on the Home tab.
Note
See Also For more about working with Quick Style lists and the Styles gallery, see Chapter 8.
On the Home tab, in the Styles group, click Change Styles and then point to Style Set (in Word 2011, click the Change Quick Style Settings button shown at left).
Click Save Quick Style Set.
In the Save Quick Style Set dialog box, name your new template and then click Save. The template is automatically saved using the .dotx file format and is placed in the Quick Styles folder (named Style Sets folder on Mac OS).
By default, your Quick Styles folder is located in the same path as your custom Document Building Blocks folder (which varies based on your operating system), as indicated in the preceding section.
You can not only save Quick Style Sets from any active document, but you can also save any .dotx file as a Quick Style Set template. Similar to the way building block templates work, when you save a .dotx file in the Quick Styles folder (or Style Sets folder on Mac OS), the Quick Style list saved in that template automatically becomes a Quick Style Set available to all documents.
When you do this, the name of the template becomes the name of the Quick Style Set, and is added to your Quick Style Set list the next time you start a new Word session. Find the Quick Style Set list on the Home tab, under the Change Styles command (in Word 2011, the Change Quick Style Settings command).
Note
See Also To learn more about Quick Style Sets, including how to create them by adding or removing styles in the Quick Style list, see Chapter 8.
Note
Technically, you can save a .dotm or .dot file as a Quick Style Set template, as well as a .dotx file, just by saving it in the Quick Styles folder. However, as with saving building block templates as .dotx files, there is no need to enable macros in a Quick Style Set template (making .dotm files unnecessary). In addition, a .dot file (the legacy template format) will lack some functionality essential to styles, such as the ability for styles to be theme-ready.
In versions of Excel prior to 2007 (or 2008 for Mac), you can save user-defined custom chart types. All of your user-defined charts are saved to the same file, which you can then share with others. You can even create new charts in that file and they appear as user-defined custom chart options. (User-defined charts in the previous version of Excel for Windows are stored in the file Xlusrgal.xls.)
The chart templates introduced in Excel 2007 are available in both Excel 2010 and Excel for Mac 2011. Because Excel charts are natively available in Word and PowerPoint as well, chart templates are also available in those programs.
Note
In Excel for Mac 2008, you can use existing chart templates, but you cannot save new chart templates. The ability to save a chart template is new to Mac users in Excel 2011.
Chart templates have very similar principles to the previous user-defined chart types, such as the fact that all format and layout settings are saved as part of the chart template (including potentially tricky settings such as customized axes, discussed later in this section). However, each chart you save as a template is saved as a separate file, which you can individually share with other users or other computers.
To save a chart as a template:
Select the chart. On the Chart Tools Design tab, click Save As Template. (In Office 2011, on the Charts tab, in the Change Chart Type group, click Other and then click Save As Template.)
The file is saved in the chart template file format (.crtx) to the Charts folder (Chart Templates on Mac OS) that’s located within the main user Templates location.
Unlike the feature-specific templates in Word, chart templates do not use a template format that you can select through the Save As dialog box. To save chart templates, always use the Chart tab options.
When saving a chart as a template, it’s important to keep in mind that literally all settings will be stored. So, as mentioned earlier, if you customize an axis scale to match the data of your current chart, the template you save based on that chart will contain that customized scale.
If you then use that template to create a new chart containing different data, the data might not appear correctly on the chart. For example, if your template contains a value axis scale set to a maximum of 100, and you use that template to create a chart with values ranging from 200 to 300, none of your values will appear on the new chart until you correct the axis scale.
Note
See Also Some formatting may not behave as expected when you use a chart template. For details, see the upcoming sidebar Charts Don’t Respond to Theme Changes.
Note
Though all settings in your chart are stored in the template, including the titles that appear on the chart, any text that you add to the chart title or axis titles is not stored in the template. New charts based on that template show placeholder text for any titles that were included on the template’s base chart.
Chart templates might not work seamlessly for some complex chart types. For example, if you save a template based on a combination chart for which the different series use different types of x-axes, you might need to correct for some confusion in charts based on that template, such as applying the correct chart type to the correct series, or changing the axis on which a series is plotted. When you save a chart template, particularly if others will be using it, try it out on sample data to ensure that it will be easier to use than creating that chart from scratch.
Note
See Also For an example of a chart with different types of x-axes, see the instructions for creating a price/volume chart, in Chapter 20.
You can add automation, such as macros (or, in Office 2010, Ribbon customization), to any document template in Word, Excel, or PowerPoint.
In addition to automation for document templates, you can also create global templates in Word—or add-ins in Word, Excel, or PowerPoint—containing automation or customizations that are available to any document in the applicable program.
A global template in Word is a template with content that’s available in Word regardless of the template attached to the active document. Normal.dotm is the default global template for Word and stores many of your defaults and settings, and it serves as the default template for new documents. If you customize Normal.dotm and later want to reset it to the default, just delete Normal.dotm from your user Templates folder (identified in the section Locate Template Folders, later in this chapter) or rename it, and a new Normal.dotm will be generated the next time you start Word.
You can add other global templates to Word—for example, to save custom macros containing company-specific information, or to save a set of timesaving document production macros so they’re available when you work on any document.
When you save a template in your Word 2010 Startup folder, it automatically becomes a global template that’s available the next time you open Word, provided that your macro security is set to allow global templates and add-ins to be added. You can also save templates to any trusted location and then add them as global templates through the Templates And Add-Ins dialog box. As mentioned earlier, to access this dialog box, on the Developer tab, click Document Template (in Word 2011, click AddIns). To add a template as a global template, on the Templates tab of that dialog box, click Add.
At the time of this writing, global templates in Word 2011 other than Normal.dotm don’t become available automatically. If you still have this experience when you try to load a global template, it takes just one additional step to ensure that global templates load each time Word starts—add a simple macro in Normal.dotm named AutoExec.
In Word 2010, if your template is not saved in a Trusted Location for global templates, such as your Startup folder for Word, you will need to manually load it on subsequent sessions. As in Word 2011, you can use an AutoExec macro in a trusted global template (such as Normal.dotm) to load it for you when Word starts.
Note
See Also If you already use VBA, get more information about AutoExec macros and learn to create VBA add-ins in the paper “Creating VBA Add-Ins to Extend and Automate Office Documents” on the MSDN Office Developer Center, at http://msdn.microsoft.com/en-us/library/gg597509.aspx. Or, to get started with VBA, see Chapter 23.
Note
Companion Content For Office 2010, the way in which global templates load in Office 2010 also depends to some degree on your Trust Center settings. To learn about the Trust Center, see the article “Securing Access to Your Documents—Document Protection Tools and Options” in the Bonus Content folder available online as part of the companion content for this book, at http://oreilly.com/catalog/9780735651999.
In Excel or PowerPoint, you must save automation and customization in an add-in file format, and store them in the Add-Ins folder, for them to be available when you work on any document in the applicable program. You can save Excel or PowerPoint add-in files directly from the Save As dialog box in either program, in both Office 2010 and Office 2011.
Add-ins can also be created for the Office 2010 programs Word, Excel, or PowerPoint by using managed code. Professional developers can take automation and customization further by working in a professional development platform, such as Microsoft Visual Studio 2010, and packaging programs to install as add-ins to your Office 2010 programs.
Note
See Also Managed code is beyond the scope of this book, but if the basics of VBA and Office Open XML that are offered in the book make you hungry for more and you want to explore the possibilities of working in Visual Studio, you’ll find a tremendous range of resources at the wonderful Office Developer Center, http://msdn.microsoft.com/office.
This chapter has included several references to folder locations for accessing or saving templates. Following, for quick reference, is a summary of template locations and some key points for working with them.
Note
If you don’t see any of the Windows file paths shown in this chapter, enable the option to view hidden files and folders in Windows Explorer. To do this in Windows 7 or Windows Vista, in a Windows Explorer window, click Organize and then click Folder And Search Options. On the View tab of the Folder Options dialog box, find the setting Show Hidden Files, Folders, And Drives. To access this dialog box in Windows XP, in a Windows Explorer window, on the Tools menu, click Options.
For Office 2010, you can find your primary Templates folder—which also contains the folders for your custom themes, chart templates, and SmartArt layouts—in the same location as your Document Building Blocks and Quick Styles folders.
By default, on Windows 7 and Vista, this location is C:Usersuser nameAppDataRoamingMicrosoft.
By default, on Windows XP, this location is C:Documents and Settingsuser nameApplication DataMicrosoft.
For Office 2011, the Office folder in your Mac OS user library contains SmartArt graphics and User Templates folders by default. The first time you save a chart template or a Quick Style Set, folders are automatically created in this location for those template types as well.
For Office 2011, this folder location is /Users/user name/Library/Application Support/Microsoft/Office.
Additionally, for Office 2011, the User Templates folder under the Office folder is where you find folders for your custom templates, themes, and document elements. That path is /Users/user name/Library/Application Support/Microsoft/Office/User Templates.
For Office 2010, the master Built-in Building Blocks.dotx, as well as the built-in templates (including themes) for several Office 2010 programs, can be found by default in C:Program FilesMicrosoft Office, regardless of your operating system.
Find most built-in document templates in C:Program FilesMicrosoft OfficeTemplateslanguage ID.
The language ID is a number that refers to your Microsoft Office editing language, such as 1033 for US English.
Find the built-in theme files in C:Program FilesMicrosoft OfficeDocument Themes 14.
Find the master built-in building blocks template in C:Program FilesMicrosoft OfficeOffice14Document Partslanguage ID14.
Find the built-in Quick Style Sets in C:Program FilesMicrosoft OfficeOffice14language IDQuickStyles.
For Office 2011, the master Document Elements folders, as well as built-in templates and themes, can be found in /Applications/Microsoft Office 2011/Office/Media.
Find most built-in document templates in /Applications/Microsoft Office 2011/Office/Media/Templates.
Find the built-in themes in /Applications/Microsoft Office 2011/Office/Media/Office Themes.
Find the built-in Document Elements in /Applications/Microsoft Office 2011/Office/Media/Document Elements.
Find the built-in Quick Style Sets in /Applications/Microsoft Office 2011/Office/Media/QuickStyles.
If you explore these folders, please do so carefully. The enclosing folders for both Office 2010 and Office 2011 master template locations also store the actual executable program files and supporting system files for your Microsoft Office programs.
When creating content templates for Word, keep the following best practices in mind:
Use the Manage Styles dialog box to hide any styles that you don’t want users of the template to access, as well as to prioritize the order in which styles appear in the Styles pane.
In Word 2010, if your template is set to use a theme or you have customized the styles in the Styles gallery to your company branding, remember that you can disable the theme or Quick Style Set switching in the Manage Styles dialog box.
Make sure any components that you want to use the applied theme, such as styles or existing template content, are formatted to be theme-ready.
To help keep the correct styles easy to identify and use, add any styles that you want users to access to the Quick Style list (so that they appear in the Styles gallery on the Home tab), and remove any styles from the list that are not used in the template.
Ensure that all styles are updated to include all formatting you need in those styles. To make the styles and formatting as intuitive as possible for others to use, avoid leaving direct formatting on top of styled paragraphs in your template content.
Remember that you can set up headers and footers for more pages than your template displays. For example, if you use a Different First Page header and footer for a letter template, but the template you save will contain only a single page, you can add a page break while creating the template in order to add content to the regular header and footer that will appear when a user’s letter exceeds one page. To save the template with only the first page, just delete the page break when you’re done. Once you add header or footer content to a document, that content remains until you remove it, even when it doesn’t appear on the page.
If your template includes tables—particularly, if users will need to add tables—create or customize table styles for formatting the table structure and set the table style you want to be used for most tables in the template as the default table style for that template. Also take the time to add details, such as Repeat Header Rows, on tables as needed.
If your template includes some elements that you want to be sure are not edited, you can protect the document so that only specified portions of the document body can be edited. In Word 2010, you can select portions of the document as small as one character to make them editable when the document is protected from all changes. In Word 2011, you can protect either the whole document or individual document sections.
In Word 2010, find protection options on the Review tab (or on the Info tab in Backstage view) and, in Word 2011, find Protect Document on the Tools menu.
Note that you can’t make headers and footers editable in a protected document, but you can edit footnotes or endnotes when they appear in an editable part of the document.
When you click the option to start enforcing protection, you can add a password if desired. Editable portions of protected documents are highlighted on screen by default, and document users will see a pane through which they can turn off highlighting or browse through editable portions of the document.
Also note that, if your organization uses Information Rights Management (IRM), you can find options for managing permissions in Word 2010 on the Info tab in Backstage view and, in Word 2011, on the File menu. IRM is available in Office 2010 Professional Plus edition and Office 2011 volume license edition.
Note
Companion Content For details on document protection options, see the article “Securing Access to Your Documents—Document Protection Tools and Options” in the Bonus Content folder available online at http://oreilly.com/catalog/9780735651999.
Because Word documents based on a template remain attached to that template, keep these things in mind when using documents created from custom templates:
To reset the styles that are part of the template, use one of the following options:
Use the option Reset To Quick Styles From Template. To find this option, on the Home tab, in the Styles group, click Change Styles (in Word 2011, click the Change Quick Style Settings button). In Word 2010, click Style Sets and then find the option to reset from the attached template at the bottom of the list of installed Quick Style Sets. In Word 2011, you’ll see Reset To Quick Styles From Template below your list of available Quick Style Sets.
This option will reset any styles that exist both in the active document and the attached template’s Quick Style list, and will add any styles in the template’s Quick Style list that don’t appear in the active document. Custom styles saved only in the document will remain intact.
Use the option Automatically Update Document Styles. To access this option in Word 2010, on the Developer tab, click Document Template. In Word 2011, on the Developer tab, click AddIns; or, on the Tools menu, click Templates and AddIns.
Once you select this option, the styles from the attached template are added to your active document, replacing existing styles of the same names. However, any additional styles you’ve added to your document that are not in the attached template will not be affected.
It’s a good idea to avoid leaving this setting enabled, so that you don’t accidentally delete customizations or lose your custom styles if the attached template becomes unavailable.
To update the styles for the attached template from an active document based on that template:
In Word 2010, when you make changes through the Manage Styles dialog box to document styles or defaults, you can select the New Documents Based On This Template option at the bottom of that dialog box.
In Word 2011, in the Modify Style dialog box for any style, you can select the option to add the changes to the attached template.
If the template attached to a document contains building block entries, macros, or Ribbon or Quick Access Toolbar customizations, those are available to any document based on the template as long as the attached template is accessible. So, if you make changes to building block entries, macros, or Ribbon or toolbar customizations in the template, those will apply to existing documents based on that template as well as to new documents.
When creating PowerPoint templates, consider the following:
PowerPoint templates (.potx or .potm files) are now similar to Word and Excel templates in that they should be used as content templates. As previously discussed, themes are the better way to save design content.
Any formatting that should be global to all slides, or slides that use a particular layout, should be set up on the applicable master or layout for consistency and ease of use.
Note
See Also To learn about the relationships between themes, masters, layouts, and slides, see Chapter 13.
You can remove from the slide masters any layouts that you don’t want to be available to users. However, be cautious when removing built-in layouts. If users need to copy content from other presentations that use different branding (such as legacy versions of your template or a customer’s presentation), slides could be attached to those built-in layouts. If the layout attached to a pasted slide doesn’t exist in the destination presentation, it is added to the presentation with its original structure—which might conflict with your branding. If you can, it’s a good idea to set up formatting you like for all built-in layouts rather than removing them, and then add extra custom layouts as needed.
Use intuitive naming conventions for any custom slide layouts you create, and be sure that custom layouts use placeholders formatted to fit the type of content you want. For example, remember that a picture placeholder retains its size and fills that space proportionally with a user’s image, whereas a content placeholder resizes to fit the proportions of an image, changing the slide layout.
Be sure that any slide content that you want to update with changes to the theme is applied using theme-ready formatting, such as colors or fonts from the theme options.
Remember that bulleted text slides now have nine available levels of text, even though only five are exposed in a presentation or template. So, when creating a template (or theme), it’s important to format all nine levels on the master and, for any layouts that use bulleted text, ensure that the formatting is as desired for all nine levels.
If your template is for a slide show, remove any animation, transition, or timings applied to slides unless those settings should always be used for the particular slide, regardless of the presentation. If such settings are used on slides, consider adding explanatory notes in the notes pane for the slide or in a comment on the slide to avoid unexpected complications for users.
Keep the following best practices in mind when creating Excel templates:
Custom cell styles and table styles will be available to any workbooks based on the template. So, make sure that custom styles are theme-ready if you want to allow theme-switching. Also, consider details to simplify working with styles, such as setting your preferred default table style.
Watch for potential user complications in workbooks saved as templates. For example, avoid hidden rows, columns, or sheets in your template unless they’re intentional, to prevent leaving unwanted content in the workbooks created from the template. Also, remove any print area settings or frozen panes, unless they’re intuitive and would be applicable to any use of that template. You might also want to delete any unused sheets in content templates to avoid user confusion and keep workbooks looking consistent.
Avoid linking cell content to external content unless that content will be available to any workbook created that’s based on the template.
When you name ranges, tables, charts, or PivotTables in a template, consider whether the names will be intuitive for others to recognize and use effectively.
If you reduce the data range from its original state, take a moment to reset the used range on any worksheets in the template.
Note
See Also For help resetting data ranges on worksheets in your template, see Chapter 18.
Remember that Excel 2010 workbooks, like Word documents, can use different headers and footers for the first page or for odd and even pages, and format your template accordingly. As in Word, header and footer content that you add to the template is retained even if it doesn’t appear in the workbook.
As mentioned earlier, when saving chart templates, avoid customizing scales on axes. Remember to test out your chart template for possible complications, particularly if it’s for a complex chart type, to ensure that using it to create new charts will be easier than creating those charts from the built-in chart types.
Note
In Excel 2010, you can add the sheets from any Excel template saved in your user Templates folder to your active workbook. To do this, right-click a sheet tab in the active workbook and then click Insert. From the Insert dialog box that opens, select the template to apply and then click OK. All sheets in the template (as well as any custom cell styles saved in that template) are added to your active workbook.
To share a custom theme with another computer, keep in mind that a theme consists of four files in Office 2010 and three in Office 2011:
If you copy just the .thmx file to another computer and save it in the user’s Themes folder, as indicated earlier in this chapter, that theme will be available from the Themes galleries in Word, PowerPoint, and Excel on that computer and it will include all theme elements. However, theme font and color (and effects in Office 2010) will not be visible on those galleries as separate entities (that is, available for mixing and matching) unless the files related to those fonts, colors, or effects also exist on the destination computer (such as when built-in options are used).
Similarly, you can copy just a set of custom theme colors, fonts, or (in Office 2010) effects to another computer without taking its related custom theme. Find your custom .thmx files and related files for custom theme fonts, colors, or effects, in the Themes folder within your user Templates folder, as referenced earlier in this chapter.
However, keep in mind that when you create a custom theme, the custom font, color, and effect files only exist if you create them. If you mix and match colors, fonts, and effects from existing themes—or if you’re an Office Open XML enthusiast and you edit the .thmx markup directly to customize theme colors and fonts in the theme—custom font and color files won’t exist.
Note
You’ll only have a custom .eftx (effects) file if you created one manually. For that matter, you’ll only have custom formatting effects in your theme if you’ve created them through Office Open XML. You can’t currently do this through any Office 2010 or Office 2011 programs. There is, however, a tool provided by the PowerPoint 2010 team that will help you create the theme effects without writing any XML. A beta version of this tool is publicly available. It runs only on Windows, but if you have access to a Windows machine (or virtual machine) and you need to create complete custom themes, it’s very handy.
Note
See Also Find the Open XML Theme Builder at http://connect.microsoft.com/themebuilder. On the Help menu of that tool, you’ll also find an extensive theme creation guide and themes SDK documents. You can also download the themes SDK document directly at http://office.microsoft.com/en-us/redir/XT102620903.aspx. Additionally, learn the details of creating a custom theme from scratch (including how to creating an .eftx file) in the MSDN Office Developer Center article “Creating Document Themes with the Office Open XML Formats,” located at http://msdn.microsoft.com/en-us/library/cc964302.aspx. Although the article was written for Office 2007, it applies to Office 2010 and Office 2011 as well.
If you want to share all the components, copy all four files (three for Mac users) to the matching folders on the destination computer.
Also keep in mind, as mentioned earlier, that you can share a complete custom theme with another computer by opening a document that uses that theme through the Browse For Themes feature. Just save the custom theme—as well as custom theme colors, fonts, and effects as available—from the active document to create that custom theme on the destination computer.
When you want to create macros to save yourself time while working in Word, Excel, or PowerPoint, use VBA. To customize formatting in your templates beyond what you can do in the Microsoft Office programs, to create custom content such as SmartArt layouts, or to add macros to the Ribbon in Office 2010, use Office Open XML. You can use VBA or Office Open XML, depending on the specific functionality you need, to automate actions in your documents. And the two can be used together to create add-ins for Word, Excel, or PowerPoint.
In the next chapter, you’ll learn the basics of VBA programming. Following that, we’ll cover the essentials of Office Open XML. And, in both chapters, you’ll find many additional resources for taking the basics even further to build your own custom content, automated templates, and add-ins.
Note
See Also Mac users may be able to use the AppleScript language and the Mac OS Automator application as well for timesaving tasks. To learn more, see www.apple.com/macosx/what-is-macosx/scripting.html.