In this chapter, you will:
Explore how an Office Open XML Format document is structured under the hood
Learn how to read Office Open XML
Discover how to create a Word document from scratch (without using Word)
Learn how to edit Office Open XML markup
Identify ways to use Office Open XML to save time and create customized content
In my favorite novel, Alexandre Dumas’s The Count of Monte Cristo, the imprisoned Abbe Faria writes a book without access to paper or writing implements. A 19th-century genius resourceful enough to turn MacGyver green with envy, the good Abbe fashions a pen out of a fishbone, ink out of soot and wine, and 12 rolls of parchment from 2 shirts. Not bad for an old man locked away in a dungeon.
In versions of Microsoft Office prior to Office 2007, the idea of editing a document without first opening the program in which it was created is much like writing a book in a 19th-century dungeon. Without the know-how of an Abbe Faria (or, in this case, a software engineer of equal talent), you’re probably out of luck.
Well, thanks to the ingenuity of some talented software engineers, you no longer need to be a fictional genius (or hold an advanced computer science degree) to understand every bit of a document’s structure well enough to even create one from scratch (if you’re so inclined). Though you never have to know a thing about the XML underlying your documents to use Office 2010 or Office for Mac 2011, if you choose to get to know the Office Open XML Formats, the benefits can be great. Using the XML content for these file formats, advanced Microsoft Office users can see and understand literally everything that goes into your Office Open XML Format documents, presentations, and spreadsheets.
As discussed at several points throughout this book, the transparency of these file formats can save time, add flexibility, improve integration with external content, and simplify essential tasks such as protecting the private content in your documents or troubleshooting document problems. But my favorite thing about these new formats is just the fact that you don’t have to be a programmer to reap many of the aforementioned benefits.
It’s important to reinforce that this is not an introduction to the XML programming language, but to the Office Open XML Formats. That said, in this primer, you’ll learn to understand, read, and edit the structure of an Office Open XML Format document. You’ll also get tips and guidance for next steps, where you can use this core knowledge of Office Open MXL to save time and take your documents further than ever before.
Note
As with the VBA primer in Chapter 23, much of what you’ll learn in this chapter can be applied to any program that uses the Office Open XML Formats. However, because this chapter assumes that you’re new to any implementation of XML, most examples and all exercises use Word documents and tasks for consistency.
XML is a language used to contain and describe data. In the case of Office Open XML, the data is your document content, and the description includes the settings required for that document to function in the applicable program as well as the settings you apply to the document.
Before we begin to explore a document’s XML, check out the sections that follow for a bit of background and basics to help you prepare for the task.
XML is a markup language. Just as you mark up a document while reviewing it—with comments, corrections, or margin notes—a markup language marks up data with descriptive information about that data.
If you’ve ever looked at the HTML source for a webpage, you already have some experience with the type of language you’ll see throughout this primer. However, instead of the paired formatting codes (called tags) wrapped around text that you see in HTML (such as <b>text</b> to turn bold formatting on and then off), the Office Open XML Formats use paired tags nested in a hierarchy that compartmentalizes, organizes, and defines everything you need to know about your document.
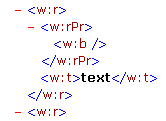
The following example shows the word text along with its formatting definition. This word is part of a paragraph but is separated out in the markup (note that code is called markup when referring to a markup language) because it contains unique formatting. The bullet points that follow the sample markup explain in detail how to read it.
<w:r>
   <w:rPr>
         <w:b />
   </w:rPr>
   <w:t>text</w:t>
</w:r>
The
w: that begins each line indicates that this information is describing a Word document. You will see different prefixes in your Microsoft Excel and PowerPoint documents. Also notice that each tag is surrounded by angle brackets (<>).Some elements in the markup of your Word, PowerPoint, and Excel documents may have a different prefix. As you’ll see in examples later in this chapter, a: is the prefix for Office Art graphics, and v: is the prefix for the legacy form of Office Art (such as shape formatting in earlier versions of Word).
As with HTML markup, XML markup used to describe content is usually paired, and the second of the pair (the end tag) begins with a slash character.
The section of markup shown in this sample is known as a run, noted by the
w:rthat introduces the first line of this sample. A run is a region of document content that contains the same properties.To complete the structure, the entire content of the paragraph to which the word text belongs is stored between the two ends of a higher-level paired tag, not shown here, that indicates the start and end of the paragraph (
<w:p>and</w:p>). The collection of paragraphs (and any other content) in the body of the document is in turn positioned within another paired tag (<w:body>and</w:body>).The second and fourth lines in the sample comprise a paired tag containing the formatting for the specified text. Notice that the
w:rPrtag name denotes run (r) properties (Pr). The third line simply indicates that the specified text is bolded<w:b />.Because formatting information in Office Open XML is stored in a structure that defines where the formatting is to be applied, the specific formatting itself doesn’t need a paired tag. If the text for this sample were also italicized, for example, the tag
<w:i />would appear on its own line, also between the lines of the same paired tag in which the bold statement is nested.Also notice that, because the bold (or italicized) statements stand on their own, they include a slash at the end of the single tag to indicate that there is no end tag for this statement. You’ll see the slash at the end of other tags throughout this primer, wherever the item is not paired. If no information needs to be nested within a tag, it is common to see it as standalone tag.
The specified text appears on the fifth line, between a pair of tags (
<w:t>and</w:t>) that indicate it’s the text being described.A single run of text might contain many sentences if they all use the same formatting. The sample shown here is a single word just for the sake of simplicity.
The last line in this sample is the end tag that indicates the end of the run (that is, the end of the description for this specified text).
If the preceding sample seems to be quite a lot of work for one word, don’t lose heart. It’s just an example of how you see Word formatting applied to text in the XML markup, used here to demonstrate how clearly information in the Office Open XML Formats is spelled out. Notice, for example, how easy it is to interpret tag names even if you’re seeing this for the first time, such as w to represent Word, p for paragraph, t for text, and so on.
Although the markup shown here also demonstrates why working in the XML wouldn’t be considered an equal alternative to the built-in program features for many document editing needs, that’s not the reason for this example. Understanding how to read XML structure will help you work more easily when you begin to use a document’s XML in ways that can simplify your work and expand the possibilities.
Don’t worry about trying to memorize any specific tags used in the preceding sample. The important thing to take away from it is the general concept of how the markup is structured. Everything in XML is organized and spelled out, like driving directions that take no turn for granted. Though the sample might seem like a lot of markup for very little content, the fact that it’s organized explicitly is the very thing that will make the tasks throughout this primer easy to understand even to those who are new to XML.
I’ll introduce terms as they arise for each task, but there are a few terms that can be useful to know up front.
The Office Open XML Formats are actually compressed folders containing a set of files that work together. ZIP technology (the .zip file extension) is the method used to compress the files into a single unit, and the set of files that make up an Office Open XML Format document is referred to as the document package.
Note
See Also For basic information about working with Office Open XML Format files in the Office 2010 and Office 2011 programs, see Chapter 1.
Each file within the package is referred to as a document part.
If you have read about XML, you probably have seen the term schema. An XML schema is a set of standards and rules that defines a given XML structure. For example, multiple schemas are available for defining different components of Office Open XML, and you’ll see references to some of these in the document parts used for the tasks throughout this chapter. But that is essentially all you need to know about them to get started. As you follow along in this chapter, you’ll automatically make use of the schemas, which simply means you’ll be making use of the language and structure of Office Open XML.
Most professional developers use Microsoft Visual Studio for editing Office Open XML, but you certainly don’t need to do that. You can use Windows Notepad (or TextEdit on Mac) for the same purpose, or any of a wide range of programs including a number of freeware, shareware, and retail XML editors.
Many people who don’t need a professional development platform for their work will use a freeware or shareware XML editor to see the XML hierarchy in a tree structure that’s easy to read. When you edit XML in Notepad or TextEdit, it typically looks like running text with no manual line breaks.
For those who don’t want to install another program for this purpose, you can use Windows Internet Explorer (or Mozilla Firefox on Mac OS) to view the markup in a hierarchical tree structure and easily find what you need, and then use Notepad or TextEdit to edit the markup.
However, if you work on Windows and you have access to Microsoft Visual Studio 2010, you can download and install a free power tool that enables you to open Office 2010 and Office for Mac 2011 documents directly to explore and edit the markup and file structure. The screenshots of formatted markup throughout this chapter use this approach, but are very much like what you will see in any structured XML viewer (such as Internet Explorer).
Note
See Also If you are using Visual Studio 2010, download and install the Open XML Package Editor Power Tool for Visual Studio 2010, which enables you to open Office Open XML document packages directly in Visual Studio. You can access the download from MSDN at http://visualstudiogallery.msdn.microsoft.com/en-us/450a00e3-5a7d-4776-be2c-8aa8cec2a75b.
Note
Mac users who have the Xcode developer tools installed can use that application to edit Office Open XML parts. However, note that it functions much like a plain text editor for this purpose. It will recognize your file as XML and will color-code the markup to make it a bit easier to read, but it will not display the markup in the hierarchical tree structure. If you don’t already have Xcode and your only current editor option is TextEdit, the color-coding does make the markup easier to read and parse. You can download a free version from Apple.com or a very inexpensive updated version ($4.99 as of this writing) from the Mac App Store.
For example, Figures Figure 24-1 through Figure 24-4 show you the same run of markup shown earlier as it appears in the different types of viewers discussed here. Note that these look nearly identical in these images because they appear here in grayscale. Text colors may differ across viewers.

Note
When you open an XML part in Internet Explorer, you’re likely to see a bar across the top of the screen indicating that active content was disabled. If you right-click that bar and activate content, you’ll be able to expand and collapse sections of your markup by using the minus signs you see beside each level of markup that contains sublevels.

Note
Firefox doesn’t display much of the header content that you’ll see in XML document parts, but that’s no problem. For most of the tasks you’ll want to do in the document package, you won’t need to worry about that header information. Just know that it’s there so that you’re not surprised by a bunch of markup at the start of the file when you open it in an editor.
Note
The markup shown in Figure 24-4 is unlikely to be alone on its own line. It might fall in the middle of a line and could well be in the middle of a large block of markup when viewed in a plain text editor such as Notepad or TextEdit. Using the Find feature in the program is often helpful when you’re confronted with a large block of markup and need to find only a small piece, such as the one shown in Figure 24-4.
If the text runs off the screen, however, when you open it in a simple text editor like Notepad or TextEdit, you can at least wrap it to the active window so that you can see everything that’s there. To do this, on the Format menu, click Word Wrap (in Notepad) or Wrap To Window (in TextEdit)
Next we’ll cover how to access the document package for an Office Open XML Format file and how to begin to make sense of what you find there. For the best results, work through the following sections step by step, and be sure you understand and feel comfortable with the content before continuing on to the next.
Because each of your Office 2010 or Office 2011 Word, Excel, and PowerPoint documents is actually a ZIP folder in disguise, you can just change the file extension to .zip to access all of the files in the package. In fact, you might not even need to change the extension, depending upon the software at your disposal. There are a couple of ways to go about this.
Note
Renaming the file to a .zip extension is easier to do if you are viewing file extensions. If you don’t see the extension for your Office Open XML Format file (such as .docx), following are steps to change that setting.
On Windows 7 (or Windows Vista):
In any Windows Explorer window, click Organize and then click Folder And Search Options.
On the View tab, turn off the option Hide Extensions Of Known File Types and then click OK.
To find the same option when working in Windows XP, in a Windows Explorer, on the Tools menu, click Folder Options.
On Mac OS Snow Leopard (or Leopard):
Change the file extension to .zip or append the .zip file extension to the existing file name. To do this in Windows Explorer or Mac OS Finder, just click to select the file and then click again on the file name (this is slower than a double-click) to enter editing mode for the file name.
For the same result on Windows, you can also press F2 once you select the file. On Mac, pressing Return activates the name change mode, and pressing Return again resets the file name after you change it.
When you change the file extension, you’ll see a warning on either Windows or Mac OS. Just disregard this message and click Yes (on Windows) to confirm that you want to continue or, on Mac OS, click Use .Zip. (However, to protect your files, it’s a good idea to save a copy of the file with its original file extension before beginning to make changes in the XML.)
Use an application that reads the ZIP package without changing the file extension. If you’re using Visual Studio 2010 with the Open XML Package Editor Power Tool mentioned earlier, you can open the Office 2010 or Office 2011 document directly in Visual Studio to explore and edit the package without changing the file extension. But there are some simpler options as well.
Some third-party compression tools will open an Office Open XML Format package as if it were a .zip file (because technically it is), without changing the extension. One such tool that I like and use on Windows 7 is named 7-zip.
There’s a nice tool for this task on Mac OS, named Better Zip, that doesn’t currently strip everything you’d need stripped out if you edit the package contents and resave the package using that tool. However, it can still be extremely handy for viewing the package structure and for accessing some files that are otherwise difficult to access on Mac OS, as discussed later in this chapter.
Note
See Also Find 7-zip for Windows at www.7-zip.org. Find Better Zip at www.macitbetter.com.
Once you change the file name to the .zip extension (or open the file in a utility that obviates the need to change the extension), open the file in a Windows Explorer or a Mac OS Finder window. The following example walks you through the package for a simple Word document, originally saved with the .docx extension.
When you first view the package for a Word document, it will look something like Figure 24-5.

Note that, at the top level of the package you see in this figure, Excel and PowerPoint files would look very similar except that the folder named word in this example would instead be named xl or ppt, respectively, for the applicable program.
The docProps folder is exactly what it sounds like—it contains the files for the document and application properties, ranging from author name to word count and software version.
The _rels folder contains a file named .rels, which defines the top-level relationships between the folders in the package. Note that additional relationship files may exist, depending on the document content, for files within a specific folder of the package (explained later in this section).
The relationship files are among the most important in the package because, without them, the various document parts in the package don’t know how to work together.
The file [Content_Types].xml also exists at the top level of every document’s ZIP package. This file identifies the content types included in the document. For example, in a Word document, this list typically includes components such as the main document, fonts, styles, theme, document properties, and application properties. Files with additional types of content, such as diagrams or other graphics, will have additional content types identified. This file also provides a definition for each file extension included in the package, such as .xml, .rels, and media files such as .jpg or .png.
Exploring a bit further, when you open the folder named word, you see something similar to Figure 24-6.
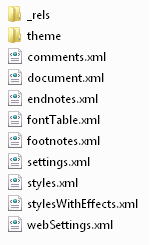
A new Word document contains XML files (XML document parts) for the fonts, styles, settings (such as the saved zoom setting and default tab stops), and web settings, whether or not formatting related to these items has been applied in the document. If headers, footers, footnotes, graphics, comments, or other content types have been added, each of those will have its own XML document part as well.
In the packages for Excel and PowerPoint files, you’ll see a similar organization, with xml document parts for file components (such as styles.xml in Excel or tableStyles.xml in PowerPoint). Additionally, the xl folder in an Excel ZIP package contains a folder named worksheets by default, because there is a separate XML document part for each sheet in the workbook. The ppt folder in a PowerPoint ZIP package also contains folders named slides, slideLayouts, and slideMasters, by default.
In addition to the XML document parts you see in Figure 24-6, notice the theme folder—which exists in the program-specific folder (word, xl, or ppt) for Word, Excel, and PowerPoint document packages. The file contained in this theme folder contains all cross-program theme settings (that is, colors, fonts, graphic effects, and background gallery styles) that are available in the document. This file is what enables you to share custom themes by sharing documents, such as by using the Browse For Themes feature at the bottom of a Themes gallery.
The _rels folder inside the program-specific folder defines the relationships between the parts inside the program-specific folder. The relationship file contained in this _rels folder is called document.xml.rels for Word documents, presentation.xml.rels for PowerPoint documents, and workbook.xml.rels for Excel documents.
Depending on the content in a given folder, its _rels folder might contain more than one file. For example, if an object (such as an image) exists in a Word document header, the word folder contains a part named header#.xml (where the pound sign represents the index number of that header in the document), and its _rels folder contains a file named header#.xml.rels that stores the relationship for the image in that header.
Content in your document from other sources (such as embedded objects, media files, or macros) is either stored in its original format (as is the case for picture files) or as a binary file (.bin file extension). For this reason, you can save time on many tasks related to working with media files (such as pictures).
Note
See Also Check out an example of a timesaving task for working with media files in the article “Using Office Open XML to Save Time Without Writing Code,” available at http://msdn.microsoft.com/en-us/library/dd627338.aspx.
As mentioned at the beginning of this section, the package shown in Figures Figure 24-5 and Figure 24-6 is for a .docx file. Remember that the x at the end of the file extension indicates that it’s a macro-free file format. If this were, instead, the package for a .docm file (or any macro-enabled file format), and a VBA project had been created in that file, you would also see files named vbaData.xml and one named vbaProject.bin.
Caution
Notice the capitalization of folder names in Figure 24-6. XML is highly case-sensitive. So, for example, the folder named word is lowercase intentionally. Typically, the first term is lowercase and subsequent terms provided as part of a single word are initial-capped, such as docProps for document properties. When you start editing document parts and packages, this is extremely important to keep in mind because one incorrectly capitalized term could break your solution. For example, if you create a custom Ribbon tab for an Office 2010 template, capitalizing a group name incorrectly will cause that group not to appear.
If you return to the top level of the package and then open the docProps folder, you’ll see the properties files shown in Figure 24-7.
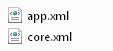
Figure 24-7. Two properties files appear by default in the document properties folder of an Office Open XML document package.
By default, this folder contains the files app.xml (for application properties such as word count and program version) and core.xml (for document properties such as the Document Properties summary information like author and subject). Additionally, if you use the options to save a preview picture or a thumbnail for your document, you see a thumbnail image file in the docProps folder. For Word 2010, this is an .emf file; for Excel 2010, it is a .wmf file; for PowerPoint 2010 and all Office 2011 applications, it is a .jpeg file.
Note
If you’re running the Office 2010 on Windows 7 or Windows Vista, you’ll find an option in the Save As dialog box in Word or Excel to save a thumbnail image of your document. In PowerPoint, or in all three programs when running Windows XP, you’ll see the option Save Preview Picture in the Document Properties dialog box.
In Office 2011, find the option to save a preview picture on the Summary tab of the Document Properties dialog box in all three programs.
Note that, despite having different image file types for the thumbnail, thumbnails saved in Office 2010 and Office 2011 files will appear when you’re viewing the document on the other platform. However, image quality may vary across platform.
In both Office 2010 and Office 2011, also note that saving a thumbnail can add to file size; in more complex documents, the size increase might be significant.
To help you get accustomed to reading XML file content, let’s take a look at it in a few of the essential document parts.
Figure 24-8 depicts the [Content_Types].xml file for the sample package shown earlier in Figure 24-5.
![The [Content_Types].xml file for a simple Word document.](http://imgdetail.ebookreading.net/business/52/9780735660083/9780735660083__documents-presentations-and__9780735660083__httpatomoreillycomsourcemspimages840167.png)
The first line of any XML file in an Office Open XML Format ZIP package will look very much like the first line in Figure 24-8. This line simply defines the type of XML structure being used.
As noted earlier, if you’re viewing the file in some editors, such as Firefox, header information might not be visible. It will always be visible in an editing tool, however, including Notepad or Text Edit.
Notice that the second line, which begins
<Types, is the first half of a paired tag; the end tag is at the bottom of this document. All other lines in this file are the definitions of the content types in this document.On the second line, inside the
Typestag, you seexmlnsfollowed by a URL. The referencexmlnsrefers to an XML namespace, which is a required component in XML document parts. Technical though this term might sound, a namespace is nothing more than a way to uniquely identify a specified item. Namespaces are required because the package can’t contain any ambiguous names (that is, the same name can’t be used to refer to more than one item). So, the namespace essentially attaches itself to the content it identifies to become part of that content’s name.It’s standard to use a web address as the namespace, but note that the file doesn’t attempt to read any data from the specified address. In fact, if you try to access some of the URLs you see in the files of an Office Open XML document package, you’ll find that some are not even valid addresses. Typically, the address in a namespace identifies the location of the source schema or other definitions used to identify the structure of the items assigned to that namespace, and the webpage associated with that address may actually contain those definitions. But any URL can be used as a namespace—the address itself is actually irrelevant to the markup.
As with the XML version tag in the first line, note that namespace information is header information that might not appear in some viewers. It’s also information you are unlikely to need to write or edit in most of the tasks for which you’ll use Office Open XML basics.
Notice that each line nested inside the
Typestag defines either a file extension used in the document or one of the document parts you saw earlier in Figures Figure 24-6 and Figure 24-7.The first two lines in that group define the two file extensions included in this particular package: .rels (the relationship files) and .xml. If the document included content that uses other file extensions, such as a .png or .jpg image, those extensions would be defined here as well.
The remaining lines in that group, each named
Override PartName, define the content type for one of the XML document parts that you saw in the word and docProps folders for this ZIP package. Take a look at the firstOverride PartNameline, shown in Figure 24-9. This one is for the main document content—the document.xml file that resides in the word folder.
Notice that the definition of the Override PartName that appears in quotation marks is actually the path to the specified file within the document package. The ContentType definition that appears in quotation marks in the second half of this line of markup is a reference to the content type as defined in the applicable schema.
Note
If you happen to be editing your packages in Visual Studio 2010 using the Open XML Package Editor power tool, you won’t be able to see or access the [Content-Types].xml file. The reason is that when you add parts to a package in Visual Studio, Visual Studio automatically updates this file for you. However, when you’re working directly in the file format as this primer teaches you to do, there might be times when you have to use another tool to access and edit that file.
Figure 24-10 shows you the content of the .rels file in the top-level _rels folder, shown earlier in Figure 24-5.

Notice that, although the content of the .rels file is very different from the content of the [Content_Types].xml file, the concept of the structure is the same. That is, the first line defines the XML standard being used, and the second line opens the paired tag that stores the core file content and specifies the relationships namespace.
Take a look at one of the relationship definitions from the .rels file—the one for the main document.xml document part. Notice in Figure 24-11 that each relationship contains three parts—the
ID, theType, and theTarget.An
IDis typically namedrID#. This structure is not required, however, so you might occasionally see relationships with different IDs. The most important thing about the relationship ID is that it must be unique for each relationship in the file.The
Typeuses a type defined in the applicable schema, which appears as a URL. As with an XML namespace, the document doesn’t need to read data from that address. However, in this case, theTypeis a specified element of the applicable schema and does need to be a content type recognized by the Office Open XML structure.If you’re adding a relationship yourself and don’t know the correct
Typereference, you can always open a document package that contains the same type of relationship to copy that information from the applicable .rels file.The
Target, as you likely recognize, is the location where the referenced file appears within the package. When you create a relationship yourself, it’s essential that you get this correct, because the relationship will do no good if it can’t find the specified file.Depending on the content in your files, you might run across defined relationships in your .rels files that aren’t used to specify files in the package and therefore might take on a slightly different structure for the relationship target. For example, notice the relationship shown in Figure 24-12, from a document.xml.rels file for a document that contains a hyperlink to the Microsoft home page.
Though the relationship
IDandTypehave the same structure as a relationship to a document part, notice that the target in this case is to an external hyperlink instead of a file in the package.
When you open a file in its originating program (Word, Excel, or PowerPoint), keep in mind that the .rels files are the first place the program looks to determine how to put the pieces together for the purpose of opening that file.
The document shown in the preceding sections is a simple Word document with all the defaults you get when you use Word to create a new document in the .docx file format. Now it’s time to build a .docx file yourself—without using Word.
If you’re thinking about skipping over the rest of this section because it sounds either too complicated or unnecessary for your needs, please wait. This exercise is important for three reasons:
You might be amazed at how easy it is to create a Word document from scratch this way. Discovering the simplicity for yourself can help you master the tasks in this chapter that you want to learn.
You can find the markup you need for this section in a provided sample file (as explained in the Companion Content note that precedes the first part of the following exercise) if you prefer not to type out the XML for yourself.
I’ve included this exercise early in the primer because when I was first learning about the Office Open XML Formats, doing a similar exercise was the most helpful thing I did toward understanding the basics of how the parts in an Office Open XML document package work and fit together.
That said, the exercise that follows walks you through creating a simple, essentials-only Word document. Though it’s good practice for anyone creating Office Open XML Format documents by constructing an Office Open XML package from scratch to include all of the defaults that the source program (Word, Excel, or PowerPoint) includes when it creates a new document, that source program (Word, in our example) actually requires only a few of those files to recognize and open the file. If you create a file that contains only the required bare basics, Word will recognize the missing pieces and add the document parts and relationships needed as you begin to use Word features in your document.
Every Office Open XML document requires [Content_Types].xml as well as a top-level _rels folder containing the .rels file. Each file also requires its program-specific folder with the main program-specific content file that goes in that folder (document.xml in a folder named word, in the case of a Word document). For a Word document, these are the only three files you must have in your ZIP package to create a .docx file that Word will recognize and open without an error. In Excel and PowerPoint, a few other files are required.
An Excel xlsx file also requires the sheets folder inside the xl folder, with an xml document part for at least one sheet. This is because an Excel workbook must contain at least one worksheet. Because of that sheets folder, the xl folder also needs its own _rels folder containing a workbook-level .rels file that defines the relationship between worksheets and workbook.
A PowerPoint pptx file also requires the slideLayouts, slideMasters, and theme folders (each of which contains required files), because a presentation must contain a theme, at least one slide master, and at least one slide layout. These folders, all of which reside in the ppt folder, also require a _rels folder in that ppt folder to define the relationships among the presentation, slide master, and theme. Note that the master and layout folders contain their own _rels folders, which is why there is no reference to the slide layouts in the presentation-level relationships file.
To create your first Word document from scratch, you’ll need to create [Content_Types].xml, .rels, and document.xml and place them in the correct folder structure. The steps that follow will walk you through this process. Note that these steps assume you are using either Notepad or TextEdit as the editor for creating the necessary files.
Note
Companion Content Find the file named Copy XML.txt, which contains all markup in this section of this chapter, in the Chapter24 sample files folder available online at http://oreilly.com/catalog/9780735651999. You can copy the markup into the files you create in Notepad or TextEdit in lieu of writing the markup for yourself.
On your computer desktop, or in any convenient location, create a folder named First Document (or any name you like; this name is for identification purposes in this exercise only). This folder will store the structure for your new .docx file. In that folder, create two sub-folders, one named _rels and the other named word. It is essential that these two folders are correctly named (including capitalization).
The main document file, document.xml, needs to reside in the word folder you just created. To create this file:
Caution
When using Notepad on Windows or TextEdit on Mac OS, keep in mind a couple of things to ensure that your files save correctly:
Notepad will save the file as an XML file when you type document.xml in the File Name box, even though the Save As Type list indicates a .txt file.
In TextEdit, on the TextEdit menu, click Preferences to select Plain Text as the Format option. Then, when you type document.xml as the file name and click Save, you’ll be prompted to confirm that you want to use the .xml file extension instead of .txt.
However, as you see in the first line of an XML document part, note that the type of encoding used in the file is UTF-8. If you use the Plain Text option in TextEdit on Mac OS, this is the default encoding option. In Windows Notepad, however, the default is ANSI. To change this when saving a file in Notepad, in the Save As dialog box, under Encoding, select UTF-8.
Open Notepad or TextEdit and save a new file as document.xml, inside the word folder you created. Be sure to type the .xml file extension as part of the file name so that the text editing application doesn’t save the file in the .txt file format.
In Notepad or TextEdit, add the following markup to the document.xml file. This markup is shown first as a formatted sample image in Figure 24-13 so that you can see its organization, and then in a plain text editor to show you how it looks without the tree structure applied.
If you’re typing this text from scratch, it’s easier to copy from the version shown in the tree structure. If you do, note that you need a space between each xml namespace (
xmlnsdefinition) because those definitions all appear together inside the same tag. However, you don’t need spaces between any tags that are enclosed in their own pair of angle brackets.
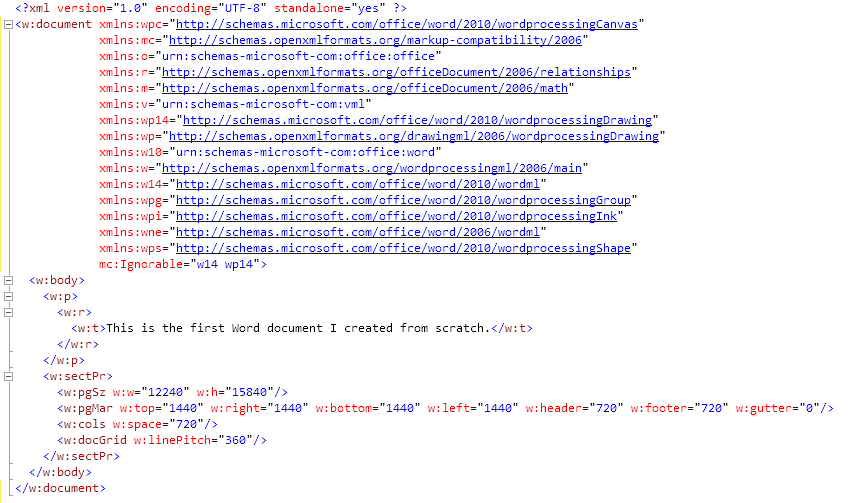
<?xml version="1.0" encoding="UTF-8" standalone="yes" ?>

<w:document xmlns:wpc="http://schemas.microsoft.com/office/word/2010/wordprocessingCanvas"
xmlns:mc="http://schemas.openxmlformats.org/markup-compatibility/2006" xmlns:o="urn:schema
s-
microsoft-com:office:office" xmlns:r="http://schemas.openxmlformats.org/officeDocument/200
6/
relationships" xmlns:m="http://schemas.openxmlformats.org/officeDocument/2006/math"
xmlns:v="urn:schemas-microsoft-com:vml" xmlns:wp14="http://schemas.microsoft.com/
office/word/2010/wordprocessingDrawing" xmlns:wp="http://schemas.openxmlformats.org/
drawingml/2006/wordprocessingDrawing" xmlns:w10="urn:schemas-microsoft-com:office:word"
xmlns:w="http://schemas.openxmlformats.org/wordprocessingml/2006/main" xmlns:w14="http://
schemas.microsoft.com/office/word/2010/wordml" xmlns:wpg="http://schemas.microsoft.com/
office/word/2010/wordprocessingGroup" xmlns:wpi="http://schemas.microsoft.com/office/
word/2010/wordprocessingInk" xmlns:wne="http://schemas.microsoft.com/office/word/2006/
wordml" xmlns:wps="http://schemas.microsoft.com/office/word/2010/wordprocessingShape"
mc:Ignorable="w14 wp14">

<w:body><w:p><w:r><w:t>This is the first Word document I created from scratch.</w:t></w:
r></w:p><w:sectPr><w:pgSz w:w="12240" w:h="15840"/><w:pgMar w:top="1440" w:right="1440"
w:bottom="1440" w:left="1440" w:header="720" w:footer="720" w:gutter="0"/><w:cols
w:space="720"/><w:docGrid w:linePitch="360"/></w:sectPr></w:body></w:document>
Caution
To accommodate the page layout for the book, markup in the unstructured XML samples throughout this chapter may break to a new line more often than it needs to do in your markup. When you view markup in Notepad or TextEdit, it might appear to break in the middle of a term because of text wrap. Remember that a single incorrect character in XML markup can break your document. Add manual line breaks cautiously, and never in the middle of a term or an individual attribute. For example, you can add a manual line break (that is, press Enter or Return) between namespace definitions, as you see in the preceding markup. But do not place a line break in the middle of a single namespace definition.
If you are typing this markup yourself, double-check your syntax against the structured version of the same markup that appears along with each unstructured sample. If copying the markup instead of typing it, do so from the sample file named Copy XML.txt referenced earlier.
Once you’re satisfied that your markup is accurate, you can save and close this file. Notice that this markup contains items you saw in the examples from preceding sections of this chapter:
The first line of markup provides the XML version definition.
The second line is the open tag for the overall document content, where the namespaces are defined. The namespaces shown here are those that appear by default in the document.xml for a new Word 2010 document that is created in Word. Notice that many of the namespaces refer to different content types that you may or may not use, such as math, drawing objects, and ink. You can leave out some of these namespaces without causing an error, but others are required. To keep things simple, we’ll just stick with the defaults that the application uses here.
The document content in this file is the single-line paragraph of text contained inside the paired
<body>tag.The last piece of content is the paired
<w:sectPr>tag, which you can see stores the basic section formatting (page setup) information. You can omit this information, and the document will open in Word using default settings. Note that the formatting settings and values you see here are explained in the section Editing and Managing Documents Through XML, later in this chapter.
Note
If you created a document in Word with just the single line of text included in our sample file, there are two more tags you’d see by default in the document.xml. Word 2010 and Word 2011 add bookmarks that enable Word to remember the location of your last edit between editing sessions. For example, if you use the Browse By Edits feature in the Object Browser (the round dot between the page up and page down icons on the vertical scroll bar in Word), these bookmarks enable Word to take you to the location of your last edit, even if that edit occurred in a previous Word session. These tags look like the following:
<w:bookmarkStart w:id="0" w:name="_GoBack"/>
<w:bookmarkEnd w:id="0"/>In Notepad or TextEdit, save a file named exactly [Content_Types].xml to the root of your First Document folder. As with the document.xml file, two versions of the markup that you need to add to this file are provided here, first shown in Figure 24-14 so that you can clearly see the tree structure, and then shown as run-of-text, similar to the way markup appears in a text editor.
![The markup for a basic Word [Content_Types].xml file.](http://imgdetail.ebookreading.net/business/52/9780735660083/9780735660083__documents-presentations-and__9780735660083__httpatomoreillycomsourcemspimages840179.png)
<?xml version="1.0" encoding="UTF-8" standalone="yes"?>

<Types xmlns="http://schemas.openxmlformats.org/package/2006/content-
types"><Default Extension="rels" ContentType="application/vnd.openxmlformats-package.
relationships+xml"/><Default Extension="xml" ContentType="application/xml"/><Override
PartName="/word/document.xml" ContentType="application/vnd.openxmlformats-officedocument.
wordprocessingml.document.main+xml"/></Types>
As you see, this is a very simple file, containing the XML version statement at the top as well as the tag named Types, in which all tags in the file are nested and where the namespace for the content types is defined. After that, you see the following:
The only file extensions present in your basic Word document are .xml and .rels, so they are the only file extensions that need to be defined here.
The only part name that requires definition as a content type is the main document (document.xml) because that is the only document part currently included, aside from the two structure-related files [Content_Types].xml and .rels.
The relationship file for this new document is the simplest of the three you need to create. In Notepad or TextEdit, create a new file and save it as .rels, inside the _rels subfolder you created within the First Document folder. Then, add the following content to that file (shown in both structured format [Figure 24-15] and in Notepad run-of-text format).
Caution
If you’re creating this file on Mac OS using TextEdit, and you have not exposed hidden files on your system as discussed earlier, it’s a good idea to name the file temporarily with some characters before the period, until you’re ready to package the document. Just remember to rename the file to .rels before you archive the files. If you start with .rels and you’re not viewing hidden files, you could have a difficult time accessing the file to make edits.

<?xml version="1.0" encoding="UTF-8" standalone="yes"?>

<Relationships xmlns="http://schemas.openxmlformats.org/package/2006/
relationships"><Relationship Id="rId1" Type="http://schemas.openxmlformats.org/
officeDocument/2006/relationships/officeDocument" Target="word/document.xml"/></
Relationships>
In the preceding markup, the XML version is defined first (as it is in every .xml or .rels format file within the package); then you see the tag for the relationships content along with its namespace definition; and finally you see the single required relationship in this case, which is to the part named document.xml.
Note
See Also For details on the three-part structure (ID, Type, and Target) of a relationship definition, see the section Understanding the Office Open XML File Structure, earlier in this chapter.
Once you save and close the .rels file, you can exit the text editor. You’re now ready to put your package together and open the file in Word, using the following steps:
Open the First Document folder in a Windows Explorer or a Finder window.
Select the file [Content_Types.xml] as well as the two subfolders (_rels and word).
On Windows, right-click, point to Send To, and then click Compressed (Zipped) Folder.
On Mac OS, use a third-party archive tool, such as the iArchiver application discussed earlier, to create archives without adding Mac-specific files. Add the selected files and folders and create the archive.
When you’ve created the .zip folder, change its name (including the file extension) to First document.docx.
Double-click to open your new Word document. It should open in Word without error. If it does not, see the upcoming section Find and Fix Errors, for help finding the problem.
Even though you didn’t add all of the default content types and relationships that Word adds to a new document, all Word functionality is available to your new file. Make any edit (you can even type just a space if you like) and then save the file while it’s open in Word. Then, close it, change the file extension to .zip, and take a look at what Word did to the package.
What you’ll find is that Word added the default files it provides when it creates a new .docx file, and it added the necessary content type and relationship definitions to go along with them. Review the changes that Word made to your file. Once you’re comfortable with the package content, you’re ready to start working directly with the XML underlying your Office Open XML documents.
When an Office Open XML Format document won’t open in Word, Excel, or PowerPoint, the problem can be as simple as a single space, angle bracket, or another individual character. But when you have packages with multiple long files, how do you even begin to find the problem? Actually, in most cases, you don’t have to—your XML viewer (perhaps with a bit of help from the applicable Microsoft Office program) will tell you where to look.
When you open the file in Word 2010 and see an error message, click the Details button on the error message. In most cases, the precise location of the error will be listed, and the error type might be included as well, as shown in Figure 24-16.
Note that Word 2011, however, does not give you the error detail in most cases.
Excel and PowerPoint in both Office 2010 and Office 2011 display an error message without any details about where the error exists, but will offer to repair the file when possible. When the program makes the repair, you are not likely to be happy with the results, so don’t be too quick to save. If the error existed in a slide or worksheet part, for example, PowerPoint or Excel will delete all content from the affected slide or worksheet (that is, it replaces the damaged part with a blank one). Doing this, however, is still helpful because it tells you which part contains the error.
If your document is for any program other than Word 2010, you can still locate the error quite easily. Open the offending part in an XML viewer such as Internet Explorer or Firefox. When the XML is not well formed and can’t be displayed, the viewer provides an error message. Figure 24-17 shows you how the error in Figure 24-16 appears in these viewers.
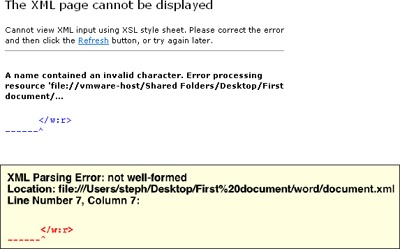
In this example, I left a closing bracket off an end tag for a text string (</t>). Notice that different viewers provide information in different ways, but each can help you easily get to the information you need. Word 2010 and Firefox both indicate that the error is in line 7, column 7—that is, the seventh line, and roughly the seventh character. Internet Explorer does not indicate the position, but it does show you that the error is in the markup directly preceding the closing tag for a run.
In Figure 24-18, you see the snippet of markup for the beginning of the document.xml file. If you’re counting to get to the line and column numbers, do so as follows:
The namespace definitions are all part of the open document tag, so they are all part of line two. That means that the closing run tag following the closing text tag is where the error is perceived (line 7).
Counting the spaces used to create the indent, the seventh column refers to the character preceding the start of the tag on that line (which would be the missing end bracket to the tag preceding the referenced location).
If you’re using a viewer such as Internet Explorer that doesn’t specify the location but does give you information to help you find it (in this case, that the error immediately precedes a closing run tag):
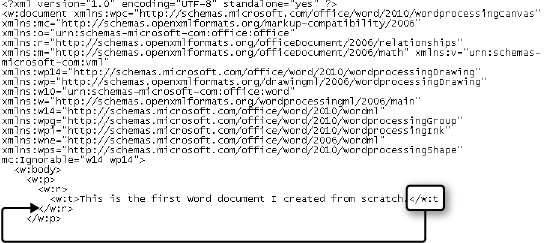
Figure 24-18. A snippet of document.xml markup shown with a missing bracket at the end of a closing tag for a text string.
Note
In the preceding error example, notice that the markup was structured even though it is displayed in Figure 24-18 in a plain text editor. If the markup was not structured, as you are likely to often see in a plain text editor, note that the line and position number provided in an error message may be different. However, in error messages for unstructured markup, you are also likely to get other context to help you find the error—such as the full (or close to it) line of markup that precedes the error.
So what do you do if your document is for Word 2011 and Word doesn’t tell you which part contains the error? Try unarchiving the contents of the package and then open all of the XML parts in Firefox or another XML viewer. Any part containing an error will be unable to display in the viewer and will show you the error information.
In each of the sections that follow, you’ll find a different exercise for editing the parts in the document package. These exercises include editing text, formatting, and style definitions; replacing a picture; and removing comments from a document.
Note
The purpose of these exercises is to familiarize you with the structure and rules of a document package, and demonstrate how to work with the syntax in the document parts to manage and troubleshoot documents. Some of the specific tasks in these exercises save you time or help you accomplish things you can’t do from within the Microsoft Office programs. Others are not tasks for which you would likely use the XML when you’re working with individual documents (such as editing text or deleting comments from a document), because doing the task in Word is faster and easier than doing it in the XML for just one file. But each exercise teaches you something important about the structure and syntax of Office Open XML Format files.
A second reason that some of these tasks aren’t ideal “for just one file” is because another benefit of being able to edit documents in the XML is that developers can create automation to batch-edit files without ever opening the source program. For example, a developer might create a program to remove comments from all files in a given folder. In that case, doing so through the XML, without having to open the files in Word, greatly simplifies the automation.
Before you begin editing Office Open XML files, it can be helpful to note several units of measure that you may see for different types of content.
Why so many different units of measure, including some you probably have not have heard of before (like twips and English Metric Units)? Well, I don’t have a good answer for that. Just go with it and don’t blame the messenger. But don’t be concerned about it either. Once you know what you’re looking at, it’s easy to decipher, so you might want to keep some of the items on this list handy for reference.
Most document measurements that appear in a document part for an Excel file will appear as the measurement you enter. For example, 16-point font appears as the number 16; a one-inch margin appears as the number 1. Though this might seem like stating the obvious, it’s mentioned here because—as you’ll see in the bullets that follow—straightforward one-to-one measurement references are not the norm in most Office Open XML.
In Word document parts, point-size measurement for font sizes is doubled in the document part. So, for example, 12-point font appears as the number 24. Most other point-size measurements are multiplied by 20 (that is, they use a unit of measure known as a twip, which is 1/20 of a point or 1/1440 of an inch). So, 12-point spacing after a paragraph appears as 240 in the document.xml part (if it’s applied as direct formatting) or in the applicable custom style definition in styles.xml.
In PowerPoint document parts, point-size measurements are typically multiplied by 100. So, 12-point spacing after a paragraph or 12-point font size applied to text would appear as the number 1200.
Many Office Art values (that is, Office Open XML tags that begin with the a: prefix, such as those for working with shapes, theme formatting, or SmartArt graphics) are expressed in one of two ways:
Percentage values are often provided as 100,000 times the percent value. For example, the end position for a reflection that displays 20 percent (0.20) of the original object would be expressed as 20,000. Some PowerPoint presentation element values are also expressed this way.
Other values, such as the horizontal and vertical position of a shape, are expressed in English Metric Units (EMUs). There are 914,400 EMUs per inch, 360,000 EMUs per centimeter, and 12,700 EMUs per point.
You can edit any document content or formatting directly in the ZIP package. In this sample exercise, we’ll walk through editing text, adding text, changing the visibility of a paragraph style, and adding direct formatting to specified text.
Note
To try the exercises in this section, you can either create your own sample document to work with or download the one provided.
To create your own sample file:
Create a new Word document containing one line of text, such as This is my sample text.
Apply the style Heading 1 to the paragraph of text.
Apply Normal style to the same paragraph (removing Heading 1). The Heading 1 style was applied in step 2 just to make the style active in the document.
Save and close the file.
When you’ve finished this setup, save the file using the .docx format in a location where you can easily access it (such as the Windows Desktop) and then close it.
Note
Companion Content To use the sample file provided instead of creating your own, find the file Text editing.docx in the Chapter24 sample files folder available online at http://oreilly.com/catalog/9780735651999.
To edit the document package, change the file extension for Text editing.docx (or your own sample file) from .docx to .zip, unless you are using a utility that doesn’t require this change. Once you have opened the document package, give the following exercises a try.
Unless you are working in a program that enables you to edit an XML part while it’s in the package (such as Visual Studio 2010 or the 7-zip utility), copy the document.xml part that appears inside the word folder for your sample document package onto your desktop or another easily accessible location. Then follow these steps.
Tip
If you’re using either Notepad or TextEdit as your editors with Internet Explorer or Firefox as your viewer, note that you can keep the file open in both the viewer and the editor at the same time. In this way, you can make changes in the editor and save the file, and then refresh the page in the viewer while it’s still open in the editor to confirm your changes and that you have not made any XML errors.
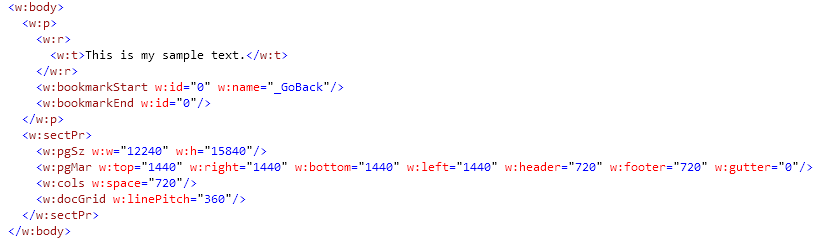
Open document.xml in whatever viewer you are using that enables you to see the file structure, such as Internet Explorer or Firefox. If you’re using the sample document provided, the document content following the namespace definitions will look like Figure 24-19.
Notice the construction of the text. There is one paragraph of text, nested within the paired tag
<w:p></w:p>, followed by some document settings, including paper size and page margins.Most XML markup uses characters or abbreviations that are logical and easy to interpret for anyone who knows the program, such as
<w:p>to refer to a Word paragraph,pgSzto refer to the size of the page, orpgMarto refer to page margins. In the comprehensive documentation for Office Open XML, which you can learn more about in the last section of this chapter, Working with the Office Open XML Formats: Next Steps, you can find virtually every tag and attribute name available in Office Open XML. However, you can see how, just using logic and what you know about the program, it’s very easy to decipher an Office Open XML document part without having to memorize the language details.Open the document.xml file in your XML editor, if it is not the same as your viewer (such as if you are using Notepad or TextEdit to edit document parts).
As noted earlier, remember that if you’re using Internet Explorer or Firefox (as viewers) along with Notepad or TextEdit (as editors), you can keep the file open in the viewer when you open it in the editor. This will save you time when checking your changes later and can make it easier to find information in the file while editing it.
Find the text This is my sample text, using the Find feature in your editing program. Then, delete the word sample.
Copy the markup for that entire paragraph, starting with
<w:p>and ending with</w:p>. Then, paste what you’ve copied immediately after the existing</w:p>end tag.You’ve just added a second paragraph to your document. You can now change the text that appears within the
<w:t>and</w:t>paired tag that denotes the text for the second paragraph. I chose to have that new paragraph read This is fun. I’m editing a Word document without opening Word.If you see the Bookmark Start and Bookmark End tags in the copied paragraph, as you will if using the sample file provided, delete them from either the original or the new paragraph so that they appear only in one place. As mentioned earlier, these tags enable Word to remember the location of your last edit between Word sessions.
Change the left and right page margins to 0.75 inches each. Remember that you’ll need to calculate the values in twips for document.xml to understand the values you add. Because there are 72 points to an inch, three-quarters of an inch is 54 points. To convert that number to twips so that document.xml understands it, multiply the number by 20. (Or, since a twip is 1/1440t of an inch, multiply 1440 * 0.75.) So, you’ll enter 1080 as the left and the right margin values. Be sure to leave quotation marks and related attributes intact when you change the numbers.
Save document.xml. Open it in your XML viewer to check your changes and confirm that there are no errors.
If the file is still open in your viewer as well, just refresh the page.
When you’re happy with your changes, copy document.xml back into the ZIP package if you had to remove it to edit it, overwriting the existing document.xml file. If you did not have to remove the file to edit it, make sure that your changes are saved and updated in the package.
Open the document in Word.
Because the next exercise also requires editing this package, if you had to change the extension to .zip for this exercise, save time by opening the .zip file in Word instead of changing the file extension back and forth. To do this, open Word and then use File, Open to open and access your file. If you don’t see your file listed, be sure that you are viewing All Files and not just All Word Documents. As mentioned earlier, the file will open like a regular Word document.
If you’re happy with the changes and additions to your text, and the changes to your page margins, continue to the next exercise.
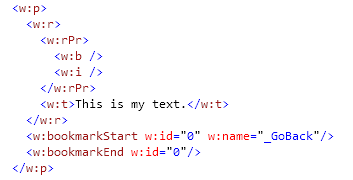
In this exercise, you’ll add some direct formatting to one paragraph in the sample document Text editing.docx and then add direct formatting to just part of the second paragraph. To do this, if you still have the copy of document.xml that you edited in the previous exercise, continue using that file. If not, copy document.xml out of the package again. Then, do the following:
Open document.xml for editing. If you want to view the structure for reference, open it first in your viewer as well.
Add direct formatting of bold and italics to the first paragraph in the document. To do this, in Notepad or TextEdit:
Place your insertion point immediately before the <w:t> tag for the first paragraph of text and then type the following markup:
<w:rPr><w:b /><w:i /></w:rPr>
As you might recognize from the first markup sample in this chapter, you’ve just added bold and italic formatting to the first paragraph in the document.
Save the file and then open or refresh it in your viewer to check the changes. The paragraph you edited should look something like Figure 24-20.
When you’re happy with your edits, copy document.xml back into the document package if you had to remove it to edit it, and save the package if the tool you use requires this. Then, in Word, press Ctrl+O (Command+O) for the Open file dialog box, and then select and open the ZIP package as you did in the previous exercise.
Open the file in Word to view your changes. If you had to change the file extension to edit the package, remember that you can use File, Open in Word to open the file without changing the extension back, because you will be editing this package again in the next exercise.
When you confirm that you completed the preceding steps correctly, the next exercise is to add direct formatting (14-point font, in this example) to just part of the second paragraph in the document. Close the document when you’re ready to continue, and then follow these steps:
Open the updated version of the document.xml part again in your viewer and editor.
If you have followed the steps in the preceding exercises, the second paragraph contains the text This is fun. I’m editing my Word document without opening Word. The steps that follow will add 14-point font size to just the first sentence in that paragraph.
Because you’ll be adding formatting to just part of the paragraph, you first need to separate the parts of the paragraph that will have different formatting. To do this, follow these substeps:
First, place your insertion point between the two sentences of the second paragraph. (If you’ve been following along with the preceding exercises, your insertion point will be after the period that follows the text This is fun.) Type the following markup between those two sentences, and then type a space (so that a space separates the new markup from the sentence it precedes).
</w:t></w:r><w:r><w:t>
The first two tags in the preceding structure end the text and the run. The next two tags begin a new run, followed by a new text string. The space you added after the four new tags is the space that will appear between the two sentences of text in the document.
Inside the new
<w:t>tag (the last of the four tags you just typed), add a space after the letter t (and before the closing angle bracket), followed byxml:space=“preserve”. That tag should now look like the following:<w:t xml:space="preserve">
This
xml: spaceattribute tells the markup to preserve the space you added at the beginning of the second sentence so that spacing between the separated sentences is retained. Figure 24-21 shows how the markup for this paragraph should look at this point.
Now, it’s time to add the 14-point font formatting to just the first sentence in the paragraph. In your editor, place your insertion point immediately before the
<w:t>tag that precedes the first sentence in the second paragraph (the one for which you intend to add the formatting). Then type the following:<w:rPr><w:sz w:val="28" /></w:rPr>
Save the file. Then, in your viewer, open or refresh the page to check your markup and confirm that it does not contain errors.
Notice that you used 28 to represent 14-point font size, as discussed earlier in this section. The paired
<w:rPr></w:rPr>tag that you also used in the preceding exercise is the tag inside which you store any unique formatting for the specified text. As with the preceding exercise, you could include additional markup to represent other font formatting after<w:sz w:val=“28”/>, such as the bold or italic you used earlier. Note that the tag w:rPr stands for Word run properties.Once you’re happy with the markup, copy document.xml back into the document package if you had to copy it out to edit it. If required by your software, save the package. Then, open the file in Word to check your changes. Again, if you’ve changed the extension to .zip, use File, Open to avoid having to switch the extension back and forth for each exercise.

This is the final exercise using the file Text editing.docx. In this exercise, you will edit settings for styles in this document.
Before beginning this exercise, first open the document in Word and then open the Styles pane or go to the Styles group on the Home tab. Notice the following:
Many built-in styles appear by default, including the first two heading styles and a selection of built-in paragraph and character styles.
The recommended order of styles is displayed by default in both the Styles pane and the Quick Styles gallery.
Point to Normal style in the Styles pane for a pop-up window that shows you the style definition, and note the settings included—such as the font as well as line and paragraph spacing.
While examining the styles.xml document part, we’ll look at how to manage document default formatting, which styles appear in the recommended order, how styles are set to be shown or hidden, and how to edit the definition of a style.
Note
See Also To learn about document default formatting, recommended style settings, and organizing styles in the Styles pane and Quick Styles galleries from within Word, see Chapter 8.
To begin, if you are using a tool for exploring the package that requires you to copy parts out to edit them, copy the file styles.xml out of the word folder of the document package.
Open the file styles.xml in your XML viewer. This is a long file with a good amount of information, so let’s take a quick walk through it and see what’s there.
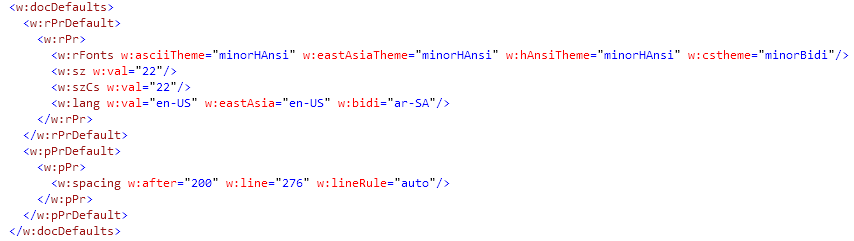
Below the XML version declaration and the open
w:stylestag that contains the namespace definitions, you seew:docDefaults, as shown in Figure 24-22.Nested within the document defaults tab, you have run properties (
w:rPr…) and paragraph properties (w:pPr…).Run properties include font formatting defaults, including the font to use as default (the minor theme font, also known as the theme body font), font size, and language setting. Note that the
w:szCstag refers to the font size for complex script fonts).Paragraph properties include paragraph and line spacing.
Following the document defaults, you see the latent styles list. This list displays the settings for whether a style is displayed in the Styles pane and Quick Styles galleries, its priority in the recommended order, and whether or not the style is locked (unavailable) when formatting in the document is restricted to a selection of styles. The latent styles open tag sets the defaults for all built-in styles in the document and then lists all styles that have exceptions (that is, those styles that include settings different from the defaults).
For example, take a look at Figure 24-23.
Notice the attributes in the
w:latentStylesopen tag. These set the default visibility, restriction, and priority settings for the styles in the list.w:defLockedStatesets the default for whether a style can be used when restricting formatting to a selection of styles. The default indicates that a style is not locked (not excluded) unless otherwise specified.Notice that many values in this list are Boolean (true/false) values, where 0 indicates false and 1 indicates true.
w:defUIPrioritysets the default priority setting for the recommended styles order. If no priority is set for a style, the default is 99.When viewed on the Recommended tab of the Manage Styles dialog box in Word 2010, any styles that use a priority order of 99 in the XML would appear as priority 100. This is because, as in many areas of programming, Office Open XML begins counting for many types of integer values with 0, whereas, within the Microsoft Office programs, numeric values typically begin counting with 1.
w:defSemiHiddensets the default for whether a style is hidden from the Styles pane and Quick Styles gallery. The default is set to 0 (false).w:defUnhideWhenUsedsets the default for the Hide Until Used setting. The default setting is 0 (false). This setting, along with thew:semiHiddensetting being set to false, means that the style will always be visible.w:defQFormatsets the default for whether a style is included in the Quick Styles gallery. The default setting is 0 (false).w:countlists the number of built-in styles present in the document. As you’ll see when you scroll through this list, many of these are not included here.
In Figure 24-23, notice the following about the styles Normal, Heading 1, and Heading 2.
Normal and Heading 1 style are set to always be shown and to be included in the Quick Styles gallery.
Heading 2 is set to be hidden until used because neither the
w:semiHiddenorw:unhideWhenUsedattributes are included for that style, so it uses the defaults set in thew:latentStylesopen tag.All three of these styles are set to be included in the Quick Styles gallery.
The priority for the recommended order is set to 1 for Normal style (displayed as 0 in the XML) and 10 for the two heading styles (displayed as 9 in the XML).
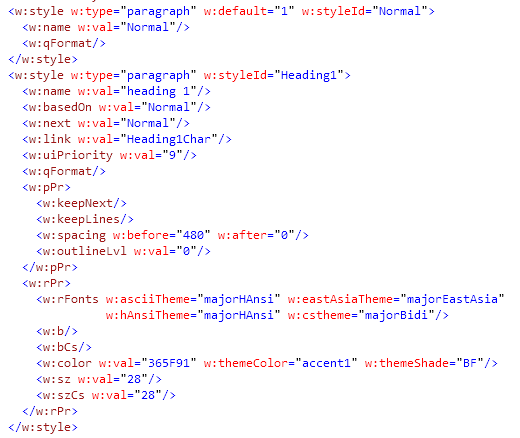
The last section of this document displays a definition for the style used in the default states of each of the four style types (Normal for paragraph styles, Default Paragraph Font for character styles, Table Normal for table styles, and No List for list styles). Additionally, this section displays a definition for each user-defined (custom) style in the document and each built-in style that is in use in the document.
Figure 24-24 shows the definitions for Normal style and Heading 1 in this document.
Notice that the Normal style definition contains no formatting settings, despite the fact that you saw in the document in Word that it contains font information as well as line and paragraph spacing.
As you saw at the top of styles.xml, the font, font size, line, and paragraph spacing are all settings in the document defaults. The Normal style definition in the XML displays these settings only if they are changed from the defaults. Similarly, the definition for any other style shown in styles.xml displays only formatting that differs from that of its base style.
In most ways, the Heading 1 style definition is typical of any style definition that might appear in this file. As with the document default settings, the definition is divided into run properties (font formatting) and paragraph properties (paragraph formatting).
However, notice the outline level tag. You may know that you can set the outline level for a paragraph or within a style. However, for the built-in heading styles, this property is read-only. You can’t change the outline level for a built-in heading style from within Word (for example, Heading 1 is always level one, so it’s displayed in the XML as 0). If you do so in styles.xml, your change will be ignored.

Note
One of the most important things to take away from the preceding walk-through is how you probably could have easily figured out the information contained in this part yourself, just from knowing Word. That is, notice that every tag and attribute discussed in the preceding list relates to a feature or setting that you can apply in the program and is expressed in fairly plain English. So, just as we interpreted the content of styles.xml, you can similarly interpret the content of any XML part for a document that belongs to a program you know well.
Once you are comfortable with the structure of the styles.xml part, open the file in your XML editor and make some edits.
In the latent styles list, find the Heading 2 style and set the UI priority to a value of 1, as you see in the following markup:
<w:lsdException w:name="heading 2" w:uiPriority="1" w:qFormat="1"/>
Note that, because the XML begins counting at 0 and you set the priority of this style to be 1, if you open the file in Word 2010 and look at the Recommend tab of the Manage Styles dialog box, you will see a priority of 2 for this style. Whether you open the file in Word 2010 or Word 2011, you will now see Heading 2 style appear after Normal style but before Heading 1 style in the Styles pane and Quick Styles gallery.
Scroll to below the latent styles list and find the definition for the Heading 1 style.
Add a line spacing setting of exactly 20 points. To do this, add the attribute
w:linewith a value of 400 (20 points, expressed in twips), and the attributew:lineRulewith a value of exact. After you set these values, thew:spacingtag should like the following:<w:spacing w:before="480" w:after="0" w:line="400" w:lineRule="exact" />
Change the font for Latin script (English, in this case) text in Heading 1 to use the body theme font. To do this, change the attribute for ascii text in the
w:rFontstag to minorHAnsi (that is, the minor or body theme font). The tag should look as follows after editing:<w:rFonts w:asciiTheme="minorHAnsi" w:eastAsiaTheme="majorEastAsia" w:hAnsiTheme="majorHAnsi" w:cstheme="majorBidi"/>
Alternatively, you could delete the
w:asciiThemeattribute with its value, because the minor theme font is the default for the document.Save and close the styles.xml file. Update the file in your package if needed.
Open the document in Word.
Notice that Heading 2 appears below Normal but above Heading 1 in the Styles pane and Quick Styles gallery. Then, apply Heading 1 style to examine the changes you made.
Create Custom Theme Fonts Using Office Open XML
As discussed in Chapter 5, you can’t create custom theme fonts from within the Office 2011 applications. And, even though you can do so from within Office 2010 applications, you might want to add font definitions for specific language scripts—which can’t be done from within the programs.
Fortunately, this is easy to do just by copying and editing a built-in theme font XML file on either Windows or Mac OS. You can copy and edit any existing theme font file you have. The main benefit of using a built-in theme font file is that most of them already include many definitions for a range of language scripts, so you can simply edit those rather than having to add your own.
Note
See Also Get locations for built-in and custom theme font folder locations on both Windows and Mac OS in Chapter 22.
To copy and change an existing theme font XML file:
Select and copy a built-in theme font XML file. You can save time by selecting an existing theme font set that uses one or more of the same fonts that you need.
Paste the theme font XML file that you copied in your user theme font folder location. Remember that inside the custom themes folder are both theme font and theme color folders (and, on Windows, a theme effects folder) for the corresponding XML files. Be sure to place the file in the correct location.
Rename the file to the name you want to give your custom theme font set and then open the file for editing in the XML editor you prefer.
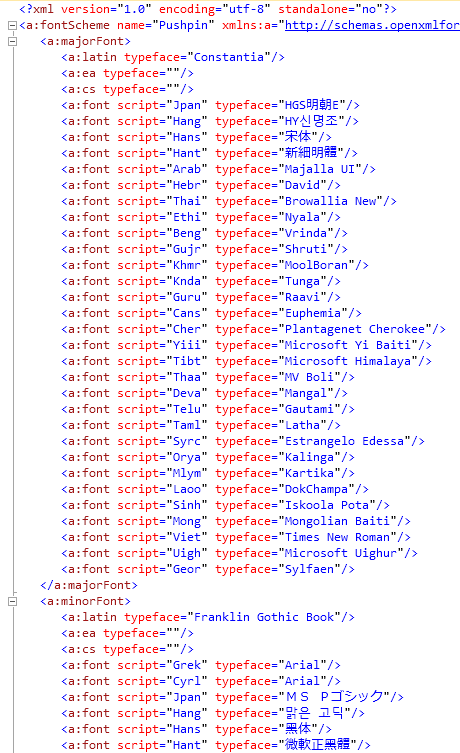
As you see in Figure 24-25, change the font scheme name in the second line of the markup, and then change the names of the fonts you need under both major (heading) and minor (body) font categories. Be sure to type font names exactly as they appear in the program. (For example, for Calisto MT, you must type Calisto MT, not just Calisto.)
As you see in the Pushpin theme font example shown in Figure 24-25, you can also edit typefaces for a range of font scripts.
Note
See Also For more information about theme fonts and script definitions, see Chapter 5.
Congratulations! Now that you can edit text and formatting for your documents through the document package, explore the additional online resources detailed in the next section for a wide range of tasks from using Office Open XML to save time to creating custom content such as themes and SmartArt layouts.
So you have the basics down. You know how to read and edit Office Open XML markup, and how the pieces in a basic document package fit together. So how can you make use of Office Open XML to save time and create custom content? Following are some of my favorite examples, along with where you can find step-by-step, detailed how-to information on how to get it done:
Say that you have an image used dozens of times throughout a long document, such as a client’s logo in a long report, or a presentation that contains multiple headers in Word or multiple masters in PowerPoint. Wouldn’t it be nice if you could just copy and paste the image once, and the Microsoft Office program you’re using would automatically place and format it everywhere it needs to go? Well, using Office Open XML, you can do exactly that—and you might be able to do it without editing a single line of markup.
You want to create a complete custom theme, including custom theme formatting effects for the SmartArt, chart, and shape style galleries and the slide background styles gallery. You can’t create your own theme effects from within any Microsoft Office program, but you can do it easily in the XML.
You want to customize graphics in the document beyond what you can do in the Microsoft Office programs. Perhaps you want to ensure that the adjustment angle of a shape (that is, when you use the yellow adjustment handles to change a shape) is identical for all like shapes in the file. Or maybe you want to change the shape used by a SmartArt diagram in your presentation so that when users add new shapes, they get the shape you want by default. Or you’d like to figure out exactly how some of those picture style perspective shadows are really set up, because you can’t replicate them using the settings in the dialog box. You might be amazed at how quick and easy it is to accomplish tasks like this using Office Open XML.
You’re creating an Office 2010 template or add-in, and you want to customize the Ribbon for just that template or add-in. Customizing the Ribbon from within the Office 2010 programs is limited to the overall application. But it’s easy to customize for a specific template or add-in using Office Open XML.
If you feel adventurous and would like to try something more advanced with your Office Open XML skills, how about creating your own SmartArt layout from scratch or your own entries for the SmartArt colors and styles galleries? This one is for folks with a bit more Office Open XML experience, but if you create custom document content professionally, it’s a great tool to add to your arsenal. If you use SmartArt graphics, you are likely to be surprised about just how much you can customize under the hood.
Note
See Also Check out the MSDN Office Developer Center for the following articles, which provide guidance for how to accomplish each task in the preceding list (note that the articles that refer to Office 2007 also apply to Office 2010 and Office for Mac 2011):
“Using Office Open XML to Save Time Without Writing Code”: http://msdn.microsoft.com/en-us/library/dd627338.aspx
“Creating Document Themes with the Office Open XML Formats”: http://msdn.microsoft.com/en-us/library/cc964302.aspx
“Using Office Open XML to Customize Document Formatting in the 2007 Office System”: http://msdn.microsoft.com/en-us/library/dd560821.aspx
“Creating VBA Add-Ins” (which includes steps and examples for using Office Open XML to customize the Ribbon in Office 2010): http://msdn.microsoft.com/en-us/library/gg597509.aspx
“Creating Custom SmartArt Layouts Using Office Open XML”: http://msdn.microsoft.com/en-us/library/gg583880.aspx