
Chapter 12. SharePoint workflows
Starting with Microsoft SharePoint 2007 and continuing with SharePoint 2010, the core SharePoint engine hosted the Windows Workflow Foundation runtime and stored all workflow-related data within the SharePoint content databases. This approach was convenient because customers did not have anything to configure: workflow functioned right out of the box in even the most basic installations. However, there were downsides to this approach: it was hard to get telemetry data on the deployed and running workflows because developers and administrators were limited to the exposure provided by the SharePoint application programming interfaces (APIs).
Microsoft has taken a very different approach to workflow in SharePoint Server 2013 from previous versions of SharePoint. The workflow team worked with the Windows Azure team to create a new product called Workflow Manager. Workflow Manager serves the role of hosting the latest version of the Workflow Foundation runtime and all the necessary services in a highly available and scalable way. It takes advantage of Service Bus for performance and scalability and, when deployed, runs in exactly the same way in an on-premises deployment and in Office 365. SharePoint is then connected and configured to hand off all workflow execution and related tasks to the Workflow Manager farm.
This chapter explains the architecture of how workflow and SharePoint work together from a high level. With this solid foundation established, the chapter then goes into the details of how to create custom workflows by using both Microsoft SharePoint Designer 2013 and Microsoft Visual Studio 2012 to take advantage of this new more scalable, powerful, and feature-rich platform.
Workflow architecture in SharePoint 2013
At first, the way in which SharePoint Server 2013 and Workflow Manager work together might sound complicated, but Microsoft has made installing, configuring, setting up, and maintaining both products very easy. All the complexity is handled within the products. After installing and configuring SharePoint Server 2013, customers are left with the same workflow execution engine that was included with prior versions of SharePoint. This means that customers can build workflows based on the former model of Workflow Foundation included in the Microsoft .NET Framework 3.5 Service Pack 1, but they cannot take advantage of any of the new features outlined in the remainder of this chapter. To take advantage of the new features, you need to perform two tasks:
Install and configure a Workflow Manager 1.0 farm.
Connect the SharePoint Server 2013 and Workflow Manager 1.0 farms together.
Installing and configuring a Workflow Manager 1.0 farm
The installation and configuration of a Workflow Manager farm is very similar to the installation and configuration of a SharePoint farm. Just like with SharePoint, the entire product and dependencies are installed on the server; the installer does not enable the user to pick what is and is not installed. Workflow Manager is best installed by using the Web Platform Installer tool (available at http://www.microsoft.com/web/downloads/platform.aspx) from Microsoft, because the tool will also download and install all dependencies such as Service Bus 1.0, which Workflow Manager uses. After Workflow Manager is installed, the next step is to configure the farm, which includes creating the required databases and provisioning the core services. This is all handled by the Workflow Manager Configuration Wizard, which should sound familiar to you if you have installed and configured SharePoint in the past.
With a SharePoint 2013 farm and Workflow Manager farm, the next step is to configure both environments to communicate with each other. This is done by going to a server in the SharePoint 2013 farm and running a specific Windows PowerShell cmdlet: Register-SPWorkflowServices. This cmdlet does two important things. First, it configures the SharePoint farm to send all workflow requests and tasks to the Workflow Manager’s front-end component endpoint. The cmdlet also configures the Workflow Manager farm with the endpoint of the SharePoint farm so that Workflow Manager knows where to send Representational State Transfer (REST) requests, which is how Workflow Manager communicates with SharePoint, in order to retrieve and submit data.
Internally, the Workflow Manager farm logs to a Service Bus topic the requests that SharePoint submits to it. Service Bus utilizes the Pub/Sub model to maintain a list of all things that want to be notified when specific messages that meet specific criteria are received by Workflow Manager. If the criteria are met, Service Bus sends the message (which is stored in a topic) to the registered subscriber of that topic. Frequently this is the workflow back-end service, which is a Windows service that is responsible for processing the workflow episodes. An episode is the short burst of workflow processing; that is, events that happen when the workflow is not waiting for an external action. When the workflow needs to communicate with SharePoint—for example, about details regarding the user who initiated the workflow, or to create and assign a task to a user—the workflow calls back to SharePoint by using the SharePoint REST services. When installing and configuring the Workflow Manager farm with SharePoint, SharePoint configures the Workflow Manager farm as an app by using the new SharePoint app model. This is also facilitated by a new service application proxy that connects SharePoint to the Workflow Manager farm. Then, Workflow Manager, in turn when connecting to SharePoint, takes advantage of the server-to-server high-trust authentication. This way, SharePoint can identify that these calls are coming from Workflow Manager, which has been granted specific permissions within SharePoint and can act on the behalf of some users.
One requirement of Workflow Manager is that the SharePoint 2013 farm must have a User Profile Service Application provisioned and running. This is because Workflow Manager uses OAuth to establish its identity with SharePoint. This is also why SharePoint Server 2013 is required to use Workflow Manager; SharePoint Foundation 2013 does not have a User Profile Service Application.
Understanding workflow in SharePoint 2013
Before diving into creating custom workflows, it helps to have a good understanding of the different components that make up the entire workflow story in SharePoint 2013. The workflow artifact that is developed by using Visual Studio deployed to SharePoint is called the workflow definition. This is simply the business logic and series of activities within the workflow that define the business process. Users cannot start a workflow from a definition. The workflow definition must first be linked with a site, list, or library that contains core parameters about this link, such as the friendly name of the workflow for users, the task and history list where all tasks and logging messages generated by the workflow definition will be stored, how the workflow can be started (manually or automatically when something is created or updated), and any additional parameters specified in the workflow definition. This link is called the workflow association. When workflows are created by using SharePoint Designer 2013, a template is not created but rather the workflow is created directly as an association, which is why SharePoint Designer 2013 workflows are not nearly as portable as workflows developed by using Visual Studio 2012. Finally, when a workflow is started and based on an existing association, it is referred to as an instance. One site or item in a list could have multiple instances of the same association running at any particular time. When an instance is running, a workflow can either be actively running (in which case it is also referred to as an episode) or paused and persisted while it waits for something to occur that triggers another episode.
For each instance of the workflow, SharePoint maintains a status page where users can view the status of the workflow, what item and user started the instance, and all tasks and history log entries created by the workflow.
Developers creating workflows with Visual Studio 2012 have access to a large number of activities. Workflow Manager 1.0 a nd SharePoint 2013 support activities included in the Microsoft .NET Framework 4.5 Workflow Foundation (anything in the System.Activities namespace), activities specific to Workflow Manager (found in the Microsoft.Activities namespace), SharePoint 2013 activities (found in the Microsoft.SharePoint.WorkflowServices.Activities namespace), and those specific to Microsoft Project server (found in the Microsoft.Office.Project.Server.WorkflowActivites namespace). SharePoint Designer 2013 workflows are limited to the activities exposed by *.action4 files. Action files are covered later in this chapter, in the “Creating custom activities” section.
Creating custom workflows for SharePoint 2013
SharePoint 2013 does include a workflow or two out of the box, but the real value in a workflow engine is in providing customers with the ability to create custom workflows that satisfy their business processes. This new architectural model for workflow in the SharePoint 2013 ecosystem does bring some changes to the process of creating custom workflows. One of the biggest changes is the fact that all custom workflows in SharePoint 2013 and Workflow Manager are completely declarative, including those built by using Visual Studio 2012. This differs from previous versions of SharePoint in that workflows developed with Visual Studio 2012 are not exclusively declarative; rather, they are a mix of declarative XAML and an assembly that contains the business logic.
This might come as a shock to seasoned SharePoint developers, who are now asking, “So how do I implement my custom business logic?” Microsoft’s recommendation is to create a custom web service, ideally a Windows Communication Service (WCF) service that returns data in the JavaScript Object Notation (JSON) format, and use some new activities and objects in this new version. The new HTTPSend activity enables calls to the simplest web services or allows you to create more complex calls with specific HTTP verbs and to provide specific HTTP headers. The web service responses that are returned as JSON are assigned to a variable that uses a new data type that understands the hierarchical structure of JSON data: DynamicValue. Microsoft has also provided a series of other activities that enable developers to extract specific values from the JSON response. The DynamicValue activity is available only to Visual Studio 2012, so the Dictionary data type is used to wrap objects of type DynamicValue so that those objects will have the same support within workflows authored in SharePoint Designer 2013.
Building custom workflows
Just like previous versions of SharePoint, SharePoint 2013 offers customers a few different options for creating custom workflows that are typically targeted at different audiences. In SharePoint 2010, Microsoft introduced the use of Microsoft Visio 2010 to model workflows. This made it easy for consultants and users to model workflows without having to have a live SharePoint site. The Visio 2010 workflow model would then be imported into SharePoint Designer 2010 so that business logic and additional functionality could be added to the workflow. By combining Visio 2010 and SharePoint Designer 2010, customers could easily create and share workflows with their clients without involving a developer. However, when more advanced customizations were required, developers could get involved by creating custom workflows with Visual Studio 2010. The significant downside to workflows developed in Visual Studio is that they have a programmatic component to them. This means they can be deployed only by using fully trusted solutions, and thus they can be used only in on-premises deployments, not to hosted deployments, which are limited to sandboxed solutions.
SharePoint 2013 has made great strides in the development and deployment of custom workflows. The following two sections outline the major changes between the two main options: Visio with SharePoint Designer, and Visual Studio.
Custom workflows with Visio 2013 and SharePoint Designer 2013
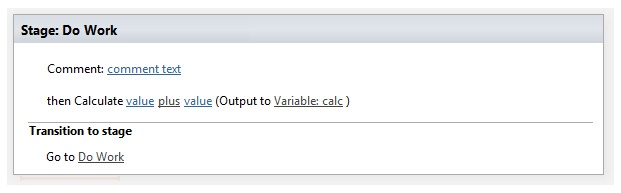
Those who have created workflows with Visio 2010 and SharePoint Designer 2010 in SharePoint 2010 will be very comfortable with the latest releases, because both tools have been improved to support the new workflow capabilities. One of the biggest customer feedback points in SharePoint Designer 2010 was the lack of support for any type of looping. Two new activities have been added to SharePoint Designer 2013 to support looping: Loop [n] Times and Loop with Condition. These two activities should satisfy many looping scenarios; however, a more significant improvement that supports more complex loops is the addition of stages. Stages are founded on the concept of Workflow Foundation flowchart activities. Workflow authors can put any number of activities within a stage and then specify one or more conditions at the end of the stage that dictate how the workflow should proceed. In this Transition To Stage section, as shown in Figure 12-1, authors can choose to transition directly to another stage (including the default End of Workflow, which terminates the workflow) or add a conditional statement by using an If activity to route to a desired stage. Revising the previous point about looping, a stage could be configured to transition back to itself, effectively creating a conditional loop.
Another improvement to SharePoint Designer 2013 is the addition of common semantics found in other Microsoft Office products such as Microsoft Word, Excel and PowerPoint; these include cut, copy, paste, move up, and move down. These additions make it easier to customize an existing workflow; in previous versions of SharePoint Designer, the workflow author had to delete and recreate the steps where they were intended to be.
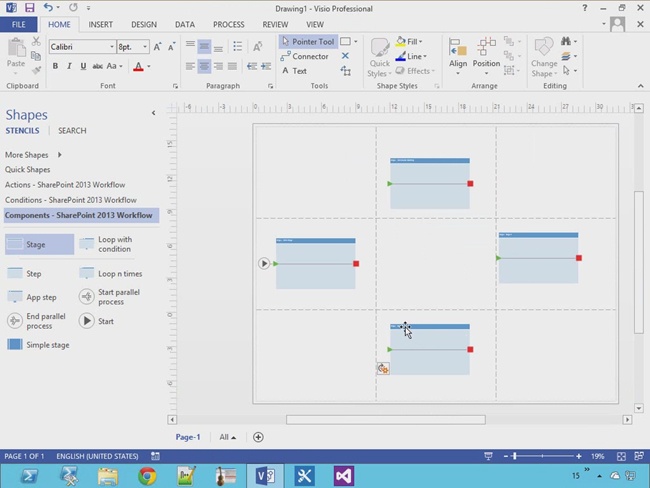
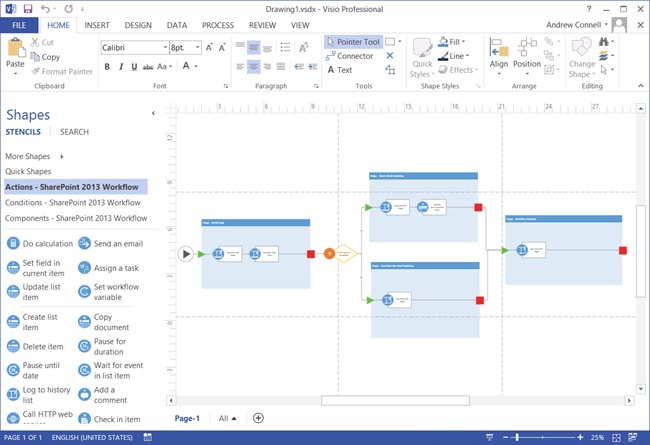
Although SharePoint Designer’s workflow authoring experience has traditionally been text based, Visio 2010 introduced a new visual designer, which made it easier for customers to view the workflow in a more familiar flowchart diagram. This visual designer has been improved in Visio 2013 in that it supports all the new activities for looping and stages that were added in SharePoint 2013 but also adds two more significant additions. First, unlike the visual designer in Visio 2010, which was limited to simply adding and linking activities, in Visio 2013 you can now modify the properties of an activity. Therefore, workflow authors can express business rules, such as the parameters of an If statement activity. The other major improvement associated with the visual designer is that now SharePoint Designer 2013 users who have Visio 2013 installed will also get the visual designer. This means that within SharePoint Designer, users can author workflows either by using the traditional text-based designer or by using the Visio visual designer, as shown in Figure 12-2.
Creating a workflow with Visio 2013 and SharePoint Designer 2013
This walkthrough will demonstrate how to create a simple workflow that uses stages with Visio 2013 and SharePoint Designer 2013. Open Visio 2013 and create a new drawing based on the Microsoft SharePoint 2013 Workflow template, found in the Flowchart category. By using the Shapes task pane, look in the Components - SharePoint 2013 Workflow section and drag three more stages onto the design surface, as shown earlier in Figure 12-2. To make things easier to follow, rename each of the stages to the following names:
Leftmost stage: Initial Stage
Top stage: Item Needs Updating
Bottom stage: Item Does Not Need Updating
Rightmost stage: Workflow Finishing
Now do the following to model the workflow stages:
Look in the Actions - SharePoint 2013 Workflow section of the Shapes task pane, add two Log To History List actions to the Initial Stage, and rename them Log entry into stage and Log value from form, respectively.
With the first stage model complete, look in the Conditions - SharePoint 2013 Workflow section of the Stage task pane, add If Any Value Equals Value immediately to the right of the Initial Stage, and rename it If user entered something.
Use the Connector tool on the Home tab of the Visio 2013 ribbon to connect the red stage finished box to the decision action.
Use the Connector tool to connect the decision to the start of the Item Needs Updating and Item Does Not Need Updating stages. Right-click each connector and set the one going to Item Needs Updating to Yes and the other connector to No.
Add two Log To History List actions to the three remaining stages (Item Needs Updating, Item Does Not Need Updating, and Workflow Finishing).
Add the Set Field In Current Item action, found in the Actions - SharePoint 2013 Workflow category of the Shapes task pane, as the second action in the Item Needs Updating stage, and rename it Update Announcement Body with Value.
Connect the Item Needs Updating and Item Does Not Need Updating stages to the Workflow Finishing stage.
Save the Visio 2013 drawing, which should look like Figure 12-3, and then close Visio 2013.
The next task is importing the workflow into SharePoint Designer, so open SharePoint Designer 2013 and do the following:
Within SharePoint Designer 2013, click the Open button and enter the URL of a SharePoint site to connect to, logging on if necessary.
In the Navigation pane on the left, click Lists And Libraries to check if there is an existing Announcements list. If not, create one:
Click the SharePoint List button on the ribbon and select Announcements.
When prompted for a name, enter Announcements and click OK.
Import the Visio drawing to create the workflow:
Click Workflows in the Navigation pane on the left.
Click the Import From Visio button on the ribbon and select Import Visio 2013 Diagram.
Find the drawing saved from Visio and click Open.
In the Create Workflow dialog box, set the name to Update Announcement Item, Workflow Type to List Workflow, and SharePoint List to Announcements, and click OK.
SharePoint Designer will create the workflow and present the visual designer view of the model. Although it is possible to edit the workflow in the visual designer, switch to the text designer by clicking Views on the ribbon and then selecting Text-Based Designer.
In the text-based designer, SharePoint Designer will display the stages in a top-down list. The order does not really matter; however, it may make sense to ensure that they are in the correct order. This can be done by selecting a stage and then right-clicking to use either the Move Up or Move Down option. Also notice how the Transition To Stage section of each stage has been wired up to route the workflow to the next stage.
Within the Initial Stage stage, click the Message link on the first action and set the message to Entering Stage - Initial Stage.
Repeat this process for the action in each stage to write a message to the log that the workflow entered the name of the current stage.
When the workflow has been initiated, this workflow will prompt the user to enter a value to write to the body of the announcement. To add this field to the initiation form, follow these steps:
On the ribbon, click Initiation Form Parameters.
Click the Add button to create a new form parameter.
Set the Name of the parameter to Body Value and click Next, then click Finish and OK.
Use the second Log action in the Initial Stage to write the value the user entered to the log:
Click the Message link and then click the ellipsis (...) button to the right to bring up the builder.
In the text area, enter Value entered by user:.
Click the Add Or Change Lookup button.
In the Lookup For String dialog box, set the Data Source to Workflow Variables And Parameters and the Field From Source to Parameter: Body Value, and click OK twice to close the two dialog boxes.
Update the condition to route to the correct stage from the Initial Stage:
In the Transition To Stage section of the Initial Stage, click the first Value link and then click the Fx button.
In the Define Workflow Lookup dialog box, set the Data Source to Workflow Variables And Parameters and the Field From Source to Parameter: Body Value, and then click OK.
Click the Equals link in the If statement and select the Is Not Empty condition, and then click OK.
Update the list item within the Item Needs Updating stage:
In the Item Needs Updating stage, select the Field link on the Set Field To Value action and select Body.
Click the Value link and click the Fx button.
In the Define Workflow Lookup dialog box, set the Data Source to Workflow Variables And Parameters and the Field From Source to Parameter: Body Value, and then click OK.
The workflow is now finished and can be tested. Click the Save button on the ribbon to save the workflow. Then click Publish to publish the workflow to Workflow Manager.
Open a browser and go to the Announcements list. Create a new item with no value in the body field and click Save. Now select the item and, by using the Items tab on the ribbon, select Workflows. On the Workflows page, select Update Announcement Item to start the workflow. When the workflow starts, you will be taken to the initiation form. Enter a value in the Body Value text box and click Start. The browser will redirect back to the list. Click the Workflows button again. This time, further down the page, notice that there is a workflow under Running Workflows or Completed Workflows (depending on whether it has already finished). Click the value of the Internal Status field to view the status page that shows all history log information. Go back to the actual list item and notice that the body value has also been updated.
Custom workflows with Visual Studio 2012
The previous section discussed some of the changes in custom workflow development found in both Visio 2013 and SharePoint Designer 2013. Many of these changes, though important, are iterative and are improvements upon the previous versions of the tools. The story with Visual Studio 2012 workflow development for SharePoint, in contrast, is quite different. The biggest change developers will quickly notice, as mentioned previously in this chapter, is the fact that there is no code view for the workflow because it is entirely declarative. All custom business logic, if it cannot be expressed by using the provided activities, should be refactored to external web services that the workflow can call.
Developers can create workflows in either a traditional SharePoint full trust farm solution or within a new SharePoint app and use either of the new project item templates added by the Microsoft Office Developer Tools for Visual Studio 2012 for SharePoint projects: Workflow and Workflow Custom Activity. Both of these project item templates are available in full trust solutions as well as in apps, but the real-world usefulness of custom activities will be dependent on the type of project selected. Custom activities are covered in the “Creating custom activities” section later in this chapter.
Though SharePoint Designer 2013 is limited to creating workflows made up of stages, which are effectively flowcharts, Visual Studio supports another powerful type of workflow: state machine. This means that workflows developed in Visual Studio 2012 effectively support three different types of workflow authoring:
Sequential. A sequential workflow follows a specific path, as shown in Figure 12-4. There might be decision branches and loops, and the workflow might not have a termination point, but it is easy to follow the predictable path in the designed process.
Flowchart. A flowchart workflow is one in which the workflow can transition into different sections depending on specific conditions, as shown in Figure 12-5. The flowchart activity, along with the associated FlowDescision and FlowSwitch activities, are typically placed within a sequence activity and act like either traditional if or switch statements in common programming languages such as C#, Microsoft Visual Basic .NET, or JavaScript. The stage construct within a workflow based on SharePoint Designer 2013 is based on the principles of a flowchart. This type of workflow, unlike a sequential workflow, does not have a prescribed path that it follows. Instead, the things that happen during the workflow dictate the path the workflow follows.
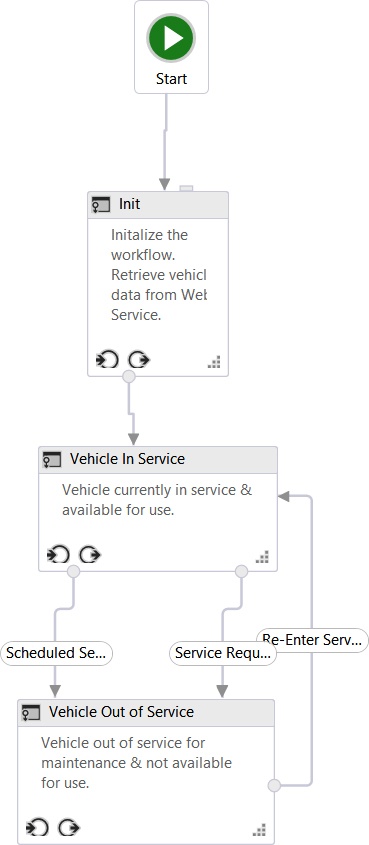
State machine. A state machine workflow, like a flowchart workflow, does not typically follow a specific path of execution. These types of workflows consist of two or more states, as shown in Figure 12-6. Think of each state as a smaller workflow that contains multiple activities. Developers can set specific activities to happen when the workflow enters or exits the state. What really makes state machines interesting is the transitions developers define. Each state can have one or more transitions that tell the workflow engine how to move from one state to another state. The workflow is always going to be in one of the states in a state machine workflow. A transition dictates the trigger for the workflow to move from one state to another. Many people favor state machine workflows over the other types of workflows because they can be made to more closely mirror real-world business processes. However, these types of workflows can quickly get very complicated.
When adding a new workflow to a SharePoint project, the template adds a single Sequence activity, which serves as the main container. If you want to create a flowchart or state machine workflow, simply delete this default activity and drag either a StateMachine or Flowchart activity onto the design surface.
Before building a custom workflow, developers should have a good understanding of the tool windows and design surface that Visual Studio 2012 provides. Many of the elements, as shown in Figure 12-7, are quite common:
The Solution Explorer tool window, which contains your project
The toolbox, which contains all the activities used in assembling the workflow
The design surface, where the activities will be placed and linked together
The Properties pane, where most aspects of the selected activity or selected item in the Solution Explorer are managed
There are two additional components within the design surface that might not be familiar to you and might need additional explanation:
At the bottom of the designer, notice three tabs: Variables, Arguments, and Import. Click Variables to view a list of all the variables used within the workflow that are available at the current scope. Scoping works the same way as it does in standard object-oriented programming design: a variable scoped at the root is accessible to all lower scopes (such as methods within a class), but a variable within a lower scope (such as a method in a class) is accessible only within that scope and its children, not in parallel or parent scopes. Click Arguments to view a list of the arguments that are used to pass values into the workflow, such as those passed in from an initiation form, as covered later in this chapter in the “Adding custom forms to workflows” section, or as properties within a custom activity.
Near the top of the designer is a breadcrumb navigation area. As workflows acquire more and more nested activities, it sometimes is easier to manipulate them by zooming into a specific area. This breadcrumb navigation area can make it easier to back out to a higher level within the workflow. It is for this reason that one approach is to rename composite activities, or those activities that contain child activities, such as Sequence, to something more appropriate. For example, the topmost Sequence activity could be renamed “Root” instead of the default “Sequence” name.
Creating a workflow with Visual Studio 2012
The following walkthrough demonstrates how to create a custom workflow that calls the OData web service of the well-known Northwind database publically hosted at the http://www.odata.org site. The user enters a customer ID and then starts the workflow, which will retrieve additional customer information and update the list item with this data. First, start Visual Studio 2012 and create a new SharePoint-hosted app project, a task that has been shown repeatedly throughout this book. Next, create a new custom list named Customers in the project. Include the following fields, leaving their default data type of String:
CustomerId (renamed from the default Title field)
Customer Name
Job Title
Address
Country/Region
Business Phone
Fax Number
After creating the list, add a workflow to the project by following these steps:
Repeat the process of adding a new item to the app, but select the Workflow template.
In the SharePoint Customization Wizard, give the workflow a friendly name and specify it as a List Workflow.
The next step in the wizard asks whether Visual Studio should automatically create an association. Select the check box to create the association, and select the only option for all drop-down list boxes.
Set the different ways in which the workflow can be started. For development, select only the A User Manually Starts The Workflow check box and leave the other automatic start options cleared. Then click the Finish button.
Visual Studio will then display the basic workflow design surface with a single Sequence activity. To keep things organized and easier to manage, rename this activity Root and add four more Sequence activities within the Root sequence, using the following names:
Init
Get Customer Data from Service
Process Service Response
Update List Item
The first step in this workflow is to retrieve the customer ID entered by the user. For this, two variables are needed, so click the Variables tab at the bottom of the designer and create the following two variables:
CustomerItemProperties (Variable Type = DynamicValue; Scope= Init). This will be used to store the results from the activity that will get all properties from the list item. The DynamicValue data type is not shown by default. To find it, select the Browse For Types option in the Variable Type column. In the search box at the top of the dialog box, enter DynamicValue and select the Microsoft.Activities.DynamicValue.
CustomerId (Variable Type = String; Scope = Root). This will be used to store the actual customer ID entered by the user in the list item.
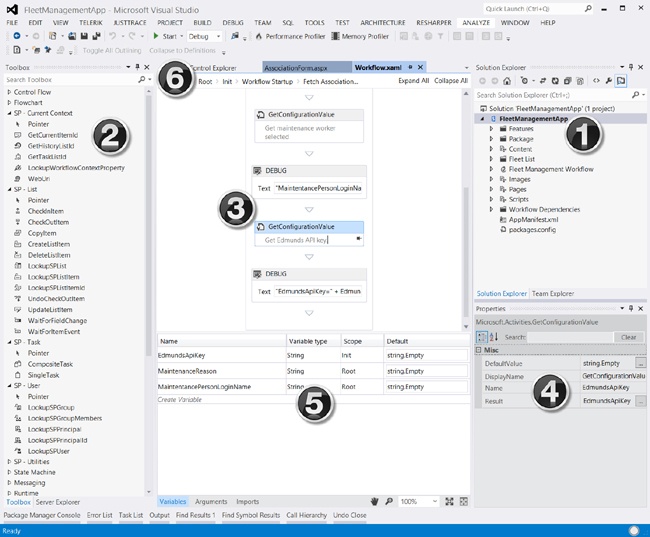
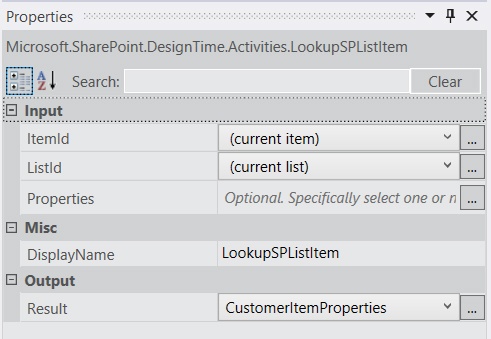
Next, drop the LookupSpListItem activity in the Init sequence, found in the SP - List section of the toolbox, and use the values shown in Figure 12-8 to set the values in the Properties pane when this activity is selected. This activity tells Workflow Manager to use the SharePoint REST API to retrieve the properties of the current list item and store the JSON response in the DynamicValue variable previously created.
To retrieve the customer ID from the item, click the Get Properties link within the LookupSpListItem activity, which will add a GetDynamicValueProperties activity to the design surface. In the Properties pane, click the ellipsis (...) button to bring up the Property selector wizard. In the wizard, set the Entity Type to List Item Of Customers and add a single property with Path = CustomerId and Assign To = CustomerId (the variable previously created).
The workflow now has a reference to the customer ID, so the next step is to call the web service. Select the sequence Get Customer Data from Service to set the current context, and create two new variables:
NorthwindServiceUri (Variable Type = String; Scope= Get Customer Data from Service). This will contain the URI that will be used to query the web service.
NorthwindServiceResponse (Variable Type = DynamicValue; Scope = Root). This will be used to store the web service response.
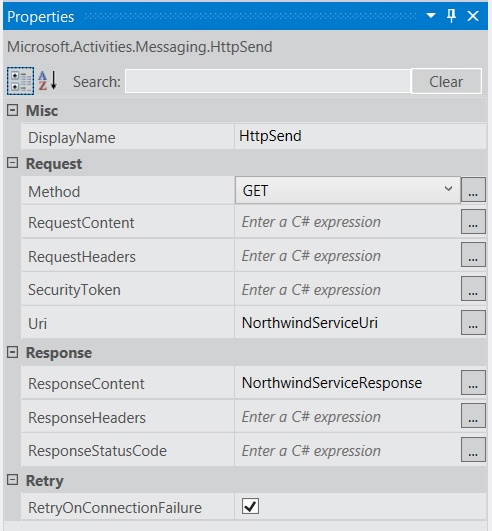
Create the URL that will be used to query the web service by dropping an Assign activity in the Get Customer Data from Service sequence. Set the left part of the Assign activity to NorthwindServiceUri and the right part to “http://services.odata.org/Northwind/Northwind.svc/Customers(‘” + CustomerId + “’)?$format=json”. Now add an HttpSend activity to the Get Customer Data from Service sequence immediately after the Assign activity, and use the values shown in Figure 12-9 to set the properties on this activity.
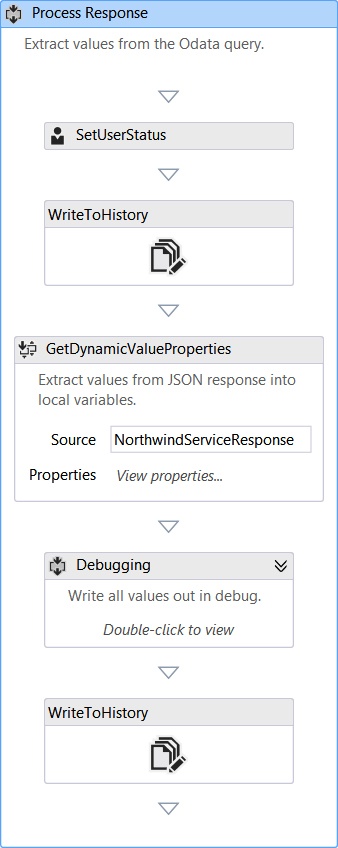
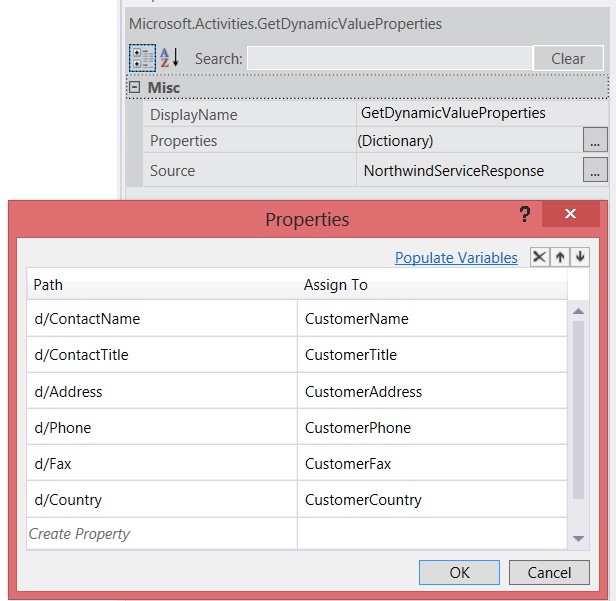
After the web service request has been made and the results are stored in the local variable, the next step is to process the response. Each value in the response will need to be added to a different variable, so create string variables, scoped to the Root sequence, for each of the fields except customer ID in the list created at the start of this walkthrough. Next, add a GetDynamicValueProperties activity to the Process Service Request sequence. In the Properties pane, set the Source value to NorthwindServiceResponse. Now click the ellipsis button for the Properties property to map paths in the response to the local variables by using the settings shown in Figure 12-10. (Note that the Assign To column contains the variables created for each field in the Customers list.)
The last step is to update the list item. To do this, add an UpdateListItem activity to the Update List Item sequence, and use the Properties pane to set the following values:
ListId (current list)
ItemId (current item)
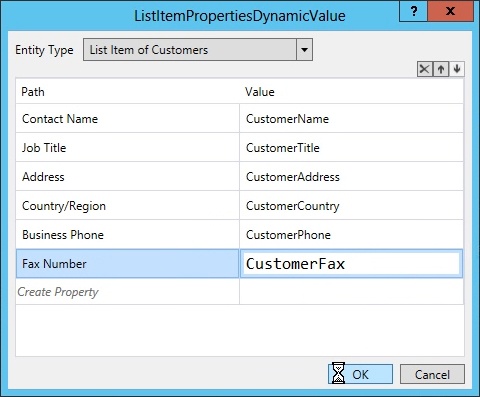
Click the ellipsis button for the ListItemPropertiesDynamicValues property. In the dialog box, set the Entity Type to List Item Of Customers and, for each of the values extracted from the web service, set the value of the list item to the variable within the workflow, as shown in Figure 12-11.
At this point, the workflow is complete, so press F5 to start debugging. Visual Studio will build and deploy the SharePoint-hosted app.
Note
Notice that a console box also appears in the deployment process. This is a debugging tool for testing workflows in an on-premises deployment. It will display the contents of WriteLine activities.
When the browser opens, find the Customers list, create a single customer with an ID of ALFKI, and save the item. Next, manually start the workflow by using the same process outlined in the previously created SharePoint Designer 2013 workflow, and then go back to the list item and keep refreshing the page to observe the workflow update the list item.
SharePoint Designer 2013 and web services
As previously mentioned in this chapter, Microsoft has added support for workflows deployed to Workflow Manager 1.0 to call external web services. With this capability, workflow authors can add custom business logic to their workflows and take advantage of existing services. Unlike workflows based on Visual Studio 2012, which use the DynamicValue type, SharePoint Designer 2013 uses the Dictionary data type with variables to send data to the workflow and to process the results from a web service call.
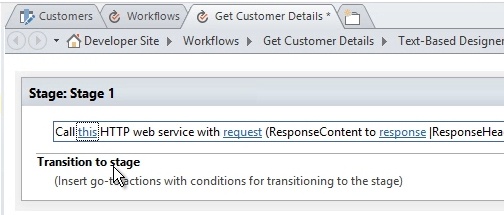
Working with web services in workflows authored in SharePoint Designer 2013 is very similar to working with them in workflows authored in Visual Studio 2012. To call a web service, use the Call HTTP Web Service action in SharePoint Designer 2013. The first step is to set the address of the web service to call. Do this by clicking the this hyperlink in the action, as shown in Figure 12-12.
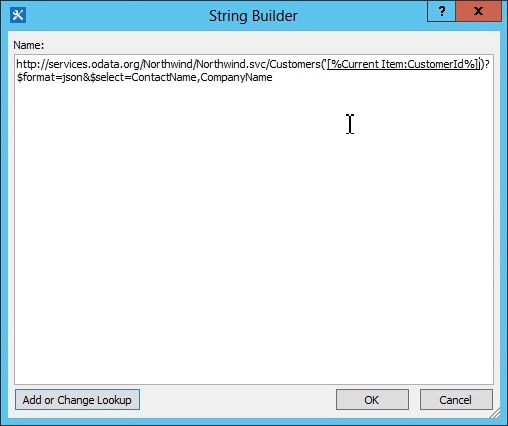
When the String Builder dialog box opens, construct the URL to the service by using values in the current list item and the Add Or Change Lookup button in the footer of the dialog box, as shown in Figure 12-13. This figure shows a call to the same Northwind service that was used in the previous workflow authored in Visual Studio 2012, but it uses the CustomerId field from the current list item and selects only the ContactName and CompanyName fields.
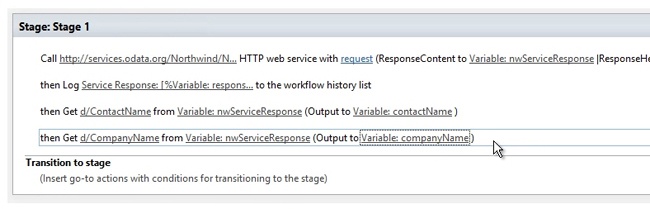
The next step is to extract the value from the web service response. First, the web service response must be stored in a new variable. Click the response link in the Call HTTP Web Service action and either select an existing variable or create a new variable of type Dictionary. To extract the values from the service response, add a Get Item from Dictionary action to the workflow. This activity has three things to set:
Item by name or path. This is the path to the item within the dictionary variable or the web service response. For instance, to get the results from the service used in Figure 12-14, the path would be d/ContactName.
Dictionary. This is the name of the variable that contains the web service response.
Item. This is the name of the variable where the result should be stored for later use in the workflow.
That is all there is to working with services in SharePoint Designer 2013. From this point, the variable can be used to update a list item or inclusion within an email message or any other task that can be performed with a workflow.
Creating custom activities
Another workflow customization supported by both SharePoint 2013 and Workflow Manager is creating custom activities. With a custom activity, a developer can create a subprocess that achieves a specific task. A custom activity can be thought of as a small workflow, which is ideal for a process that could be reused multiple times in various workflows. Before creating a custom activity, the developer needs to consider where and how it will be used. If the goal is to simply refactor a complex workflow into smaller or reusable components that are stored in files separately from the main workflow, the development approach is quite simple. Only Visual Studio 2012 supports creating custom activities; SharePoint Designer 2013 contains no support for creating custom activities. To create a custom activity in Visual Studio, add a new project item to a SharePoint project (either a traditional SharePoint solution or SharePoint app) by using the Workflow Custom Activity template; add the business logic; and finally, add the activity to the workflow as demonstrated in the next section.
Creating a custom workflow activity in a SharePoint app
The following walkthrough demonstrates how to create a custom activity for use within a workflow hosted in a SharePoint app. It will use the workflow project previously created in this chapter that calls the Northwind OData service as a starting point to retrieve additional customer data. The custom activity will refactor the process of querying the web service and processing the response so that the workflow can call this activity by passing in a customer ID and get back the additional customer details without having to deal with the web service.
First, add a new item to the project by using the Workflow Custom Activity template and name it GetCustomerDetailsActivity. Next, cut and paste the sequences Get Customer Data from Service and Process Service Response from the previously created workflow into the sequence in the custom activity. Rename the default Sequence activity to Root. Now create two variables by clicking the Variables tab at the bottom of the designer. These variables will be used in the workflow to store the URL of the service and the response:
NorthwindServiceUri (Variable Type = String; Scope= Get Customer Data from Service). This will contain the URI that will be used to query the web service.
NorthwindServiceResponse (Variable Type = DynamicValue; Scope = Root). This will be used to store the web service response.
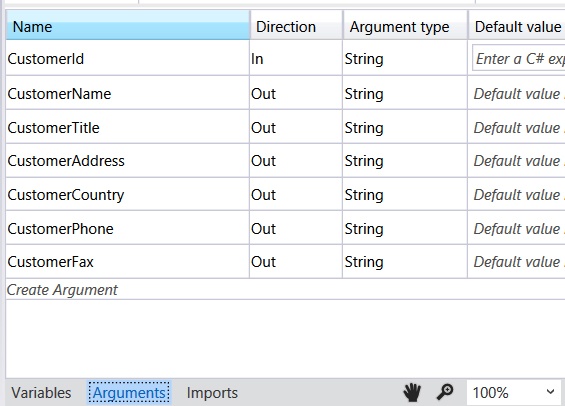
The next step involves modifying the arguments used to pass data to and from the activity. Within the activity, click the Arguments tab at the bottom of the designer, as shown in Figure 12-15. Create one input argument for the customer ID that the calling workflow will supply, and output parameters for all the values extracted from the web service response, as shown in Figure 12-15. As long as the argument names are the same as the variable names in the previous workflow, the activities will not need to be updated.
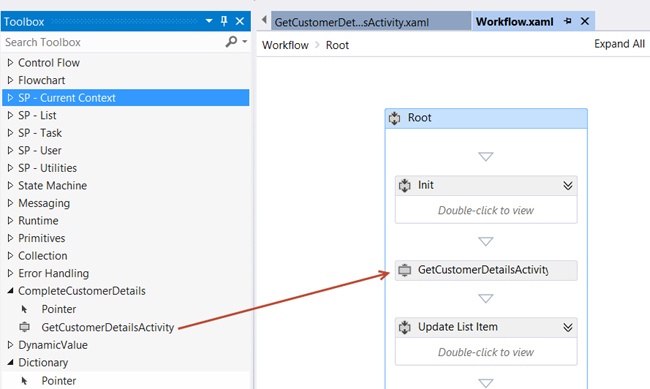
The custom activity is now finished, and the next step is to update the workflow. With the workflow open in the designer, remove the two variables NorthwindServiceUri and NorthwindServiceReponse; they are no longer needed, because the activity handles them. To add the activity to the workflow, you must compile the project so that the toolbox will show the activity as one to use in the workflow. Build the project, and then drag the custom activity into the designer between the Init and Update List Item sequences, as shown in Figure 12-16.
The last step is to select the custom activity in the designer and associate all the input and output parameters with the variables in the workflow.
This example showed how to use a custom activity within a workflow deployed as a SharePoint app. This is great for many solutions, but many business requirements demand that the activity be used in multiple workflows. Sharing a single activity XAML file between projects and limiting it to workflows built with Visual Studio 2012 is cumbersome. Another option is to deploy the activity to Workflow Manager and advertise the existence of it to SharePoint so that workflows authored by using SharePoint Designer 2013 can use it. There are two extra requirements to creating a custom activity for use in SharePoint Designer 2013 workflows.
First, the activity must be deployed by using a solution, not in an app. Deploying it in an app would make the activity available only within the AppWeb, which is quite limiting. The solution used for deployment can be a sandboxed or fully trusted farm solution, but it probably makes the most sense to do it as a sandboxed solution. Because the custom activity will be fully declarative like workflows authored in Visual Studio 2012, there is no custom code, and thus it can be deployed by using a sandboxed solution. Further, because fully trusted farm solutions are supported only in on-premises deployments, the sandbox makes more sense because it can be used in either on-premises or hosted deployments such as Office 365.
The other requirement in creating a custom activity that will be used in SharePoint Designer 2013 workflows is that the activity must be advertised to SharePoint Designer. This is achieved by using an actions file. When you are creating a new workflow with SharePoint Designer 2013, the site collection interrogates the target site collection for all available actions supported by the site collection. These actions map to activities and tell SharePoint Designer how the user-friendly designer should work, what the inputs and outputs are, and where it should appear in the SharePoint Designer user interface—for example, which category it should be present in. Actions files are deployed as part of the SharePoint solution package that includes the custom activity.
Creating a custom workflow activity for SharePoint Designer 2013
The following walkthrough demonstrates how to create a custom activity that can be used within SharePoint Designer 2013. It is a variant of the one included in the previous walkthrough that addressed creating a custom action for Visual Studio 2012, so the differences between the two will be easily noticeable. First, create a SharePoint 2013 empty project, making sure that it is a SharePoint solution and not a SharePoint app project. When prompted, specify that the project is a sandboxed solution.
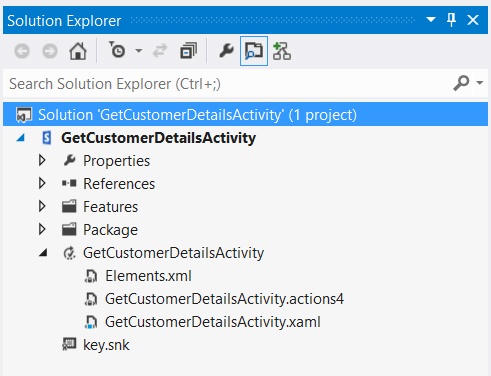
Next, add a Workflow Custom Activity item to the project and recreate the activity from the previous example, including the variables and arguments. Essentially, what you should be left with is a sandboxed solution with no workflow, but the same activity from the previous project. There is one very important difference in that there is now a *.actions4 file in the project item, as shown in Figure 12-17.
After the activity has been created, it must be exposed as an action for it to be accessible in SharePoint Designer 2013 workflows. This is done by using the *.actions4 file. Open this file and add the contents shown in the following code. This file dictates how the activity will appear in SharePoint Designer 2013 and how the values entered by the workflow author will be passed to and from the activity:
<Action Name="GetCustomerDetailsActivity"
ClassName="GetCustomerDetailsActivity.GetCustomerDetailsActivity"
Category="Custom Activities"
AppliesTo="all">
<RuleDesigner Sentence="Fetch customer details for
customer %1 from Northwind as %2, %3, %4, %5, %6 and %7">
<FieldBind Field="CustomerId" Id="1"
DesignerType="TextBox" Text="id" DisplayName="Customer Id" />
<FieldBind Field="CustomerName" Id="2"
DesignerType="TextBox" Text="fullName" DisplayName="Customer Name" />
<FieldBind Field="CustomerTitle" Id="3"
DesignerType="TextBox" Text="jobTitle" DisplayName="Customer Job Title" />
<FieldBind Field="CustomerAddress" Id="4"
DesignerType="TextBox" Text="address" DisplayName="Customer Address" />
<FieldBind Field="CustomerCountry" Id="5"
DesignerType="TextBox" Text="country" DisplayName="Customer Country" />
<FieldBind Field="CustomerPhone" Id="6"
DesignerType="TextBox" Text="phone" DisplayName="Customer Phone" />
<FieldBind Field="CustomerFax" Id="7"
DesignerType="TextBox" Text="fax" DisplayName="Customer Fax" />
</RuleDesigner>
<Parameters>
<Parameter Name="CustomerId" Type="System.String, mscorlib"
Direction="In" DesignerType="Hide" />
<Parameter Name="CustomerName" Type="System.String, mscorlib"
Direction="Out" DesignerType="Hide" />
<Parameter Name="CustomerTitle" Type="System.String, mscorlib"
Direction="Out" DesignerType="Hide" />
<Parameter Name="CustomerAddress" Type="System.String, mscorlib"
Direction="Out" DesignerType="Hide" />
<Parameter Name="CustomerCountry" Type="System.String, mscorlib"
Direction="Out" DesignerType="Hide" />
<Parameter Name="CustomerPhone" Type="System.String, mscorlib"
Direction="Out" DesignerType="Hide" />
<Parameter Name="CustomerFax" Type="System.String, mscorlib"
Direction="Out" DesignerType="Hide" />
</Parameters>
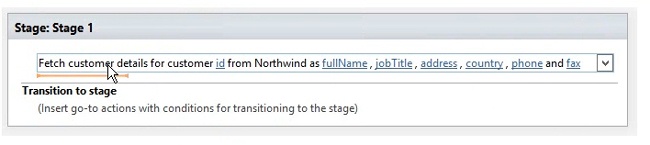
</Action>In this markup, notice the <RuleDesigner> element, specifically the Sentence attribute. It contains a string that is shown in the SharePoint Designer experience. Each of the pieces of the sentence that start with the % character are treated as linked placeholders. They map to the <FieldBind> elements in the markup. For instance, %2 maps to the fullName field. What is shown in the design experience is a hyperlinked string fullName, which the workflow author can click. The <Parameters> section tells the designer how each field should be treated; for instance, whether it is an email address, string, number, or datetime field. Based on the type specified, the designer shows different designers and applies different validation rules.
When you are finished, deploy the sandboxed solution to a SharePoint 2013 site and create a new workflow. The activity will appear in the category that the *.actions4 file specified and will appear in the designer, as shown in Figure 12-18.
Using tasks in workflows
One of the biggest value propositions that SharePoint brings to Workflow Foundation is the incorporation of tasks and task management. When you are associating a workflow with a site or list, one of the requirements is to specify the list that will contain any of the tasks that are created within the workflow. Both SharePoint Designer 2013 and Visual Studio 2012 support creating tasks and assigning them to users. Handing the outcome of the tasks is much simpler than it was in prior versions of SharePoint.
Developers using Visual Studio 2012 can create tasks by using one of two activities: SingleTask or CompositeTask. The first one creates and assigns a task to a specified user or group. With the latter, a developer can create multiple tasks and assign them to multiple people, such as everyone within a group. A task can be configured to stop the workflow until everyone or a percentage of people have addressed the assigned task. Both activities have properties that allow the workflow author to specify the subject and body of the different email messages that are sent out when the task is assigned to someone, when it is overdue, or when it has been canceled. Unlike in previous versions of SharePoint, developers do not have to keep track of correlation tokens if they don’t want to, because the tasks can be flagged to wait until the task has been completed by the person it was assigned to.
Microsoft has created a new task list definition in SharePoint 2013 (list template ID = 171) that provides a timeline view and uses the new Workflow Task (SharePoint 2013) content type. This content type is derived from the base Task content type (ID = 0x0108), but it adds two columns. The first column, WorkflowInstanceId, is used to track which instance the task is associated with. The other column is TaskOutcome, which is used to provide the two default outcomes available for a task: Approved and Rejected.
Adding tasks to a workflow
The following walkthrough demonstrates how to use the SingleTask activity to add a task to a workflow by using the out-of-the-box workflow task and task outcomes. Create a new SharePoint-hosted app by using Visual Studio 2012, add an Announcements list to the app project, and then add a workflow that is associated with the Announcements list and starts only manually, not automatically. Because the task needs to be assigned to someone, for the sake of simplicity, use the creator of the list item that will trigger the workflow. Therefore, use the same techniques that were demonstrated in the previous workflows to get the list item’s properties, but this time put the Created By field value from the list item in a local string variable called AnnouncementItemAuthorId.
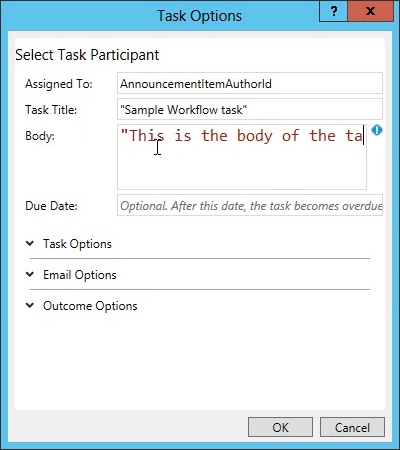
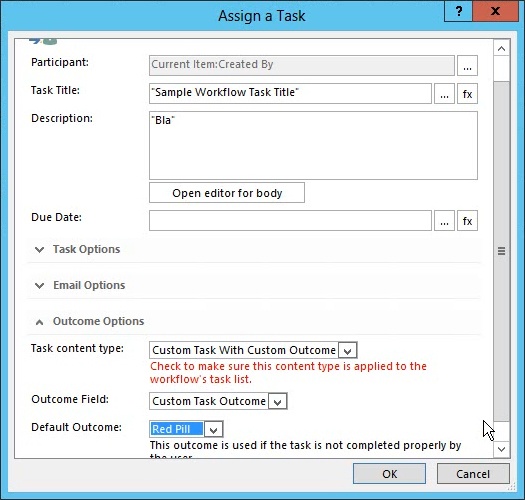
Next, by using the toolbox, add a SingleTask activity to the end of the workflow and click the Properties link within the activities to open the Task Options dialog box. Set the Assigned To property to the AnnouncementItemAuthorId variable, and update the other fields such as the Task Title and Body to something descriptive. Notice that there are additional sections for Due Date, Task Options, Email Options, and Outcome Options that can be set, as shown in Figure 12-19.
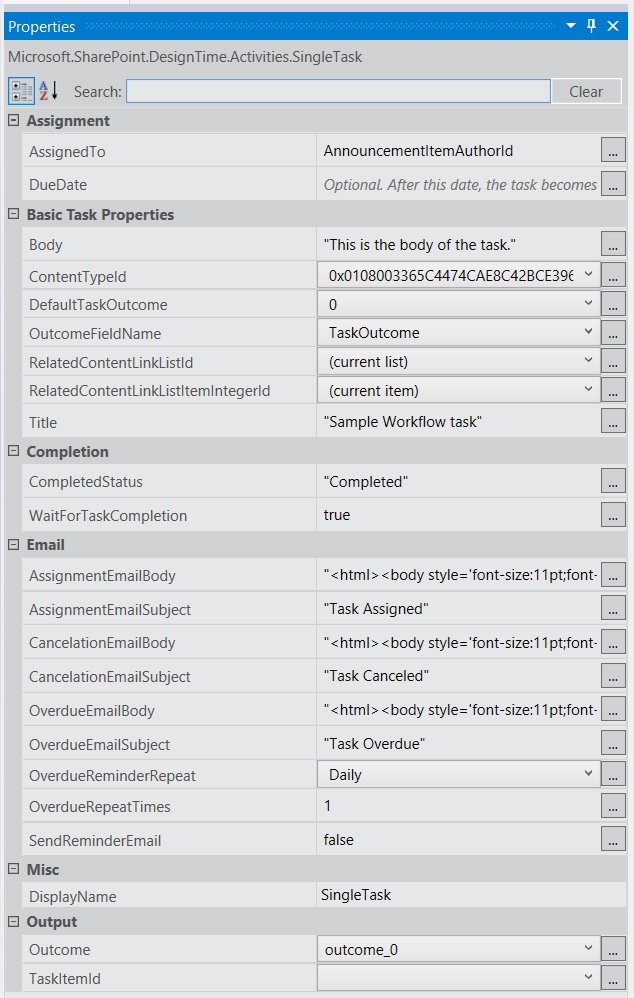
Although the Task Options dialog box has quite a few options that the workflow author can set, selecting the SingleTask activity in the designer will expose a significant number of additional properties in the Properties pane, as shown in Figure 12-20. These include custom email subjects and bodies for the three types of email messages that can be sent, and configuration of the variable where the task outcome should be saved for evaluation later in the workflow.
Custom task outcomes
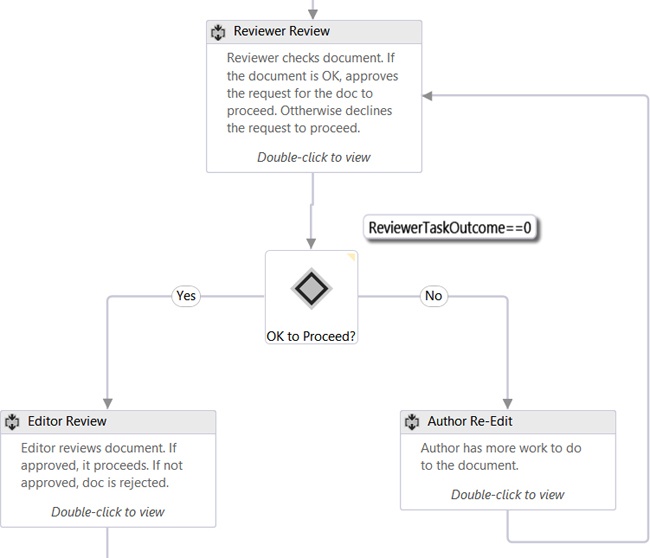
Workflow task outcomes are presented on the task edit form as buttons at the bottom of the form, alongside the Save and Cancel buttons. Workflows in SharePoint 2013 are not limited to just the two options Approved and Rejected. Many times the out-of-the-box options do not meet a company’s business requirements. For instance, consider a task that is assigned to a reviewer of a draft document for a manuscript. When the reviewer surveys the submitted draft document, the two options should be to either send the draft document back to the author for more edits or pass it along to the editor. In this case, Approved and Rejected do not really fit; more appropriate options could be “Return to Author” and “Proceed to Editor.”
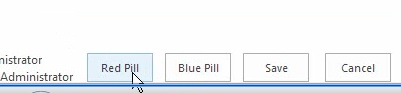
Workflow authors using either SharePoint Designer 2013 or Visual Studio 2012 can create custom workflow tasks that include custom task outcomes. This is achieved by creating a custom task as a special content type and adding a custom site column that defines all the possible outcomes. The custom column should be derived from the field type called OutcomeChoice, which is a choice field. This can pose a challenge in that the content type the custom task is derived from is the Workflow Task (SharePoint 2013) content type, which includes the default TaskOutcome site column, which contains the Approved and Rejected options. Therefore, what Microsoft recommends is to remove the TaskOutcome column from the custom task content type and ensure that it is not present in the workflow task list; otherwise, the result would show multiple options. For instance, consider a custom outcome that has two options, Red Pill and Blue Pill. If the default outcome is not removed, the users completing the task will be presented, in the browser, with the options shown in Figure 12-21. Not only is this confusing, it simply makes no sense in this context.

Microsoft recommends creating different workflow task lists for each type of task being created in a workflow. Depending on the tool used to create the workflow, the steps could be a bit different.
Creating custom task outcomes for a SharePoint Designer 2013 workflow
When creating custom tasks and custom task outcomes in workflows authored by using SharePoint Designer 2013, workflow authors needs to keep in mind that they are going to be responsible for creating the workflow task list. The basic steps for creating the custom outcome are as follows:
Create a custom site column by using the field type Task Outcome with custom choices.
Create a custom content type that is derived from Workflow Task (SharePoint 2013), found in the List Content Types group.
To this content type, add a reference to the custom site column previously created.
Remove the default TaskOutcome site column that comes from the Workflow Task (SharePoint 2013) content type.
Create a new list and add the custom content type to it.
Verify that the TaskOutcome site column is not in the task list. If it is, remove it.
Following these steps will render a single set of outcome buttons, as shown in Figure 12-22.
When you are adding the task action in the workflow by using SharePoint Designer 2013, simply select the correct task content type and outcome column to ensure that the workflow uses the correct settings. Notice that the dialog box warns the author to ensure that the content type has been added to the associated workflow task list. This is not checked in the publication process of the workflow, nor at runtime. Instead, the workflow will produce an error during the process of creating a task, with a message about an ArgumentException on the ContentTypeId, as shown in Figure 12-23. This is something that might not be intuitive to the experienced user or end user, so make sure that this is set ahead of time.
Creating custom task outcomes for a Visual Studio 2012 workflow
The process of creating custom task outcomes for custom tasks with workflows built by using Visual Studio 2012 is similar to that of SharePoint Designer 2013. The most important difference is to keep in mind that the workflow author is responsible for binding the custom content type to the workflow task list. This can be done by opening the Elements.xml file for the WorkflowTaskList project item and adding a second <ContentTypeBinding /> element referencing the content type ID of the custom content type, as shown in the following code snippet:
<?xml version="1.0" encoding="utf-8" ?>
<Elements xmlns="http://schemas.microsoft.com/sharepoint/">
 <ListInstance FeatureId="{f9ce21f8-f437-4f7e-8bc6-946378c850f0}"
             TemplateType="171"
             Title="WorkflowTaskList"
             Description="This list instance is used for workflow Task items."
             Url="Lists/WorkflowTaskList"
             RootWebOnly="FALSE" />
    <ContentTypeBinding ListUrl="Lists/WorkflowTaskList"
                      RootWebOnly="FALSE"
                      ContentTypeId="0x0108003365C4474CAE8C42BCE396314E88E51F"/>
 <ContentTypeBinding ListUrl="Lists/WorkflowTaskList"
                      RootWebOnly="FALSE"
                      ContentTypeId="0x010800C5462A9EBAE14BFC8DA48A659BFC2C80"/>
</Elements>
Workflow services CSOM and JSOM
In SharePoint 2013, Microsoft also invested in bolstering the client-side object model (CSOM), both the managed implementations and the JavaScript object model (JSOM), for the workflow services. The way it works is that everything is routed through the Workflow Service Manager. This is the client component that is hosted in SharePoint and knows how to communicate through a client proxy with the SharePoint farm’s configured Workflow Manager farm. The Workflow Service Manager provides interfaces to a few specialized workflow services:
Deployment service. This service provides a vehicle for interrogating and exploring all deployed workflow definitions. In addition, developers can validate and submit workflow definitions to SharePoint and Workflow Manager through this service.
Subscription service. This service provides a vehicle for interrogating, exploring, modifying, and creating new or existing workflow associations of a workflow definition with a specified site, list, or library.
Instance service. This service, like the two other services previously mention, provides a vehicle for interrogating, exploring, creating, and interacting with new and existing workflow instances on a specific SharePoint site, list item, or document.
By using these new services, developers can create some really interesting solutions. However, from a practical standpoint, the Workflow Services JSOM will be most used within workflow forms, as covered in the next section of this chapter. To use the workflow CSOM or JSOM, add the necessary references to your project (Microsoft.SharePoint.Client.WorkflowServices.dll in the case of the CSOM; sp.workflowservices.js in the case of JSOM). Next, pass a SharePoint client context and the target site to connect to. The following sample demonstrates how to do this by using JSOM:
var context = SP.ClientContext.get_current();
var wfManager = SP.WorkflowServices.WorkflowServicesManager.newObject(context,
  context.get_web());
For a practical implementation and demonstration of how to use the Workflow Services JSOM, refer to the next section on working with forms in SharePoint 2013 workflows.
Adding custom forms to workflows
Workflows in prior versions of SharePoint supported three different types of custom forms. The first type, custom task forms, has already been covered in this chapter and is handled by custom content types and outcome columns. The other two types of forms are association and initiation forms. In previous versions of SharePoint, creating these custom forms was challenging because they had special undocumented and confusing logic that was not exposed to customers and was used to implement them by using either InfoPath or ASP.NET pages. SharePoint 2013 has made this task much easier. First, all forms should be created as ASP.NET pages, and there are templates for the available forms within the Office Developer Tools for Visual Studio 2012. Just like traditional SharePoint apps, the ASP.NET forms should not have any server-side code and instead only utilize client-side code such as JavaScript. The form templates in Visual Studio 2012 already contain the base Workflow Services JSOM code needed by the forms. For the most part, all the developer needs to do is modify a little section that collects values from the form controls specific to the workflow, and then pass them along in the Workflow Services JSOM call to SharePoint.
Association forms in SharePoint 2013
An association form is presented after the user creates a new association for a workflow definition and SharePoint site, list, or library. The first part of the association is selecting the workflow definition and giving it a friendly name, followed by selecting the workflow task and history list the workflow will be associated with, and finally, selecting how it can start. If there is a linked association form with the workflow, it is presented when the user clicks Next on the default association form. These types of forms are very useful when the workflow needs some configuration information, such as an API key that needs to be submitted to a workflow that the workflow is calling, or when the workflow needs some default data.
Creating association forms
This walkthrough demonstrates creating a custom association form and using it to collect some information that is then passed along to the workflow. Following the same setup process you used with the other workflows you built in Visual Studio 2012 in this chapter, create a new SharePoint-hosted app project with an Announcement list, and add a workflow, but this time do not associate the workflow with the list. Instead, the workflow will be manually associated after it is deployed.
To demonstrate how association forms work, the workflow will simply show the value of one field submitted from the custom association form. Right-click the workflow and add a new project item by using the Workflow Association Form template. Visual Studio will add the form to the Pages module in the project and update the workflow’s properties to point to the URL of the item. The ASPX page that is created for the association form is nearly complete because it will use the Workflow Services JSOM to create the workflow history list and task list (if necessary), as well as the association. First, notice that within the PlaceHolderMain section there is a server control that’s worth mentioning:
<WorkflowServices:WorkflowAssociationFormContextControl />
This control collects the input form controls from the HTTP POST submitted on the previous page, the one in which the user selects the workflow definition, task list, history list, and workflow start configuration. Without this, the association could not be created. The control simply adds a handful of hidden form controls on the page that are accessed by the JavaScript generated in this template. Scroll a little further down to find the core form within a table. By default, it includes a handful of form controls, but to simplify things, delete the two form controls and just leave the single textarea field control.
The form also includes a button that will call a JavaScript function on the page to trigger the association creation process. Scroll through the JavaScript to a section that creates a new variable called metadata. When you find it, change the key of the array item to AssociationFormValue:
var metadata = new Object();
// Get form input values and set workflow in-argument values
var strInputValue = document.getElementById("strInput").value;
if (strInputValue) {
   metadata['AssociationFormValue'] = strInputValue;
}
This block is collecting three form values and placing them in the metadata array. Remove the code block that creates intInputValue and dateTimeInputValue variables, because those were previously removed in an earlier step. Now scroll down to the comment “Add new workflow association”, past the code that creates a history list and task list if mandated on the previous form:
// Add new workflow association
var newSubscription = SP.WorkflowServices.WorkflowSubscription.newObject(context);
newSubscription.set_definitionId(definitionId);
newSubscription.set_eventSourceId(eventSourceId);
newSubscription.set_eventTypes(eventTypes);
newSubscription.set_name(workflowName);
for (var key in metadata) {
   newSubscription.setProperty(key, metadata[key]);
}
// Publish
wfManager.getWorkflowSubscriptionService().publishSubscriptionForList(newSubscription, listId);
This section uses the Workflow Service JSOM to do the following things:
Create a new workflow association, referred to in the API as a subscription.
Set the workflow definition ID of the association, which is the ID of the workflow developed in Visual Studio 2012.
Set the ID of the list or library the workflow is being associated with.
Set the start type or types for the workflow, such as manual or automatic when something is created or updated.
Set the name of the workflow to that specified by the user creating the association.
Walk through the contents of the metadata collection and set each property on the workflow.
Create the workflow subscription.
Notice that the only things that need to be modified are the form and form controls, and the section in which those values are collected and saved into the metadata array. The next step is to add an activity to the workflow itself to collect these properties being passed in.
Within the workflow, create a new variable named AssociationFormValue of type string. Next, add a GetConfigurationValue to the workflow and set the Name property equal to the name of the property being passed in from the form via the Workflow Services JSOM, and set the Result property to the local variable: AssociationFormValue. Now the workflow has access to the values passed in from the association form!
To test it, deploy the SharePoint-hosted app and, when the browser opens, navigate to the Announcement list. On the List tab on the ribbon, click the Workflow button. Click the Add A Workflow link. Select the custom workflow, give it a friendly name, and select the history and task lists. When the Next button is clicked, the custom form is displayed.
Initiation forms in SharePoint 2013
Initiation forms are used to collect some information from the user when a workflow is manually started. All the characteristics of an association form apply to initiation forms, including the fact that developers should use JavaScript only to implement business logic. The project item template in Visual Studio 2012 contains most of this script by default. One thing is important to keep in mind with respect to initiation forms: these forms are displayed only when a workflow is started manually. Workflows that start automatically when items are created or updated in a list, or that start programmatically, do not show the initiation form to the user. Your workflow should account for this, and if some information is required from the user, it is a good idea to also create an association form that enables the person creating the association to supply default values for the workflow.
Creating initiation forms
This walkthrough demonstrates creating a custom initiation form and using it to collect some information from the user when the workflow is started manually. Following the same setup process you used for the other workflows you built in Visual Studio 2012 in this chapter, create a new SharePoint-hosted app project with an Announcement list, and add a workflow that is associated with the Announcement list and starts manually.
Right-click the workflow and add a new project item by using the Workflow Initiation Form template. Visual Studio will add the form to the Pages module in the project and update the workflow’s properties to point to the URL of the item. The .aspx page that is created for the initiation form, just like with the association form, is nearly complete because it will use the Workflow Services JSOM to start the workflow and pass in specific values.
Following the same process as the association form, find the form controls and remove the second textarea and datetime controls. Next, change the strInput textarea control to an input control. To make things a little interesting, add another control, the SharePoint server-side people picker:
<SharePoint:PeopleEditor runat="server" AllowEmpty="False"
                            ValidatorEnabled="False" MultiSelect="False" ID="peoplePicker" />
To make development a bit easier, add a reference to the included jQuery library to the head portion of the page, within the PlaceHolderAdditionalPageHead section, just after the sp.workflowservices.js reference.
Now, scroll down into the JavaScript code to the comment “Set workflow in-arguments/initiation parameters” section, which is where another array is created with all the things to send to the workflow. First, remove the two sections that are collecting the second textarea and datetime controls previously removed. Rename the parameter that is being passed in to SomeRandomString, and add some additional JavaScript that will get a reference to the people picker client-side control and extract the logon name of the selected user, as shown in the following code:
// get people picker value
var html = $("#ctl00_PlaceHolderMain_peoplePicker_upLevelDiv");
wfParams['UserLoginName'] = $("#divEntityData", html).attr("key");
// get string input
var strInputValue = document.getElementById("strInput").value;
if (strInputValue) {
 wfParams['SomeRandomString'] = strInputValue;
}
With the parameters selected, find the comment “Get workflow subscription and then start the workflow” further along in the JavaScript. This section obtains a reference to the Workflow Services Manager, the core component of the Workflow Services JSOM, in addition to references to the deployment and subscription services, which were covered earlier in this chapter, in the section Workflow services CSOM and JSOM. This code then obtains a subscription (association) by using the subscriptionID that was passed, by SharePoint 2013, into the page via a value on the query string.
The code then, by using an instance of the workflow instance service, starts a workflow on a specific list item by passing in the workflow subscription, the ID of the item the workflow should be associated with, and a collection of the parameters from the form:
// Get workflow subscription and then start the workflow
var context = SP.ClientContext.get_current();
var wfManager = SP.WorkflowServices.WorkflowServicesManager.newObject(context,
  context.get_web());
var wfDeployService = wfManager.getWorkflowDeploymentService();
var subscriptionService = wfManager.getWorkflowSubscriptionService();

context.load(subscriptionService);
context.executeQueryAsync( function (sender, args) {
// Success
 var subscription = null;
 // Load the workflow subscription
 subscription = subscriptionService.getSubscription(subscriptionId);
 if (itemId != null && itemId != "") {
     // Start list workflow
     wfManager.getWorkflowInstanceService().startWorkflowOnListItem(subscription, itemId,
wfParams);
 } else {
     // Start site workflow
     wfManager.getWorkflowInstanceService().startWorkflow(subscription, wfParams);
 }
 context.executeQueryAsync(
     function (sender, args) { window.location = redirectUrl; },
     function (sender, args) { ... }
 )
});
The last step is to configure the workflow to collect these values being passed in. Within the workflow, add two input arguments for SomeRandomString and UserLoginName, both strings. The workflow engine and SharePoint will handle sending the form values into the workflow and linking them up with these arguments, which can then be used within the workflow for various use cases.
Summary
This chapter covered the new workflow platform in SharePoint 2013. It first explained how the architecture is very different in SharePoint with the addition of Workflow Manager and how this change benefits customers greatly. The chapter then explained the process for creating custom workflows both with SharePoint Designer 2013 and Visual Studio 2012. Next, the topics of custom tasks, custom outcomes, and how to add custom forms to custom workflows was covered. At this point, developers and experienced users alike should have a solid understanding of how things work and how to model simple or complex business processes by using the new workflow engine in SharePoint 2013.