Chapter 13. SharePoint search
Of all the components available in Microsoft SharePoint Server 2013, Enterprise Search has the highest profile and the greatest impact on users. Searching has become a normal part of everyday life. Users utilize web-based search engines such as Bing and Google for both personal and professional needs. Concepts such as keyword searching, advanced searching, and search links are familiar to everyone. In fact, Enterprise Search has become a primary entry point into SharePoint—the first place someone goes when trying to find information. If the search engine returns strong results, then users will be satisfied with SharePoint. On the other hand, poor search results can lead to negative opinions of SharePoint overall. Because Enterprise Search plays such a significant role in the success of SharePoint Server 2013, it is important to deploy, configure, and customize it correctly.
Fortunately, the search story in SharePoint 2013 is cleaner and more powerful than it was in previous versions. The story is cleaner because both FAST and Search Server have been eliminated from the products, leaving only SharePoint 2013 Foundation, SharePoint Server 2013 Standard, SharePoint Server 2013 Enterprise, and SharePoint Online as the available products. The search story is more powerful because FAST and SharePoint Search have been unified into a single platform with many new capabilities. Table 13-1 summarizes the functionality available in each version. Although this chapter will cover many of the capabilities listed in Table 13-1, keep in mind that the focus will be on extensibility points for developers. Furthermore, all of the material presented in this chapter assumes that you are working with SharePoint 2013 Enterprise.
Capability | Foundation | Standard | Enterprise | Online |
Advanced content processing | Yes | Yes | Yes | No |
Content Processing Enrichment | No | No | Yes | No |
Content Search Web Part | No | No | Yes | No |
Continuous crawl | Yes | Yes | Yes | No |
Custom entity extraction | No | No | Yes | No |
Deep links | No | Yes | Yes | Yes |
Event-based relevancy | No | Yes | Yes | Yes |
Expertise Search | Yes | Yes | Yes | Yes |
Graphical refiners | No | Yes | Yes | Yes |
Hybrid search | Yes | Yes | Yes | |
Managed navigation | No | Yes | Yes | Yes |
Phonetic name matching | Yes | Yes | Yes | Yes |
Query rules—add promoted results | No | Yes | Yes | Yes |
Query rules—advanced actions | No | No | Yes | Yes |
Query spelling correction | Yes | Yes | Yes | Yes |
Query suggestions | No | Yes | Yes | Yes |
Query throttling | No | Yes | Yes | Yes |
Quick preview | Yes | Yes | Yes | Yes |
Recommendations | No | Yes | Yes | Yes |
Refiners | Yes | Yes | Yes | No |
RESTful query API | Yes | Yes | Yes | Yes |
Result sources | Yes | Yes | Yes | Yes |
Search connector framework | No | No | Yes | No |
Search results sorting | Yes | Yes | Yes | Yes |
Search vertical: “Conversations” | No | Yes | Yes | Yes |
Search vertical: “People” | No | Yes | Yes | Yes |
Search vertical: “Video” | No | No | Yes | Yes |
Tunable relevancy | No | No | Yes | No |
Introducing search-based applications
Traditionally, search engines have been used to return results for a specific user request as a list ranked by relevance. The results might provide some basic information, such as the title of a document or the date of a webpage, along with a description, but users typically have had to follow links to determine whether the item was of interest. More recently, however, this paradigm is being replaced with the concept of a search-based application. A search-based application is a custom application that is written around a search engine.
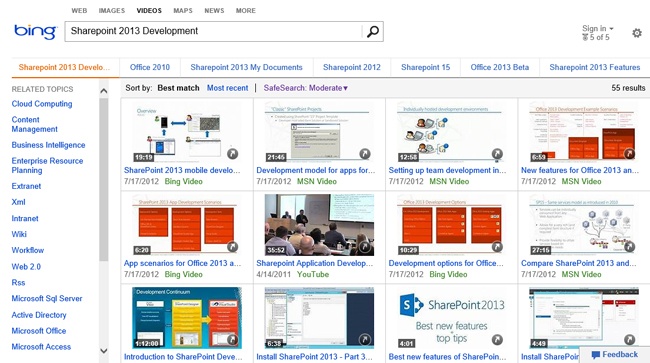
The value of a search-based application is that it presents search results in an appropriate form and allows the user to operate on the results directly. A good example of a search-based application is the Bing video search. Figure 13-1 shows the results of searching for the term SharePoint 2013 Development. You can tell that the search results are returned as videos that can be played directly from the page, thus making it significantly easier to locate items of interest.
Although the default search results page in SharePoint still displays items in a simple list, you will find that the customization opportunities tend to support the creation of search-based applications. These customizations include the ability to modify the sorting and ranking, changing the way search results appear on the page, and creating completely custom solutions against the search object model. The concept of search-based applications is important to keep in mind as you work through this chapter. Instead of simply returning items from a search, give consideration to how the results appear and what operations can be performed. Then think about how the customizations presented in this chapter come into play.
As a quick example of a search-based application in SharePoint, consider the management of tasks for users. Task lists can be created in any site within SharePoint, so it is often the case that an individual is assigned tasks in multiple sites. In many cases, a users might not even know that he has been assigned a particular task. Setting alerts on all the lists is unmanageable because the notifications become a form of internal spam. Thus, users are sometimes left unable to effectively manage their tasks.
In the past, developers have often created “rollups” to solve this problem. Rollup solutions go out to all sites looking for tasks and then display them in a single master list to the user. The problem with this, however, is that it can be very CPU-intensive if done incorrectly. A search-based solution is a better idea.
Instead of a single master list of tasks, imagine that a user goes to a specialized Search Center that runs a query to return all the task items for the current user sorted by due date. In addition, the user can view the key information for each task. The user could also operate on the task directly in the search results by changing its status or editing the description. This is a search-based solution that is truly useful to a user. Figure 13-2 shows such a solution created in SharePoint 2013. This solution is discussed in more detail in the section “Extending the Search Center” later in this chapter.

Understanding search architecture
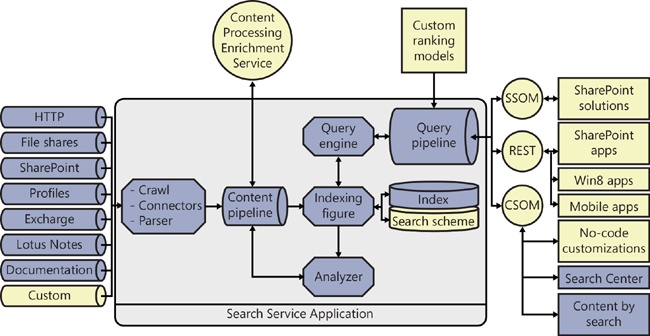
The search architecture for SharePoint Server 2013 is complex. It includes components for crawling, indexing content, administration, and executing search queries. Figure 13-3 shows a block diagram of the search architecture. Components in the diagram represented in darker shades are not extensible by developers. Components represented in lighter shades represent extensibility points covered in this chapter.
In the center of the search architecture is the Search Service Application (SSA). The SSA is the primary administrative interface for search and is one of the many shared services available in SharePoint Server 2013. You can create and share multiple instances of the SSA across farms just like any other service application. From the Central Administration website, you can access the SSA by selecting Manage Service Applications. From the list of service applications, you can select the SSA, set its properties, designate administrators, and perform search administration.
Understanding the indexing process
The indexing process is responsible for building the index file. The index file contains crawled properties from content sources, along with access control lists (ACL) that ensure that search results display only content for which the user has rights. The process of building the index file involves crawling designated content sources. A content source is a repository that can be searched. Content sources can be SharePoint sites, websites, external file systems, Microsoft Exchange Server public folders, Business Connectivity Services (BCS) External Systems, or other custom repositories. New content sources are defined within the SSA.
SharePoint 2013 supports three different kinds of crawls: full, incremental, and continuous. A full crawl indexes the entire content source whether or not specific items have changed since the last crawl. An incremental crawl indexes only those items that have changed based on either a time stamp or a change log. A continuous crawl is an option that can be used instead of an incremental crawl for any specified content source.
A continuous crawl, as the name implies, indexes a content source continuously. The purpose of the continuous crawl is to achieve maximum freshness. Incremental crawls cannot run in parallel, but continuous crawls can. Parallel indexing allows continuous crawling to achieve a level of freshness not possible with incremental crawls.
Connecting and parsing
The crawler gains access to content sources through connectors. SharePoint 2013 ships with several out-of-the-box connectors, which allow search to index many common repositories, as shown earlier in Figure 13-3. If you have a custom repository, however, you will need to build a Microsoft .NET Assembly Connector to index that repository. Chapter 12, presented the fundamentals of .NET Assembly Connectors, which are used by BCS to connect with External Systems. The indexing process uses these same components to connect with content sources. The section “Creating .NET Assembly Connectors for search” later in this chapter covers the additional development necessary for connectors to support indexing an External System.
In previous versions of SharePoint, IFilters were used to allow the indexing process to access the contents of an item and extract associated metadata. In SharePoint 2013, IFilters are partially replaced by parsers and format handlers. Parsers are responsible for detecting the type of an item, and format handlers extract the metadata. Parsers and format handlers perform the same basic function as an IFilter but are more sophisticated. Parsers, for example, do not rely on the file extension associated with a document to determine its type, as was the case with IFilters. Instead, a parser can identify the type of a document by examining its content. Format handlers support several powerful features such as deep link extraction and visual metadata extraction. Deep link extraction provides links directly to major subsections of a document in the search results. Visual metadata extraction extracts key metadata such as titles, authors, and dates directly from the document content in case those values are incorrectly set in the document metadata.
Enhancing metadata
The processing of crawled items is represented in Figure 13-3 by the content pipeline component. In SharePoint 2013, developers are able to extend the content pipeline with a custom Content Processing Enrichment Service (CPES). The CPES is a custom web service that accepts a collection of document metadata properties. Within the CPES, this collection can be modified in order to enhance the metadata associated with an item. Such enhancement supports data cleansing, entity extraction, classification, and tagging.
Data cleansing allows for the normalization of data across crawled items. As an example, consider a company property, which is set manually by users. If the company in question were Microsoft, it would not be uncommon for various users to set the metadata value to be Microsoft, Microsoft Corporation, or even the ticker symbol MSFT. In this case, the CPES could normalize all of these values to be Microsoft Corporation.
Entity extraction allows new properties to be added to an item. In the case in the previous paragraph, a new property, ticker, could be added to the item through the CPES. That property could then be set to MSFT, allowing people to search for documents by ticker symbol as well as company name.
Classification and tagging also relies on the ability to add new properties, but for the purpose of classifying a document based on a set of rules. Additional tags could also be added based on a taxonomy. All of this makes the documents easier to find in search.
Analyzing searches
The analyzer component is used to improve the quality of search results. The analyzer performs click analysis on search results to determine the most relevant results from a specific query. The click analysis is fed back into the content pipeline to enhance the information associated with a crawled item.
Understanding the query process
After the index file is created, it can be used to support query execution. Query execution typically begins when a user navigates to the Search Center and enters a query, but a query can also be issued from an app or other customization. Regardless of whether the query comes from an out-of-the-box component or a custom component, it interfaces with the query pipeline through one of the available application programming interfaces (APIs): the server-side object model (SSOM), the client-side object model (CSOM), or the Representational State Transfer (REST) interface.
Creating managed properties
The issued search query can be a simple text keyword or a search against managed properties. Managed properties simplify the search schema and provide more control over how metadata is used in search. Managed properties are defined at the tenant, SSA, or site. To use managed properties in SharePoint Online, start in the SharePoint Admin Center and click Search | Manage Search Schema. For SSA, in Central Administration, you would start in the Search Service Application and click Search Schema. In a site, you would start on the Site Settings page and click Schema.
Managed properties are mapped to one or more crawled properties. Mapping a managed property to multiple crawled properties is important because different repositories use different field names to represent the same data. For example, imagine that you have three different document repositories. The first repository uses the field name Title for the document title. The second repository uses a Name field, but that field actually contains a document title. The third repository uses a field called DOCTTL for the title. When performing a search, end users cannot be expected to know about these fields. So a single managed property named Title is created and mapped to all three of the crawled properties. Now users can simply ask for any document containing the word Training in its title, and search will query all three underlying crawled properties.
Managed properties also have attributes that control the way they are used in search. These attributes allow for the managed property to be used for such things as querying, refining, sorting, or other purposes. Table 13-2 lists the various attributes of managed properties and their purpose.
Attribute | Purpose |
Searchable | Allows the managed property to be searched by using a simple keyword (for example, Training) |
Queryable | Allows the managed property to be used in a Keyword Query Language (KQL) query (for example, Title:Training) |
Retrievable | Allows the managed property to be returned as a field to the search results page |
Refinable | Allows the managed property to be used as a refiner in search results |
Sortable | Allows the managed property to be used for sorting search results |
Introduction to ranking models
When the user issues a search, the query is sent to the query engine through the query pipeline. Within the query pipeline, ranking models are applied to order the returned results. Although SharePoint has several out-of-the-box ranking models, developers can affect the query results by creating a custom ranking model. Custom ranking models are used to give additional weight to certain managed properties. This can be useful when the standard ranking models are not pushing important items far enough to the top. However, custom ranking models should be used sparingly, because they tend to be created in such a way as to force certain items to the top of the results while burying other potentially important items much deeper.
Executing queries
The search query is executed by the query engine against the managed properties and index. However, SharePoint does not run the query against the entire index. Instead, it uses a result source to specify the scope of the query. Result sources are new to SharePoint 2013 and are a new way to define a scope by using query language. Result sources are covered in more detail in the section “Creating result sources” later in this chapter.
Understanding Keyword Query Language
SharePoint 2013 supports two different languages for issuing queries: FAST Query Language (FQL) and Keyword Query Language (KQL). Previous versions of SharePoint also supported a third query language known as SQL query. FQL is the language used with the FAST search product. Though FQL has been carried over to SharePoint 2013, Microsoft does not recommend teaching it to end users or using it in development. The SQL query language has been completely removed from SharePoint 2013, and any solutions that relied on this query language must be rewritten. This leaves KQL as the query language of choice for both end users and developers.
KQL queries can be entered directly in the Search Center by an end user, appended to a Search Center URL, used in the definition of result sources, or issued programmatically to any of the search APIs. In all cases, the query is formed in exactly the same way: a KQL query consists of one or more free-text terms and managed property restrictions.
Issuing free-text queries in KQL causes the search engine to look in the index for matching terms. These terms include text from the body of documents as well as the value for any managed property whose Searchable attribute is true. Free-text queries are case-insensitive and limited to 2,048 characters. Free-text queries support wildcarding the end of a term by using the asterisk (*) as well as complete phrases by surrounding terms with double quotes (“). Table 13-3 shows some examples of free-text queries.
Description | |
Microsoft | Searches for items containing the term Microsoft in the index and managed properties marked as Searchable |
Microsoft Training | Searches for items containing both the words Microsoft AND Training, but not in any particular order |
“Microsoft Training” | Searches for items containing the exact phrase Microsoft Training |
Micro* | Searches for items containing terms that begin with Micro |
Managed properties can be used in conjunction with free-text or alone to form a query. When managed properties are used, the query is formed by specifying the name of a managed property, followed by an operator, followed by a value (for example, Title=SharePoint). A managed property must have its Queryable attribute set to true before it can be used in a KQL query. Table 13-4 lists the operators that can be used with managed properties.
Operator | Description | Example |
property:value | Searches for items whose property contains the specified value | Title:SharePoint |
property=value | Searches for items whose property equals the specified value | FileExtension=docx |
property<>value | Searches for items whose property does not equal the specified value | FileExtension<>pdf |
property>value | Searches for items whose property is greater than the specified value | Created>1/1/2013 |
property>=value | Searches for items whose property is greater than or equal to the specified value | LastModifiedTime>=1/1/2013 |
property<value | Searches for items whose property is less than the specified value | Created<1/1/2013 |
property<=value | Searches for items whose property is less than or equal to the specified value | LastModifiedTime<=1/1/2013 |
property=value1..value2 | Searches for items whose property falls in the specified range | LastModifiedTime=1/1/2012..1/1/2013 |
Multiple sets of free text and managed property elements can be combined when forming a query. KQL supports several operators, including Boolean operators, proximity operators, synonym operators, and ranking operators. Additionally, parentheses can be used in the query to group the operations. Table 13-5 lists the various operators for use with multiple sets of query elements.
Description | Example | |
element AND element element + element | Searches for items where both elements are true. | Title:Training AND Created>1/1/2012 Title:Training + Created>1/1/2012 |
element OR element | Searches for items where either element is true. | Title:Training OR Title:SharePoint |
NOT element -element | Searches for items where the element is false. | NOT FileExtension=docx -FileExtension=docx |
element NEAR(x) element | Searches for items where the elements are in close proximity without regard for the order. The x parameter specifies the maximum distance between the elements. | App NEAR(5) JavaScript |
element ONEAR(x) element | Searches for items where the elements are in close proximity while preserving the order. The x parameter specifies the maximum distance between the elements. | App ONEAR(5) JavaScript |
WORDS(element, element)) | Searches in the same way as the OR operator, but ranks the results as if the elements specified were exactly the same term. This raises the relevancy of items containing both terms. | WORDS(Microsoft, MSFT) |
element1 XRANK element2 | Searches for items matching element1, then boosts the items matching element2 to the top of the results. There are several complex factors involved in the rank boost, which can be explored further at the following URL: http://msdn.microsoft.com/en-us/library/ee558911.aspx. | “Training” XRANK(cb=100, rb=0.4, pb=0.4, avgb=0.4, stdb=0.4, nb=0.4, n=200) FileExtension=docx |
Although any managed property whose Searchable or Queryable attribute is true can be used in KQL, there are a few critical managed properties that stand out as particularly useful. Both end users and developers will benefit from knowing these managed properties. Table 13-6 lists the key managed properties, describes them, and shows some examples.
Property | Description | Example |
Title | Searches for items with a specified title | Title:SharePoint |
Author | Searches for the author of an item | Author:Cox |
Created | Searches for the date an item was created | Created=1/1/2012..1/1/2013 |
LastModifiedTime | Searches for the date an item was modified | LastModifiedTime>1/1/2012 |
IsDocument | Specifies whether search results should include only documents | “SharePoint” IsDocument:1 |
FileExtension | Specifies the file extension to search for | FileExtension=docx |
LastName | Searches for a person by last name | LastName:C* |
ContentClass | Searches for items based on their type | ContentClass:STS_Site Content_Class:STS_Web ContentClass:STS_ListItem_Tasks ContentClass:STS_ListItem_Events |
Path | Searches for items based on a URL location |
Creating no-code customizations
Although SharePoint 2013 provides complete support for developing apps and solutions, many common customizations simply don’t require writing code anymore. Furthermore, most search customizations do not even require the use of the SharePoint Designer. Microsoft has done a particularly good job in this release of supporting search customizations directly in the browser. Therefore, developers should thoroughly understand the possibilities for no-code customizations before proceeding with code-based development.
Creating simple link queries
Developers often overlook the fact that the out-of-the-box Search Center is URL accessible. This means that you can issue queries to the Search Center by constructing a URL containing KQL. When this idea is coupled with an out-of-the-box links list, powerfully simple search customizations can be created. As an example, consider the A though Z employee directory shown in Figure 13-4.
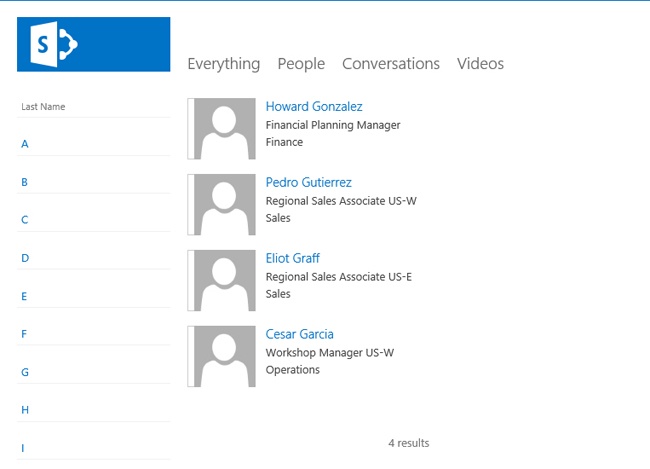
The directory solution was created by first filling a links list with links to the people search in the Search Center. Each link in the list carries a KQL query for the last name (such as LastName:C*). For example, the link for people whose last name starts with C looks like the following, where the KQL is encoded into the k parameter:
http://intranet.wingtiptoys.com/SearchCenter/Pages/PeopleResults.aspx?k=LastName%3AC%2A
After creating the list of links for each letter in the alphabet, the list view was altered to hide every field except the URL. The URL field was then renamed to Last Name. Finally, the list was added as a Web Part to the people search page. This is an incredibly simple solution that satisfies a very common request quite elegantly. Many other similar solutions can be created by using this approach.
Extending the Search Center
The Search Center in SharePoint 2013 is the hub for search-based applications. Thus you will find that extending the Search Center to include your custom search-based applications makes good sense. You will also find that these solutions can be created almost entirely within the browser. Though this section explains the components and techniques necessary to extend the Search Center, it is important to point out that the concepts presented are used in more advanced solutions as well. To support the explanation of these concepts, this section will explain how to create the task-management solution shown earlier in Figure 13-2.
Adding pages to search navigation
The out-of-the-box Search Center consists of several pages that allow searching against different results sources: Everything, People, Conversations, and Video. Each source in the Search Center has a dedicated page for displaying search results. In order to extend the Search Center, you will need to add a new page to the Search Center navigation.
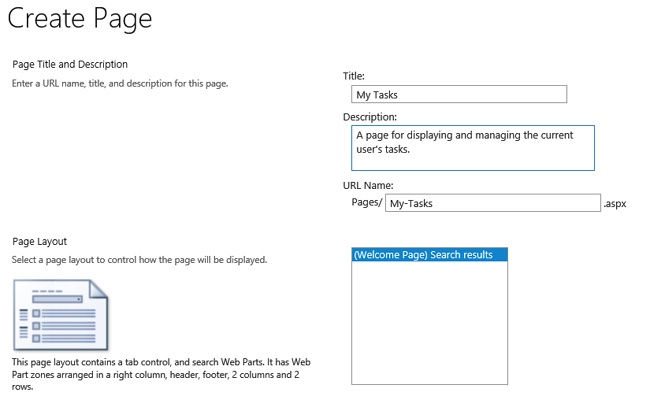
New pages are created and added directly in the Search Center site. To create a new page, on the Site Contents page, locate the Pages document library. From this library, you can create new search results pages to extend the Search Center. Figure 13-5 shows the Create Page form.
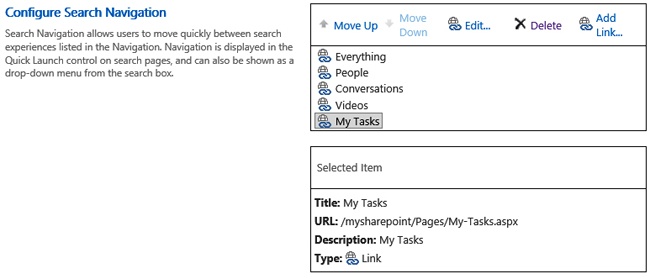
After the new search results page is created, it can be added to the Search Center navigation. To do so, starting on the Site Settings page, click Search Settings in the Search area. From here, you can add new nodes to the Search Center, as shown in Figure 13-6.
Creating result sources
After you have added a page to the Search Center navigation, you will find that the new search page works, but that it yields the same results as the Everything page. In order to display custom results, you must create a new result source. Result sources can be defined in the tenant, SSA, site collection, or site. In SharePoint Online, you would start in the SharePoint Admin Center and click Search | Manage Result Sources. In Central Administration, you would start in the Search Service Application and click Result Sources. In a site collection or site, you would start on the Site Settings page and click Result Sources. The result source should be created at the level appropriate for the scope of its intended use.
When a new result source is created, you must first select one of four indexes as a starting point: Local SharePoint, Remote SharePoint, OpenSearch, or Exchange. Local SharePoint refers to the index associated with the current SharePoint farm. Remote SharePoint refers to the index associated with a different SharePoint farm. OpenSearch refers to the index associated with a non-SharePoint search engine that supports OpenSearch. Exchange refers to a Microsoft Exchange server.
When the index is selected, you can define a query transform to define the new result source. A query transform uses KQL to define a subset of the index to include in the result source. Clicking the Launch Query Builder button opens a dialog box for defining the query transform. This dialog has three tabs: Basics, Sorting, and Test. The Basics tab allows you to define KQL by using a combination of placeholder tokens and managed properties. The Sorting tab allows you to specify the sort order of the results by using managed properties. The Test tab allows you to test the result source definition. Figure 13-7 shows the Basics tab defining the result source to return tasks for the current user.
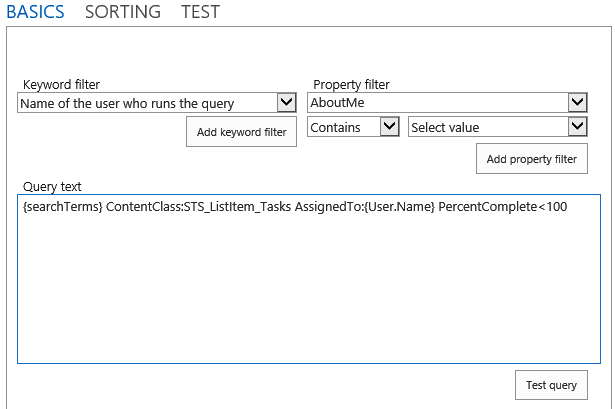
The Keyword Filter list contains all of the possible tokens for use in the result source definition. Table 13-7 lists the available tokens and provides a description of each. The Property Filter list contains the names of all the managed properties marked as Searchable or Queryable. Note that you may have to create several managed properties before you can properly define a result source. In the example, the PercentComplete and DueDate managed properties had to be created to define the result source membership and sort order, respectively.
Token | Description |
{CurrentDisplayLanguage} | The current display language based on MUI in ll-cc format |
{CurrentDisplayLCID} | The numeric value of the current display language based on MUI in ll-cc format |
{List} | The URL of the current list |
{List.<property>} | Any property of the current list |
{ListItem} | The URL of the current list item |
{ListItem.<property>} | Any property of the current list item |
{Page.<FieldName>} | The value of a field on the page from which the query was issued |
{Page.URL} | The URL of the page from which the query was issued |
{Page.UsageAnalyticsId} | The item ID for Usage Analytics |
{QueryString.<ParameterName>} | A query string parameter from the URL of a page specified by name |
{Request.<PropertyName} | A value from the current HTTP request—for example, {Request.RawUrl} |
{SearchBoxQuery} | |
{SearchTerms} | The query value entered into the search box on a page with all query transformations applied |
{Site.ID} | The GUID of the site from which the query was issued |
{Site.LCID} | The numeric value of the locale in the site from which the query was issued |
{Site.Locale} | The language of the site from which the query was issued in ll-cc format—for example, en-us |
{Site.<property>} | Any property from the property bag of the SPWeb from which the query was issued |
{Site.URL} | The URL of the site from which the query was issued |
{SiteCollection.ID} | The GUID of the root web from the site collection from which the query was issued |
{SiteCollection.LCID} | The numeric value of the locale in the site collection from which the query was issued |
{SiteCollection.Locale} | The language of the site collection from which the query was issued |
{SiteCollection.<property>} | Any property from the property bag of the root SPWeb |
{SiteCollection.URL} | The URL of site collection from which the query was issued |
{Term.ID} | The GUID of the current site navigation node with a prefix of #0 |
{Term.IDWithChildren} | The GUID of the current site navigation node with a prefix of # |
{Term.Name} | The label of the site navigation node |
{Term.<property>} | Any property from the property bag of the term |
{TermSet.ID} | The GUID of the term set used for current site navigation |
{TermSet.Name} | The label of the term set used for current site navigation |
{Today+/- <integer>} | A date calculated from the date when the query is issued |
{URLToken.<integer>} | A portion of the URL of a page specified in sequential order |
{User.Email} | The email address of the user who issued the query |
{User.LCID} | The numeric value of the locale as defined in the profile of the user who issued the query |
{User.Name} | The display name of the user who issued the query |
{User.PreferredContentLanguage} | The Preferred Content Language specified in the profile of the user who issued the query |
{User.PreferredDisplayLanguage} | The Display Content Language as specified in the profile of the user who issued the query |
{User.<property>} | Any property from the user profile of the user who issued the query |
{User.SID} | The SID of the user who issued the query |
When the new result source is created, it can be used with the new page that was added to the Search Center. Each search results page in the Search Center hosts four Web Parts: Refinement, Search Box, Search Navigation, and Search Results. In order to use the new result source, you must edit the properties for the Search Results Web Part. Clicking the Change Query button in the Web Part properties opens a dialog box that is similar to the one used in creating the result source, but with more functionality.
The Basics tab allows you to select the result source to be used by the Web Part. On this tab, you would select the new result source you just created. Note that you can narrow the results further in this tab by using additional tokens and managed properties. This allows you to create result sources that are more generalized and rely on each consuming Web Part to further define them for a specific purpose. After the new result source is set, the associated search result page will only return items from that source.
Displaying search results
When extending the Search Center, you will undoubtedly want to change the way search results are displayed based on the type of data. In the example of a user’s tasks shown earlier in Figure 13-2, the task tile, responsible person, and due date are shown, with a nice icon next to each item. Furthermore, clicking any item opens a dialog box that allows the user to edit the task item. This type of functionality is accomplished by using result types and display templates.
Result types can be defined in a site collection or site by clicking Result Types on the Site Settings page. When creating a new result type, you must associate it with a particular result source. You can also choose to associate it with a specific type of content so that a single result source can be associated with several different result types. Finally, you select the display template to be used with the result type. In this way, you can change the way an item appears in search results based on the rules defined for the result types.
SharePoint 2013 has several out-of-the-box display templates defined, but you will likely want to create your own. Display templates are created as HTML files that use special markup syntax to define placeholders for managed properties. These HTML files are saved into the Master Page Gallery for use by the Search Results Web Part. The Master Page Gallery has different folders for organizing the display templates, but you can locate all of the display templates for search by starting at the Site Settings page and clicking Master Pages and Page Layouts | Display Templates | Search.
When creating a custom display template, you should always start with an existing template. The Item_Default.html file represents the default display template for search results. To create a custom display template, download this file from the Master Page Gallery and rename it to something appropriate. In the case of the example, it was renamed to Task_Default.html. After renaming it, you can open it in Microsoft Visual Studio for editing.
The first task in creating a custom display template is to add the managed properties that the template will need to successfully render. Defining the managed properties is done in the mso:ManagedPropertyMapping element by using a format that maps a markup name to the property name. The simplest way to approach this is to use the same name for both parts, as shown in the following code:
<mso:ManagedPropertyMapping msdt:dt="string">
'Title':'Title','Path':'Path','Description':'Description',
'AssignedTo':'AssignedTo','DueDate':'DueDate'
</mso:ManagedPropertyMapping>
After the managed properties are defined, you can use them in the markup associated with the display template. The basic approach is to include them in the generated HTML by surrounding them with the delimiting strings _# and =#_. This allows you to build up an HTML template that will substitute in the values of the managed property for each item in the results. The following code shows how this is done for the example solution:
<h3>
  <img src="/_layouts/images/icon_tasklist.gif" alt="Task"/>
  <a title="Open task" style="cursor:pointer" href="#">_#=ctx.CurrentItem.Title=#_</a><br />
  <span>Assigned To: _#=ctx.CurrentItem.AssignedTo=#_</span><br />
</h3>
<div id="_#= $htmlEncode(hoverId) =#_" class="ms-srch-hover-outerContainer"></div>
In addition to using the managed properties in the HTML, you can also call to custom JavaScript functions defined in the markup. These custom functions must be defined between the delimiting strings <!--#_ and _#-->. The following code shows a date formatting and style function used in the example:
<!--#_
  getFormattedDate = function() {
    var d = new Date(ctx.CurrentItem.DueDate);
    return (d.getMonth() + 1) + "/" + d.getDate() + "/" + d.getFullYear();
  };

  getDueDateStyle = function() {
    var d1 = new Date(ctx.CurrentItem.DueDate);
    var d2 = new Date();
    if(d2>d1)
    return 'color:red';
    else
      return 'color:black';
    };
_#-->
Notice how the getFormattedDate and getDueDateStyle functions refer to the ctx.CurrentItem object. This object represents the current item in the search results. The function is called once for each item in the search results, and the call must be included in the markup surrounded by the delimiting strings _#= and =#_ as shown in the following code:
<span style="_#=getDueDateStyle()=#_">Due Date: _#=getFormattedDate()=#_</span>
The JavaScript functions included in the display template markup should not be confused with JavaScript you want to inject into the search results page. You can include references to JavaScript in the template you create by using the $includeScript function to register an external library. The following code shows an example:
$includeScript(this.url, "~sitecollection/SiteAssets/custom.js");
Note that it is also possible to inject JavaScript by writing it directly in the action element attributes, such as onclick. Though this approach can quickly become unwieldy, it does offer the powerful ability to substitute managed property values into the JavaScript code. In the example, the following JavaScript is used to open a task item for editing when it is clicked in the search results page:
<a title="Open task" style="cursor:pointer" href="#" onclick="
var title='_#=ctx.CurrentItem.Title=#_';
var path='_#=ctx.CurrentItem.Path=#_';
SP.SOD.executeFunc('sp.ui.dialog.js', null, function () {
  SP.UI.ModalDialog.showModalDialog({
    width: 600, height: 338, allowMaximize: true, title: title, url: path,
    dialogReturnValueCallback: function (dialogResult, returnValue) {
      SP.UI.ModalDialog.RefreshPage(SP.UI.DialogResult.OK); }
  });
});
">_#=ctx.CurrentItem.Title=#_</a>
Finally, if you would like to run some JavaScript after all of the display template processing is complete, you can use the OnPostRender method. This method can invoke a function contained in the custom JavaScript library you registered earlier. Just ensure that the following code appears first in the display template before any other code:
<!--#_
  ctx.OnPostRender = [];
  ctx.OnPostRender.push(function(){ CustomMethodCall() });
_#-->
When the display template is complete, it must be uploaded to the Master Page Gallery before it can be used. Simply upload the HTML file to the same folder where the other search display templates are located. Upon uploading, SharePoint will automatically generate a JavaScript file with the same name as the template. This JavaScript file is the one that is actually used by SharePoint, but the developer simply focuses on the HTML file, which provides a reasonable experience for customizing templates. After the display template is uploaded, it can be associated with a result type. Finally, you can edit the Search Results Web Part to use the defined result type, which will in turn use the associated display template for rendering.
Defining query rules
Query rules allow you to add promoted results, add a result block, or change the user’s issued query based on a condition such as the terms contained in a search query. A promoted result allows you to add a new link that will show up at the top of the search results just like a best bet in previous versions of SharePoint. Result blocks execute a secondary search query but display the results in a block along with the original query results. This allows you to call out related or special items for attention. Changing the user’s query allows you to modify or completely change the issued query.
Query rules can be defined in the tenant, SSA, site collection, or site. To define a query rule, in SharePoint Online, start in the SharePoint Admin Center and click Search | Manage Query Rules. In Central Administration, start in the Search Service Application and click Result Rules. In a site collection or site, start on the Site Settings page and click Query Rules. When you create a query rule, you specify the triggering condition and the responding action. You can also specify the dates during which the rule is active. Setting dates for a rule to be active makes sense when you want to promote results for a period of time, such as when items go on sale.
For the example task management solution, three query rules were created named past, present, and future. The idea behind these query rules was to allow the end user to enter one of the terms and easily search for overdue tasks, tasks due in the next 30 days, or tasks due more than 30 days from now, respectively. Each query rule uses the condition Query Matches Keyword Exactly. The associated action is Change ranked results by changing the query. If the term past is entered, the query is changed to DueDate<{Today}. If the term present is entered, the query is changed to DueDate>{Today} AND DueDate<{Today+30}. If the term future is entered, the query is changed to DueDate>{Today+30}.
Adding refiners
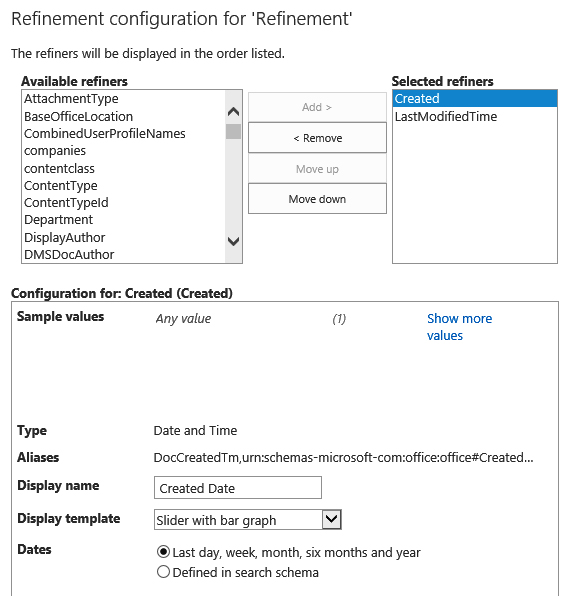
Managed properties whose Refinable attribute is set to true can be used as the basis for a refiner in the Search Center. The Refinement Web Part provides a configuration dialog box that lets you choose the refiners to be used with the search results. Like result types, refiners also use display templates to control how the refinement information is presented. SharePoint 2013 provides several display templates for refiners, which are located in the Master Page Gallery | Display Templates | Filters folder. These display templates can be selected when you are configuring the Refinement Web Part, as shown in Figure 13-8.
Along with managed properties, refiners can also be defined by using Managed Metadata. Managed Metadata refiners are primarily used in the Web Content Management system when you are using a list as a catalog to drive site content. Web Content Management is covered in Chapter 14.
Exporting search customizations
Although creating search-based applications directly in the browser is powerful and convenient, the production environment is not the place to develop these applications. As with all development, these applications should be created in a development environment and verified in a staging environment before being moved to production. To support migrating the applications, SharePoint 2013 provides the ability to export and import search settings.
Exporting and importing can be done through the Site Settings page by clicking Configuration Import or Configuration Export under the Search heading. Exporting search configurations produces an XML file with information about result sources, result types, query rules, and managed properties. Unfortunately, the export file does not contain information about master pages, display templates, and Web Parts, which must be migrated separately.
In addition to using the export capability to migrate between environments, you can also use the exported search settings within a search-based app. In Visual Studio 2012, you can add a new Search Configuration item, which will allow you to import the search settings XML file into an app project. The purpose of importing the search settings XML file is to allow your app to use those settings when it is installed in a different farm. Suppose your app, for example, needs a certain result source defined in order to function. Including a search settings XML file will allow that to happen.
Apps that include search settings XML files can choose to import the settings only into the app web or the hosting site collection. Importing into the app web is a simple matter of including the search settings XML file in the app. Importing into the site collection, however, requires two modifications. First, the app must request full control over the site collection in the app manifest. Second, the search settings XML file must be edited so that the <DeployToParent> element has a value of true. Now, when the app is installed, the search settings will be imported into the hosting site collection.
One thing to note about this capability—it does not support importing any managed properties. Even though the managed properties will be included in the search settings XML file, they will not be imported; the tools simply don’t support managed properties in this release.
Using the Content Search Web Part
The Content Search Web Part (CSWP) is new to SharePoint 2013 and allows search results to be displayed on any page in a site. The CSWP works a lot like the Search Results Web Part in that it uses result sources, result types, and display templates to generate search results. The CSWP keeps its templates in the Master Page Gallery in the Content Web Parts folder. Here you’ll find two types of templates: control and item. Control templates are run once and generate the beginning and end of the display. Item templates are run once for each item in the search results and are similar to the display templates used by the Search Results Web Part.
The difference between the CSWP and the standard Search Results Web Part is that the CSWP provides a few more out-of-the-box configurations so that it is easier for an end user to set up without having to create custom display templates. Both control and item templates are selectable within the properties pane for the CSWP. Additionally, managed properties can be mapped to placeholders in the template directly in the property pane.
Finally, the CSWP plays a big role in creating search-driven sites in the Web Content Management workload. This capability is covered in detail in Chapter 14.
Using the client-side API
When creating search-based apps, you can use either the REST or CSOM API to execute searches. These interfaces can be used from either JavaScript or C# just like any of the other client-side endpoints. As discussed in Chapter 5, the choice is really based on the architecture of your app.
Using the REST API
SharePoint 2013 provides three RESTful endpoints to execute queries and return suggestions. By using these endpoints, you can create sophisticated search-based apps. Table 13-8 describes the available search endpoints.
Endpoint | Description |
| Used to run search queries by using HTTP GET |
| Used to run search queries by using HTTP POST to overcome URL length limitations |
| Used to retrieve query suggestions by using HTTP GET |
To use the search REST API, an app must make a permission request, and that request must be granted during app installation. The required permission request is formatted similar to any other permission request, and you can access it in Visual Studio by using the designer associated with the app manifest. The following code shows the underlying XML that forms the requested permission:
<AppPermissionRequests>
  <AppPermissionRequest Scope="http://sharepoint/search" Right="QueryAsUserIgnoreAppPrincipal" />
</AppPermissionRequests>
The simplest way to run a query against the REST API is to pass a keyword query. You do this by setting the value of the querytext parameter in the RESTful Uniform Resource Identifier (URI). You can use this approach for either the query or suggest endpoints. The querytext value can be any legal Keyword Query Language (KQL) construction, including managed properties and operators. The following code shows two examples of returning search results with keyword queries:
http://wingtiptoys.com/_api/search/query?querytext='SharePoint'
http://wingtiptoys.com/_api/search/query?querytext='Title:SharePoint'
The real power of the REST API lies in all of the available query parameters that can be used. These parameters reflect many of the properties historically available through the KeywordQuery class. By using these parameters, you can control the columns returned, sorting, paging, and relevance model, to name just a few. Table 13-9 lists some of the key query parameters.
Because access to the search engine is available through the REST API, building search-based apps is just a matter of creating a library that forms the appropriate URI and parses out the results. Example 13-1 shows how to execute a keyword query by using REST, JavaScript, and jQuery.
$(document).ready(function () {
    (function () {
        $.ajax(
            {
                url: _spPageContextInfo.webAbsoluteUrl +
                    "/_api/search/query?querytext='Title:SharePoint'" +
                    "&selectproperties='Title,Path'",
                method: "GET",
                headers: { accept: "application/json;odata=verbose" },
                success: function (data) {
                    var results =
                        data.d.query.PrimaryQueryResult.RelevantResults.Table.Rows.results
                    var count = results.length;
                    alert("Found " + count + " results. Showing first 5.");
                    for (var r = 0; r < 5; r++) {
                        alert(results[r].Cells.results[2].Value);
                    }
                },
                error: function (err) {
                    alert(JSON.stringify(err));
                }
            }
        );
    })();
});
Although executing JavaScript calls against the RESTful endpoints is certainly useful in app development, nothing prevents the use of RESTful calls from C#. This approach can be useful when you are trying to create more traditional solutions, such as console applications. Example 13-2 shows how to make a RESTful search query by using C#.
static void Main(string[] args)
{
    string url = "http://intranet.wingtiptoys.com/" +
                 "_api/search/query?querytext='Title:SharePoint'" +
                 "&selectproperties='Title,Path'";
    HttpWebRequest request = (HttpWebRequest)WebRequest.Create(url);
    request.Method = "GET";
    request.Credentials = System.Net.CredentialCache.DefaultNetworkCredentials;

    WebResponse response = request.GetResponse();
    using (XmlReader reader = XmlReader.Create(
       new StreamReader(response.GetResponseStream())))
    {
        bool titleFlag = false;
        while (reader.Read())
        {
            if (reader.NodeType == XmlNodeType.Text && titleFlag == true)
            {
                Console.WriteLine(reader.Value);
                titleFlag = false;
            }
            if (reader.NodeType == XmlNodeType.Text && reader.Value == "Title")
            {
                titleFlag = true;
            }
        }
    }
}
Using the CSOM API
The CSOM API for search is centered on two key objects: KeywordQuery and SearchExecutor. The KeywordQuery object supports the construction of the query, and the SearchExecutor object executes the query against SharePoint. Both JavaScript and C# have versions of these objects.
In JavaScript, the objects are found in the Microsoft.SharePoint.Client.Search.Query namespace. This namespace is part of the sp.search.js library, so you must add a reference to this library in your app. After the reference is added, the usage is fairly straightforward, as shown in Example 13-3.
"use strict";

var WingtipToys = window.WingtipToys || {};
WingtipToys.Results = {};

WingtipToys.Search = function () {

    var execute = function (kql) {
        var context = SP.ClientContext.get_current();
        var keywordQuery = new Microsoft.SharePoint.Client.Search.Query.
        KeywordQuery(context);
        keywordQuery.set_queryText(kql);
        var searchExecutor =
        new Microsoft.SharePoint.Client.Search.Query.SearchExecutor(context);
        WingtipToys.Results = searchExecutor.executeQuery(keywordQuery);
        context.executeQueryAsync(onGetEventsSuccess, onGetEventsFail);
    },

    onGetEventsSuccess = function() {
        var relevantResults = WingtipToys.Results.m_value.ResultTables[0];
        $('#message').text(relevantResults.RowCount +
        " events were found in farm calendars.");
    },

    onGetEventsFail = function (sender, args) {
        alert('Failed. Error:' + args.get_message());
    }

    return {
        execute: execute
    }
}();

$(document).ready(function () {
    WingtipToys.Search.execute("ContentClass=STS_ListItem_Events");
});
In order to query with CSOM from C#, you must add a reference to the Microsoft.SharePoint.Client, Microsoft.SharePoint.ClientRuntime, and Microsoft.SharePoint.Client.Search assemblies. Using the KeywordQuery and SearchExecutor classes in code then follows the same basic pattern as the JavaScript approach. The biggest difference is that the C# code can execute synchronously, as shown in Example 13-4.
using (ClientContext ctx = new ClientContext("http://intranet.wingtip.com/"))
{
    KeywordQuery query = new KeywordQuery(ctx);
    query.QueryText = "Title:SharePoint";
    query.SelectProperties.Add("Title");
    query.SelectProperties.Add("Path");

    SearchExecutor executor = new SearchExecutor(ctx);
    ClientResult<ResultTableCollection> results = executor.ExecuteQuery(query);
    ctx.ExecuteQuery();

    foreach (var row in results.Value[0].ResultRows)
    {
        Console.WriteLine(row["Title"]);
    }
}
Using the script Web Parts
When building search-based apps, you can certainly create your own user interface to display search results. However, you can also use a simple set of script-based Web Parts found in the Microsoft.Office.Server.Search.WebControls namespace located in the Microsoft.Office.Server.Search.dll assembly. The Web Parts ResultScriptWebPart, SearchBoxScriptWebPart, and RefinementScriptWebPart allow you to easily surface search results, a query box, and a refinement panel, respectively. You can include these script Web Parts in an ASP.NET page by adding the following reference:
<%@ Register Tagprefix="SearchWC" Namespace="Microsoft.Office.Server.Search.WebControls"
      Assembly="Microsoft.Office.Server.Search, Version=15.0.0.0, Culture=neutral,
      PublicKeyToken=71e9bce111e9429c" %>
The ResultScriptWebPart is the only one of the three Web Parts that requires any serious configuration. Typically, you will configure the data source to search by setting the UseSharedDataProvider and the DataProviderJSON properties. UseSharedDataProvider indicates whether the Web Part receives data from another part on the page and should be set to false. The DataProviderJSON property is a JSON object that defines the name of the result source to use and the level where it can be found (Tenant, SSA, SPSite, or SPWeb). The following code shows an example JSON object:
{ "SourceName":"MyResultSource","SourceLevel":"SPSite" }Along with specifying the result source, you can also specify the result template to use. This is done by setting the ItemTemplateId property to the URL of the desired template. The following code shows a typical ResultScriptWebPart configured to use a result source and template in the host site collection:
<SearchWC:ResultScriptWebPart ID="ResultScriptWebPart1"
runat="server" ChromeType="None" UseSharedDataProvider="false"
DataProviderJSON="{ "SourceName":"Documents",
"SourceLevel":"SPSite" }"
ShowAdvancedLink="false"
ScrollToTopOnRedraw="true"
ShowUpScopeMessage="true"
UseSimplifiedQueryBuilder="false"
ItemTemplateId=
"~sitecollection/_catalogs/masterpage/Display Templates/Search/Item_Default.js" />The SearchBoxScriptWebPart must be configured with the address of the results page where it will redirect when searching. The RefinementScriptWebPart requires no real configuration—just place it on the same page as the ResultScriptWebPart. The following code shows an example configuration for the SearchBoxScriptWebPart and the RefinementScriptWebPart:
<SearchWC:SearchBoxScriptWebPart
          ID="SearchBoxScriptWebPart1"
          ChromeType="None" runat="server"
          ResultsPageAddress="../pages/Default.aspx"/>
<SearchWC:RefinementScriptWebPart
          ID="RefinementScriptWebPart1"
          runat="server" ChromeType="None"/>
Improving relevancy
When end users execute a query, they have a strong expectation that the content they have in mind will be near the top of the search results. When this doesn’t happen, end users may abandon the search and complain that it just doesn’t work. The challenge, of course, is that there are many factors that determine the quality of search results, not the least of which is the query entered by the user. Still, improving the relevancy of search results is critical to the success of any search-based solution. In SharePoint 2013, you can affect relevancy through the use of authoritative pages, dynamic reordering rules, and ranking models.
When looking to improve relevancy, the first place to start is with authoritative pages. Authoritative pages are pages that link to critical information within the SharePoint farm. When authoritative pages are defined, it affects the ranking of every page that is connected by links to that page by click distance. Click distance is the number of clicks required to get from the authoritative page to the content in question. Authoritative pages are defined in the SSA. For on-premises deployments, no authoritative pages are defined by default. For SharePoint Online, the home page of the main site collection is defined as authoritative. In the SSA, you can define three levels of authoritative pages as well as pages that are not authoritative, which helps eliminate irrelevant information from the relevancy calculation.
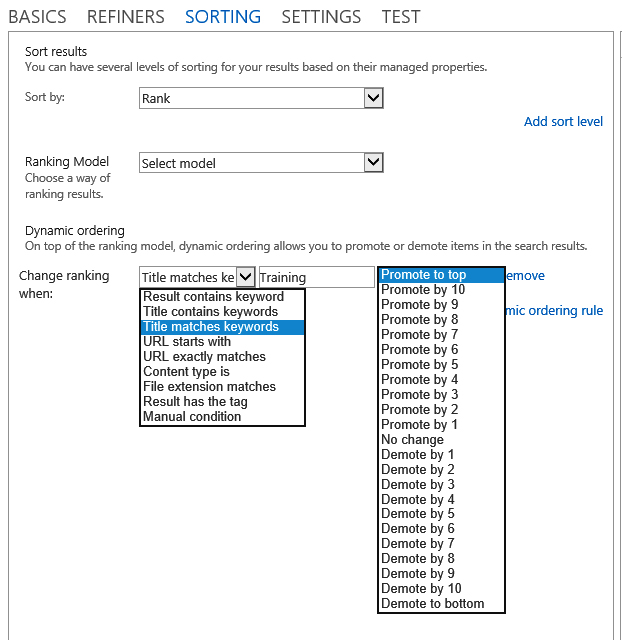
Dynamic reordering rules let you reorder the results of a query based on a set of conditions. Dynamic reordering rules are like query rules except that they are applied after the query is run instead of before. Although SharePoint 2013 provides a graphic interface for setting up dynamic reordering rules, they are implemented by using the XRANK keyword behind the scenes.
Dynamic reordering rules are defined within the Query Builder on the Sorting tab. On the Sorting tab, the primary sort key must be set to Rank in order to define dynamic reordering rules. You can then add one or more rules, which allows for the definition of the condition and the resulting rank change to promote or demote an item. Figure 13-9 shows the settings in the Query Builder.
The query engine is responsible for assigning a ranking score to each returned item based upon a number of factors defined in a ranking model. The ranking model contains the rules that will be applied to the search results to determine ranking. SharePoint Server 2013 ships with several ranking models that are applied when you search different contexts such as documents or people. You can list all of the ranking models available in your environment with the following Windows PowerShell commands:
$ssa = Get-SPEnterpriseSearchServiceApplication -Identity "Search Service Application"
$owner = Get-SPEnterpriseSearchOwner -Level Ssa
Get-SPEnterpriseSearchRankingModel -SearchApplication $ssa -Owner $owner
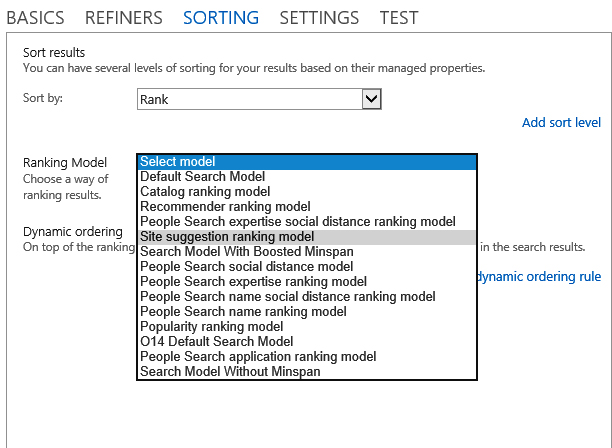
When you list the ranking models, you will notice that each one uses a GUID as an identifier. These GUIDS can be used in your custom search solutions to set the ranking model that should be used with a particular query. The REST, CSOM, and SSOM objects all support properties for setting this value. Additionally, you can select the ranking model to use directly in the Query Builder, as shown in Figure 13-10.
Ranking models are created as XML files and registered with the search engine for use. These are complex files for which there is very little documentation. You can, however, view the XML associated with any ranking model by using the following Windows PowerShell commands:
$ssa = Get-SPEnterpriseSearchServiceApplication -Identity "Search Service Application"
$owner = Get-SPEnterpriseSearchOwner -Level Ssa
$model = Get-SPEnterpriseSearchRankingModel -SearchApplication $ssa
          -Owner $owner -Identity {RankingModelID}
$model.RankingModelXml
In SharePoint 2013, it is possible to modify or create new ranking models. However, Microsoft strongly recommends against this. The recommendation from the search team at Microsoft is to make use of dynamic reordering rules rather than creating a custom ranking model. This is likely the reason why there is little documentation available concerning the structure of these models.
Enhancing content processing
During the crawl process, SharePoint 2013 allows you to inspect and modify the values of managed properties for selected items through the creation of a custom Content Processing Enrichment Service (CPES). As mentioned in the section Understanding the indexing process earlier in this chapter, content enhancement supports data cleansing, entity extraction, classification, and tagging, all of which can significantly enhance the quality of search results.
A custom CPES is a SOAP web service that implements the IContentProcessingEnrichmentService interface. This interface implements a ProcessItem method that passes in a collection of managed properties associated with a particular item being crawled. The custom CPES can then modify the values of the managed properties in the set, add new managed properties, or delete managed properties from the set.
As an example, consider a custom CPES that will look for items that have a company name associated with them and will add a new managed property containing the ticker symbol for the company. This will allow users to search for a company by either its proper name or ticker symbol. Before the custom CPES can be created, however, all of the managed properties that will be used for both input and output must be created.
In this example, the managed property FictitiousCompany is used as the input and FictitiousTickerSymbol is the new managed property that gets added during the crawl process. The input managed property should be set up in the SSA and associated with any crawled properties that represent a company name. The output managed property, however, does not need to be associated with any crawled properties because its value will be set by the custom CPES. Figure 13-11 shows the managed properties defined in the SSA.

After the managed properties are defined, you can create a web service in Visual Studio 2012. You must then add a reference to the Microsoft.Office.Server.Search.ContentProcessingEnrichment.dll assembly located at C:Program FilesMicrosoft Office Servers15.0SearchApplicationsExternal. After the reference is set, the following statements will allow you to use the assembly in your service:
using Microsoft.Office.Server.Search.ContentProcessingEnrichment;
using Microsoft.Office.Server.Search.ContentProcessingEnrichment.PropertyTypes;
Creating the custom CPES is a simple matter of implementing the ProcessItem method. This method receives an Item and returns a ProcessedItem. The typical process is to examine the ItemProperties collection associated with the input Item for managed properties of interest. You can then add, modify, or delete properties as required. Example 13-5 shows the code to identify the presence of the FictitiousCompany property and then add a new FictitiousTickerSymbol property.
//The new managed property to add
private Property<string> tickerSymbol =
    new Property<string> { Name = "FictitiousTickerSymbol" };

//A temporary holder for the item being processed
private readonly ProcessedItem processedItemHolder =
        new ProcessedItem { ItemProperties = new List<AbstractProperty>() };

//The dictionary of ticker symbols
private readonly Dictionary<string, string> tickerSymbolsDictionary =
        new Dictionary<string, string> {...}

public ProcessedItem ProcessItem(Item item)
{
    foreach (AbstractProperty property in item.ItemProperties)
    {
        //Determine if this managed property is the company property
        if (property.Name.Equals("FictitiousCompany",
            StringComparison.InvariantCultureIgnoreCase))
    {
    //Get the managed property
    Property<string> companyProperty = property as Property<string>;

    if (tickerSymbolsDictionary.ContainsKey(property.ObjectValue.ToString()))
    {
        //Add the ticker symbol managed property
        tickerSymbol.Value = tickerSymbolsDictionary[property.ObjectValue.ToString()];
        processedItemHolder.ItemProperties.Add(tickerSymbol);
    }

    return processedItemHolder;
}
After the web service is created, it must be deployed and then registered with the search service. When the service is registered, the input and output managed properties are defined as well as the service endpoint. This registration process ensures that only items meeting the specified criteria get sent to the custom CPES for processing, ensuring that the additional processing does not unnecessarily slow down the overall crawl process. The following code shows how to register the service by using Windows PowerShell:
$ssa = Get-SPEnterpriseSearchServiceApplication
$config = New-SPEnterpriseSearchContentEnrichmentConfiguration
$config.Endpoint = "http://webs.wingtiptoys.com/ContentProcessingEnrichment/CPE.svc"
$config.InputProperties = "FictitiousCompany"
$config.OutputProperties = "FictitiousTickerSymbol"
Set-SPEnterpriseSearchContentEnrichmentConfiguration
   -SearchApplication $ssa -ContentEnrichmentConfiguration $config
If you no longer want to use the custom CPES for processing, then it can be removed from the pipeline. The following Windows PowerShell command will remove the service:
Remove-SPEnterpriseSearchContentEnrichmentConfiguration -SearchApplication $ssa
Creating .NET Assembly Connectors for search
Chapter 12 showed in detail how to create a .NET Assembly Connector to allow Business Connectivity Services access to any external system. You can also use a .NET Assembly Connector to index any external system by search-enabling the connector. Because .NET Assembly Connector fundamentals were covered in Chapter 12, this chapter will focus only on the requirements for enabling search.
Search-enabling a model
Whenever any External Content Type (ECT) is created in BCS, there is an XML model that gets created behind the scenes. This model defines the external system, entities, relationships, methods, and user access rights for the ECT. The same is true when a .NET Assembly Connector is created. The primary difference is that the external system is defined as an association between a .NET assembly and the ECT.
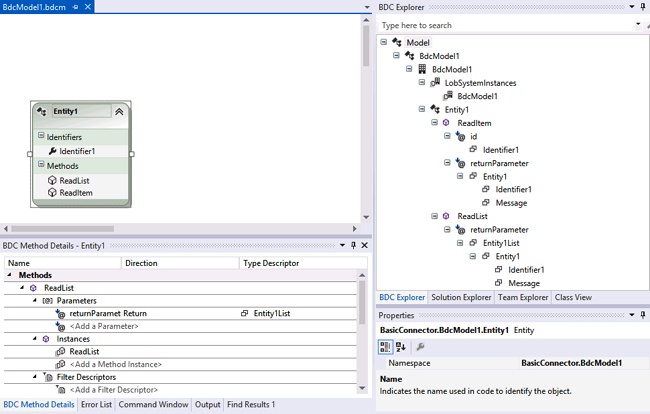
When you use SharePoint Developer to create ECTs, the model is generated for you so that you never have to deal with XML directly. When you use Visual Studio 2012 to create a .NET Assembly Connector, you also have design tools that hide the XML, but you often have to edit the XML model manually to get the exact capabilities you need. In Visual Studio, the XML model is contained in a file with a .bdcm extension. When this file is opened, it appears in three windows. First, a design surface is available for creating entities. Second, a detail section is available for method definitions. Third, the Business Data Connectivity (BDC) Explorer is available for browsing the model. Figure 13-12 shows the three windows of information for the model described in Chapter 12. This model used a .NET Assembly Connector to connect with product information.
You can view the XML for the model directly by right-clicking the .bdcm file in the Solution Explorer and selecting Open With from the shortcut menu. When the Open With dialog box appears, select the option to open the file with the XML Editor. If you study the XML model alongside the BDC Explorer, you will begin to notice that the BDC Explorer contains a node for each key element in the model. This concept is important because you typically will be adding information to model elements when you prepare a .NET Assembly Connector to support search.
To search-enable an existing model, you must make two changes. The first change is to designate which method to call during the indexing process. The second change allows the model to appear as a content source in search. Both changes are simple edits to the XML.
Chapter 12 discussed BCS operations in detail. In particular, Finder methods were defined as methods that return many records from an external system. Essentially, a Finder method defines a view of an external system. When search crawls an external system, it needs to know which of the available Finder methods represents the entire population of records to index. This finder method is known as the RootFinder method.
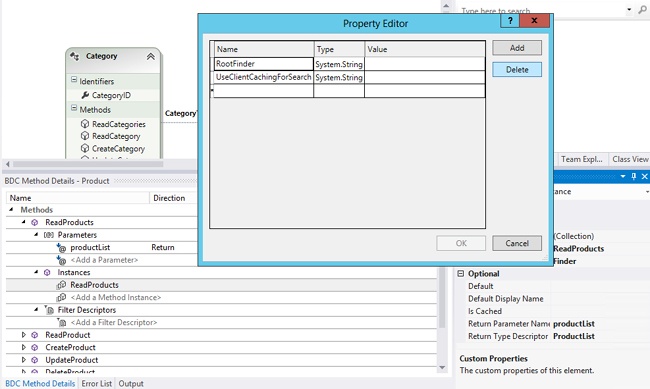
In your .NET Assembly Connector, you designate the RootFinder by first selecting the method instance in the Method Details pane. When you select it, the Properties window in Visual Studio 2012 will show details for the method. From this window, you can open the Custom Properties collection. In the Property Editor window, you can enter the RootFinder designation with a Type of System.String. Optionally, you can include the UseClientCachingForSearch property, which instructs the crawler to manage data directly in memory for more efficiency. This setting is appropriate for situations in which the width of the record is less than 32K. If records are larger, they might be dropped during the crawl process. Figure 13-13 shows the modifications being made to an existing .NET Assembly Connector.
After setting RootFinder, you can open the model XML in Visual Studio and view how the new information was added to the model. In fact, it’s often easier to simply add the properties directly in the XML rather than using the Visual Studio dialog boxes. The following code shows the resulting XML:
<MethodInstances>
  <MethodInstance Type="Finder"
     ReturnParameterName="returnParameter"
     Default="true" Name="ReadList"
     DefaultDisplayName="Entity1 List">
    <Properties>
        <Property Name="RootFinder" Type="System.String">x</Property>
    </Properties>
  </MethodInstance>
</MethodInstances>
After RootFinder is defined, you must make an additional change to allow the .NET Assembly Connector to appear as a content source in search. This is accomplished by applying the ShowInSearchUI property to the model. This property is applied by selecting the LobSystemInstance for your project under the LobSystemInstances folder in the model explorer. You can then create the property by using the same technique as for RootFinder. Optionally, you can make the change directly in the XML. The following code shows the modified model:
<LobSystemInstances>
  <LobSystemInstance Name="BdcModel1" >
    <Properties>
      <Property Name="ShowInSearchUI" Type="System.String"></Property>
    </Properties>
  </LobSystemInstance>
</LobSystemInstances>
After you have completed the two modifications, the model is search-enabled. You can deploy the feature and immediately select it as a search content source. It is worth noting that when you create models using SharePoint Designer, the RootFinder and ShowInSearchUI properties are added automatically.
Implementing security in search results
Though search-enabling a BCS model is fairly simple, this process provides no security checking against search queries. This means that when a search is run against the external system, all matching results will be returned regardless of whether the current user is supposed to see them. In most production applications, you will want to implement an access control list (ACL) that specifies rights for the records returned when you are searching with a .NET Assembly Connector. This is accomplished by adding a special method to the model called a BinarySecurityDescriptorAccessor method.
The process to implement security begins by adding a new method to the model. In Visual Studio, you can right-click the entity in the design surface and select Add New Method from the context menu. You can then give it a name such as ReadSecurityDescriptor. After it is created, the method will appear in the Method Details pane. Next, in the Method Details pane, you must create a new method instance beneath the new method. After the new method instance is created, you can change its type in the Properties window to BinarySecurityDescriptorAccessor.
The new method instance will require input and output parameters. Typically, the input parameters are the identifier for an item and the user name of the current user. The output parameter must be a byte array that holds the security descriptor. The following code shows the XML for the new method:
<Method Name="ReadSecurityDescriptor">
  <Parameters>
    <Parameter Name="id" Direction="In">
      <TypeDescriptor Name="ID" TypeName="System.String" IdentifierName="ID" />
    </Parameter>
    <Parameter Name="acl" Direction="Return">
      <TypeDescriptor Name="SecurityDescriptor"
        TypeName="System.Byte[]" IsCollection="true" >
        <TypeDescriptors>
          <TypeDescriptor Name="SecurityDescriptorByte" TypeName="System.Byte"/>
        </TypeDescriptors>
      </TypeDescriptor>
    </Parameter>
  </Parameters>
  <MethodInstances>
    <MethodInstance Name="ReadSecurityDescriptorInstance"
      Type="BinarySecurityDescriptorAccessor" ReturnParameterName="acl"/>
  </MethodInstances>
</Method>
When you create the new method definition, Visual Studio will automatically generate a method stub in code that accepts the input parameters and returns a byte array. Your job is to write code for this method that creates an ACL for the item. When the BinarySecurityDescriptorAccessor method is called during the indexing process, the crawl account will be the account accessing the system. This account should be designated as the owner account for the ACL. In the implementation, you can add other permissions for users based on whatever criteria you need. For example, the code in Example 13-6 grants access to all users.
public static byte[] ReadSecurityDescriptor(string id, string username) {
  try {
    //Grant everyone access
    NTAccount workerAcc = new NTAccount(
    username.Split('')[0], username.Split('')[1]);
    SecurityIdentifier workerSid =
        (SecurityIdentifier)workerAcc.Translate(typeof(SecurityIdentifier));
    SecurityIdentifier everyone =
         new SecurityIdentifier(WellKnownSidType.WorldSid, null);
    CommonSecurityDescriptor csd = new CommonSecurityDescriptor(
         false, false, ControlFlags.None, workerSid, null, null, null);
    csd.SetDiscretionaryAclProtection(true, false);
    csd.DiscretionaryAcl.AddAccess(
    AccessControlType.Allow, everyone, unchecked((int)0xffffffffL),
    InheritanceFlags.None, PropagationFlags.None);
    byte[] secDes = new byte[csd.BinaryLength];
    csd.GetBinaryForm(secDes, 0);
    return secDes;
  }
  catch (Exception x) {
    PortalLog.LogString("Product Model (ReadSecurityDescriptor): {0}", x.Message);
    return null;
  }
}
After you have created the BinarySecurityDescriptorAccessor method, you must add a property to the ECT entity to hold the ACL. This property is named SecurityDescriptor. The model must then be updated to relate the BinarySecurityDescriptorAccessor method to the SecurityDescriptor property. The following code shows how to relate the entity and the method instance:
<MethodInstances>

  <MethodInstance Name="ReadSecurityDescriptorInstance"
                  Type="BinarySecurityDescriptorAccessor"
                  ReturnParameterName="acl">
    <Properties>
      <Property Name="WindowsSecurityDescriptorField" Type="System.String">
        SecurityDescriptor
      </Property>
    </Properties>
  </MethodInstance>

<MethodInstances>
Crawling the .NET Assembly Connector
When your .NET Assembly Connector is complete, you should be able to select it as a content source and initiate a full crawl. When you crawl the solution for the first time, it’s a good idea to attach Visual Studio to the crawl process (mssdmn.exe) and watch how the crawl progresses. Set breakpoints in the Finder, SpecificFinder, and BinarySecurityDescriptorAccessor methods. Also, be sure that you have granted access in the BCS service to the account that will perform the crawling.
When the crawl is initiated, you should notice the Finder method called first. You’ll then notice the SpecificFinder called for each individual item returned from the Finder method. Along the way, the security descriptor should be built for each item. After the crawl completes, check the crawl log for errors. Now you can run a search against the crawled data. SharePoint should use the security descriptors that you constructed to limit access to items as appropriate.
Summary
This chapter focused on all the components necessary to create search-based solutions in SharePoint 2013. When designing your solutions, you should give consideration to creating solutions that use search, either through apps, keyword queries, or .NET Assembly Connectors, and present results to users so that they can be understood and acted upon. In this way, you can create search-based solutions that provide value to end users.