Chapter 16. Business Connectivity Services
Although Microsoft SharePoint Server 2013 provides a platform with significant capabilities, there will always be other systems in an organization that maintain critical business data. Systems such as customer relationship management (CRM) and enterprise resource planning (ERP) services have special roles that are not replaced easily by SharePoint. As a result, strategies must be adopted to provide interoperability between SharePoint and these systems.
In the absence of a strategy for integrating systems with SharePoint, many organizations duplicate information in SharePoint lists. Customer contact information, for example, may exist in a CRM system and also be entered into a contact list in SharePoint. Worse still, the data may be duplicated many times in different team sites by different groups. This kind of duplication leads to significant data maintenance issues because updates must be performed in many lists.
Along with these existing systems, custom applications, databases, and web services are common within organizations. When a separate database is required, developers have historically created Microsoft ASP.NET applications or custom Web Parts that act as front ends for the database to have the data appear in the SharePoint environment. However, these types of solutions generally offer little integration with SharePoint capabilities; they are largely limited to presenting data within a SharePoint page.
Business Connectivity Services (BCS) greatly enhances the ability to integrate systems, databases, and web services with SharePoint. Beyond simply bringing data into SharePoint for display, BCS allows for capabilities that simply can’t exist in an ASP.NET application or custom Web Part without a significant investment. These capabilities include enterprise search, External Data Columns, user profile integration, app development, client synchronization, offline support, and Microsoft Word integration.
We should point out at the beginning of this chapter that BCS is a large subsystem within the SharePoint 2013 product; it is simply impossible to cover the entire depth of it in a single chapter. If you have been working with BCS in SharePoint 2010, then you will find that all of its functionality has been carried forward into SharePoint 2013, and several new capabilities have been added; these are summarized in Table 16-1. If you have never worked with BCS before, then this chapter will provide you with a good overview from which to get started.
Description | |
App-level ECTs | External Content Types that are scoped to a single SharePoint app can be created. |
Notification and event receivers | External Lists and External Content Types support “Alert Me” functionality and attaching custom event receivers. |
OData sources | Microsoft Visual Studio 2012 provides tooling for creating ECTs that are based on OData sources. |
REST and CSOM | Both Representational State Transfer (REST) and client-side object model (CSOM) programming APIs are available. |
SharePoint Online | New and improved support for using External Content Types in SharePoint Online is provided. |
Sorting and filtering | Sorting and filtering infrastructure is improved, making External Lists much more efficient when querying external systems. |
Introduction to Business Connectivity Services
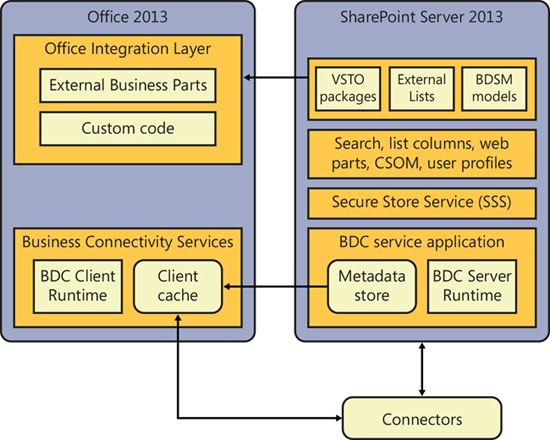
Business Connectivity Services is a term for a set of technologies that integrates external system data with SharePoint 2013 and Microsoft Office 2013. Figure 16-1 shows a block diagram of the major components in BCS. In our discussions of BCS, several new terms are introduced that will be used throughout the chapter. These terms all start with the word External to signify their association with BCS. The terms are listed here for reference:
External System. Any data source with which BCS can connect
External Content Type (ECT). The definition of the fields and operations for connecting with an External System
External Data. The data exchanged with an External System
External List. A list in SharePoint based on External Data
External Data Column. A column in a standard list or library whose source is External Data
External Data Web Part. Any of several out-of-the-box Web Parts that can display External Data
BCS uses the term External System to refer to any application that is outside SharePoint. These External Systems can include third-party software, custom applications, databases, web services, and even cloud computing solutions. The Business Data Connectivity (BDC) layer contains the plumbing, BDC Runtime application programming interface (API), and connectivity functionality necessary to communicate with External Systems. Out of the box, the BDC layer provides connectors for databases, web services, and OData sources, but you can create your own connectors for any system.
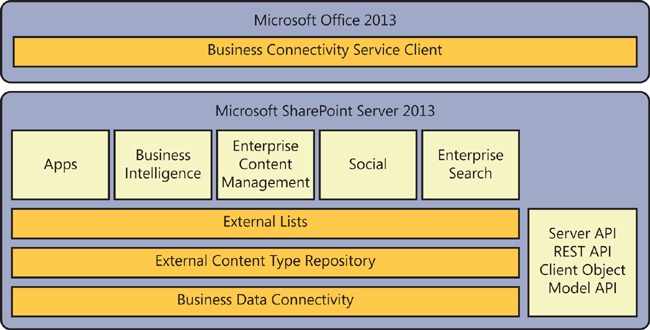
The operations performed on the External Data and the schema for the returned data set are defined by an External Content Type (ECT). ECTs define fields, operations, and filters to be used with the External Data and are the heart of the BCS infrastructure. As an example, consider a manufacturing database that contains product information. An ECT named Product can be created that defines ProductID, ProductName, and ProductDescription fields. Furthermore, it might define operations for retrieving data based on a keyword query or exact product identifier. Defining ECTs is one of the primary activities involved in creating a BCS solution and can be performed in either Microsoft SharePoint Designer 2013 or Microsoft Visual Studio 2012. ECTs are stored in a metadata catalog, which is either part of the BDC Service application or created locally inside a SharePoint app.
Although you can create many custom solutions by using code, the easiest way to create a solution in BCS is through an External List. An External List is a list that is based on an ECT definition and displays External Data. Conceptually, External Lists use ECTs the same way that standard SharePoint lists use standard content types. You can create External Lists in a browser or through SharePoint Designer without writing any code; External Lists are accessible through the SPList object in the server object model or through the _api RESTful endpoint just like a standard SharePoint list.
Along with External Lists, ECTs can also be used in other ways through SharePoint. SharePoint ships with a set of Web Parts called External Data Web Parts that can display data from External Systems based on an ECT. ECTs can also be used to create lookup fields in standard SharePoint lists. ECTs can be used to enhance the information in a user’s profile by drawing on human resource systems such as PeopleSoft. Finally, ECTs can be used to facilitate searching External Systems and displaying results in SharePoint.
In Office 2013, the BCS Client layer provides the ability to display External Data in Office clients. Microsoft Outlook can display data using standard forms, such as contact lists or calendar items. Microsoft Word can use External Data to support document creation. Microsoft InfoPath is also available to customize the display and edit forms for External Data. In addition, clients running Office 2013 support access to External Data in an offline mode using a cache system that updates the External System when the client reconnects.
Creating simple BCS solutions
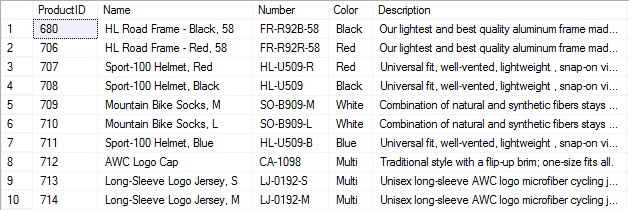
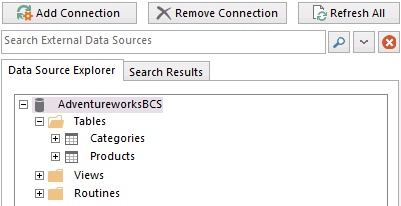
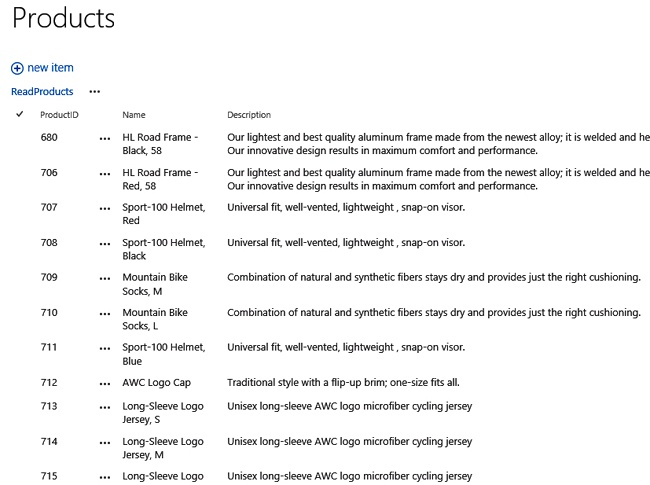
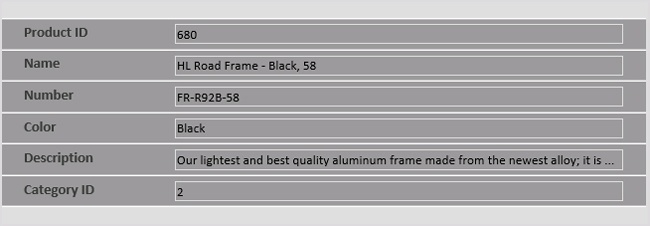
The BCS infrastructure is complex and covers a variety of authentication, authorization, and operation scenarios. The beauty of BCS, however, is that you can also create simple solutions with no code. SharePoint Designer provides a set of tools you can use to create ECTs against External Systems and surface them as External Lists. In fact, the easiest way to understand the fundamentals of BCS is to create a simple solution. The classic solution is to create an ECT based on data found in the AdventureWorks sample database. Figure 16-2 shows some product data that can be used as a source for a no-code solution.
Creating External Content Types
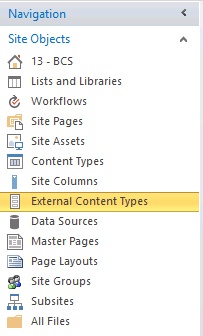
BCS solutions always begin by defining External Content Types for the schema and operations. These definitions are nearly always created by using SharePoint Designer. SharePoint Designer provides all the basic tooling necessary to create ECTs and External Lists. In addition, ECTs can be exported from SharePoint Designer so that they can be migrated from a development environment to a quality assurance (QA) environment and then to a production environment. To begin creating an ECT, you open a SharePoint site in SharePoint Designer and click the External Content Types object in the list of Site Objects, as shown in Figure 16-3. This produces a list of all the existing ECTs in the farm.
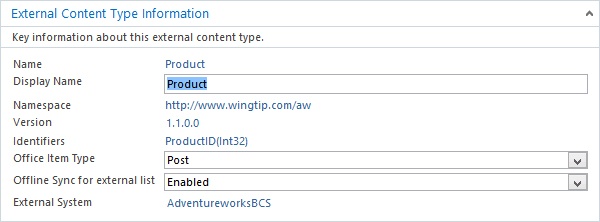
After you have a view of the available ECTs, you can define a new one by clicking the New External Content Type button on the ribbon. The basic ECT information consists of a name, display name, namespace, and version. You can also select from a list of various Office types, which determine what form will be used to render the information when it is displayed in Outlook. Figure 16-4 shows the basic ECT information for the walkthrough with the Post type selected.
After the basic ECT information is defined, you will define connection information for the External System. Clicking the Operations Design View button on the ribbon presents a form for defining the connection information. From this form, clicking Add Connection allows you to select from three types of connections: WCF, SQL, and .NET Type. Selecting WCF allows you to connect to a web service, SQL allows you to connect to a database, and .NET Type allows you to use a custom Microsoft .NET Assembly Connector (which is covered in the section “Creating .NET Assembly Connectors” later in this chapter).
BCS supports a number of authentication mechanisms for connecting to the External System. You can connect as the current user or the BDC service account, you can transform credentials to another account, or you can even use claims-based access. In this walkthrough, the connection is made by using the BDC service account. The details concerning authentication options are discussed in the section Understanding authentication scenarios later in this chapter. Figure 16-5 shows the connection information for the walkthrough.
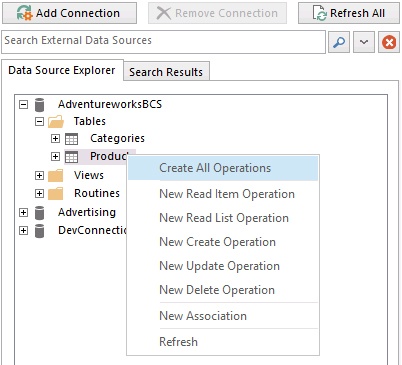
After the data source connection is made, SharePoint Designer can create operations for the ECT. When a SQL connection is used, SharePoint Designer can infer a significant amount of information about the data source and the operations, so it is easy to create the entire set of create, read, update, and delete (CRUD) operations. In fact, all you have to do is right-click the table in the connection and select Create All Operations from the shortcut menu, which will start the Operation Wizard to collect the small amount of information required to complete the operation definitions. Figure 16-6 shows the shortcut menu in SharePoint Designer.
The Operation Wizard starts whenever SharePoint Designer needs additional information to complete the operation definition. The information required typically includes a mapping of fields between the ECT and Outlook, identification of the primary key for the ECT, and the definition of filters to throttle the size of returned result sets. SharePoint Designer displays errors and warnings throughout the wizard to guide you in correctly defining the operations.
After the operations are defined, the ECT should be saved. Saving the ECT writes the definition to the metadata catalog, where it becomes available to the entire farm. After the ECT is saved, it will appear in the list of External Content Types in SharePoint Designer. From the list of External Content Types, you can also export the ECT definition as an XML file. This XML file can subsequently be imported through the Business Data Connectivity service interface in Central Administration.
Creating External Lists
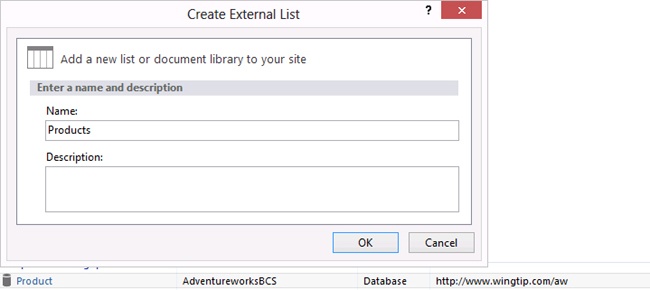
After the ECT is created, it can be used as the basis for an External List. External Lists can be created directly in SharePoint Designer or in the browser by using the Add An App button in SharePoint. For this walkthrough, a new External List was created directly from the summary page in SharePoint Designer. Figure 16-7 shows the dialog box for defining the list name and associating operations.
After the new External List is created, it can be viewed in the browser. Because all the CRUD operations were created, the resulting list supports editing, adding, and deleting items. Figure 16-8 shows the new list in SharePoint Server 2013. Note how the appearance of the External List closely resembles a standard SharePoint list. The ribbon is functional, as well as the edit-control block (ECB) associated with individual items. Any changes to items in the list will be reflected immediately in the External System.
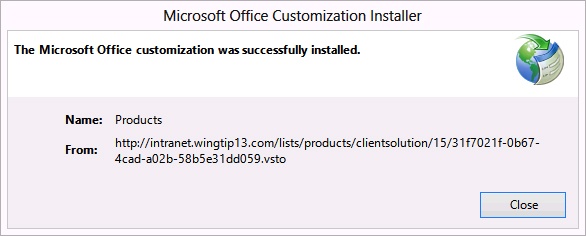
Just like regular lists, External Lists can be taken offline through Outlook. For this walkthrough, the ECT was defined as a generic list in Outlook. If the Offline Synchronization For External Lists site feature is activated, Outlook will display the data when the Connect To Outlook button on the List tab of the ribbon is clicked. When an External List is synchronized with Outlook, BCS delivers a Visual Studio Tools for Office (VSTO) package to the client for accessing the External System. Figure 16-9 shows the VSTO solution installation dialog box.
Understanding External List limitations
Though an External List appear similar visually to a standard SharePoint list and is supported by a SPList object, External Lists do have significant limitations that must be considered in any design. These limitations include lack of workflow support and several standard list features. The following lists some of the major limitations of External Lists:
Attachments. Attachments are not supported directly but must be implemented by using a StreamAccessor operation in a custom solution.
Checking in/checking out. Checking in and checking-out of items are not supported.
Content types. Using standard site content types in External Lists is not supported.
Drafts. Drafts of items are not supported.
ECB. Send-To operations are not supported.
Ribbon. Datasheet View is not supported.
SPLINQ. Querying through LINQ to SharePoint is not supported.
Templates. Document templates are not supported.
Versioning. Versioning of items is not supported.
Workflow. Starting workflows from items is not supported, but workflows can read or write to External Lists through the SPList object.
Validation. Validation formulas are not supported.
Despite these limitations, BCS solutions provide a powerful authentication and resource infrastructure that allows you to integrate External Data with SharePoint in a way that provides good performance and security. External Lists are not intended to be a substitute for an External System or a SharePoint list. Instead, you should think of External Lists as miniature versions of the External Systems that they represent. Through this perspective, you can tell that they are intended to bring commonly used data directly to information workers without requiring a separate logon to an External System. Also, don’t forget the additional capabilities that External Lists provide, such as offline access and search support.
The standard SPList object can be used in code running against the Microsoft.SharePoint namespace to access the items in External Lists, but there are a few special requirements. When code accesses the items in an External List, the unique identifier for an item is found in the BdcIdentity field, not the standard ID of the item. In addition, to access the list items, you must enumerate the SPListItem collection. Other than those restrictions, accessing the items in the list is straightforward. The following code shows how to access the items in the Products list created in the walkthrough:
SPWeb site = SPContext.Current.Web;
SPList externalList = site.Lists["Products"];

foreach (SPListItem item in externalList.Items) {
  foreach (SPField field in item.Fields) {
    if (field.Title != null) {
      string title = item[field.Title].ToString();
    }
  }
}
External Lists can also be accessed from the client side by using both the RESTful endpoint and CSOM. The REST pattern is similar to the approach taken with standard lists, by making an asynchronous call to the RESTful endpoint using the jQuery ajax function. The following code shows how to make such a call against the Products list created in the walkthrough:
$.ajax({
    url: _spPageContextInfo.webServerRelativeUrl +
        "/_api/lists/getByTitle('Products')/items?$select=ProductID,CategoryName",
    headers: {
        "accept": "application/json;odata=verbose",
        "X-RequestDigest": $("#__REQUESTDIGEST").val()
    },
    success: onSuccess,
    error: onError
});
Accessing an External List by using CSOM is also similar to the approach used for standard lists. A Collaborative Application Markup Language (CAML)query must be created and then executed asynchronously. The following code shows how to execute a CAML query against the External List from the walkthrough using CSOM:
var products;
var ctx = SP.ClientContext.get_current();
var query = "<View><ViewFields><FieldRef Name='ProductID'/>" +
            "<FieldRef Name='CategoryName'/></ViewFields></View>";
var camlQuery = new SP.CamlQuery();
camlQuery.set_viewXml(query);
var list = ctx.get_web().get_lists().getByTitle("Products");
ctx.load(list);
products = list.getItems(camlQuery);
ctx.load(products, 'Include(ProductID,CategoryName)'),
ctx.executeQueryAsync(onSuccess, onError);
Understanding BCS architecture
BCS architecture consists of components on both the server and client. These components support connectivity, ECT definition, operations, and data management. The design of BCS provides for a symmetry between client and server so that clients can have equivalent functionality when offline. Figure 16-10 shows a block diagram of the BCS architecture.
Understanding connectors
BCS communicates with External Systems by using connectors. Connectors contain the functionality necessary to communicate with databases, web services, and other systems. The walkthrough presented earlier used the SQL connector to access a Microsoft SQL Server database, but BCS also supports a WCF connector for accessing web services, and an OData connector for RESTful services. The SQL, WCF, and OData connectors provide a lot of the functionality you will need for basic BCS solutions, but in more advanced cases, you may need to create a connector. When you create your own connector, you can create a .NET Assembly Connector.
A .NET Assembly Connector is a project that you create in Visual Studio 2012 that contains the ECT definition and associated business logic for accessing a specific External System. The .NET Assembly Connector differs from the out-of-the-box connectors because it targets a specific system, as opposed to all instances of a specific system type.
Understanding Business Data Connectivity
The Business Data Connectivity (BDC) layer provides the plumbing and runtime components of BCS. In SharePoint 2013, both the server and the client have BDC components to support the symmetry of operations on the client and the server. You can use a similar approach to creating BCS solutions whether you are focused on the server, client, or both. On the server, the BDC components consist of the ECT catalog and the BDC Server Runtime. On the client, the BDC components consist of a metadata cache and the BDC Client Runtime. The metadata cache can be thought of as the client-side metadata catalog, whereas the run-time components have symmetrical functionality to support operations against the External Systems.
Managing the BDC service
When you create ECTs in SharePoint Designer and save them, they are stored in the metadata catalog, which is a database accessed through the BDC service application. The BDC service application wraps the BDC and makes it available as a farm service so that ECTs can be used throughout the farm. Figure 16-11 shows the basic architecture of the BDC service application.
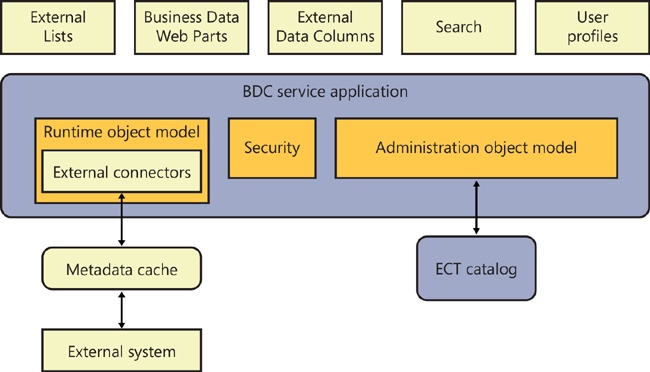
The BDC service application wraps the BDC plumbing and makes BDC functionality available as a service. When External Systems are accessed through connectors, the returned data is made available by the BDC service application to support External Lists, searching, Web Parts, and so on. The metadata cache is maintained in the BDC service so that ECT data is accessed easily without having to be read from the database. This metadata cache is updated every minute by a timer job so that the latest changes are available. Note that External Data itself is never cached by the server—only the ECT metadata.
Along with caching metadata to improve performance, BCS implements limits on the number of connections that can be made to an External System. In addition, the BDC service application also implements five different throttle settings to limit the connections made and data returned from External Systems. Table 16-2 lists the throttle settings for the BDC service application.
Type | Description | Scope | Default | Maximum |
Connections | Total number of connections allowed to External Systems | Global | 100 | 500 |
Items | Number of rows returned from a database query | Database | 2000 | 25,000 |
Timeout | Database connection timeout | Database | 60 seconds | 600 seconds |
Size | Size of returned data | WCF | 3 MB | 150 MB |
Timeout | Web service connection timeout | WCF | 60 seconds | 600 seconds |
You can view and change throttle values by using Windows PowerShell commands. Before you can change them, however, you must get a reference to the BDC service application. The following Windows PowerShell code shows how to return a reference to the BDC service application named Business Data Connectivity:
$bdc = Get-SPServiceApplicationProxy | Where {$_ -match "Business Data Connectivity"}After you have a reference to the BDC service application, you can use the Get-SPBusinessDataCatalogThrottleConfig cmdlet and the Set-SPBusinessDataCatalogThrottleConfig cmdlet to view and change throttle settings. Each of these cmdlets requires you to specify the throttle that you are viewing or changing. The following code shows how to view the current throttle settings by using Windows PowerShell:
Get-SPBusinessDataCatalogThrottleConfig -ThrottleType Connections -Scope Global '
                                        -ServiceApplicationProxy $bdc
Get-SPBusinessDataCatalogThrottleConfig -ThrottleType Items -Scope Database '
                                        -ServiceApplicationProxy $bdc
Get-SPBusinessDataCatalogThrottleConfig -ThrottleType Timeout -Scope Database '
                                        -ServiceApplicationProxy $bdc
Get-SPBusinessDataCatalogThrottleConfig -ThrottleType Size -Scope Wcf '
                                        -ServiceApplicationProxy $bdc
Get-SPBusinessDataCatalogThrottleConfig -ThrottleType Timeout -Scope Wcf '
                                        -ServiceApplicationProxy $bdc
When changing throttle settings, you must specify the new value in the Set-SPBusinessDataCatalogThrottleConfig cmdlet. New throttle settings take effect immediately. As an example, the following code shows how to change the number of items that can be returned from a database:
$bdc = Get-SPServiceApplicationProxy | Where {$_ -match "Business Data Connectivity"}
$throttle = Get-SPBusinessDataCatalogThrottleConfig -ThrottleType Items -Scope Database
                                                    -ServiceApplicationProxy $bdc
Set-SPBusinessDataCatalogThrottleConfig -Maximum 3000 -Default 1000 -Identity $throttle
Along with viewing or editing throttle values, you can disable them. However, disabling or changing throttles is not something that should be done lightly. Disabling throttles can result in poor BCS performance and can affect the performance of the SharePoint farm as a whole. The following code shows how to disable the connection limit throttle:
$bdc = Get-SPServiceApplicationProxy | Where {$_ -match "Business Data Connectivity"}
$throttle = Get-SPBusinessDataCatalogThrottleConfig -ThrottleType Connections
            -Scope Global -ServiceApplicationProxy $bdc
Set-SPBusinessDataCatalogThrottleConfig -Enforced:$false -Identity $throttle
The BDC service application is part of the service application framework in SharePoint. As such, it functions like any of the other shared services in SharePoint. You can access the management interface for the BDC service application through the Central Administration home page by selecting Application Management, Manage Service Applications. Figure 16-12 shows the BDC service application in Central Administration.
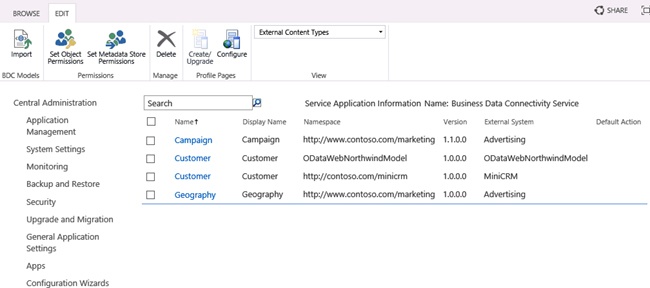
From the Service Applications page, you can click the Properties button on the ribbon and view the basic service properties for the BDC service application. In the Properties dialog box, you will find the name of the database used for the ECT repository. As with all services, you can also set administrative and connection permissions for the service so that it can be used by other servers in the SharePoint farm.
Clicking the Manage button on the Service Applications page allows you to manage the ECTs in the repository. Here you will find the ECTs that you have defined along with information about the associated models and External Systems. Models can be imported and exported from this page, so you can export models from SharePoint Designer in a development environment and import them into the BDC service application in QA or production environments.
Managing the BDC service application also allows you to set permissions for the various objects in your model. Users must have permissions to access the ECT and its operations before they will see data in SharePoint. This permission is separate from the actual permissions required to access an External System. There are four different rights available for an ECT: Edit, Execute, Selectable in Clients, and Set Permissions. The Edit right grants the ability to edit models, data sources, and External Content Types. The Execute right grants the ability to perform CRUD operations by using the ECT. The Selectable in In Clients right grants the ability to create new External Lists, use the External Data Web Parts, and pick External Content Types from the various pickers that appear in SharePoint. The Set Permissions right grants the ability to set permissions in the BDC service.
Understanding the BDC Server Runtime
The BDC Server Runtime consists of the run-time object model, the administration object model, and the security infrastructure. The run-time object model provides access to ECTs and their associated operations, whereas the administration object model provides objects for managing the ECTs and their associated models. The security infrastructure facilitates authentication and authorization for ECT operations and External System access.
Understanding the client cache
BCS uses a client cache to store information from the ECT repository and data from the External System so that Office client applications can access External Systems directly or take data offline. The client cache is a SQL Server Compact Edition database that is installed as part of the Office 2013 installation. A synchronization process called BCSSync.exe runs on the client to synchronize the cache with model information in the BDC layer. When operations are performed on data within the Office clients, the operations are queued inside the client cache and synchronized with the External System when it is available. The synchronization process also attempts to update data in the cache at various intervals from the External System depending on the user settings and availability of the External System. Conflicts between the cache and the External System are flagged for the user so that they can be resolved. When clients access External Systems, they always use the information in the cache to access the External System. There is never any case in which the client application accesses the External System through the server-side components.
Understanding the BDC Client Runtime
The BDC Client Runtime, which is also called the Office Integration Runtime (OIR), is the client-side component that complements the BDC Server Runtime. Like the server-side component, the BDC Client Runtime is responsible for the plumbing and functionality necessary to execute operations against an External System and bind the data to clients such as Outlook. The BDC Client Runtime is installed on the client as part of the Office 2013 installation process just like the cache. This means that all Office 2013 client installations will support BCS functionality.
Introduction to the Secure Store Service
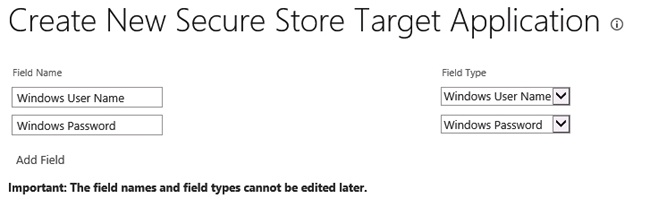
The Secure Store Service (SSS) is a service application that provides for the storage, mapping, and retrieval of credential information. It is used in authentication scenarios in which the user account is either not available or not supported by the External System. To store credential sets for an External System, a new Target Application must be created in SSS. The Target Application acts as a container for credential sets mapped to an External System. The Target Application settings page contains a name for the application and a setting to specify whether each individual user will have a separate set of mapped credentials or whether every user will map to a single common set of credentials. Figure 16-13 shows application settings mapping a single set of credentials to an Active Directory Domain Services (AD DS) group.

After the Target Application is defined, credential fields are defined to specify what credentials are required to access the External System. In most cases, the Target Application will save a Windows user name and password, but you could also map credentials for non-Windows authentication schemes such as SQL accounts. SSS also supports additional attributes such as personal identification numbers (PINs) for credentials. Figure 16-14 shows the field definition form for a Target Application.
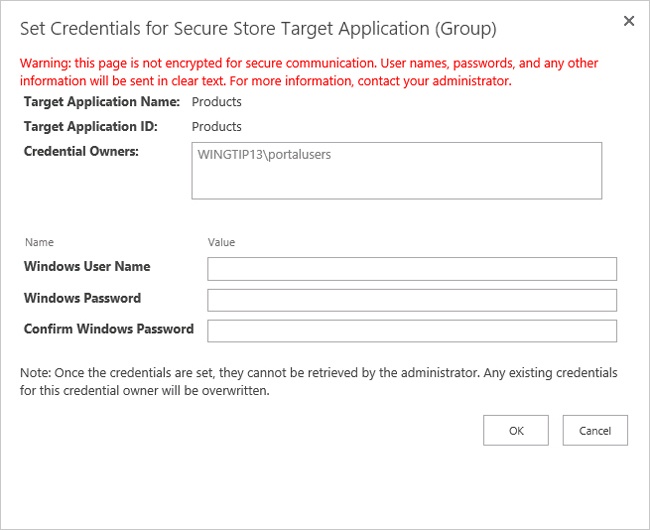
After the application and credential fields are defined, you must enter the actual credential information for a specific user. For each user or group that will access the External System, a set of credentials is stored in SSS. If a user attempts to access the system without proper credentials in SSS, then that person will be directed to a logon page so that the credentials can be entered and stored just-in-time. After the credentials are mapped, you can specify the name of the Target Application in SharePoint Designer during ECT creation. When the Target Application is specified in this way, BCS will use the SSS credentials to access the External System. Figure 16-15 shows a dialog box for setting the credentials used in a group mapping. In this case, all users are utilizing a single account.
The credentials stored in SSS are accessible through a set of objects designed to support your custom solutions. By using these objects, you can create solutions, such as Web Parts, that use SSS credentials to gain access to External Systems. The Microsoft.Office.SecureStoreService assembly contains the main classes necessary to work with SSS. In addition, the Microsoft.BusinessData assembly contains supporting classes for working with BCS.
The general approach to retrieving SSS credentials in code involves getting a reference to the SSS service application through the ISecureStoreProvider class. The GetCredentials method can then be called with the name of the Target Application to return the credentials. Example 16-1 shows how a Web Part can use this approach to build a connection string for an External System.
protected override void OnPreRender(EventArgs e) {
  string username = string.Empty;
  string password = string.Empty;

  try {
    ISecureStoreProvider p = SecureStoreProviderFactory.Create();
    using (SecureStoreCredentialCollection creds =
               p.GetCredentials(ApplicationId)) {

      // enumerate through all credentials
      foreach (SecureStoreCredential c in creds) {
        switch (c.CredentialType) {
          case SecureStoreCredentialType.UserName:
            username = ConvertToString(c.Credential);
            break;

            case SecureStoreCredentialType.Password:
              password = ConvertToString(c.Credential);
              break;

            case SecureStoreCredentialType.WindowsUserName:
              username = ConvertToString(c.Credential);
              break;

            case SecureStoreCredentialType.WindowsPassword:
              password = ConvertToString(c.Credential);
              break;
        }
      }
    }

    SqlConnectionStringBuilder cBuilder = new SqlConnectionStringBuilder();
    cBuilder.DataSource = ServerName;
    cBuilder.InitialCatalog = DatabaseName;
    cBuilder.UserID = username;
    cBuilder.Password = password;

    messages.Text = cBuilder.ConnectionString;

  }
  catch (Exception x) {
    messages.Text = x.Message;
  }
}

private String ConvertToString(SecureString s) {
  IntPtr b = Marshal.SecureStringToBSTR(s);
  try { return Marshal.PtrToStringBSTR(b); }
  finally { Marshal.FreeBSTR(b); }
}
Understanding package deployment
When a user elects to synchronize an External List with Outlook, BCS creates a VSTO Click-Once deployment package that contains all the elements necessary to work with the list on the client. The package is created by BCS just-in-time and stored under the list in a folder named ClientSolution. After the package is created, the deployment is started automatically.
The package contains the BCS model defining the External System, ECTs, operations, and security information that is necessary to access and modify data. The package also contains subscription information, which tells the client cache what data to manage and how it should be refreshed. Finally, the package contains pre-deployment and post-deployment steps that should be taken, such as creating custom forms in the client application to display the data.
After it is deployed, the add-in can use Office Business Parts on the client to help render data. Office Business Parts are Windows form controls that display a single item or list of items in a task pane to simplify the rendering process so that custom task panes do not have to be created for the client.
Understanding authentication scenarios
When connecting to back-end systems, BCS must deal with several different authentication scenarios. In the simplest case, BCS might be passing Windows credentials from the user through to the External System. However, most real-world applications have more complex requirements, such as proprietary authentication mechanisms, tokens, or claims. For BCS solutions to be secure, they must deal with these situations adequately.
Configuring authentication models
BCS supports two authentication models: Trusted Subsystem and Impersonation and Delegation. In the Trusted Subsystem model, BCS uses a single account to access the External System regardless of the user identity. Under Impersonation and Delegation, BCS attempts to impersonate the user and access the External System. The AuthenticationMode element in the BDC Metadata Model determines how authentication is performed and has several different options.
Understanding Passthrough authentication
Passthrough authentication is used in the Impersonation and Delegation authentication model. Setting the value of the AuthenticationMode element to Passthrough causes BCS to use the credentials of the current user to access the External System. You can set up Passthrough authentication by selecting the Connect With User’s Identity option when creating a connection to an External System in SharePoint Designer. The following code shows a portion of a BDC Metadata Model connecting to the AdventureWorks database by using Passthrough authentication:
<LobSystemInstances>
  <LobSystemInstance Name="Adventureworks Data Warehouse">
    <Properties>
      <Property Name="AuthenticationMode" Type="System.String">
        PassThrough
      </Property>
      <Property Name="DatabaseAccessProvider" Type="System.String">
        SqlServer
      </Property>
      <Property Name="RdbConnection Data Source" Type="System.String">
        AWSQL
      </Property>
      <Property Name="RdbConnection Initial Catalog"
                Type="System.String">AdventureworksDW</Property>
      <Property Name="RdbConnection Integrated Security" Type="System.String">
        SSPI
      </Property>
      <Property Name="RdbConnection Pooling" Type="System.String">true</Property>
    </Properties>
  </LobSystemInstance>
</LobSystemInstances>
Though Passthrough authentication is easy to implement, it is unlikely to be useful in many situations because of a particular limitation in Windows authentication known as the double-hop issue. Windows authentication takes two forms: NTLM and the Kerberos protocol. NTLM is the classic challenge-response protocol used to authenticate users. The Kerberos protocol is an advanced ticket-based protocol that is much more secure. NTLM authentication is often compared to a carnival where you must pay for each ride separately. The Kerberos protocol, on the other hand, is often compared to a theme park where you pay for one ticket and then have access to all the rides. Though Kerberos authentication is considered to be a best practice for BCS, many organizations still run under NTLM authentication.
The double-hop issue describes a scenario under NTLM authentication where the web server attempts to impersonate a user through a series of “hops” involving multiple servers. When a user makes a request to view an External List, SharePoint will attempt to impersonate the user. This impersonation is done at the ASP.NET level, independent of BCS. However, when BCS subsequently attempts to access the data source, it will be prevented from continuing to impersonate the user, and the account identity will change to that of the system account. At this point, the original user identity islost and access to the data source will be denied.
The double-hop issue is not a bug; it was a built-in feature of NTLM. The limitation is designed to prevent viruses from accessing network resources if credentials are compromised. The Kerberos protocol does not suffer from this limitation because its ticketing-based protocol is more secure than challenge-response. So changing the network authentication mechanism from NTLM to the Kerberos protocol will solve this problem. Otherwise, you must use a different BCS authentication mechanism to access External Systems.
Understanding RevertToSelf
RevertToSelf is used in the Trusted Subsystem model of authentication. Setting the value of the AuthenticationMode element to RevertToSelf causes BCS to use the credentials of the application pool to access the External System. The following code shows a BDC Metadata Model using RevertToSelf authentication:
<LobSystemInstances>
  <LobSystemInstance Name="Adventureworks Data Warehouse">
    <Properties>
      <Property Name="AuthenticationMode" Type="System.String">
        RevertToSelf
      </Property>
      <Property Name="DatabaseAccessProvider" Type="System.String">
        SqlServer
      </Property>
      <Property Name="RdbConnection Data Source" Type="System.String">
        AWSQL
      </Property>
      <Property Name="RdbConnection Initial Catalog"
                Type="System.String">AdventureworksDW</Property>
      <Property Name="RdbConnection Integrated Security" Type="System.String">
        SSPI
      </Property>
      <Property Name="RdbConnection Pooling" Type="System.String">true</Property>
      <Property Name="ShowInSearchUI" Type="System.String"></Property>
    </Properties>
  </LobSystemInstance>
</LobSystemInstances>
Configuring RevertToSelf is accomplished by editing the connection information for the External System after it is defined. In SharePoint Designer, in the Summary View for the ECT, the connection information can be edited by clicking the hyperlink for the External System. Figure 16-16 shows the Connection Properties dialog box. RevertToSelf is specified by selecting the BDC Identity option for Authentication Mode.
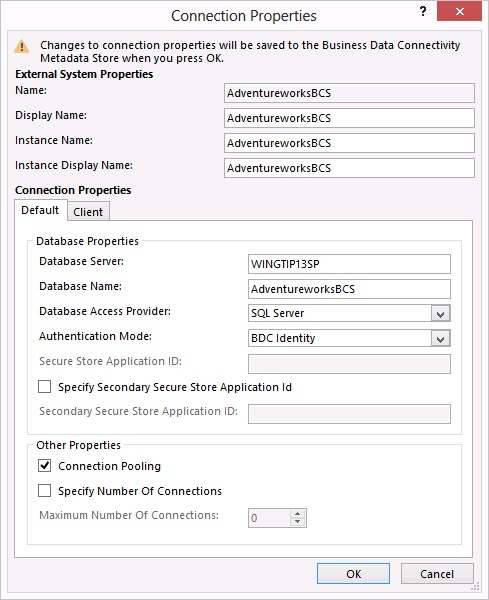
Using RevertToSelf authentication eliminates the double-hop issue because BCS is no longer attempting to impersonate the user all the way to the External System. The drawback to this approach, however, is that all access is accomplished using the same account. As a result, no auditing of individual activities against the External System is possible.
In addition to the limitations imposed by RevertToSelf authentication, it is important to understand that the application pool identity is a powerful one whose credentials must be protected. Along with being the account under which the web application runs, the application pool identity is used to access the SharePoint content databases. Furthermore, the application pool identity is the account under which code runs when the SPSecurity.RunWithElevatedPrivileges method is called in SharePoint, which essentially allows code to perform any action in a SharePoint farm. For this reason, RevertToSelf is disabled by default and must be enabled explicitly by using the following Windows PowerShell script:
$bdc = Get-SPServiceApplication
 | where {$_ -match "Business Data Connectivity Service"}
$bdc.RevertToSelfAllowed = $true
$bdc.Update;
Understanding secure store options
SSS is a flexible credential management service that supports both the Trusted Subsystem and Impersonation and Delegation authentication models. If you map all user credentials to a single group account in SSS, then you can support the Trusted Subsystem authentication model. If you map user credentials to a unique set of credentials per user, then SSS is supporting the Impersonation and Delegation authentication model. SSS is a far superior choice to either Passthrough or RevertToSelf because you can configure access to External Systems such that auditing is still possible while still overcoming double-hop issues. SSS is capable of managing three different types of credentials: Windows, SQL, and user name/password. These three credential types, WindowsCredentials, RdbCredentials, and Credentials, correspond to three different settings for the AuthenticationMode element.
Setting the AuthenticationMode element to WindowsCredentials is used with External Systems that support Windows authentication. Setting the AuthenticationMode to RdbCredentials is used with External Systems that support SQL authentication, such as SQL Server. Setting the AuthenticationMode to Credentials is used with External Systems that support simple user name/password authentication. The WindowsCredentials and RdbCredentials are used by selecting the Impersonate Windows Identity or Impersonate Custom Identity option, respectively, in the Connection Properties dialog box. The Credentials setting is used exclusively with web services that do not support Windows authentication.
In addition to the primary SSS application, BCS also supports a secondary SSS application that can be used for application-level authentication. This functionality exists to support special situations in which the External System requires credentials to be passed to the system as part of each operation. The credentials held in the secondary application can be configured as a filter to restrict the results returned from the External Systems. Filters are discussed in the section “Defining filters” later in this chapter.
Accessing claims-based systems
Because SharePoint 2013 supports claims authentication, BCS can also use claims to authenticate against External Systems. To implement claims authentication, the External System must support claims and trust the claims provider used with SharePoint. Currently, there are few systems that support claims authentication.
To implement claims authentication, the AuthenticationMode should be set to Passthrough. None of the other configurations really makes sense because claims authentication is based on delegating the user’s identity. For the most part, claims-based authentication happens automatically, provided that the External System accepts the token offered by BCS.
Accessing token-based systems
Today, many web-based applications use a token-based authentication system such as OAuth to secure Open Data Protocol (OData) services. BCS can support authentication against these token-based systems by using the OData Extension Provider. The OData Extension Provider allows you to attach tokens to outgoing BCS calls. In order to use the OData Extension Provider, you must create a class that implements the ODataExtensionProvider abstract class. This class provides a BeforeSendRequest method and an AfterReceiveResponse method. You can write custom code in these methods to query the token provider and attach the token before passing the data request to the External System.
After the assembly is created, it must be stored in the global assembly cache and registered as a new connection setting in BCS associated with the service endpoint. The assembly is registered with the New-SPODataConnectionSetting Windows PowerShell command. The following code shows an example:
New-SPODataConnectionSetting
    -Name "WingtipServiceApp"
    -ServiceContext "http://intranet.wingtip.com"
    -ServiceAddressURL "https://data.cloudapp.net/data.svc"
    -AuthenticationMode "Anonymous"
    –ExtensionProvider "WingtipExtensionProvider.Extension, WingtipExtensionProvider,
                        Version=1.0.0.0, Culture=neutral, PublicKeyToken=41bc4812ca364d35"
The final step is to modify the BDC Metadata Model to reference the new connection setting. This is done by adding the ODataConnectionSettingsId property under the LobSystemInstance node, as shown in the following code:
<Property Name="ODataConnectionSettingsId" Type="System.String">WingtipServiceApp</Property>
Managing client authentication
BCS clients are designed to have symmetry with the server-side functionality so that they can operate offline. The Application Model created in SharePoint Designer is synchronized with clients when External Lists are accessed through Office clients and later using subscription information. Some authentication settings, however, will not work correctly from the client because they don’t make sense. For example, when you set the client AuthenticationMode to RevertToSelf, BCS is supposed to use the application pool account when accessing the External System. However, clients have no mechanism to use this account because they always access the External Systems directly. Additional problems can occur when a Trusted Subsystem authentication model maps to group credentials in SSS. In this case, BCS will prompt the user to enter credentials for the group, but the user is unlikely to know these credentials.
The Passthrough mode makes the most sense for clients. When you set the client AuthenticationMode to Passthrough, the client will always try to connect to the External System using the Windows credentials of the current user. This means that the External System must support Windows authentication and the current user must have rights to perform the requested operations.
Client credentials are stored not in SSS, but in the Credential Manager. The Credential Manager is a password store system that supports single sign-on (SSO) to a variety of systems, including websites and remote computers. Credential Manager is part of the client operating system, so you can open it within Windows and view and manage your credentials. If authentication fails from the client, BCS automatically deletes the credentials from the Credential Manager store and prompts you to enter them again.
Creating External Content Types
Defining External Content Types is the primary activity necessary to implement BCS solutions. The definition of an ECT includes all the information schema, data operations, relationships, filters, actions, and security descriptors necessary to bring External System data into SharePoint. All this information is defined inside a BDC Metadata Model, which is an XML file stored in the ECT repository. Although SharePoint Designer does a good job of giving you visual tools to create the model, there are times when you will want to modify the XML directly. Therefore, you should understand the basic structure of the XML model. Example 16-2 shows part of the basic XML structure with an emphasis on the ECT definition represented by the Entity element.
<?xml version="1.0" encoding="utf-16" standalone="yes"?>
<Model>
  <LobSystems>
    <LobSystem Type="Database" Name="Wingtip Products">
      <LobSystemInstances>
        <LobSystemInstance Name="Wingtipdb">
        </LobSystemInstance>
      </LobSystemInstances>
      <Entities>
        <Entity Namespace="http://www.wingtip.com"
                Version="1.1.0.0"
                EstimatedInstanceCount="10000"
                Name="Product"
                DefaultDisplayName="Product">
        </Entity>
      </Entities>
    </LobSystem>
  </LobSystems>
</Model>
Creating operations
BCS supports a wide variety of operations designed to facilitate accessing systems and performing CRUD functions. Generally, you will be concerned with basic reading and writing to External Systems using the Finder (Read List), SpecificFinder (Read Item), Creator (Create), Updater (Update), and Deleter (Delete) methods. These methods are also supported in SharePoint Designer through menus in the Operations Design view. Methods that are not supported by SharePoint Designer offer additional functionality and control, but they must be created by manually editing the BDC Metadata Model or creating a .NET Assembly Connector. Manually editing the XML model requires that you export the model, edit it, and import the new model. Table 16-3 lists all the supported BCS operations.
Description | |
Finder | Returns multiple records from an External System based on a wildcard |
SpecificFinder | Returns a single record from an External System based on a primary key |
IdEnumerator | Returns all primary keys from an External System to support search indexing |
Scalar | Returns a scalar value from an External System |
AccessChecker | Checks to determine what rights are allowed for a user |
Creator | Creates a new record in an External System |
Updater | Updates an existing record in an External System |
Deleter | Deletes a record in an External System |
ChangedIdEnumerator | Returns primary keys for records that have changed, to support incremental search indexing |
DeletedIdEnumerator | Returns primary keys for records that have been deleted, to support incremental search indexing |
AssociationNavigator | Navigates from one entity to a related entity |
Associator | Associates an entity with another entity |
Disassociator | Disassociates one entity from another |
GenericInvoker | Used to perform operations not supported by any of the defined operations |
StreamAccessor | Supports accessing binary large object (BLOB) data from an External System |
BinarySecurityDescriptorAccessor | Returns a security descriptor |
BulkSpecificFinder | Returns a set of records from the External System in a batch based on a set of primary keys |
BulkAssociatedIdEnumerator | Returns a set of primary keys representing records associated with an entity |
BulkAssociationNavigator | Supports navigation from one entity to many related entities |
BulkIdEnumerator | Returns all primary keys in a batch from an External System to support search indexing |
Subscribe | Allows a user or event receiver to request notification when external data changes |
Unsubscribe | Allows a user or event receiver to delete a request for notification |
Finder methods are used to return a result set from the External System and are one of two required operations for External Lists. You can create a Finder method in SharePoint Designer by selecting the option to create a New Read List operation from the shortcut menu. Example 16-3 shows the definition of a Finder method.
<Method Name="Read List" DefaultDisplayName="Product Read List">
  <Properties>
    <Property Type="System.Data.CommandType, [assembly name for System.Data]"
              Name="RdbCommandType">Text</Property>
    <Property Name="RdbCommandText" Type="System.String">
      SELECT TOP(@ProductID) [ProductID] , [ProductName]
      FROM [dbo].[Products] ORDER BY [ProductID]
    </Property>
    <Property Name="BackEndObjectType"
              Type="System.String">SqlServerTable</Property>
    <Property Name="BackEndObject" Type="System.String">Products</Property>
    <Property Name="Schema" Type="System.String">dbo</Property>
  </Properties>
  <Parameters>
    <Parameter Direction="In" Name="@ProductID">
      <TypeDescriptor TypeName="System.Int64" AssociatedFilter="Filter"
                      Name="ProductID">
        <DefaultValues>
          <DefaultValue MethodInstanceName="Read List"
                        Type="System.Int64">100</DefaultValue>
        </DefaultValues>
      </TypeDescriptor>
    </Parameter>
    <Parameter Direction="Return" Name="Read List">
      <TypeDescriptor
         TypeName="System.Data.IDataReader, [assembly name for System.Data]"
         IsCollection="true" Name="Read List">
       <TypeDescriptors>
          <TypeDescriptor
           TypeName="System.Data.IDataRecord, [assembly name for System.Data]"
            Name="Read ListElement">
            <TypeDescriptors>
              <TypeDescriptor TypeName="System.Int32" ReadOnly="true"
                              IdentifierName="ProductID" Name="ProductID" />
              <TypeDescriptor TypeName="System.String" Name="ProductName">
                <Properties>
                  <Property Name="Size" Type="System.Int32">50</Property>
                  <Property Name="RequiredInForms"
                            Type="System.Boolean">true</Property>
                  <Property Name="ShowInPicker"
                            Type="System.Boolean">true</Property>
                </Properties>
                 ...
    </Parameter>
  </Parameters>
  <MethodInstances>
    <MethodInstance Type="Finder" ReturnParameterName="Read List" Default="true"
                    Name="Read List" DefaultDisplayName="Product Read List">
      <Properties>
        <Property Name="UseClientCachingForSearch" Type="System.String"></Property>
        <Property Name="RootFinder" Type="System.String"></Property>
        <Property Name="LastModifiedTimeStampField"
                  Type="System.String">LastUpdate</Property>
      </Properties>
    </MethodInstance>
  </MethodInstances>
</Method>
In the definition for the Finder method, SharePoint Designer automatically generates a SQL query to retrieve items for display in the list if the External System is a database. This is done when the methods are created in the wizard. If you want, you can use stored procedures or views instead of dynamic SQL. Also, note how the return parameters are defined so that BCS understands the data returned from the External System. In particular, note the use of the TypeDescriptor element. TypeDescriptor is used to map data types in the External System to .NET data types in BCS.
You can create multiple Finder methods, but one will always be designated as the default. The default Finder method forms the basis of the default view of an External List and provides support for indexing the External System so it can be searched. SharePoint Designer automatically adds a RootFinder property to the default Finder method. This property is used when the External System is being indexed, to specify the records in the External System that should be indexed. In addition, the method can designate a timestamp field to support incremental crawls. Designating a field as a timestamp is done in the Return Parameters section of the Operation Wizard; the field appears in the BDC Metadata Model as the value for the LastModifiedTimeStamp property.
SpecificFinder methods are used to return a single item from the External System and are also required to support External Lists. Creator, Updater, and Deleter methods are optional for External Lists. All the methods have similar XML structures in the BDC Metadata Model. You can examine these structures easily by creating models and exporting them from SharePoint Designer.
Creating relationships
BCS supports the definition of relationships between entities, which allows you to display relationships and navigate between entities within SharePoint. Within the SharePoint Designer, one-to-many, self-referential, and reverse associations are supported by the tooling. The most common type of association in BCS solutions is the one-to-many association, whereby a parent entity instance is related to many child entity instances. Self-referential associations are just like one-to-many relationships, except that a self-referential relationship uses the same ECT as both the parent and the child. Reverse associations return a single parent entity instance for a child entity instance. Reverse associations are not supported for tables and views, but they are supported for stored procedures and web services because the reverse association is not inherent in the database schema. It must be programmed explicitly through a stored procedure or web service.
To create a relationship, you select New Association from the shortcut menu in the Operations Design view. This will start a wizard to help you define the new association. The wizard will ask you to select another ECT with which to make the association. If the ECTs are based on related tables in a database, then SharePoint Designer will infer the relationship using the foreign key. If not, then you will have to specify the relationship manually by associating fields from the parent to the child ECT. Example 16-4 shows a relationship between a Product entity and a Category.
<Method IsStatic="false" Name="CategoryAssociation">
  <Properties>
    ...
  </Properties>
  <Parameters>
    <Parameter Direction="In" Name="@CategoryId">
      <TypeDescriptor ... />
    </Parameter>
    <Parameter Direction="Return" Name="CategoryAssociation">
      <TypeDescriptor ...>
        <TypeDescriptors>
          ...
        </TypeDescriptors>
      </TypeDescriptor>
    </Parameter>
  </Parameters>
  <MethodInstances>
    <Association Name="CategoryAssociation" Type="AssociationNavigator"
     ReturnParameterName="CategoryAssociation"
     DefaultDisplayName="Category Association">
      <Properties>
        <Property Name="ForeignFieldMappings" Type="System.String">
        ... ForeignFieldMapping ForeignIdentifierName="CategoryId" ...
        </Property>
      </Properties>
      <SourceEntity Namespace="http://www.wingtip.com" Name="Category" />
     <DestinationEntity Namespace="http://www.wingtip.com" Name="Product" />
    </Association>
  </MethodInstances>
</Method>
Defining filters
When creating Finder and SpecificFinder methods, you often might want to limit the information that is returned from the External System. You might want to limit the returned data simply to prevent a large amount of data from being requested, or to support conditional queries, paging, or wildcards. The Application Model supports all these types of filters. Filters can also be thought of as input parameters to an ECT operation. Generally, their values are set by the calling client before the operation is invoked. The wizards in SharePoint Designer will help you define the most common filters when you are creating ECTs. Table 16-4 lists all the filters supported in BCS.
Description | |
ActivityId | A GUID representing the correlation ID of the current operation. |
Batching | Information about the current batch operation for filtering. |
BatchingTermination | Information about the current terminating batch operation for filtering. |
Comparison | Filters the records returned based on a value compared to a specific field. |
Input | Can be used by the operation as an input value when the operation is called. |
InputOutput | Can be used by the operation as both an input and output value when the operation is called. |
LastId | Identifies the ID of the last item in an operation. |
Limit | Limits the total number of records returned to a fixed amount. Not compatible with the PageNumber filter. |
Output | Can be used by the operation as an output value when the operation is called. |
PageNumber | Limits the records returned using paging. Not compatible with the Limit filter. |
Password | The password for the current operation. |
SsoTicket | The ticket for use when authenticating. |
Timestamp | Filters the records returned based on a specified DateTime field. |
UserContext | Context information about the current user. |
UserCulture | The current user culture. |
Username | The current user name. |
UserProfile | Profile information about the current user for filtering returned results. |
Wildcard | Filters the records returned based on Starts With or Contains values. |
Whenever you are creating Finder and SpecificFinder methods, you should define a Limit filter for the operation. This filter ensures that large result sets are not returned to an External List, which is critical for maintaining BCS performance. Though BCS does implement throttling at the system level, the ECT should implement its own tighter limits to ensure that query performance is maintained.
Defining filters in SharePoint Designer is done in the Operation Wizard on the Filter Parameters Configuration page. On this page, you can click Add Filter Parameter to add a new filter. After adding a new filter, you must then click the Filter hyperlink to open the Filter Configuration dialog box. Figure 16-17 shows the Filter Configuration dialog within the Operation Wizard.

Using ECTs in SharePoint 2013
After you have created ECTs, they can be used in a variety of ways. External lists are the simplest way to use them. Beyond creating a list, you can also enhance the list with custom forms, actions, and profiles. SharePoint can also use ECTs to display data in Web Parts, to support enhancements to other lists, and as a source for custom solutions.
Creating custom forms
Although External Lists have several limitations, they also have many of the same capabilities as a standard list. When they are created from SharePoint Designer, for example, you can also select to create a Microsoft InfoPath form for editing items by clicking the Create Lists And Form button. Creating an InfoPath form allows you to customize the appearance of the form, as well as add validation logic.
After you have created the InfoPath form, you can edit it by clicking the Design Forms In InfoPath button, which is available on the List Settings tab. Clicking this button will open the form in InfoPath, where you have complete control over the appearance and functionality of the form. Figure 16-18 shows a simple item edit form that has been modified in InfoPath.
In addition to creating InfoPath forms, you can also create new ASPX forms for External Lists. The default forms created for the External Lists use the List Form Web Part (LFWP). The LFWP executes CAML queries against the External List to display items. Unfortunately, the LFWP does not support modifying its presentation; therefore, a new form must be created instead.
Clicking the New button above the form list in SharePoint Designer opens the Create New List Form dialog box. This dialog box is used to create, edit, and display forms that are based on the Data Form Web Part (DFWP). The DFWP uses Extensible Stylesheet Language for Transformations (XSLT) to transform list data into a display. By modifying this XSLT you can easily change the presentation of list data.
Using External Data Columns
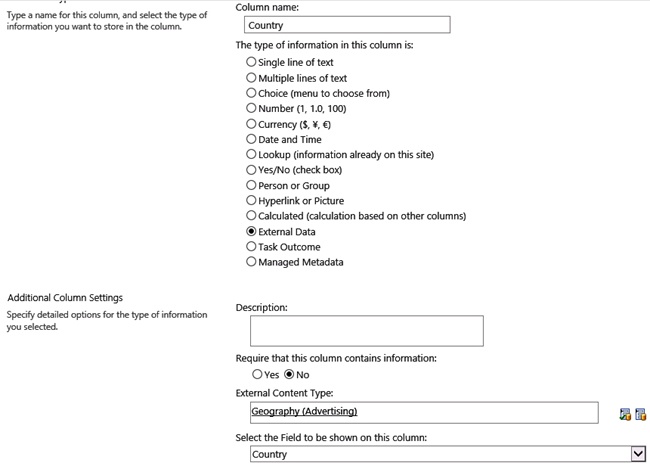
Along with using an ECT as the basis for a list, you can use an ECT as the source for a column in another list. This capability is known as an External Data Column. When you create an External Data Column for a list, you select the ECT to use as the basis for the column. You can then select one or more of the fields available in the ECT to display alongside the column you are creating. These additional fields are known as projected fields because they project data from the ECT into the parent list. Figure 16-19 shows an external column definition.
Using External Data Web Parts
Another way you can use ECTs is through a set of Web Parts that ship with SharePoint Server 2013 known as External Data Web Parts (also called Business Data Web Parts). External Data Web Parts are designed specifically to display ECT data and relationships. The available parts include the Business Data List, Business Data Related List, and Business Data Item. These Web Parts display a list based on an ECT, a list based on an ECT association, or a single item, respectively.
The Business Data List part allows you to select an ECT, and then it displays a list of data based on a Finder method that you specify. In many ways, this Web Part is like an External List. You can, for example, modify the view by selecting which columns to display. If you have filters defined for the Finder method, the Web Part will display simple filtering controls that support operations such as keyword filtering. Finally, you can change the appearance of the list by altering the XSLT contained within the Web Part. This XSLT is used to transform the data returned for display in the Web Part.
The Business Data Related List is meant to be used in conjunction with the Business Data List to show data based on an association between two ECTs. After selecting an ECT for both the Business Data and Business Data Related lists, you can use the Web Part menu to connect the two lists. When they are connected, the Business Data List Web Part acts as a filter against the Business Data Related List Web Part. This gives users a simple way to filter the list view by clicking items in the related list.
The Business Data Item Web Part is used to display a single record based on an ECT. This Web Part is configured by first selecting the ECT and then selecting the particular record to display. This Web Part is especially useful when combined with the Business Data Item Builder Web Part, which builds a business item from query string parameters in the page URL. This combination of the Business Data Item Builder Web Part and Business Data Item Web Part is used by BCS to create a profile page for an ECT. Profile pages are discussed in the next section.
Creating a profile page
When SharePoint surfaces ECT data in lists and Web Parts, it does not necessarily show all the available fields and associations. For example, when an ECT is used as the source for an external column, only a single field is required for display. When users see partial ECT data, however, they are quite often interested in being able to view the data behind it. This is where profile pages enter the picture. A profile page is a dedicated page that shows all the ECT data for a specific record. This way, users can jump from partial ECT data to a complete view of the record.
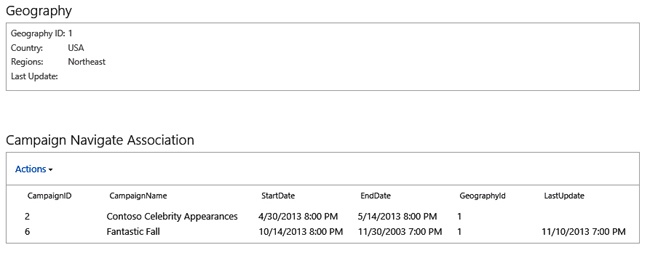
The Business Data Item Builder and Business Data Item Web Parts are deployed onto a dedicated profile page. The profile page is typically accessed through an action. An action is defined as a hyperlink containing query string parameters that can be used by the Business Data Item Builder Web Part to construct the profile page. Actions are typically surfaced in a drop-down menu associated with the displayed ECT data. Figure 16-20 shows a profile page.
Before you can create profile pages, they must be enabled through the BDC service application. On the Edit tab for the BDC service application, you can click the Configure button in the Profile Pages group. In the Properties dialog box that opens, you must specify a SharePoint site where the profile pages can be created. After that, you can simply select ECTs and click the Create/Upgrade button to make profile pages for the ECTs that you select. You can also make profile pages in SharePoint Designer when you are designing your ECT.
Searching External Systems
ECTs created with SharePoint Designer already support indexing by SharePoint Search with no additional work. However, External Systems will be indexed only if you explicitly set up a content source that includes the ECT. Content sources can be created within the Search service application, where you will have the option to create a content source associated with an External System.
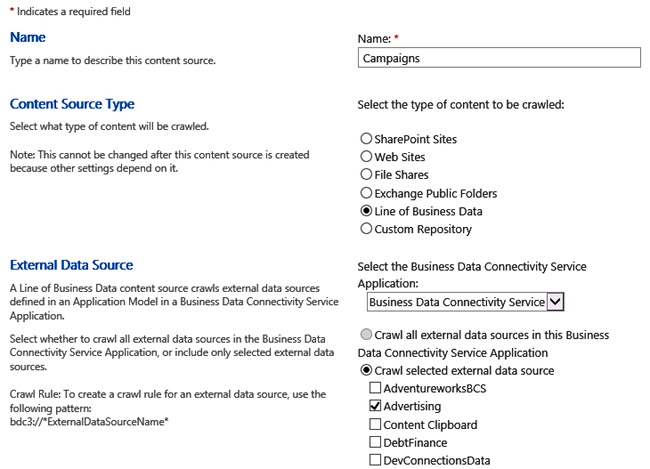
When you select the option to create a new content source in the Search service application, you will be presented with a drop-down list of the available BDC service applications. When you choose a BDC service application, you will then have the option to index all External Systems associated with the selected service or to pick particular systems. Figure 16-21 shows the content source creation options.
After a content source is created and crawled, it can be used in the standard ways. This means that you can simply go to the Search Center, type a keyword, and return records from the External System. These results include a hyperlink to the profile page so that users can view the full details of the returned records. You can also set up search scopes and use them to search only the External System data.
Supplementing user profiles
The User Profile service application is used to synchronize data from AD DS with the profile database maintained by SharePoint. The profile database contains rich information about users that can be displayed in sites. The User Profile service application maps AD DS fields to fields in the user’s profile. On a scheduled basis, this information is imported from AD DS.
In much the same way that you can add search connections to External Systems through ECTs, you can add profile synchronization connections. Adding a new synchronization connection allows you to use data from External Systems to supplement the data in the profile system. This is often useful in organizations that maintain a Human Resources (HR) system but that do not have rich data in their AD DS system. In such cases, ECTs are designed against the HR system and mapped to fields in the profile database.
Using ECTs in Office 2013
Not only can ECTs be used on the SharePoint server, they can also be used in Office 2013 clients. With little effort, ECTs can be surfaced as items in Outlook or metadata columns in Word. Furthermore, Office clients can sync with SharePoint to allow External Lists to be managed offline.
Understanding Outlook integration
You can synchronize lists with Outlook by clicking the Connect To Outlook button on the List tab. Outlook allows users to work with data offline and then synchronize it with SharePoint later. When you are synchronizing External Lists, ECTs can use Outlook forms by explicitly declaring that they should be displayed as an appointment, contact, task, or post when they are designed in SharePoint Designer. Choosing to display an ECT as a particular type of Office item requires that External System fields be mapped to Outlook fields in the SharePoint Designer wizard. Generally, the SharePoint Designer wizard will prompt for the correct mapping through messages. This mapping ensures that the data is displayed correctly inside Outlook.
When you synchronize lists to Outlook, a VSTO solution is installed for working with the items. Although the synchronization behavior works out of the box, you could choose to enhance the overall solution with your own VSTO solution, which could be a full-blown custom VSTO solution created in Outlook or a special declarative solution unique to BCS. The subject of creating these advanced custom VSTO solutions is beyond the scope of this chapter.
Using Word Quick Parts
When you choose to create an External Data Column for a document library, this column appears in Word in the Document Information Panel (DIP) at the top of the document. The DIP is designed to present metadata information so that it can be filled in during the document creation process, asopposed to prompting for metadata values when the document is saved.
In conjunction with displaying the metadata values in the DIP, document templates can also use Quick Parts. Quick Parts in Word allow you to insert fields into the document template that are bound to the metadata fields of the document. When a user fills in the field as part of the document creation process, the metadata values are set automatically. Adding Quick Parts to a document is done by selecting the appropriate metadata field from the Quick Parts list, which appears on the Insert tab in Word.
Although Quick Parts work well with all manner of document metadata, they work especially well with ECTs. This is because the Quick Parts will surface a picker dialog box for metadata that is based on an ECT. This makes it easy for users to select valid values for the metadata, improving the document creation experience.
Creating custom BCS solutions
Though BCS offers significant functionality without requiring you to write any code at all, there are advanced scenarios in which you will want to write custom code. To support custom solutions, BCS has a complete set of object models for manipulating External Data and managing ECT metadata. These models can be used on both the client and the server and have a high degree of symmetry between the two programming models. Along with coding against the client and server model, you can create your own External System connectors called .NET Assembly Connectors. These connectors are one of the most common BCS customizations because they give you a significant amount of control over the business logic applied to External Data. Finally, you can include ECTs directly in a SharePoint app, deploy them with the app, and manipulate them through the REST or CSOM APIs.
Using the BDC Runtime object models
The BDC Server Runtime and BDC Client Runtime are the server-side object models used for manipulating External Data. By using the object models, you can perform full CRUD operations on External Data through custom code. This is the programming interface used by External Lists and Outlook, which means you can create custom Web Parts, pages, and add-ins for SharePoint and Office clients.
Using the object models requires you to set references in Visual Studio 2012 to the appropriate assemblies where the programming interface is defined. Selecting the correct assemblies is first a matter of deciding whether you are creating a server-side customization or a client-side customization. For server-side customizations, you will need to set references to the assemblies Microsoft.BusinessData.dll and Microsoft.SharePoint.dll. For client-side customizations, you will need to set references to Microsoft.BusinessData.dll and Microsoft.Office.BusinessApplications.Runtime.dll.
After you set references to the appropriate assemblies, the first challenge is to connect to the appropriate catalog. If you are on the server, then you will connect to the metadata catalog associated with the BDC service application. If you are on the client, then you will connect to the client cache.
Connecting to the metadata catalog on the server can be done with or without a SharePoint context, but the code will be different. In any case, you must get a reference to BdcServiceApplicationProxy, which can then be used to connect with the metadata catalog, which is represented by the DatabaseBackedMetadataCatalog object. If your code is running with a SharePoint context, then the following code will connect to the metadata catalog:
BdcServiceApplicationProxy sap =
      (BdcServiceApplicationProxy)SPServiceContext.Current.GetDefaultProxy(
      typeof(BdcServiceApplicationProxy));
DatabaseBackedMetadataCatalog catalog = sap.GetDatabaseBackedMetadataCatalog;
If your code is running outside a SharePoint context, then you will need additional code to connect with BdcServiceApplicationProxy. The following code shows how to create a LINQ query to return the application proxy:
SPFarm farm = SPFarm.Local;
SPServiceProxyCollection spc = farm.ServiceProxies;
BdcServiceApplicationProxy sap =
(BdcServiceApplicationProxy)((from sp in spc
                              where sp.TypeName.Equals("Business Data Connectivity")
                              select sp).First.ApplicationProxies.First);
DatabaseBackedMetadataCatalog catalog = sap.GetDatabaseBackedMetadataCatalog;
In addition to using the BdcServiceApplicationProxy object to establish context, you can use the Microsoft.SharePoint.BusinessData.SharedService.BdcService class. The BdcService class is an abstraction of the BDC Service Application, and it is useful for determining whether or not a BDC Service Application is available in the farm. The following code shows how to connect to the metadata catalog:
BdcService service = SPFarm.Local.Services.GetValue<BdcService>;
  if (service == null)
    throw new Exception("No BDC Service Application found.");
DatabaseBackedMetadataCatalog catalog =
  service.GetDatabaseBackedMetadataCatalog(SPServiceContext.GetContext(site));
If your code is running on the client, then you will connect to the client cache instead of the metadata catalog. The client cache is represented by the RemoteSharedFileBackedMetadataCatalog object. The following code shows how to make the connection:
RemoteSharedFileBackedMetadataCatalog catalog = new RemoteSharedFileBackedMetadataCatalog();
After you make a connection to the appropriate catalog, you can read or write to the entities that it contains. These changes will be reflected in the External System, as well as any External Lists based on the ECT. Example 16-5 shows how to retrieve an entity and print the values of its fields by using a Finder method.
IEntity ect = catalog.GetEntity("http://www.wingtip.com/products", "Product");
ILobSystem lob = ect.GetLobSystem;
ILobSystemInstance lobi = lob.GetLobSystemInstances["Wingtipdb"];
IFilterCollection filter = ect.GetDefaultFinderFilters;
IEntityInstanceEnumerator ects = ect.FindFiltered(filter, lobi);
while (ects.MoveNext) {
  Console.WriteLine(ects.Current["ProductName"].ToString();
}
If the Finder method defines filters (such as a limit, wildcard, or page filter), then these values must be provided in the call to the FindFiltered method. An IFilterCollection instance can be returned by calling the GetFilters method of the IMethodInstance. The values for the filters can then be set. The following code shows how to get the filter collection and set values:
IMethodInstance mi =
  ect.GetMethodInstance(FinderMethodInstanceName, MethodInstanceType.Finder);

IFilterCollection filters = mi.GetFilters;
(filters[0] as LimitFilter).Value = 10;
(filters[1] as PageNumberFilter).Value = 2;
(filters[3] as WildcardFilter).Value = "Bike";
(filters[4] as ComparisonFilter).Value = "CN123720";
Calling SpecificFinder is done through the FindSpecific method. When calling the FindSpecific method, you will always provide an Identity object, which represents the identifier for the desired entity instance. Simply create a new Identity object by using the appropriate value and pass the object as an argument. Identity objects can be created with any data type, but be aware that String values are case-sensitive when used as Identifiers. The following code shows how to call the FindSpecific method:
//Connect to BDC Service Application
BdcService service = SPFarm.Local.Services.GetValue<BdcService>;

if (service != null) {
//Get Metadata elements
  DatabaseBackedMetadataCatalog catalog =
    service.GetDatabaseBackedMetadataCatalog(SPServiceContext.Current);
  IEntity ect = catalog.GetEntity(EntityNamespace, EntityName);
  ILobSystem lob = ect.GetLobSystem;
  ILobSystemInstance lobi =
    lob.GetLobSystemInstances[LobSystemInstanceName];
}

//Execute SpecificFinder
int id = 5;
IMethodInstance mi = ect.GetMethodInstance(SpecificFinderMethodInstanceName,
                                           MethodInstanceType.SpecificFinder);
IEntityInstance item =
   ect.FindSpecific(new Identity(id), SpecificFinderMethodInstanceName, lobi, true);
To invoke an Updater method, you first use the FindSpecific method to return the entity to update. The field values of the return entity can then be modified, and those modifications are committed through the Update method of the IEntityInstance interface. To invoke a Deleter method, you first use the FindSpecific method to return the entity instance to delete. The entity instance can then be deleted by using the Delete method of the IEntityInstance interface.
Along with reading or updating entities, you can create new ones. As with other operations, these changes will flow all the way back to the External System. Of course, if you are writing to the client cache, the changes will be made only when the client is online. Example 16-6 shows how to add a new record to an External System through the ECT.
Using the Administration Object Model
Along with the Runtime Object Models, BCS has an Administration Object Model. The Administration Object Model allows you to manipulate the metadata for an Application Model. To work with the Administration Object Model, you must set references to Microsoft.BusinessData.dll and Microsoft.SharePoint.
As with the Runtime Object Models, you must first connect to the appropriate catalog before you can manipulate the data. In the case of the Administration Object Model, you must connect to the AdministrationMetadataCatalog object. Connecting to this catalog requires a reference to BdcServiceApplicationProxy, just as it did with the Runtime Object Model. Example 16-7 shows how to connect to the catalog if your code is running outside a SharePoint context. Inside the context, you can use the SPServiceContext object as discussed previously.
SPFarm farm = SPFarm.Local;
SPServiceProxyCollection spc = farm.ServiceProxies;
BdcServiceApplicationProxy sap =
  (BdcServiceApplicationProxy)
    ((from sp in spc
      where sp.TypeName.Equals("Business Data Connectivity")
      select sp).First.ApplicationProxies.First);

AdministrationMetadataCatalog catalog = sap.GetAdministrationMetadataCatalog;
The Administration Object Model provides a set of objects that allow you to manipulate the Application Model XML. The names of the objects correspond closely with the names of the elements in the Application Model. Example 16-8 shows a complete example of creating a simple Application Model from code and saving it into the metadata catalog.
Model model = Model.Create("MiniCRM", true, catalog);
LobSystem lob =
  model.OwnedReferencedLobSystems.Create("Customer", true, SystemType.Database);
LobSystemInstance lobi = lob.LobSystemInstances.Create("MiniCRM", true);

lobi.Properties.Add("AuthenticationMode", "PassThrough");
lobi.Properties.Add("DatabaseAccessProvider", "SqlServer");
lobi.Properties.Add("RdbConnection Data Source", "CONTOSOSERVER");
lobi.Properties.Add("RdbConnection Initial Catalog", "MiniCRM.Names");
lobi.Properties.Add("RdbConnection Integrated Security", "SSPI");
lobi.Properties.Add("RdbConnection Pooling", "true");

Entity ect = Entity.Create("Customer", "MiniCRM", true,
                           new Version("1.0.0.0"), 10000,
                           CacheUsage.Default, lob, model, catalog);

ect.Identifiers.Create("CustomerId", true, "System.Int32");

Method specificFinder =
  ect.Methods.Create("GetCustomer", true, false, "GetCustomer");

specificFinder.Properties.Add("RdbCommandText",
   "SELECT [CustomerId] ,[FullName] " +
   "FROM MiniCRM.Names " +
   "WHERE [CustomerId] = @CustomerId");

specificFinder.Properties.Add("RdbCommandType", "Text");

Parameter idParam =
  specificFinder.Parameters.Create("@CustomerId", true, DirectionType.In);

idParam.CreateRootTypeDescriptor(
    "CustomerId", true, "System.Int32", "CustomerId",
     new IdentifierReference("CustomerId",
        new EntityReference("MiniCRM", "Customer", catalog), catalog),
     null, TypeDescriptorFlags.None, null, catalog);

Parameter custParam =
  specificFinder.Parameters.Create("Customer", true, DirectionType.Return);
TypeDescriptor returnRootCollectionTypeDescriptor =
    custParam.CreateRootTypeDescriptor(
        "Customers", true,
        "System.Data.IDataReader, [full assembly name for System.Data]",
        "Customers", null, null, TypeDescriptorFlags.IsCollection, null, catalog);
TypeDescriptor returnRootElementTypeDescriptor =
    returnRootCollectionTypeDescriptor.ChildTypeDescriptors.Create(
        "Customer", true,
        "System.Data.IDataRecord, [full assembly name for System.Data]",
        "Customer", null, null, TypeDescriptorFlags.None, null);

returnRootElementTypeDescriptor.ChildTypeDescriptors.Create(
        "CustomerId", true, "System.Int32", "CustomerId",
        new IdentifierReference("CustomerId",
            new EntityReference("MiniCRM", "Customer", catalog), catalog),
        null, TypeDescriptorFlags.None, null);

returnRootElementTypeDescriptor.ChildTypeDescriptors.Create(
        "FirstName", true, "System.String", "FullName",
         null, null, TypeDescriptorFlags.None, null);

specificFinder.MethodInstances.Create("GetCustomer", true,
                                      returnRootElementTypeDescriptor,
                                      MethodInstanceType.SpecificFinder, true);

Method finder = ect.Methods.Create("GetCustomers", true, false, "GetCustomers");

finder.Properties.Add("RdbCommandText",
                      "SELECT [CustomerId] , [FullName]FROM MiniCRM.Names");
finder.Properties.Add("RdbCommandType", "Text");

Parameter custsParam = finder.Parameters.Create("Customer", true,
                                                DirectionType.Return);

TypeDescriptor returnRootCollectionTypeDescriptor2 =
    custsParam.CreateRootTypeDescriptor(
        "Customers", true,
        "System.Data.IDataReader, [full assembly name for System.Data]",
        "Customers", null, null, TypeDescriptorFlags.IsCollection, null, catalog);

TypeDescriptor returnRootElementTypeDescriptor2 =
    returnRootCollectionTypeDescriptor2.ChildTypeDescriptors.Create(
        "Customer", true,
        "System.Data.IDataRecord, [full assembly name for System.Data]",
        "Customer", null, null, TypeDescriptorFlags.None, null);

returnRootElementTypeDescriptor2.ChildTypeDescriptors.Create(
        "CustomerId", true, "System.Int32", "CustomerId",
        new IdentifierReference("CustomerId",
           new EntityReference("MiniCRM", "Customer", catalog), catalog),
        null, TypeDescriptorFlags.None, null);

returnRootElementTypeDescriptor2.ChildTypeDescriptors.Create(
        "FirstName", true, "System.String", "FullName",
         null, null, TypeDescriptorFlags.None, null);

finder.MethodInstances.Create("GetCustomers", true,
                              returnRootCollectionTypeDescriptor2,
                              MethodInstanceType.Finder, true);

ect.Activate();
Creating custom event receivers
In SharePoint 2013, Business Connectivity Services introduces the ability to attach event receivers to External Lists and External Content Types. This capability is based on implementing the new Subscribe and Unsubscribe stereotypes in an ECT. Figure 16-22 shows a high-level view of the major components involved in the notification process.
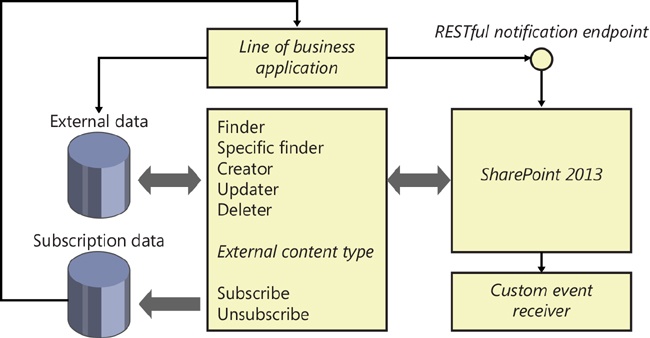
Custom event receivers are created in exactly the same way as standard list event receivers. This means that you simply create a class that inherits from SPItemEventReceiver. Custom event receivers, however, are limited to receiving only the ItemAdded, ItemUpdated, and ItemDeleted events. After it is created, the custom event receiver can be attached to an External List in the same way as a standard event receiver. The following code shows how to attach a custom event receiver to an external list:
string assembly = "4-part assembly name";
string className = "namespace.classname";
using (SPSite siteCollection = new SPSite("http://server"))
{
    using (SPWeb site = siteCollection.OpenWeb())
    {
        SPList externalList = site.Lists["ExternalList"];
        externalList.EventReceivers.Add(SPEventReceiverType.ItemAdded,
                                     assembly, className);
    }
}
When a custom event receiver is attached to an External List, SharePoint automatically creates a RESTful endpoint to receive incoming notifications. An separate endpoint is created for each subscribed event. SharePoint then calls the Subscribe stereotype on the ECT associated with the External List. The Subscribe stereotype receives the address of the RESTful notification endpoint and is expected to save the address somewhere for use later when data changes. It is important to understand that although SharePoint creates a RESTful endpoint to receive notifications, it is the sole responsibility of the External System to call this endpoint when data changes. This means that you must create a custom solution to save the endpoints and invoke them. A typical solution is to implement the Subscribe method so that it saves endpoints to a database table and returns the primary key of the row. The primary key is saved by SharePoint and used when the Unsubscribe method is called. The Unsubscribe implementation uses the primary key to remove the subscription entry.
When data in the External System changes, a custom solution must call each of the saved endpoints. SharePoint receives the calls and fires any attached event handlers. The endpoint call is performed as an HTTP POST that can send a message back to SharePoint. This message can be read by the event receiver through the SPItemEventProperties.ExternalNotificationMessage property. The following code shows how to call the notification endpoint:
HttpWebRequest request = (HttpWebRequest)HttpWebRequest.Create({the notification endpoint});
request.Credentials = CredentialCache.DefaultCredentials;
request.Method = "POST";
request.Headers["X-RequestDigest"] = digest; //A form digest is required to call in
request.Accept = "*";
byte[] bodyBytes = Encoding.UTF8.GetBytes({a message to send});
request.ContentLength = bodyBytes.Length;
request.ContentType = "application/atom+xml";

Stream requestStream = request.GetRequestStream();
requestStream.Write(bodyBytes, 0, bodyBytes.Length);
requestStream.Flush();

using (var response = (HttpWebResponse)request.GetResponse())
{
    if (response.StatusCode != HttpStatusCode.OK)
        MessageBox.Show(response.StatusDescription);
}
Creating .NET Assembly Connectors
A .NET Assembly Connector associates a custom assembly with an ECT so that you can control precisely how information is accessed, processed, and returned from External Systems. The first step in developing the connector is to create a new empty SharePoint 2013 solution project and add a new Business Data Connectivity Model item. Visual Studio provides a completely coded solution when you add the new model. In fact, you can simply press F5 to start the project and then create new External Lists right away in SharePoint.
The default project provides an entity named Entity1 along with two classes: Entity1.cs and Entity1Service.cs. The Entity1 class provides the properties necessary to hold data from the External System. The following code is from the Entity1 class in the default connector project. For your own connector, you would simply create a class containing properties for the data to be returned from the External System:
public partial class Entity1
{
    public string Identifier1 { get; set; }
    public string Message { get; set; }
}
The Entity1Service class provides the implementation of stereotypes to perform CRUD operations against the External System. In order for a connector to support External Lists, it must implement at least a Finder and SpecificFinder. The following code shows the implementation for the default project. Notice how the Finder implementation returns a collection of entity class instances whereas the SpecificFinder returns a single entity class instance:
public class Entity1Service
{
    public static Entity1 ReadItem(string id)
    {
        Entity1 entity1 = new Entity1();
        entity1.Identifier1 = id;
        entity1.Message = "Hello World";
        return entity1;
    }
    public static IEnumerable<Entity1> ReadList()
    {
        Entity1[] entityList = new Entity1[1];
        Entity1 entity1 = new Entity1();
        entity1.Identifier1 = "0";
        entity1.Message = "Hello World";
        entityList[0] = entity1;
        return entityList;
    }
}
When you’re working with the Business Data Connectivity Model item, there are three explorers/designers available: the BDC Model Explorer, the Entity Design Surface, and the Method Details pane. The BDC Model Explorer is used to navigate the nodes of the BDC Metadata Model. The Entity Design Surface is used to design the ECT that will be associated with the .NET Assembly Connector. The Method Details pane is used to create the function signatures for ECT operations. Along with these three new elements, the Business Data Connectivity Model project template also gives you the standard windows such as the Solution Explorer and the Properties pane. Figure 16-23 shows the tooling in Visual Studio 2012.
To be successful with the tooling you must understand how the various explorers and designers relate to the underlying model XML. Furthermore, you must understand which elements of the project are affected as you make changes. In particular the BDC Model Explorer and the Method Details pane can be confusing if their relationships to the underlying XML are not well understood.
Not all of the underlying BDC Metadata Model can be represented in the BDC Model Explorer. In particular, the BDC Model Explorer shows methods, but not method instances. Methods are used in the BDC Metadata Model as prototypes, which are subsequently implemented by method instances. The Method Details pane provides the interface necessary to define the method instances.
The Entity Design Surface is also used to edit the underlying BDC Metadata Model. However, it is focused on the creation of entities. By using this tool you can create new entities, assign the Identifier, and create new methods.
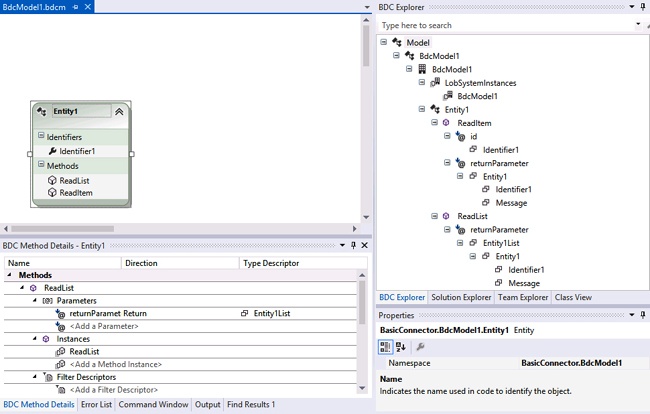
Regardless of which tool you are using, the Properties pane can be used to edit the selected node. The Properties pane lists the type of node and its attributes. Although the nodes have many attributes, most of them are not required. It is not always clear, however, which attributes are required to implement any particular node. The better you understand the model, the more likely you are to create the one you need.
The tooling is all designed to edit the underlying BDC Metadata Model, with one exception. The service class is used to implement the method instances that you define in the model. This class module is created automatically and is always given the name of the entity followed by the word Service. If you change the name of the entity in your model, the service class name is updated automatically. If you delete the service class from the project, it is recreated the next time you make any changes to the method definitions.
The methods implemented in the service class have types defined by the input and return parameters in the BDC Metadata Model. These types can be simple types or classes. Typically, however, the Finder and SpecificFinder methods return classes that represent the ECT associated with the .NET Assembly Connector. In the Business Connectivity Model item, a class named Entity1.cs is created by default and is returned from the Finder and SpecificFinder methods. These methods are also created by default when you create a project with the Business Connectivity Model item.
Even though the item template includes a class that has the same name as the entity, there is actually no connection between the entity definition and the entity class as far as the tooling is concerned. Changing the name of the entity in the model does not change the name of the class, and the class is never automatically generated. The class is really just a payload returned from the .NET Assembly Connector. Its name is meaningless, but it is a best practice to keep the name of the class synchronized with the name of the entity it represents. The methods in the service class return instances of the entity class that are passed on to external lists for display. In more advanced scenarios, you might choose to implement the entity classes in a separate project so that they can be easily referenced by custom Web Parts that will display the data.
The tooling is largely focused on defining and implementing methods as opposed to defining the data returned by the entity class. In the default project template, the entity has a data field named Message, which is defined as a TypeDescriptor with a TypeName of System.String. The entity class has a corresponding property whose value is set during the execution of the Finder or SpecificFinder methods. To add or modify data fields for the ECT, you must make changes to the model in the BDC Model Explorer and add new properties to the entity class manually.
Although the Visual Studio tooling is helpful, there are times when you must access the underlying BDC Metadata Model as XML either for direct editing or simply to verify the work you have done using the tools. The BDC Metadata Model can be found in the Solution Explorer as the file with the .bdcm extension. You can open this file as XML by right-clicking it and selecting Open With from the shortcut menu. From the Open With dialog box, open the file with the XML Editor. If you make changes to the underlying model by hand, those changes will be reflected in the various Visual Studio tools. This is an excellent way to learn the relationships between the BDC Metadata Model and the Visual Studio tools.
Adding a new entity to the project can be done using the toolbox in Visual Studio. Dragging the entity object onto the Entity Design surface creates the new entity. When the new entity is created, Visual Studio automatically creates a new empty entity service class. Visual Studio does not, however, create a new entity class, which you must define manually. This class should include properties for all of the data to return from the External System, including the primary key.
After the new entity class is created, an Identifier must be defined against the primary key. In the default project, the Identifier is named Identitier1. You can create a new Identifier by right-clicking the entity and selecting Add, Identifier. By using the Properties pane you can subsequently set the name and data type for the Identifier.
After the entity is defined, you can create new methods for it, which is easily the most confusing process in the entire project. In the Method Details pane you can choose to create a new method. Remember that a method is just a stereotype and that you must also create a method instance to implement the method. You can create a new method instance by clicking the Add Method Instance link in the Method Details pane. After you have created the method instance, you can specify the type of the method instance in the Properties pane. Typically, your first method will be a Finder method.
After the method instance is defined, you must define its parameters. In the case of the default Finder method, you will typically define a return parameter only. Other method instances might require input parameters as well as filters. You can create a new parameter by clicking Add a Parameter in the Method Details pane. By using the Properties pane you can then change the parameter name and direction.
When a parameter is defined, Visual Studio automatically creates a TypeDescriptor for the parameter. The TypeDescriptor acts as a mapping between the data types found in the External System and the data types returned by the .NET Assembly Connector. Clicking the TypeDescriptor in the Method Details pane enables you to define the TypeName for the TypeDescriptor. In the case of a Finder method, the TypeDescriptor is typically a collection of entity instances. Therefore, the IsCollection property should be set to True before you select the TypeName. After the TypeDescriptor is designated as a collection, you can open the TypeName picker, click the Current Project tab, and select the Product class. Figure 16-24 shows the Type Name picker in Visual Studio.
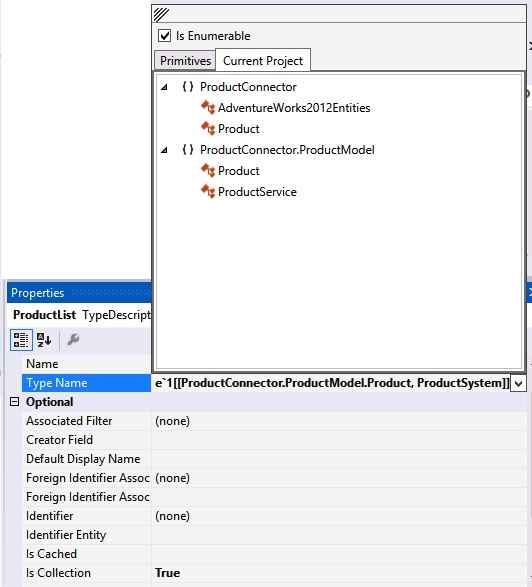
At this point, you can open the code for the service class and see that Visual Studio has created a method whose signature is based on the method, parameter, and TypeDescriptor settings. However, your work is not yet done because the return TypeDescriptor was designated as a collection. Therefore a new TypeDescriptor must be added to represent the member of the collection. Additionally, each field in the collection member must be defined.
To create the additional TypeDescriptors, you work in the BDC Model Explorer. In the Model Explorer, you can view the TypeDescriptor defining the collection. You can define a collection member by right-clicking the collection TypeDescriptor and selecting Add Type Descriptor from the shortcut menu. Finally, you must add a TypeDescriptor for every property of the entity you want to return. Take care to set the Identifier property for the TypeDescriptor that represents the Identifier of the entity, in order to designate this property as the one containing the Identifier value. Finally, return to the Method Details pane and select the method instance. In the Properties pane, set Return Parameter Name and Return TypeDescriptor to reference the items already created. This completes the definition of the method, which can now be coded in the service class.
When the .NET Assembly Connector is complete, you can deploy and test it. As with all features created in Visual Studio 2012, you can easily debug the .NET Assembly Connector by setting breakpoints in the code and pressing F5.
Developing SharePoint apps
Along with most of the SharePoint 2013 workloads, Business Connectivity Services has been updated to work with the app model. App model enhancements include support for OData sources, app-level External Content Types, and a new client-side object model. Together, these enhancements allow you to create apps for either on-premises installation or SharePoint online.
Understanding app-level ECTs
With SharePoint 2013, BCS now supports the use of OData sources as the basis for defining an ECT. Because OData is emerging as an accepted standard for exposing data sources in the cloud, these services are an ideal source for developing BCS-based apps. When creating a SharePoint app, you can easily add an ECT based on an OData source by selecting Add, Content Types For An External Data Source from the project context menu. This action starts a wizard that will prompt you for the endpoint of the OData source. Figure 16-25 shows the wizard referring to the publically available Northwind data source.
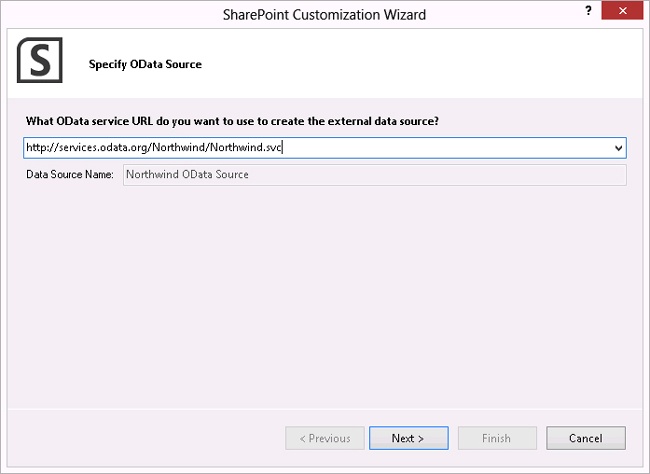
After connecting to the source, the wizard prompts you to select from the available entities exposed by the service. All you have to do is select one or more entities and click Finish. Visual Studio will then generate a BDC Metadata Model and an associated external list within you app project. The BDC Metadata Model and the external list definition are packaged and deployed with the app, which uses the model at run time to connect to the source and fill the external list. Figure 16-26 shows the basic app architecture for accessing the OData source and displaying the data in an External List.
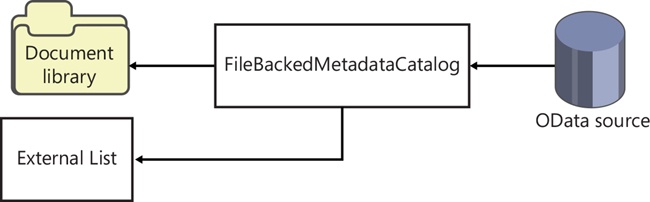
Under normal circumstances, BDC Metadata Models are stored in the BDC Service Application associated with the farm. Such an architecture would be unacceptable for apps, however, because apps are supposed to be isolated from the other farm elements. In the case of an app, the model is loaded in an in-memory BDC catalog known as the FileBackedMetadataCatalog. The BDC Metadata Model deployed with the app is stored in a special document library and subsequently loaded into the FileBackedMetadataCatalog. After it is loaded, the model is used to determine the connection to the OData source and what data to retrieve. The external list is then filled with the data in much the same way as any external list in a SharePoint farm. The only drawback is that the external list will not be immediately visible. This is because the app pages do not include a Web Part or code for displaying the list. This is where some client-side coding comes into play.
Understanding the BCS client object model
When it comes to displaying the data in the External List, you have two options. The first is to make a RESTful call to the External List. External Lists support the same RESTful access to data that standard SharePoint lists support. Therefore, there is nothing new to learn, and you can use standard techniques covered elsewhere in this book. The second option is to use the client-side object model (CSOM) through JavaScript.
CSOM access to BCS data follows the same general approach used in the server-side model discussed earlier in this chapter. Because the approaches are similar, it should be easier for developers to learn the CSOM version. The only big difference is that the CSOM version relies on asynchronous operations, so the developer must handle several callbacks to be successful.
All of the objects necessary to work with BCS in an app are contained in the sp.js library found in the LAYOUTS directory. Development begins by retrieving the standard ClientContext object in JavaScript. After the ClientContext is retrieved, it can be used to access the web associated with the app and then the in-memory SP.BusinessData.AppBdcCatalog object. When the catalog is accessed, the target SP.BusinessData.Entity object can be retrieved by using the entity name and entity namespace as shown in the following code:
var ctx = SP.ClientContext.get_current();
var ect = ctx.get_web().getAppBdcCatalog().getEntity(entityNamespace, entityName);
ctx.load(ect);
After the entity is retrieved, it can be used to execute the basic stereotypes associated with it. The JavaScript methods all have names that are similar to the ones found in the server-side object model, and you can view the complete definition for the methods by examining the sp.debug.js library found in the LAYOUTS directory. As an example, we’ll walk though executing the Finder method using the findFiltered method.
The findFiltered method requires that you provide the name of the method instance, values for any filters associated with the method instance, and the associated SP.BusinessData.LobSystemInstance object. Retrieving the associated SP.BusinessData.LobSystemInstance object requires a round trip, so that should be done first by using the following code, which returns a SP.BusinessData.Collections.LobSystemInstanceCollection object:
var ctx = SP.ClientContext.get_current();

var ect = ctx.get_web().getAppBdcCatalog().getEntity(entityNamespace, entityName);
ctx.load(ect);

var lob = ect.getLobSystem();
ctx.load(lob);

var collection = lob.getLobSystemInstances();
ctx.load(collection);
ctx.executeQueryAsync(onLobSystemInstancesSuccess, onLobSystemInstancesError);
When the collection is returned, you can look through it for the associated SP.BusinessData.LobSystemInstance object by name. Then you can retrieve and set any required filters. Finally, you can call the findFiltered method, as shown in the following code:
var ctx = SP.ClientContext.get_current();

for (var i = 0; i < collection.get_count(); i++) {
    if (collection.get_item(i).get_name() === lobSystemInstanceName) {
        lobi = collection.get_item(i);
        break;
    }
}

var filters = ect.getFilters(methodInstanceName);
ctx.load(filters);

var results = ect.findFiltered(filters, methodInstanceName, lobi);
ctx.load(results);

ctx.executeQueryAsync(onExecuteFinderSuccess, onExecuteFinderError);
When the results of the operation are returned, then you can loop through them and read the property values. Typically, you will take these values and save them into an object array for use when displaying them in a webpage. The following code shows how the resulting records can be read:
for (var i = 0; i < results.get_count() ; i++) {
    var entityInstance = results.get_item(i);
    var fields = entityInstance.get_fieldValues();
    var v1 = fields.ProductID;
    var v2 = fields.ProductName;
    var v3 = fields.CategoryName;
    var v4 = fields.UnitsInStock;
    var v5 = fields.ReorderLevel;
}
Summary
Business Connectivity Services (BCS) is a powerful mechanism for connecting SharePoint to External Data. BCS solutions can be imagined to span a spectrum from simple no-code solutions to full-code solutions using run-time object models and .NET Assembly Connectors. SharePoint developers should think of these BCS components as a primary mechanism for creating solutions that require data from an external source.