
Chapter 17. SharePoint social enterprise features
Social enterprise features in Microsoft SharePoint have forever changed for the better with the release of SharePoint 2013. Many of SharePoint’s new social features allow organizations and their people almost instant access to social capabilities ranging from newsfeeds, to following people and content, to taking advantage of Yammer, one of Microsoft’s recent acquisitions.
The investment that Microsoft has put into these new features, along with the global trends in social components within organizations, attest to the fact that social components can be a game changer for how people collaborate and communicate with one another throughout the workplace. Efficiency and productivity can dramatically increase as a result of including social features within your organization’s roadmap for your intranet, extranet, and public-facing sites. This increased attention can also be attributed to the fact that many more organizations have gone global or have a dispersed workforce than ever before, which means that social features are often viewed as the hopeful keystone for ensuring a connected workplace and team even though the individuals might be miles or countries apart.
What’s new in SharePoint 2013
There have been many changes within the social space of SharePoint. Most people say that it has been rebuilt from the ground up, and in many cases this is an accurate statement. One of the primary reasons for this rebuild might have been to make the social experience with SharePoint 2013 truly people-centric. This will become more evident as you read this chapter and learn about many of these social components.
Community portals and sites are a much-needed upgrade to the discussion forums that were available in SharePoint 2010. Taking advantage of the badge and reward system found within these sites offers up new incentives and opportunities for portal users within an organization to not only help other coworkers, but to obtain merit and recognition in the form of a badge that the rest of the organization can view.
The My Sites functionality has been simplified and enhanced all at the same time. The UI and navigational elements found within personal sites have been simplified and modernized to comply with the new modern UI user experience. This has promoted the intuitive nature and experience that should exist within a personal site.
Microblogging is available within SharePoint 2013 in the form of social newsfeeds. These social newsfeeds make use of popular social features such as @ mentions, hashtags, replies, likes, and embedding links and videos within a post or reply. This is a vast improvement over the activity feed that could be used within SharePoint 2010. Yammer also makes use of the same popular social abilities of SharePoint’s social feeds, but it also has the added benefit of being capable of being either a standalone solution or one that integrates with SharePoint. Yammer will be discussed in more detail in the section titled Understanding Yammer later in this chapter.
In addition to all these new and ready-to-use feature sets, there have been numerous enhancements to the SharePoint Object Models (OMs) and APIs, which we will discuss in detail later in this chapter, within the section titled Working with the social APIs and throughout this chapter.
Understanding social components
With something as new and vast as the social additions in SharePoint 2013, it is best to organize the subject into manageable pieces so that a good understanding can eventually be obtained. One of the best ways to organize these new additions is to place them into one of three major pillars or components. Figure 17-1 illustrates the breakdown of these components, which are user profiles, social feeds, and following.
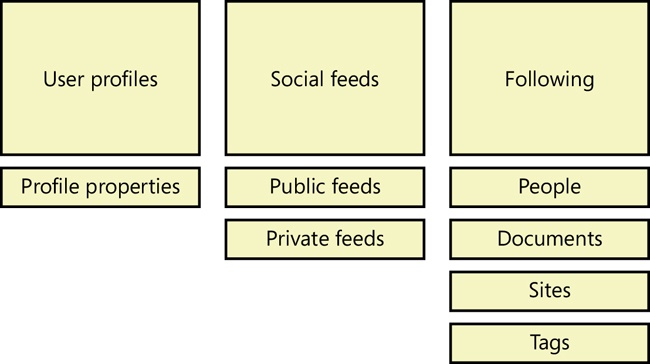
The first pillar or component is user profiles. Simply put, profiles exist to allow people to be represented within SharePoint. The next logical step is to have properties within these profiles so that they can become more meaningful and useful. Properties can range in purpose and might not be visible even to the person to whom the profile belongs. Organizations have been known to use profile properties that are not visible to a typical user for operational needs, such as storing asset tag IDs for equipment that has been assigned to the person.
The second component is social feeds. Social feeds have taken the place of the activity feed found within SharePoint 2010. Social feeds at a high level can be broken down into two types: public and private. A public feed is what you would find if you went to someone’s profile page and looked at the newsfeed on that page, whereas a private feed could be a feed that exists on a team site, where only those who have permissions to the team site can view the newsfeed.
The third and final social component is following. Following can be looked at as taking the place of Colleagues in SharePoint 2010, with some much-needed benefits. Some of the benefits are obvious when you look back at Figure 17-1; not only can you follow people, but you can also follow documents, sites, and tags.
These social pillars or components, in addition to Yammer, have produced the potential for a rich social ecosystem. As you continue to read through this chapter, we will examine each of these components in further detail. We will also look at how to access and extend these social components within SharePoint itself or within other line of business (LOB) applications.
Working with the social APIs
When the social components of SharePoint were rewritten, a rich set of APIs were made available to provide access to each of the primary social components previously mentioned. The server-side object model (SSOM), client-side object model (CSOM), and REST API are all available tools for accessing or extending a social component. Chapter 2, introduced you to these APIs, so we will not go into any further detail on what each of them are; however, we will look into the social-centric namespaces and endpoints that they offer and how they allow you to write code against the social components.
The server-side object model has been around the longest and, as such, has the most complete set of APIs and classes available. The main social namespaces for the server-side object model are:
Microsoft.Office.Server.Social (social feeds and following)
Microsoft.Office.Server.UserProfiles (user profiles and user profile properties)
Microsoft.Office.Server.SocialData (ratings, feedback, and comments)
If you did custom development work in SharePoint 2010, you might have also used the API in the Microsoft.Office.Server.ActivityFeed namespace. It is important to note that this namespace and its API are deprecated, because that functionality has been replaced by newsfeeds and the APIs just listed.
The client-side object model is vastly improved over previous versions, though there are still a few core namespaces or classes that are found in the server-side object model that are absent from the client-side object model. As an example, there is no client-side accessibility to the Microsoft.Office.Server.SocialData namespace. The main social namespaces for the client-side object model are:
Microsoft.SharePoint.Client.Social (social feeds and following)
Microsoft.SharePoint.Client.UserProfiles (user profiles and user profile properties)
When comparing the server-side and client-side lists of namespaces, you can tell that there truly is more commonality then disparity between the two object models. The increased client-side functionality has also brought with it a new recommended approach for writing code against SharePoint 2013, which is that whenever possible you should use the client APIs in place of the server-side object model.
Understanding user profiles
User profiles are vital to the social experience within SharePoint, because this is where people are represented within the SharePoint environment. It is imperative that you remember that for a person to participate in the social experience he or she must have a profile and a My Site. This is a major change from what might have been typical in SharePoint 2010. In SharePoint 2010, many organizations by way of their governance committee might have elected to turn on all the profile features except the storage component, which would provision a site collection for a person. This approach still allowed profiles, the profile page, the organizational chart, and the activity feed to function, without requiring the storage for additional content databases. In SharePoint 2013, this same approach offers the ability to have profiles and the organizational chart, but social feeds and following, which take the place of the activity feed, would not be available. The primary reason for this is because the microblogging that surfaces in social feeds is now stored within the My Site Host content database, whereas in SharePoint 2010 the activity feed was stored in one of the social databases that supported the User Profile Service Application. There are many good reasons why the re-architecture is justified, but as a result you need to be more mindful in your planning of user profiles within your SharePoint implementations now and how they and My Sites can determine what social features can be used.
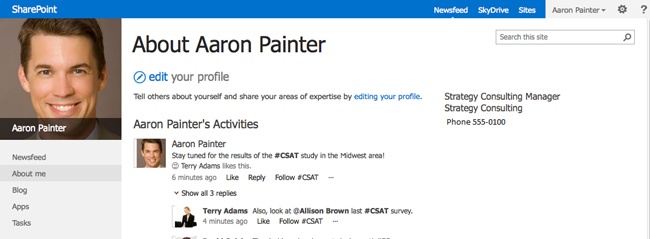
User profiles are also significant because of the properties that are stored within them. Everything from a user’s first and last name to the user’s office phone number is often available in the profile, which is easily viewable by way of the user profile page, as shown in Figure 17-2. Organizations might even elect to have user profiles with SharePoint be the single source of a user’s data, because of the User Profile Service Application’s ability to aggregate properties from many disparate systems (such as Personnel and Financial) and also because of the APIs that can be used to access these properties from the profile store.
Retrieving user profile properties
One of the most common requirements is often to simply access a set of user profile properties for a particular purpose. This purpose could be for use within a SharePoint Web Part, to showcase the upcoming birthdays for the current month or to show office phone numbers within an LOB application that is available outside of SharePoint. It is wise to examine all of the business and functional requirements before coming up with the solution design, but after that has been done, it is time to evaluate which API is the most appropriate for the job. For example, in the case of simply needing to query for a few user profile properties, the client-side APIs would be the recommended approach; however, if you needed to write back to any of these properties, you would need to use the server-side object model. This is due to a limitation of the client-side object model that gives the API only Read access to user profile properties, with the one exception being the user profile photo property. This single-write limitation can bring a solution to a sudden halt if it is not identified and vetted against the functional requirements of the solution before code begins to be written.
Assume for this section’s example that only the retrieval of user profiles properties is needed. Examples for both the CSOM and REST APIs will be shown. If you have not used CSOM or REST to perform coding tasks against SharePoint, it is recommended that you read Chapter 2 before continuing. The goal for this section’s example will be to retrieve the office phone number for a user and likewise for all of that user’s peers.
We will start off with the CSOM approach. You will need to have your SharePoint development environment properly configured before you begin; if you have not done so, please read the information in Chapter 3, on how to set up a development environment.
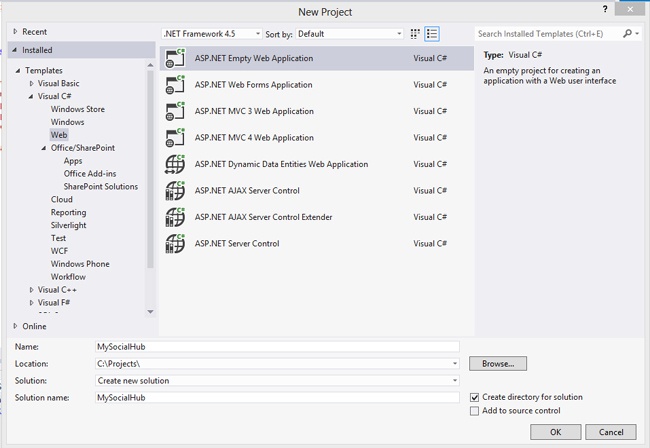
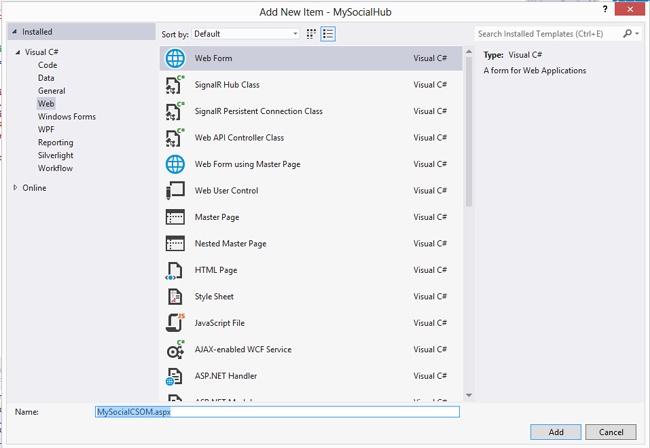
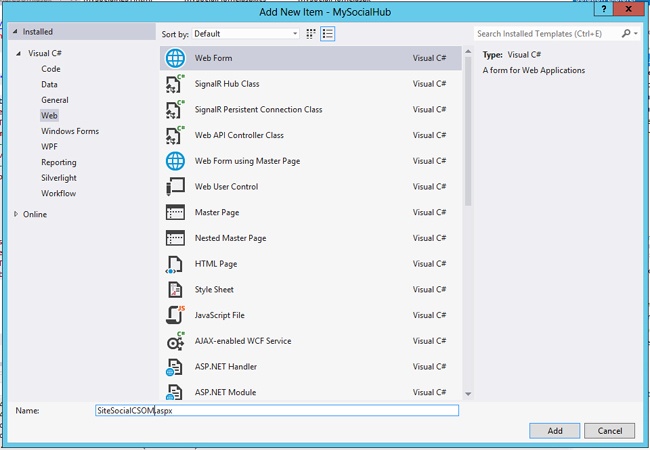
Begin by creating a new Microsoft Visual Studio solution and project. Remember, the nice thing about using the client-side approach is that you do not have to choose one of the SharePoint project templates; you could even choose a console project template if you want. The examples throughout this chapter use a project based on the ASP.NET Empty Web Application project template, because this is more realistic than the need for a console application, as shown in Figure 17-3.
When the new project loads in Visual Studio, you will want to add references to the required client-side assemblies for interacting with user profiles by using C# and CSOM. They are:
Microsoft.SharePoint.Client
Microsoft.SharePoint.ClientRuntime
Microsoft.SharePoint.Client.UserProfiles
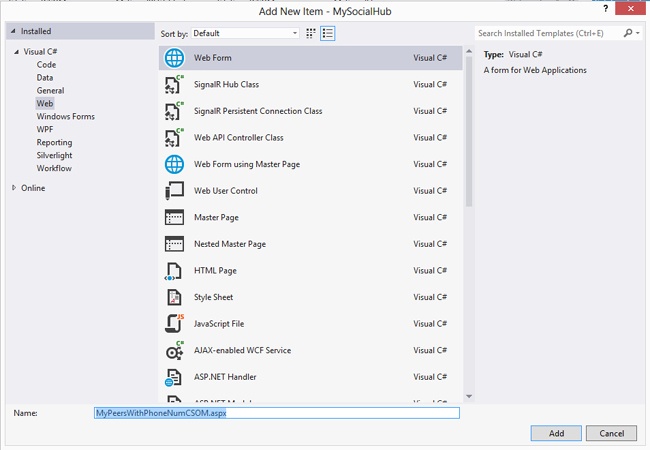
When you have included these references, you will need to create a new page within the project, as shown in Figure 17-4.
After you have added the Web Form, you will need to add the following namespaces to the code-behind file so you can easily access the required objects for this example:
Microsoft.SharePoint.Client
Microsoft.SharePoint.Client.UserProfiles
When that is complete, you will need to add a few variables to the code-behind of the Web Form to store the URL of a SharePoint site, so that you can get context and get the name of the user whose peers’ office phone numbers we want to retrieve. The code in Example 17-1 shows these variables set for a SharePoint site at http://portal.contoso.com and a user named Aaron Painter, who has a domain username of aaronp.
//Variables
string siteURL = "http://portal.contoso.com";
string curUser = @"contosoaaronp";
Now that you have these variables set, you can initialize the SharePoint client context by using the siteURL you set up to gain context within SharePoint. This is shown in Example 17-2.
Having context within SharePoint allows you to now instantiate a PeopleManager object. The PeopleManager object is used to access user profile properties and other operations that are related to people. After you initialize a PeopleManager object, you will also need to initialize a PersonProperties object to gain access to the profile properties. Example 17-3 shows both objects being initialized.
//Initialize objects for profile properties access
PeopleManager peopleManager = new PeopleManager(clientContext);
PersonProperties personProperties = peopleManager.GetPropertiesFor(curUser);
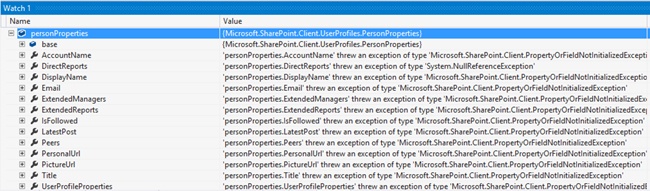
If you are not already familiar with CSOM and you happened to have added the personProperties object to a watch, you would have noticed quite a few exceptions being thrown, as shown in Figure 17-5. This is because with the client-side approach, code is sent to the SharePoint server in batches, where it is converted into server-side code, executed, and then sent back. The act of sending the code is available in both synchronous and asynchronous mode and requires an action on the client side, such as the execution of the requests registered within the ClientContext object by calling its Load() and ExecuteQuery() methods.
As you can imagine, if all of the solutions you build from this point on use the CSOM approach, that would be a lot of calls being sent to SharePoint. To be as efficient as possible, you should only request those properties that you need access to at the moment. In this case, you need to get the peers for Aaron Painter, and for good measure you will also request Aaron’s display name and office phone number to display along with his peers within a list you will generate. Example 17-4 shows the updated code to request the properties, and Figure 17-6 shows watch panel after you apply the code.
//Get Aaron Painter's Office Phone and Peers
PeopleManager peopleManager = new PeopleManager(clientContext);
PersonProperties personProperties = peopleManager.GetPropertiesFor(curUser);
clientContext.Load(personProperties, p => p.DisplayName, p => p.UserProfileProperties
  ,p => p.Peers);
clientContext.ExecuteQuery();
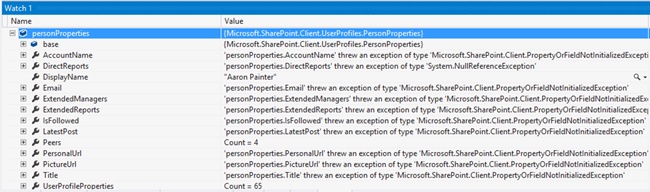
After the updated code is executed, you can tell that Aaron Painter’s Display Name, Peers, and UserProfileProperties properties are not throwing exceptions any longer and have actual values that you can use. You might be wondering where the Office Phone property is; it’s actually stored within the UserProfileProperties array under the key WorkPhone. The Peers object is also an array that stores the account name for each of Aaron’s peers. This proves useful because you simply need to execute the same block of code, minus the request for the Peers property, as you initially did for Aaron. Example 17-5 shows the completed code needed to access both Aaron’s information and the information of his peers. Example 17-6 shows the markup necessary to complete the example.
//Variables
string siteURL = "http://portal.contoso.com";
string curUser = @"contosoaaronp";
ClientContext clientContext = new ClientContext(siteURL);

//Get Aaron Painter's Office Phone and Peers
PeopleManager peopleManager = new PeopleManager(clientContext);
PersonProperties personProperties = peopleManager.GetPropertiesFor(curUser);
clientContext.Load(personProperties, p => p.DisplayName, p => p.UserProfileProperties
  ,p => p.Peers);
clientContext.ExecuteQuery();
//Get Aaron Painter's Information
Dictionary<string, string> myOfficePhone = new Dictionary<string, string>();
myOfficePhone.Add(personProperties.DisplayName,
personProperties.UserProfileProperties["WorkPhone"]);
List<string> curUserPeers = personProperties.Peers.ToList<string>();
//Get Office Phone for each of Aaron Painter's Peers
Dictionary<string,string> peersWithOfficePhones = new Dictionary<string,string>();
foreach (string peer in curUserPeers)
{
personProperties = peopleManager.GetPropertiesFor(peer);
clientContext.Load(personProperties, p => p.DisplayName, p => p.UserProfileProperties);
clientContext.ExecuteQuery();
peersWithOfficePhones.Add(personProperties.DisplayName,
  personProperties.UserProfileProperties["WorkPhone"]);
}

//Bind Aaron's Information to Repeater for Rendering

rptMyInfo.DataSource = myOfficePhone;
rptMyInfo.DataBind();

//Bind Peers Information to Repeater for Rendering
rptPeerInfo.DataSource = peersWithOfficePhones;
rptPeerInfo.DataBind();<div>
<asp:Repeater ID="rptMyInfo" runat="server">
<HeaderTemplate><div><h3>My Information</h3></div></HeaderTemplate>
<ItemTemplate>
<div><strong><%# Eval("Key") %></strong></div>
<div><%# Eval("Value") %></div>
</ItemTemplate>
<FooterTemplate><hr /></FooterTemplate>
</asp:Repeater>
<asp:Repeater ID="rptPeerInfo" runat="server">
<HeaderTemplate><div><h3>My Peers</h3></div></HeaderTemplate>
<ItemTemplate>
<div><strong><%# Eval("Key") %></strong></div>
<div><%# Eval("Value") %></div>
</ItemTemplate>
<FooterTemplate></FooterTemplate>
</asp:Repeater>
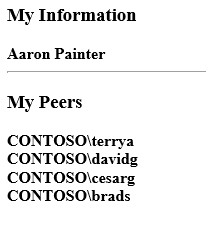
</div>If you have success executing the code, you should find something similar to what is displayed within Figure 17-7, but probably with different names and numbers.

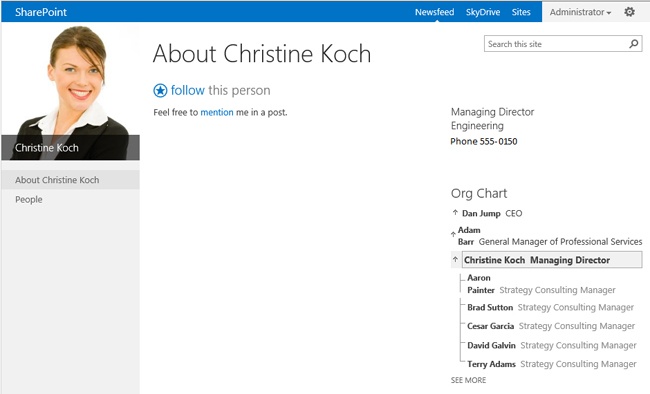
To ensure that the solution is indeed a success, you can compare the list of peers returned with those found on the user’s manager’s profile page. As Figure 17-8 suggests, you have successfully returned Aaron’s peers within the example.
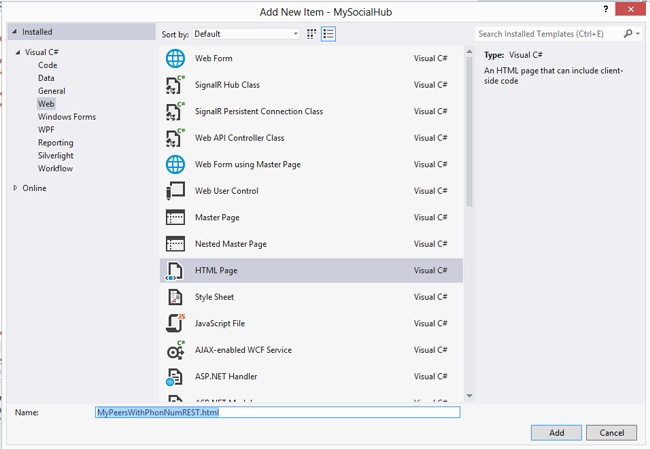
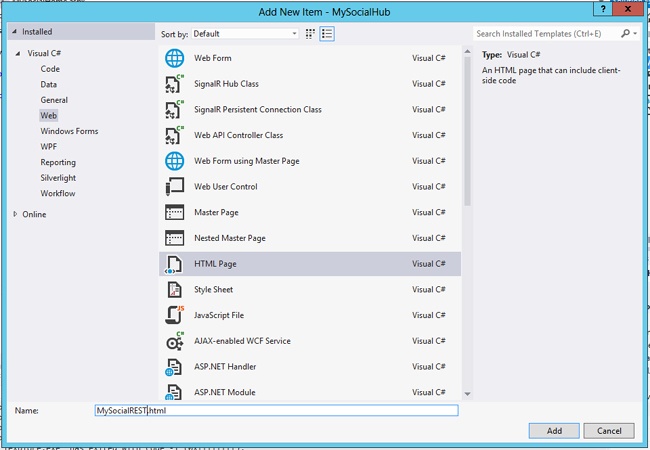
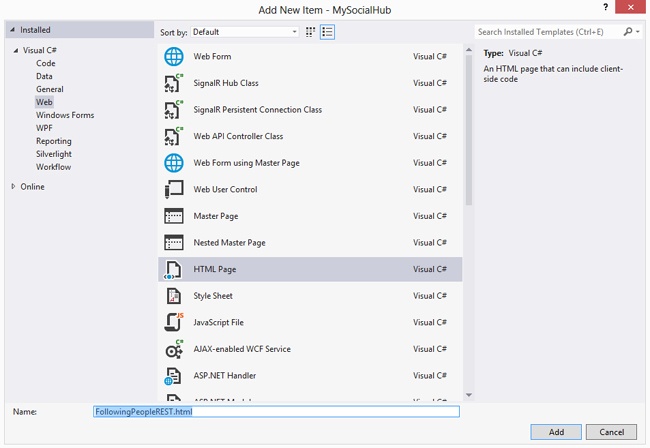
Next you will perform the same example, but you will use the REST API in place of CSOM. As described earlier, the REST API in SharePoint 2013 is extremely robust in comparison to its implementation in previous versions of SharePoint. To begin the REST example, you can use the same Visual Studio project that was used for the CSOM example and simply add a new HTML page to the project, as shown in Figure 17-9.
The fact that you are selecting an HTML page should give you an indication that you will not be using references in the way you typically would for CSOM or SSOM. With REST, you typically make requests by sending a POST or GET request to an available endpoint. Just as with CSOM, the code will interact with a PeopleManager object, with the one difference being how you access the PeopleManager object. With REST, you access it by calling an endpoint at the following address: http://<siteUri>/_api/SP.UserProfiles.PeopleManager. By using this address, you can call the GetPropertiesFor method and pass in variables to return the desired results. Example 17-7 shows how you can build the GET request to the PeopleManager endpoint to return back the user’s properties and the account names of his peers.
 <html xmlns="http://www.w3.org/1999/xhtml">
<head>
    <title></title>
    <script src ="http://ajax.aspnetcdn.com/ajax/jQuery/jquery-2.0.2.min.js"></script>
    <script type="text/javascript">
        $().ready(function () {

            //variables
            var curUser = "contoso\aaronp";
            var profileEndPoint = "http://portal.contoso.com/_api/SP.UserProfiles.
PeopleManager/GetPropertiesFor(accountName=@v)?@v='" + curUser + "'";

            $.ajax({
                type: "GET",
                contentType: "application/json; charset=utf-8",
                datatype: "json",
                url: profileEndPoint,
                headers: { "ACCEPT": "application/json;odata=verbose" },
                success: onSuccess,
                error: onFail
            });
            function onSuccess(data) {
                var myDisplayName = data.d.DisplayName;
                var myPeers = data.d.Peers;
                $("#myDisplayName").html("<strong>" + myDisplayName + "</strong>");

                $.each(myPeers.results, function (value,key) {
                    $("#myPeers").after("<div><strong>" + key + "</strong></div>");
                });

            }

            function onFail(errorObject, errorMessage) {
                $("#errMessage").text("Error: " + errorMessage);
            }
        });
    </script>
</head>
<body>
    <div><h3>My Information</h3></div>
    <div id="myDisplayName"><strong></strong></div>
    <div id="myWorkPhone"></div>
    <hr />
    <div><h3>My Peers</h3></div>
    <div id="myPeers"></div>
    <div id="errMessage"></div>
</body>
</html>
Walking through the code from top to bottom, the first need is to reference the jQuery library. In Example 17-7, this was done by using the ASP.NET Content Delivery Network (CDN). After the script reference, a script block is declared with a jQuery document.ready() function. For reasons of simplicity, all variables and declarations are made within this code block to avoid naming conflicts within the namespace. If you would like to learn more about namespaces, you can do so in Chapter 5. Continuing on through the code, variables are declared for Aaron Painter and for the PeopleManager endpoint. An Asynchronous JavaScript and XML (AJAX) method is used to execute the GET request, which passes the endpoint as the URL to which the request is to be submitted, and requests that the results be returned as a JavaScript Object Notation (JSON) object. Both a success and a failure method are used to capture either the returned JSON object or the error object. The success method accepts a data object whose top-level properties contain the DisplayName and Peers properties for the requested user profile properties. jQuery is used to render these results to the markup found with the body element of the HTML markup in Example 17-7.
At this point, if you viewed the HTML page within the browser, you should find something similar to Figure 17-10.
As you can tell, this is very close to the results that you received when using the CSOM approach. The only things missing are the display names and phone numbers for each peer in place of the account name. Example 17-8 has a few additional utility methods that help you complete this task. The matching results to the CSOM example are shown in Figure 17-11.
<html xmlns="http://www.w3.org/1999/xhtml">
<head>
    <title></title>
    <script src ="http://ajax.aspnetcdn.com/ajax/jQuery/jquery-2.0.2.min.js"></script>
    <script type="text/javascript">
        $().ready(function () {

            //variables
            var curUser = "contoso\aaronp";
            $.ajax({
                type: "GET",
                contentType: "application/json; charset=utf-8",
                datatype: "json",
                url: buildProfileEndPoint(curUser),
                headers: { "ACCEPT": "application/json;odata=verbose" },
                success: onSuccess,
                error: onFail
            });

            function GetUserProfile(user) {
                //send GET request to SharePoint
                $.ajax({
                    type: "GET",
                    contentType: "application/json; charset=utf-8",
                    datatype: "json",
                    url: buildProfileEndPoint(user),
                    headers: { "ACCEPT": "application/json;odata=verbose" },
                    success: function (data) {
                        $("#myPeers").after("<div><strong>" + data.d.DisplayName +
                          "</strong></div><div>" + getValueByKey

("WorkPhone", data.d.UserProfileProperties.results) + "</div>");
                    },

                    error: function (errorObject, errorMessage) {
                        $("#errMessage").text("Error: " + errorMessage);
                    }
                });
            }

            function onSuccess(data) {
                var myDisplayName = data.d.DisplayName;
                var myWorkPhone = getValueByKey("WorkPhone",
                  data.d.UserProfileProperties.results);
                var myPeers = data.d.Peers;
                $("#myDisplayName").html("<strong>" + myDisplayName + "</strong>");
                $("#myWorkPhone").text(myWorkPhone);
                $.each(myPeers.results, function (value,key) {
                    GetUserProfile(key);
                });

            }
function onFail(errorObject, errorMessage) {
                $("#errMessage").text("Error: " + errorMessage);
            }

            //Utility Functions
            function getValueByKey(key, results) {
                var item = jQuery.grep(results, function (e) {
                    if (e.Key === key)
                        return e;
                })[0].Value;

                return item;
            }

            function buildProfileEndPoint(user) {
                return "http://portal.contoso.com/_api/SP.UserProfiles.PeopleManager/
                  GetPropertiesFor(accountName=@v)?@v='" + user + "'"
            }

        });
    </script>
</head>
<body>
    <div><h3>My Information</h3></div>
    <div id="myDisplayName"><strong></strong></div>
    <div id="myWorkPhone"></div>
    <hr />
    <div><h3>My Peers</h3></div>
    <div id="myPeers"></div>
    <div id="errMessage"></div>
</body>
</html>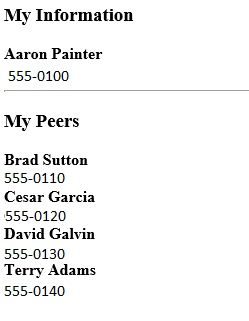
Now that you have completed an example of retrieving profile properties not only for a user but also for his peers by using both CSOM and the REST API, you have the necessary foundation to work with profiles and access properties when needed.
Understanding social feeds
As stated earlier in this chapter, social feeds for all intents and purposes have taken the place of the activity feed found in SharePoint 2010. The activity feed was a step forward from versions previous to 2010; however, with the ever-increasing demand for social features within the collaboration space, this feed would not sufficiently meet today’s standards. This is why there is more than one type of social feed and why what you can do within each feed has vastly improved over the activity feed.
The important thing to remember with these feeds is that they are people-centric; even if you choose to interact with a document, the interaction itself is taken by a person or an Actor, which is one of the primary objects you’ll be working with whenever you are coding against the user profile and social namespaces.
Another object that you’ll want to become familiar with is the SocialFeedManager, which is similar to the PeopleManager in terms of how you go about accessing social feeds as with a profile.
By the end of this chapter, you will have completed examples that will be able to request the social feed for the current user, post to your feed, request the social feed for a team site, and post to a social feed for a team site.
Just as in the examples in the previous section, we will work through both a CSOM and a REST approach.
Retrieving posts from your newsfeed
The term microblogging is new to SharePoint and might be a mystery to some as to what it actually entails. A short description is that it is the act of posting short blocks of text or updates. These updates can be created through the SharePoint UI by a person using his personal feed, which is shown in the newsfeed found on his personal site, or from a private feed, which is a newsfeed found typically on a team site. As you can tell, these actions are very similar to those found on a full-fledged blog site, just minified in terms of the amount of content that is typically posted.
As a developer you can start to imagine all the possibilities that are available. To help you get a good idea of how microblogging works, the first example you will complete is retrieving posts from your own personal feed.
From within your Visual Studio project, create a new Web Form page similar to the one shown in Figure 17-12.
The following namespaces need to be added to the code-behind for the newly created Web Form so that you can easily access the necessary objects:
Microsoft.SharePoint.Client
Microsoft.SharePoint.Client.Social
Next you will need to declare variables for a site URL to gain context within SharePoint by passing it to a ClientContext object. Similar to the technique you used to get the profile for a user, there is a manager class for accessing social feeds that is called the SocialFeedManager. By using the SocialFeedManager, you can retrieve, create, and delete posts. The methods listing here for the SocialFeedManager class give a good indication of what its purpose is:
As you can tell, a lot of heavy lifting is done for you via this class. For now, the method that you will want to take advantage of is the one aptly named GetFeed, because you want to get the current user’s feed.
To use the GetFeed method, you first need to create an instance of ClientContext and then pass it to an instance of the SocialFeedManager, as shown in Example 17-9.
//variables
string siteURL = "http://portal.contoso.com";
//Create instances for ClientContext and SocialFeedManager
ClientContext clientContext = new ClientContext(siteUrl);
SocialFeedManager feedManager = new SocialFeedManager(clientContext);
Now that you have a feedManager object, you can execute the GetFeed method. It is important to note that this method can only be used for the current user. When you use the GetFeed method, one of the parameters you need to specify is a feed type, which is of the SocialFeedType enumeration. The available types in the enumeration are:
Everyone
Likes
News
Personal
Timeline
Basically what each feed type shows is a filtered version of the Everyone feed type, which accounts for all activity for the current user’s organization. Table 17-1 shows each of the available feed types and the data that is returned by each.
Feed type | Description |
Everyone | All recent activities by the current user’s organization. |
Likes | All microblog posts liked by the current user. |
News | All activities by the current user; people and content that the user is following, sorted by modified date. Emphasis is on date as to what is returned. |
Personal | All activities by the current user only. |
Timeline | All activities by the current user, people and content that the user is following, sorted by created date. Emphasis is on the user’s social graph as to what is returned. |
In this example you will use the News type, because it will show content that you know the user would be interested in. In addition to the type of feed, you also must specify options for the feed being returned before you can request the feed. The options are based on the SocialFeedOptions class. There are four properties that you can use when instantiating an instance of the SocialFeedOptions class:
MaxThreadCount. Allows you to specify the maximum number of threads to return. The default is 20 threads.
NewerThan. Allows you to specify a date after which the thread must have been created.
OlderThan. Allows you to specify a date before which the thread must have been created.
SortOrder. Allows you to specify the order in which the threads are returned. There are only two options, passed as integers. Use 0 to sort by the modified date and 1 to sort by created date of the root post.
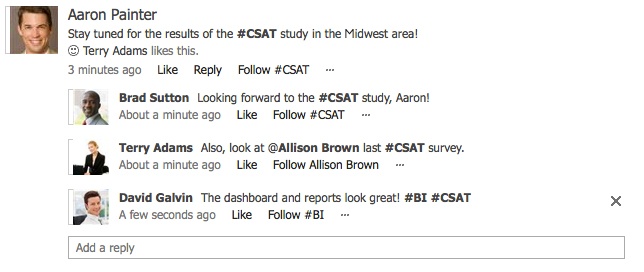
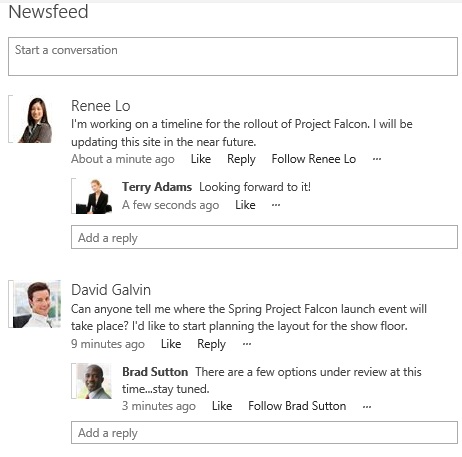
Now is a good time to go over how posts are constructed from an object hierarchy before we progress any further with this code example. Figure 17-13 shows a newsfeed in which Aaron Painter has started a conversation about CSAT. There are three replies by others in the organization.
The breakdown of this conversation from an object perspective is shown in Figure 17-14.
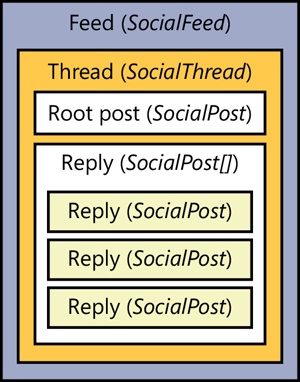
The newsfeed is a SocialFeed object that contains threads that are SocialThread objects. From the SharePoint UI, as shown in Figure 17-13, threads are represented as conversations. Each thread has a root post, the original post or the post that started the conversation, and all the replies to the thread. Notice that all posts, regardless of whether they are the root post or one of the replies, are stored as SocialPost objects. The only difference is that the replies are stored in an array within the thread.
Recall that the GetFeed method allows you to pass into the SocialFeedOptions object the maximum number of threads to return, but it didn’t have anything for you to specify the maximum number of replies to return. This is because the GetFeed method will only return the two most recent replies for the thread or conversation. Even though only two will be returned, you can read the TotalReplyCount property for the thread to determine if there are, in fact, more replies. If so, the GetFullThread method will return the thread with all of the replies, if you pass it the thread ID. You might wonder why the two-reply limit is placed on the GetFeed method. If you spend enough time within the SharePoint UI, you will notice that all conversations use this structure. Figure 17-15 shows the conversation Aaron Painter started before the Show All Replies link was clicked. This mechanism was put into place to be more resource-friendly and ensure that the newsfeed could render as quickly as possible. You would also be correct if you assumed that the Show All 3 Replies link within Figure 17-15 would call the GetFullThread method if you clicked on it, which would give you the view that is shown back in Figure 17-13.

Now that you have a better understanding of how posts are treated in SharePoint, you can continue with the code example by executing the GetFeed method and displaying the results within a Repeater control, as shown in Example 17-10.
//Code-behind
//variables
string siteURL = "http://portal.contoso.com";
//Create instances for ClientContext and SocialFeedManager
ClientContext clientContext = new ClientContext(siteURL);
SocialFeedManager feedManager = new SocialFeedManager(clientContext);
ClientResult<SocialFeed> personalFeedResults = feedManager.GetFeed(SocialFeedType.News,
new SocialFeedOptions()
{
MaxThreadCount = 5
});
clientContext.ExecuteQuery();
rptPosts.DataSource = personalFeedResults.Value.Threads;
rptPosts.DataBind();
//ASPX Markup
<%@ Page Language="C#" AutoEventWireup="true" CodeBehind="MySocialHome.aspx.cs"
Inherits="MySocialHub.MySocialHome" %>
<%@ Import Namespace="Microsoft.SharePoint.Client.Social" %>
<%@ Import Namespace="Microsoft.SharePoint.Client" %>
<%@ Assembly Name="Microsoft.SharePoint.Client.UserProfiles, Version=15.0.0.0,
Culture=neutral, PublicKeyToken=71e9bce111e9429c" %>
<%@ Assembly Name="Microsoft.SharePoint.Client.Runtime, Version=15.0.0.0, Culture=neutral,
PublicKeyToken=71e9bce111e9429c" %>
<!DOCTYPE html>
<html xmlns="http://www.w3.org/1999/xhtml">
<head runat="server">
<title></title>
</head>
<body>
<form id="form1" runat="server">
<div>
<div><h3>My Newsfeed</h3></div>
<asp:Repeater ID="rptPosts" runat="server">
<HeaderTemplate></HeaderTemplate>
<ItemTemplate>
<!-- Post Properties -->
<div><%# ((SocialThread)Container.DataItem).RootPost.Text %></div>
<!-- Post Replies -->
<asp:Repeater id="rptPostReplies" runat="server"
DataSource="<%# ((SocialThread)Container.DataItem).Replies %>">
<HeaderTemplate><ul></HeaderTemplate>
<ItemTemplate>
<li><%# Eval("Text") %></li>
</ItemTemplate>
<FooterTemplate></ul></FooterTemplate>
</asp:Repeater>
</ItemTemplate>
<FooterTemplate></FooterTemplate>
</asp:Repeater>
</div>
</form>
</body>
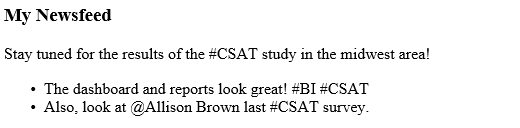
</html>After running this code, you can compare what is shown in Figure 17-16 with what the SharePoint UI on the newsfeed was showing and note that they match.
Now that you have successfully retrieved posts from a newsfeed by using CSOM, you will walk through the same example by using the REST API.
Start the REST API example by first creating a new HTML page within your Visual Studio project, as shown in Figure 17-17.
Within the markup for the HTML page, you will want to include a script reference to the jQuery library so that you can use the AJAX method for communication with the REST API. The next step is to determine which endpoint to use when making a request for a social feed. With the CSOM example you used the GetFeed method to get the feed for the current user, and then specified the type that you would like returned. However, before you could use the GetFeed method you had to have a SocialFeedManager object to work with first. This is represented within the REST API by an endpoint located at http://<site>/_api/social.feed. When you use this endpoint, the type is determined by the endpoint you choose to append to the social feed endpoint. In Table 17-2, some of the key endpoints for use with the current user are listed, along with a description.
Endpoint | Description |
My/Feed | Activities by the current users only |
My/Likes | All microblog posts liked by the current user |
My/News | All activities by the current user, people and content that the user is following from the newsfeed, sorted by modified date |
My/MentionFeed | All activities that mention the current user |
My/Timelinefeed | All activities by the current user, people and content that the user is following, sorted by created date |
You will use the My/News endpoint for requesting the posts for the current user for this example.
The next step is to pass feed options to the newsfeed endpoint. This is accomplished by passing parameters to the endpoint. You will use the max count of five again for the number of threads to return. Parameters can be passed to the REST endpoint in a few different ways. The appropriate approach will typically depend on what you are trying to pass as the parameters. If, for instance, you are passing a simple number such as 5, as in this case when you want to specify the max thread count, you can pass it like this: http://<site>/_api/social.feed/my/news(MaxThreadCount=10). However, if you have a case in which a special character is involved, such as the backslash () used when passing an account name structured in domainusername style, then you might want to use something called an @ alias. An @ alias is used like this: http://<site>/_api/social.feed/actor(item=@v)/feed?@v=’domain\username’. A URL is not limited as to the number of @ aliases you can use. Just make sure to use a different @ alias for each of the parameters you want to pass. For example, if you wanted to also pass a date for declaring the NewerThan property in addition to the username, you could still use @v for the username and @x for the date, which would have a URL structure like this: http://<site>/_api/social.feed/actor(item=@v)/feed(NewerThan=@x)?@v=’domain\username’&@x=datetime’2013-07-19T08:00’.
Example 17-11 shows the completed code for making the GET request to the My/News endpoint to return the newsfeed for the current user. Also, in addition to what was returned in the previous example, this example has been extended to show who the root post creator is, along with who each of the repliers is in addition to the posts.
<!DOCTYPE html>
<html xmlns="http://www.w3.org/1999/xhtml">
<head>
<title></title>
<script src="http://ajax.aspnetcdn.com/ajax/jQuery/jquery-2.0.2.min.js""></script>
<script type="text/javascript">
$().ready(function () {
//variables
var endpointURL = "http://portal.contoso.com/_api/social.feed/my/
news(MaxThreadCount=5)"
$.ajax({
type: "GET",
url: endpointURL,
headers: {
"accept": "application/json;odata=verbose"
},
success: onSuccess,
error: onFail
});
function onSuccess(data) {
var threads = data.d.SocialFeed.Threads.results;
$.each(threads, function (value) {
var orgPost = threads[value].RootPost.Text;
var orgPoster = threads[value].Actors.results[threads[value].
OwnerIndex].Name;
var post = "<div><strong>" + orgPost + "</strong></div>";
post += "<div><i>" + orgPoster + "</i></div><br/>";
var replies = threads[value].Replies.results;
$.each(replies, function (key) {
var rplPost = replies[key].Text;
var rplPoster = threads[value].Actors.results[replies[key].
AuthorIndex].Name;
post += "<div class='reply'><strong>" + rplPost + "</strong>
</div>";
post += "<div class='reply'><i>" + rplPoster + "</i></div>";
});
$("#myNewsfeed").after(post);
});
}
function onFail(errorObject, errorMessage) {
$("#errMessage").text("Error: " + errorMessage);
}
});
</script>
<style>
.reply {
padding-left:15px;
}
</style>
</head>
<body>
<div id="myNewsfeed"><h2>My Newsfeed</h2></div>
<div id="errMessage"></div>
</body>
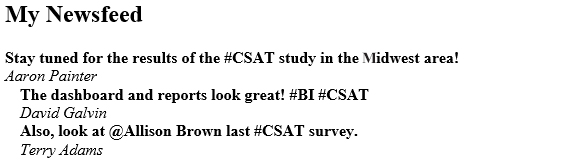
</html>When you load the HTML page, as shown in Figure 17-18, you can tell that the feed is successfully returned along with who each post was created by.
You might have noticed, if you walked through both the CSOM with C# and the REST example, that the REST example was completed with less code. This could partially be because you are using the jQuery library, so many of the functions could be abstracted, but another reason is because of how easy JSON is to work with. Because it has XML type characteristics, it can be iterated through much more easily at times than C# objects can, which can equate to less code. As developers, we should always want to write less code, because it means less to debug and sift through when it comes to maintenance.
Retrieving posts from a site feed
Retrieving posts from a site feed is very similar to retrieving posts from personal feeds. In the previous section you walked through how to retrieve the current user’s feed, but if you had instead walked through how to retrieve another user’s feed it would be even more similar to the example you are about to go through.
Of course, a site feed must exist on a site before you can code against it, so discussing how a site feed comes into existence is a good topic to start with. It is actually a fairly short conversation, because all the functionality required for a site feed is contained within a single web-scoped feature called Site Feed, as shown in Figure 17-19.

When this feature is activated, a few items are provisioned on the site, but the more important thing for this discussion is that a microfeed feed now exists for you to code against. Figure 17-20 shows the site newsfeed for a team site that you will be coding against.
Now that you have that out of the way, you can begin coding the example. You might think at first that there will be quite a few differences between site feeds and personal feeds, and in some ways there might be, but for this example, when you are trying to access each of these newsfeeds from CSOM by using C#, there are actually only two changes: you need to use the GetFeedFor method within the SocialFeedManager object, and the actor parameter that you pass is not a domain user account, but a site URL that has a social feed provisioned on it. Other than that, the objects that you interact with both from a request and a rendering perspective are identical. To start this example, you can create a Web Form page called SiteSocialCSOM.aspx, similar to the one shown in Figure 17-21. Example 17-12 details the code-behind and the markup required to complete this example.
//variables
string siteURL = "http://portal.contoso.com";
//Create instances for ClientContext and SocialFeedManager
ClientContext clientContext = new ClientContext(siteURL);
SocialFeedManager feedManager = new SocialFeedManager(clientContext);
ClientResult<SocialFeed> siteFeedResults = feedManager.GetFeedFor(
"http://projects.contoso.com/gearsproject", new SocialFeedOptions()
{
MaxThreadCount = 5
});
clientContext.ExecuteQuery();
rptPosts.DataSource = siteFeedResults.Value.Threads;
rptPosts.DataBind();
//ASPX markup
<%@ Page Language="C#" AutoEventWireup="true" CodeBehind="SiteSocialCSOM.aspx.cs"
Inherits="MySocialHub.SiteSocialCSOM" %>
<%@ Import Namespace="Microsoft.SharePoint.Client.Social" %>
<%@ Import Namespace="Microsoft.SharePoint.Client" %>
<%@ Assembly Name="Microsoft.SharePoint.Client.UserProfiles, Version=15.0.0.0,
Culture=neutral, PublicKeyToken=71e9bce111e9429c" %>
<%@ Assembly Name="Microsoft.SharePoint.Client.Runtime, Version=15.0.0.0, Culture=neutral,
PublicKeyToken=71e9bce111e9429c" %>
<!DOCTYPE html>
<html xmlns="http://www.w3.org/1999/xhtml">
<head id="Head1" runat="server">
<title></title>
</head>
<body>
<form id="form1" runat="server">
<div>
<div><h3>Site Newsfeed</h3></div>
<asp:Repeater ID="rptPosts" runat="server">
<HeaderTemplate></HeaderTemplate>
<ItemTemplate>
<!-- Post Properties -->
<div><%# ((SocialThread)Container.DataItem).RootPost.Text %></div>
<!-- Post Replies -->
<asp:Repeater id="rptPostReplies" runat="server"
DataSource="<%# ((SocialThread)Container.DataItem).Replies %>">
<HeaderTemplate><ul></HeaderTemplate>
<ItemTemplate>
<li><%# Eval("Text") %></li>
</ItemTemplate>
<FooterTemplate></ul></FooterTemplate>
</asp:Repeater>
</ItemTemplate>
<FooterTemplate></FooterTemplate>
</asp:Repeater>
</div>
</f
</body>
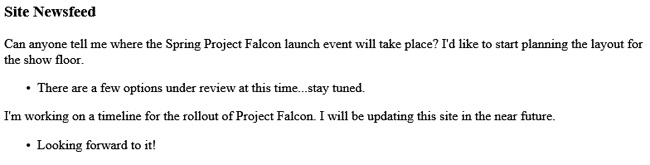
</html>And finally, Figure 17-22 shows the site newsfeed rendered out in the SiteSocialSCOM.aspx page.
When you want to retrieve a site newsfeed by using the REST API approach, the same holds true when it comes to the small amount of change that is necessary when compared to the previous examples. With the CSOM approach, you simply needed to use a different method and pass in the site URL; with REST this translates to a different endpoint that you pass the GET request to. In addition to the different endpoint, you also need to pass the site URL. The endpoint that you need to target is http://<site>/_api/social.feed/actor(item=@v)/feed. You’ll notice that this endpoint uses an @ alias that you can pass at the end of the URL, like this: http://<site>/_api/social.feed/actor(item=@v)/feed?@v=’http://<teamSite>/newsfeed.aspx’, where the <teamSite> variable is the URL to the site containing a newsfeed.
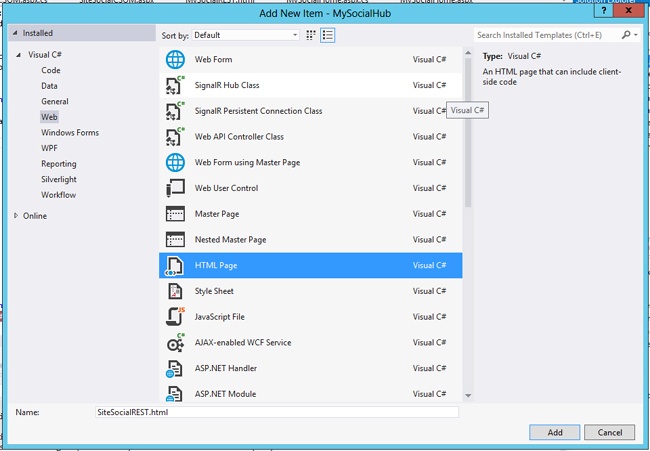
To start this example, add a new HTML page called SiteSocialREST.html to the MySocialHub project, as shown in Figure 17-23.
At this point, you can use the code from the REST example for retrieving a personal feed, except that you need to update the endpoint that you send the GET request to. Also, because the last REST example rendered out the author of each post and used the owner index attribute to look up the author, you have another amendment to make to the code. This is because when you are working with a SocialThread object that is returned from a personal feed, the owner of the thread is always the author of the root post; however, when you are dealing with a site feed, the owner of the thread is always the site and, as such, has the site’s title stored in it. So the way to get the true author is to always use the AuthorIndex property for the root post, in place of the thread’s OwnerIndex, so that your rendering code is reusable regardless of whether it is accessing a personal feed or a site feed. Example 17-13 contains the updated REST code for accessing the site newsfeed by using the AuthorIndex, and Figure 17-24 shows the results rendered on the HTML page.
<!DOCTYPE html>
<html xmlns="http://www.w3.org/1999/xhtml">
<head>
    <title></title>
    <script src="http://ajax.aspnetcdn.com/ajax/jQuery/jquery-2.0.2.min.js""></script>
    <script type="text/javascript">
        $().ready(function () {
            //variables
            var siteURL = "http://projects.contoso.com"
            var endpointURL = siteURL + "/_api/social.feed/actor(item=@v)/
              feed?@v='http://projects.contoso.com/gearsproject'"

            $.ajax({
                type: "GET",
                url: endpointURL,
                headers: {
                    "accept": "application/json;odata=verbose"
                },
                success: onSuccess,
                error: onFail
            });

            function onSuccess(data) {
                var threads = data.d.SocialFeed.Threads.results;
                $.each(threads, function (value) {
                    var orgPost = threads[value].RootPost.Text;
                    //var orgPoster = threads[value].Actors.results[threads[value].
OwnerIndex].Name;
                    var orgPoster = threads[value].Actors.results[threads[value].RootPost.
AuthorIndex].Name;
                    var post = "<div><strong>" + orgPost + "</strong></div>";
                    post += "<div><i>" + orgPoster + "</i></div><br/>";
                    var replies = threads[value].Replies.results;
                    $.each(replies, function (key) {
                        var rplPost = replies[key].Text;
                        var rplPoster = threads[value].Actors.results[replies[key].
AuthorIndex].Name;
                        post += "<div class='reply'><strong>" + rplPost + "</strong>
                          </div>";
                        post += "<div class='reply'><i>" + rplPoster + "</i></div>";

                    });
                    $("#siteNewsfeed").after(post + "<br/>");
                });
            }
            function onFail(errorObject, errorMessage) {
                $("#errMessage").text("Error: " + errorMessage);
            }
        });
    </script>
    <style>
        .reply {
            padding-left:15px;
        }
    </style>
</head>
<body>
    <div id="siteNewsfeed"><h2>Site Newsfeed</h2></div>
    <div id="errMessage"></div>
</body>
</html>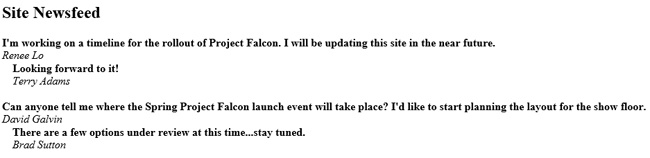
This concludes the examples for retrieving posts from a site feed. You should now be comfortable retrieving posts from any site by using either CSOM with C# or the REST API.
Posting to your personal feed
Now that you are comfortable retrieving posts that already exist, the next logical step is to post to a social feed. You will start by posting to the current user’s feed. It is important to remember that you can only post to the current user’s feed, because at this time there is no administration-type functionality to post to another’s feed. Even with this restriction, there are numerous possibilities that are opened up when you gain the initial knowledge required to perform a post. As with all other examples in this chapter, you will first start with the CSOM and C# approach and then finish with the REST API approach.
If you have not worked through the examples in the section “Retrieving posts from your newsfeed,” it is recommended that you do so to gain an understanding of the social objects required to initially access the current user’s newsfeed. The SocialFeedManager object is used to create posts as well as retrieve them, so this will simplify the first part of creating a post, because you are already familiar with this object. The method that is used to create a post is the aptly named CreatePost, which can be used to either create a root post, also known as a new thread, or reply to an existing thread. There two parameters, both of which are required, regardless of whether you want to reply to or create a new thread. The parameters are listed in Table 17-3.
Type | Description | |
targetId | String | Can be one of the following:
|
creationData | SocialPostCreationData | The contents of the new post, which can be anything from an attachment (such as a video or image) to the actual text that you would like to post |
Creating a post via code can be a very simple task when you are only passing text, as a new post is required to do. Example 17-14 shows the code necessary to create a simple post with some text.
// Define properties for the post.
SocialPostCreationData postCreationData = new SocialPostCreationData();
postCreationData.ContentText = "Post via Code";

//Call CreatePost method
feedManager.CreatePost(null, postCreationData);

//Call ExecuteQuery
clientContext.ExecuteQuery();
As you can tell, there isn’t much to creating a simple post. As with all the other examples in this chapter, you’ll need to have ClientContext and SocialFeedManager objects, but other than that, just four lines of code will create a new post. If you dissect the code sample just shown, you’ll notice that the ContentText property of the SocialPostCreationData object called postCreationData is what you pass the text to be included in the post to. One limitation to keep in mind is that this text is limited to 512 characters and is not permitted to have HTML tags. This restriction might seem alarming at first, because if you have spent any reasonable amount of time within the SharePoint Web UI interacting with a social feed, you’ll know that links are possible in a post. So how is it that from a coded approach we have this restriction? This is merely a restriction on how links can be passed into a new post. As you have already learned, the text of the post is set by using the ContentText property, whereas links, tags, sites, documents, and even users are set within a post by using the ContentItems array. Example 17-15 shows the previous example updated with two new items being included in the post.
// Create a link to include in the post.
SocialDataItem linkItem = new SocialDataItem();
linkItem.ItemType = SocialDataItemType.Link;
linkItem.Text = "SharePoint Website";
linkItem.Uri = "http://office.microsoft.com/en-us/sharepoint/";

//Create a person mention to include in the post
SocialDataItem userItem = new SocialDataItem();
userItem.ItemType = SocialDataItemType.User;
userItem.AccountName = "contoso\terrya";

// Define properties for the post.
SocialPostCreationData postCreationData = new SocialPostCreationData();
postCreationData.ContentText = "Visit the {0}. Look for a post by {1} while you are
there.";
postCreationData.ContentItems = new SocialDataItem[] { linkItem, userItem };
feedManager.CreatePost(null, postCreationData);
clientContext.ExecuteQuery();
The first new block of code declares a new SocialDataItem object called linkItem. The second line in that block sets the ItemType to a link, by using the SocialDataItemType enumerator. There are, in fact, five different types available within this enumeration:
User
Document
Site
Tag
Link
Also, including ItemType, there are a total of five usable properties for the SocialDataItem object:
AccountName
ItemType
TagGuid
Text
Uri
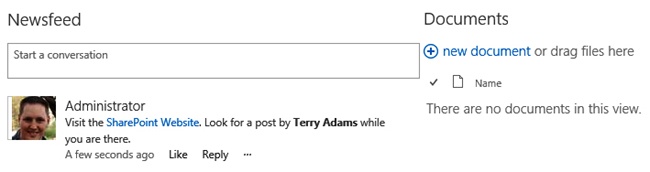
Not all are necessary; their use depends on what you intend to use the object for. Going back to the last example, you can tell that the linkItem has a value set for ItemType, Text, and Uri. The next section in the code declares another object of the same type called userType, which has its type set to User and only sets a value for the AccountName property. Figure 17-25 shows how each post looks within the SharePoint UI on the current user’s newsfeed. Note that a hyperlink was created by using the text for the linkItem and that the Uri is the href. Also, notice that even though you only used the AccountName property for the userItem, it was able to display the display name for the user and that it is also a hyperlink that links to the About page for that user.
Posting to your personal feed by using REST is still done through the social.feed endpoint. Additionally, you need to add another endpoint to the end of the social.feed endpoint: /my/Feed/Post. This final endpoint can be looked at as equivalent to the CreatePost method in the CSOM example. Also, as in the CSOM example, you need to create a SocialPostCreationData object. The REST API actually goes a step further and wraps this object within another object called SocialRestPostCreationData (note the inclusion of REST in the object name). Up to this point in the chapter, we have not discussed in any detail how to formulate a POST to a REST endpoint. You have, however, passed parameters to an endpoint to specify what you would like returned by the endpoint. In essence, the act of passing a parameter to an endpoint holds true for what you do in a POST request, but the parameter metadata is usually a lot more complex and is typically moved from the URI to the request body of the POST request. Example 17-16 shows the part of the code used to send the same post you did in the final CSOM example, this time by using the REST API. The data property contains the parameter metadata.
$.ajax({
           url: "http://portal.contoso.com/_api/social.feed/my/Feed/Post",
           type: "POST",
           data: JSON.stringify({
                     'restCreationData': {
                             '__metadata': {
                                     'type': 'SP.Social.SocialRestPostCreationData'
                             },
                             'ID': null,
                             'creationData': {
                                     '__metadata': {
                                             'type': 'SP.Social.SocialPostCreationData'
                                     },
                                     'ContentItems': {
                                     'results': [
                                     {
                                             '__metadata': {
                                                   'type': 'SP.Social.SocialDataItem'
                                             },
                                             'ItemType': 4,
                                             'Text': 'SharePoint Website',
                                             'Uri': 'http://office.microsoft.com/
en-us/sharepoint/'
                                     },
                                     {
                                             '__metadata': {
                                                     'type': 'SP.Social.
SocialDataItem'
                                             },
                                             'ItemType': 0,
                                             'AccountName': 'contoso\terrya',
                                     }
                                     ]
                             },
                             'ContentText': 'Visit the {0}. Look for the post by {1}
                             while you are there.',
                             'UpdateStatusText': false
                        }
                }
       }),
       headers: {
                   "accept": "application/json;odata=verbose",
                   "content-type": "application/json;odata=verbose",
                   "X-RequestDigest": formDigestValue
       },
       success: function (data) {
                       GetPersonalFeed();
       },
       error: function (xhr) {
                       alert("Error:" + xhr.status);
       }
});
After reviewing this code, you can tell how easy it would be to have a missing quote, colon, or comma that would result in the POST request failing. Besides advising you to be overmeticulous in checking your scripts, we will review a few noteworthy sections of the code so that you can feel comfortable moving forward with creating posts by using this approach. We will be focusing on the data property, starting with the object called restCreationData. This object contains an ID property that is used the same way as the targetId is used in the CreatePost method using CSOM and C#. The next object is the creationData object. This object contains the ContentText property and can optionally contain a ContentItems property and a few other properties. The structure of the ContentItems property should at first appear out of place to you, because it doesn’t follow the metadata structure like the other complex properties do. In its place, you should notice that there is a results array. This is required to conform to the use of the JSON.stringify method requires the use of the results format when you are dealing with arrays. Inside of the results property you can begin to recognize the familiar metadata attributes again and you have the same two SocialDataItem objects from the previous example, with one slight difference being that you are using the numeric value for the ItemType enumeration. The remaining code in the listing is typical for a POST to the REST API.
Posting to a site feed
With a good understanding of how posting to your own feed is accomplished, you can extend this capability to posting to a site feed. There really isn’t much of a difference between creating a post on the two types of feeds besides the fact that you can only create a root post to your own personal feed, in contrast to the fact that you can create a root post on any site’s feed to which you have the correct permissions.
Another difference from the CSOM approach in posting to your personal feed is that you need to now pass the URL to a site newsfeed as the targetId when calling the CreatePost method of the SocialFeedManager object in place of a null. Example 17-17 shows a code block that will create the same post from the previous section. Note the one modification to the CreatePost method that has the path to a site with a feed.
//Create a link to include in the post.
SocialDataItem linkItem = new SocialDataItem();
linkItem.ItemType = SocialDataItemType.Link;
linkItem.Text = "SharePoint Website";
linkItem.Uri = "http://office.microsoft.com/en-us/sharepoint/";

//Create a person mention to include in the post
SocialDataItem userItem = new SocialDataItem();
userItem.ItemType = SocialDataItemType.User;
userItem.AccountName = "contoso\terrya";

//Define properties for the post.
SocialPostCreationData postCreationData = new SocialPostCreationData();
postCreationData.ContentText = "Visit the {0}. Look for a post by {1} while you are
there.";
postCreationData.ContentItems = new SocialDataItem[] { linkItem, userItem };
feedManager.CreatePost(feedURL, postCreationData);

clientContext.ExecuteQuery();
If you executed this block of code, as shown in Figure 17-26, the same post would be created with the same functionality as the post written to the personal feed.
The number of differences between using the REST API for posting between each of the feed types is identical to those found in the CSOM approach. First, you of course have to use a different endpoint with the inclusion of the social.feed endpoint. The endpoint used for a site feed is Actor/Feed/Post. Inline it would look like this: http://<site>/_api/social.feed/actor/feed/post.
Using this endpoint, you need to pass the site URL by using an @ alias with the actor parameter, like this: http://<site>/_api/social.feed/actor(item=@v)/feed/post?@v=’http://<site>/ newsfeed.aspx’.
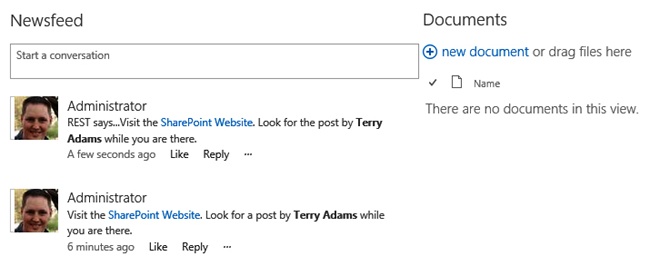
Other than this simple update, you can execute the same code from the previous REST example. Figure 17-27 illustrates a site’s newsfeed with two visible posts, one created with the REST example and the other with the CSOM using C# example.
Understanding following within SharePoint 2013
The ability to follow someone or something in the social space is an expected behavior for any collaboration tool that expects to play in this space. The intent of following is to enable users to only act once when they find someone or something that they would like to be notified about when it undergoes changes. This supports the push notification model, in which users don’t have to hunt around, losing precious time looking for what interests them or pertains to their daily workload. In SharePoint 2013, you can follow just about anything. To be more precise, the entities that you can follow are:
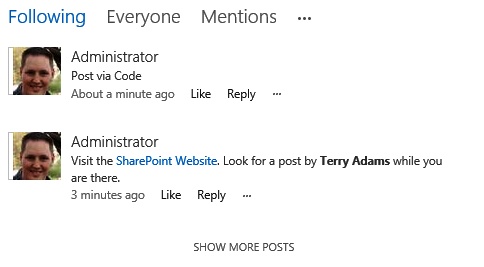
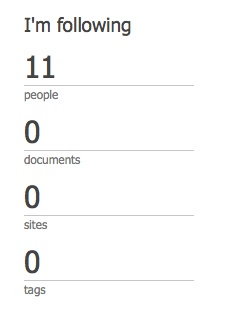
In the context of SharePoint, when a user choses to follow a person, for example, that person’s activities, which include posts, post replies, and other social activities, will start to show up in that user’s newsfeed. Also, by visiting a user’s newsfeed you can view an aggregate count of each entity type that user is following, as shown in Figure 17-28.
In the following section you will work through an example of following people by using CSOM and REST. The functionality for following content uses primarily the same objects as following people, so we will not be covering following content in any detail.
Programming for following either people or content starts with the SocialFollowingManager object for CSOM or the Social.Following endpoint for REST. By using this object, you can do any of the following:
Have the current user start or stop following someone or an item
Get whether the current user is following someone or an item
Get all documents, sites, tags, and people the current user is following
Get the count for all documents, sites, tags, and people the current user is following
Get the people who are following the current user
Get the people whom the current user might want to follow
Get the URL for the site that lists the current user’s followed documents or sites
Though this usage is not as common, it is important to note that the PeopleManager object that you used in the “Retrieving user profile properties” section can be used to access additional functionality around following people that is not available via the SocialFollowingManager object.
Following people
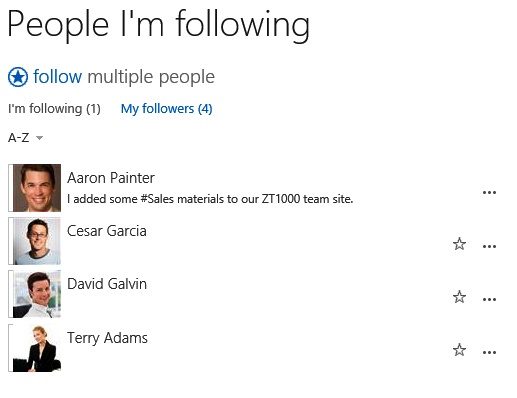
The act of following people is probably the task that users are most acquainted with due to its prevalence in most social media systems. As such, we will focus this example on following people to help acclimate you to coding tasks around following within SharePoint 2013. The exercise you will work through is that of discovering people who are following you that you are not yet following, and then adding yourself as one of their new followers.
Figure 17-29 shows a list of the current user’s followers, with a star next to each that is not being followed by the current user. By the end of this example, there should be no stars, and the count for I’m Following and My Followers should both equal 4.
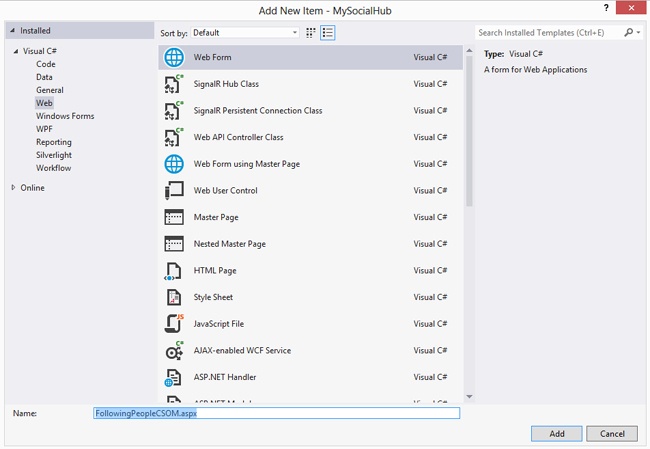
To start, create a new Web Form for your Visual Studio project named FollowingPeopleCSOM.aspx, as shown in Figure 17-30.
The same namespaces that you have used throughout this chapter are still those needed to code following functionality; they are:
Microsoft.SharePoint.Client
Microsoft.SharePoint.Client.Social
At this point, you can start using the SocialFollowingManager object along with the methods to access your current followers and those users that you are also following. Example 17-18 shows the code used to get back both your followers and those that you are followed by into two separate lists.
//Variables
string siteURL = "http://portal.contoso.com";

ClientContext clientContext = new ClientContext(siteURL);

// Get the SocialFeedManager instance.
SocialFollowingManager followingManager = new SocialFollowingManager(clientContext);

// Get users being followed
ClientResult<SocialActor[]> followedUsers = followingManager.GetFollowed(SocialActorTypes.Users);

// Get followers
ClientResult<SocialActor[]> followerUsers = followingManager.GetFollowers();

clientContext.ExecuteQuery();
After you have created an instance of the SocialFollowingManager, the GetFollowed method is invoked and expects a SocialActorType enumerator for members passed within it, which you use to filter the results to just users. This method is actually used to retrieve all other types of SocialActors objects that the current user is also following. A full list of each of the members for the SocialActorTypes enumeration is found in Table 17-4.
Name | Value | Description |
All | 15 | All actor types are included. |
None | 0 | None of the actor types are included. |
Users | 1 | Results are filtered to only users. |
Documents | 2 | Results are filtered to only documents. |
Sites | 3 | Results are filtered to only sites. |
Tags | 8 | Results are filtered to only tags. |
ExcludedContentWithoutFeeds | 268435456 | Results are filtered to only sites that have a site feed. |
Both the GetFollowed and GetFollowers methods return a clientResult<SocialActor[]> object, which contains a list of each of the actors that current user is following. If in either case a following is not present, then there will be zero items in the clientResult<SocialActor[]> object’s value. For this example, you should have a count of 1 for the followedUsers object and a count of 4 for the followerUsers object, which is illustrated in the watch panel shown in Figure 17-31.

With this data, you can simply iterate through each one of your followers and determine if they are in the list of users that you are following, if not, you will start following them by using the Follow method. This can be done with the code found in Example 17-19.
//iterate through each follower and determine if already following user
foreach (SocialActor user in followerUsers.Value)
{
var userFound = followedUsers.Value.SingleOrDefault(u => u.AccountName ==
user.AccountName);
if (userFound == null)
{
//if not already following user, start following user
followingManager.Follow(new SocialActorInfo()
{
AccountName = user.AccountName,
ActorType = user.ActorType
});
}
}
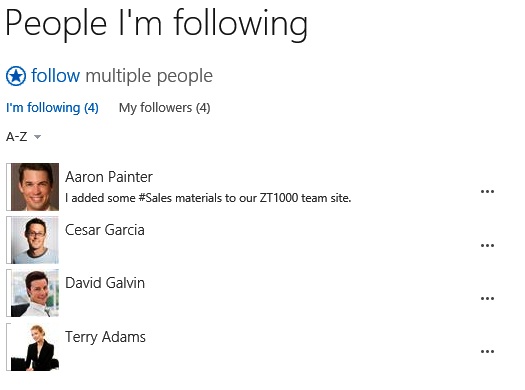
clientContext.ExecuteQuery();The Follow method expects a SocialActorInfo object as shown in the previous listing, so you need to map the attributes of the current SocialActor object to a new SocialActorInfo object that you can pass to the Follow method. After executing the code in this example, you can tell that you are now following each of the users that is following you, as shown in Figure 17-32.
You can use REST to accomplish the same task of adding followers by using the Social.Following endpoint in addition to other endpoints to access who is being followed and your followers, and then another to start following others. To start, create a new HTML page similar to the one shown in Figure 17-33.
Next you can retrieve your current followers with a GET request to http://<siteURL>/_api/social.following/my/Followers. To retrieve those that you are following, you need to issue a GET request to http://<siteURL>/_api/social.following/my/Followed(1). Notice that you are passing a value of 1 to the Followed endpoint. Looking back at Table 17-4, you can tell that this is the value for the enumeration member named User in the SocialActorTypes enumeration. The only remaining endpoint needed to complete the example is http://<siteURL>/_api/social.following/my/follow. The follow endpoint, like the Follow method in the CSOM example, expects a SocialActorInfo object to be passed to it. This can be accomplished either within the URL itself or within the request body. By using the code in Example 17-20 you can accomplish the same functionality you did in the CSOM example.
window.ContosoREST = window.ContosoREST || {};

ContosoREST.FollowingPeople = {
        //variables
        EndpointURL: "http://portal.contoso.com/_api/social.following",
        FormsDigest: "",

        GetFormsDigest: function(){
                 // Get form digest value
                 $.ajax({
                         async: false,
                         url: "http://portal.contoso.com/_api/contextinfo",
                         type: "POST",
                         headers: {
                                  "Accept": "application/json;odata=verbose"
                         },
                         success: function (contextInfo) {
                                  ContosoREST.FollowingPeople.FormsDigest = contextInfo.d.
GetContextWebInformation.FormDigestValue;
                         },
                         error: function (xhr, ajaxOptions, thrownError) {
                                 alert("Error:" + thrownError);
                         }
                 });

       },
       GetFollowers: function () {
               var followers;
               $.ajax({
                       async: false,
                       type: "GET",
                       url: this.EndpointURL + "/my/followers",
                       headers: {
                                "accept": "application/json;odata=verbose"
                       },
                       success: function(data){
                               followers = data.d.Followers.results;
                       },
                       error: function (xhr, ajaxOptions, thrownError) {
                               alert("Error:" + thrownError);
                       }
               });
               return followers;
       },

       GetFollowed: function () {
               var followed;
               $.ajax({
                       async: false,
                       type: "GET",
                       url: this.EndpointURL + "/my/followed(1)",
                       headers: {
                                  "accept": "application/json;odata=verbose"
                         },
                         success: function(data){
                                  followed = data.d.Followed.results;
                         },
                         error: function (xhr, ajaxOptions, thrownError) {
                                 alert("Error:" + thrownError);
                         }
                 });
                 return followed;
        },

        Follow: function (accountName) {
                 $.ajax({
                         type: "POST",
                         url: this.EndpointURL + "/my/follow(ActorType=0,AccountName=@v,
                           Id=null)?@v='" + accountName + "'",
                         headers: {
                                  "accept": "application/json;odata=verbose",
                                  "X-RequestDigest": this.FormsDigest
                         },
                         error: function (xhr, ajaxOptions, thrownError) {
                                 alert("Error:" + thrownError);
                         }
                });
        },

        GetUserByAccountName: function(key, results) {
                var item;
                $.grep(results, function (e) {
                        if (e.AccountName === key)
                                item = e;
                });

        return item;
        },

};

$().ready(function () {

        //Get followers and those user is following
        var followers = ContosoREST.FollowingPeople.GetFollowers();
        var following = ContosoREST.FollowingPeople.GetFollowed();

        //Get FormsDigest, so Follows can be performed
        ContosoREST.FollowingPeople.GetFormsDigest();

        //Iterate through followers
        $.each(followers, function (value,key) {
                var userFound = ContosoREST.FollowingPeople.GetUserByAccountName(key.
AccountName, following);
                if (userFound == null) {
                         //Add new user to those user is following
                         ContosoREST.FollowingPeople.Follow(key.AccountName);
                }
        });
});
The pattern used in the previous listing for following a new person is the singleton pattern; to learn more about this pattern and others, see Chapter 5. The final section of code iterates through each of the followers and determines if they exist within the following list; if not, the AccountName is sent to the custom Follow method, which sends a POST to the follow endpoint and passes inline the user’s account name, using an @ alias for any users who need to start being followed.
Understanding Yammer
Yammer is a social tool that allows organizations to have private social networks where their employees can connect, communicate, collaborate, and share information with one another at the organizational or group level. It can be used as a standalone application or can be integrated with any of the many applications that already exist for other purposes. The simplified hierarchy found within Yammer starts with a top-level object called a Network. This usually represents an organization. The next level down can either be users or groups. Groups allow conversations to be organized so that users who are not a part of the group aren’t flooded with its communications. A Yammer network can be accessed by logging into Yammer by using the Yammer website or any of the mobile or desktop-based applications.
Understanding how Yammer can work with SharePoint
SharePoint is a great example of an application that can benefit from integration with Yammer for an enhanced social experience. Yammer integration was very prevalent with SharePoint 2010 because of the social shortcomings of SharePoint 2010. An advantage of being able to integrate with Yammer even with SharePoint 2013, which has a rich social experience, is Yammer’s ability to be a standalone tool and at the same time have the ability to integrate with so many other applications, both mobile and web based. Because of this, Yammer is sometimes chosen as the primary social tool for an organization. As a result, the organization can choose to integrate SharePoint 2013 and Yammer so that Yammer’s feed ability replaces that of the SharePoint 2013 out-of-the-box functionality and SharePoint can continue to be the primary content hub. Because of this, and because future deeper integration between these two technologies is likely, it is wise to begin to understand and use Yammer and also become acquainted with its APIs.
Retrieving followers and followings from Yammer
In the same way you learned how to access followers and those that you are following within SharePoint 2013, you can likewise access the same type of entities within Yammer.
In order to code against the Yammer APIs, you must have an account and a registered application, to name a couple of prerequisites. You can visit the Yammer developer site at https://developer.yammer.com/connect to learn about the different ways to authenticate to and make API requests to the Yammer platform. The quickest way to start making API requests is to create a test access token that can be passed inline or within the request body when accessing any REST endpoints. Instructions on how to do so can be found at https://developer.yammer.com/authentication/#a-testtoken. For the example that retrieves your followers and those you are following, it will be assumed that you have a test access token available.
The Yammer API that you will work with is the REST API. A sampling of the REST endpoints available can be found at https://developer.yammer.com/restapi/. It is also important to note that the list found at this URL is not exhaustive in identifying all available endpoints. For example, the two endpoints that you will use to access your followers and those you are following are not referenced on the REST API page.
To retrieve the list of users that you are following, make a GET request to https://www.yammer.com/api/v1/users/following/<YourYammerUserID>.json. You will need to know your Yammer ID in order to perform the GET request. If you are uncertain of what your ID is, you can access https://www.yammer.com/api/v1/users/current.json from any browser, passing inline the test access token as the value of a query string parameter called access_token. A sampling of what is returned is shown here:
{"show_ask_for_photo":false,"id":0000000000,"expertise":null,"mugshot_url":"https://mug0.
assets-yammer.com/mugshot/images/48x48/M2v-Z-000000000","summary":null,"contact":{"im":{"prov
ider":"","username":""},"has_fake_email":false,"email_addresses":[{"address":"aaron.painter@
contoso.com","type":"primary"}],"phone_numbers":[]},"last_name":"Painter","name":"aaronp","kids_
names":null,"network_name":"contoso.com","job_title":"Managing Consultant","url":"https://www.
yammer.com/api/v1/users/000000","settings":{"xdr_proxy":"https://xdrproxy.yammer.com"},"mugshot_
url_template":"
Notice that the top line contains an “id” property; this is your Yammer ID. With this ID, you can successfully perform a GET request to retrieve your followers. A sampling of what is returned is shown here:
{"more_available":false,"users":[{"url":"https://www.yammer.com/api/v1/users/000000","job_
title":" Strategy Consulting Manager","full_name":"BradSutton","stats":{"following":16
5,"updates":161,"followers":39},"state":"active","name":"bradsutton","type":"user","ac
tivated_at":"2012/07/12 18:09:56 +0000","mugshot_url":"https://mug0.assets-yammer.com/
mugshot/images/48x48/000000000","web_url":"https://www.yammer.com/contoso.com/users/
xxxxx","id":000000,"mugshot_url_template":"https://mug0.assets-yammer.com/mugshot/images/{width}
x{height}/0000000000"}
The first property returned tells you whether or not there are more followers than those returned by the request. Following this property is the Users property, which contains all the followers. There is quite a bit of useful information that will allow an application to have a rich UI, enabling it to easily access the photo for a follower, determine how many followers the user herself has, and even how long the user has had a Yammer account.
The same results are returned when you make a GET request for who you are following, though the endpoint is different. The endpoint for retrieving who you follow is https://www.yammer.com/api/v1/users/followed_by/<YourYammerUserID>.json.
To display both listings on an HTML page, along with each user’s own count of followers and those they are following, you can use the code found in Example 17-21. If you are successful, the output should look similar to that shown in Figure 17-34.
<!DOCTYPE HTML>
<html>
<head>
    <title></title>
        <script src="http://ajax.aspnetcdn.com/ajax/jQuery/jquery-2.0.0.min.js"></script>
     <script>
         window.MyYammerREST = window.MyYammerREST || {};

         MyYammerREST.Social = {

             AccessToken: "YourTestAccessToken",

             GetFollowers: function (userID) {
                 var followers = "";
                 $.ajax({
                     async: false,
                     url: "https://www.yammer.com/api/v1/users/following/" + userID +
".json",
                     type: "GET",
                     headers: {
                         "Accept": "application/json;odata=verbose",
                         "Authorization": "Bearer " + this.AccessToken
                     },
                     success: function (data) {
                         var users = data.users;

                         $.each(users, function (value, key) {
                             followers += "<div>" + key.full_name + "</div>" +
                                        "<div>Followers: " + key.stats.followers +
                                          "</div>" +
                                        "<div>Following: " + key.stats.following +
                                          "</div><br/><br/>"
                         });
                     },
                     fail: function (xhr, thrownError) {
                         alert("Error: " + thrownError);
                     }

                 });
                 return followers;
             },
             GetFollowing: function (userID) {
                 var followedBy = "";
                 $.ajax({
                     async: false,
                     url: "https://www.yammer.com/api/v1/users/followed_by/" + userID +
                                         ".json",
                     type: "GET",
                     headers: {
                         "Accept": "application/json;odata=verbose",
                         "Authorization": "Bearer " + this.AccessToken
                     },
                     success: function (data) {
                         var users = data.users;

                         $.each(users, function (value, key) {
                             followedBy += "<div>" + key.full_name + "</div>" +
                                        "<div>Followers: " + key.stats.followers +
                                          "</div>" +
                                        "<div>Following: " + key.stats.following +
                                          "</div><br/><br/>"
                         });
                     },
                     fail: function (xhr, thrownError) {
                         alert("Error: " + thrownError);
                     }

                 });
                 return followedBy;
             }

         }
         $().ready(function () {
             $('#followers').append(MyYammerREST.Social.GetFollowers(YourYammerID));
             $('#following').append(MyYammerREST.Social.GetFollowing(YourYammerID));
         });
    </script>

</head>
<body>
    <div style="float:left;padding:20px;">
        <div><h2>Followers</h2></div><br />
        <div id="followers"></div>
    </div>
    <div style="float:left;padding:20px;">
        <div><h2>Following</h2></div><br />
        <div id="following"></div>
    </div>
</body>
</html>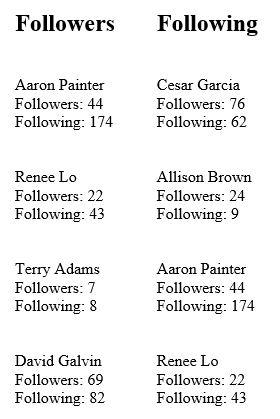
Working through this simple example should shed light on the potential integrations between Yammer and SharePoint, whether they are through an app for SharePoint or something as simple as a Content Editor Web Part. You can create extensive integrations, in which Yammer takes the place of the SharePoint newsfeed, or less extensive solutions, in which you merely surface parts of Yammer within parts of SharePoint.
Summary
This chapter began by examining the new social components found inside SharePoint 2013. We looked at how you can use the numerous APIs to extend or access social data stored within SharePoint. You also worked through many examples that used CSOM with C# and the REST API for getting and creating social content. You learned about the abilities and purpose of social feeds for individuals and sites. Finally, the chapter concluded by examining the art of following inside SharePoint and Yammer and how you can retrieve a list of those users you are following in addition to your own followers.