
Chapter at a glance
Check
Check for Windows updates, page 446

Learn
Learn File History and how to use it, page 451

Restore
Restore your system to a previous state with System Restore, page 465
Use
Use the Action Center to prevent problems, page 470
IN THIS CHAPTER, YOU WILL LEARN HOW TO
Prevention is an important part of having a safe and pleasant computing experience. Windows 8.1 offers a few tools to help you stay away from trouble for as long as possible and, if you do have trouble, restore your lost user files.
The first and most important tool for preventing problems is Windows Update. In this chapter, you’ll learn about its role in keeping your computer running smoothly, how it works, and how to use it to keep your system up to date. You’ll learn how to use the File History feature in Windows 8.1 to make automated backups of your user folders, libraries, and files and to restore files from those backups. In addition, you’ll learn about System Restore and how to use it to revert to an earlier and more stable state if you encounter problems. Finally, you’ll see how to use the Action Center to stay informed about the maintenance and security of your system so that you can spot problems before they have a major impact on your system.
Practice Files
You don’t need any practice files to complete the exercises in this chapter. For more information about practice file requirements, see the section “Using the practice files” in the Introduction of this book.
Keeping your system up to date is important for maintaining it as secure and trouble-free as possible. Viruses and other forms of malware that exploit security vulnerabilities in Windows and other operating systems appear on a daily basis. Being up to date means having fewer security issues and fewer chances for your computer to become infected and exploited by unauthorized parties.
Windows Update also includes stability and compatibility fixes that solve problems you might encounter with your system; other updates can add functionality. Another important type of update is drivers for your computer’s components. Windows Update automatically installs the newest versions of signed drivers for your system’s components, which keep your system’s performance at optimum levels.
All these are good reasons for you to have Windows Update turned on at all times and configured to install the most important updates automatically. It is enabled by default in Windows 8.1, and it should be active and working on your system. The only exceptions are business computers and devices on which the updates and the update policy are handled by the IT support staff.
You can find Windows Update in both PC Settings and Control Panel. In PC Settings, you can view information about available updates, check for new updates manually, install those that are available, view your update history, and choose how updates get installed in Windows 8.1.
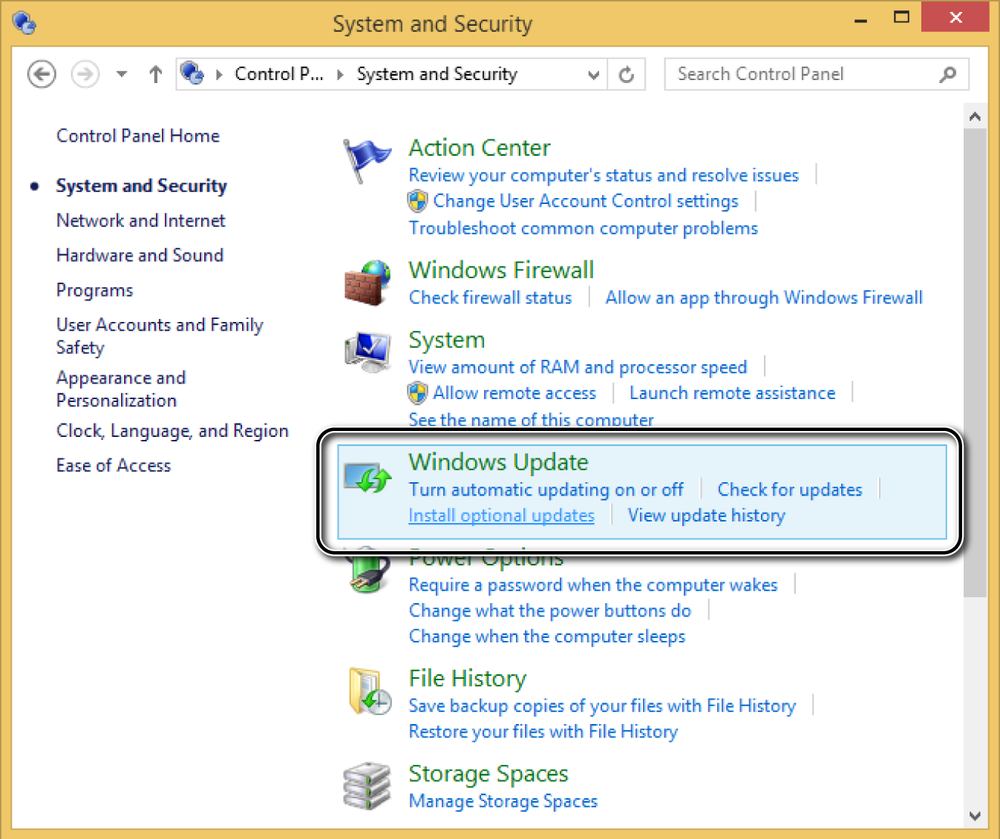
In Control Panel, open System And Security and then Windows Update.
From Control Panel, you can customize many aspects of how Windows Update works by using the options presented in the column on the left, which are described here:
Check For Updates. With this option, you can check for new updates manually.
Change Settings. This option opens a list of all the Windows Update settings that you can customize.
View Update History. This option shows a list of all the updates that have been installed on your system, with complete information about what they do, when they were installed, and so on.
Restore Hidden Updates. With this option, you can restore updates that have been hidden and marked as unavailable for your system.

If you are using Windows 8.1 on a traditional computer, don’t hesitate to experiment with using and configuring Windows Update from Control Panel. You will be able to learn a lot about the way it works and tweak its behavior in detail.
Windows handles the installation of updates automatically. However, you can check for updates manually and install them at any time.
In this exercise, you’ll learn how to check for updates manually and install the available updates from PC Settings.
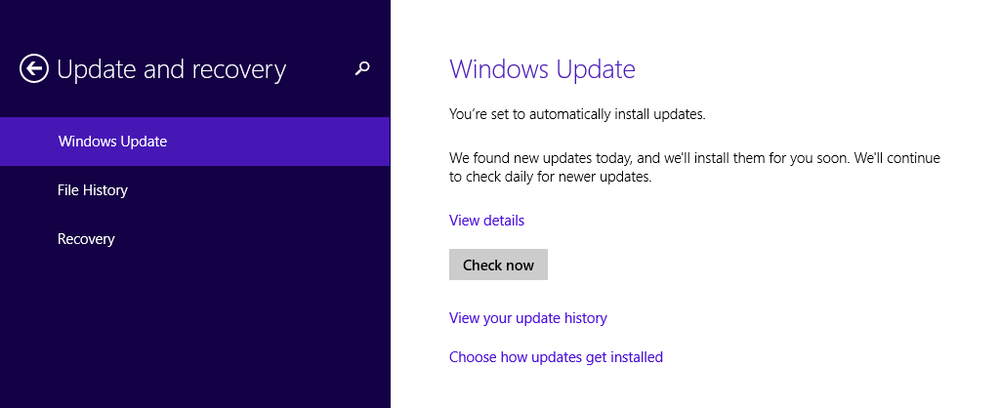
In PC Settings, click Update And Recovery and then click Windows Update.
Click Check Now and wait a few seconds for the process to finish.
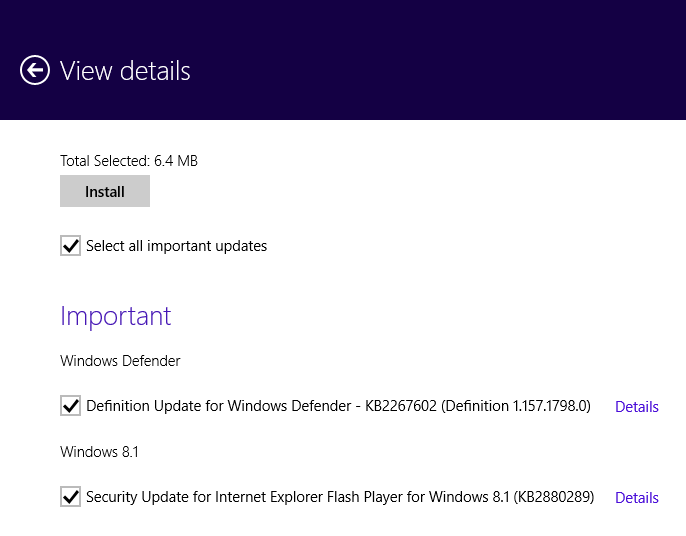
Click View Details to see a list of the updates found.
Select the updates that you want to install and then click Install.
Clean Up
Close PC Settings at any time, even if the updates are still being downloaded and installed.
The download and installation process for all the available updates is handled in the background by Windows Update. Its window does not need to remain open. You can continue your normal computing activities while the updates are installed.
File History was introduced in Windows 8. With it, users can back up the files in their Libraries, Contacts, Favorites, and Desktop. The backup is handled automatically by Windows after this feature is turned on and the backup location is available.
File History backs up only your users’ libraries and the aforementioned folders. If you want to have file copies made for other folders, you must include them in one of your user libraries.
See Also
To learn more about libraries and how to create a library and add folders to it, see Chapter 4.
File History also stores the versions you create for any file, depending on how you set it, so you can revert to a previous version of a file if you need to.
File History works best with external storage devices such as hard disks or large USB memory sticks that have sufficient space for the file copies. You can also make copies on network locations such as folders from another computer or a home server if you have one available.
File copies can be restored at any time on the same computer or on other Windows devices and computers. This can be useful if your system crashes or encounters problems with data corruption. By using File History, you can ensure that your important data is always backed up and available.
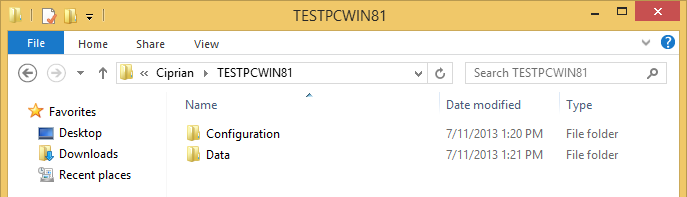
The file copies are made on the target drive (or network location) by using the following folder structure: File History<Your User Account Name>Your Computer Name. There, you will find the following two folders:
You can access File History both from PC Settings and Control Panel. PC settings offers a simplified version with which you can only turn this feature on or off, select the drive where the backup is made and perform a manual backup.
The File History window in Control Panel is organized as follows:
On the left is a column of links that gives you access to different configuration options.
In the center you can view the File History status: on or off.
In the center you can also see where file copies are stored.
Below that you can view when the last file copies were made.
On the right is a button for turning File History on and off.

The column on the left side of the File History window has the following links:
Restore Personal Files. Starts the wizard for restoring files using the existing copies. This will be covered in a step-by-step exercise later in this chapter.
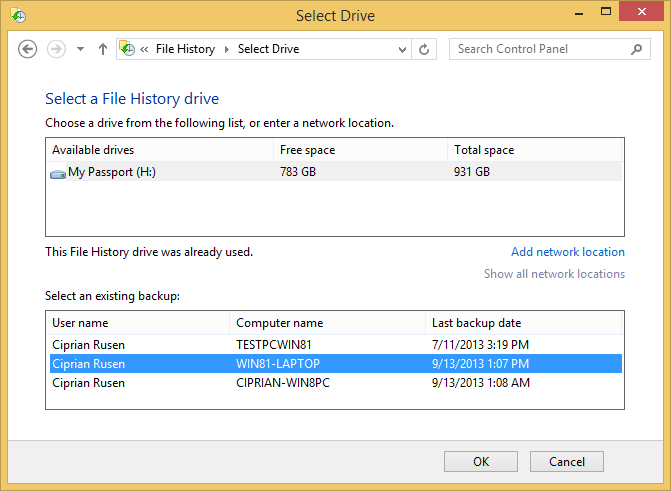
Select Drive. Use this to change the drive on which file copies are made. You can also add a network location if that suits your needs better.
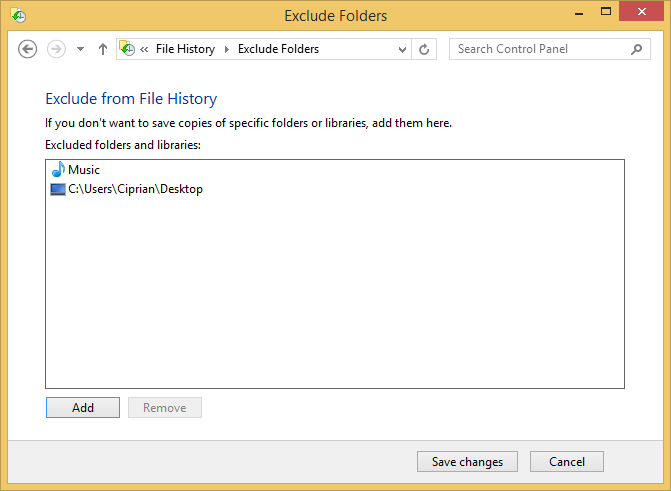
Exclude Folders. Use this to exclude specific folders and libraries from backup by File History.
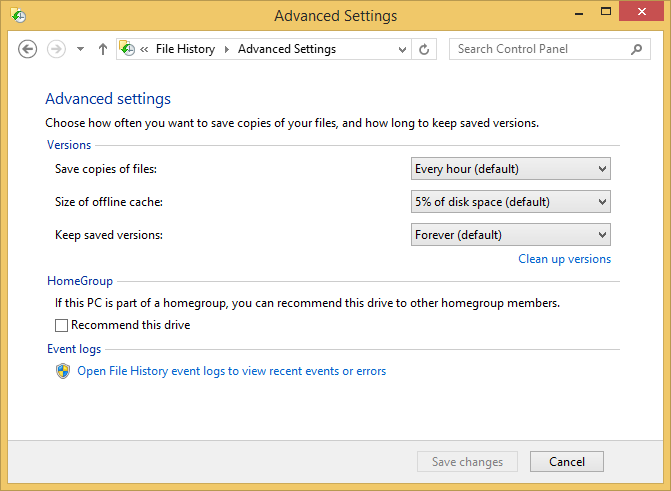
Advanced Settings. Click this link to access and change the following settings.
Save Copies Of Files. Sets how often file copies are made. The default is to save copies of files every hour. The interval can be changed to almost anything, from every 10 minutes to daily.
Size Of Offline Cache. Sets the percentage of space that file copies can occupy on the target storage device. The default is 5 percent. It can be changed to values ranging from 2 percent to 20 percent.
Keep Saved Versions. Sets how long you want to keep the different versions of files. The default is to keep file versions forever. It can be set to keep versions until space is needed on the target storgae device or for a set time ranging from one month to two years.
Recommend This Drive. Enabling this setting can be done only if your computer is part of a homegroup. When enabled, your storage drive is recommended to other homegroup members so that they can store their data by using File History.
After File History is turned on, it automatically starts creating copies of your files based on its default schedule settings. If copies were created, you are shown the date and time when they were last copied.
One important aspect to keep in mind is that File History is turned on only for your own user account. If you want the files in other user accounts on the same Windows 8.1–based computer or device to be backed up, turn on File History for each account.
In this exercise, you’ll learn how to turn on File History in Windows 8.1, from PC Settings.
Set Up
Plug in an external hard disk or a USB memory stick, wait for Windows 8.1 to detect it, and then open PC Settings.
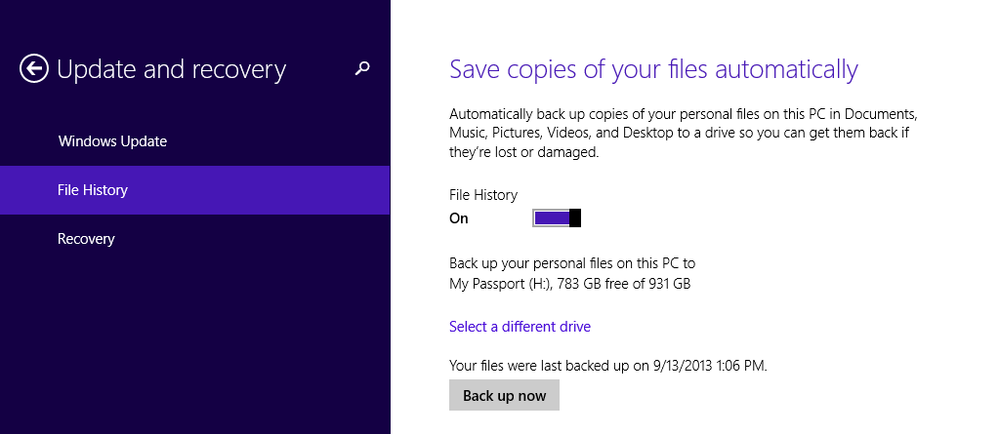
File History is now turned on and will automatically save copies of your files according to its default settings and when the external drive is available for making the copies. You can turn off File History by using the steps in the preceding exercise but, instead, slide the File History switch to Off.
It’s easy to use File History to restore files, and you can do it at any time. You can restore complete folders and libraries as well as individual files. If you want to restore a library, you select it; If you want to restore only one file, browse to its location and select it.
To select more than one item, press and hold the Ctrl key on your keyboard while selecting each item with the mouse.
You can restore files to the location on your computer from which files were initially copied or to a different location. If you want to restore a file to a different location, select it, click the Options button, and then, on the menu that appears, click Restore To.

In this exercise, you’ll learn how to restore folders and libraries previously backed up by using File History. You’ll restore individual files by using the same steps but selecting files instead of folders or libraries.
Set Up
Plug in the drive on which your File History is stored, wait for Windows 8.1 to detect it, and then open Control Panel.
Click System And Security and then File History.
The File History window opens.
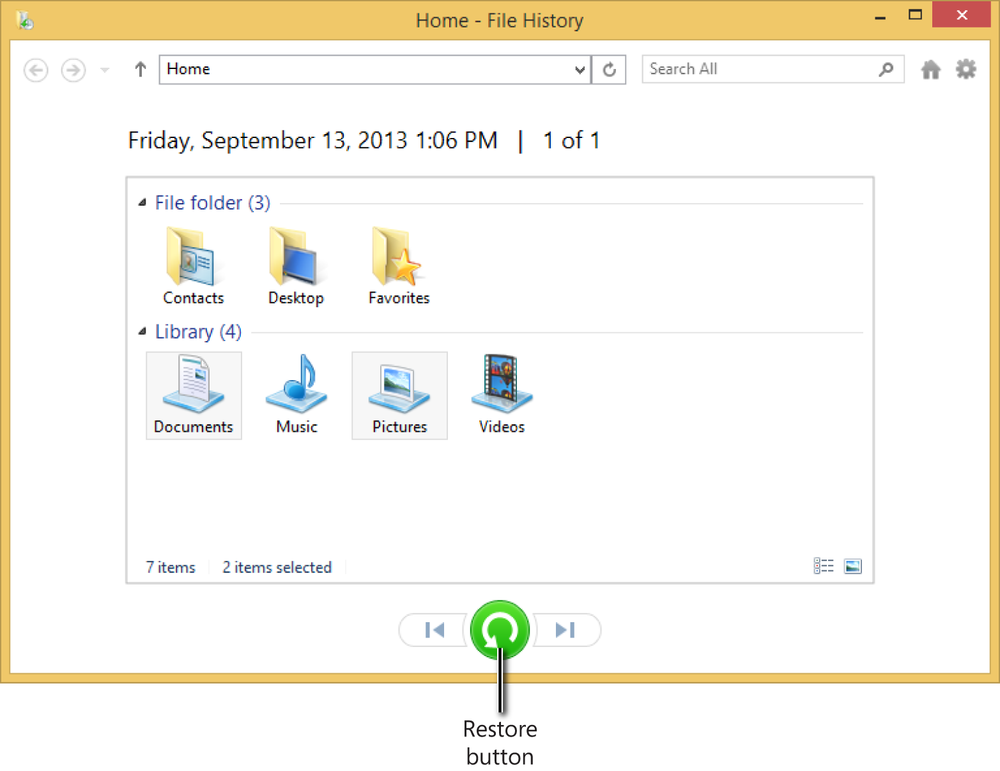
Click Restore Personal Files to open the File History wizard.
Select the libraries and folders that you want to restore.
Click the Restore button to start the restoration procedure.
You are asked to confirm that you want to replace the existing files with the ones from your backup.
Click Replace The Files In The Destination and wait for the files to be copied.
After the copying process completes, a File Explorer window opens, showing the files, folders, and libraries you copied.


The selected folders and libraries are now restored to their original location.
System Restore is a time-tested and useful desktop app that can restore your system and settings to a previous state. It can be used when you encounter problems and you need to revert quickly to a previously working state without removing all of your installed desktop apps, as is the case when using the Refresh Your PC feature.
This feature is turned on by default in Windows 8.1 for the partition in which the operating system is installed. It automatically creates a new restore point each time you install a new app or make important changes to your system such as installing a long list of updates and drivers. These restore points can then be used to restore your system to an earlier but stable state if you encounter some stability or performance issues later.
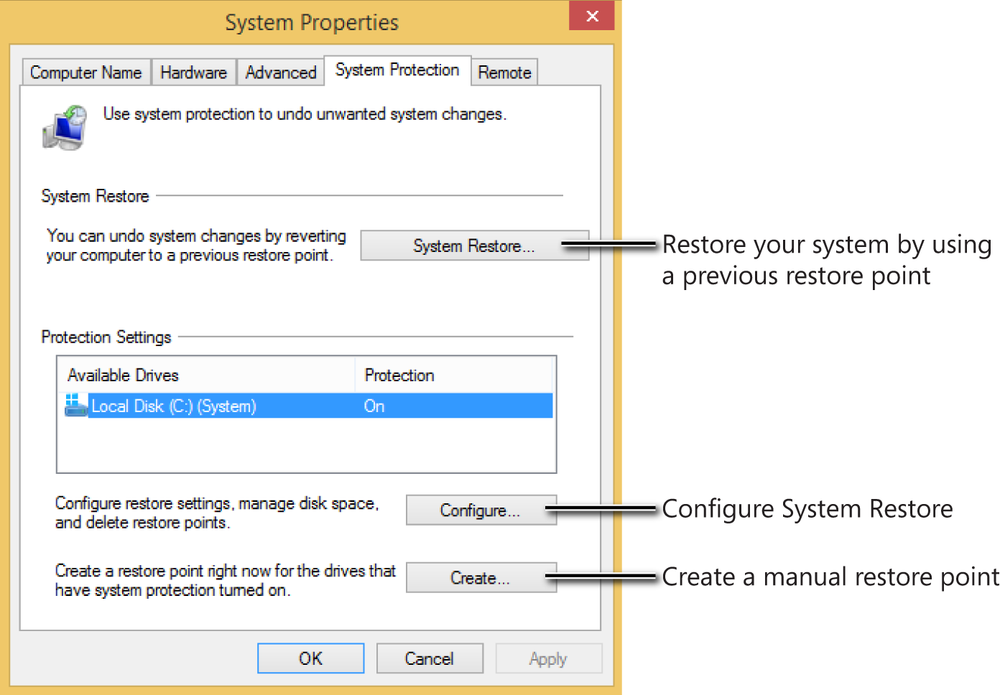
To access System Restore settings, in the System Properties window, click the System Protection tab. The tool is straightforward and easy to use. Following are descriptions of the items you need to set up restore points:
Use the System Restore button to start the wizard for restoring your system by using a previous restore point.
The Protection Settings section contains a list of all the partitions available on your computer or device. You can see whether the System Restore protection is turned on or off in each partition.
When you select a partition, you can change its protection settings by using the Configure button.
Use the Create button when you want to create a manual system restore point.
Having System Restore turned on is a good prevention practice. If you encounter issues, the first and easiest step is to use this tool to restore your system to a previous and more stable state.
In Windows 8.1, the System Restore tool is hidden behind menus and options, so it is not easy to find. In this exercise, you’ll learn how to start System Restore.
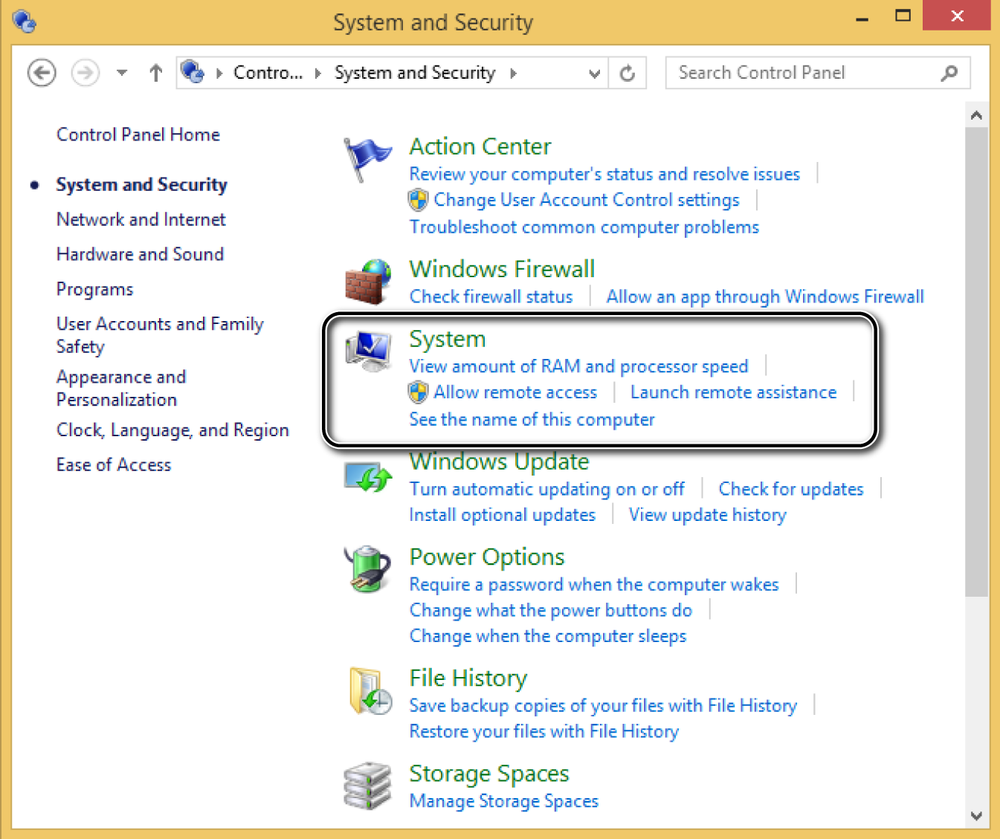
Click System And Security.
In the System And Security window, click System.
The System window opens, presenting information about your system’s hardware and software configuration.
In the left column, click System Protection.
The System Properties window opens, in which you can start and configure System Restore.
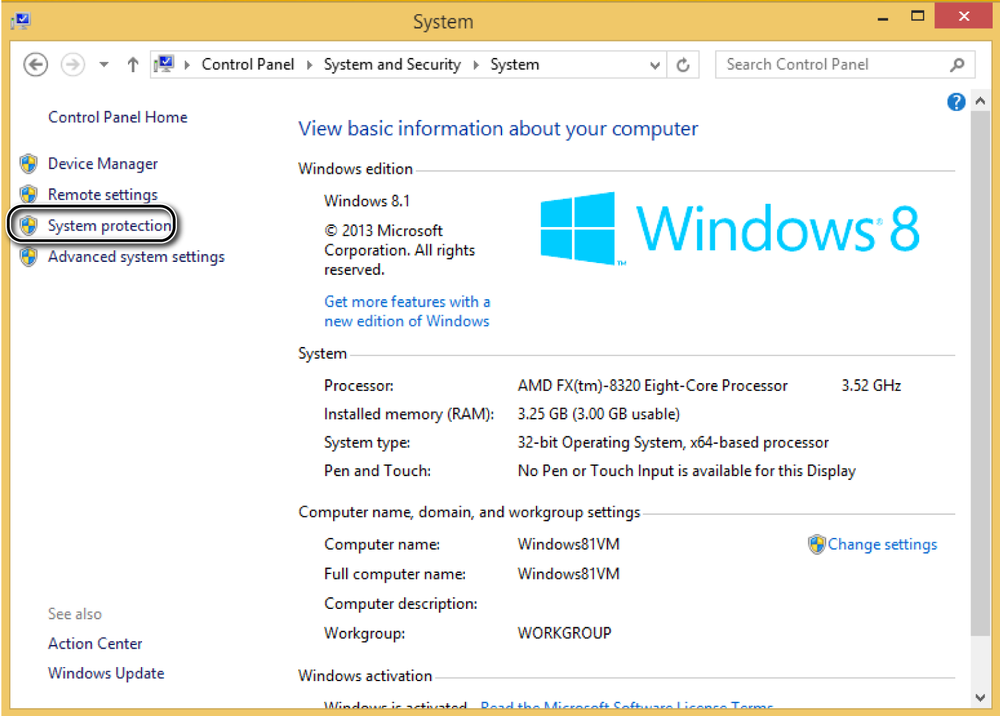
The System Properties window is opened directly at the System Protection tab, where you can find System Restore.
If you have installed some new drivers that make your system unstable or you have instigated some performance issues, you can use System Restore to revert to an earlier and hopefully more stable state.
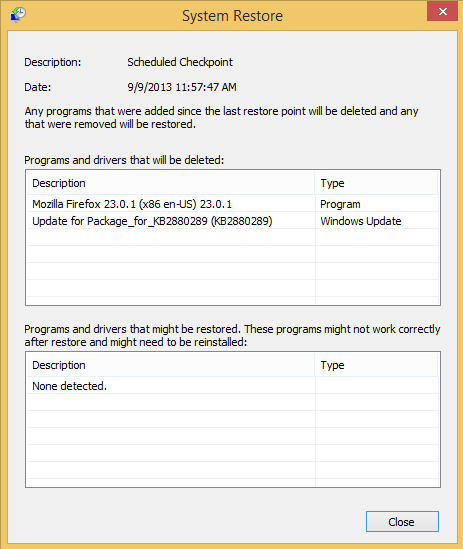
Before starting the restoration process, start System Restore, and then click Scan For Affected Programs.

This opens a new window in which you are shown a summary of the changes that will be made to your system when the restoration process is complete. If you don’t like the number of changes that will be executed, you can select a more recent restore point (if available) that makes fewer changes. Unfortunately, System Restore does not display the Windows Store apps that will be deleted during the process. It only displays traditional desktop apps.
After the restore process is started, it cannot be interrupted. It also involves a restart, so before you go ahead with the process, it is best to close any apps and current work.
In this exercise, you’ll learn how to use System Restore to return Windows 8.1 to a previous state.
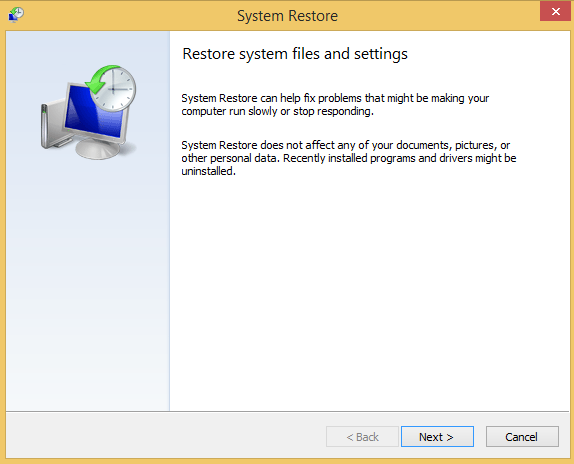
Click System Restore.
The System Restore Wizard opens.
Click Next.
You are asked to select the restore point to which you want to restore.
Select the restore point you want to use and then click Next.
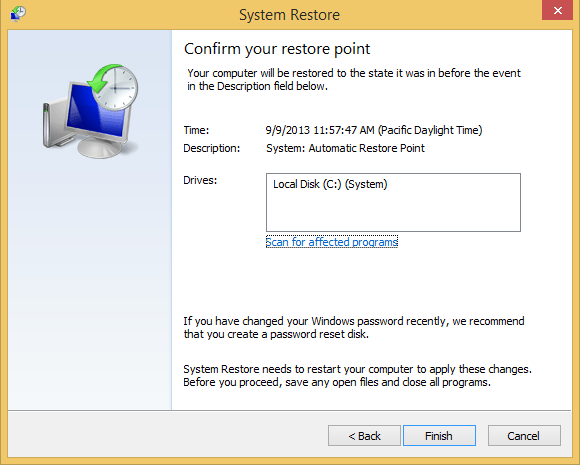
You are informed of the changes that will be made.
Click Finish.
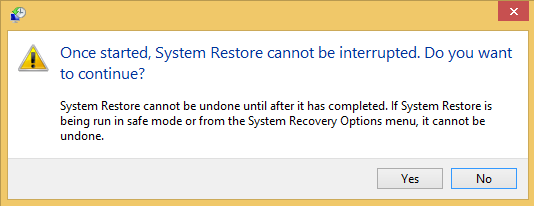
You are asked to confirm that you want to continue the process.
Click Yes and wait for Windows to restart and revert to the selected restore point.

Clean Up
Log on to Windows and resume your computing activities. When System Restore informs you that the restoration process has been completed, click Close.
Windows 8.1 is now restored to the selected restore point. Any changes made to your system as well as any apps that were installed after the restore point was created are no longer available.
Windows 8.1 comes with a convenient way to help you review the state of your system and find solutions to security and maintenance issues. This feature is called Action Center, and it is built upon the foundation set by the Windows Security Center, which was first introduced in Windows XP Service Pack 2 and then revised in all Windows versions that have been released since.
Action Center continuously monitors the state of your system. If it notices any kind of problem related to the security or good maintenance of your system, it immediately notifies you so that you can take corrective action. Action Center monitors the following aspects of Windows 8.1:
Whether Windows Update is turned on and working well.
Whether all Internet Security settings are set to their recommended levels.
Whether the network firewall is actively protecting your computer or device.
Whether your Microsoft account is working properly.
Whether there are any issues with the activation of your Windows installation.
Whether you have an active tool providing spyware and related protection.
Whether User Account Control (UAC) is turned on.
Whether virus protection exists and is working well.
Whether the SmartScreen technology used in Internet Explorer and File Explorer is turned on.
Whether Windows Backup is working well when Windows users use this feature.
Whether automatic maintenance scheduled and performed automatically by Windows is active and working well. This maintenance includes checking for the latest software updates, making a security scan of your system, and running some quick system diagnostics to search for new problems.
Whether all your drives are working well.
Whether you need additional drivers and software installed for some of your computer’s hardware devices.
Whether apps running on the Windows startup have a big performance impact on the system’s boot timings.
Whether there are any ongoing problems that can be fixed by using Windows troubleshooting tools.
Whether a homegroup is available.
Whether File History is turned on and working well.
Whether Storage Space is working well when Windows users use this more advanced feature.
Whether Work Folders are working well when business users use this more advanced feature.
When a problem is detected, you are notified and provided with guidance regarding what you can do to fix it. As you can see, Action Center is an important tool for preventing problems with your system.
On the Desktop, in the notification area of the Windows taskbar, you’ll see a small white flag. This is the Action Center icon. When there are messages for the user, one of two additional graphics appears just below the flag: an x in a red circle or a black clock. The x in the red circle means there is at least one important message, so you need to pay attention. The black clock overlay means a scheduled task is running in the background (for example, a scheduled Windows Defender scan).

Hover over the flag icon to see a tooltip, giving you some brief information about what is happening with your system.
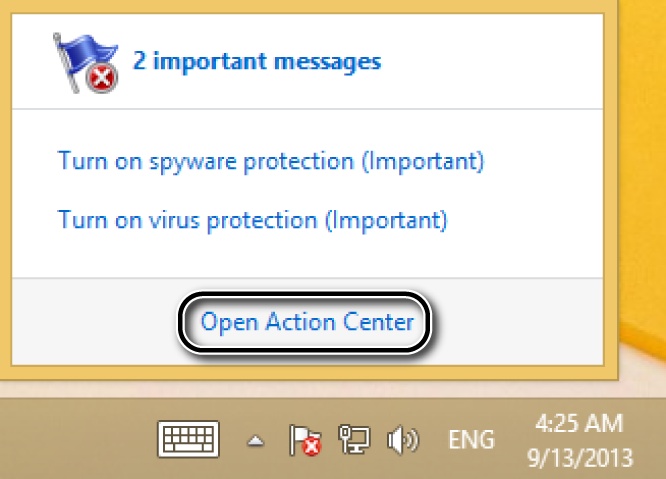
To see the list of messages you should read, click the Action Center icon.

To open Action Center and view more details, click Open Action Center.
As an alternative, on the Start screen, you can type the words action center and then click the appropriate search result.
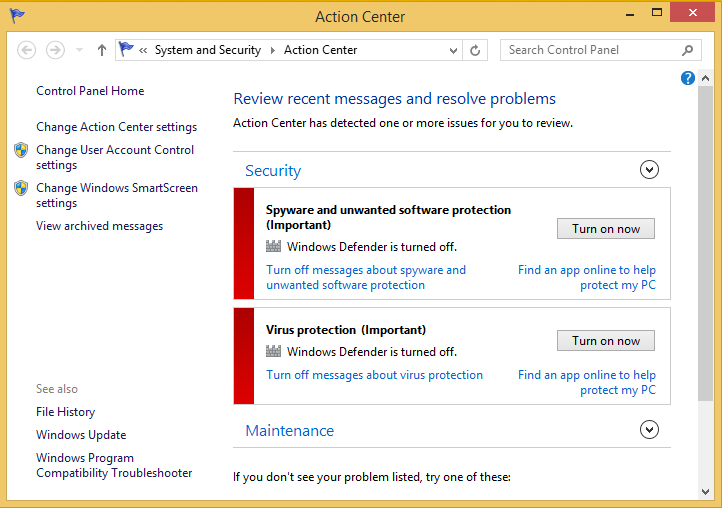
Reviewing the list of messages displayed by Action Center is simple. No complicated jargon is involved, and all you need to do is follow what the tool recommends to keep your computer in top shape. Each message has a button that takes you directly to where you need to fix things. For example, in the following screen shot, Action Center strongly recommends to Turn On Windows Defender. Click Turn On Now to activate this Windows security feature.
The same thing happens with the recommendation to install software for your devices. Clicking Install Automatically starts the download and installation process for that missing software.
Another great thing about Action Center is that you can configure it to fit your needs. You can easily customize which types of alerts and messages you want to receive, depending on how you have configured your Windows 8.1 installation and the additional software you have installed.
In this exercise, you’ll learn how to configure the list of messages Action Center shows you.
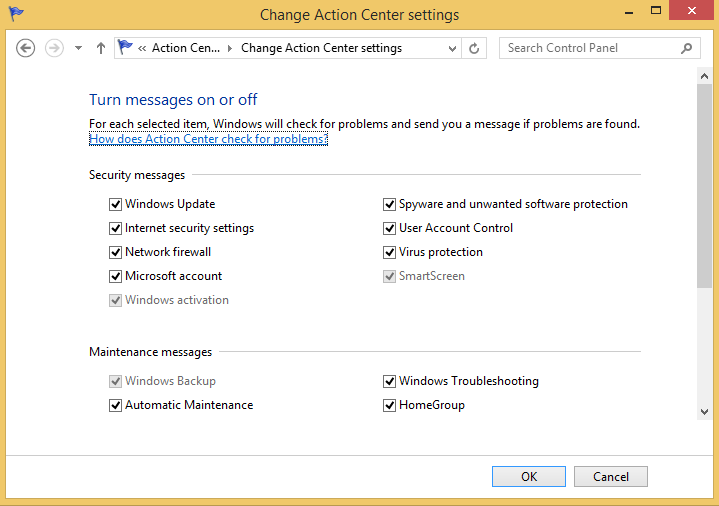
In the upper-left corner of the Action Center window, click Change Action Center Settings.
Select the check boxes adjacent to the messages you want to receive.
Clear the check boxes for the messages you do not want to receive.
Click OK.
Action Center will now show only messages for the items that you want it to monitor on a continuous basis.
Windows Update is a key feature for preventing problems and for securing your system.
You can set File History to back up your important user folders, libraries, and files automatically.
With File History, you can restore files to the location where they were originally stored or to a new, custom location.
You can use System Restore when you have stability or performance problems to revert to an earlier and more stable system state.
Action Center keeps you informed of the status of your system’s security and regular maintenance tasks.