
Chapter at a glance
Use
Use the Windows Mobility Center, page 520
Start
Start Presentation mode, page 524
Encrypt
Encrypt the operating system drive by using BitLocker, page 530

Set
Set up a VPN connection, page 541
IN THIS CHAPTER, YOU WILL LEARN HOW TO
The chances are pretty good that you will also be using Windows 8.1 at your workplace. Although the tools covered in this book can be used both at home and at work, there are a few that you are likely to use mostly at work, not at home.
The first is Windows Mobility Center, which is targeted at laptop or netbook users who are mobile and need to connect to multiple devices and external displays. The second is BitLocker, a feature by which you can encrypt your computer and ensure that your data is safe and accessed only by you and other authorized people. The third tool is one with which you can connect to your workplace when working from home or other remote places by setting up a Virtual Private Network (VPN) connection.
In this chapter, you’ll learn how to use the Windows Mobility Center, connect to external displays, and use Presentation mode to deliver presentations without any unwanted interruptions. Then, you’ll learn how to encrypt and decrypt hard disks by using BitLocker. Last but not least, you will learn how to set up a VPN connection to your company’s network.
Practice Files
You don’t need any practice files to complete the exercises in this chapter. For more information about practice file requirements, see the section “Using the practice files” in the Introduction of this book.
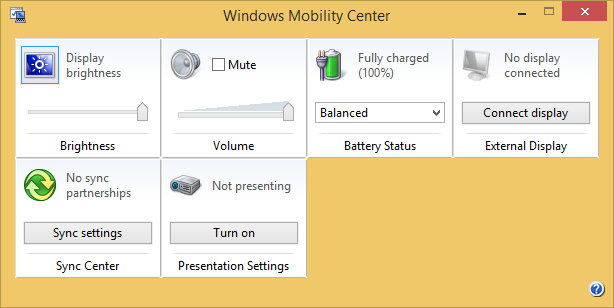
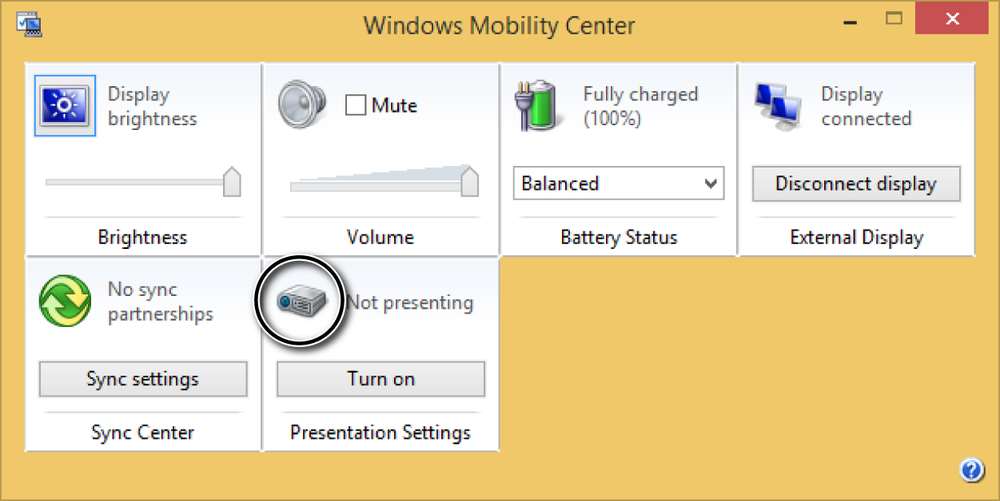
The Windows Mobility Center is a tool that works only on mobile computers and devices such as laptops and netbooks. It is not available on desktop computers. Its role is to help users be mobile and quickly take the following actions:
Change the display brightness of the screen
Change the sound volume of the Windows 8.1 computer or device
Change the power plan
Connect or disconnect external displays
Set synchronized partnerships with portable music players, USB memory sticks, or smartphones that provide support for this feature
Turn Presentation mode on or off
Although all the settings that you can manage through the Windows Mobility Center are important, two will be especially appreciated during office hours: the ability to connect external displays, and the ability to turn on Presentation mode.
These settings are very useful when switching among different office rooms and connecting the laptop to different kinds of external displays, from monitors to TVs and projectors.
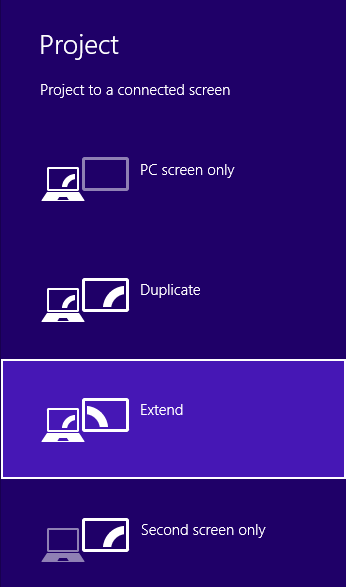
The Connect Display button is the equivalent of pressing the Windows key+P on your keyboard. It opens a window that asks how you want to set the second screen The following are your options:
PC Screen Only. The second screen is ignored and no image is displayed on it.
Duplicate. The image on your laptop’s screen is duplicated on the external display.
Extend. The second screen extends your laptop’s screen, which you can use as an additional desktop.
Second Screen Only. The second screen becomes your main screen, and the laptop’s screen is turned off.
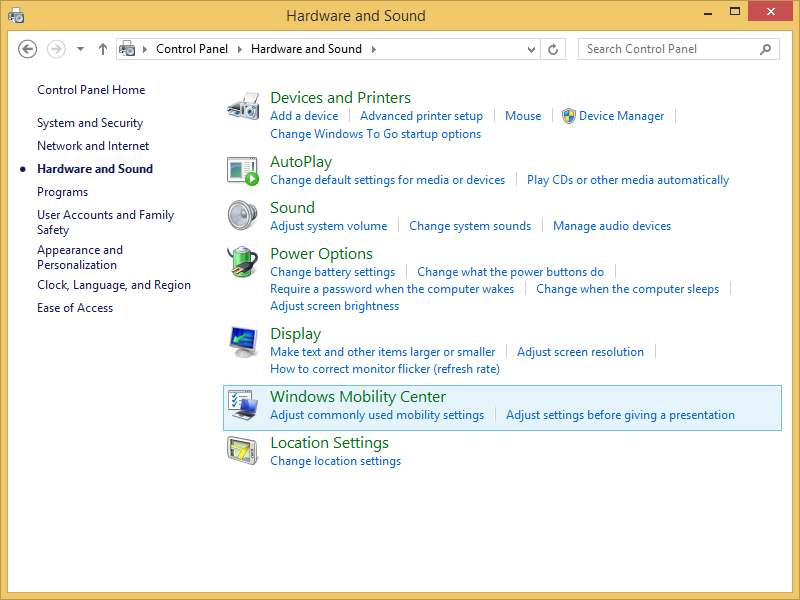
To start the Windows Mobility Center, open Control Panel, choose Hardware And Sound, and then select Windows Mobility Center.
As an alternative, you can type Mobility on the Start screen and then, in the search results area, click the appropriate item. Last but not least, you can find its shortcut in the Windows+X or WinX menu as it is named by some.
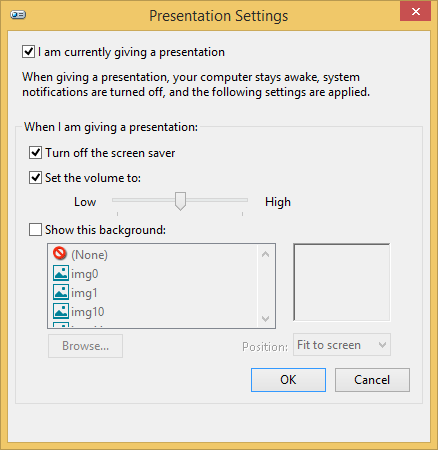
Presentation mode is very useful when delivering any kind of presentation. Take some time to configure Presentation mode exactly the way you want so that your presentation runs smoothly without unwanted hiccups and interruptions (such as the screen saver showing up when you don’t need it).
In this exercise, you’ll learn how to turn on Presentation mode and configure it.
Set Up
Open Windows Mobility Center and connect the external display that you want to use with your computer.
In Windows Mobility Center, click Connect Display to set how you want to connect the second screen.
Click Extend.
The second external display now acts as a second Desktop.
Back in the Windows Mobility Center, in the Presentation Settings section, click the projector icon.
The Presentation Settings window opens.
Select the check boxes for I Am Currently Giving A Presentation and Turn Off The Screen Saver.
Set the volume and the background as you want them to be and then click OK.
You return to the Windows Mobility Center window.

Clean Up
After you have delivered your presentation, click the Turn Off button under Presentation Settings and close Windows Mobility Center.
Now, you can move the documents and presentations you want to show to the second display and start your presentation. You don’t have to worry about unwanted screen savers turning on, distracting wallpapers appearing, and so on.
Many companies use different encryption solutions to ensure the security of the data stored on the companies’ systems. If a business laptop is stolen or a USB memory stick with company data is lost, it’s important for the stored data to be inaccessible to unwanted people. In such scenarios, encryption is the only solution which ensures that the data is accessed only by people who have the appropriate access keys and passwords. Some businesses also have policies that forbid the distribution of company data on removable media such as USB memory sticks. Be sure you comply with such policies. However, if you need to have important business data on a mobile device when you’re away from the office and you won’t break any company policies by doing so, use encryption. It is the only sensible solution to the challenge of protecting your data.
BitLocker is available only for the business editions of Windows 8.1 (Windows 8.1 Pro and Windows 8.1 Enterprise). That’s why it is very likely that you will use it only on your work computers. In addition, it works only on computers with Trusted Platform Module (TPM) chips. These chips can store the cryptographic keys BitLocker and other encryption solutions use. TPM chips are included in most business computers but not in computers sold to consumers and home users.
One important change in Windows 8.1 is that it features what Microsoft calls Pervasive Device Encryption. Device encryption previously found on Windows RT and Windows Phone 8 is now available in all editions of Windows. It is active right out of the box if your hardware supports this feature. Your Windows 8.1 devices are automatically encrypted and protected when using a Microsoft account. Data on any Windows connected standby device is automatically protected (encrypted) with device encryption. BitLocker is now an additional layer that provides more protection options and manageability.
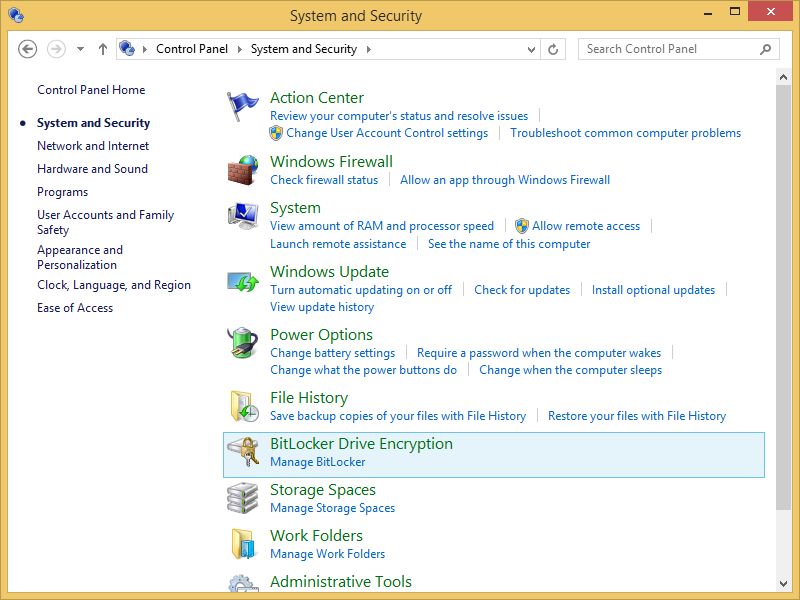
You can find BitLocker by opening Control Panel, choosing System And Security, and then selecting BitLocker Drive Encryption.
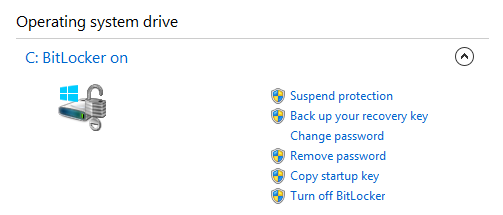
BitLocker’s main window is well organized and easy to understand and use. You can see the drive on which Windows is as well as other fixed data drives that might exist on your computer. You can also see the removable storage devices that are plugged into your computer.
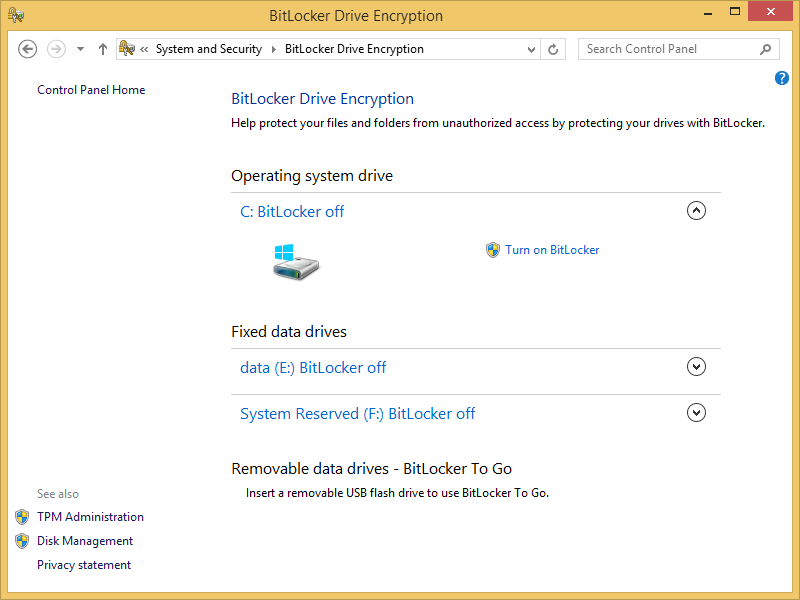
You can use BitLocker to encrypt all of these devices. After a drive is encrypted, its status changes from BitLocker Off to BitLocker On. In addition, you can perform tasks such as the following:
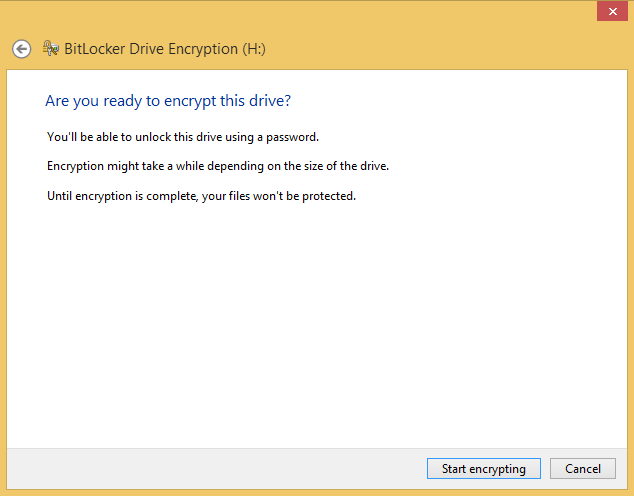
The encryption process is rather lengthy and first involves setting a password that will be used prior to starting Windows and using any encrypted drive. It is important to remember this password. Without it, you won’t be able to access the encrypted drive.
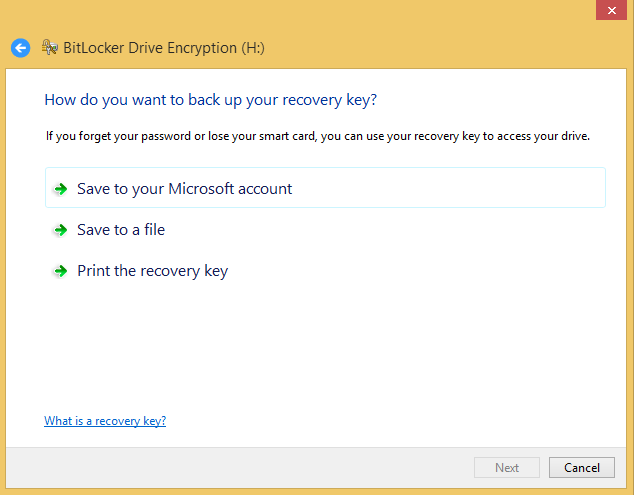
To prevent you from losing access to the encrypted drive, the encryption process includes a step to save a backup recovery key. You can use it if you forget the password and need to recover the encrypted data. You can save the recovery key automatically to your Microsoft account (if you log on to Windows 8.1 with a Microsoft account), to a file on a USB memory stick, on a different drive, or it can be printed on a piece of paper.
Tip
When encrypting a drive other than the operating system drive, the text displayed will be slightly different. However, the options you can choose remain the same.
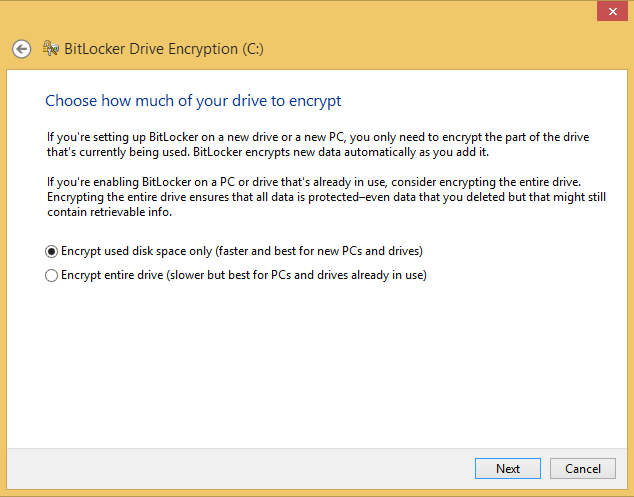
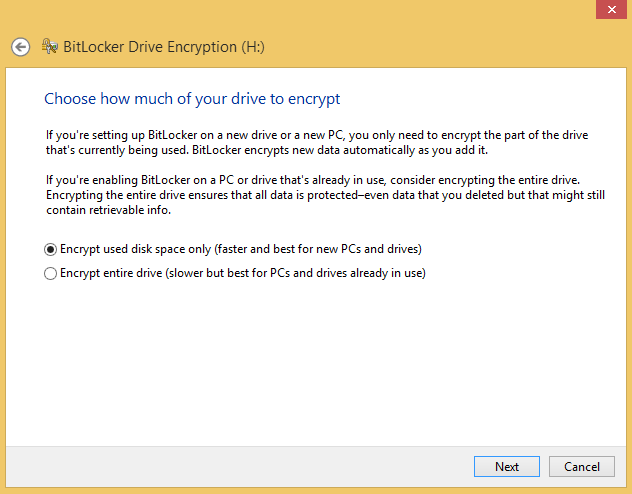
Before the encryption process begins, you are asked whether you want to encrypt only the used disk space or the entire drive. Both methods work well. If you have a newer computer with a fresh installation of Windows 8.1, it is best to choose the first option. If your computer has been used for quite some time, it is best to encrypt the entire drive. However, the second option takes longer than the first.
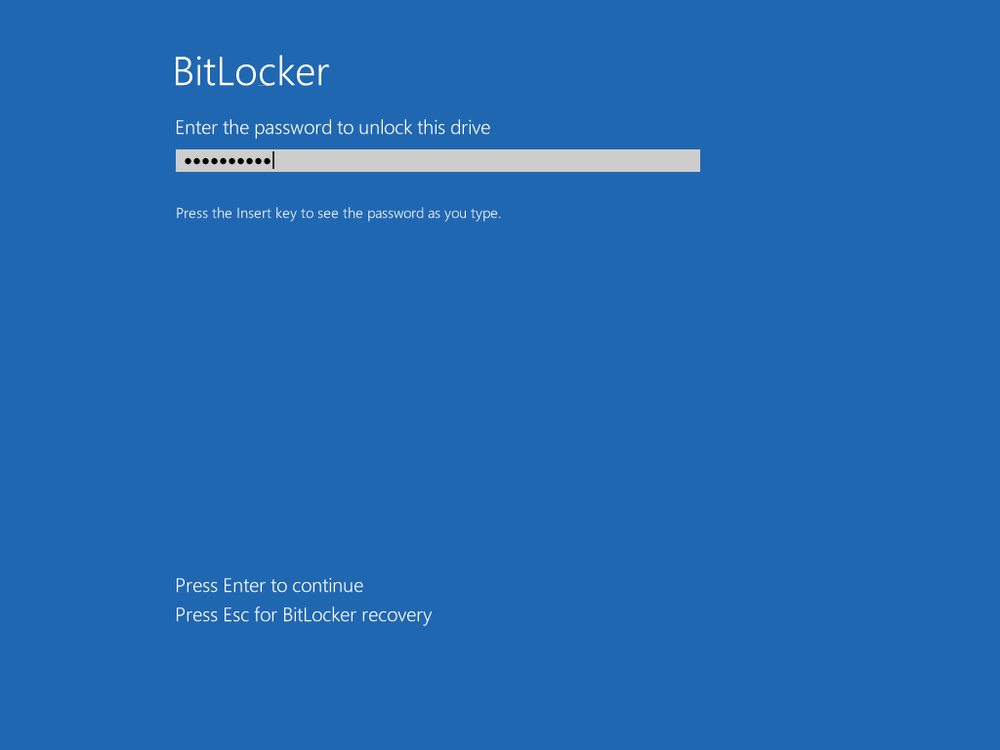
As soon as the encryption process begins, each time you start your computer you are asked to enter the password you set earlier. Without it, you can’t start Windows or access the encrypted drive.
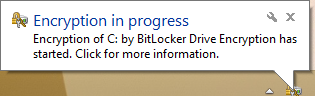
Prior to encrypting the drive, you are asked to restart the computer. When you log on again, you see the Encryption In Progress notification on the Desktop.
You can click the notification to see a progress indicator for the encryption process.
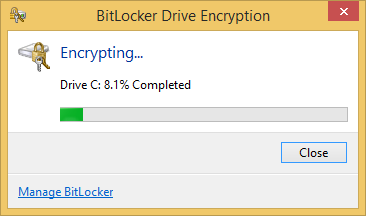
During the encryption process, you can use your computer normally. You can run apps, work on documents, and so on. You can restart your computer even if the encryption is not yet finished; it will resume automatically the next time you start Windows.
In this exercise, you’ll learn how to encrypt your operating system drive by using BitLocker.
Adjacent to the operating system drive, click Turn On BitLocker to start the BitLocker Drive Encryption Wizard.
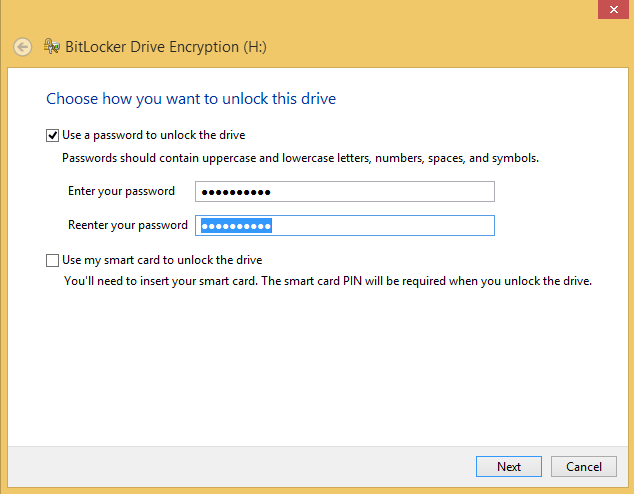
You are asked to choose how to unlock your drive at startup.
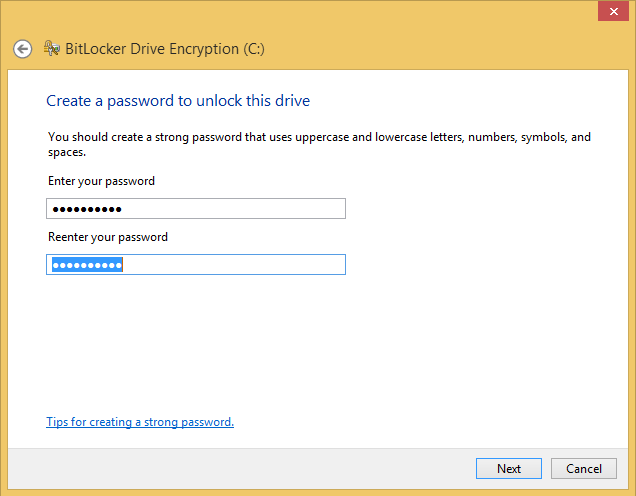
Choose Enter A Password and you are asked to enter the password twice.
In the Enter Your Password and Reenter Your Password boxes, type the password that you want to use, and then click Next.
Save the recovery key by using the method you prefer and then click Next.
You are asked to choose how much of your drive you want to encrypt.
Select the option that best fits your needs and then click Next.
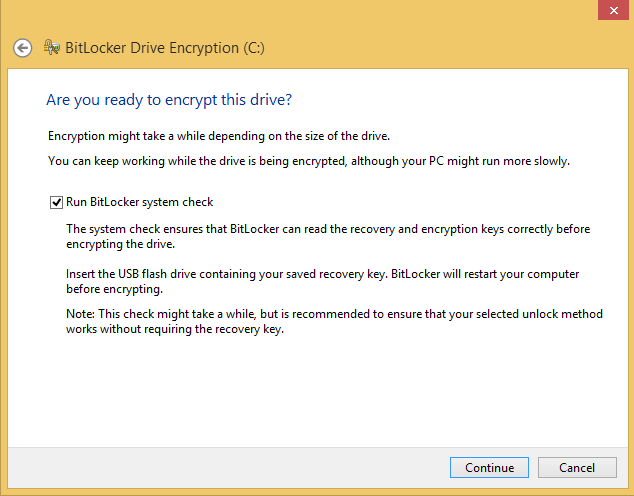
Leave the Run BitLocker System check box selected and click Continue.
You are informed that the encryption will be completed after the computer is restarted.
Restart the computer and enter the BitLocker password you set in step 3.
You are notified that the encryption is in progress.


The time it takes for the operating system drive to be encrypted depends on its size and how much data is stored on it. The speed of your computer’s processor will also affect the amount of time it takes. The faster the processor, the faster the encryption process will be. It can take from 30 minutes to a few hours, so be patient.
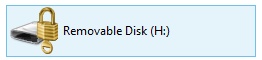
Encrypting a removable data storage device such as a USB memory stick doesn’t take long, and it involves fewer steps than encrypting the operating system drive. After the encryption process ends, each time you plug that device into a Windows computer, it will be displayed in File Explorer using a lock icon, signaling that it is encrypted. To access its content, you must enter the password that was set during the encryption process.
In this exercise, you’ll learn how to use BitLocker to encrypt a USB memory stick. The process is the same for other types of removable storage devices, such as external hard disks.
Set Up
Plug in the USB flash drive that you want to encrypt and then open the BitLocker Drive Encryption window.
Click Turn On BitLocker next to the storage device to start the BitLocker Drive Encryption Wizard.
On the first page of the wizard, select the Use A Password To Unlock The Drive check box.
In the Enter Your Password and Reenter Your Password boxes, type the password that you want to use, and then click Next.
Save the recovery key by using the method you prefer and then click Next.
You are asked to choose how much of your drive you want to encrypt.
Select the option that best fits your needs and then click Next.
You are asked to confirm that you are ready to encrypt the drive.
Click Start Encrypting.
A progress window appears.
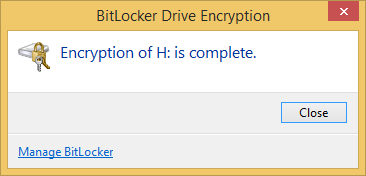
You can now use the USB memory stick as you normally would. All the data stored on it is now encrypted and can be accessed only by using the password you have set. You can encrypt other removable devices, including external hard disks, by using the same procedure. The steps will be the same, but some of the options will appear slightly different depending on the device.
Each time you plug the encrypted removable storage device into any computer running Windows 8.1, including your own, a notification appears saying that the drive is BitLocker-protected.
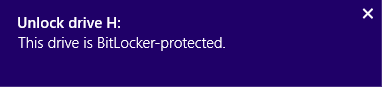
Click the notification, and you are asked to type the password you set during the encryption process. Type the password and click Unlock. If you click More Options, you can also set Windows to unlock this drive automatically each time you insert it.
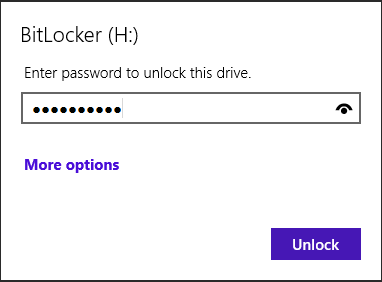
If notifications are turned off in Windows 8.1, you can access the encrypted device from File Explorer. When you double-click the device, a prompt for entering the password is shown, just like the one in the preceding screen shot.
Only after typing the correct password are you able to view and use the data stored on the device.
The process for decrypting a BitLocker-protected drive is easy. First, unlock the drive it by providing the appropriate encryption password. Then, open the BitLocker Drive Encryption window and click Turn Off BitLocker for the drive you want to decrypt.
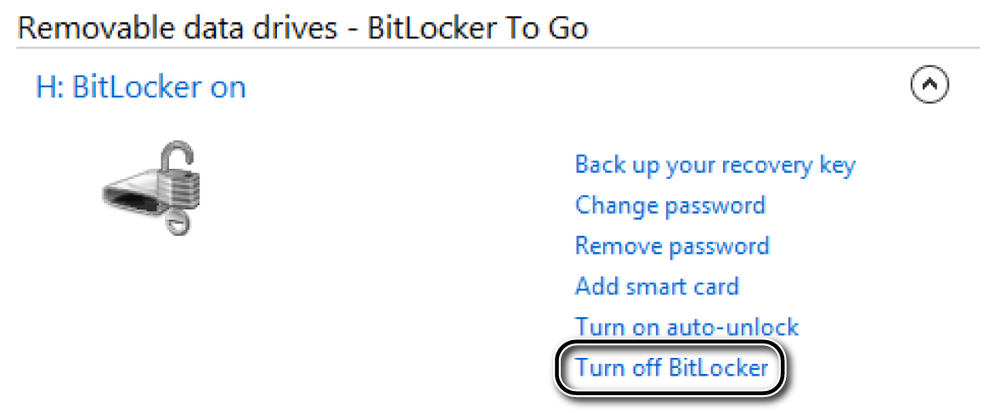
Confirm that you want to decrypt the drive and wait for the process to finish. When the decryption is complete, BitLocker no longer protects the device.
A VPN is a link between your computer or device and your company’s network. Such connections extend access to your company’s private network across public networks such as your home network. VPN connections are useful because they enable you to send and receive data across public networks as if you were connected to your workplace’s network. This makes it possible for you to access apps and services available on your company’s network even though you are working remotely.
VPN connections benefit also from increased security because all transferred data is encrypted. These connections cannot be easily sniffed by unauthorized parties which might be trying to monitor your public network connection and the data you send and receive through it. VPNs are also cost effective because they can connect geographically disparate offices of an organization creating one cohesive virtual network, without spending too much money and resources to set them up.
If your company uses VPN connections for its remote employees, you will receive a specific user account and password to establish VPN connections to your company’s network. Before you go ahead and try to connect via VPN, ensure that you are aware of all the technical details required to set it up. The list of details varies depending on your company’s setup, but it will include at least the following details: the IP address (Internet address) of the VPN server, the connection name, and a username and password.
You can establish VPN connections by using third-party tools or you can do it directly from Windows 8.1. It depends on the VPN solution adopted by your company. If your company is using Microsoft solutions, including for VPN, Windows 8.1 makes it easy for you to connect to your workplace’s network.
In this exercise, you’ll learn how to connect to your workplace through a VPN.
Set Up
Ensure that you know the technical details required for setting up a VPN connection: Internet address of the VPN server, its name, credentials, and other parameters. They will be given to you by the company’s IT department, when it sets up your VPN account. Then, on your work laptop or device, connect to the Internet and open the Network And Sharing Center.
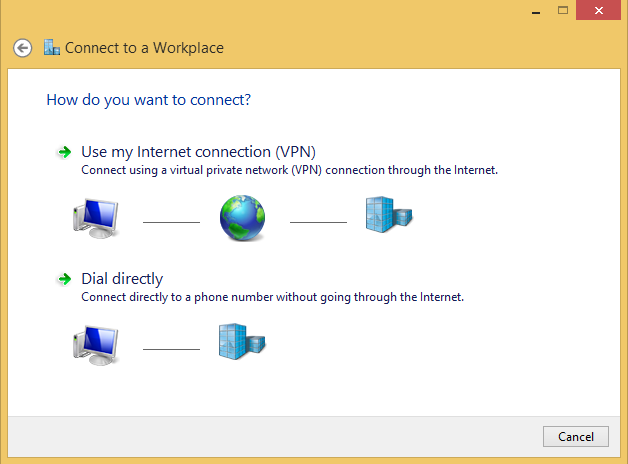
In the Network And Sharing Center, click Set Up A New Connection Or Network, to open a wizard of the same name.
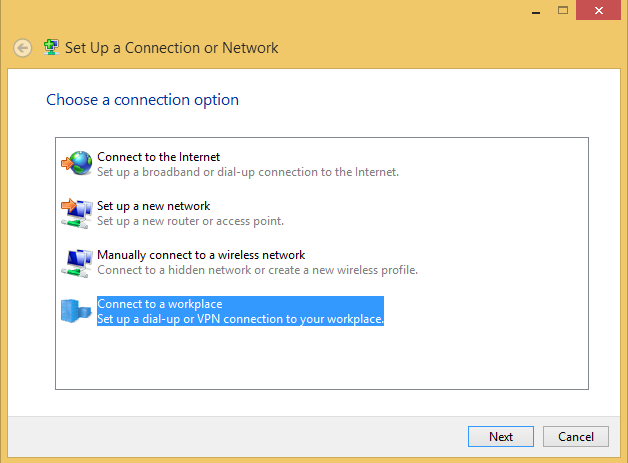
Select Connect To A Workplace and then click Next.
You are asked to select how you want to connect.
Select Use My Internet Connection (VPN).
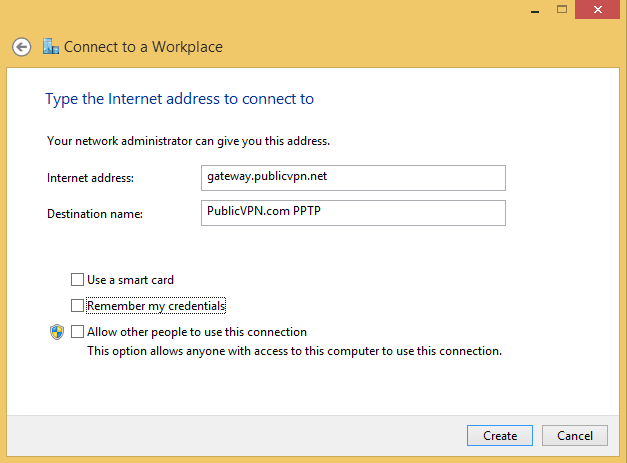
You are asked to enter the details of the VPN connection.
Type the Internet address of the VPN server, the destination name, and select or clear the appropriate options, as instructed by your company’s IT staff.
When ready, click Create.
You are taken to the Desktop.
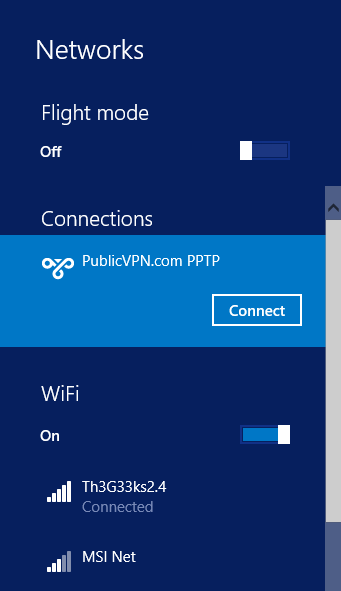
Click the network icon in the notification area of the taskbar to open the Networks pane.
In the Connections section, click the VPN connection you just created and then click Connect.
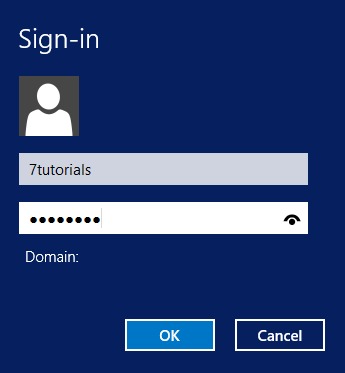
You are asked to enter your username and password.
Enter the requested details and click OK.
You are now connected to your workplace through VPN.
Windows 8.1 also offers other enterprise-friendly features. Because the space available for this book is limited, we could not cover all of them in detail. However, there are a few features we would like to mention:
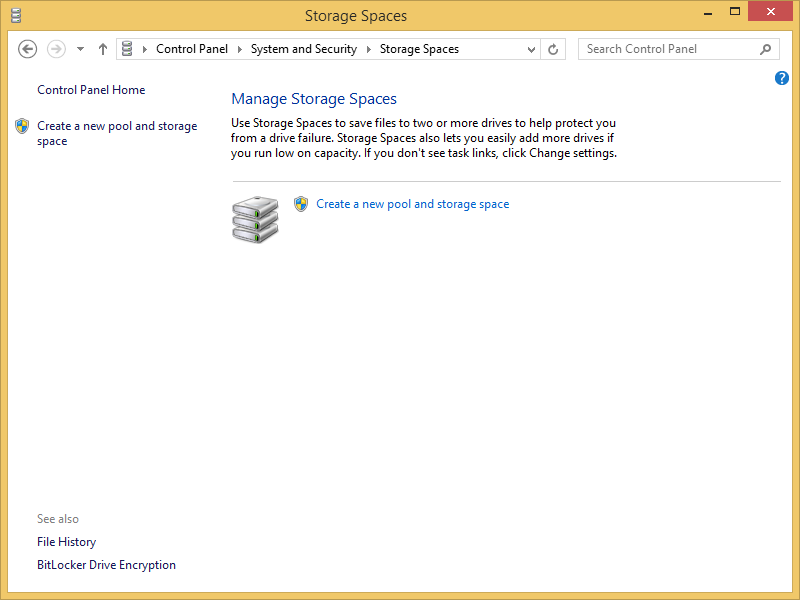
Storage Spaces. This is a feature designed for IT enthusiasts and professionals who need a lot of flexibility when working with drives and storage space. This feature makes it possible for you to group together physical storage drives in a storage pool. Then, you can use the pool’s capacity to create storage spaces. These spaces are virtual drives that appear in File Explorer. You can use them like any other drive and do whatever you need to do with them. If you happen to run low on capacity, you can add more drives at any time and increase the capacity available for your storage spaces.
Storage Spaces also offer resiliency features, such as two-way mirroring, 3-way mirroring and parity, to secure your data and prevent its loss when disk failures take place. By enabling resiliency, you will have at least two copies of your data on separate physical disks. Since the data saved in the storage space is always mirrored, you will be able to access it even though one physical drive fails.
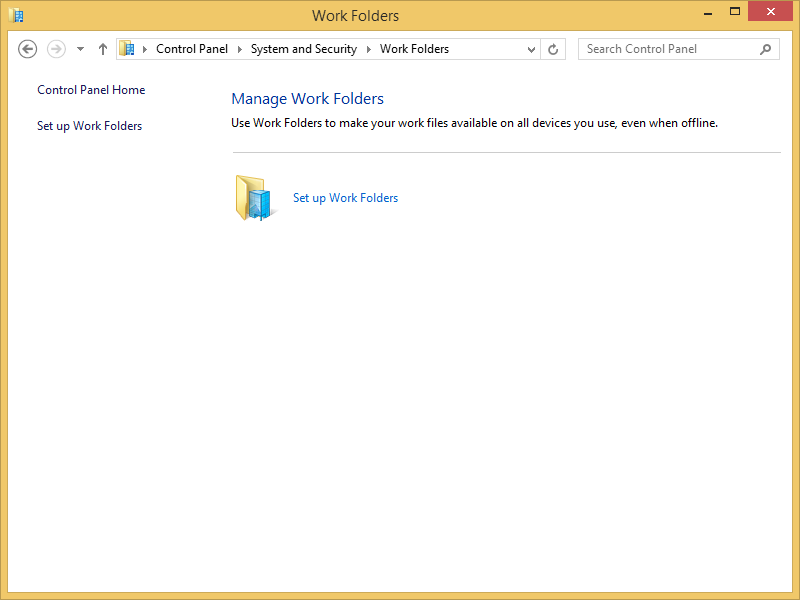
Work Folders. You can use these to store and access work files on any kind of computer or device. You will have a location where you can store work files and access them from anywhere, even when connected to remote networks. Businesses can use this feature to store files on centrally managed file servers and set in place policies such as encryption and lock-screen passwords when users try to access their data from remote computers. Using Work Folders, users can access their work files while offline and synchronize them with the central file server when their computer or device has an Internet connection available.
Windows to Go. This is a feature for enterprise users with which they can boot a full version of Windows 8.1 from external USB drives on any computer, including their personal computer. When booting from the USB drive, a full Windows 8.1 instance is started and the user can work with it as with any other Windows edition. In a business environment, only the IT administrator(s) will provision Windows to Go drives to the company’s employees. The users cannot create these themselves from Windows 8.1.
Windows Mobility Center is a helpful tool when you are mobile and you need to connect your laptop to multiple devices and displays.
Turning on Presentation mode is helpful when you need to deliver presentations at work or anywhere else.
Encryption is a great solution for ensuring that your data cannot be accessed by unwanted people.
With BitLocker, you can encrypt both your computer’s drives and removable data storage devices such as USB flash memory sticks.
VPNs offers a fast and secure way to connect remotely to your company’s network and access its apps and services.