

Administration
An important aspect of a Content Manager OnDemand system is the effective design and implementation of a strategy for system administration from a report administration perspective and from a user authority and responsibility perspective. The focus of this strategy is to ensure that the system is planned to provide the greatest functionality and the best performance as the system matures.
In this chapter, we cover the following topics:
•XML Batch Administration
3.1 Report administration
Report design and definition are key to a successful implementation of a Content Manager OnDemand system. Knowledge of the data that will be indexed, loaded, and retrieved, with knowledge of Content Manager OnDemand preferred practices, results in the most efficient and easy-to-use system possible. In this section, we consider the processes that are followed when you define a Content Manager OnDemand report. We present hints and tips to help in the design and implementation process.
The system components that are required for creating, retrieving, and viewing a Content Manager OnDemand report are a storage set, an application group, an application, and a folder. Optionally, cabinets might be used to organize and simplify folder access. These elements, in combination, allow the Content Manager OnDemand administrator to define and create a report definition that can then be used to index and load data into Content Manager OnDemand. Figure 3-1 illustrates the relationship of these elements in a typical Content Manager OnDemand system.

Figure 3-1 Content Manager OnDemand system components relationship
To help you better understand how to perform report administration, we use the example company that is mentioned in 1.2.1, “Background information of an example company” on page 6 with the Content Manager OnDemand Administrator Client running on Windows to create the required system components. We use the monthly credit card statements that are generated by AFinancial Co in our example. These statements are stored in a single application group in Content Manager OnDemand.
3.1.1 Storage sets
When you define a report, the first component to create is a storage set if one does not exist. A storage set is a named collection of primary storage nodes that support application groups with similar archive storage management requirements.
For example, a storage set can be used to maintain data from different application groups that must retain documents for the same length of time and require the data to be kept on the same type of media. Different storage sets can be created to handle different data retention requirements. One storage set can be set up to maintain data on cache-only storage, and another storage set can be set up to point to an archive storage to maintain data for three years on optical media. Business practices and legal requirements determine the storage management design that is required.
For most implementations of Content Manager OnDemand for i, a storage set is created by creating a migration policy.
Figure 3-2 shows the window where you add a storage set. When you define a storage set, you must specify the report load type. For our example, we create a storage set, StatementStorage. It stores credit card statements from the customers. The load type is Fixed.

Figure 3-2 Creating a storage set
For a more in-depth look into storage management, see Chapter 5, “Storage management” on page 89.
3.1.2 Application groups
After you create a storage set, the next object to create is an application group. We create an application group that is called Credit Card Statements. An application group represents the data that you store in Content Manager OnDemand. It contains a collection of one or more applications that contain common indexing and storage management requirements. The application group contains the database information that is used to load, search for, and retrieve reports. The application group also defines the data that will be loaded into the database.
Figure 3-3 on page 48 shows the Add an Application Group window. For our example, we create an application group that is called Credit Card Statements. All applications that are related to credit card statements are under this application group.

Figure 3-3 Creating an application group
When you define an application group, you also specify the database fields and storage management information. In the following sections, we look closer at different aspects of the application group definition that can contribute to a successful Content Manager OnDemand system implementation.
Database information
Click Advanced (shown in Figure 3-3) to specify advanced database information for the application group. Figure 3-4 shows the Database Information window.

Figure 3-4 Database information on a z/OS system
When you define the database information, you must determine the number of rows (Maximum Rows) that are stored in each database table and the number of report loads that are included in each database table. These values are important to system performance and maintenance.
Maximum Rows value
Physically, an application group consists of one or more tables that contain the index data for the stored documents and reports. Each table is referred to as an application group segment table. The Maximum Rows value determines how many data rows are loaded into each of these “segment” tables. When the Maximum Rows value is reached, the open segment table is closed and a new segment table is created. We selected the default value of 10 million rows because in most cases, this value is sufficient for balancing the performance of data loads and queries.
Consider the following factors when you specify the Maximum Rows value:
•The number of rows that is specified needs to be large enough to handle the largest possible input report file.
•Decrease the value if the total number of indexes (documents) that is stored for the application group will never reach the 10 million rows value.
•Increase the Maximum Rows value if the 10 million rows value is too small compared to the number of indexes (documents) to be stored so that many application group segment tables are created and as a result, a single user query results in a search of multiple tables.
Storage Management
The Storage Management setting determines how long report data and indexes are kept in cache storage before they are expired. Options determine how soon data is migrated to archive storage after the report load completes.
For a detailed description of the storage management options, see Chapter 5, “Storage management” on page 89.
Field Information tab
The Field Information tab (Figure 3-5) is used to define the attributes of the database fields that make up the Content Manager OnDemand report index data. These attributes determine the characteristics of the index data and control many aspects of loading and processing data in the system. A database field must be added for each index value that is required by applications to be part of the application group.

Figure 3-5 Application group’s Field Information tab
|
Note: You can update the application group to add a database field.
|
When you define a field, you specify the field name, field type, data type, whether it is a segment field, the expiration date, and more. In the following sections, we take a closer look at field type and whether it is a segment or an application ID field.
Type
The Type attribute determines the manner in which the database field is used by Content Manager OnDemand. The main types of attributes are index and filter.
A field needs a type of index if it is used to uniquely identify a document or if it is frequently used when a user searches for documents in the application group. Designating a field as an index serves to enhance query performance but increases the required processing during loading and database maintenance. A separate index table is created and maintained for application group fields that are designated as indexes. These index tables are searched first when a folder query is run to quickly pinpoint the documents to include in the document “hit” list.
A field needs a type of filter if it does not uniquely identify a document. A filter is used with an index field during folder queries.
|
Important: Folder queries that use filter fields alone result in a sequential scan through database tables. An index field must always be included in folder queries. For more information about folders, see 3.1.4, “Folders” on page 54.
|
A thorough understanding of the way that users search for documents in the system is required before you determine the fields that will be indexes and the fields that will be filters. Only fields that will be heavily used when users are searching for and retrieving documents need a type of index. An index field will always be included in a folder query.
|
Note: Date fields are almost always defined as filters, not indexes.
|
Segment
Segment is the date or date and time field that is used to limit the number of tables that are searched during a folder query. By using a segment date to limit folder queries to a single table or a limited set of tables, performance is improved. The segment date is especially important for application groups that contain a large amount of data.
If the expiration type is segment, Content Manager OnDemand also uses the segment field to determine when to delete data from the application group. You might specify only one segment field for each application group.
|
Note: The date field that is used for the segment date must always have a type of filter. By default, an index is created for the segment date, and setting the segment date to a type of index creates unnecessary processing.
|
Application ID field
The application ID field is used to identify an application within an application group when you create an application group that contains more than one application. The database mapping fields are used to map the value to be stored in the database as the label that is displayed for folder queries and in the subsequent query hit list. A query can be made against a specific application in an application group or against all of the applications in an application group.
3.1.3 Applications
An application defines the data to index and load. An application associates the data with an application group and specifies the type of indexing process to perform on the data. It also defines any logical views to be put in place for users and determines any special print options to use with the data. In this section, we consider several of the load information attributes that are defined for an application.
Load Information tab
The Load Information tab specifies the processing and resource information that the Content Manager OnDemand loader uses to load the input data onto storage volumes and to load the associated index data into the database.
The File Format, Preprocessor Parameters, and Postprocessor Parameters (Figure 3-6) are defined as part of the load information:
•File Format: Provides settings that control how the Content Manager OnDemand system compresses and stores documents and resources
•Preprocessor: Specifies processing that is carried out on database fields before indexing data
•Postprocessor: Specifies a system command or exit program that runs against an index file before the index records are loaded into the database

Figure 3-6 Application Load Information
Large object
In the File Format section, you can set support for large objects. Content Manager OnDemand large object support provides enhanced usability and better retrieval performance for reports that contain large documents.
For example, suppose that a report contains statements that typically exceed 1,000 pages. With large object support, the statements can be divided into parts of 100 pages. When a user views a statement, Content Manager OnDemand retrieves and uncompresses the first part of the statement. To view a specific page of a statement, the user can choose the Go To command in the viewer window and enter the page number. Content Manager OnDemand automatically retrieves and uncompresses the part of the statement that contains the requested page. When the user moves from page to page of a statement, Content Manager OnDemand automatically retrieves and uncompresses parts of the statement as needed.
When you use large object support, users experience consistent response time when they move from page to page of the document.
You must consider several factors when you use large object support:
•The report must be indexed with an indexing program that generates a large object by dividing large documents into smaller parts and defining the indexing information that is used to retrieve the documents.
•The amount of data per page and the number of pages that you divide documents into affects retrieval and viewing response time. The number of bytes per page typically dictates the number of pages that you can divide documents into. In general, the larger the page size in bytes, the smaller the number of pages that you can divide your documents into. For example, if the average page in the document contains 2.5 KB of data, choose 100 - 1000 pages per Large Object (LO) segment; if the average page in the document contains 50 KB of data, choose 1 - 100 pages per LO segment.
•The capacity of your network and the traffic in the network might determine the number of pages that you need to divide your documents into. Larger document sizes (large byte size even when compressed) require more network bandwidth (or more time if the bandwidth is not available) to transfer from a Content Manager OnDemand server to a client. The number of users that are concurrently accessing Content Manager OnDemand and the sizes of the documents that are being retrieved determine the overall load in the network.
•Response time requirements. The goal of Content Manager OnDemand large objects is to provide better performance and usability. Large object support clearly provides enhanced usability. However, you must implement large object support so that dividing your documents into parts provides better overall performance than other methods of segmenting the input data.
When you choose a large object, Content Manager OnDemand displays the Number of Pages field. Specify the number of pages that you want Content Manager OnDemand to divide documents into in the Number of Pages field.
To generate large objects, the indexer that is specified on the Indexing Information page must be AFP Conversion and Indexing Facility (ACIF), OS/390, or OS/400. When you select the Large Object check box, Content Manager OnDemand automatically adds the INDEXOBJ=ALL parameter to the indexing parameters (which causes the indexing program to generate the large object indexing information).
Exporting an application
It is not possible to export an application to application groups with different database fields or attributes. However, you can export applications to a different server if the application group on the target server is identical to the application group on the source server (the server on which the applications are defined).
Ensure that no existing application has the same application ID in the target application group. For more information, see the section “Adding items to a server” in the IBM Content Manager OnDemand for Multiplatforms, V9.5, Administration Guide, SC19-3352.
Selecting font by line data graphical indexer
The font that is used by the line data graphical indexer to display a document can be changed from within the line data graphical indexer at the Content Manager OnDemand Administrator Client.
|
Note: For the best indexing results, select a monospacing font with the line data graphical indexer.
If the font is changed by using the Administrator Client, the selected font is also used by the Windows client the next time that the Windows client is started and a line data document is viewed.
|
For more information, see Technote 1215957, which is available at the following web address:
3.1.4 Folders
A folder is the interface that allows a user to search for reports and documents that are stored in the Content Manager OnDemand system. One or more application groups can be defined to a folder. The user enters index search criteria into the folder search fields. In the background, an SQL search is issued for each included application group. The results of the queries are accumulated, and a document hit list is constructed and returned to the user. The folder can be customized to provide the look and feel that is wanted for the users of the Content Manager OnDemand system. The Content Manager OnDemand administrator can also grant specific permissions for users and groups to use the folders.
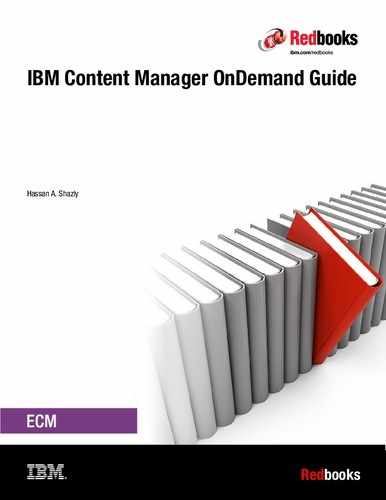
Figure 3-7 shows the Add a Folder window.
Figure 3-7 Folder general information
Display Document Location
The Display Document Location setting (Figure 3-7) determines whether the client shows the storage location of each document in the document list by placing an icon next to each entry. The possible locations are cache storage (on the library server or an object server) or archive storage.
|
Important: Use care when you enable this feature. The Display Document Location function can result in degraded search performance because the storage location information for every document that is returned must be retrieved from the Content Manager OnDemand object server.
|
Display Document Hold
The Display Document Hold setting (Figure 3-7 on page 54) determines whether the client shows a column that indicates whether a hold is placed on the document. For more information, see Chapter 16, “Enhanced Retention Management” on page 353.
Note Search
If the annotation parameter (annotation flags in the document database table) in the application group is set to “No”, the Note Search parameter (Figure 3-7 on page 54) determines when Content Manager OnDemand searches the database for annotations and notifies the user of the annotations. The following options are possible:
•Hit list: When a folder query is run, Content Manager OnDemand searches for annotations, and a note icon, which contains an annotation, is displayed next to each document in the resulting hit list. The hit list option has a direct performance impact on the generation of the document list.
•Retrieve: Content Manager OnDemand searches for annotations when the user selects a document for display. This option is the default and preferred option.
•Note: Content Manager OnDemand searches for annotations when the user selects the note command when the user views a displayed document.
As a preferred practice, set the annotation parameter in the application group advanced settings to “Yes”. In this case, an annotation flag is set in the database when a user adds an annotation to a document. When the document hit list is displayed, a note icon is displayed next to the documents for which an annotation exists.
Full Report Browse
In the Permissions tab of the folder definition window (Figure 3-8 on page 56), the Full Report Browse option allows a user of the Content Manager OnDemand Windows Client to select a document, retrieve that document, and view the entire report to which the document belongs.

Figure 3-8 Folder Permissions tab
If the user has Full Report Browse authority for a specific folder (which can be configured in the Administrator Client), the Windows client has a new View Full Report button. When the user clicks it, Content Manager OnDemand retrieves the entire report so that the user can view it. If the user does not have Full Report Browse authority, the button is not visible in the Windows client.
If you click View Full Report, the entire report (with the same load ID) that is associated with the selected document is viewed, rather than the individual document. If a Full Report document is displayed and the entire document is printed to a server printer, the entire report is printed as a single job.
Maximum Hits
The Maximum Hits section (Figure 3-8) sets the maximum number of document hit list entries that are returned by a folder query. Limiting the number of hits that can be returned from a query prevents performance degradation that might occur if a large result is returned from a query. If a query results in a large hit list that takes a long time to create, the cancel operation function on Content Manager OnDemand Client can be used to stop the creation of the hit list.
Secondary Folder
The Secondary Folder parameter (Figure 3-8) is used to manage the number of folders that a user is presented with when the user logs on to the Content Manager OnDemand system and their list of folders is displayed. By default, Content Manager OnDemand presents a list of the primary folders that a user is authorized to access. Marking a folder as a secondary folder reduces the size of the initial folder list. All folders that the user is authorized to view might be displayed by selecting the show all folders option in Content Manager OnDemand Client.
Server Based Sorting option
The Server Based Sorting option (Figure 3-8 on page 56) is used to sort the document hit list on the server before it is returned to the client.
|
Important: Sorting might still occur on the client if any of the following items are true:
•Multiple application groups are searched. (The folder contains multiple application groups.)
•The search query is too long or too complex for a single SQL statement.
•The user specifies the Append option.
|
Text Search
Text Search (Figure 3-9) is used to search documents that contain a specific word or phrase before the document hit list is built. Only documents that contain the specified word or phrase are returned as part of the hit list. The search takes place on the server.
Figure 3-9 shows the Text Search option in the Field Definition tab of the Add a Folder window.

Figure 3-9 Text Search
By using Text Search, a user can further qualify a search without adding the processing that is associated with adding and maintaining additional index fields to the database. Text search is performed on the documents that match the criteria for the other query fields. For example, if the other query fields are date and account number, a text search is performed on the documents that match the specified date and account number. If the document contains the text search string, it is returned as part of the hit list. Text search fields are not mapped to database fields.
A text search string can be a word or a phrase. Only one text search field can be defined per folder. The only valid search operator is EQUAL. Wildcard searches and pattern searches are allowed. Text search is not case-sensitive.
3.1.5 Cabinets
A cabinet is a container for folders. You can use cabinets to manage folders and enable users to navigate to folders more easily. A folder can belong to one or more cabinets.
3.1.6 The report wizard
So far, we described how to use Content Manager OnDemand reporting tools to create an application group, an application, and a folder as separate actions. Two methods exist to define a report to Content Manager OnDemand:
•Add a separate application group, an application, and a folder.
•Use the report wizard.
This section briefly describes the report wizard’s capabilities.
The report wizard defines a report to Content Manager OnDemand by combining the tasks of adding an application group, an application, and a folder into one task. Information for the application, application group, and folder is gathered by answering a series of questions and by using the graphical indexer to define the indexing parameters, the database fields, and the folder fields. Alternatively, database fields and folder fields can be defined without using the graphical indexer.
To start the report wizard, you click the report wizard icon on the main window of the Administrator Client, as shown in Figure 3-10.

Figure 3-10 Report wizard icon on the OnDemand Administrator Client
Report wizard settings
As you move through the report wizard, standard options are selected for you. Use the defaults unless you have a specific reason not to use them. Depending on how you use the Report Wizard, you might not see all of the windows that we will describe.
Introduction window
The Report Wizard introduction window provides a brief explanation of the report wizard. Your first step is to select the indexer that you want to use to index the data. For all indexers, you specify the type of data that you want to store. For indexers other than Generic and XML, you specify the location of the sample data.
Choose the indexer and type of data and then set up the sample data, as shown in Figure 3-11.

Figure 3-11 Setting up the report wizard
On z/OS or Multiplatform implementations, if AFP is selected as the data type and the report data is line data, it is converted to AFP before it is loaded into Content Manager OnDemand. The report wizard cannot be used to define a report to Content Manager OnDemand if the report is already AFP data.
Report window
The Report window (Figure 3-12 on page 60) displays the sample data and provides easy-to-use tools to help you define indexing information, database fields, and folder fields. Press F1 to display the online help for options and commands that are available on the Report window. Use the online help to learn how to define triggers, fields, indexes, database fields, and folder fields.
|
Important: When you finish defining the indexing, database, and folder information, save your changes.
|
Figure 3-12 Report window
View information window
If you specify User Defined as the data type on Figure 3-11 on page 59, you must specify a file extension. If you specify Line as the data type, you must specify the code page, carriage control (CC), and record format (RECFM). See Figure 3-13.

Figure 3-13 View information options
Managing fields window
When you select the Generic indexer or the XML indexer, you add and remove database and folder fields.
When you click Add or Properties (Figure 3-14 on page 61), the report wizard displays a window where you specify the properties of a field.

Figure 3-14 Managing fields
Managing data window
When you load a report into the system, you can specify that you want report data to be stored by using large object support. You also need to specify how you want Content Manager OnDemand to manage annotations that users attach to pages of the report. See Figure 3-15.

Figure 3-15 Managing data
Application identifier window
When you use the report wizard to add an application to an existing application group, you must specify the name of the application and select a value that uniquely identifies the application within the application group. See Figure 3-16 on page 62.

Figure 3-16 Application identifier
Storage management window
The storage management window (Figure 3-17) determines where the storage manager maintains copies of reports and also determines how and when Content Manager OnDemand deletes report data from the system.

Figure 3-17 Storage management
Applications in the application group window
If the report that you define is one of several reports that will be stored in the same application group, you can use the report wizard (Figure 3-18) to define the following information for the report:
•The database field that contains the values that identify an application within the application group
•The folder field that users use to search a specific application
•The length of the application ID field
If you select Document Size, Content Manager OnDemand adds a field to the application group and folder. Content Manager OnDemand stores the size of the document in the application group field when data is loaded.
If you select Page Count, Content Manager OnDemand adds a field to the application group and folder. Content Manager OnDemand stores the number of pages in the document in the application group field when data is loaded.
You must provide the folder names for both fields (Document Size and Page Count). You do not need to specify the names for the application group fields because they are predefined.

Figure 3-18 Application group
Enhanced Retention Management and Interoperate with IBM FileNet P8 Platform window
In this window (Figure 3-19 on page 64), you can configure the application group to work with the following features:
•Enhanced Retention Management feature of Content Manager OnDemand
•Interoperability between Content Manager OnDemand and IBM FileNet® P8 Platform

Figure 3-19 Enhanced Retention Management and Interoperate with FileNet P8 Platform window
Full Text Index window
If Full Text Indexer is installed, specify the name of the Content Manager OnDemand Full Text indexing server and optionally, add Full Text Index folder fields (Figure 3-20).

Figure 3-20 Full Text Index window
Name window
In this window (Figure 3-21), specify the names of the application group, application, and folder. After you enter the names, Content Manager OnDemand queries the library server to ensure that the names are valid and unique.

Figure 3-21 Specifying names
Wizard complete window
In this window (Figure 3-22 on page 66), you confirm the selections that you made for the report. Click Display to view a summary of the application group, application, and folder definitions. From the summary window, choose the Print icon from the toolbar to print a copy of the definitions.
When you are satisfied with the selections that you made for the report, click Finish to complete the report definition. Content Manager OnDemand adds the application group, application, and folder to the library server, closes the report wizard, and returns to the administrator window.

Figure 3-22 Completion window
3.2 User and group administration
When you design a Content Manager OnDemand system, you must determine the best way to implement the many authority structures that are available for users and administrators of your system. The span of control for the administration of the system must be considered with the level of user access to the data that is stored in the system. How many different administrators are required? Will all administrators have system administrator authority or will different administrators have different levels of authority? What is the most effective way to restrict a user’s access to only the data that is necessary to do that user’s job?
The answers to these questions depend on the size of the system, the degree of centralization to be exercised over system administration, and the nature of the data and the business needs of the users.
Centralized or decentralized
In a system design that exercises centralized control, one or a few administrators are granted system administrator authority. A centralized system typically is used when the number of reports and users to be added to the system is small. Centralized administration is also appropriate where resources are limited and only one person might have the skills and knowledge to perform the system administration tasks, or where one user group performs all of the administration tasks.
In a system design with decentralized control, different users are granted different levels of administrative authority. For example, you might have users that have the authority to create users and groups. Other users might have the authority to create application groups and folders, and others might be given full system administration authority.
The skill level of the users might be a determining factor in the degree of authority that is granted. It takes a more skilled user to define indexes and report parameters than to set up users and groups. A decentralized system is typically used when data from different sources is stored on the same Content Manager OnDemand system but must be maintained independently of other data. Decentralization also makes sense when report loading and processing needs are limited to a specific group of users for security purposes or when administrators that add users and groups must be prevented from accessing report data.
The decision about whether to use a centralized or a decentralized administration model is best made before any data is set up in the system. Even though the type of administration that is chosen can be changed later, the amount of work that is involved in that change is greater than the amount of work that is necessary to study the requirements of the system and implement the appropriate administration policies from the beginning.
In this section, we describe different types of users, followed by a description of a decentralized administrative plan. We also introduce a new administrative tool, Content Manager OnDemand XML Batch Administration, which is a command-line program that is run on the Content Manager OnDemand server.
3.2.1 User types, authorities, and functions
Four types of users are available in a Content Manager OnDemand system. Each type has a different level of access, authority, and responsibility in the system:
•User: Logs in and queries the system to retrieve documents and reports for viewing.
•User administrator: Adds users or other user administrators to the system.
•Report administrator: Defines the application groups, applications, folders, and cabinets to be part of the system. The report administrator is responsible for understanding the report and document data and for defining the indexes to be extracted from the data and stored. A report administrator is also responsible for designing the user interface to the reports through the folder definition process and for controlling access authority to the reports that the report administrator designs, indexes, and loads.
•System administrator: Has the highest level of authority in a Content Manager OnDemand system. The system administrator has authority for all system functions and can grant other users the authority to perform various tasks. The system administrator is the only level of authority that can create storage sets and define system printers.
When the administrative tasks and levels of authorities are understood, you must decide the span of control in the system. Is it better to have one user control all access and functions in the Content Manager OnDemand system, or is it better to spread the administrative tasks among several users to smooth the workload based on system requirements? The answer to this question depends on whether your environment uses centralized or decentralized administrative control.
A centralized administrative plan is best suited for a Content Manager OnDemand system with a few users and relatively few reports to define. In the next section, we focus on the decentralized system and describe the different aspects of a decentralized administrative plan.
3.2.2 System administration
Content Manager OnDemand can centralize or decentralize the administration of the system. A centralized environment means that one type of user, a system administrator, controls the creation and access to all of the objects that are defined on the system. A decentralized environment means that the tasks of the system administrator are divided and assigned to other users. The responsibilities of the other users might vary from user administration, group administration, application group administration, folder administration, or any combination of the administrative tasks.
You need to decide whether to centralize or decentralize the administration of the system before objects are added to the system. Although the decision is reversible, the amount of work that is required to change from one type of administration to the other can be significant if many users, groups, folders, and application groups are already defined to the Content Manager OnDemand system.
Many ways exist to decentralize the administration of the system because of the various user types and the additional authority levels that can be specified for users. Two specific models are described in this section: the object type model and the object owner model.
Object type model
In the object type model, which is shown in Figure 3-23, all of the objects on the system are logically grouped into administrative domains according to the type of the object. The administrator of a domain maintains all of the objects within the domain. For example, an application group, folder, or cabinet administrator maintains all of the application, application group, folder, and cabinet objects on the system.

Figure 3-23 Decentralized system administration - object type model
In this model, the system administrator defines two new users. One user is responsible for administering applications, application groups, and folders, and this user is defined as an application group, folder, and cabinet administrator. The second user is responsible for administering users and groups, and this user is defined as a user administrator with the Create Groups authority.
Table 3-1 on page 69 shows the administrative users and the tasks that are assigned to the users.
Table 3-1 Administrator roles in object type model
|
Administrator type
|
Administrative tasks
|
|
System administrator
|
Creates report administrators.
Creates user administrators with Create Groups authority.
Creates and maintains storage sets.
Creates and maintains system printers.
|
|
Application group, folder, and cabinet administrator
|
Creates and maintains application groups.
Creates and maintains applications.
Creates and maintains folders.
Creates and maintains cabinets.
|
|
User administrator with Create Groups authority
|
Creates and maintains users.
Creates and maintains groups.
|
When they are maintaining application groups and folders, the application group, folder, and cabinet administrator must give other users access to the application groups, folders, and cabinets. The recommended and simplest way to perform this task is to give access to a group, rather than to individual users. No additional work is required by the application group, folder, and cabinet administrator when another user needs access to the application group, folder, or cabinet. When a new user is added to the group, the user automatically gets access to the application group, folder, and cabinet. Adding the user to the group is the responsibility of the user administrator because the user administrator owns all of the groups in this model.
Another reason for giving groups rather than individual users access to application groups and folders is that the application group, folder, and cabinet administrator does not have access to the users and groups in this model. Because the application group, folder, and cabinet administrator must first be granted access to any users or groups that require access to application groups, folders, or cabinets, it is simpler and less time-consuming to give access to a few groups rather than hundreds or even thousands of users. The application group, folder, and cabinet administrator is given access to a group by adding the application group, folder, and cabinet administrator to the group. This task is performed by the user administrator with the Create Groups authority. As a group member, the application group, folder, and cabinet administrator can see the group in the list and can grant group access to any application groups and folders on the system.
To give an application group, folder, and cabinet administrator access to a user, the user administrator with the Create Groups authority must update each user and give the application group, folder, and cabinet administrator access to the user. After access is granted, the application group, folder, and cabinet administrator can see the user in the list and can grant the user access to any application groups, folders, and cabinets on the system. Again, this approach is not recommended because this task must be repeated each time that a user is added to the system.
Object owner model
In the object owner model, which is shown in Figure 3-24 on page 70, the objects on the system are logically grouped into administrative domains according to the creator or owner of the object. An administrator maintains only the objects that they create. For example, a user with Create Application Groups and Create Folders authority can maintain only the applications, application groups, and folders that they created.

Figure 3-24 Decentralized system administration - object owner model
The object owner model can be used to separate the objects on the system into logical parts, such as a department, company, or another entity. Each part is independent of the other part and each part must be maintained separately. Each part typically requires two administrative users. One user is responsible for creating and maintaining users and groups. The other user is responsible for creating and maintaining applications, application groups, and folders. However, you can also define one user with the authority to create and maintain users, groups, applications, application groups, and folders. In effect, the one user is the system administrator for a logical part of the system.
In the object owner model, the system administrator defines two users for each logical part of the system. One user is responsible for maintaining the users and groups for a logical part of the system. The other user is responsible for maintaining the applications, application groups, folders, and cabinets for a logical part of the system. With the object owner model, you store data from several sources on one Content Manager OnDemand system and let only one set of users access each set of data. Table 3-2 on page 71 shows the administrative users and the tasks that are assigned to the users.
Table 3-2 Administrator roles in the object owner model
|
Administrator type
|
Administrative tasks
|
|
System administrator
|
Creates a report administrator with Create Application Groups and Create Folders authority.
Creates a user administrator with Create Groups authority.
Creates and maintains storage sets.
Creates and maintains system printers.
|
|
Report administrator
|
Creates and maintains application groups.
Creates and maintains applications.
Creates and maintains folders.
Creates and maintains cabinets.
|
|
User administrator
|
Creates and maintains users.
Creates and maintains groups.
|
To illustrate how the object owner model can be used, assume that a company installs a Content Manager OnDemand system to provide data archival and retrieval services for other organizations. The company provides the hardware and software that are required to administer the system and archive and retrieve the data. An administrator from each organization defines application groups and folders for their data. Another administrator defines the users that can access the data. The system must be able to limit access to an organization’s application groups and folders. Only users that are defined by an organization must have access to the application groups and folders that are owned by the organization. The system must also be able to limit access to the data. Only users that are defined by an organization must have access to the data that is owned by the organization.
Summary
Choosing the correct administration model is an important decision in the design of a Content Manager OnDemand system. Table 3-3 contains general guidelines to consider when you decide on an administration model.
Table 3-3 Administration guidelines
|
Environment
|
Recommendation
|
|
The number of reports and users to add to the Content Manager OnDemand system is small (fewer than 100).
|
Centralized system administration
|
|
Resources are limited and only one person performs system administrative tasks.
|
Centralized system administration
|
|
All of the system administration tasks are performed by one group.
|
Centralized system administration
|
|
Data from several independent sources is maintained on the same Content Manager OnDemand system. The data must be kept independent of other data in the system. Data must be isolated and access is allowed only for users who must view the data.
|
Decentralized system administration that uses the object owner model
|
|
Report processing and loading must be limited to a group of users for security reasons.
|
Decentralized system administration that uses the object type model
|
|
The administrator that adds and maintains users must not have access to the report data. A separate administrator performs report administration and loading.
|
Decentralized system administration that uses the object type model
|
3.3 Content Manager OnDemand XML Batch Administration
In addition to the Administrator Client that runs under Windows, Content Manager OnDemand provides an administrative program that uses Extensible Markup Language (XML). The XML Batch Administration program (XML batch program) is run on the Content Manager OnDemand server and provides the same functionality as the Administrator Client.
The difference between the two programs is that for the Administrator Client, the user must provide input through the graphical user interface (GUI) as opposed to the XML batch program, which receives input through the XML interface.
In this section, we describe the following items:
Benefits of using the XML batch program
Many benefits are possible when you use the XML batch program:
•It provides another way to perform the Content Manager OnDemand system administrative tasks.
•It can process different types of objects, such as updating users in a group and application group permission at the same time.
•The Administrator Client is not needed.
•It is useful for replicating the same objects to multiple Content Manager OnDemand servers, and it can even replicate the object when no network connection exists between the servers.
•It simplifies the automation of system administrative tasks.
•For Content Manager OnDemand support purposes, the output XML file can be used to provide information to the support team for problem determination.
3.3.1 Using the XML Batch Administration program
This section provides a brief explanation of how to use the new XML batch program. For more information, see IBM Content Manager OnDemand for Multiplatforms - Administration Guide, SC19-3352.
The Batch Administration program is called arsxml. With this XML batch program, you can export, add, delete, and update Content Manager OnDemand objects.
To use the program, you must have the following files:
•The schema file, ondemand.xsd
•An input XML file (for example, exportusers.xml)
•A password stash file
In XML, the definition and syntax of the markup language are defined in a schema file. For the Content Manager OnDemand XML batch program, the schema file is called ondemand.xsd. It contains the definitions for the Content Manager OnDemand objects: users, groups, applications, application groups, storage sets, folders, printers, and others. Each Content Manager OnDemand object definition contains one or more child objects. For example, a user object has a child object for permissions, and a group object has a child object for users in the group. The schema file (ondemand.xsd) must not be changed in any way by the user.
The input XML file for the XML batch program is parsed to ensure that it is valid according to the schema file. Each object within the file is examined to ensure that the attributes are valid according to the object type. The XML batch program generates XML when Content Manager OnDemand objects are exported. The XML that is generated can be used as an input for the subsequent arsxml command.
Example 3-1 shows a sample of the file exportusers.xml from the XML samples directory. You can change the names of the users to the users that you want to export.
Example 3-1 Sample XML input file for exporting users
<?xml version="1.0" encoding="UTF-8"?>
<onDemand xmlns:xsi="http://www.w3.org/2001/XMLSchema-instance"
xsi:noNamespaceSchemaLocation="../ondemand.xsd">
<user name="SAMPLEUSER0" />
<user name="SAMPLEUSER1" />
<user name="SAMPLEUSER2" />
<user name="SAMPLEUSER3" />
<user name="SAMPLEUSER4" />
</onDemand>
You can export objects by running arsxml export. The following command exports the users that are listed in the exportuser.xml file, from the server odserver1, to an output file named users.xml:
arsxml export -u oduser1 -p /my/stash/pwfile -h odserver1 -i exportusers.xml -o users.xml -v
You can import objects by running arsxml add. The following command imports the users from the users.xml file (which is generated from the previous command) to server odserver2:
arsxml add -u oduser2 -p /my/stash/pwfile -h odserver2 -i users.xml -v
You can delete objects by running arsxml delete. The following command deletes the users from odserver2, based on the users that are listed in the users.xml file:
arsxml delete -u oduser2 -p /my/stash/pwfile -h odserver2 -i users.xml -v
For deletion, you are prompted before each object in the XML is deleted, unless the -x parameter is used.
You can update objects by running arsxml update. For example, you want to update the description of the user User1 with a new description and add the authority to create users. In this case, you construct the XML input file that is shown in Example 3-2.
Example 3-2 Input file to update user - updateUser.xml
<?xml version="1.0" encoding="UTF-8" ?>
<onDemand xmlns:xsi="http://www.w3.org/2001/XMLSchema-instance" xsi:noNamespaceSchemaLocation="ondemand.xsd" >
<user name="User1" description="User1" createUsersAuth="Yes" >
</user>
</onDemand>
The following command updates user User1:
arsxml update -u oduser2 -p /my/stash/pwfile -h odserver2 -i updateUser.xml -v
Certain attributes are not allowed to be updated, such as the data type of an application group field or folder field. If you specify to ignore and continue, the XML batch program produces a warning message and the rest of the attributes continue to be updated.
You can validate the input XML file by running arsxml validate. When the validate command is used, only the lines in the input XML file are checked. No call to the Content Manager OnDemand server is made. The following command validates the input XML file:
arsxml validate -i sample.xml
|
Note: When you create an input XML file, not all attributes must be specified for each object.
|
3.3.2 Special features of the XML batch program
You can add user or group permissions to an application group or folder by adding a permission child object to the application group or folder group object.
Dependent objects, such as all users that belong to a group, can be exported together when you choose to export the group rather than having to add a user object to the XML file for every user in the group. You export the group by specifying the arsxml command option -r d on the command line.
In a case when no network connection exists between two servers, the XML batch program can be used to export Content Manager OnDemand objects to an XML file from one server and later import to another server.
If an error occurs during the processing of one of the objects in the input XML file, the remainder of the XML file is not processed unless option -e c is used on the arsxml command line.
|
Note: Objects must be specified in the correct order. For example, when you add application groups and applications in the same XML file, you must first specify all of the application groups and then specify the applications.
|
3.3.3 Tips on using the ARSXML command
If you are not familiar with the syntax of the ARSXML command, an easier way to begin is to perform an export of the object. By doing so, you get a working XML input file that you can modify to suit your needs. Ensure that the export is successful without any errors; otherwise, the output XML file might be incomplete.
Adding objects to the Content Manager OnDemand server is straightforward. If you are performing more advanced operations, such as updating the permission of an existing user for an application group or folder, and you are not getting the results that you are expecting, the task attribute might be missing. You must include this attribute when you want to update an existing object, such as removing a user’s permission from an application group or updating a user’s permission to an application group. The values for the task attribute are add, delete, and update.
For example, if you want to remove the permission of the user User1 from an application group, you must use the following line in the input XML file:
<permission user="User1" task="delete" />
Another example is when you want to update the query restriction of the user User1 for the application group CreditCardAG. In this case, you must use the following line in the input XML file, with the task attribute set to update.
<permission user="User1" task="update" queryRes="account='000-000-000'" />
The previous line is incorporated in Example 3-3 for the input file updateag.xml.
Example 3-3 Input file updateag.xml
<?xml version="1.0" encoding="UTF-8"?>
<onDemand xmlns:xsi="http://www.w3.org/2001/XMLSchema-instance"
xsi:noNamespaceSchemaLocation="../ondemand.xsd">
<!-- update application group with query restriction-->
<applicationGroup name="CreditCardAG" >
<permission user="User1" task="update" queryRes="account=’000-000-000'" />
</applicationGroup>
</onDemand>
The following command updates the query restriction for user User1:
arsxml update -h odserver -i updateag.xml -v -u User1 -p /my/stash/pwfile
Example 3-4 shows the output from the previous command.
Example 3-4 Successful output of updating the query restriction for user User1
ARS6822I Attempting login for userid 'User1' on server 'hodserver'
Updating applicationGroup, CreditCardAG
Update of applicationGroup, CreditCardAG was successful.
Updating applicationGroup-permission, CreditCardAG-User1
Update of applicationGroup-permission, CreditCardAG-User1 was successful.
Finished processing file updateag.xml.
The operation is successful. If you do not specify task="update" in the input XML file, you see a message that indicates that the object exists, as shown in bold in Example 3-5. In this scenario, user User1 is not updated with the new query restriction.
Example 3-5 Output of updating the user without using task=“update”
ARS6822I Attempting login for userid 'User1' on server 'odserver'Updating applicationGroup, CreditCardAG
Update of applicationGroup, CreditCardAG was successful.
An applicationGroup-permission object named 'CreditCardAG-User1' already exists.
Finished processing file updateag.xml.
..................Content has been hidden....................
You can't read the all page of ebook, please click here login for view all page.