

Developing a Hello World Node.js app on IBM Cloud
IBM SDK for Node.js provides a stand-alone JavaScript runtime and server-side JavaScript solution for IBM platforms. It provides a high-performance, highly scalable, event-driven environment with non-blocking I/O that is programmed with the familiar JavaScript programming language. The IBM SDK for Node.js is based on the Node.js open source project.
The Eclipse Orion Web IDE is a web-based, integrated development environment (IDE) where you can create, edit, run, debug, and perform source-control tasks. You can seamlessly move from editing to running, submitting, and deploying.
In this chapter, you install the IBM SDK for Node.js on an IBM Cloud account. You develop a Node.js-based server application (by using the Eclipse Orion Web IDE) that responds to web browser requests.
This chapter contains the following topics:
1.1 Getting started
To start, read through the objectives, prerequisites, and expected results of this use case.
1.1.1 Objectives
Web developers write JavaScript applications to add interactivity to client-side web applications. As an interpreted scripting language, developers do not need to use compilers to write applications. The syntax of the programming language is simple enough for web developers with little programming experience to write simple applications.
IBM SDK for Node.js uses the JavaScript programming language for server-side applications. Instead of running scripts in a web browser, the node application interprets and runs JavaScript applications on a server. Node.js works on an event-driven model, which means it responds to events through callback functions that Node.js calls when an operation completes.
By completing the steps in this chapter, you install the IBM SDK for Node.js on an IBM Cloud account. You develop a server application that responds to web browser requests.
By the end of this chapter, you should be able to accomplish these objectives:
•Create an IBM SDK for Node.js application.
•Write your first Node.js application.
•Deploy an IBM SDK for Node.js application on an IBM Cloud account.
•Create a Node.js module and use it in your code.
1.1.2 Prerequisites
Before you start, be sure that you meet these prerequisites:
•A valid email account
•A workstation that has these components:
– Internet access
– Web browser: Google Chrome or Mozilla Firefox
– Operating system: Linux, Mac OS, or Microsoft Windows
1.1.3 Expected results
The expected result of this exercise is to have a running Node.js application on IBM Cloud, as shown in Figure 1-1.

Figure 1-1 Expected results: Node.js app
This application is developed by using Eclipse Orion Web IDE. Eclipse Orion Web IDE is a web-based IDE where you can create, edit, run, debug, and perform source-control tasks.
The Web IDE is part of the IBM Cloud continuous delivery toolchains. Figure 1-2 shows the code.

Figure 1-2 Expected results: Node.js code
The application’s scope is to show a Hello NodeJS! message in the web browser for the user. It will also show the current system date by using a custom Node.js module that you will develop in this exercise. The output is shown in Figure 1-3.
Figure 1-3 Expected results: Hello NodeJS! message and system date and time
1.2 Architecture
The architecture of the Node.js Hello World app is shown in Figure 1-4.

Figure 1-4 Architecture
The following steps explain the sequence of interactions between the components that are used in the exercise:
1. The user accesses the web application in a web browser through a URL provided by IBM Cloud.
2. The web browser sends the HTTP request to the deployed Node.js app in IBM Cloud.
3. The Node.js app listens to the incoming request and responds with a Hello World message that includes the current date and time.
4. The web browser shows the received message to the user.
1.3 Step-by-step implementation
This section describes how to implement the Hello World Node.js app.
1.3.1 Set up your IBM Cloud account
Register with IBM Cloud by providing a valid, unique email address. Your email address acts as your user name for IBM Cloud, and you provide a password of your choice. When you sign up to IBM Cloud, you are prompted for your demographic information (such as your name and company). An email is sent to the email account that you provide in the registration to confirm that your email account is valid and active.
Complete these steps to set up your IBM Cloud account:
1. Open the IBM Cloud console at http://bluemix.net.

Figure 1-5 IBM Cloud Sign up pane
|
Important note: Select United States for Country or Region. The exercises in this course were developed and tested in the IBM Cloud US South region. You must select United States to ensure that you create the resources in the US South region to be consistent with the services that are used during course development. IBM Cloud assigns you a region that is nearest to the country or region that you specify in your registration form.
If you are physically located in a country that is closer to an IBM Cloud region other than the US South, the closest region might be selected when you log in. Every time you log in to IBM Cloud, check that the US South region was selected and, if not, switch the region to US South.
|
3. Complete the form with your personal information. Note that you must use a valid email address for this course because IBM Cloud sends you an email to verify your account.
4. Click Create Account. You are redirected to a page that looks similar to Figure 1-6. Close the page.

Figure 1-6 Email sent confirmation page
5. Check your email at the email account that you used to sign up to IBM Cloud. You will receive an email similar to the one shown in Figure 1-7.

Figure 1-7 Confirm your account
6. Click Confirm Account. A page opens that explains that you have now activated your IBM Cloud account.
7. Close this browser or browser tab. You may proceed to the next step.
The page that confirms that your account was activated also includes a Log in link. Instead of following this Log in link, open a new browser window to experience the regular login to IBM Cloud.
1.3.2 Log in to your IBM Cloud account
Log in to your IBM Cloud account by completing these steps:
1. Open your web browser, enter the following web address, and press Enter:
2. The IBM Cloud login page opens (Example 1-8). Click Log in and provide your authentication credentials.

Figure 1-8 IBM Cloud login
1.3.3 Create the Node.js application on IBM Cloud
Create the Node.js app by using the SDK for Node.js runtime on IBM Cloud by completing these steps:

Figure 1-9 Creating the application
2. The IBM Cloud Catalog page opens. It lists the infrastructure and platform resources that can be created in IBM Cloud. Scroll down to the Cloud Foundry Apps section under Platform and click SDK for Node.js (Figure 1-10).

Figure 1-10 IBM Cloud catalog
3. In the App name field, enter vy102-XXX-nodejs. Replace XXX by three random characters that become your unique key (Figure 1-11). You will be using this unique key in the naming convention of this exercise.
The Host name field is automatically populated with the same value as the app name.
Keep the default values for the other fields.
In the Pricing Plans section, select 128 MB.
|
Note: If you are physically located in a country that is closer to an IBM Cloud region different from the US South, the closest region might be selected when you log in. Every time you log in to IBM Cloud, check that the US South region was selected and, if not, switch the region to US South.
|
Click Create.

Figure 1-11 Creating the Node.js app
4. The Getting started page for the created application opens (Figure 1-12). The status for vy102-XXX-nodejs is shown as Starting until the application runs. Wait until the status changes to This app is awake (for IBM Cloud Lite accounts) or Running (for non-IBM Lite accounts).

Figure 1-12 Created Node.js App
1.3.4 Enable continuous delivery by using toolchain
The Getting started page of your app shows instructions for accessing your app through the command-line interface (CLI). However, in this exercise, you use continuous delivery.
Enable continuous delivery for the Node.js app by completing these steps:
1. Click Overview on the left pane, scroll down to the Continuous delivery tile, and then click Enable (Figure 1-13).

Figure 1-13 Enabling continuous delivery
2. A new Continuous Delivery Toolchain tab opens. This toolchain includes tools to develop and deploy the application.
The Toolchain Name field is automatically populated. Keep the default values for the Select Region and Choose an organization fields (Figure 1-14).

Figure 1-14 Toolchain page
Scroll down to see three main icons (Figure 1-15), which are described later:
– Git Repos and Issue Tracking.
– Eclipse Orion Web IDE.
– Delivery Pipeline.
The Git Repos and Issue Tracking icon is selected by default.
Figure 1-15 Three primary icons: Git Repos and Issue Tracking is selected by default
The Repository type field menu lists options to start from your code base:
New Start a new application.
Fork Start from a certain existing repository (you specify its URL), and then have a separate stream of the same repository.
Clone Clone an existing repository to create a new one.
Existing Link to an existing repository and continue working on it.
3. The default selection is Clone. For this exercise, select New, so that you can start your application from scratch.
4. For the other fields, keep their default values, then click Create.
5. A new page opens, showing the three main phases (Figure 1-16). A toolchain is a set of tool integrations that support development, deployment, and operations tasks. The UI to create a new toolchain groups the tools into the following phases:
THINK This phase is for planning the application by creating bugs, tasks, or ideas by using the Issue Tracker, which is part of the Git repository.
CODE This phase is for the implementation of the application by providing a GIT repository as source code management system, and a Web IDE (Eclipse Orion) to edit your code online. In the repository, you can specify whether to clone a repository or start from scratch by selecting New in the repository type.
DELIVER This phase is for configuring the delivery pipeline. It allows you to specify automatic build, deployment, and testing of your code after a developer pushes new code to the Git repository.

Figure 1-16 THINK, CODE, and DELIVER
1.3.5 Create a Hello World Node.js server
The following steps describe how to write Node.js code from Eclipse Orion Web IDE, and how to link this code to the Node.js app on IBM Cloud that you created in the previous sections:
2. The page now shows the generated Node.js project through the Eclipse Orion Web IDE (Figure 1-17).
The Eclipse Orion Web IDE is a browser-based development environment where you develop for the web. You can develop in JavaScript, HTML, and CSS with the help of content-assist, code-completion, and error-checking.
The left side of the current page shows the project structure. Currently, no Node.js files are available. In the next steps, you create these files one by one.

Figure 1-17 Eclipse Orion Web IDE
3. Right-click the root of the project (named vy102-XXX-nodejs) from the project structure on the left, and then select New → File (Figure 1-18).

Figure 1-18 Creating a file

Figure 1-19 Creating the manifest.yml file
The manifest.yml file is now created (Figure 1-20).

Figure 1-20 Viewing the manifest.yml file
The manifest.yml file contains information about the deployment of the application to IBM Cloud.
Add the code snippet from Example 1-1 to manifest.yml.
Example 1-1 Code snippet: Application details
applications:
- path: .
memory: 256M
instances: 1
domain: mybluemix.net
name: vy102-XXX-nodejs
host: vy102-XXX-nodejs
disk_quota: 1024M
|
Note: Replace the XXX with your unique key (three random characters) that you chose in step 3 on page 9 to give a unique name to your Node.js app and host.
|
Table 1-1 explains the meaning of each attribute in the manifest.yml file.
Table 1-1 manifest.yml file attributes
|
Attribute
|
Description
|
|
path
|
Indicates to Cloud Foundry the directory where the application is located.
|
|
memory
|
Specifies the memory limit for all instances of the application.
|
|
instances
|
Specifies the number of app instances that are needed for the application.
A value of one instance is sufficient for this exercise.
|
|
domain
|
The Cloud Foundry domain to which you are deploying the application.
|
|
name
|
The name of the application that you specified when you created the Cloud Foundry app in IBM Cloud.
|
|
host
|
The subdomain where the application is available.
|
|
disk_quota
|
Specifies the allocation amount of disk space for the app instance.
|
5. If required, change the domain based on your IBM Cloud region as listed in Table 1-2.
|
Note: If you followed the instructions for this exercise, you should be in the US South region.
|
Table 1-2 IBM Cloud regions and domains
|
Region
|
Domain
|
|
US South
|
mybluemix.net
|
|
United Kingdom
|
eu-gb.mybluemix.net
|
|
Sydney
|
syd.mybluemix.net
|
|
Germany
|
eu-de.mybluemix.net
|
6. Save the file by clicking File → Save.
7. Right-click the root of the project (named vy102-XXX-nodejs), select New → File, name the file package.json, and then press Enter.
The package.json file holds various metadata relevant to the project. For example, in Example 1-2, the “start” field specifies app.js, which is the starting point (entry JS file) for this application. The package.json file also specifies the dependencies on other Node.js modules.
The package.json file is used by node package manager (NPM), which is the default package manager for the JavaScript runtime environment, Node.js.
NPM provides two main functions:
– A command-line utility to install Node.js packages, and perform version management and dependency management of Node.js packages.
NPM accesses the package.json file to perform tasks such as registering the application by using the name field in the package.json file, making sure the dependencies in the package.json file are available in the Node.js online repository with the specified versions, and so on.
Insert the code snippet from Example 1-2 in the package.json file.
Example 1-2 Code snippet for package.json file
{
"name": "NodejsStarterApp",
"version": "0.0.1",
"description": "A Hello World NodeJS sample",
"scripts": {
"start": "node app.js"
}
}
The main attributes of the package.json file are described in Table 1-3.
Table 1-3 Main attributes
|
Attribute
|
Description
|
|
name
|
The name of your node application. The name and version together form an identifier that is assumed to be completely unique.
|
|
version
|
The version of the current application. The version must always be in the form of n.n.n (that is, 1.0 is not an allowed value).
|
|
description
|
A simple description about the application.
|
|
scripts
|
A dictionary property containing script commands that are run at various times in the lifecycle of your package. The key is the lifecycle event, and the value is the command to run at that point. In this case, the “start” event is needed to refer to the node app.js command.
|
Save the file by clicking File → Save.
8. Create a file and name it app.js. This is the entry JavaScript file for your application.
Example 1-3 Add variable
var http = require("http");
Figure 1-21 shows the variable in IBM Cloud DevOps.

Figure 1-21 The app.js file: Importing the HTTP module
The require statement is used to import node modules that are managed by NPM.
The name of the built-in module, http, is managed by NPM. This module is mainly used to allow Node.js to transfer data over the Hypertext Transfer Protocol (HTTP).
10. Enter the code snippet from Example 1-4 to create the server. This server is expected to handle the HTTP requests coming from the client.
Example 1-4 Code snippet: Creating the server
// Read the port from the underlying environment.
// If not exist, use the default port: 8080
var port = process.env.VCAP_APP_PORT || 8080;
// Create the server and listen to requests on the specified port.
http.createServer(function (request, response) {
}).listen(port);
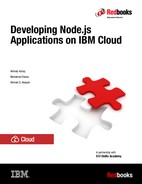
Your app.js file, which now looks like Figure 1-22, shows the createServer function.

Figure 1-22 The createServer function
As shown, the HTTP module has a createServer callback function, which is responsible for creating a server. This server provides a callback that receives two parameters:
– request: This object contains the HTTP request details from the client. You should be able to read parameters from this request to use in your application.
– response: This object is created by the HTTP module and you add the response details to it. Then, the HTTP module sends the response object back to the client as an HTTP response to the original HTTP request from the client.
The server listens to a port variable. The port variable is set by the following value:
process.env.VCAP_APP_PORT
The process.env property returns an object that contains the user’s environment. In this case, it contains properties related to the deployed application and its underlying IBM Cloud environment.
The process.env.VCAP_APP_PORT port value is provided by IBM Cloud automatically when you create the project.
If the process.env.VCAP_APP_PORT is null for some reason (this can happen if you run this application outside the IBM Cloud), then the port variable is set to 8080 (port 8080 is the default port for Node.js).
11. Inside the function of the createServer, add the code snippet from Example 1-5.
Example 1-5 Code inside createServer function
// Set the content type of the response
response.writeHead(200, {'Content-Type': 'text/plain'});
This line has the response’s header details:
– Status code: Identifies whether the request was a success, a bad request, a forbidden request, and so on. The code for success is 200.
– Content type: Identifies the type of content returned in the body of the response. The content type can be text/plain, text/html, and other types. In this scenario, content type is set as text/plain.
12. Add the code snippet from Example 1-6 to the end of the createServer function.
Example 1-6 Code snippet: Response - Hello NodeJS
// Write a simple Hello World message,
// which will be shown in the user's web browser
response.end('Hello NodeJS!');
The end function is used to add the text passed as an argument to the body of the response.
The app.js file now looks like the one in Figure 1-23, showing the added response.
Figure 1-23 The app.js file: Added response
Save the file by clicking File → Save.
13. In the server toolbar, select Create new launch configuration from the drop-down list and click the “+” button to display the Edit Launch Configuration window. If you do not have the Create new launch configuration option, skip this step.
In the Edit Launch Configuration window, ensure that the Organization is set to your email address, Space is set to dev, and click Save.
14. Now, you can click the play button (Deploy the App from the Workspace), highlighted in Figure 1-23. Clicking this button deploys the application to IBM Cloud.
You might receive a notification warning you that your application will be redeployed. Click OK to confirm.
The deployment status indicates that deployment is in progress (Figure 1-24).

Figure 1-24 Pressing the Deploy the App from the Workspace button
|
Note: If you receive an error message about a timeout, refresh the page.
|

Figure 1-25 Opening the deployed app
A new tab opens and displays the Hello NodeJS! message.
1.3.6 Add a module to the Node.js application
In this section, you add a Node.js module to your application.
A module encapsulates related code into a single unit of code. Creating a module means moving the related functions into one file. This point is illustrated next with an example involving an application that is built with Node.js.
Several modules are built in Node.js. For example, the HTTP module is a built-in module. The following steps show how to create your own custom module:
1. Close the Running Application tab to return to Eclipse Orion.

Figure 1-26 Creating a folder
3. Name the new folder currentDate.
4. In the currentDate folder, create a file named package.json.
Example 1-7 Code snippet: Add currentDate
{
"name": "currentDate",
"main": "./lib/currentDate"
}
The results are shown in Figure 1-27.
The figure shows that the new package.json file represents the new module:
– It has the usual name attribute and another attribute named main.
– This main attribute has the path of the JS file that contains the code of this module.
– The value of the main attribute is "./lib/currentDate". You need to create a currentDate.js file inside the lib folder, which you do in the next steps.
Save the file by clicking File → Save.

Figure 1-27 The currentDate module in the package.json file
6. In the currentDate folder, create a folder named lib.

Figure 1-28 The currentDate module in the currentDate.js file
Example 1-8 Code snippet: Export current date time
exports.currentDateTime = function() {
return Date();
};
This new currentDateTime function simply returns the current date by using Date().
This function is added to a variable named exports, which is used for exposing the function so it can be used by other modules in the system. It is a special object, which by default is included in every JS file in the Node.js application.
Your file now looks like the one shown in Figure 1-29.

Figure 1-29 The currentDate module: Exporting the currentDateTime function
Save the file by clicking File → Save.
Example 1-9 Set variable http
var http = require("http");
Below that line, add the line from Example 1-10.
Example 1-10 Set variable dateModule
var dateModule = require('./currentDate');
This line imports the currentDate, which you just created, to your app.js file.
|
Note: In the line, the period and forward slash (./) characters indicate that the currentDate module exists in the same folder as the folder that contains this app.js file.
|
10. Find the lines that are shown in Example 1-11.
Example 1-11 Write Hello world message
/ Write a simple Hello World message,
// which will be shown in the user's web browser
response.end('Hello NodeJS!');
Replace those lines with the lines from Example 1-12.
Example 1-12 Lines to use
// Write a simple Hello World message appended with the current date
response.end('Hello NodeJS! The time now is: ' + dateModule.currentDateTime());
The result is shown in Figure 1-30.

Figure 1-30 Using the currentDate module in the app.js file
All changes are automatically saved in Eclipse Orion. If the changes are not automatically saved or if you want to force a save, select File → Save.
To deploy, click the play button (Deploy the App from the Workspace), as shown in Figure 1-31. You might receive a notification warning you that your application will be redeployed. Click OK to confirm.

Figure 1-31 Deploying the application that is using the currentDate module
11. After deployment is complete, open the deployed application by clicking Open the Deployed App (Figure 1-32).

Figure 1-32 Opening the deployed application that is using the currentDate module
Your web browser now opens and displays the result (Figure 1-33).
Figure 1-33 Results
1.3.7 Stop the application
IBM Cloud Lite account provides you with 256 MB of application memory for Cloud Foundry apps and 100 Cloud Foundry services.
To free the resources assigned to your application, you can either stop your application or delete it:
Figure 1-34 Stop the application
2. Close your web browser.
1.4 Exercise review
In this exercise, you accomplished the following goals:
•Created a Node.js App on the IBM Cloud environment.
•Used the Continuous Delivery Toolchain to develop and deploy the Node JS App.
•Wrote your first Node.js “Hello NodeJS!” application.
•Created a module in Node.js to wrap functionality and use it from other JS files.
..................Content has been hidden....................
You can't read the all page of ebook, please click here login for view all page.