

High availability installation
This chapter provides a step by step guide on how to install IBM Cloud Private in a high availability (HA) configuration. It also discusses the recommended HA configuration options.
This chapter covers the following topics:
2.1 High availability considerations
In a container-as-a-Service (CaaS) platform such as IBM Cloud Private, two levels of high availability exists for resiliency:
•High availability for platform components.
•High availability of the workloads and applications hosted on this platform.
High availability installations of IBM Cloud Private platform are only supported through Cloud Native and Enterprise Edition only. See section 1.3, “IBM Cloud Private architecture” on page 10 for details on the IBM Cloud Private architecture and section 1.2, “IBM Cloud Private node types” on page 6 for a discussion of the IBM Cloud Private node types.
System administrators should determine the high availability requirements of the IBM Cloud Private platform installation before the software is installed.
|
Important: It is not possible to convert a standard installation into a high availability installation, or add new master nodes to a highly available installation.
|
Kubernetes technology provides built-in functions to support the resiliency of a cluster. When administrators install IBM Cloud Private, the installation process installs all the components that they need. However, it is always good to know how Kubernetes works. Administrators can deploy the master nodes and the proxy nodes in plurality for achieving high availability. System administrators can configure high availability for only the master nodes, only the proxy nodes, or for both types of nodes.
|
Note: Every instance of the master node has its own etcd database and runs the API Server. The etcd database contains vital data of the cluster used in orchestration. Data in etcd is replicated across multiple master nodes. This applies incase the etcd is included within the masters, you can also separate etcd nodes from the master nodes.
|
|
Note: Scheduler and Control managers of Kubernetes are in all the master nodes, but they are active only in one master node. They work in leader election mode so that only one is active. If a failure occurs, another instance of master node takes over.
|
2.1.1 Fault tolerance
System administrators must have an odd number of masters in the IBM Cloud Private cluster. Having an odd master size does not change the numbers needed for majority. Majority is the number of master nodes needed for the cluster to be able to operate. However, adding extra master nodes provide a higher tolerance for failure. For N number of masters in a cluster, the cluster can tolerate up to (N-1)/2 permanent failures. For example, in a cluster that has three masters, if one master fails, then the fault tolerance is as (3-1)/2=1. System administrators must aim for a fault tolerance of one or more.
Table 2-1 shows how fault tolerance in a cluster is affected by even and odd sized clusters.
Table 2-1 Fault tolerance for the HA clusters
|
Cluster Size
|
Majority
|
Fault Tolerance
|
|
1
|
1
|
0
|
|
2
|
2
|
0
|
|
3
|
2
|
1
|
|
4
|
3
|
1
|
|
5
|
3
|
2
|
|
6
|
4
|
2
|
|
7
|
4
|
3
|
2.1.2 Considerations for sizing the IBM Cloud Private cluster
System administrators should consider following points while sizing the cluster.
Worker node considerations
Consider the following when planning your worker nodes:
•If your cluster has a few worker nodes, consider increasing the number of worker nodes while decreasing the size of the nodes for adequate headspace, efficiency, mobility, and resiliency.
•Accommodate the workload mobility.
•Consider the memory that is required for a specific type of workload.
•Consider the memory that is required for other application frameworks.
•The maximum pod per node is 500 and the maximum pod per CPU core is 10 (This is for Intel based workload).
•The cluster size depends on the worker node number. The pod number depends on the application type and the worker node’s configuration.
Proxy node considerations
The following needs to be considered when planning your proxy nodes:
•If your cluster has a few worker nodes, consider increasing the number of worker nodes while decreasing the size of the nodes for adequate headspace, efficiency, mobility, and resiliency.
•Accommodate the workload mobility.
•Consider the memory that is required for a specific type of workload.
•Consider the memory that is required for other application frameworks.
•The maximum pod per node is 500 and the maximum pod per CPU core is 10.
•The cluster size depends on the worker node number. The pod number depends on the application type and the worker node’s configuration.
Management node considerations
Larger clusters with more workload require larger management nodes. Management nodes can be added at any time if they were originally externalized.For proxy nodes, consider the headspace requirements to carry the workload due to a node failure.
Large cluster considerations
The following are the large cluster considerations:
•The node-to-node mesh starts to fail with 700 nodes in the cluster. You must create a router reflector for BGP (Border Gateway Protocol) daemons.
•Consider to use etcd outside of your master nodes if you plan on having a cluster with several hundred worker nodes. A separated etcd cluster is ideal to reduce the impact on the master node.
•Be sure to implement load balancing on your master node.
•The number of services in your cluster affects the load on each node. In large clusters with more than 5000 services, you must run your nodes in IP Virtual Server (IPVS) mode.
2.1.3 Sample sizing for your IBM Cloud Private cluster
This section gives some sample configurations for sizing your IBM Cloud Private cluster.
Small size environment with medium resiliency
Table 2-2 shows sizing of small sized IBM Cloud Private cluster environment.
Section 2.4, “Step-by-step installation guide using Terraform” shows installation of IBM Cloud Private cluster with number of nodes of each type, shown in Table 2-2 with an additional vulnerability advisor node.
Table 2-2 Small size environment with medium resiliency
|
Node Type
|
Number of Nodes
|
CPU
|
Memory (Gb)
|
Disk (Gb)
|
|
Boot
|
1
|
2
|
8
|
250
|
|
Master
|
3
|
16
|
32
|
500
|
|
Management
|
2
|
8
|
16
|
500
|
|
Proxy
|
2
|
4
|
16
|
400
|
|
Worker
|
3+
|
8
|
32
|
400
|
Medium size environment with medium resiliency
Table 2-3 below shows sizing of medium sized IBM Cloud Private cluster environment.
Table 2-3 Medium size environment with medium resiliency
|
Node Type
|
Number of Nodes
|
CPU
|
Memory (Gb)
|
Disk (Gb)
|
|
Boot
|
1
|
2
|
8
|
250
|
|
Master
|
3
|
16
|
32
|
500
|
|
Management
|
2
|
16
|
32
|
500
|
|
Proxy
|
3
|
4
|
16
|
400
|
|
Worker
|
3+
|
8
|
32
|
400
|
|
Vulnerability advisor
|
3
|
6
|
24
|
500
|
Large size environment (worker nodes < 500) with high resiliency
Table 2-4 below shows sizing for large sized IBM Cloud Private cluster environment with 500 or less worker nodes.
Table 2-4 Large size environment with 500 worker nodes
|
Node Type
|
Number of Nodes
|
CPU
|
Memory (Gb)
|
Disk (Gb)
|
|
Boot
|
1
|
4
|
8
|
250
|
|
Master
|
3
|
16
|
128
|
500
|
|
Management
|
2
|
16
|
128
|
500
|
|
Proxy
|
2
|
4
|
16
|
400
|
|
Worker
|
500
|
8
|
32
|
400
|
|
Vulnerability advisor
|
3
|
6
|
48
|
500
|
Large size environment (worker nodes < 1000) with high resiliency
Table 2-5 shows sizing for large sized IBM Cloud Private cluster environment with 1000 or less worker nodes.
Table 2-5 Large size environment with 1000 worker nodes
|
Node Type
|
Number of Nodes
|
CPU
|
Memory (Gb)
|
Disk (Gb)
|
|
Boot
|
1
|
4
|
8
|
250
|
|
Master
|
3
|
16
|
128
|
500
|
|
Management
|
5
|
16
|
128
|
500
|
|
Proxy
|
2
|
4
|
16
|
400
|
|
Worker
|
1000
|
8
|
32
|
400
|
|
Vulnerability advisor
|
3
|
6
|
48
|
500
|
2.2 High Availability models for IBM Cloud Private cluster
Listed below are three classification models for highly available IBM Cloud Private cluster:
•Intra Cluster
•Intra Cluster with multiple availability zones
•Inter Cluster with federation on different availability zones
2.2.1 Intra cluster
A cluster is composed of at least master nodes and worker nodes. This model consists of HA inside an IBM Cloud Private cluster. The redundancy is implemented by deploying multiple nodes for master and for workers that are distributed in a single site.
This scenario uses Kubernetes functions but can’t protect applications from site failure. If system administrators need site-based protection, they should combine this model with other protection solutions, including a disaster recovery solution. Figure 2-1 shows the IBM Cloud Private intra cluster topology.

Figure 2-1 Intra cluster topology
2.2.2 Intra cluster with multiple availability zones
This kind of scenario is often referred to as business continuity. It combines intra cluster HA with the capability to protect from a site failure.
The cluster is distributed among multiple zones. For example, you might have three, or five, or seven master nodes and several worker nodes distributed among three zones. Zones are sites on the same campus or sites that are close to each other. If a complete zone fails, the master still survives and can move the pods across the remaining worker nodes.
|
Note: This scenario is possible, but might present a few challenges. It must be implemented carefully.
|
Potential challenges in this form of workload deployment
•The spread across multiple zones must not introduce latency. A high latency can compromise the overall Kubernetes work with unpredictable results. For example, because of latency, the master might consider a group of workers as unreachable and start to uselessly move pods. Or, one of the master nodes might be considered down only because of a long latency.
•In any failure condition, make sure that most of the master nodes survive. Distributing the cluster in only two zones is almost useless. However, configuring three zones implies more costs and complexity.
Figure 2-2 shows the intra cluster with multiple availability zone topology.

Figure 2-2 Intra cluster with multiple availability zone topology
2.2.3 Inter Cluster with federation on different availability zones
For this model, think of two Kubernetes clusters, each with its own master and worker nodes. If one cluster fails, its pods are run on the other cluster. Kubernetes supports this model by implementing a cluster federation. A higher-level master is deployed as a federated control plane. If a cluster fails, the master control plane instructs the masters of the surviving cluster to redeploy the failed pods.
The federation model is possible; however, beyond the orchestrator, you must consider all the other components of IBM Cloud Private to recover. For example, you must recover all the tools to manage the logs and to monitor your platform and workloads.
While the federation for Kubernetes is a built-in feature, you still must take care of all the other components. As in the “Intra cluster with multiple zones” model, you must also be aware of possible latency problems.
Support for federation is relatively new in Kubernetes. Before you apply federation to business-critical workloads, look at its evolution and maturity.
Figure 2-3 shows the inter cluster with federation on different availability zones topology.

Figure 2-3 Inter cluster with federation on different availability zones topology
2.3 Performance considerations for IBM Cloud Private setup
This chapter covers some of best practises to consider in an IBM Cloud Private cluster setup. These are baselines and the optimal varies based on specific environment needs.
2.3.1 Nodes considerations
This section gives summary of the nodes considerations that we have discussed in the previous section.
•Boot node considerations:
– Externalizing your boot node alleviates some resource constraints during cluster installation.
•Master node considerations:
– At least 3 nodes ensures a quorum can be reached upon failure.
– Additional nodes help ensure the ability to recovery from failure.
– Consider minimum recommendations to be applicable to only non-production environments.
– Can Load Balance masters, but only one is the primary master.
– Only one master node is active at any point in time:
•Management node considerations:
– Larger clusters with more workload thus require larger management nodes.
– Fewer large nodes will have the same impact as many small nodes.
– Your production clusters should use independent management nodes.
•Proxy node considerations:
– For compute sizing consider total resource sizing versus the # of nodes.
– You can tune your ingress controller to your workload.
– Your proxy VIP will point only to a single node at a time.
– Consider optionally load balancer to spread workload to your proxy nodes.
– Understand your workload to tune and size appropriately.
•Worker node considerations:
– If your cluster has a small amount of workload consider increasing the number of worker nodes while decreasing the size of the nodes (for adequate headspace, efficiency, mobility, resiliency).
– If you have large pods your worker nodes should be larger to accommodate workload mobility.
– Java workloads typically use 4 x CPU for memory.
– Other application frameworks may be closer to 2 x CPU = memory.
– Consider your workload to size your worker nodes.
2.3.2 Tuning the IBM Cloud Private setup
The first thing with tuning is to look at the overhead of logging when talking about high transaction rates. It all depends on your environment, but especially in some network intensive loads this can accumulate an additional overhead that you should take into account. The overhead is mostly attributable to the ELK stack activity.
Impact of the proxy size and upstream keep-alive
Proxy node capacity is vital, ensure yours is sufficient. For network intensive workloads, bigger proxy node can be more efficient than multiple smaller proxy nodes. Default keep-alive is 64: consider tuning this based upon your workload. For more information, see the following IBM Knowledge Center link https://www.ibm.com/support/knowledgecenter/en/SSBS6K_3.1.0/installing/proxy_resource.html.
IBM Cloud Private application logging
Configure log rotate for Docker (max-size, max-file). Without log rotate disk may fill and trigger pod eviction and image garbage collection as shown in Figure 2-4.

Figure 2-4 Docker log rotation
If Docker is installed independently, update the Docker services with —log-opt max-size=10m –log-opt max-file=10. Add the config to /etc/docker/daemon.json as shown in Figure 2-5.

Figure 2-5 etc/docker/daemon.json
In summary:
•Consider your workload volumes. Do you have a high number of transactions? Is the workload variable?
•Consider your workload personality. Are your services network intensive? What are the programming frameworks you are using?
•Consider your performance requirements. How do your applications scale: horizontal, vertical, or sharding?
2.4 Step-by-step installation guide using Terraform
In this section, you learn how to install IBM Cloud Private step-by-step using Terraform. Terraform is a tool that allows provisioning and automating the infrastructure using scripts. The infrastructure can include the low level infrastructure as well as the software components on top of it.
In case of IBM Cloud Private, you use Terraform to perform the following automation:
•Create Security Groups to allow intercluster communication, allow specific port range for the public communication to the load-balancer, and to allow ssh between the boot node and all nodes for installation.
•Create two local load balancers in-front of the proxy nodes and the master nodes.
•Create virtual machines for boot node, master nodes, proxy nodes, management nodes, vulnerability advisor, and worker nodes.
•Create file storage for master nodes shared storage.
•Deploy IBM Cloud Private 3.1.2 Enterprise Edition on top of the provisioned infrastructure.
Figure 2-6 on page 41 shows an architecture diagram for the IBM Cloud Private highly available configuration. You learn how to deploy IBM Cloud Private based on the recommendations described in 2.1, “High availability considerations” on page 32. In this example, you deploy IBM Cloud Private on top of IBM Cloud infrastructure using the following configuration:
•3 master nodes
•2 management nodes
•2 proxy nodes
•1 vulnerability advisor node
•3 worker nodes
•Endurance NFS storage for the directories that should be shared across all master nodes
•Local load balancer in front of the proxy node to allow public to the applications
•Local load balancer in front of the master nodes to allow access by admins to the IBM Cloud Private cluster.

Figure 2-6 Architecture diagram for IBM Cloud Private cluster
You perform the following steps explained in this section:
1. Environment preparation.
2. Upload IBM Cloud Private installation binaries to the file server.
3. Configure the Terraform template.
4. Configure security.
5. Apply the Terraform template.
2.4.1 Environment preparation
In this section, you prepare your local environment with the pre-requisites needed to do the installation.You install Terraform, IBM Cloud provider for Terraform, and git client in this section. Skip this section in case you have these tools installed. You do this environment preparation on your local machine or in a Virtual Server Instance in IBM Cloud.
|
Note: These steps have been tested on MacOs and Ubuntu 18.04 Minimal LTS. Provision an Ubuntu 18.04 Virtual Server Instance in case you use other Operating System locally and run into a problem while preparing your environment or while applying the Terraform script. The specification of the machine needs to be at least 2 virtual cores with 4 GB of RAM.
|
Install Terraform
Install Terraform on your machine as you use it to run the scripts needed to install IBM Cloud Private. Perform the following steps to install Terraform:
1. Download the package corresponding to your operating system and architecture from the following URL:
Ubuntu: wget https://releases.hashicorp.com/terraform/0.11.11/terraform_0.11.11_linux_amd64.zip
2. Extract the compressed folder. Perform the steps in Example 2-1 in case you have Ubuntu operating system.
Example 2-1 Extract the binaries of Terraform
sudo apt-get update
sudo apt-get install wget unzip
unzip terraform_0.11.11_linux_amd64.zip
3. Update your PATH environment variable to point to the directory that have the extracted binary or move the binary to binary directory:
Ubuntu: sudo mv terraform /usr/local/bin/
4. Verify that Terraform is installed successfully.
Open Terminal and write this command terraform --version, the Terraform version should appear if installed successfully.
Install IBM Cloud Provider plug-in for Terraform
In this step by step guidance, you perform installation of IBM Cloud Private on top of IBM Cloud infrastructure. For that Terraform needs to interact with IBM Cloud through its APIs. Terraform understands the provider APIs to access and manage its resources through Provider plug-ins.
Perform the following steps to install and configure IBM Cloud Provider plug-in:
1. Download the package corresponding to your operating system and architecture from the following URL:
Ubuntu: wget https://github.com/IBM-Cloud/terraform-provider-ibm/releases/download/v0.14.1/linux_amd64.zip
2. Extract the compressed folder:
Ubuntu: unzip linux_amd64.zip
3. Create plugins directory in the following directory corresponding to your platform then move the extracted binary into it:
Windows: mkdir %APPDATA% erraform.dplugins
Linux/Unix/OS X: mkdir ~/.terraform.d/plugins
mv terraform-provider-ibm_v0.14.1 .terraform.d/plugins/
Install Git client
You use git client to clone the Terraform script. Perform the following steps to install Git client on your local machine.
1. Download and install the package corresponding to your operating system and architecture from the following URL:
Ubuntu: sudo apt install git
2. Verify that git is installed through running the command git --version from terminal.
2.4.2 Upload IBM Cloud Private binaries
The installation of IBM Cloud Private happens from the boot node. In this example, the boot node is a Virtual Server Instance (VSI) on IBM Cloud. That boot node needs access to the installation binaries.
Perform the steps in “Upload IBM Cloud Private binaries to a File Server” in case you run Terraform from your local machine in order to upload the binaries to File Server.
Upload IBM Cloud Private binaries to a File Server
In this section you upload the IBM Cloud Private installation binaries to a File Server accessible to the boot node on IBM Cloud. Skip the first two steps in case you have already a File Server.
1. Create Virtual Server Instance in IBM Cloud. You use this to install your File Server on top of it.

Figure 2-7 IBM Cloud console Login Page
b. Click on Catalog from the above toolbar.
c. Select Virtual Server from the catalog.
d. Select Public Virtual Server then click Continue.

Figure 2-8 Create IBM Cloud Virtual Server Instance
f. Read the terms and conditions then click on I have read and agree to the Third-Party Service Agreements listed below: then click on Create.
g. Wait till the virtual server is provisioned.
2. Install Apache HTTP Server on your Virtual Server Instance.
|
Note: The following steps shows the basic steps in order to create an Apache HTTP Server. Make sure to apply the security considerations to secure it. Skip this step if you have an existing HTTP Server or NFS server.
|
a. SSH to your server with your root username and password.
b. Update your local Linux packages:
sudo apt update
c. Install apache2 package:
sudo apt install apache2
d. Verify that the web server is running as shown in Example 2-2.
Example 2-2 Verify that the HTTP server is working
sudo systemctl status apache2
● apache2.service - The Apache HTTP Server
Loaded: loaded (/lib/systemd/system/apache2.service; enabled; vendor preset:
Drop-In: /lib/systemd/system/apache2.service.d
└─apache2-systemd.conf
Active: active (running) since Tue 2019-02-19 17:54:06 UTC; 1min 12s ago
Main PID: 2446 (apache2)
Tasks: 55 (limit: 1145)
CGroup: /system.slice/apache2.service
├─2446 /usr/sbin/apache2 -k start
├─2448 /usr/sbin/apache2 -k start
└─2449 /usr/sbin/apache2 -k start
Feb 19 17:54:05 virtualserver01 systemd[1]: Starting The Apache HTTP Server...
Feb 19 17:54:06 virtualserver01 systemd[1]: Started The Apache HTTP Server.
e. Verify that the HTTP Server is accessible over the internet through navigating to http://PUBLIC_IP from your web browser. You should see the default page as shown in Figure 2-9.

Figure 2-9 Apache HTTP server default page
3. Download IBM Cloud Private binaries from Passport Advantage such as ibm-cloud-private-x86_64-3.1.2.tar.gz for IBM Cloud Private Enterprise Edition V3.1.2.
4. Copy ibm-cloud-private-x86_64-3.1.2.tar.gz from your local machine to the HTTP Server on /var/www/html/.
5. Verify that you can access and download the binary file by navigating to http://PUBLIC_IP/ibm-cloud-private-x86_64-3.1.2.tar.gz from your web browser.
2.4.3 Configure the Terraform template
In this section, you configure the Terraform template with the instance specification. Perform the following steps in order to configure Terraform.
|
Note: The tag 3.1.2_redbook is included in the git clone command. This is because the installation has been tested on this code base. Feel free to remove this tag in case you would like to work with the latest version of the script.
|
Example 2-3 Clone the GitHub repo that has the Terraform IBM Cloud Private installation script
git clone --branch 3.1.2_redbook https://github.com/ibm-cloud-architecture/terraform-icp-ibmcloud.git
Cloning into 'terraform-icp-ibmcloud'...
remote: Enumerating objects: 59, done.
remote: Counting objects: 100% (59/59), done.
remote: Compressing objects: 100% (34/34), done.
remote: Total 215 (delta 31), reused 36 (delta 25), pack-reused 156
Receiving objects: 100% (215/215), 296.70 KiB | 334.00 KiB/s, done.
Resolving deltas: 100% (96/96), done.
Note: checking out '62eb61a8fd1b8434b7460591e73038e7b7635960'.
You are in 'detached HEAD' state. You can look around, make experimental
changes and commit them, and you can discard any commits you make in this
state without impacting any branches by performing another checkout.
If you want to create a new branch to retain commits you create, you may
do so (now or later) by using -b with the checkout command again. Example:
git checkout -b <new-branch-name>
|
Note: The terraform templates contained in this Github repository will be continuously updated by IBM team for upcoming IBM Cloud Private releases.
|
2. In order to allow Terraform to access your Cloud account, you need to provide the API username and API key of your IBM Cloud infrastructure account.
|
Note: In case you are not an account owner or Superuser, make sure you have the following permissions with IBM Cloud infrastructure:
•Manage Storage.
•Manage Security Groups.
|
a. Navigate to your user profile on IBM Cloud infrastructure account through opening https://control.softlayer.com/account/user/profile.
b. Copy the API Username and Authentication Key from the portal, as shown in Figure 2-10.

Figure 2-10 IBM Cloud infrastructure user profile
c. On your local machine, navigate to terraform-icp-ibmcloud/templates/icp-ee/.
d. Create a new file and name it terraform.tfvars that holds the configurations of your environment.
e. Add in the file the two lines shown in Example 2-4. Replace API_USERNAME and API_AUTH_KEY with your IBM Cloud infrastructure Username and API key as retrieved in Figure 2-10.
Example 2-4 terraform.tfvars username and API key content
sl_username = "API_USERNAME"
sl_api_key = "API_AUTH_KEY"
3. Specify the data-center that will host all the Virtual Server Instances by add the following line to terraform.tfvars. Replace dal10 with the intended data-center code.
datacenter = "dal10"
|
Note: Some customers have data residency requirements. Make sure that in these situations that the data-center configured in this step resides in the country of the customer. For example, if it is a Singaporian customer that has data-residency requirements, you will need to pick a data-center in Singapore, for example SNG01 as shown in Figure 2-11.
|
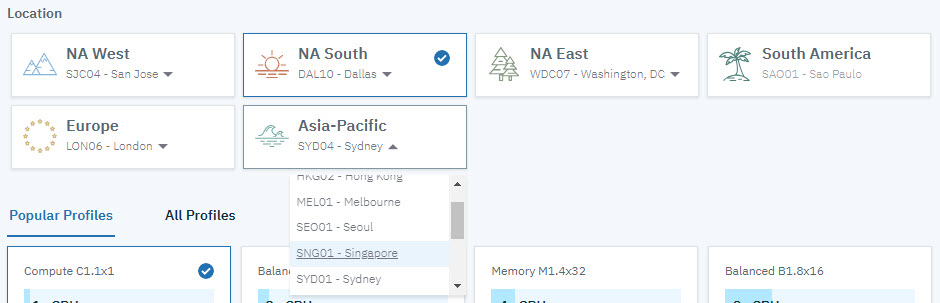
Figure 2-11 Data-Center code identification
4. Set the IBM Cloud Private Image to use for installation as shown. Get the image corresponding to your version from knowledge center.
For IBM Cloud Private Enterprise Edition 3.1.2, the image is ibmcom/icp-inception-amd64:3.1.2-ee. Add the following line to terraform.tfvars:
icp_inception_image = "ibmcom/icp-inception-amd64:3.1.2-ee"
5. Specify the location for the image by adding the following line to terraform.tfvars. Image Location can NFS, HTTP, or a private registry. Replace IMAGE_LOCATION with the location of your image that you have defined in 2.4.2, “Upload IBM Cloud Private binaries” on page 43.
image_location = "IMAGE_LOCATION"
6. Set IBM Cloud Private admin password by adding the following line to terraform.tfvars
icppassword = "IBM-Cloud-Private-Admin-Redbooks".
|
Note: Starting from IBM Cloud Private 3.1.2, by default the admin password should comply with a specific regular expression enforcement rule '^([a-zA-Z0-9-]{32,})$'. This regular expression can be changed during installation.
|
7. Specify the cluster name by adding the following line to terraform.tfvars:
deployment = "redbooks-deployment"
domain = "redbooks-deployment.icp"
8. Specify which management services will be disabled by adding the following line to terraform.tfvars. For IBM Cloud Private 3.1.2, the following management services can be disabled (custom-metrics-adapter, image-security-enforcement, istio, metering, logging, monitoring, service-catalog, storage-minio, storage-glusterfs, and vulnerability-advisor).
disabled_management_services = ["storage-glusterfs", "storage-minio"]
9. Specify the number and configuration of nodes as described in 2.1, “High availability considerations” on page 32. Add the following lines shown in Example 2-5 to terraform.tfvars with the specifications.
Example 2-5 IBM Cloud Private nodes specification
master = {
nodes = "3"
cpu_cores = "8"
memory = "32768"
disk_size = "100" // GB
docker_vol_size = "400" // GB
}
mgmt = {
nodes = "2"
cpu_cores = "8"
memory = "16384"
disk_size = "100" // GB
docker_vol_size = "400" // GB
}
va = {
nodes = "1"
cpu_cores = "8"
memory = "16384"
disk_size = "100" // GB
docker_vol_size = "400" // GB
}
proxy = {
nodes = "2"
cpu_cores = "4"
memory = "16384"
disk_size = "100" // GB
docker_vol_size = "300" // GB
}
worker = {
nodes = "3"
cpu_cores = "8"
memory = "32768"
disk_size = "100" // GB
docker_vol_size = "400" // GB
}
10. Check variables.tf to know the other options that you can change by overriding in terraform.tfvars.
11. In case you plan to run glusterfs or ceph in your worker nodes, then you need to have a dedicated disk for each to run. Perform the following steps to add two additional disks on the worker nodes.
a. Open instances.tf and locate disks variable under resource "ibm_compute_vm_instance" "icp-worker"
b. Add the following two lines to define a pointer for the two new variables defining the additional disks for worker nodes:
"${var.worker["disk3_size"]}",
"${var.worker["disk4_size"]}"
c. Your disks variable should look as Example 2-6.
Example 2-6 disks variable inside “ibm_compute_vm_instance" "icp-worker"
disks = [
"${var.worker["disk_size"]}",
"${var.worker["docker_vol_size"]}",
"${var.worker["disk3_size"]}",
"${var.worker["disk4_size"]}"
]
d. Notice in the previous step, you added a reference to worker["disk3_size"], and "${var.worker["disk4_size"]}" variables. Define this variables in variables.tf inside variable “worker” block and add a default value for it. Your variable “worker” block should now look as shown in Example 2-7.
Example 2-7 Variable worker in variables.tf after adding the two additional variables
variable "worker" {
type = "map"
default = {
nodes = "3"
cpu_cores = "4"
memory = "16384"
disk_size = "100" // GB
docker_vol_size = "100" // GB
local_disk = false
network_speed= "1000"
hourly_billing = true
disk3_size = "100" // GB
disk4_size = "100" //GB
}
}
e. Override the values in terraform.tfvars with the intended size of disk 3 and disk 4 as shown in Example 2-8.
Example 2-8 Defining the size of disk 3 and disk 4 for worker nodes
worker = {
disk3_size = "200"
disk4_size = "200"
}
2.4.4 Apply the Terraform template
Perform the following steps in order to apply the Terraform template:
1. Initialize Terraform in the script by writing the command shown in Example 2-9.
Example 2-9 Init Terraform
terraform init
Initializing modules...
- module.icpprovision
Getting source "git::https://github.com/IBM-CAMHub-Open/template_icp_modules.git?ref=2.3//public_cloud"
Initializing provider plugins...
- Checking for available provider plugins on https://releases.hashicorp.com...
- Downloading plugin for provider "tls" (1.2.0)...
- Downloading plugin for provider "null" (2.0.0)...
- Downloading plugin for provider "random" (2.0.0)...
The following providers do not have any version constraints in configuration,
so the latest version was installed.
To prevent automatic upgrades to new major versions that may contain breaking
changes, it is recommended to add version = "..." constraints to the
corresponding provider blocks in configuration, with the constraint strings
suggested below.
* provider.ibm: version = "~> 0.14"
* provider.null: version = "~> 2.0"
* provider.random: version = "~> 2.0"
* provider.tls: version = "~> 1.2"
Terraform has been successfully initialized!
You may now begin working with Terraform. Try running "terraform plan" to see
any changes that are required for your infrastructure. All Terraform commands
should now work.
If you ever set or change modules or backend configuration for Terraform,
rerun this command to reinitialize your working directory. If you forget, other
commands will detect it and remind you to do so if necessary.
2. Run terraform plan to know the changes that Terraform will make. The output you receive should be similar to Example 2-10.
Example 2-10 terraform plan output
Refreshing Terraform state in-memory prior to plan...
The refreshed state will be used to calculate this plan, but will not be
persisted to local or remote state storage.
------------------------------------------------------------------------
An execution plan has been generated and is shown below.
Resource actions are indicated with the following symbols:
+ create
Terraform will perform the following actions:
....
....
Plan: 66 to add, 0 to change, 0 to destroy.
------------------------------------------------------------------------
Note: You didn't specify an "-out" parameter to save this plan, so Terraform
can't guarantee that exactly these actions will be performed if
"terraform apply" is subsequently run.
3. Run terraform apply to start the deployment then confirm the action by typing yes. It takes around 3 hours.
|
Troubleshooting: In case the apply fails for any reason like network failure, you can perform terraform apply again; terraform preserves the state and will not start from scratch.
In some cases you may need to delete a resource manually, make any needed modifications, and perform terraform apply again. For example in case you would like to change the image location, you need to delete the resource image_load using terraform destroy -target null_resource.image_load. This is to make sure it reloads the image from the new path.
|
4. Example 2-11 shows a successful completion.
Example 2-11 Successful completion of the IBM Cloud Private installation
Apply complete! Resources: 66 added, 0 changed, 0 destroyed.
Outputs:
ICP Admin Password = IBM-Cloud-Private-Admin-Redbooks
ICP Admin Username = admin
ICP Console URL = https://redbooks-deployment-0665b912-1673867-dal10.lb.bluemix.net:8443
ICP Console load balancer DNS (external) = redbooks-deployment-0665b912-1673867-dal10.lb.bluemix.net
ICP Kubernetes API URL = https://redbooks-deployment-0665b912-1673867-dal10.lb.bluemix.net:8001
ICP Proxy load balancer DNS (external) = redbooks-deployment-proxy-0665b912-1673867-dal10.lb.bluemix.net
ICP Registry URL = redbooks-deployment-0665b912-1673867-dal10.lb.bluemix.net:8500
|
Note: You can use similar steps to install IBM Cloud Private Community Edition in case you don’t have a license for IBM Cloud Private. The Community Edition is free of charge and its terraform template exist in the same GitHub repository under folder icp-ce-minimal.
https://github.com/ibm-cloud-architecture/terraform-icp-ibmcloud/tree/master/templates/icp-ce-minimal.
You can also install IBM Cloud Private Community Edition locally to your PC through Vagrant.
|
2.5 Post installation verification
As a sanity validation step, perform the following steps in order to verify that your IBM Cloud Private cluster is installed successfully. You do the verification through the IBM Cloud Private Command Line Interface and IBM Cloud Private Console User Interface.
2.5.1 IBM Cloud Private command line interface
In this section, you verify that you can login to the IBM Cloud Private CLI and do some sanity commands.
For more details on how to install these tools, see Appendix A, “Command line tools” on page 347.
1. Perform the instructions in this Knowledge Center to install IBM Cloud Private CLI (Cloudctl):
2. Follow the instructions in this Knowledge Center to download and install Kubernetes CLI (Kubectl):
3. Verify that Cloudctl and Kubectl are installed by performing the following commands:
cloudctl version
kubectl version
4. Log in to your cluster with the following command, where ibm_cloud_private_console_url is the external host name or IP address for your master:
cloudctl login -a https://<ibm_cloud_private_console_url>:8443 --skip-ssl-validation
5. Make sure that there are no errors during login.
6. Make sure that all pods are in either status Running or Completed in kube-system through performing the command shown in Example 2-12.
Example 2-12 Verifying that pods are running
kubectl get pods -n kube-system
NAME READY STATUS RESTARTS AGE
audit-logging-fluentd-ds-2fdws 1/1 Running 1 8d
audit-logging-fluentd-ds-6bcp6 1/1 Running 0 8d
audit-logging-fluentd-ds-dt6pd 1/1 Running 0 8d
audit-logging-fluentd-ds-hd7lp 1/1 Running 0 8d
audit-logging-fluentd-ds-m7nlc 1/1 Running 0 8d
audit-logging-fluentd-ds-mhkw5 1/1 Running 0 8d
audit-logging-fluentd-ds-tvsx9 1/1 Running 0 8d
audit-logging-fluentd-ds-v4v9f 1/1 Running 0 8d
audit-logging-fluentd-ds-xspfz 1/1 Running 0 8d
auth-apikeys-f45sd 1/1 Running 0 8d
auth-apikeys-sllwj 1/1 Running 1 8d
auth-apikeys-wq9dk 1/1 Running 0 8d
auth-idp-6p52r 4/4 Running 2 8d
auth-idp-fsnw4 4/4 Running 3 8d
auth-idp-k6zmh 4/4 Running 7 8d
auth-pap-7wpdp 2/2 Running 3 8d
auth-pap-jhp7f 2/2 Running 0 8d
auth-pap-skd5j 2/2 Running 0 8d
auth-pdp-6q76t 2/2 Running 0 8d
auth-pdp-cd9wm 2/2 Running 3 8d
auth-pdp-lcm8t 2/2 Running 0 8d
calico-kube-controllers-85676f8998-dt2dv 1/1 Running 0 8d
calico-node-2l4ld 2/2 Running 1 8d
calico-node-8c65m 2/2 Running 0 8d
calico-node-8txd6 2/2 Running 2 8d
calico-node-9z28f 2/2 Running 0 8d
calico-node-cbrmm 2/2 Running 0 8d
calico-node-djvlf 2/2 Running 0 8d
calico-node-k4nlg 2/2 Running 0 8d
calico-node-wn9g9 2/2 Running 0 8d
calico-node-zcpg4 2/2 Running 0 8d
catalog-ui-9s2pc 1/1 Running 0 8d
catalog-ui-qfqsm 1/1 Running 2 8d
catalog-ui-zt2vx 1/1 Running 0 8d
custom-metrics-adapter-597f7645cf-74n5d 1/1 Running 0 8d
default-http-backend-54987cd76b-2rvbq 1/1 Running 0 8d
heapster-545458b4ff-q8d8k 1/1 Running 0 28h
heapster-545458b4ff-rd8pq 1/1 Running 0 8d
heapster-545458b4ff-tgv9f 1/1 Running 0 8d
helm-api-56fb65c854-tzgsd 3/3 Running 0 8d
helm-repo-847fbc5cd8-mc7q6 2/2 Running 0 8d
ibmcloud-image-enforcement-6d47d6d485-mwpq8 1/1 Running 0 8d
ibmcloud-image-enforcement-6d47d6d485-nkz9w 1/1 Running 0 28h
ibmcloud-image-enforcement-6d47d6d485-w6jnp 1/1 Running 0 8d
icp-management-ingress-b2tl8 1/1 Running 0 8d
icp-management-ingress-g94gj 1/1 Running 1 8d
icp-management-ingress-th2w8 1/1 Running 0 8d
icp-mongodb-0 1/1 Running 2 8d
icp-mongodb-1 1/1 Running 1 8d
icp-mongodb-2 1/1 Running 1 8d
image-manager-0 2/2 Running 2 8d
image-manager-1 2/2 Running 3 8d
image-manager-2 2/2 Running 1 8d
k8s-etcd-10.177.233.177 1/1 Running 0 8d
k8s-etcd-10.177.233.184 1/1 Running 0 8d
k8s-etcd-10.93.221.119 1/1 Running 1 8d
k8s-kmsplugin-10.177.233.177 1/1 Running 0 8d
k8s-kmsplugin-10.177.233.184 1/1 Running 0 8d
k8s-kmsplugin-10.93.221.119 1/1 Running 1 8d
k8s-master-10.177.233.177 3/3 Running 3 8d
k8s-master-10.177.233.184 3/3 Running 1 8d
k8s-master-10.93.221.119 3/3 Running 4 8d
k8s-proxy-10.171.37.135 1/1 Running 0 8d
k8s-proxy-10.177.233.176 1/1 Running 0 8d
k8s-proxy-10.177.233.177 1/1 Running 0 8d
k8s-proxy-10.177.233.181 1/1 Running 0 8d
k8s-proxy-10.177.233.184 1/1 Running 0 8d
k8s-proxy-10.93.221.105 1/1 Running 0 8d
k8s-proxy-10.93.221.119 1/1 Running 1 8d
k8s-proxy-10.93.221.68 1/1 Running 0 8d
k8s-proxy-10.93.221.97 1/1 Running 0 8d
key-management-api-787d976f79-7qnjz 1/1 Running 0 8d
key-management-crypto-558dff975-82kgj 1/1 Running 0 8d
key-management-lifecycle-5bfdf7978c-l8bfc 2/2 Running 0 8d
key-management-onboarding-pgwvg 0/1 Completed 0 8d
key-management-pep-7b864d6c88-9dlts 1/1 Running 0 8d
key-management-persistence-75ff587647-9kw5g 1/1 Running 0 8d
kube-dns-29r6d 1/1 Running 0 8d
kube-dns-5td8z 1/1 Running 1 8d
kube-dns-klbk7 1/1 Running 0 8d
logging-elk-client-564c6c7894-b7t4b 2/2 Running 0 8d
logging-elk-data-0 1/1 Running 0 8d
logging-elk-elasticsearch-curator-1550619000-7n6cc 0/1 Completed 0 45h
logging-elk-elasticsearch-curator-1550705400-s8wvp 0/1 Completed 0 21h
logging-elk-elasticsearch-pki-init-kml4g 0/1 Completed 0 8d
logging-elk-filebeat-ds-26g4l 1/1 Running 0 8d
logging-elk-filebeat-ds-9ns27 1/1 Running 0 8d
logging-elk-filebeat-ds-f9dt2 1/1 Running 0 8d
logging-elk-filebeat-ds-fb9bt 1/1 Running 1 8d
logging-elk-filebeat-ds-jr26q 1/1 Running 0 8d
logging-elk-filebeat-ds-k8f4x 1/1 Running 1 8d
logging-elk-filebeat-ds-nhf5v 1/1 Running 0 8d
logging-elk-filebeat-ds-zdxv6 1/1 Running 1 8d
logging-elk-filebeat-ds-zt7s5 1/1 Running 0 8d
logging-elk-kibana-578c8dcc6c-q58st 2/2 Running 0 8d
logging-elk-kibana-init-q8gw2 0/1 Completed 6 8d
logging-elk-logstash-b54c9bb89-4glgr 1/1 Running 0 8d
logging-elk-master-9d5866588-xrpsw 1/1 Running 0 8d
mariadb-0 2/2 Running 0 8d
mariadb-1 2/2 Running 12 8d
mariadb-2 2/2 Running 0 8d
metering-dm-57b569b5c9-jxf2t 1/1 Running 0 8d
metering-reader-7c74p 1/1 Running 0 8d
metering-reader-7fj9f 1/1 Running 0 8d
metering-reader-g5767 1/1 Running 0 8d
metering-reader-gcd47 1/1 Running 0 8d
metering-reader-jx8zx 1/1 Running 0 8d
metering-reader-l8d29 1/1 Running 0 8d
metering-reader-lwzxv 1/1 Running 3 8d
metering-reader-tlq52 1/1 Running 0 8d
metering-reader-v546l 1/1 Running 0 8d
metering-ui-7d68d4dc79-r5fhx 1/1 Running 0 8d
metrics-server-6d47b6dc6b-przdl 1/1 Running 0 8d
mgmt-repo-7c9cf9dc89-2djtq 2/2 Running 0 8d
monitoring-grafana-5fc5676bdf-794bd 3/3 Running 0 8d
monitoring-prometheus-56988655cf-j66ht 4/4 Running 0 8d
monitoring-prometheus-alertmanager-8c5fcb784-f55bs 3/3 Running 0 8d
monitoring-prometheus-collectdexporter-cc9f4656c-d7bxq 2/2 Running 0 8d
monitoring-prometheus-elasticsearchexporter-6565fb986-z7df8 2/2 Running 0 8d
monitoring-prometheus-kubestatemetrics-5fb65cd8b-gwtv8 2/2 Running 0 8d
monitoring-prometheus-nodeexporter-28z4n 2/2 Running 0 8d
monitoring-prometheus-nodeexporter-845cl 2/2 Running 2 8d
monitoring-prometheus-nodeexporter-fbd5s 2/2 Running 0 8d
monitoring-prometheus-nodeexporter-hfxtw 2/2 Running 0 8d
monitoring-prometheus-nodeexporter-mns4t 2/2 Running 0 8d
monitoring-prometheus-nodeexporter-qrjtp 2/2 Running 0 8d
monitoring-prometheus-nodeexporter-sxgl9 2/2 Running 0 8d
monitoring-prometheus-nodeexporter-w7f5t 2/2 Running 0 8d
monitoring-prometheus-nodeexporter-xq8zj 2/2 Running 0 8d
nginx-ingress-controller-lcz9k 1/1 Running 0 8d
nginx-ingress-controller-znqr7 1/1 Running 0 8d
nvidia-device-plugin-5gpxt 1/1 Running 0 8d
nvidia-device-plugin-7g7p4 1/1 Running 1 8d
nvidia-device-plugin-82dp7 1/1 Running 0 8d
nvidia-device-plugin-cb9lw 1/1 Running 0 8d
nvidia-device-plugin-hgrnx 1/1 Running 0 8d
nvidia-device-plugin-jt4j6 1/1 Running 0 8d
nvidia-device-plugin-mb4x5 1/1 Running 0 8d
nvidia-device-plugin-qvgsp 1/1 Running 0 8d
nvidia-device-plugin-xmlf7 1/1 Running 0 8d
oidc-client-registration-x7hgh 0/1 Completed 0 8d
platform-api-758ff75d7b-b8wlk 2/2 Running 0 8d
platform-api-758ff75d7b-cg5lt 2/2 Running 0 28h
platform-api-758ff75d7b-j6ggv 2/2 Running 0 8d
platform-deploy-6744cfb478-77stf 1/1 Running 0 8d
platform-deploy-6744cfb478-pk48z 1/1 Running 0 28h
platform-deploy-6744cfb478-qng4v 1/1 Running 0 8d
platform-ui-kz6jn 1/1 Running 0 8d
platform-ui-mmvlg 1/1 Running 0 8d
platform-ui-vffd4 1/1 Running 1 8d
secret-watcher-777978d867-qvg78 1/1 Running 0 8d
security-onboarding-bk4qv 0/1 Completed 0 8d
service-catalog-apiserver-5n5rn 1/1 Running 1 8d
service-catalog-apiserver-bk5k6 1/1 Running 0 8d
service-catalog-apiserver-jlqr7 1/1 Running 0 8d
service-catalog-controller-manager-6cd6684cf7-jztjh 1/1 Running 0 28h
tiller-deploy-854fc7d5d-pkbv7 1/1 Running 0 28h
unified-router-86jnr 1/1 Running 0 8d
unified-router-8zbh4 1/1 Running 0 8d
unified-router-zvf6p 1/1 Running 1 8d
web-terminal-cd5674776-pmxf9 1/1 Running 0 8d
Example 2-13 Verify that all nodes are created
kubectl get nodes
NAME STATUS ROLES AGE VERSION
10.171.37.135 Ready proxy 8d v1.12.4+icp-ee
10.177.233.176 Ready worker 8d v1.12.4+icp-ee
10.177.233.177 Ready etcd,master 8d v1.12.4+icp-ee
10.177.233.181 Ready worker 8d v1.12.4+icp-ee
10.177.233.184 Ready etcd,master 8d v1.12.4+icp-ee
10.93.221.105 Ready management 8d v1.12.4+icp-ee
10.93.221.107 Ready management 8d v1.12.4+icp-ee
10.93.221.119 Ready etcd,master 8d v1.12.4+icp-ee
10.177.233.171 Ready worker 8d v1.12.4+icp-ee
10.93.221.68 Ready proxy 8d v1.12.4+icp-ee
10.93.221.97 Ready va 8d v1.12.4+icp-ee
2.5.2 IBM Cloud Private Console user interface
In this section, you make sure that you can access the Console UI, access the catalog, and perform a sample application deployment.
1. Navigate to the URL of your IBM Cloud Private Console as displayed at the end of the installation output in ibm_cloud_private_console_url.
2. In the log in page, enter the admin username and password that you have specified during installation then click Log in as shown in Figure 2-12.

Figure 2-12 IBM Cloud Private login screen
3. After you login, you should be able to see “Welcome to IBM Cloud Private” screen as shown in Figure 2-13.

Figure 2-13 IBM Cloud Private welcome screen
4. Click on Catalog in the above toolbar and make sure that the Helm charts are loaded as shown Figure 2-14.

Figure 2-14 IBM Cloud Private Catalog
5. Try to deploy a sample helm-chart like ibm-nodejs-sample. Select ibm-nodejs-sample from the catalog.
6. The documentation of the helm-chart should appear as shown in Figure 2-15. Click Configure to proceed.

Figure 2-15 ibm-nodejs-sample Info page
7. Input nodejs-test in Helm release name and choose default in Target namespace then click on Install as shown in Figure 2-16.

Figure 2-16 Configure Helm chart

Figure 2-17 View Helm release dialog
9. Wait till the deploy is successful, your screen should be similar to Figure 2-18. Make sure that the available deployment is 1, Pod is in running status.

Figure 2-18 Helm release status
2.6 Installing IBM Cloud Private on other Cloud platforms
Kubernetes has become the de facto standard in managing container-based workloads. IBM Cloud Private builds on top of the Kubernetes orchestrator and provides a private cloud platform for developing and running a container workload solely for one organization. It is a reliable way of running containerized IBM middleware given the knowledge and verification test applied to both.
2.6.1 Typical scenario of running IBM Cloud Private on other Cloud platforms
Below are four “why” scenarios for clients considering IBM Cloud Private running on other Cloud infrastructure:
•Multicloud strategy: Customers would like to leverage the strength and unique offerings from different cloud vendors, but also want to have a consistent operation and runtime environment that they can achieve portability without cloud platform lock-in. For example, running digital innovation on both IBM public cloud and AWS.
•Cloud bursting: If you have private cloud environments running on-prem and would like to expand the cluster or private cloud to external infrastructure only in certain special condition or bursting workload.
•Disaster recovery: Since the same workload can be easily and quickly provisioned, external cloud providers can also be a great place to act as a disaster recovery data center. IBM Cloud Private on other cloud provider fits this use case nicely.
•Existing other cloud users with IBM Middleware workload: IBM middleware investments are further extended with an app modernization strategy. IBM’s middleware also benefits from associated data analytic services, such as IBM Cognos Analytics to gain a deeper understanding of your business and IBM SPSS statistical analysis to predict outcomes; you can continue deploying them in your cloud environment by leveraging ICP. This approach gives the best of both worlds.
2.6.2 Installing IBM Cloud Private on AWS using Terraform
This repository url below contains a collection of Terraform templates to install IBM Cloud Private on Google Cloud.
2.6.3 Installing IBM Cloud Private on Microsoft Azure using Terraform
This repository url below contains a collection of Terraform templates to install IBM Cloud Private on Google Cloud.-CAMHub-Open/template_icp_azure.git
2.6.4 Installing IBM Cloud Private on Google Cloud using Terraform
This repository url below contains a collection of Terraform templates to install IBM Cloud Private on Google Cloud.
2.6.5 Installing IBM Cloud Private on RedHat OpenShift
IBM and Red Hat have partnered to provide a joint solution that uses IBM Cloud Private and OpenShift. You can deploy IBM certified software containers running on IBM Cloud Private onto Red Hat OpenShift. Similar to IBM Cloud Private, OpenShift is a container platform built on top of Kubernetes. You can install IBM Cloud Private on OpenShift by using the IBM Cloud Private installer for OpenShift.
For more details, see the following IBM Knowledge Center URL:
|
Note: Pre-requisites to install IBM Cloud Private on other Cloud providers:
•Basic understanding of IBM Cloud Private
•Cloud account
•Access to IBM Cloud Private Images
|
2.6.6 Installing IBM Cloud Private on OpenStack Cloud provider
This repository url below contains a collection of Terraform templates to install IBM Cloud Private on OpenStack Cloud provider. This Terraform example configurations uses the OpenStack provider to provision virtual machines on OpenStack and TerraForm Module ICP Deploy to prepare VMs and deploy IBM Cloud Private on them.
2.6.7 Installing IBM Cloud Private on VMware vSphere Cloud provider
This repository url below contains a collection of Terraform templates to install IBM Cloud Private on VMWare vSphere Cloud provider. This Terraform example configurations uses the VMware vSphere provider to provision virtual machines on VMware and TerraForm Module ICP Deploy to prepare VMs and deploy IBM Cloud Private on them. This Terraform template automates best practices learned from installing ICP on VMware at numerous client sites in production.
2.6.8 Install IBM Cloud Private on existing Virtual Machines
This repository url below contains a collection of Terraform templates to install IBM Cloud Private on Vans already provisioned on-premise or on any cloud provider. This Terraform module can be used to deploy IBM Cloud Private on any supported infrastructure vendor. Tested on Ubuntu 16.04 and RHEL 7 on SoftLayer, VMware, AWS and Azure.
2.7 Setting up IBM Cloud Private catalog in an airgap environment
An airgapped environment is an environment where a computer or network is prevented from establishing an external connection due to security reasons.
Generally post installing IBM Cloud Private on a internet connection enabled host, the IBM Charts will be synced automatically and all the IBM charts with its respective images are synced to the local IBM Cloud Private cluster.
However, in production environments due to client security policies, direct access to internet is disabled resulting in empty catalog on the IBM Cloud Private admin GUI. The below steps are documented in getting the desired chart to be available on IBM Cloud Private. IBM Liberty chart is taken as an example in the below steps.
2.7.1 Prerequisites
The following are the prerequisites for setting up IBM Cloud Private catalog in an airgap environment:
•Ensure you have git configured on the local system.
•Ensure Docker is installed on the local system, and has internet access.
•Install and configure Helm on the local system.
•Install IBM Cloud Private command line interface (CLI).
2.7.2 Steps to follow
Perform the following steps:
1. Obtain the Helm chart for the image. Clone the /IBM/Charts repository from git using: git clone https://github.com/IBM/charts.git.
2. Open the values.yaml file from the chart and locate the image that it uses. In this example, the repository is “websphere-liberty”, and tag is “latest” as shown in Figure 2-19.

Figure 2-19 Liberty chart
3. Pull the image locally using the repository and tag information from the values.yaml file: docker pull <repository>:<tag>. In this example, it would be:
docker pull websphere-liberty:latest
4. Upload the image to the private image repository on IBM Cloud Private:
docker login <cluster_CA_domain>:8500
Tag the image: docker tag image_name.
<cluster_CA_domain:8500>/namespace/imagename:tagname. In our example:
docker tag websphere-liberty:latest mycluster.icp:8500/default/websphere-liberty:latest.
5. Push the image to private repository:
docker push mycluster.icp:8500/default/websphere-liberty:latest
6. Open the values.yaml file again, and update the location of the Docker image, as shown in Figure 2-20 on page 67:
repository: <cluster_CA_domain>:8500/namespace/imagename tag: <tagname>

Figure 2-20 Modify chart repository
7. Repackage the Helm chart: helm package <path_to_helm_directory> where <path_to_helm_directory> is the directory that contains the Helm chart. On running this, a .tgz file containing the Helm chart is created. In our example, the file ibm-websphere-liberty-1.0.1.tar.tgz was created.
8. Upload the new Helm chart to your IBM Cloud Private cluster:
bx pr login –a <ICP_master_ip>:8443 –skip-ssl-validation
To upload the Helm chart ibm-websphere-liberty-1.0.1.tgz, use the following command:
bx pr load-helm-chart –archive ibm-websphere-liberty-1.0.1.tgz
9. Update the package repository using the IBM Cloud Private management console. You should be able to see the Helm chart deployed as shown in Figure 2-21.

Figure 2-21 Catalog showing IBM Liberty chart
2.8 Changing certificates post installation
You can replace certificates for Image Manager (Docker Registry) and Management ingress created by the installer in your IBM Cloud Private environment. Before trying to replace certificate verify that your IBM Cloud Private cluster is running. Complete the following steps to replace certificates.
1. Generate a new certificate key pair for the certificate that you want to replace. The following sample creates an icp-router certificate and key pair. See Example 2-14.
|
Note: You must replace mycluster.icp with your own cluster_CA_domain that you configured in the <installation_directory>/cluster/config.yaml file.
|
Example 2-14 Generate a new certificate key pair
openssl req sxw -newkey rsa:4096 -sha256 -nodes -keyout icp-router.key -x509 -days 36500 -out icp-router.crt -subj "/C=US/ST=California/L=Los Angeles/O=Your Domain Inc/CN=mycluster.icp" 
2. Log in to the boot node as a cluster administrator.
Example 2-15 Change to the cluster/cfc-certs/ directory
cd <installation_directory>/cluster/cfc-certs/
4. Back up the original certificate directory or file. The following example (Example 2-16) backs up the router directory which contains the icp-router.crt and icp-router.key.
Example 2-16 Back up the original certificate directory
mv router router.bak
5. Replace router/icp-router.key and router/icp-router.crt with your own key pair and certificate that you generated in step 1. See Example 2-17.
Example 2-17 Replace router/icp-router.key and router/icp-router.crt
mkdir ./router
cp <custom_certificate_directory>/icp-router.crt ./router/icp-router.crt
cp <custom_certificate_directory>/icp-router.key ./router/icp-router.key
6. Change to the cluster directory: cd ..
7. Run the following command to replace the certificate. See Example 2-18.
Example 2-18 Replace the certificate
docker run -t --net=host -v $(pwd):/installer/cluster -e LICENSE=accept ibmcom/icp-inception-$(uname -m | sed 's/x86_64/amd64/g'):3.1.2-ee replace-certificates -v 
..................Content has been hidden....................
You can't read the all page of ebook, please click here login for view all page.