
CHAPTER 15
Chapter Objectives
By the end of the chapter, readers will be able to:
![]() Define, discuss, and use classes.
Define, discuss, and use classes.
![]() Discuss the difference between public and private access specifiers.
Discuss the difference between public and private access specifiers.
![]() Distinguish between class data members and class methods.
Distinguish between class data members and class methods.
![]() Distinguish between a class and an object.
Distinguish between a class and an object.
![]() Explain and demonstrate the concept of instantiation.
Explain and demonstrate the concept of instantiation.
![]() Use the binary scope resolution operator where appropriate.
Use the binary scope resolution operator where appropriate.
![]() Write setter and getter member functions.
Write setter and getter member functions.
![]() List the four class manager functions.
List the four class manager functions.
![]() Explain and create constructors and destructors.
Explain and create constructors and destructors.
![]() Discuss and create overloaded functions.
Discuss and create overloaded functions.
![]() Discuss the concept of name mangling and how it relates to function overloading.
Discuss the concept of name mangling and how it relates to function overloading.
![]() Illustrate how C++ performs implementation hiding.
Illustrate how C++ performs implementation hiding.
![]() Create programmer-defined header files.
Create programmer-defined header files.
![]() Explain the value of conditional compilation and demonstrate its usage.
Explain the value of conditional compilation and demonstrate its usage.
![]() Discuss the use of #pragma once.
Discuss the use of #pragma once.
![]() Explain the concept of base member initialization.
Explain the concept of base member initialization.
![]() Pass objects by const-ref.
Pass objects by const-ref.
![]() Explain the importance of const methods and how they apply to const objects.
Explain the importance of const methods and how they apply to const objects.
In the last chapter, we presented some of the language-independent philosophies behind object-oriented programming. It is now time to return our focus to C++ and discover how these generic concepts are implemented. Many of these concepts, however, are more advanced than what is appropriate for this chapter, and so we will provide only an introduction to classes as well as some related C++ topics.
15.1 Classes
As discussed in the last chapter, classes form the foundation on which object-oriented languages acquire their capabilities. Classes in C++ are similar in many ways to structures. The following sections illustrate some of the core concepts related to C++ classes.
15.1.1 Definition Syntax
A class definition is similar to a structure definition except that the keyword class is used. The syntax for defining a class is as follows:
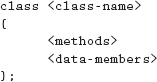
In this syntax diagram, the <methods> and <data-members> can be specified in any order. Remember to include the semicolon at the end of the class definition. Many of our students have forgotten that semicolon, costing them many hours tracking down the error. Unfortunately, the errors that are displayed may not be indicative of the actual cause of the error.
15.1.2 Access Specifiers
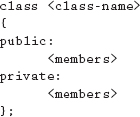
As stated earlier, the data members of a class should be sheltered from functions outside the class that attempt to change their values. This is done via access specifiers. Think of access specifiers as denoting the level of protection for data members and methods from functions outside the class. There are three access specifiers available: public, private, and protected. The protected access specifier is used in conjunction with inheritance and therefore will not be discussed any further in this chapter.
Anything defined in the public area of the class is available to any function that has access to an instance of the class. This area is where methods that provide the interface to the class should be defined. Although legal, you should avoid defining data members in this area, as doing so destroys any hope of keeping your data safe.
Members defined in the private section can only be accessed by methods that are a part of the class. This is where all data members should be defined, as well as any methods that are not part of the public interface of the class. If no access specifiers are used within the class, everything will default to private. This is the opposite level of protection provided by structures, whose default access is public.
Adding access specifiers into the syntax diagram shown in the previous section results in the following:
15.1.3 Data Members
Class data members are defined in exactly the same manner as structure data members. Since data members are just placeholders, they aren't allocated any memory until an object is instantiated; therefore, an initial value cannot be provided in the definition. And stylistically, each data member should be placed on a separate line, as shown in Example 15.1.1.


15.1.4 Member Functions
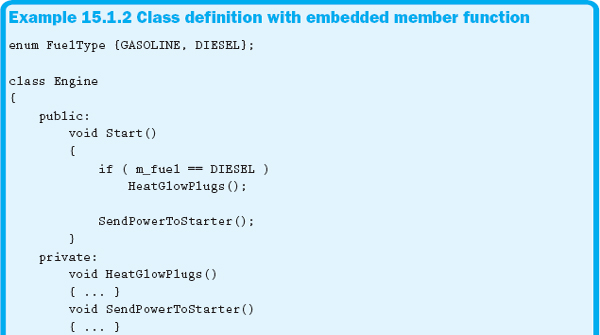
There are two locations in which a member function for a class can be physically placed. The first places the entire function definition inside the class; it is demonstrated in Example 15.1.2.

As you can see from Example 15.1.2, the class definition can quickly become cluttered. For this reason, the preferred style is to only specify the function declaration within the class definition. The function definition is then supplied elsewhere, as shown in Example 15.1.3.

As you can see from Example 15.1.3, this second location drastically cleans up the class by placing the function definition external to the class, thus making both the class and the function more readable. Notice that the method's definition can be provided immediately after the class definition.
The function header in Example 15.1.3 uses the binary scope resolution operator (::) to specify that the Start method belongs to the Engine class.
![]()
The binary scope resolution operator specifies that the identifier on the right belongs to the data type (usually a class) on the left.
Remember, not all methods need to be public. For example, the SendPowerToStarter method does not need to be accessed by any function outside of the class. Therefore, this method should be placed within the private section of the class.
15.1.5 Setters and Getters
There are two types of functions commonly found in classes that provide a way to interface with the data members of a class. A setter is a member function that is passed a parameter, which will then be assigned to a specific data member. A getter is a member function that returns the value of a specific data member. Setters and getters are added to the Engine class, as shown in Example 15.1.4. For the sake of brevity, the previously shown methods have been removed from the class definition.
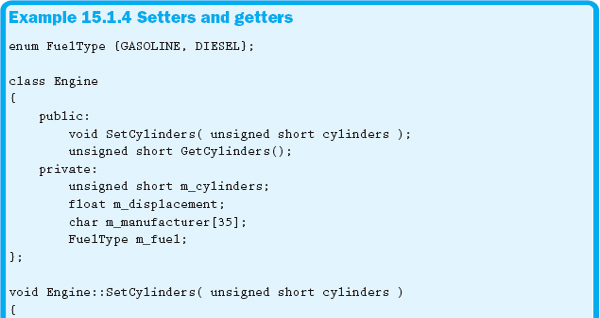

The setter and getter shown in Example 15.1.4 are pretty basic. Setters will often provide more error checking to ensure that the data members have valid data. For example, the setter shown in Example 15.1.4 should check the parameter to make sure the user didn't try to set the number of cylinders to a negative number. Getters are almost always like the one in the example; they just return the value of the data member.
It is not appropriate to blindly provide a setter and a getter for every data member. Some attributes, such as pointers, can be dangerous to the integrity of the object if they were to be accessed or changed from outside the class. Therefore, carefully consider all factors before providing a setter or a getter for a data member.
Section 15.1 Exercises
1. Indicate whether each of the following statements is true or false.
a. A class definition is very similar to a structure definition, except that the keyword class is used instead of struct.
b. Within a class, data members must be listed before methods; otherwise, a syntax error will be generated.
c. A semicolon is required at the end of a class definition.
d. The default access specifier for a class is public.
e. When writing your own classes, you are required to include setters and getters for all of your data members.
2. Based on the following class, please complete each of the following tasks:
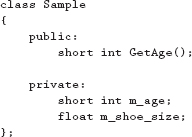
a. Write the necessary statement to declare a getter for the shoe size.
b. Declare a setter for the age data member.
c. Write the function defintions for the three methods now contained within your class. Make sure to define the functions external to the class definition.
Section 15.1 Learn by Doing Exercises
1. Write the necessary statements to define a class called Person. Within your class, include the following private data members: id (integer) and gender (1 character). Include the setter and getter methods for all of the data members. Make all of your class methods public. Place the entire function definition for each of your methods within the body of the class.
2. Rewrite your class from Learn by Doing Exercise 1, only this time place the definitions for your methods outside of the class.
15.2 Instantiation
Now that we have a basic class definition, we can instantiate, or declare an object of the class. Since you have been doing this for quite some time now, Example 15.2.1 should quickly make sense.

Once you have instantiated an object, you can call any public method or access any public data member. You can try accessing private members, but your program will not compile. To access public members from outside the class, you must use the arrow or dot operator as appropriate, just as with structures. Example 15.2.2 uses the objects declared in Example 15.2.1 to call the Start method.

Each of these objects has their own copy of the data members specified in the class definition. The methods of the class, however, are shared among all of its objects. The encapsulation of the data members allows you to do anything with these objects that you can with regular variables. Passing by value, passing by reference, passing by pointer, and even assignment operations can all be performed using these objects. However, as soon as you add a pointer data member to the class definition, you will have to be very careful and will have to provide special functions to handle these new data members. These special functions will not be discussed in this chapter because of the advanced techniques they require.
Section 15.2 Exercises
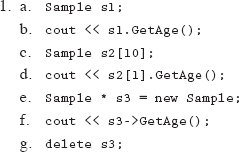
1. Based on the following class, please complete each of the following tasks:
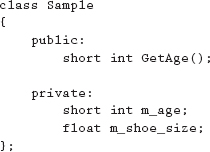
a. Write the statement to instantiate an object called s1 based on the class Sample.
b. Using the object you just created, write the statement to call the function GetAge and display the value returned.
c. Write the statement to instantiate an array called s2 containing 10 instances of the class Sample.
d. Using the array variable just created, call the function GetAge with the second element and display the returned value.
e. Write the statement to dynamically allocate an instance of the Sample class, assigning the pointer into a variable called s3.
f. Using the variable s3, call the function GetAge and display the value returned.
g. Write the statement to delete the memory you dynamically allocated.
15.3 Manager Functions
There are special functions that perform fundamental tasks associated with a class, such as assignment, copy, and initialization. The four manager functions are constructor, destructor, copy constructor, and the assignment operator. Anytime you create a class, these manager functions are automatically provided for you. Unfortunately, except for the most trivial classes, these functions will not be robust enough for your class. Therefore, we should provide our own versions of these manager functions.
Copy constructors and overloaded assignment operators are only required once pointers are introduced as data members. These two functions require advanced techniques that will not be discussed in this chapter.
15.3.1 Constructor
A constructor, or ctor, is a special function that is automatically called anytime an object is instantiated. The job of the constructor is to build, or construct, the object. As stated earlier, even though a default constructor is provided for each class, we will often need to write our own.
![]()
A default constructor is a constructor that can be called without any parameters.
The purpose of a constructor is to provide initial values for the data members and to allocate any resources, such as memory, needed for the class. A constructor is easily recognized in the class definition because it has the same name as the class and has no return type. Example 15.3.1 shows a default constructor for the Engine class.


Now that we have a constructor that assigns values to our data members, we have effectively accomplished one of the important concepts of OOP: always know the state of your data members. Although important, this type of constructor does not allow for much flexibility. However, we can extend this concept and have multiple constructors for the same class.
In C++ you can have multiple versions of a function with the same name as long as the number and type of parameters are different. This ability is called function overloading. Although not limited to being available only within classes, it is important when writing constructors for classes. This topic will be explored in greater detail in a later section.
![]()
Remember: When overloading functions, the number or type of parameters must be different for each version of the function. It is illegal to have multiple functions whose signatures only differ in their return types.
One of the most important uses of constructors is to provide a way for the user of your class to supply initial values for its data members. These values are supplied to the object during its instantiation. Example 15.3.2 demonstrates how to write an overloaded constructor and make the appropriate instantiations.
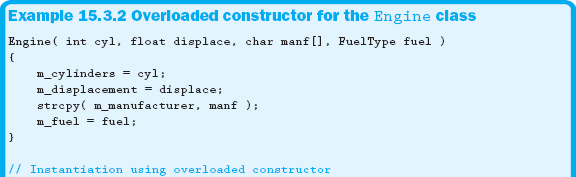

As you can see in Example 15.3.2, the constructor is passed the desired information during the instantiation of the objects. One mistake many of our students make is to use parentheses when instantiating an object using the default constructor. Example 15.3.3 demonstrates this error.
Example 15.3.3 may look like it should call the default constructor of the Engine object. However, to the compiler it is a function declaration for a function called FourBanger that is passed nothing and returns an Engine object. Since the syntax is correct for a function declaration, no errors will be generated until you try to access a member of the FourBanger object. The correct syntax is shown in Example 15.3.4.
15.3.2 Destructor
Another manager function called a destructor, or dtor, is automatically invoked when an object is destroyed. Its job is essentially the opposite of a constructor; it frees up any allocated resources. Unlike a constructor, a destructor never takes any parameters and therefore cannot be overloaded.
![]()
Remember: An object is destroyed when it either goes out of scope or is explicitly deallocated using the delete operator.
A destructor is also easy to recognize. Like a constructor, a destructor's name is the same as the class. However, a destructor's name is always prefaced with a tilde (~) character. Example 15.3.5 demonstrates how to write a destructor.
Since the Engine class doesn't have any explicitly allocated resources, there isn't anything required of the destructor. Therefore, it is acceptable not to explicitly define a destructor for this class.
Section 15.3 Exercises
1. List the four manager functions provided for you every time you create an instance of a class.
2. What is the name of the function that is automatically called whenever an instance of an object is instantiated?
3. What do we call the ctor that is automatically provided for our class, and what are its parameters?
4. Explain the purpose of the constructor.
5. When is a destructor called?
Section 15.3 Learn by Doing Exercise
1. Expand the class specified in Question 1 of Section 15.2 Exercises as indicated in the following:
a. Write a constructor that assigns age and shoe size the value 0. Within the body of your constructor, display a message indicating that this constructor has been called.
b. Write the destructor for the class and, within its body, display an informative message that indicates that the destructor has been called.
c. Create a main function that includes a statement to instantiate an instance of your class that automatically invokes the default constructor.
d. Write another constructor for the Sample class that takes two parameters, one for the age and one for the shoe size. Set the shoe size to 8 using a default argument. Within the body of the function, do any necessary assignment statements and display an informative message indicating that this specific ctor was executed.
e. Create another instance of the Sample class called s1, passing in the initial value of 18 for the age.
f. Exercise your program and note how the various constructors and destructors are being called automatically.
g. Create an array of five Sample objects. Execute your program and notice which manager functions get called.
15.4 Implementation Hiding
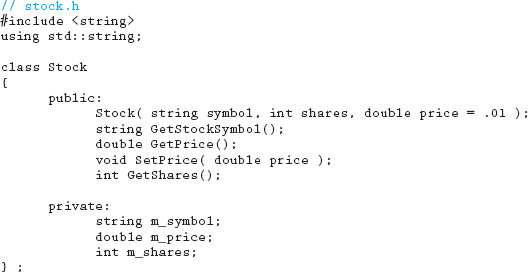
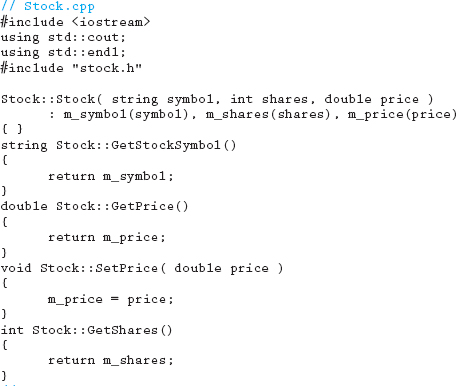
As discussed in the last chapter, implementation hiding refers to the process of providing an interface to the class without exposing the details of how the member functions were implemented. C++ achieves implementation hiding by placing the class definition in a header file and the associated function definitions in a separate .cpp file. Example 15.4.1 shows the files for the Engine class.
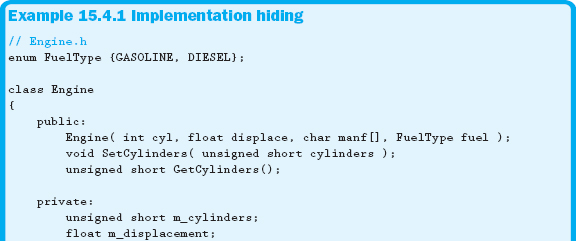

Notice that the class definition in Example 15.4.1 shows the methods available to manipulate the class as well as what data members are available to store information. The class definition is placed in a header file. The implementation of the methods is placed in the associated .cpp file, which, when compiled, will be translated into an object file. The header file provides the interface that can be used by other programmers, while the implementation details can remain a mystery.
15.4.1 #include “header.h”
In Example 15.4.1, a new form of the #include was demonstrated. If a path is specified in the string literal, the compiler will look in that directory for the header file. If no path is specified, the compiler will look in the current directory. If the header file is not found, the compiler will then look in the standard include file locations. Remember that the < > around the header file's name tells the compiler to look in the include directory, which was created when your compiler was installed. Generally, user-defined header files are included using quotation marks, whereas predefined header files are included using the < >.
The header file itself is required for the .cpp file to correctly compile. The function definitions use the scope resolution operator to specify that the definitions belong to the Engine class. The .cpp file needs to have access to the header file where the class definition is located. When using Visual Studio, it is necessary to incorporate the .cpp file into the project. This allows Visual Studio to compile the source code and then link all object files into an executable.
Section 15.4 Exercises
1. To help achieve implementation hiding, place the function definition in a ______________ file and the class definition in a ________________ file.
2. Assume that you wrote a class called Sample. Write the statement to include the header file for this class within the sample.cpp file.
3. Another programmer using your class would be more interested in the ___________________ it provides than the details of how specific functions are implemented.
Section 15.4 Learn by Doing Exercise
1. Using the class created in Section 15.3 Learn by Doing Exercise, separate the class definition from the function definitions by using the methods shown in this section.
15.5 Conditional Compilation
Separating the interface and the implementation into different files can cause some problems. The header file can be included in multiple .cpp files, causing errors stating that multiple definitions of the class exist. Figure 15.5.1 illustrates this situation.
As you can see from Figure 15.5.1, when the Driver program is compiled, there are multiple definitions of the Engine class. Fortunately, there are a couple of methods for guaranteeing that the class definition is only included once. These are discussed in the next two sections.
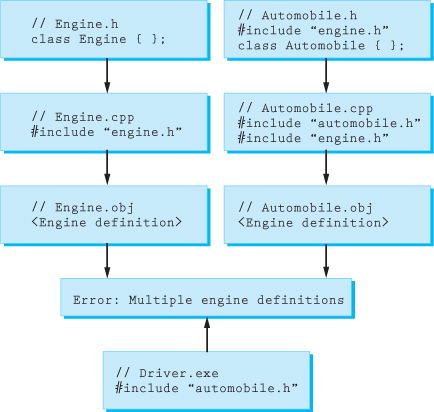
Figure 15.5.1 Class redefinition
15.5.1 #ifndef
Using the #ifndef preprocessor directive is one of several methods for conditionally compiling a section of code. This directive causes the preprocessor to check for the definition of an associated identifier. If the identifier is not defined, the code between the #ifndef and the ending #endif will be compiled.
![]()
Remember: The term #ifndef comes from if not defined.
Example 15.5.1 shows the Engine header file with the appropriate preprocessor directives to perform conditional compilation.

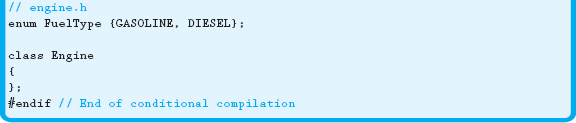
Example 15.5.1 tells the preprocessor that if the identifier, ENGINE_H, is not defined, it should define the identifier and then include the class definition into the object file. If the identifier has already been defined, it means that this header file has already been processed and therefore doesn't need to be included.
15.5.2 #pragma once
An alternative to using the #ifndef is to use #pragma once. Although not a standard construct, it is supported in many compilers. This directive does not require the use of any other directives and is demonstrated in Example 15.5.2.
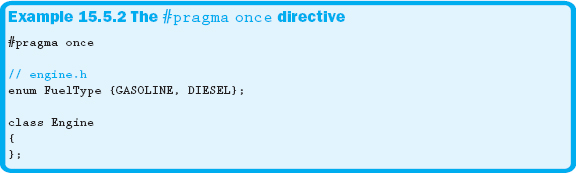
An argument for using #pragma once is that it is usually more optimized and will therefore speed up the compilation process.
Section 15.5 Exercises
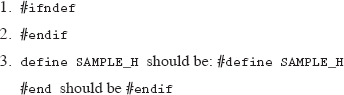
1. What is the preprocessor directive that is used to check for the definition of an associated identifier?
2. What is the directive to mark the end of the conditional compilation section?
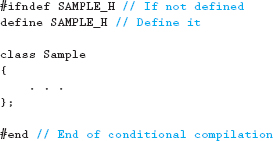
3. Identify any errors contained within the following code:
Section 15.5 Learn by Doing Exercise
1. Add the appropriate conditional compilation directives to the header file created in Section 15.4 Learn by Doing Exercise.
15.6 Base Member Initialization
Constructors have a feature that is not only beneficial but required in certain circumstances. Base member initialization, sometimes called a colon init list, provides the only opportunity to initialize the data members of a class. Throughout this book we have stressed the importance of initialization over assignment; therefore, we strongly encourage the use of base member initialization. There are three situations in which base member initialization is required:
1. The class has a constant data member.
2. The class has a reference data member.
3. It is necessary to invoke a base class’ constructor other than the default constructor.
Although all three of these situations require other constructs that we are not yet ready to present, it is still important to use base member initialization whenever possible. Example 15.6.1 shows base member initialization used with the Engine class constructors.
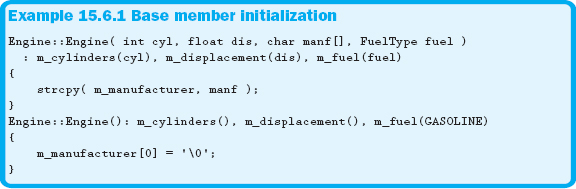
In Example 15.6.1, the first constructor initializes the data members to the parameters passed into the constructor. There is an obvious anomaly in the initialization process. Arrays cannot be initialized using base member initialization. The default constructor in Example 15.6.1 demonstrates that empty parentheses can be used to initialize the data members to the default value for that data type. This same technique was demonstrated in Chapter 12 to initialize dynamically allocated memory. The data members can be initialized to any value known at the time the constructor is invoked. This is demonstrated in the default constructor when the m_fuel data member is initialized to an enum identifier.
![]()
Remember: Base member initialization can only be used with constructors.
Section 15.6 Exercises
1. List the three instances when base member initialization is required.
2. True or false: You can use base member initialization with constructors, setters, and getters.
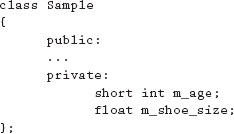
3. Using the following class, write the constructor to initialize m_age to 18 and m_shoe_size to 0.
15.7 Function Overloading
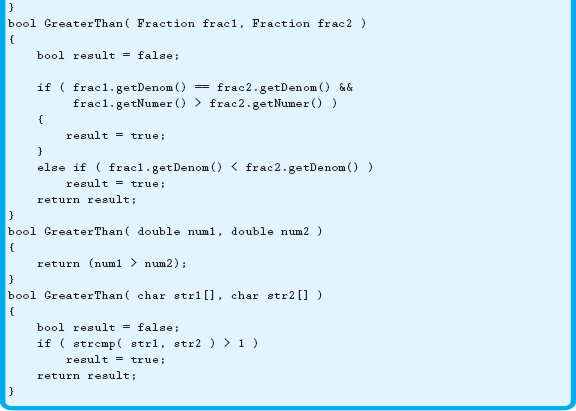
We have seen that a class can have multiple versions of a constructor. This process of overloading functions is in no way limited to classes in C++. Any function can be overloaded as long as the number or type of parameters is different. Function overloading is valuable in that it aids in the readability of your code. Example 15.7.1 shows overloaded functions and how they might be used.

The next section takes a look under the hood at how functions with the same name can refer to different definitions.
15.7.1 Name Mangling
Name mangling, or name decoration, is the process the compiler takes to ensure that each function has a unique name. When a C++ compiler translates a function into object code, the data type of each parameter is used in conjunction with the function name to create a unique identifier. Therefore, to the programmer, functions may have the same name, but under the hood they are quite unique. There isn't any standard specifying how a compiler should mangle names, so different compilers may produce different mangled names. Table 15.7.1 shows the mangled names produced by Microsoft Visual Studio for each of the overloaded functions in Example 15.7.1.
As you can see in Table 15.7.1, the return type does not participate in the name mangling, helping illustrate why functions cannot differ only by their return types.
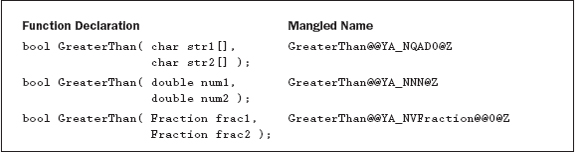
Table 15.7.1 Name mangling
15.8 Passing By Const-ref
Since objects may contain data members that need large amounts of memory, passing objects by value and therefore making a copy of the object can be prohibitive, both in the extra amount of memory and in the time it takes to make the copy. The alternatives of passing by reference or pointer are unsafe for those situations that require the object to maintain its original state.
To address these issues, programmers often pass objects in a way that doesn't require a copy to be made but still allows for the object to maintain its original state. This method of passing parameters is called passing by const-ref. Passing by const-ref allows a parameter to be passed by reference to avoid the performance cost of making a copy of the object, but still has the safety of passing by value because the object cannot be changed. This method is shown in Example 15.8.1.
15.8.1 Const Methods
To ensure that the object retains its original state, calls to methods that change the state of the object's data members are prohibited with constant objects. A new function signature is introduced that guarantees data members will not be changed. Methods that have this signature are often called const methods. An example of a const method is shown in Example 15.8.2.

If an attempt to call a non-const method from a const object is made, the compiler will issue a syntax error.
![]()
Remember: Const objects can only call const methods. Non-const objects can call both const methods as well as non-const methods.
Section 15.8 Exercises
1. Explain the value of passing parameters by const-ref.
2. What is the purpose of having const methods?
15.9 Problem Solving Applied
In the last chapter, we introduced the Unified Modeling Language, or UML. As we discussed, the goals of UML include providing some standards we can use to help design, create, and document our software. This section illustrates an example of how we might develop a UML class diagram to help describe one of the classes, Dog, in a hypothetical software system.
We begin our class diagram by simply creating a rectangular box composed of three different sections or components: name of the class, attributes associated with the class, and the operations or methods the class contains. Figure 15.9.1 illustrates the three sections usually contained within a class diagram.
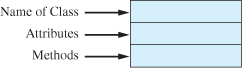
Figure 15.9.1 Components of a class diagram
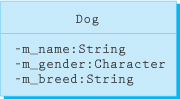
Figure 15.9.2 Components of the Dog class
The first section of the diagram is no doubt the easiest. The name of the class should be descriptive of the entity we are developing. In this example, the ideal name of the class would be Dog, and it is centered within the first section.
The second section contains the attributes, or data members, of the class. Each of these data members has its name, followed by a colon and the type of attribute it is. If the variables have public access, we place a plus symbol on the left side of the variable. If the variable allows only private access, we use the minus symbol.
To determine the attributes of the class, we need to consider the characteristics that describe the entity along with their associated data type. In the Dog class example, it would be useful to include the following data members and their corresponding types: name (string), gender (character), and breed (string). Figure 15.9.2 shows the updated diagram for the Dog class, including the related access specifiers.
The final section of the class diagram contains the various methods the class will need. Each of the methods is listed, followed by the return value. In addition, it is also common to show the data type of any arguments.
Determining the methods associated with the class includes assessing how the outside world will want to interact with objects derived from the class. In the case of our Dog class, we know that there will be a need to retrieve the name, gender, and breed for each respective instance of the class. It was also determined that a one-argument constructor is required to ensure that every instance of Dog has a gender. Consequently, we see the need to include not only a constructor that takes one argument but also two additional methods to set the name and the breed. Figure 15.9.3 shows an example of the updated diagram, which includes the methods just mentioned along with the corresponding access privileges.
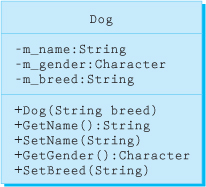
Figure 15.9.3 Completed class diagram
There are a number of other components associated with UML besides class diagrams. While we have only begun to scratch the surface with this brief introduction of class diagrams, hopefully you can see the value in using diagrams as another tool to help model the various pieces of a software system.
15.10 C—The Differences
Since classes are a C++ construct, some programmers may assume that you can't use the object-oriented paradigm with C; however, this just isn't true. For example, C allows structs to contain function pointers, which, when used correctly, can simulate a class. Although advanced features of OOP languages aren't available, such as inheritance, there isn't any reason why programmers can't create objects using structs.
15.11 SUMMARY
This chapter focused mainly on classes, one of the cornerstones of object-oriented programming. Syntactically, classes resemble structures, except that classes generally encapsulate both data members, or attributes, and the methods that manipulate the data.
To control the visibility of the attributes and methods, access specifiers are used. Access specifiers allow the developer of the class to determine what can be accessed by functions outside of the class. This ability to safeguard and control access to class members is an important characteristic of classes. To facilitate this safety mechanism, we examined two main specifiers: public and private. By defining variables within the public section of a class, the attributes and methods can be manipulated by any function. The private area of a class only allows functions that are members of the class to access anything defined in this section.
Within a class, there are several categories of methods. For example, a getter is a member function that returns the value of a specific data member. A setter is a method that is passed a value, which is then assigned to a specific data member. As discussed, there is also a broad group of methods called manager functions. Within this chapter we explored two of the four manager functions that are automatically provided for us: constructors and destructors. The constructor is a function that is automatically called anytime an object is created or instantiated. A destructor, on the other hand, is automatically called whenever an object goes out of scope or is destroyed.
After looking at some of the manager functions, we reviewed the concept of implementation hiding. As you recall, implementation hiding is the practice of supplying a class interface without exposing the details of how an individual member function is written. To actually apply this concept to our source code, we demonstrated how C++ achieves implementation hiding by placing the class definition in a header file and the associated function definitions in a separate .cpp file. To help facilitate this approach, we examined a modified version of the #include statement, noting how quotation marks are used around the .h filename to indicate where the compiler should physically look for the specified file. To further strengthen this process, the concept of conditional compilation was introduced, along with some additional preprocessor directives like #ifndef and #pragma.
Later in the chapter we revisited the concept of constructors and introduced base member initialization. We stressed how member initialization can only be used with constructors, and noted how it is the only option available for initializing data members.
Next we took a closer look at function overloading, noting how it becomes crucial when we are writing multiple constructors for a class. To help illustrate why a function with the same name must differ by the number or types of parameters, the concept of name mangling was presented.
The chapter concluded by presenting two different methods for passing objects in a way that help protect its data members. The first option centered on passing an object by constref, whereby a parameter is passed by reference but still has the safety of being passed by value because the object itself cannot be modified. The second alternative, called a const method, is used to guarantee that the calling object's data members will not be changed.
Obviously there is a lot of information related to object-oriented programming that we didn't present within this chapter. The previous chapter and this chapter were designed simply to introduce you to object-oriented programming and to show how it applies to C++. We chose to defer our discussion of object-oriented programming until these chapters since we felt the reader would now have the tools necessary to understand the building blocks of classes.
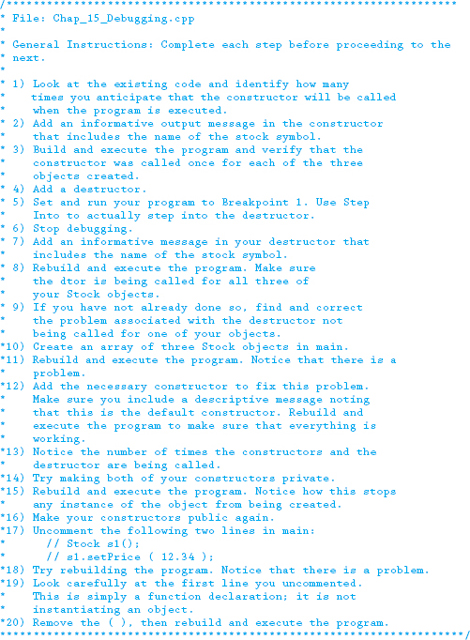
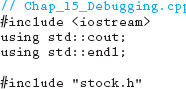
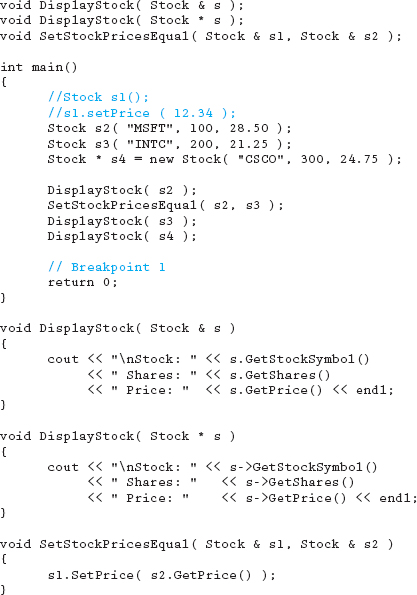
15.12 Debugging Exercise
Download the following file from this book's website and run the program following the instructions noted in the code
15.13 Programming Exercises
The following programming exercises are to be developed using all phases of the development method. Be sure to make use of good programming practices and style, such as constants, whitespace, indentation, naming conventions, and commenting. Make sure all input prompts are clear and descriptive and that your output is well formatted and looks professional.
1. Implement the class described by the following UML class diagram:
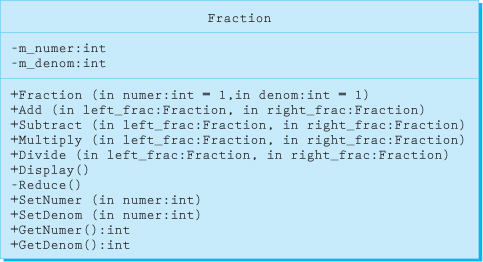
Figure 15.13.1 Fraction class diagram
Microsoft Visio, which was used to develop this diagram, shows how each parameter is to be passed to the method. Each parameter is prefaced with either “in”, “out”; or “in out”. If a parameter is to be passed by value, “in” is specified. If a parameter is to be passed by reference but the initial value is not used, “out” is specified. If a parameter is to be passed by reference and the initial value is used, “in out” is specified. Visio is a tool that can be used to develop a wide variety of diagrams, including UML.
Other supporting methods can be added to the class diagram as needed. What follows is a code fragment that demonstrates how the mathematical method calls should be performed.
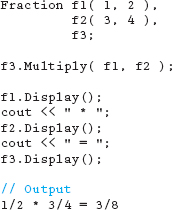
Notice that the results of the mathematical operation are stored in the object that is used to call the method. Implement this class and test the functionality appropriately using the code fragment as a guide.
2. Using the following class diagram, implement a deck of cards.
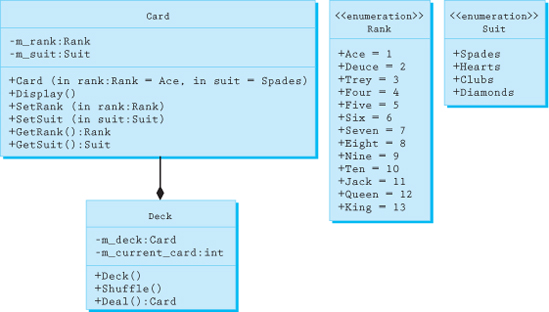
Figure 15.13.2 Deck class diagram
The blackened diamond is a UML convention to show that a class contains an object of a different class. In the diagram above, a Deck will contain 52 Cards.
3. Using a UML class diagram, design a program to store information about a course at your school. Your program should contain the following classes.
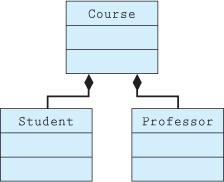
Figure 15.13.3 Class diagram
A course will have a maximum of 30 students and only one professor. Determine what other information and functionality each class should include. Once the class diagram has been completed, write the classes as well as the program that tests the functionality of the classes.
15.14 Team Programming Exercise
It seems our old friend Troy has once again been assigned to work on your team and has completed some of the preliminary design on a project for a system that will eventually be used to manage a movie database. The UML diagram for the Movie class follows. Notice that the diagram has been expanded and includes the initial values required for a couple of the data members, and that it also includes a three-argument constructor. To conform to UML standards, Troy has added the + symbol, to represent public access, and the – symbol, to represent private.
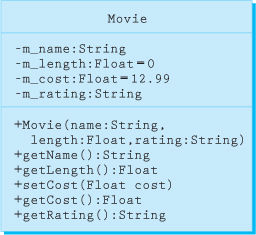
Figure 15.14.1 Movie class diagram
Your job is to write the necessary source code to create the Movie class. Make sure you include all of the attributes and methods listed within the class diagram. You must separate the interface file (.h) from the implementation file (.cpp). Include within your project a separate .cpp file that includes main and acts as a driver in which you actually instantiate and test your class. Make it a point to instantiate two different objects and exercise each of the class methods.
To further test the functionality of your class, create a nonmember function and pass an object by const-ref. Once again test all of the methods, this time from the const object. This will cause compiler errors using the current class diagram because there are no const methods. Update the class diagram and code to reflect that the getters need to be const methods.
15.15 Answers to Chapter Exercises
Section 15.1
1. a. True
b. False
c. True
d. False
e. False
2. a. float GetShoeSize();
b. void SetAge( short int age );

Section 15.2
Section 15.3
1. The four manager functions are: constructor, destructor, copy constructor, and the assignment operator.
2. Constructor, or ctor.
3. Default constructor; it is called without any parameters.
4. The purpose of a constructor is to provide initial values to data members and to allocate any needed resources for the class.
5. The destructor is automatically called when an object is destroyed.
Section 15.4

Section 15.5
Section 15.6
1. It is required that base member initialization be used when:
a. the class has a const data member;
b. the class has a reference data member;
c. it is necessary to invoke a base class constructor other than the default constructor.
2. False—base member initialization can only be used with constructors.
![]()
Section 15.8
1. Passing parameters by const_ref allows a parameter to be passed by reference but provides the safety of passing by value because the object cannot be changed.
2. Const objects can only call const methods.