
Queues are an essential part of algorithms that manage the allocation and scheduling of work, events, or messages to be processed. They are often used as a way of enabling different processes—either on the same or different machines—to communicate with one another.
In this chapter, you will learn the following:
How queues differ from lists
Characteristics and implementation of a first-in-first-out (FIFO) queue
How to create a thread-safe queue
How to create a bounded queue—one with a maximum size limit
How to combine all of these queue types to build a multi-threaded simulation of a call center to see just how queues can be put to use
Customers line up in a bank waiting to be served by a teller and in supermarkets waiting to check out. No doubt you've been stuck waiting in a line to speak to a customer service representative at a call center. In computing terms, however, a queue is a list of data items stored in such a way that they can be retrieved in a definable order. The main distinguishing feature between a queue and a list is that whereas all items in a list are accessible—by their position within the list—the only item you can ever retrieve from a queue is the one at the head. Which item is at the head depends on the specific queue implementation.
More often than not, the order of retrieval is indeed the same as the order of insertion (also known as first-in-first-out, or FIFO), but there are other possibilities as well. Some of the more common examples include a last-in-first-out queue (see Chapter 5) and a priority queue (see Chapter 8), whereby retrieval is based on the relative priority of each item. You can even create a random queue that effectively "shuffles" the contents.
In this book, whenever we use the term "queue," we are not necessarily referring to a FIFO queue.
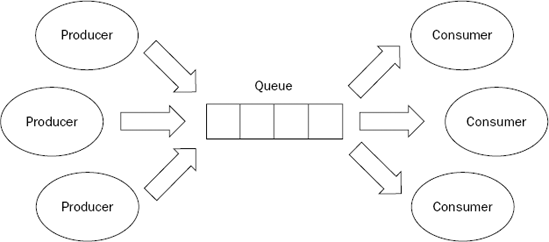
Queues are often described in terms of producers and consumers. A producer is anything that stores data in a queue, while a consumer is anything that retrieves data from a queue. Figure 4-1 shows the interactions between producers, consumers, and queues.
Queues can be ether bounded or unbounded. Bounded queues have limits placed on the number of items that can be held at any one time. These are especially useful when the amount of available memory is constrained—for example, in a device such as a router or even an in-memory message queue. Unbounded queues, conversely, are free to grow in size as the limits of the hardware allow.
This chapter describes several different queues used throughout the course of this book, all with slightly different retrieval order. Irrespective of their behavior, the various queues all share a common interface. Table 4-1 lists each of the queue operations along with a brief description.
Table 4.1. Queue Operations
Operation | Description |
|---|---|
| Stores a value in the queue. The size of the queue will increase by one. |
| Retrieves the value at the head of the queue. The size of the queue will decrease by one. Throws |
| Deletes all elements from the queue. The size of the queue will be reset to zero (0). |
| Obtains the number of elements in the queue. |
| Determines whether the queue is empty ( |
As you can see, the queue interface is much simpler than that of the list: enqueue() is responsible for storing values, dequeue() for retrieving them. The remaining methods have the same behavior as those with the same names defined for lists. Notice also that there is no means for accessing all of the data items in a queue at once using an iterator (see Chapter 2), further reinforcing the idea that the only thing you can do is obtain the item at the head.
Any operations you have defined can be translated directly into a Java interface so that you can easily create pluggable implementations:
package com.wrox.algorithms.queues;

public interface Queue {
    public void enqueue(Object value);
    public Object dequeue() throws EmptyQueueException;
    public void clear();
    public int size();
    public boolean isEmpty();
}
Each operation has been translated directly into a method on the interface. The only other thing you need to define is the EmptyQueueException thrown by dequeue():
package com.wrox.algorithms.queues;

public class EmptyQueueException extends RuntimeException {
}
We have chosen to make EmptyQueueException a runtime extension. This means you will not be forced to wrap try-catch blocks around calls to dequeue(). The primary reason for this is that we consider retrieval attempts from an empty queue to be a programming error; you can always call isEmpty() to check before calling dequeue().
This section describes the implementation of a first-in-first-out (FIFO) queue. You'll first learn about the characteristics of a FIFO queue. After that, you'll develop some tests and finally implement a very straightforward unbounded FIFO queue based on lists.
The name says it all really: The first value to go in is always the first value to come out. Calling dequeue() on a FIFO queue always returns the element that has been in the queue the longest.
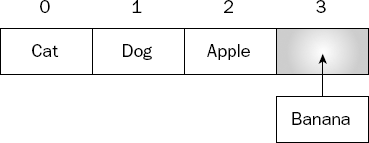
If you were to call enqueue() with the values Cat, Dog, Apple, and Banana, for example, calling dequeue() would return them in the following order: Cat, Dog, Apple, Banana.
Although there are many ways to implement a FIFO queue (and other types of queues, for that matter), one of the simplest solutions, and the one presented here, is to use a list as the underlying storage mechanism. In many ways, this is a very natural fit: A queue can be thought of as a simplified list that includes some constraints on adding and removing items.
When you enqueue a value, it is added to the end of the list, as shown in Figure 4-2.
Conversely, when you dequeue a value, it is removed from the beginning of the list, as shown in Figure 4-3.

Of course, you could just as easily have chosen to add to the start and remove from the end. Either way will work, but in this instance we have chosen to add to the end and remove from the start because this seems to better fit our mental model of a queue.
Having discussed the design, it's time to write some code. As usual, you'll write some tests first and then the actual queue implementation.
The first test is really a bit of bounds checking. You want to make sure that an empty list returns a size of zero, that isEmpty() returns true, and that attempting to dequeue something results in an EmptyQueueException:
public void testAccessAnEmptyQueue() {
        assertEquals(0, _queue.size());
        assertTrue(_queue.isEmpty());

        try {
            _queue.dequeue();
            fail();
        } catch (EmptyQueueException e) {

            // expected
        }
    }
The next test is a little longer but still pretty straightforward. It checks to make sure that you can successfully enqueue and dequeue values:
public void testEnqueueDequeue() {
        _queue.enqueue(VALUE_B);
        _queue.enqueue(VALUE_A);
        _queue.enqueue(VALUE_C);

        assertEquals(3, _queue.size());
        assertFalse(_queue.isEmpty());

        assertSame(VALUE_B, _queue.dequeue());
        assertEquals(2, _queue.size());
        assertFalse(_queue.isEmpty());

        assertSame(VALUE_A, _queue.dequeue());
        assertEquals(1, _queue.size());
        assertFalse(_queue.isEmpty());

        assertSame(VALUE_C, _queue.dequeue());
        assertEquals(0, _queue.size());
        assertTrue(_queue.isEmpty());

        try {
            _queue.dequeue();
            fail();
        } catch (EmptyQueueException e) {
// expected
}
}There is also one final test to ensure that when you call clear(), the queue is emptied as expected:
public void testClear() {
_queue.enqueue(VALUE_A);
_queue.enqueue(VALUE_B);
_queue.enqueue(VALUE_C);
assertFalse(_queue.isEmpty());
_queue.clear();
assertEquals(0, _queue.size());
assertTrue(_queue.isEmpty());
try {
_queue.dequeue();
fail();
} catch (EmptyQueueException e) {
// expected
        }
}Having developed the abstract test class, we can now create a concrete test class for the actual FIFO queue implementation. Of course, we haven't yet defined the implementation class, but that won't stop us from defining the test case:
package com.wrox.algorithms.queues;

public class ListFifoQueueTest extends AbstractFifoQueueTestCase {
    protected Queue createFifoQueue() {
        return new ListFifoQueue();
    }
}The new test class, AbstractFifoQueueTestCase, defines some constants that will be used later in the actual tests. It also defines a local variable, _queue, for holding an instance of a FIFO queue for running the tests against. The setUp() method—called prior to running each individual test—ensures that the local variable always has a value. It achieves this by calling createFifoQueue(), an abstract method you will implement to return an instance of the specific FIFO queue class under test.
In the second and third tests, we ensure that each time a value is enqueued and dequeued, our actions are reflected accurately in the size of the queue, and, importantly, that when we retrieve values, they are returned to us in exactly the same order as they were stored. That is, of course, the definition of a FIFO queue.
The final test simply stores a number of values to the queue, calls clear(), and ensures that the queue is actually empty.
In the creation of the concrete class, the queue class will be named ListFifoQueue, in line with the fact that it is a FIFO queue and uses a list to store the data. Notice how easy it is to extend AbstractFifoQueueTestCase and implement the createFifoQueue method to return an instance of our concrete queue class.
With the tests in place, you can safely start coding up your implementation class: ListFifoQueue:
package com.wrox.algorithms.queues;

import com.wrox.algorithms.lists.LinkedList;
import com.wrox.algorithms.lists.List;

public class ListFifoQueue implements Queue {
    private final List _list;

    public ListFifoQueue(List list) {
        assert list != null : "list can't be null";
        _list = list;
    }

    public ListFifoQueue() {
        this(new LinkedList());
    }


    ...
}
Besides implementing the Queue interface, this holds the underlying list and defines two constructors. The first constructor takes as its only argument a list to use for storing the data (naturally it is checked for null). The second—a default constructor—calls the first, passing in an instance of a linked list.
A linked list is perfectly suited for use with a queue, as it is capable of efficiently adding and removing elements from either end. Compare this to an array list, which you may recall incurs the overhead of continually moving elements as they are removed.
Now that you can construct a list-based FIFO queue, you need to be able to add things to the queue. For this there is enqueue():
public void enqueue(Object value) {
        _list.add(value);
    }
Pretty simple. As discussed earlier, all enqueue() does is add the value to the end of the underlying list.
Next you implement dequeue(), which enables you to retrieve items from the queue:
public Object dequeue() throws EmptyQueueException {
        if (isEmpty()) {
            throw new EmptyQueueException();
}
return _list.delete(0);
}That wasn't much more complicated. Remember that dequeue() simply removes and returns the last element in the underlying list. The only extra action to do is a quick check to ensure that there is an element to remove. If there isn't (because the list is empty), you need to throw an EmptyQueueException as defined in the Queue interface.
You could argue here that because the
Listinterface throws anIndexOutOfBoundsException, you might simply catch the exception and throw anEmptyQueueExceptioninstead of checking for an empty list. However, as mentioned previously, if anIndexOutOfBoundsExceptionwas ever to be thrown, we would like it to propagate out as an indication of a programming error, and not something the caller has done wrong.
The last few methods on the Queue interface are even easier to implement, as all of them (not coincidentally) have a corresponding method of the same name on the List interface:
public void clear() {
        _list.clear();
    }

    public int size() {
        return _list.size();
    }

    public boolean isEmpty() {
        return _list.isEmpty();
    }
In all three cases, you need do nothing more than delegate the call to the underlying list.
Queues are often used in multi-threaded environments as a form of interprocess communication. Unfortunately, your ListFifoQueue is totally unsafe for use in situations where multiple consumers would be accessing it concurrently. Instead, a blocking queue is one way to provide a thread-safe implementation, ensuring that all access to the data is correctly synchronized.
The first main enhancement that a blocking queue offers over a regular queue is that it can be bounded. So far, this chapter has only dealt with unbounded queues—those that continue to grow without limit. The blocking queue enables you to set an upper limit on the size of the queue. Moreover, when an attempt is made to store an item in a queue that has reached its limit, the queue will, you guessed it, block the thread until space becomes available—either by removing an item or by calling clear(). In this way, you guarantee that the queue will never exceed its predefined bounds.
The second major feature affects the behavior of dequeue(). Recall from the implementation of ListFifoQueue presented earlier that an EmptyQueueException is thrown when an attempt is made to retrieve an item from an empty queue. A blocking queue, however, will instead block the current thread until an item is enqueued—perfect for implementing work queues where multiple, concurrent consumers need to wait until there are more tasks to perform.
By encapsulating all this behind the Queue interface, you free the consumers of the queue from the intricacies and subtleties of thread synchronization. There are two options for creating the blocking queue: extend an existing queue implementation (so far only ListFifoQueue), or try to wrap the behavior around another queue. The first option would lock you into one specific queue implementation, so instead you should use the second option—wrap another queue—as it gives you the flexibility to easily turn any queue implementation (such as the priority queues presented in Chapter 8) into a blocking queue.
Insofar as synchronization is concerned, we use a very common technique for ensuring that the code plays nicely in a multi-threaded environment: A lock object or, in more technical terms, a mutual exclusion semaphore (mutex), will be used as the synchronization point for all the methods in the class. A mutex is one of the least error prone ways of ensuring that only one thread has access to the underlying queue at any given time.
What!? No tests?
Actually, we did indeed write tests, but an explanation of testing multi-threaded applications is entirely beyond the scope of this book, so we chose to omit them from the text. Therefore, you're just going to have to trust us on this one. You can, of course, still run the tests by downloading the entire source code for the book.
If you would like to learn more about writing multi-threaded code, try starting with Doug Lea's Concurrent Programming in Java: Design Principles and Patterns (1999).
The discussion of BlockingQueue code starts with the class declaration:
package com.wrox.algorithms.queues;

public class BlockingQueue implements Queue {
    private final Object _mutex = new Object();
    private final Queue _queue;
    private final int _maxSize;

    public BlockingQueue(Queue queue, int maxSize) {
        assert queue != null : "queue can't be null";
        assert maxSize > 0 : "size can't be < 1";

        _queue = queue;
        _maxSize = maxSize;
    }

    public BlockingQueue(Queue queue) {
this(queue, Integer.MAX_VALUE);
}
...
}The BlockingQueue implements the Queue interface and holds a few instance variables. Two of the variables are pretty straightforward: the first, queue, holds a reference to the underlying queue in which the data will actually be stored; the second, _maxSize, holds the maximum allowable size of the queue. The third variable, _mutex, is the lock object described earlier.
There are also two constructors. The first takes a queue to be used for data storage and a maximum allowable size. This is the constructor that enables us to create a bounded queue. The second constructor only accepts a queue. It then calls the first constructor, passing in the largest possible integer value for the maximum queue size. Although there is still a limit, it is so large that you have effectively created an unbounded queue.
Now it's time to look at how to go about implementing the desired behavior, starting with enqueue(). It may look a little spooky at first, but it's really not that complicated:
public void enqueue(Object value) {
        synchronized (_mutex) {
            while (size() == _maxSize) {
                waitForNotification();
            }
            _queue.enqueue(value);
            _mutex.notifyAll();
        }
    }

    private void waitForNotification() {
        try {
            _mutex.wait();
        } catch (InterruptedException e) {
            // Ignore
        }
}The first thing that enqueue does (and all other methods, for that matter) is ensure that no other threads can access the queue at the same time. In Java, this is achieved by using synchronized to obtain a lock on an object—in this case, our mutex. If another thread already has a lock, the current thread will be blocked until that thread releases its lock. Once obtained, no other threads will be able to access the queue until the current thread falls out of the synchronized block. This enables you to manipulate the underlying queue without worrying about stepping on the actions of another thread, or another thread unexpectedly manipulating the underlying queue.
Having obtained sole access to the queue, the next thing to do is ensure that the bounds are respected. If the queue is already at the maximum allowable size, you need to allow another thread the opportunity to free up some space. This is achieved in our call to the waitForNotification() method. This method calls the mutex's wait() method, effectively putting the thread to sleep. In putting the thread to sleep, you temporarily give up the lock on the queue. The only way this thread can be woken from this sleep is for another thread to call the notifyAll() method on the mutex, at which time enqueue() will regain control and try again.
Eventually, enough space becomes available and the new value is stored in the underlying queue. You then call notifyAll() on the mutex so that any other threads that might have been asleep are woken.
Just as was done for enqueue(), dequeue() obtains an exclusive lock to ensure that it is the only thread accessing the queue. It then waits until at least one item is available before calling dequeue() on the underlying queue.
Again, as you did for enqueue(), once you're done, you call notifyAll(). Because dequeue() retrieves items, you need to notify any threads that may have been blocked while calling enqueue() (such as when the queue reaches its maximum allowable size).
After first obtaining a lock in the usual manner, the underlying queue is cleared and, just as you did for dequeue(), all threads are notified in case some were blocked waiting to store items in a queue that had reached its size limit.
Now it's time to put our queues to use. This is where you get to take what you've learned so far and use it in a practical—if somewhat simplistic—context. You've already learned how queues can be used in allocating and prioritizing work, so in this section you're going to take one of the example scenarios, a call center, and build a simulator that uses a blocking queue.
The main idea is pretty simple: Develop a system whereby calls are randomly made to a call center and thereby queued, ready to be answered by the next available customer service agent. Figure 4-4 gives you an idea of the main concepts involved.
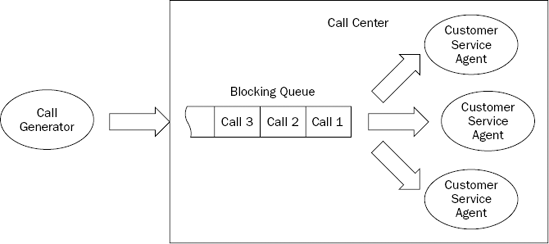
A call generator creates calls that are sent to a call center. The call center then stores them in a blocking queue where they wait to be answered by the next available customer service agent. As each agent completes a call, it returns to the queue and attempts to retrieve another. If there are more calls to be processed, the queue returns immediately with the next one. If, however, the queue is empty, it will block until a new call appears. In this way, a customer service agent need never worry whether there are more calls to be answered; all that logic is handled by the blocking queue.
Notice that the queue, along with the customer service agents, live within the call center. Also notice that there are multiple customer service agents, all working at the same time—just like in the real world. Because of this concurrent execution, each customer service agent needs to run in its own thread. Thankfully, our blocking queue implementation was designed specifically with multi-threading in mind; and because the queue will be the only point of thread contention, in the context of this example, there's no need to worry about synchronizing any other parts of the application.
The simulator will be developed as a stand-alone application that will print log messages to the console as it runs so that you can see what is happening. The program enables you to run simulations under different scenarios based on the values of certain variables. These variables will be specified on the command line as follows:
Number of customer service agents
Number of calls
Maximum call duration
Maximum call interval
The number of customer service agents enables you to specify the number of threads consuming calls on the queue. The more agents (threads) you have, the faster the calls will be processed. The flip side to this is that depending on the rate of generated calls, the more threads you have, the more agents will be waiting for new calls to arrive if the queue is empty.
The number of calls determines how many calls in total to generate. This is purely a safety precaution to prevent the application from running forever. If you prefer, you can still set it to a very large number and see what happens.
The maximum call duration defines an upper limit on how long each call will take once answered. This enables you to simulate what happens when calls take longer or shorter amounts of time.
The maximum call interval defines an upper limit on how long to wait between generating each call.
The design itself is relatively straightforward—we've tried to keep it as simple as possible—and involves several classes in addition to using the BlockingQueue developed earlier. Each class is described fully in the next section.
Now that you have an idea of what we're trying to achieve, it's time to develop the application. Again, for reasons previously explained, we will forgo the usual tests and jump straight into the code. (Remember that tests are available with the downloadable source code, although we felt that an explanation within the text would confuse the issue.)
You'll start by creating a class for each of the concepts depicted in Figure 4-4 and finish with a simple simulator application that can be run from the command line.
So that you can monitor the behavior of a simulation as it runs, each class prints information to the console. When you run the application, you'll see a flood of messages showing you just what is happening inside the simulator. At the end of the section, we've included some example output to give you an idea of what this diagnostic information looks like.
Each call is assigned a unique id and a call duration. The id enables you to track the progress of a call through the system. The call duration determines how much time will be spent "answering" a call. Lastly, you record the time at which the call started. This will be used to determine how long each call has been waiting in the queue.
The only method in the call class is answer(). This method is used by a customer service agent to, you guessed it, answer the call:
public void answer() {
        System.out.println(this + " answered; waited "
                    + (System.currentTimeMillis() - _startTime)
                    + " milliseconds");

        try {
            Thread.sleep(_duration);
        } catch (InterruptedException e) {
            // Ignore
        }
    }
Start by printing out the fact that the call was answered, along with the total time spent waiting in the queue. The method then goes to sleep for the duration specified when the call was constructed. In this way, the call is responsible for simulating the time taken to complete a call. Think of this as being like a customer who won't hang up until they're ready to do so.
Just like a call, an agent is also assigned a unique id. Again, this helps you identify which agent is doing what. Each agent also holds a reference to the queue from which to retrieve calls.
Notice that CustomerServiceAgent implements the Runnable interface. This enables each instance to be run in a separate thread, thereby enabling multiple agents to be run concurrently. Runnable specifies one method, run, that must be implemented; and this is where you'll put the code that pulls calls from the queue and answers them:
public void run() {
        System.out.println(this + " clocked on");

        while (true) {
            System.out.println(this + " waiting");

            Call call = (Call) _calls.dequeue();
            System.out.println(this + " answering " + call);

            if (call == GO_HOME) {
                break;
            }

            call.answer();
}
System.out.println(this + " going home");
}Each time a customer service agent is run, it prints a little message to say that it has started working. It then sits in a loop pulling calls from the queue and answering them. Each time a call is retrieved, a message is printed and the call is answered. Once the call has completed, the agent goes back to the queue for another.
You may have noticed there is no check to determine whether anything actually exists before calling dequeue(). You would be forgiven for thinking that because of this, it won't be long before you encounter an EmptyQueueException; this is where the blocking queue comes in. Recall that a blocking queue, besides being thread-safe, waits—as opposed to throwing an exception—when the queue is empty.
The other odd thing about this method is the following piece of code:
if (call == GO_HOME) {
                break;
            }
Without this check, an agent would continue looping forever, waiting for more calls to arrive. Imagine what would happen when the call center closes for the day and stops accepting calls. As just discussed, the blocking queue will wait, leaving our poor customer service agent sitting there all night with nothing to do!
This is actually a fairly common problem when dealing with work queues. Fortunately, there is a very common solution as well. The idea is to create a special value that is understood to mean "stop processing." This example defined a constant, GO_HOME, right at the start of the class definition. Anytime this call appears on the queue, the customer service agent knows it's time to finish for the day.
Before you can process calls, you must open the call center—just like in the real world. For this, you have the aptly named method open():
public void open() {
        assert _threads.isEmpty() : "Already open";

        System.out.println("Call center opening");

        for (int i = 0; i < _numberOfAgents; ++i) {
            Thread thread =
                           new Thread(new CustomerServiceAgent(i, _calls));

            thread.start();
            _threads.add(thread);
        }

        System.out.println("Call center open");
    }
Once a call center is open, it can begin accepting calls:
public void accept(Call call) {
        assert !_threads.isEmpty() : "Not open";

        _calls.enqueue(call);

        System.out.println(call + " queued");
    }
Eventually, you need to close the call center and send all the customer service agents home:
public void close() {
        assert !_threads.isEmpty() : "Already closed";

        System.out.println("Call center closing");

        for (int i = 0; i < _numberOfAgents; ++i) {
            accept(CustomerServiceAgent.GO_HOME);
        }


        Iterator i = _threads.iterator();
        for (i.first(); !i.isDone(); i.next()) {
            waitForTermination((Thread) i.current());
}
_threads.clear();
System.out.println("Call center closed");
}
private void waitForTermination(Thread thread) {
try {
thread.join();
} catch (InterruptedException e) {
// Ignore
}
}The first thing CallCenter does is create a queue—more specifically, an instance of a BlockingQueue. This enables us to happily run multiple customer service agents, each in its own thread, all accessing the same queue. Note that because you are starting multiple threads, it must also stop them all as well. For this reason, you maintain a list of currently running threads. Lastly, you store the number of agents you will be starting.
The open() method is responsible for starting as many agents as were specified at construction. Each CustomerServiceAgent is constructed with an id—here you've just used the value of the iteration variable—and the call queue. Once created, it is started in its own thread and added to the list.
Each call, when you get around to placing it on the queue, waits to be answered by the "next available operator," which is not to say that your call isn't important to us, just that you won't be able to answer all the calls straightaway.
To send the agents home, the first thing you do is place a special call on the queue—one to tell all the customer service agents to finish for the day. For each agent you have running, place the special GO_HOME call onto the queue. Simply telling the agents to go home is not enough, however, as there may still be other calls waiting in the queue; you're a friendly sort of call center and you don't just hang up on your customers. After placing the GO_HOME call, you still need to wait for them to finish before turning off the lights and locking the doors.
The method waitForTermination() uses Thread.join() to effectively sleep until the thread finishes execution.
You're almost done now. Only two classes to go.
Besides the constructor, there is only one other public method, which, as you might imagine, actually performs the call generation:
public void generateCalls() {
        for (int i = 0; i < _numberOfCalls; ++i) {
            sleep();
            _callCenter.accept(
                    new Call(i, (int) (Math.random() * _maxCallDuration)));
        }
    }

    private void sleep() {
        try {
            Thread.sleep((int) (Math.random() * _maxCallInterval));
        } catch (InterruptedException e) {
            // Ignore
        }
}The method generateCalls() sits in a loop and generates as many calls as configured. Each call is generated with a random duration before being sent to the call center for processing. The method then waits for a random interval between calls—again, all specified at construction time.
The main() method is the entry point to the application and will be called by the Java interpreter, passing in an array of command-line arguments. These are then checked to ensure that all the required parameters have been provided:
The number of agents to use
The number of calls to generate
The maximum call duration
The maximum time to wait between generated calls
If parameters are missing, the application prints a message to this effect and terminates immediately. If all of the necessary parameters are there, the application constructs a call center and call generator. The call center is then opened, calls are generated, and finally the call center is closed to ensure that customer service agents are stopped correctly.
Before compiling and running the simulator, let's summarize the application you've just created: A CallGenerator creates Calls with a random duration. These calls are accepted by a CallCenter that places them onto a BlockingQueue. One or more CustomerServiceAgents then answer the calls until they are told to GO_HOME. All these are then tied together by a command-line application, CallCenterSimulator.
You ran the call center simulator with three customer service agents answering 200 calls. The maximum call duration was set at 1 second (1,000 milliseconds) and the maximum time to wait between generating calls was 100 milliseconds. Here is the output (with a large chunk removed for the sake of space):
Call center opening
Agent 0 clocked on
Agent 0 waiting
Agent 1 clocked on
Agent 1 waiting
Agent 2 clocked on
Agent 2 waiting
Call center open
Agent 0 answering Call 0
Call 0 answered; waited 1 milliseconds
Call 0 queued
Agent 1 answering Call 1
Call 1 answered; waited 1 milliseconds
Call 1 queued
Agent 2 answering Call 2
Call 2 answered; waited 1 milliseconds
Call 2 queued
Call 3 queued
Call 4 queued
Call 5 queued
Call 6 queued
Call 7 queued
Agent 2 waiting
Agent 2 answering Call 3
Call 3 answered; waited 203 milliseconds
Call 8 queued
Call 9 queued
Call 10 queued
Call 11 queued
Agent 1 waiting
Agent 1 answering Call 4
Call 4 answered; waited 388 milliseconds
...
Call 195 answered; waited 22320 milliseconds
Agent 1 waiting
Agent 1 answering Call 196
Call 196 answered; waited 22561 milliseconds
Agent 0 waiting
Agent 0 answering Call 197
Call 197 answered; waited 22510 milliseconds
Agent 0 waiting
Agent 0 answering Call 198
Call 198 answered; waited 22634 milliseconds
Agent 1 waiting
Agent 1 answering Call 199
Call 199 answered; waited 22685 milliseconds
Agent 2 waiting
Agent 2 answering Call −1
Agent 2 going home
Agent 0 waiting
Agent 0 answering Call −1
Agent 0 going home
Agent 1 waiting
Agent 1 answering Call −1
Agent 1 going home
Call center closed
This only shows the first and last five calls being answered, but you can still see the program in action. You can observe the call center opening, the three agents signing on, and then the calls being generated and waiting in the queue before being answered by the next available agent. Notice how the wait time starts at much less than a second, but by the time the last call is answered it's up to around 20 seconds (20,000 milliseconds)! Try playing with the input variables such as number of agents, time between calls, and so on, to see how that affects the results.
Although we have tried to keep the code relatively simple, it is hoped that you have an idea of how you might go about using queues. You might like to try gathering more statistics, such as average wait time for a call or for an agent, or perhaps even extending the code to allow different types of call generators to run against the same call center. In this way, you could simulate different types of calls, peak load times, and so on.
In this chapter, you learned the following key points about queues and their operation:
Queues are similar to lists with a simpler interface and a defined order of retrieval.
Queues can be optionally bounded such that limits are placed on the number of items in a queue at any one time.
A linked list is an ideal data structure upon which to build a FIFO queue.
You can implement a thread-safe wrapper that works with any queue implementation.
You can implement a bounded queue—one with a maximum size limit.
Implement a thread-safe queue that performs no waiting. Sometimes all you need is a queue that will work in a multi-threaded environment without the blocking.
Implement a queue that retrieves values in random order. This could be used for dealing cards from a deck or any other random selection process.