
What You’ll Learn in This Hour:
Sources for data binding
Sorting, filtering, and converting values
Using data templates, and how they differ from styles
Understanding collection views
We began our discussion of data binding in Hour 6, “Introducing Data Binding,” and even then we saw a lot of what data binding is capable of. In this hour, we further explore this star feature of WPF and see how we can apply it to our Contact Manager application.
You can do a lot with the techniques for data binding that we discussed in Hour 6. However, you will find that you frequently need to format, or convert, the data that you are binding. For example, if you are binding a DateTime value to a TextBlock, you’ll want to control how the date is rendered. Should it render as 5/22/1998 or as May 22nd, 1998?
The situation is even more complicated when you are binding to collections. Suppose that you want to filter a collection that you have bound to a ListBox. You don’t want to filter the actual underlying collection, just what is rendering in the control. A problem also occurs when you add or remove items from a collection. Most enumerables don’t provide any notification to the data bindings when items are added or removed.
Let’s extend our Contact Manager to demonstrate how we can handle these problems. We’re going to add another view to the application that will present all the contacts in a more traditional grid view. We’ll include columns for names, telephone numbers, and email addresses. More important, we’re going to format the telephone numbers that are rendered in this view. We’ll also examine the code we introduced in Hour 13, “Presenters and Views,” for binding the text on tab headers.
Open the Contact Manager project in Visual Studio.
Right-click the
Viewsfolder and select Add, User Control.Name this new view
ContactListView.xaml.Now we can create the associated presenter for this view. Right-click the Presenters folder and select Add, Class.
Name the presenter
ContactListPresenter.cs.We’ll begin with a basic implementation of the presenter that will support opening and closing the view, but not much else. Modify
ContactListPresenter.csso that it matches the following:public class ContactListPresenter : PresenterBase<ContactListView> { private readonly ApplicationPresenter _applicationPresenter; public ContactListPresenter( ApplicationPresenter applicationPresenter, ContactListView view) : base(view, "TabHeader") { _applicationPresenter = applicationPresenter; } public string TabHeader { get { return "All Contacts"; } } public void Close() { _applicationPresenter.CloseTab(this); } public override bool Equals(object obj) { return obj != null && GetType() == obj.GetType(); } }
All the code we just added is either to satisfy the requirements of the base class or to support the tabbed interface that will host the associated view. Remember that the
ApplicationPresenteris the coordinator for the entire application, and we use an instance of it to handle closing the tab. The view will need a button to callClose()on the presenter. We’ll also make the layout of this view similar toEditContactView.xamlby docking the Close button at the bottom. Replace theGridelement inContactListView.xamlwith the following markup:<DockPanel Margin="5"> <StackPanel DockPanel.Dock="Bottom" Style="{StaticResource buttonPanel}"> <Button Content="Close" Click="Close_Click" /> </StackPanel> </DockPanel>
We also want to remove the
HeightandWidthattributes from the UserControl so that it will stretch to fill the entire tab.Now add the following handler to the code-behind:
public ContactListPresenter Presenter
{
    get { return DataContext as ContactListPresenter; }
}

private void Close_Click(object sender, RoutedEventArgs e)
{
    Presenter.Close();
}
You’ll also need to add the following using statement at the top of the file:
using ContactManager.Presenters;Finally, we need a way to access this new view. Open
ApplicationPresenter.csand locate theDisplayAllContactsmethod we added in Hour 13, “Presenters and Views.” Replace the method with the following code:public void DisplayAllContacts() { View.AddTab( new ContactListPresenter( this, new ContactListView() ) ); }
Run the application and you’ll see that clicking the View All button in the sidebar opens a new view, albeit useless at the moment, and the Close button on the view closes the tab.
In Hour 13, we wrote the following method on the code-behind for Shell.xaml that was responsible for adding tabs to the interface.
public void AddTab<T>(PresenterBase<T> presenter)
{
    TabItem newTab = null;

    for (int i = 0; i < tabs.Items.Count; i++)
    {
        TabItem existingTab = (TabItem)tabs.Items[i];

        if (existingTab.DataContext.Equals(presenter))
        {
            tabs.Items.Remove(existingTab);
            newTab = existingTab;
            break;
        }
    }

    if (newTab == null)
    {
        newTab = new TabItem();

        Binding headerBinding = new Binding(presenter.TabHeaderPath);
        BindingOperations.SetBinding(
            newTab,
            TabItem.HeaderProperty,
            headerBinding
            );

        newTab.DataContext = presenter;
        newTab.Content = presenter.View;
    }

    tabs.Items.Insert(0, newTab);
    newTab.Focus();
}
This method programmatically binds some data to the header on the tab. Let’s outline the logic inside this method.
We loop through all the currently open tabs.
If we discover that the presenter we are trying to add is already open, we remove the tab. We store a reference to it, and we reinsert it again at the end of the method.
If we didn’t find an existing tab for the presenter (
newTab == null), we create a new tab for the presenter.When creating a new tab, we create a binder for the header, we set the data context of the tab to the presenter, and then we inject the presenter’s view into the tab.
We insert the tab at the head of the collection and give it the focus.
The code for binding the tab header is a bit tricky, so let’s dig into it further. The Binding class is analogous to the Binding markup extension. It’s an entity in and of itself that represents the relationship between the source and the target of the data binding. The constructor for Binding accepts a path to the target. The path tells the binding how to get the target data, starting from the data context of the source. In this code, the path is provided from the presenter.
If we examine the constructor of ContactListPresenter, we’ll see that we set the value of TabHeaderPath to TabHeader. In this context, the code
Binding headerBinding = new Binding(presenter.TabHeaderPath);
is equivalent to the markup extension {Binding Path=TabHeader}. All the parameters you find on the markup extension are properties on the Binding class.
Keep in mind that we are setting the data context of newTab to the presenter. This means that it will look on the instance of ContactListPresenter for a property named TabHeader. We wrote this property to return the string All Contacts.
BindingOperations is a utility class used for manipulating bindings. We use the SetBinding method to establish the relationship between the tab and the presenter. SetBinding takes three parameters. The first is the target of the data binding. The second is the dependency property on the target that we are binding to. (Recall that dependency properties are available as static members on their parent class.) The third parameter is the binding we just created.
In summary, there are three steps to create a functioning data binding:
Create an instance of
Binding.Establish the relationship between the target and the binding with
BindingOperations.SetBinding().Set the data context on the target to the source of the data.
Before we move on, let’s consider how the tab binding works with EditContactPresenter. When we examine its constructor we see that it is setting TabHeaderPath to Contact.LookupName. Because EditContactPresenter has a property Contact of type Contact, this binds the tab’s header to the LookupName property on the presenter’s Contact property. Furthermore, Contact implements INotifyPropertyChanged. This means that any updates to the Contact.LookupName are immediately reflected in the tab header.
In practice, you rarely need to manipulate bindings programmatically. However, from time to time you will encounter situations such as this that do require it.
As we mentioned in Hour 6, for data binding to work, the source of the data must communicate any changes to the binding. The three methods of communication we discussed in Hour 6 are shown in Table 15.1.
Table 15.1. Communicating Change with Data Bindings
Name | Description |
|---|---|
Dependency properties | WPF controls all make use of the dependency property system. You can use dependency properties in your own classes, but often it will be overkill to do so. |
| Classes that implement this interface raise an event when one of their properties changes. This is fairly lightweight compared to implementing dependency properties. It is also the notification mechanism we are using for the model classes with the Contact Manager. |
Event naming convention | If neither of the preceding methods are used, WPF automatically looks for events that follow a naming convention. The convention is the name of the property with the suffix |
These three approaches are primarily concerned with properties changing on single instances of an object. How do we handle the situation when we are adding or removing items from a collection?
In general we are talking about classes that implement IList or IList<T>. These classes have Add and Remove methods for changing the contents of the collection. The classes that ship with .NET that implement these interfaces don’t include a mechanism for change notification. On the whole that’s what we want, because change notification is expensive.
WPF includes the INotifyCollectionChanged interface to help us solve the problem. It is the sibling of INotifyPropertyChanged. Even better, WPF includes a default implementation of this interface, a generic class, ObservableCollection<T>.
You probably will never use INotifyCollectionChanged. With the advent of generics, it’s pretty rare that we ever need to implement our own collections. ObservableCollection<T> provides all the functionality that you’ll generally need.
In Hour 13, we added a field to ApplicationPresenter:
private ObservableCollection<Contact> _currentContacts;
Then in the constructor, we initialized _currentContacts, like this:
_currentContacts = new ObservableCollection<Contact>(
    _contactRepository.FindAll()
    );
You can pass in an instance of List<T> into the constructor of ObservableCollection<T>. This is very handy because most of the time we care to use only an ObservableCollection<T> in the presentation layer.
Let’s get back to the Contact Manager now. First, we’ll expose our set of contacts in the ContactListPresenter, and then we’ll demonstrate how changes to the collection are reflected in the UI.
Open
ContactListPresenter.cs.Add the following using statements to the top of the file:
using System.Collections.ObjectModel;
using ContactManager.Model;
Now add the following property:
public ObservableCollection<Contact> AllContacts
{
    get { return _applicationPresenter.CurrentContacts; }
}
All we are doing with this property is exposing the collection so that it is accessible in the view.
Open
ContactListView.xaml. We’re going to display the number of contacts at the top of the view. Add the following markup as the first element inside theDockPanel.<Border DockPanel.Dock="Top" Style="{StaticResource header}"> <StackPanel Orientation="Horizontal"> <TextBlock Text="All Contacts (" /> <TextBlock Text="{Binding AllContacts.Count}" /> <TextBlock Text=")" /> </StackPanel> </Border>
Notice how we are reusing the style
headerthat we defined in Hour 14.Run the application and click the View All button. Our new view will be displayed. Notice the current count, but don’t close the tab. Now add and save a new contact. When you switch back to the All Contact tab, you will find that the count has been updated.
Now that we have an observable collection of contacts on our presenter, let’s modify the view to display them in grid form. We’re going to use the ListView control to display them. The ListView is derived from ListBox, but it allows you to provide a “view” for rendering the items. WPF ships with only one view, the GridView. It allows us to display our collection items in a tabular format. We’ll discuss ListView further in the next hour.
Open
ContactListView.xaml.After the
StackPanel, add the following markup. It will be the last element in theDockPanel.<ListView Margin="5" ItemsSource="{Binding AllContacts}"> <ListView.View> <GridView> <GridViewColumn Header="Last Name" DisplayMemberBinding="{Binding LastName}" /> <GridViewColumn Header="First Name" DisplayMemberBinding="{Binding FirstName}" /> <GridViewColumn Header="Work Phone" DisplayMemberBinding="{Binding OfficePhone}" /> <GridViewColumn Header="Cell Phone" DisplayMemberBinding="{Binding CellPhone}" /> <GridViewColumn Header="Email Address" DisplayMemberBinding="{Binding PrimaryEmail}" /> </GridView> </ListView.View> </ListView>
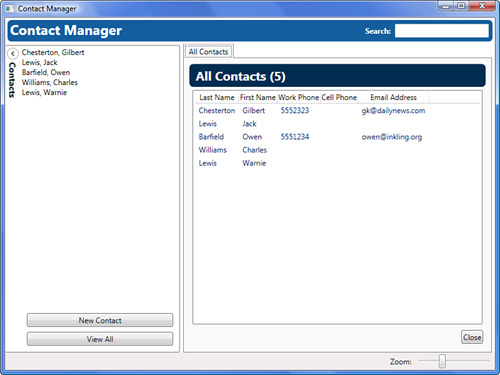
Run the application. Make sure you have some contacts, and click the View All button. The application should resemble Figure 15.1.
Data templates are one of the two types of templates used in WPF. They provide a way to describe how data should be visualized in terms of UI elements. This is different from deciding how to render a DateTime value, or formatting a telephone number. We’ll cover that scenario later this hour.
Data templates are a composition of UI elements. Many controls have properties of type DataTemplate. For example, ItemsControl.ItemTemplate and GridView.CellTemplate.
Data templates are best explained with an example. In our new list view, we would like to include a button on each row for displaying an individual contact.
Open
ContactListView.xamlagain, and locate theGridViewelement nested inside theListView.We’re going to add a new column to the
GridView. Add the following as the first element in theGridView:<GridViewColumn> <GridViewColumn.CellTemplate> <DataTemplate> <Button Style="{StaticResource openButton}" /> </DataTemplate> </GridViewColumn.CellTemplate> </GridViewColumn>
The new column contains a button, and we are applying a style we defined in Hour 14.
If you run the application, you’ll see that the first column has a button on each row. However, we haven’t wired the buttons to do anything yet. We need to go back to the presenter and implement the behavior we want.
Open
ContactListPresenter.csand add the following method:public void OpenContact(Contact contact) { _applicationPresenter.OpenContact(contact); }
Again, we are just passing through to the method on the
ApplicationPresenter.Now we can return to
ContactListView.xaml. On theListView, add the following attribute:Button.Click="OpenContact_Click"
In the code-behind, implement the handler with:
private void OpenContact_Click(object sender, RoutedEventArgs e)
{
    Button button = e.OriginalSource as Button;

    if(button != null)
        Presenter.OpenContact(button.DataContext as Contact);
}
You’ll also need to add a using statement at the top of the file:
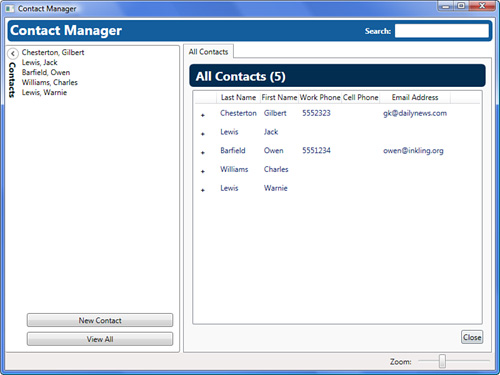
using ContactManager.Model;You can now run the application and open contacts from the list view. It should resemble Figure 15.2.
Notice in step 5 that we cast the DataContext of the button to a Contact before we pass it to the presenter. The data context for the data template is set for each contact in the collection.
Also, notice how we used the attached property Button.Click to wire the handler for all the buttons in the ListView. We first discussed this technique in Hour 9, “Getting a Handle on Events.”
In the next hour, we’ll show you how data templates can be used with much more impressive results.
By the Way
Sometimes it can get confusing to know which feature of WPF is appropriate in a given scenario. There’s some overlap in the things that styles, data templates, and control templates are able to do. To add to the confusion, you can embed styles in your data templates, control templates in your styles, and so on. Here are a few thoughts to help you decide what to use:
Styles are the simplest of the three, so if you are able to achieve what you want using styles, that is the best choice. Keep in mind that styles allow you to set nonvisual properties as well.
Control templates define the UI elements that compose a given control. That’s a lot more complicated than merely setting some properties. You should use control templates only when you really need to.
Data templates resemble control templates in that they allow you to compose UI elements. They are often used with list controls to define how items in a list should be rendered.
It’s good practice to store all three in your application’s resources. This helps reduce noise and makes your markup more readable. Additionally, it is a common practice to set control templates using styles.
We’ve mentioned more than once the need to format or convert data when binding it to the UI. When working with data bindings in WPF, you can use a converter to transform the data. Converters are used to format data being displayed in the UI, but they can also be used to translate user input into the desired format.
We’ll demonstrate this with the telephone numbers we use in the Contact Manager. For example, we would like to consistently display telephone numbers in one of the following formats, depending on the number of digits provided:
###-####
(###) ###-####
+# (###) ###-####
We’d also like to store the phone numbers in a consistent format. We’ll keep it simple and store just the digits.
Converters are classes that implement IValueConverter. The interface has two methods, Convert and ConvertBack. Convert is used when data flows from the source to the target. ConvertBack is used when data flows back to the source (in a two-way binding).
Both methods take four parameters. The first is value, and it is the actual data to be manipulated. The second is the type of the target data. The third is for general use and can be used to parameterize your converter. We’ll discuss it later. The fourth is the cultural information about the executing context.
Let’s implement a class for handling telephone numbers in the Contact Manager:
Right-click the Presenters folder, and add a new class named
PhoneConverter.cs.Add the using statements:
using System.Windows.Data;
using System.Globalization;
Modify the class declaration:
public class PhoneConverter: IValueConverter
We’ll handle the
ConvertBackmethod later; in the meantime we’ll just stub it out:public object ConvertBack(object value, Type targetType, object parameter, CultureInfo culture) { return null; }
Next, we’ll implement the
Convertmethod as follows:public object Convert(object value, Type targetType, object parameter, CultureInfo culture) { string result = value as string; if(!string.IsNullOrEmpty(result)) { string filteredResult = string.Empty; foreach(char c in result) { if(Char.IsDigit(c)) filteredResult += c; } long theNumber = System.Convert.ToInt64(filteredResult); switch (filteredResult.Length) { case 11: result = string.Format("{0:+# (###) ###-####}", theNumber); break; case 10: result = string.Format("{0:(###) ###-####}", theNumber); break; case 7: result = string.Format("{0:###-####}", theNumber); break; } } return result; }
Let’s review the logic in the Convert method:
First, we take the incoming data and cast it as a string.
We filter out all the non-numeric characters and store the result.
We convert the filtered result into an
Int64. This makes it easier to format the number.We choose a format based on the number of digits (that is the length of the
Int64).Finally, we use the powerful
String.Formatto apply the correct format for the number.
Now we need to wire this converter to the necessary bindings. You may have already noticed that the Binding class has a property called Converter that accepts IValueConverter. We need to assign an instance of PhoneConverter to that property.
Open
App.xaml. We’re going to create an instance ofPhoneConverterin the resource dictionary for the application.Because
PhoneConverteris part of our code, and not part of WPF, we need to create a namespace alias to reference the class. Add the following attribute to theApplicationelement:xmlns:Presenters="clr-namespace:ContactManager.Presenters"
Inside the ResourceDictionary element, add the following:
<Presenters:PhoneConverter x:Key="phoneConverter" />
The complete markup for
App.xamlis shown in Listing 15.1.Example 15.1. Converter in Application Resources
<Application x:Class="ContactManager.App"
             xmlns="http://schemas.microsoft.com/winfx/2006/xaml/presentation"
             xmlns:x="http://schemas.microsoft.com/winfx/2006/xaml"
             xmlns:Presenters="clr-namespace:ContactManager.Presenters"
             StartupUri="Shell.xaml">
    <Application.Resources>

        <ResourceDictionary>
            <ResourceDictionary.MergedDictionaries>
                <ResourceDictionary Source="ResourcesColorsAndBrushes.xaml" />
                <ResourceDictionary Source="ResourcesDefaultStyles.xaml" />
            </ResourceDictionary.MergedDictionaries>

            <Presenters:PhoneConverter x:Key="phoneConverter" />

        </ResourceDictionary>

    </Application.Resources>
</Application>
Open
ContactListView.xamland locate theGridViewColumnbound toOfficePhone. Change the binding to the following:{Binding Path=OfficePhone, Converter={StaticResource phoneConverter}}
We had to explicitly provide
Pathbecause we now have more than one parameter. Additionally, the value forConverteris another markup extension, one that pulls the instance ofPhoneConverterout of the resources. You can embed markup extensions inside other markup extensions.Change the binding for the cell phone column as well:
{Binding Path=CellPhone, Converter={StaticResource phoneConverter}}
Run the application, and make sure that you have some contacts with phone numbers. Open All Contacts and see how the converter works.
By the Way
It’s surprising that WPF does not provide any implementations of IValueConverter. We frequently have the need for a DateTime converter. You will also frequently need converters for currency and other numeric values. It’s easy to roll out your own generic converters that make use of ConverterParameter, and we recommend building a little library of commonly used converters.
Now we need to handle the second half of the converter. Here we are going to convert the user input into the format we really want. The logic we want to use is already present in the Convert method. We’ll extract it for reuse, and then use it in ConvertBack.
Open
PhoneConverter.cs.Add the following method to the class:
private static string FilterNonNumeric(string stringToFilter)
{
    if (string.IsNullOrEmpty(stringToFilter)) return string.Empty;

    string filteredResult = string.Empty;

    foreach (char c in stringToFilter)
    {
        if (Char.IsDigit(c))
            filteredResult += c;
    }

    return filteredResult;
}
Now we can modify
Convertto use this new function. The result is this:public object Convert(object value, Type targetType, object parameter, CultureInfo culture) { string result = value as string; if (!string.IsNullOrEmpty(result)) { string filteredResult = FilterNonNumeric(result); long theNumber = System.Convert.ToInt64(filteredResult); switch (filteredResult.Length) { case 11: result = string.Format("{0:+# (###) ###-####}", theNumber); break; case 10: result = string.Format("{0:(###) ###-####}", theNumber); break; case 7: result = string.Format("{0:###-####}", theNumber); break; } } return result; }
Now, implementing
ConvertBackis very simple:public object ConvertBack(object value, Type targetType, object parameter, CultureInfo culture) { return FilterNonNumeric(value as string); }
The complete code for
PhoneConverteris shown in Listing 15.2.To see
ConvertBackin action, we need to apply the converter someplace where data binding is two-way. Open theEditContactView.xaml.Locate the three
TextBoxelements that are bound to the telephone numbers. They are namedoffice,cell, andhome. Modify the binding on each to match the following pattern:{Binding Path=Contact.OfficePhone, Converter={StaticResource phoneConverter}}
Run the application and create a new contact. Enter some telephone numbers without formatting. Notice that the numbers are formatted as soon as the field loses focus.
Example 15.2. The PhoneConverter Class
using System;
using System.Globalization;
using System.Windows.Data;

namespace ContactManager.Presenters
{
    public class PhoneConverter : IValueConverter
    {
        public object Convert(object value, Type targetType, object parameter, CultureInfo culture)
        {
            string result = value as string;

            if (!string.IsNullOrEmpty(result))
            {
                string filteredResult = FilterNonNumeric(result);

                long theNumber = System.Convert.ToInt64(filteredResult);

                switch (filteredResult.Length)
                {
                    case 11:
                        result = string.Format("{0:+# (###) ###-####}", theNumber);
                        break;
                    case 10:
                        result = string.Format("{0:(###) ###-####}", theNumber);
                        break;
                    case 7:
                        result = string.Format("{0:###-####}", theNumber);
                        break;
                }
            }

            return result;
        }

        private static string FilterNonNumeric(string stringToFilter)
        {
            if (string.IsNullOrEmpty(stringToFilter)) return string.Empty;

            string filteredResult = string.Empty;

            foreach (char c in stringToFilter)
            {
                if (Char.IsDigit(c))
                    filteredResult += c;
            }

            return filteredResult;
        }

        public object ConvertBack(object value, Type targetType, object parameter, CultureInfo culture)
        {
            return FilterNonNumeric(value as string);
        }
    }
}
You can provide additional information to a converter through the ConverterParameter. Even though we don’t need it for the Contact Manager, I’ll provide a brief example. You might have a converter with the following method:
public object Convert(object value, Type targetType, object parameter, CultureInfo culture)
{
    string formattedText = parameter as string;
    if (string.IsNullOrEmpty(formattedText)) return value;
    return string.Format(formattedText, value);
}
Then in our markup, we could create a binding like
{Binding Path=OfficePhone, Converter={StaticResource phoneConverter}, ConverterParameter='TEL:{0}'}
The resulting output would be equivalent to
string.Format("TEL:{0}", OfficePhone);
That’s something of a contrived example, but it should give you the general idea. This is an easy way to make your converters more generic.
This is a topic that really confused me when I first encountered it. I think it’s best to start by considering the problem we need to solve. In our Contact Manager, we have a collection of contacts. Specifically, we are working with an ObservableCollection<Contact> on the ApplicationPresenter. Both the sidebar and the list view bind directly to this collection. Additionally, when we add a contact we are inserting it into this collection. So far, this is what we want because changes produced in one part of the application are immediately reflected in other parts.
Now imagine that we want to filter the contacts on the sidebar, or perhaps sort the contacts in the list view. If we change the collection, it changes everywhere, and that’s not what we want. We don’t want sorting in the list view to affect the sidebar.
The solution is to use an intermediary object, or a collection view. The CollectionView class is part of WPF and acts as a wrapper around the collection we are interested in manipulating. The collection view tracks additional information about the collection, such as sorting, filtering, and grouping currently selected items.
Fortunately, WPF automatically uses a collection view whenever we bind to a collection. This is what enables a ListBox, or any item control, to track what is currently selected. That means we don’t have to solve the problem ourselves. The solution is built in to the framework!
WPF uses three types of collection views depending on the underlying collection. Table 15.2 lists the three types.
It’s important to understand that a collection view does not change the underlying collection. This means that you can have multiple views of the same collection and they don’t interfere with one another. Two ListBox controls bound to the same collection track their currently selected items independently.
To work with collection views in XAML, we have to introduce another class, CollectionViewSource. As the official documentation is careful to point out, a collection view source is not the same thing as a collection view. It’s a proxy that allows us to declare a collection view in markup.
CollectionViewSource has a property View that allows you to access the collection view. Also, it has a Source property that you explicitly assign to the collection you are interested in.
Let’s use CollectionViewSource in the Contact Manager to keep the contacts sorted by their lookup name in the list view.
Open
ContactListView.xaml.Add a namespace alias to the
UserControlelement:xmlns:ComponentModel="clr-namespace:System.ComponentModel;assembly=WindowsBase"
We’ll create a resources element for the user control and add the collection view source. Immediately after the opening
UserControltag add the following:<UserControl.Resources> <CollectionViewSource x:Key="contactSource" Source="{Binding AllContacts}"> <CollectionViewSource.SortDescriptions> <ComponentModel:SortDescription PropertyName="LookupName" /> </CollectionViewSource.SortDescriptions> </CollectionViewSource> </UserControl.Resources>
Now we need to modify the binding on the
ListViewto use the newCollectionViewSource, instead of theAllContactsproperty directly. The new binding onListViewwill look like this:{Binding Source={StaticResource contactSource}}
If you run the application now (assuming you have an adequate number of contacts), you will see that contacts on the list view are sorted.
By the Way
There is a great deal more that can be said regarding binding lists and how to use collection views—much more than we have room for in this book. An excellent online resource is the blog of Beatriz Costa. Beatriz was part of the data binding test team for WPF, and she has a lot of insight. Her blog can be found at www.beacosta.com/blog/.
We covered a lot of ground in this hour. You should now have a basic understanding of how to create and manipulate bindings in code. We used converters to help us format our telephone numbers; we used data templates to link buttons to contacts; and we demonstrated how we can apply sorting through the use of collection views.
Even so, there’s still a lot more that you can do with data binding.