
What You’ll Learn in This Hour:
Building a functioning media viewer application
Learning how to play audio and video
Implementing another version of the MVP pattern
With the first three parts of this book behind us, we’ve uncovered most of what the typical developer needs to be successful with WPF. However, we are not going to stop here, because we have yet to take advantage of several of the most innovative and powerful features in WPF. To really let WPF shine, we are going to build a media-based application. This will send us on a deep dive into the fantastic UI customization that WPF enables through graphics, animations, and control templating, among other things.
For the book’s final application, we wanted to do something with a little more pizzazz. We decided that one of best ways to demonstrate the full capabilities of WPF is to bring together several types of media in an attractive and useful presentation. Thus the Media Viewer concept was born. The requirements for this application are simple:
Provide users with an attractive menu screen through which they can choose to experience a variety of media types.
Allow users to view pictures, listen to music, and watch video.
Provide a highly stylized and customized user experience.
Leverage all the best practices and techniques that reasonably apply from previous hours.
We’ll begin this hour by setting up a general solution structure like we have on several previous occasions. We’d like to note that the following code is the product of a lot of thought, trial, error, and refactoring. It’s less likely that you would start out with the following structure, but more common that this design would emerge over time, as it did in our case. However, the first few steps should be fairly familiar to you by now:
Open Visual Studio and create a new WPF Application called
MediaViewer.Add the following folders to the solution:
Model,Presenters,Resources,UserControls, andViews.Change
Window1.xamltoMainWindow.xamland make the appropriate changes in the code-behind and in theApp.xamlfile.Use the following XAML to implement the markup for
MainWindow.xaml:<Window x:Class="MediaViewer.MainWindow" xmlns="http://schemas.microsoft.com/winfx/2006/xaml/presentation" xmlns:x="http://schemas.microsoft.com/winfx/2006/xaml" Title="Media Viewer" Height="600" Width="800" Loaded="MainWindow_Loaded"> <DockPanel> <Button DockPanel.Dock="Top" Content="Media Player" Click="Header_Click"/> <ContentControl x:Name="currentView" /> </DockPanel> </Window>
Ensure that the
MainWindow.xaml.csfile contains the handlers for the eventsMainWindow_LoadedandHeader_Clickas defined in the XAML. One way to do this is to right-click the name of the handler in the XAML and select the Navigate to Event Handler option from the context menu.Add the following code to the
MainWindowclass in theMainWindow.xaml.cs:public void TransitionTo(object view) { currentView.Content = view; }
Add a new class to the
Presentersfolder calledApplicationController.csand use the code in Listing 17.1 as the implementation.Now update the code in
MainWindow.xaml.csto match that found in Listing 17.2.
Example 17.1. ApplicationController.cs
using System;
using System.IO;
using Microsoft.Win32;

namespace MediaViewer.Presenters
{
    public class ApplicationController
    {
        private readonly MainWindow _shell;

        public ApplicationController(MainWindow shell)
        {
            _shell = shell;
        }

        public void ShowMenu()
        {
        }

        public void DisplayInShell(object view)
        {
            GC.Collect();
            GC.WaitForPendingFinalizers();

            _shell.TransitionTo(view);
        }

        public string RequestDirectoryFromUser()
        {
            OpenFileDialog dialog = new OpenFileDialog();

            dialog.InitialDirectory = Environment.GetFolderPath(
                Environment.SpecialFolder.MyDocuments
                );

            dialog.Title = "Please choose a folder.";
            dialog.CheckFileExists = false;
            dialog.FileName = "[Get Folder]";
            dialog.Filter = "Folders|no.files";

            if ((bool)dialog.ShowDialog())
            {
                string path = Path.GetDirectoryName(dialog.FileName);
                if (!string.IsNullOrEmpty(path)) return path;
            }

            return string.Empty;
        }
    }
}
Example 17.2. MainWindow.xaml.cs
using System.Windows;
using MediaViewer.Presenters;

namespace MediaViewer
{
    public partial class MainWindow : Window
    {
        public MainWindow()
        {
            InitializeComponent();
            DataContext = new ApplicationController(this);
        }

        public ApplicationController Controller
        {
            get { return (ApplicationController)DataContext; }
        }

        public void TransitionTo(object view)
        {
            currentView.Content = view;
        }

        private void MainWindow_Loaded(object sender, RoutedEventArgs e)
        {
            Controller.ShowMenu();
        }

        private void Header_Click(object sender, RoutedEventArgs e)
        {
            Controller.ShowMenu();
        }
    }
}
The design we have chosen for the main window is quite simple: a Button and a ContentControl. Recall from earlier chapters that ContentControl is the base class for many other WPF controls. It defines a simple, yet handy, property called Content. In our MainWindow layout, we are using the ContentControl as a placeholder for views that will be switched in and out by our application. You can see how this works by looking at the code for the TransitionTo method in the code-behind. Note that both event handlers in the code-behind delegate responsibility to the ShowMenu method on the ApplicationController, which itself is instantiated in the MainWindow constructor. This allows the menu screen to be shown at startup as well as anytime the user clicks our button header.
The ApplicationController is one of the most important classes in the application because it enables almost everything else to work. The single instance of this class will be passed around to various presenters (don’t forget that we are using an MVP pattern), giving them access to its core functionality. Look at the DisplayInShell method. This method enables other presenters to display their view in the main shell. Notice how it does some memory management before asking the view to handle the transition. Because we are going to be dealing with media files, we want to make sure that we clean up after ourselves frequently. The ApplicationController will ensure that this happens before a new view is displayed. Also, take a look at the RequestDirectoryFromUser method. Sometimes a presenter will need to ask the user for a directory to search for media. We have chosen to expose this functionality through the ApplicationPresenter as well. WPF, at present, doesn’t offer a standard dialog box for folder selection, so we have demonstrated a simple workaround using the OpenFileDialog. The only other unexplained code is the ShowMenu method, which is the subject of the next section.
The menu screen is what the users see when they first load the application and what they return to when they choose to experience different types of media. We’ll build a simple and intuitive screen for this purpose and prepare the way for the real meat of the application.
Begin by adding a new user control to the
Viewsfolder calledMenuView.xaml.Use the markup from Listing 17.3 to implement the view. Make sure that the declared event handlers are created in the code-behind.
Add a new class to the
Presentersfolder calledMenuPresenter.cs. Use the code in Listing 17.4 to fill out the implementation.Change the code-behind file
MenuView.xaml.csto match Listing 17.5.Change the
ShowMenumethod in theApplicationControllerto the following:public void ShowMenu() { new MenuPresenter(this); }
Run the application. You should see something similar to Figure 17.1.
<UserControl x:Class="MediaViewer.Views.MenuView"
             xmlns="http://schemas.microsoft.com/winfx/2006/xaml/presentation"
             xmlns:x="http://schemas.microsoft.com/winfx/2006/xaml">
    <Grid TextBlock.FontSize="72">
        <Grid.ColumnDefinitions>
            <ColumnDefinition />
            <ColumnDefinition />
        </Grid.ColumnDefinitions>
        <Grid.RowDefinitions>
            <RowDefinition />
            <RowDefinition />
        </Grid.RowDefinitions>

        <Button Content="Video"
                Grid.ColumnSpan="2"
                Click="Video_Click" />
        <Button Content="Music"
                Grid.Row="1"
                Click="Music_Click" />
        <Button Content="Pictures"
                Grid.Row="1"
                Grid.Column="1"
                Click="Pictures_Click" />
    </Grid>
</UserControl>
Example 17.4. MenuPresenter.cs
using MediaViewer.Views;

namespace MediaViewer.Presenters
{
    public class MenuPresenter
    {
        private readonly ApplicationController _controller;

        public MenuPresenter(ApplicationController controller)
        {
            _controller = controller;
            _controller.DisplayInShell(new MenuView(this));
        }

        public void DisplayPictures()
        {
        }

        public void ListenToMusic()
        {
        }

        public void WatchVideo()
        {
        }
    }
}
Example 17.5. MenuView.xaml.cs
using System.Windows;
using System.Windows.Controls;
using MediaViewer.Presenters;

namespace MediaViewer.Views
{
    public partial class MenuView : UserControl
    {
        public MenuView(MenuPresenter presenter)
        {
            InitializeComponent();
            DataContext = presenter;
        }

        public MenuPresenter Presenter
        {
            get { return (MenuPresenter) DataContext; }
        }

        private void Video_Click(object sender, RoutedEventArgs e)
        {
            Presenter.WatchVideo();
        }

        private void Music_Click(object sender, RoutedEventArgs e)
        {
            Presenter.ListenToMusic();
        }

        private void Pictures_Click(object sender, RoutedEventArgs e)
        {
            Presenter.DisplayPictures();
        }
    }
}

If you were comfortable with the architecture presented when we built the Contact Manager, the previously introduced code should seem quite natural. Again, we are using an MVP pattern to separate our view logic from our presenter logic. Because of this, when events on the MenuView fire, the results of the action are handled by the MenuPresenter. This keeps our classes concise and easy to maintain. The MenuView is a simple interface with three big buttons, allowing users to easily choose the path they are most interested in. The presenter actions for each of these buttons will be filled in later this hour after we have built our model.
The basic functionality of our application is geared around loading files and rendering them, either to the screen or to the computer audio device. All we need for a model in this case is a thin wrapper around the FileInfo class that .NET provides. Displaying images turns out to be a little more complicated in our scenario, however, so we’ll derive a special model class for them.
Add a new class to the
Modelfolder calledMedia.cs. Use the code in Listing 17.6 for the implementation.Add a second class to the
Modelfolder with the namePicture.cs. Use the code in Listing 17.7 for this class.
Example 17.6. Media.cs
using System;
using System.ComponentModel;
using System.IO;

namespace MediaViewer.Model
{
    public class Media : INotifyPropertyChanged
    {
        protected FileInfo _fileInfo;
        protected Uri _uri;
        public string Name
        {
            get { return Path.GetFileNameWithoutExtension(_fileInfo.Name); }
        }

        public string Directory
        {
            get { return _fileInfo.Directory.Name; }
        }

        public Uri Uri
        {
            get { return _uri; }
        }

        public void SetFile(FileInfo fileInfo)
        {
            _fileInfo = fileInfo;
            _uri = new Uri(_fileInfo.FullName);

            OnPropertyChanged("Name");
            OnPropertyChanged("Directory");
            OnPropertyChanged("Uri");
        }

        public event PropertyChangedEventHandler PropertyChanged;

        protected virtual void OnPropertyChanged(string propertyName)
        {
            if (PropertyChanged != null)
            {
                PropertyChanged(
                    this,
                    new PropertyChangedEventArgs(propertyName)
                    );
            }
        }
    }
}
using System;
using System.IO;
using System.Threading;
using System.Windows;
using System.Windows.Media;
using System.Windows.Media.Imaging;
using System.Windows.Threading;

namespace MediaViewer.Model
{
    public class Picture : Media
    {
        private ImageSource _thumbnail;

        public ImageSource Thumbnail
        {
            get
            {
                if(_thumbnail == null)
                {
                    ThreadPool.QueueUserWorkItem(
                        LoadImage
                        );
                }
                return _thumbnail;
            }
        }

        private void LoadImage(object state)
        {
            byte[] buffer = File.ReadAllBytes(_fileInfo.FullName);
            MemoryStream mem = new MemoryStream(buffer);

            BitmapDecoder decoder = BitmapDecoder.Create(
                mem,
                BitmapCreateOptions.None,
                BitmapCacheOption.None
                );

            _thumbnail = decoder.Frames[0];

            Application.Current.Dispatcher.Invoke(
                DispatcherPriority.Normal,
                (Action)delegate { OnPropertyChanged("Thumbnail"); }
                );
        }
    }
}
The Media class is pretty straightforward. It provides change notification and easily data-bindable properties around the values of a FileInfo class, which can be set using the SetFile method. The Picture class is where the interesting code is. As you’ll see shortly, loading a large number of pictures into a UI can be a time-consuming operation. We would like our picture view to be able to display thumbnails of the images as each one is loaded, rather than waiting until all images are loaded. To accomplish this, we’ve built a bit of simple multithreaded code into our model. When the thumbnail is requested, if it is not already loaded, we use ThreadPool.QueueUserWorkItem to load the image on one of the .NET background threads. This is done in the LoadImage method. The process goes like this:
Create a
MemoryStreamfrom the image bytes.Use the stream to create a
BitmapDecoderby calling the staticCreatemethod. This method takes several options that allow a developer to customize how the bitmap is decoded. We have specified not to use any particular options.Set the
_thumbnailfield to the first frame of the decoder.Fire the
PropertyChangedevent on the UI thread.
Most of this code is typical file loading and decoding (very similar to what was presented in Hour 11, “Output.”) The important part is the call to Application.Current.Dispatcher.Invoke. This method executes the delegate on the UI thread according to the specified DispatcherPriority. This is important because WPF is not guaranteed to work properly with events firing on threads other than the UI thread.
With our model built, we can actually proceed to displaying some real media files. Let’s begin by creating the screen and associated code for viewing pictures on your computer:
To the
Viewsfolder, add a new user control calledPictureView.xaml. Use the markup in Listing 17.8 to create the view.Add a new class to the
Presentersfolder namedMediaPresenter.cs. The code in Listing 17.9 should be used to implement this class.Add the following using statements to
MenuPresenter.cs:using System; using System.Windows.Controls; using MediaViewer.Model;
Add the following helper method to the
MenuPresenterclass:private void Display<View, MediaType>( string mediaPath, params string[] extensions ) where View : UserControl, new() where MediaType : Media, new() { MediaPresenter<MediaType> presenter = new MediaPresenter<MediaType>(mediaPath, extensions); View view = new View(); view.DataContext = presenter; _controller.DisplayInShell(view); }
Change the
DisplayPicturesmethod to be as follows:public void DisplayPictures() { string myPicturesPath = Environment.GetFolderPath( Environment.SpecialFolder.MyPictures ); Display<PictureView, Picture>( myPicturesPath, "*.jpg", "*.gif", "*.png", "*.bmp" ); }
Make sure that you have some picture files in your
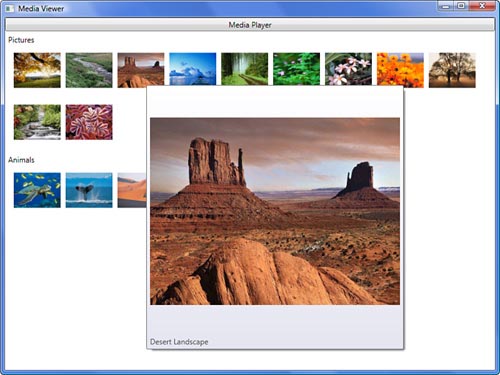
MyPicturesfolder.Run the application. Click the Pictures button on the main menu. You should see something like Figure 17.2.
By the Way
We’ve put a cap of 50 on the number of files loaded. This allows us to greatly simplify this sample application by easily preventing issues that could be caused by loading too many pictures into memory. In a real application you would remove this limit and restructure the code to carefully load only visible images and remove them from memory after they go out of view. This technique is called UI Virtualization and is beyond the scope of this book.
Example 17.8. PictureView.xaml
<UserControl x:Class="MediaViewer.Views.PictureView"
             xmlns="http://schemas.microsoft.com/winfx/2006/xaml/presentation"
             xmlns:x="http://schemas.microsoft.com/winfx/2006/xaml"
             xmlns:cm="clr-namespace:System.ComponentModel;assembly=WindowsBase">
    <UserControl.Resources>
        <CollectionViewSource x:Key="pictureSource"
                              Source="{Binding Media}">
            <CollectionViewSource.SortDescriptions>
                <cm:SortDescription PropertyName="Name" />
            </CollectionViewSource.SortDescriptions>
            <CollectionViewSource.GroupDescriptions>
                <PropertyGroupDescription PropertyName="Directory" />
            </CollectionViewSource.GroupDescriptions>
        </CollectionViewSource>
    </UserControl.Resources>

    <ScrollViewer HorizontalScrollBarVisibility="Disabled"
                  VerticalScrollBarVisibility="Auto">
        <ItemsControl ItemsSource="{Binding Source={StaticResource pictureSource}}">
            <ItemsControl.ItemsPanel>
                <ItemsPanelTemplate>
                    <WrapPanel />
                </ItemsPanelTemplate>
            </ItemsControl.ItemsPanel>
            <ItemsControl.ItemTemplate>
                <DataTemplate>
                    <Image Source="{Binding Thumbnail}"
                           Width="75"
                           Height="75"
                           Margin="4">
                        <Image.ToolTip>
                            <StackPanel>
                                <Image Source="{Binding Thumbnail}"
                                       Width="400"
                                       Height="400" />
                                <TextBlock Text="{Binding Name}" />
                            </StackPanel>
                        </Image.ToolTip>
                    </Image>
                </DataTemplate>
            </ItemsControl.ItemTemplate>
            <ItemsControl.GroupStyle>
                <GroupStyle>
                    <GroupStyle.ContainerStyle>
                        <Style TargetType="{x:Type GroupItem}">
                            <Setter Property="Margin"
                                    Value="5" />
                        </Style>
                    </GroupStyle.ContainerStyle>
                </GroupStyle>
            </ItemsControl.GroupStyle>
        </ItemsControl>
    </ScrollViewer>
</UserControl>
Example 17.9. MediaPresenter.cs
using System.Collections.ObjectModel;
using System.IO;
using MediaViewer.Model;

namespace MediaViewer.Presenters
{
    public class MediaPresenter<T>
        where T : Media, new()
    {
        private readonly string[] _fileExtensions;
        private readonly string _mediaPath;
        private ObservableCollection<Media> _media;

        public MediaPresenter(string mediaPath, params string[] extensions)
        {
            _mediaPath = mediaPath;
            _fileExtensions = extensions;
        }

        public ObservableCollection<Media> Media
        {
            get
            {
                if(_media == null) LoadMedia();
                return _media;
            }
        }

        private void LoadMedia()
        {
            if(string.IsNullOrEmpty(_mediaPath)) return;

            _media = new ObservableCollection<Media>();
            DirectoryInfo directoryInfo = new DirectoryInfo(_mediaPath);

            foreach(string extension in _fileExtensions)
            {
                FileInfo[] pictureFiles = directoryInfo.GetFiles(
                    extension,
                    SearchOption.AllDirectories
                    );

                foreach(FileInfo fileInfo in pictureFiles)
                {
                    if(_media.Count == 50) break;

                    T media = new T();
                    media.SetFile(fileInfo);
                    _media.Add(media);
                }
            }
        }
    }
}
Looking over the PictureView.xaml, we don’t see anything we haven’t seen in a previous hour. We are simply taking full advantage of ItemsControl to provide a custom ItemsPanel, ItemTemplate, and GroupStyle for display of our picture objects. Notice that we are binding to our custom Thumbnail property.
The MediaPresenter is the interesting part of this section. Its sole job is to use a folder path and set of file extensions to populate an easily bindable Media collection with objects. This version of the class came about with much experimentation on our part. We specifically constructed it so that we could generically use it as the presenter for not only PictureView but the yet to be discussed MusicView and VideoView. The generic constraints enable the presenter to create Media instances or Song instances depending on the need. This is more clearly seen in the changes made to MenuPresenter. Out of a desire to reuse as much code as possible, we have created a generic method called Display. This method’s generic parameters allow us to easily specify what view and media type should be created, and it takes care of instantiating them and hooking up all the necessary pieces. You’ll see us take advantage of this when we add code for other media types. But, before we do that, we need to learn more about media playback.
WPF has powerful media playback capabilities. Most simple tasks can be accomplished through the use of the MediaElement. This single FrameworkElement derivative allows for the full playback and control of the most common types of audio and video today. The MediaElement does not expose a UI for media control, so we will have to build one ourselves. Because we will need this for both audio and video playback, we’ll build a user control that we can plug into any view that we need.
In the
UserControlsfolder, create a new user control calledMediaPlayer.xaml.Use the markup in Listing 17.10 and the code in Listing 17.11 to implement the control.
Example 17.10. MediaPlayer.xaml
<UserControl x:Class="MediaViewer.UserControls.MediaPlayer"
             xmlns="http://schemas.microsoft.com/winfx/2006/xaml/presentation"
             xmlns:x="http://schemas.microsoft.com/winfx/2006/xaml">
    <DockPanel>
        <Grid DockPanel.Dock="Bottom">
            <Grid.ColumnDefinitions>
                <ColumnDefinition Width="*" />
                <ColumnDefinition Width="*" />
                <ColumnDefinition Width="*" />
                <ColumnDefinition Width="*" />
                <ColumnDefinition Width="*" />
                <ColumnDefinition Width="*" />
                <ColumnDefinition Width="*" />
            </Grid.ColumnDefinitions>
            <Button Grid.Column="2"
                    Content="Stop"
                    Click="Stop_Click" />
            <Button Grid.Column="3"
                    Content="Play"
                    Click="Play_Click" />
            <ToggleButton Grid.Column="4"
                          Content="Mute"
                          IsChecked="{Binding ElementName=mediaElement, Path=IsMuted}" />
            <Slider Grid.Column="5"
                    Minimum="0"
                    Maximum="1"
                    Value="{Binding ElementName=mediaElement, Path=Volume}"/>
        </Grid>
        <Slider x:Name="progressSlider"
                DockPanel.Dock="Bottom"
                Minimum="0"
                LargeChange="1000"
                PreviewMouseLeftButtonDown="progressSlider_MouseDown"
                PreviewMouseLeftButtonUp="progressSlider_MouseUp"/>
        <MediaElement x:Name="mediaElement"
                      DockPanel.Dock="Top"
                      LoadedBehavior="Manual"
                      MediaOpened="mediaElement_MediaOpened"
                      MediaEnded="mediaElement_MediaEnded"/>
    </DockPanel>
</UserControl>
Example 17.11. MediaPlayer.xaml.cs
using System;
using System.Windows;
using System.Windows.Controls;
using System.Windows.Input;
using System.Windows.Media;
using System.Windows.Media.Animation;
using MediaViewer.Model;

namespace MediaViewer.UserControls
{
    public partial class MediaPlayer : UserControl
    {
        public static readonly DependencyProperty MediaProperty =
            DependencyProperty.Register(
                "Media",
                typeof(Media),
                typeof(MediaPlayer));

        private bool _userMovingSlider;

        public MediaPlayer()
        {
            InitializeComponent();
        }

        public Media Media
        {
            get { return GetValue(MediaProperty) as Media; }
            set { SetValue(MediaProperty, value); }
        }

        private void mediaElement_MediaOpened(object sender, RoutedEventArgs e)
        {
            progressSlider.Maximum = mediaElement.NaturalDuration.TimeSpan.TotalMilliseconds;
        }

        private void Play_Click(object sender, RoutedEventArgs e)
        {
            MediaClock clock = mediaElement.Clock;

            if(clock != null)
            {
                if(clock.IsPaused)
                {
                    clock.Controller.Resume();
                    DataContext = "Playing";
                }
                else
                {
                    clock.Controller.Pause();
                    DataContext = "Paused";
                }
            else
            {
                if(Media == null) return;

                MediaTimeline timeline = new MediaTimeline(Media.Uri);
                clock = timeline.CreateClock();
                clock.CurrentTimeInvalidated += Clock_CurrentTimeInvalidated;
                mediaElement.Clock = clock;
            }
        }

        private void Stop_Click(object sender, RoutedEventArgs e)
        {
            mediaElement.Clock = null;
        }

        private void mediaElement_MediaEnded(object sender, RoutedEventArgs e)
        {
            mediaElement.Clock = null;
        }

        private void Clock_CurrentTimeInvalidated(object sender, EventArgs e)
        {
            if(mediaElement.Clock == null || _userMovingSlider) return;

            progressSlider.Value =
                mediaElement.Clock.CurrentTime.Value.TotalMilliseconds;
        }

        private void progressSlider_MouseDown(
            object sender,
            MouseButtonEventArgs e)
        {
            _userMovingSlider = true;
        }

        private void progressSlider_MouseUp(object sender, MouseButtonEventArgs e)
        {
            MediaClock clock = mediaElement.Clock;

            if(clock != null)
            {
                TimeSpan offest = TimeSpan.FromMilliseconds(
                    progressSlider.Value
                    );

                clock.Controller.Seek(
                    offest,
                    TimeSeekOrigin.BeginTime
                    );
            }
            _userMovingSlider = false;
        }
    }
}
The MediaPlayer.xaml markup contains a typical layout of controls that could control media. We set up element bindings for muting and controlling the volume and added buttons for the standard functions. To more effectively control the MediaElement, we wired a number of events that are handled in the code-behind.
The MediaPlayer.xaml.cs is where the real magic happens. We begin by creating a custom dependency property so that we will be able to bind to the media, and after that, the events take over. Here is how things work:
When a user clicks play, the event handler checks to see if a media file is already playing. If not, it uses the
Mediato create aMediaTimeline. This timeline exposes a clock that can be used to monitor and control the playback of the media. The clock is assigned to the so-named property on theMediaElement.When the
Clockproperty changes, theMediaElementattempts to load the file. When this is complete, theMediaOpenedevent fires. Our handler for this event makes sure to set theprogressSlider.Maximumto the length of the media.As the media begins playing, the
CurrentTimeInvalidatedevent on the clock begins firing. The handler for this event updates the position of theprogressSlideras long as there is a clock (the media is loaded) and the user is not manually dragging the slider.If the user is dragging the slider, we use its value to
Seekto the appropriate position in the media. This is done by using theControllerproperty on the clock, which exposes a variety of methods for fine-grained control of media playback.If the media ends or the stop button is pressed, we remove the
Clockby setting the property tonullon theMediaElement.The user can also pause/resume media playback by using the Play button. This works only if there is a valid clock.
Now that we have a reusable media player control, all we have to do is create the video and music views that use it.
All we have left to do is create our final two views and hook them into the overall application navigation:
Add a new user control to the
Viewsfolder calledMusicView.xaml. Use the markup from Listing 17.12 to implement this view.Add another user control to the
Viewsfolder and name itVideoView.xaml. Use the markup from Listing 17.13 for it.Open the
MenuPresenter.csand change theListenToMusicandWatchVideomethods to match the following:public void ListenToMusic() { Display<MusicView, Media>( Environment.GetFolderPath(Environment.SpecialFolder.MyMusic), "*.wma", "*.mp3" ); } public void WatchVideo() { Display<VideoView, Media>( _controller.RequestDirectoryFromUser(), "*.wmv" ); }
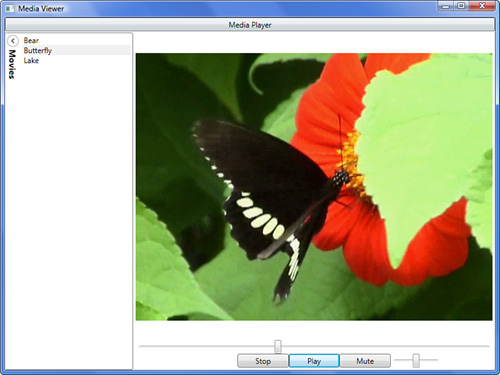
Run the application. You now have a fully functional media viewer. See Figure 17.3.
By the Way
Due to some quirks in Visual Studio, adding these user controls and their accompanying code may cause some problems for the design-time view. Don’t worry, just compile the code, and the problem should fix itself.
Example 17.12. MusicView.xaml
<UserControl x:Class="MediaViewer.Views.MusicView"
             xmlns="http://schemas.microsoft.com/winfx/2006/xaml/presentation"
             xmlns:x="http://schemas.microsoft.com/winfx/2006/xaml"
             xmlns:cm="clr-namespace:System.ComponentModel;assembly=WindowsBase"
             xmlns:uc="clr-namespace:MediaViewer.UserControls">
    <UserControl.Resources>
        <CollectionViewSource x:Key="songSource"
                              Source="{Binding Media}">
            <CollectionViewSource.SortDescriptions>
                <cm:SortDescription PropertyName="Name" />
            </CollectionViewSource.SortDescriptions>
            <CollectionViewSource.GroupDescriptions>
                <PropertyGroupDescription PropertyName="Directory" />
            </CollectionViewSource.GroupDescriptions>
        </CollectionViewSource>
    </UserControl.Resources>

    <DockPanel>
        <uc:MediaPlayer DockPanel.Dock="Top"
                        Margin="4"
                        Media="{Binding ElementName=songList, Path=SelectedItem}"/>
        <ListBox x:Name="songList"
                 ItemsSource="{Binding Source={StaticResource songSource}}"
                 DisplayMemberPath="Name">
            <ListBox.GroupStyle>
                <GroupStyle>
                    <GroupStyle.ContainerStyle>
                        <Style TargetType="{x:Type GroupItem}">
                            <Setter Property="Margin"
                                    Value="5" />
                        </Style>
                    </GroupStyle.ContainerStyle>
                </GroupStyle>
            </ListBox.GroupStyle>
        </ListBox>
    </DockPanel>
</UserControl>
Example 17.13. VideoView.xaml
<UserControl x:Class="MediaViewer.Views.VideoView"
             xmlns="http://schemas.microsoft.com/winfx/2006/xaml/presentation"
             xmlns:x="http://schemas.microsoft.com/winfx/2006/xaml"
             xmlns:uc="clr-namespace:MediaViewer.UserControls"
             xmlns:cm="clr- namespace:System.ComponentModel;assembly=WindowsBase">
    <UserControl.Resources>
        <CollectionViewSource x:Key="movieSource"
                              Source="{Binding Media}">
            <CollectionViewSource.SortDescriptions>
                <cm:SortDescription PropertyName="Name" />
            </CollectionViewSource.SortDescriptions>
        </CollectionViewSource>
    </UserControl.Resources>

    <DockPanel>
        <Expander DockPanel.Dock="Left"
                  ExpandDirection="Right"
                  IsExpanded="True"
                  BorderThickness="0 1 1 1"
                  BorderBrush="Gray"
                  Margin="0 2 0 0"
                  Padding="2">
            <Expander.Header>
                <TextBlock Text="Movies"
                           FontSize="14"
                           FontWeight="Bold">
                  <TextBlock.LayoutTransform>
                    <RotateTransform Angle="90" />
                  </TextBlock.LayoutTransform>
                </TextBlock>
            </Expander.Header>
            <ListBox x:Name="movieList"
                     Width="175"
                     BorderThickness="0"
                     ItemsSource="{Binding Source={StaticResource movieSource}}"
                     DisplayMemberPath="Name" />
        </Expander>
        <uc:MediaPlayer Media="{Binding ElementName=movieList, Path=SelectedItem}"
                        Margin="4"/>
    </DockPanel>
</UserControl>
There’s not much to be said about this XAML. Now that we have our MediaPlayer control built, all we do is plug it into the two views. Each of these views binds to the Media collection on its presenter and displays a list of available media with the SelectedItem bound to the player.
We’ve built an entire application this hour. It’s designed using an MVP pattern that keeps the classes small and organized so that it will be easy to maintain and extend. Hopefully you are beginning to see the benefits of this approach by now. The views and associated presenters allow for intuitive browsing of photos and playback of common audio and video files. We’ve even built a reusable media player to simplify the views and help provide a standard user interface for the application. In future hours we’ll focus on improving the look and feel of this application with many of WPF’s most powerful features.