
Chapter 6. Moving Files To and From the Internet
In This Chapter
One of the most common questions people have when they start to build their own websites is how to transfer the files to the Internet. This chapter shows you that it’s easier than you think.
The simplest way to understand putting your files on the Internet is to realize all you are doing is moving files from one computer to another. If you have moved files between computers at home or work, you have essentially done everything you need to do to move files to the Internet.
Moving files from the Internet to your computer is called downloading. When you are moving files from your computer to the Internet you are uploading them.
The best way to transfer files to and from the Internet is by using File Transfer Protocol (FTP). Several FTP programs are outlined in Chapter 5, “Gathering Your Development Tools.” An FTP program enables you to connect to a server on the Internet that allows FTP connections. When you’re connected to an FTP server you can move files to and from that server. This chapter tells you how to use those programs to actually move your files.
Before you start thinking about moving your files to and from the Internet, it’s important to take some time to organize your files on your own computer. Keeping things organized is going to make it easier to find things and ensures fewer errors when moving files. This section covers some best practices for your file storage and introduces you to a more efficient way of storing things.
A common problem with new web developers is that they often reference files incorrectly. This can cause all sorts of problems and can drive you nuts if you don’t organize your files.
One question you’ll probably ask when you create files to use on your website is, “What should I name this file?” You really can name your files just about anything, but here are a few simple rules you should follow.
Try to keep your names as simple as possible and be as descriptive as possible. The description might be the file’s purpose and dimensions. For example, instead of calling a graphics file picture01.jpg, maybe try logo125×125.jpg. This way you know the file is a logo, and you know its size without ever having to open it.
With some servers and web hosts, the case of a file you are referring to needs to be very specific. If a server has the file named in uppercase LOGO.gif and you make a reference in HTML to the file using lower case, logo.gif, the server might not know you mean the same file.
By keeping all your filenames lower case you make sure you are always going to have clean references.
Using spaces in a filename is not a good idea. When a browser encounters a space in an HTML filename it fills it in with %20. So,
becomes
Because this is not the exact name of your page, referring to it this way makes the page impossible for your browser to find. You don’t have this problem if your filenames have no spaces.
If you need to use a space, one solution is to use an underscore, which is the character above the subtraction (-) sign on most computers. Usually, you press the subtraction key and Shift at the same time. This changes the filename reallylongconfusingfilename.html to really_long_confusing_file_name.html. The filename is easier to read, and with no spaces you don’t run the risk of a bad HTML address.
This might seem like a simple thing, but storing your files in one place on your hard drive is sometimes overlooked. Keeping your HTML files, images, and scripts straight on your computer is going to make your life much easier in the long run. This is especially true if you are working on more than one website at once.
After you have all your files in one place, the next thing you want to do is organize them. This makes it easier for you to find what you are looking for and to store new files. There are any number of ways you can do this, but when I am working on multiple websites, I use folders to store all the pieces of one website in one place (see Figure 6.1). Within the website folder, I have folders for HTML files, graphics, and multimedia scripts. By creating the same directory structure each time, I find things more easily and have fewer reference errors in my code.
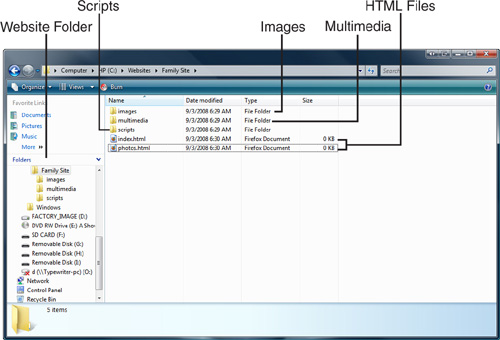
Website Folder
Images folder
Scripts folder
Multimedia folder
HTML Files
If you are building multiple websites or are collaborating on one with a lot of people, you might want to consider version control systems. These store, keep track of, and monitor who is using files for your projects and ensure that you don’t accidentally overwrite changes another person has made. Subversion is a free open source version control system that thousands of software developers use.
If you are interested, you can learn more at the following websites:
![]() A Visual Guide to Version Control—http://betterexplained.com/articles/a-visual-guide-to-version-control/
A Visual Guide to Version Control—http://betterexplained.com/articles/a-visual-guide-to-version-control/
![]() Revision Control—http://en.wikipedia.org/wiki/Revision_control
Revision Control—http://en.wikipedia.org/wiki/Revision_control
![]() Subversion—http://subversion.tigris.org/
Subversion—http://subversion.tigris.org/
After your website is finished and ready to go live, you need to move the files onto a computer (your web server) on which you are connected to the Internet. To do this, you connect to a server that allows FTP connections. Most often, your web server will allow FTP connections.
To do this, you need an FTP program like those described in Chapter 5. I am going to use Filezilla for these examples, but any FTP program should be able to move files to and from your FTP server.
Before you start, you need some information that your host provider will give you, including the name of the FTP server to which you want to connect, the username, and your password. You might have had to define your username and password when signed on to the hosting service, but you might need to check with them to make sure the same username and password are what you use for your FTP login information.
After you have this information, log in to the server. The FTP program window has two sides. One side shows the files on your computer, and the other side shows the files on the web host’s computer.
To log in to an FTP server:
1. In the Host field, enter your hostname.
2. Enter your username and password in the correct fields.
3. Unless your host provider told you to use a specific port, leave the Port field blank.
4. Click the Quickconnect button.
You are now connected to the FTP server at your host (see Figure 6.2).

After you have connected to an FTP server, all you need to do is drag the files from your computer to the server. This does not delete the files from your computer but places a copy on the FTP server.
What happens if you find a file on the Internet and want to download it? If you have FTP access to the server that stores the file you are looking for, you just need to connect to the server and do the reverse of the upload process.
When you download files from the Internet, sometimes you might be downloading one file and other times it might be a bunch of files combined into one. Both types download the same way, but when you download a group of files you might have to do some extra things, such as run them or unzip them to get the individual files unpacked to your computer.
Most browsers make it easy for you to download files; simply click the hyperlink to the file or use a submenu (such as a right-click menu) to download it. This works similar to FTP in that you are downloading a copy of the file onto your computer. Downloading a file from the Internet doesn’t affect the file on the Internet.
Depending on the file and your operating system, downloads come in a few different types of files. Some of these files are easy to deal with, whereas others require special programs.
Files usually have two parts: the name of the file and a suffix that is the file extension. The file extension comes after the period (.) in the filename. The file extension tells you the type of file and also tells the operating system what program to use to open it by default. So, for example, logo.bmp is a file named “logo” that is of the “BMP” or bitmap type.
The following sections describe some common file types and their uses.
Graphics files don’t require anything special to be done to them after they are downloaded, but you must have a graphics program to view and edit them. These days, most operating systems can deal with these files and show them to you, but you might run into a file that doesn’t open right away. The open source graphics program GIMP (http://www.gimp.org/) should open anything you need.
note
If a file you are downloading has no extension or you are unfamiliar with the file extension, take the safe route and investigate the file extension first before downloading it to your computer. This site lists hundreds of file extensions in alphabetical order:
This is the extension used for self-contained executable files, which are files that run on their own when clicked. In Windows, all you need to do is double-click the downloaded file and it begins to run.
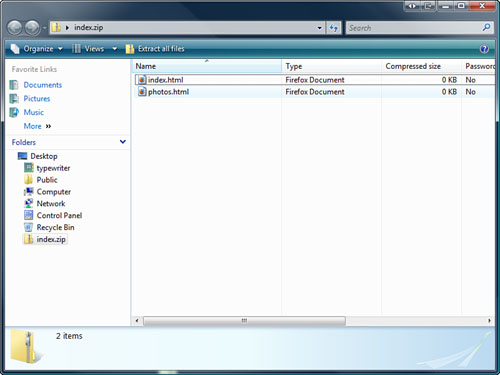
A zip file compresses one or several files into one smaller file. This new, smaller file contains the files and maintains the file structure when unpacked. Most operating systems allow you to double-click these files to open them (see Figure 6.4).
This is basically the Mac version of the executable file. When you download a file like this to your Mac just double-click it to run it.
Like the files you use to build your website, keeping your downloads organized is essential. Organization allows you to find files you are looking for and conserve space. Here are some best practices for downloading files:
![]() Keep all your downloads in one place—When you are downloading a lot of files, you need to keep them in one place so you can find them after you have downloaded them. I use a folder called Downloads where all my browsers put downloads.
Keep all your downloads in one place—When you are downloading a lot of files, you need to keep them in one place so you can find them after you have downloaded them. I use a folder called Downloads where all my browsers put downloads.
![]() Don’t download to your desktop—One place where you should not download files is your desktop. This is just going to clutter up your desktop and make it difficult to find anything.
Don’t download to your desktop—One place where you should not download files is your desktop. This is just going to clutter up your desktop and make it difficult to find anything.
![]() Delete large package files after they are unpacked—If you are downloading large files, such as ISO files, you should delete the file after you have unpacked it. You don’t want to eat up all your hard drive space with files you use only once.
Delete large package files after they are unpacked—If you are downloading large files, such as ISO files, you should delete the file after you have unpacked it. You don’t want to eat up all your hard drive space with files you use only once.