
Chapter 11. Working with Images
Believe it or not, prior to 1993, the Internet was mainly text based. For some of you this might seem almost unbelievable. Since then, the Internet has become a very visual place, full of color, life, and vivid imagery.
This chapter covers the different types of images, what programs you can use with them, how to use them on web pages, and where to find images.
You should understand some terms before we start:
![]() Pixels—Like atoms that make up matter, pixels make up digital images. A pixel is the smallest piece of information in a digital image and is one color. Every image can be described as a certain number of pixels high and a certain number wide (see Figure 11.1).
Pixels—Like atoms that make up matter, pixels make up digital images. A pixel is the smallest piece of information in a digital image and is one color. Every image can be described as a certain number of pixels high and a certain number wide (see Figure 11.1).

![]() Resolution—An image’s resolution is how many pixels make up a square inch of your image. The higher the resolution, the larger the file size. The most common resolution is 72 pixels per inch.
Resolution—An image’s resolution is how many pixels make up a square inch of your image. The higher the resolution, the larger the file size. The most common resolution is 72 pixels per inch.
![]() RGB—Red, green, blue. This is a mode of creating colors by mixing red, green, and blue in certain amounts. Each of the three colors has values from 0 to 255. Using this method, more than 16 million colors are available to you. For more information on color, refer to Chapter 4, “Designing Your Site.”
RGB—Red, green, blue. This is a mode of creating colors by mixing red, green, and blue in certain amounts. Each of the three colors has values from 0 to 255. Using this method, more than 16 million colors are available to you. For more information on color, refer to Chapter 4, “Designing Your Site.”
![]() Hexidecimal—A method of taking three-digit RGB numbers and converting them to two-digit numbers that HTML can understand
Hexidecimal—A method of taking three-digit RGB numbers and converting them to two-digit numbers that HTML can understand
There are almost as many image file types used on the web as there are web pages. This section is going to cover the top three file formats. Unless you are doing something completely out of the ordinary you should keep to these formats.
I recommend that you always try to keep the size of the file small. An HTML file with 100 words can be as little as 8,192 bytes, whereas a small image file that is 100 pixels by 100 pixels (roughly the size of a postage stamp) can be almost half that many bytes. Image compression tries to make your files as small as possible while retaining quality. Lossy compression degrades the image slightly to make the size of the file smaller. Lossless compression has no degradation, so usually the file sizes are not as reduced as in lossy compression. Here is a list of the most common file types:
![]() Graphics Interchange Format (
Graphics Interchange Format (.gif)—This is a lossless file format common on the web. These files can be saved with a maximum of only 256 colors, making it a better file format for graphics rather than photographs (see Figure 11.2). You can make one color on a .gif transparent (the background shows through), and .gif files can be animated. Animated .gifs are covered later in this chapter.

![]() Portable Network Graphics (
Portable Network Graphics (.png)—This is a lossless image format to replace .gif that is becoming more common on the web. Like a .gif, it can also be transparent. It can be larger than a .gif and/or a .jpg.
![]() Joint Photographic Experts Group (
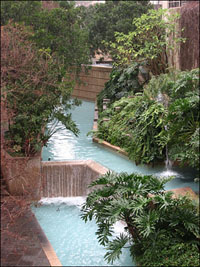
Joint Photographic Experts Group (.jpg or .jpeg)—This is a lossy file format, but that doesn’t mean it is bad. It just uses math to determine patterns so that the image size can be made smaller. More compression, though, means lower image quality. A .jpg can display millions of colors at once. This format is mainly used for photographs. It is the most common file format used on the web. A picture I took in San Antonio, shown in Figure 11.3, is an example of a graphic saved as a .jpg.
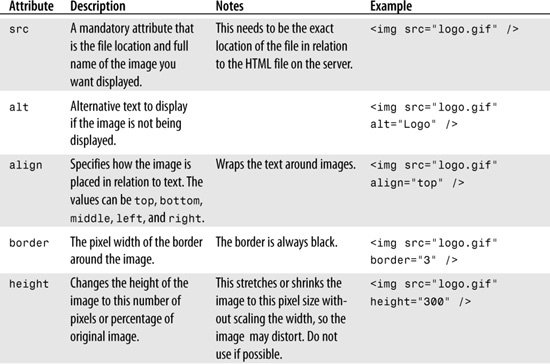
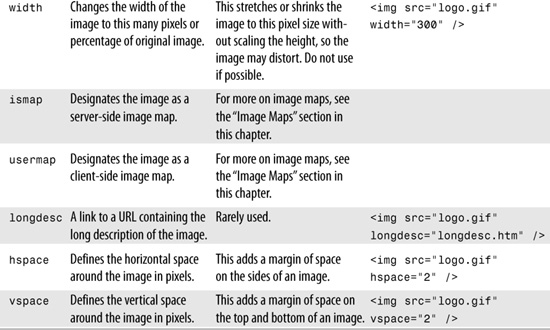
To add images to a web page, use the HTML tag IMG. This tag has several properties, or attributes. Attributes are the things that define how the image is displayed. The following table lists some of the more common attributes:
Have a look at the images on different websites (by viewing the source of the website) and see how they use the image tag. As an example, this image tag came off a news site:
<img hspace="0" height="239" border="0" width="265" vspace="0" alt="A "![]() src="images/candidate.jpg"/>
src="images/candidate.jpg"/>
Images can be used as the background of an entire page. Background images use the BODY tag and the background attribute. Though all the rage when the attribute was introduced, it is now considered old-fashioned or tacky. If you’re going to use a background image, use a CSS. For more on using a CSS, see Chapter 13, “Building a Site Using HTML.”
An image map is an HTML structure that allows you to specify coordinates on an image connected to hyperlinks. They can be server side (that is, there are files stored on the server that assist with the image map) and client side (all the information for the image map is stored in the HTML file).
The client-side image map uses the MAP and AREA tags within the HTML code to define the actions taken when clicking on a certain area of the image.
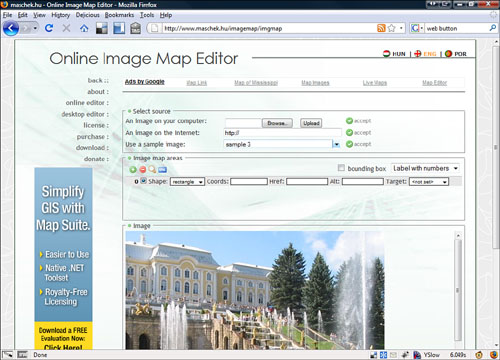
You can even find sites online to help build your image map. The Online Image Map Generator (http://www.maschek.hu/imagemap/imgmap), shown in Figure 11.4, enables you to define client-side image maps easily and generates the code for you.
Animated gifs are a series of .gif files saved into one larger .gif file that animate when loaded into a web browser. Use these sparingly, if at all, because they can be large files that slow down the load time of your page and are perceived as tacky attention-getters. If you need to add an animated .gif, use a free online animated .gif creator like gickr (http://gickr.com/).
As said earlier, your site should have the best images with the lowest file sizes. In the end, it is a trade-off. Sometimes that high-resolution photograph with millions of colors makes your site come together and look spectacular, but other times it is important to have the fastest-loading site possible.
Do not resize your images in HTML. The height and width tags mentioned earlier should never be used. If you use these attributes to change the size of an image, the entire original image is loaded, then resized, so there is no benefit from using those attributes.
As mentioned earlier, whenever possible, use the highest level of compression and lowest number of colors you can. Photos should be .jpg and graphics should be .gifs.
You might feel like a kid in a candy store when looking for images on the web. It’s certainly easy to find images, but it is not legal, nor is it moral, to use them without the permission of the person to whom they belong. People add images to the Web constantly and don’t realize that there are people out there who take them without asking. Let me be clear: It’s illegal to use images for which you have not obtained permission.
There are sites that offer free images. This is good because you can use the images free of charge and with the owner’s permission. The problem is they are usually not the best images and may appear on other websites. If you plan on using free images you have to do quite a bit of looking to find just what you want, but you can’t beat the price.
There are websites that offer the use of images for free. When using images from these sites remember to read all the rules and fine print to protect yourself. Here are some of the better free image sites:
![]() Creative commons (http://search.creativecommons.org/)—The Creative commons is a group dedicated to changing copyright and ownership. This site lets you search creative commons licensed content.
Creative commons (http://search.creativecommons.org/)—The Creative commons is a group dedicated to changing copyright and ownership. This site lets you search creative commons licensed content.
![]() Kave Wall (http://www.kavewall.com/)—A great site for backgrounds and textures for free.
Kave Wall (http://www.kavewall.com/)—A great site for backgrounds and textures for free.
![]() freestockphotography (http://www.adigitaldreamer.com/gallery/index.php)—Images that are free and royalty free.
freestockphotography (http://www.adigitaldreamer.com/gallery/index.php)—Images that are free and royalty free.
![]() visipix.com (http://visipix.dynalias.com/index_hidden.htm)—High-resolution images with free copyright for private and commercial use.
visipix.com (http://visipix.dynalias.com/index_hidden.htm)—High-resolution images with free copyright for private and commercial use.
If you find an image on the web that you want to use, contact the person who owns the image and explain who you are, what image you want to use, what your website is all about, and why you want to use that image. If you are granted permission, make sure to credit the image owner. If you do not get permission or get no response, don’t just go ahead and use the image.
One solution to finding images for your website is to take your own pictures or make your own graphics. This certainly makes it easier for you to credit the creator of the images, but as I said before, someone could possibly take your images. If your images matter to you, be careful where you put them.