
Chapter 13. Using HTML to Build a Site
Now that you have done all your prep work on your web page, you are ready to build a website with HTML.
Although it might be a rare thing these days to use only HTML to create a site, it is a good exercise in the fundamentals of website creation. Learning these fundamentals helps you understand how to edit the HTML behind your blog post or family website. Using HTML is still one of the best ways to create a simple web page, and understanding how it works helps you make the edits that produce the results you are looking for.
This chapter covers some of the basics of creating web pages and websites in HTML. You’ll see at the source code behind a page coded in HTML.
Under every web page on the Internet is at least some HTML. Even a site that uses something like Flash still has an HTML wrapper around it.
Geek Speak
wrapper
A wrapper is something that surrounds something. When you buy a chocolate bar it comes covered in a wrapper. An HTML wrapper works in the same way. It surrounds something, such as a Flash object in HTML code so that a web browser can recognize it.
To really understand the web, you need to understand how web pages work, the parts that make up pages, and how these parts all work together.
Each web page is a file. It might reference other files, but it is still a single file. The web page is just a text file of the HTML commands. This file is very small, which is why it loads so quickly.
A web page, like most computer files, has an extension (for more on extensions see Chapter 5, “Gathering Your Development Tools”). The extensions for web pages are .htm or .html. Either works fine, but you should choose one for your website and stick with it to make it easy for you to keep your references straight. When you are creating hyperlinks you need to use the right filename and extension, so staying with one extension makes it easy.
These extensions tell a web browser that the file contains HTML and should be displayed as a web page.
You can use a couple of different types of tools for HTML creation. These include both text editors and WYSIWYG editors. Most web developers use a combination of these things. For instance, a quick page fix is usually done with just a text editor, whereas the creation of a table is better done with a WYSIWYG editor. It’s important to understand the unique advantages each editor offers so that you can easily decide which tool will work best for the particular job you are doing. For more information on editors consult Chapter 10.
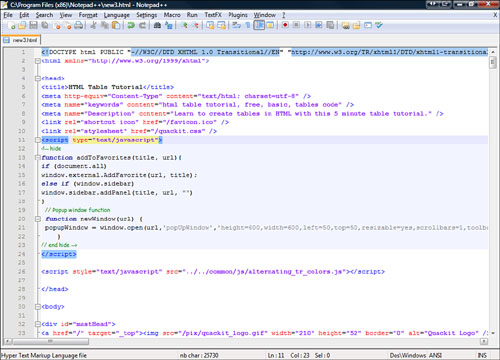
![]() Text editors—Text editors are the simplest tools for creating HTML files. All you have to do is type in the HTML, save it, and you’re finished. Text editors have become more sophisticated in the last few years. For instance, Notepad++ has a built-in HTML plug-in that colors your tags and does some text formatting to make it easier to create your pages (see Figure 13.1).
Text editors—Text editors are the simplest tools for creating HTML files. All you have to do is type in the HTML, save it, and you’re finished. Text editors have become more sophisticated in the last few years. For instance, Notepad++ has a built-in HTML plug-in that colors your tags and does some text formatting to make it easier to create your pages (see Figure 13.1).
![]() WYSIWYG editors—These editors enable you to create web pages by working directly with the page itself, without having to bother with the HTML code. Your screen will appear the same as it does in a browser, and the editor builds the HTML for you. WYSIWYG editors (see Figure 13.2) can be a huge time saver, but they can also lead to pages with proprietary tags or pages that don’t display correctly in every browser.
WYSIWYG editors—These editors enable you to create web pages by working directly with the page itself, without having to bother with the HTML code. Your screen will appear the same as it does in a browser, and the editor builds the HTML for you. WYSIWYG editors (see Figure 13.2) can be a huge time saver, but they can also lead to pages with proprietary tags or pages that don’t display correctly in every browser.

So let’s take a look at the tags and structures that make up the format of a web page. Understanding the parts of the page is invaluable in creating your own pages and learning from other people’s web page code. This section covers those basic tags and a couple of other ways HTML pages can be structured (div tags, tables, frames, and layers).
There are some tags that every web page has to have:
![]()
<html></html>—This tag says this is an HTML document. It is essential and comes at the very beginning and very end of an HTML document.
![]()
<head></head>—This tag is for the heading part of the HTML file. Nothing that appears in the <head> tag appears in the body of your web page.
![]()
<title></title>—This tag defines the title of the website as it appears in the title bar of the browser. The <title> tag appears within the <head> tag, so the text does not appear on the body of the web page.
![]()
<body></body>—This is the main part of your web page. Everything in here is what shows up in the web browser.
So put together properly, the HTML code looks like this:
<html>
<head>
<title>This is the title of
this web page.</title>
</head>
<body>
This is the body of the HTML document.
</body>
</html>
A good web developer documents his or her code. When developing a simple page, everything about it is easy to keep straight, but as your pages get more and more complicated, you need to add notes in the code to help you remember why you did certain things. Also, if you are working with other people on your web page it lets them know what you did when you are not there. To add notes, use the comment tag. The comment tag takes this form:
<!--This is a comment-->
This text will never be displayed on the web page and serves only as a note to the web developer.
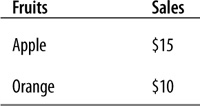
Tables are not only useful for storing information but also as a structural tool for design. Normally a table is used to create a grid of information like this:
Tables are not always this simple, though. Some web developers use tables to structure their web pages. In fact, tables can be essential to properly spacing elements on websites. Tables can contain text, images, and other elements and also can be nested within each other. Let’s look at some simple examples.
First, based on the web page structures described earlier in this chapter (header, body, footer, and sidebars), a web page can be created with a table. The following HTML code produces a very simple web page that uses tables:
<html>
<head>
<title>Sample Page using Tables</title>
</head>
<body>
<table border=1 cellspacing=0 cellpadding=0>
<tr >
<td width=73 valign=top>
<br/>
</td>
<td width=168 valign=top>
<br/>Header
</td>
<td width=84 valign=top>
<br/>
</td>
</tr>
<tr >
<td width=73 valign=top>
<br/>Sidebar 1
</td>
<td width=168 valign=top>
<br/>Body
</td>
<td width=84 valign=top>
<br/>Sidebar 2
</td>
</tr>
<tr >
<td width=73 valign=top>
<br/>
</td>
<td width=168 valign=top>
<br/>Footer
</td>
<td width=84 valign=top>
<br/>
</td>
</tr>
</table>
</body>
</html>
This simple table produces a very simply structured web page (see Figure 13.3).
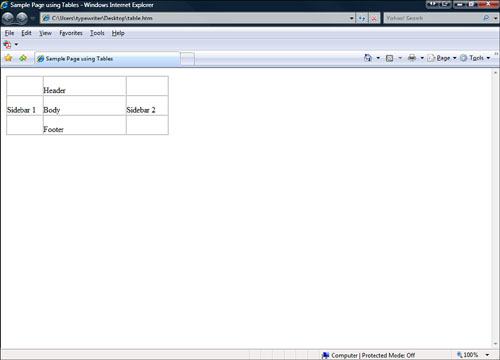
If you add a bit more content, you still retain the initial table structure and your content stays in place. Nesting tables is one way to do this. HTML enables you to create tables that are nested within other tables. These tables within tables can give you even greater control over your content. So for example, in the page shown in Figure 13.3, you could nest another table within the body section of the larger table to create structure within the body part of the table.
Nested tables get very hard to code by hand and really should be left up to the HTML Jedi table masters. Your best bet is to use a WYSIWYG editor to help you create the table so you don’t have to mess with the HTML code.
If you’re brave enough and want to learn more about coding tables, consult the following sites:
![]() W3Schools—HTML Tables, http://www.w3schools.com/html/html_tables.asp
W3Schools—HTML Tables, http://www.w3schools.com/html/html_tables.asp
![]() HTML Code Tutorial—http://www.htmlcodetutorial.com/tables/
HTML Code Tutorial—http://www.htmlcodetutorial.com/tables/
![]() Quackit.com—HTML Table Tutorial, http://www.quackit.com/html/html_table_tutorial.cfm
Quackit.com—HTML Table Tutorial, http://www.quackit.com/html/html_table_tutorial.cfm
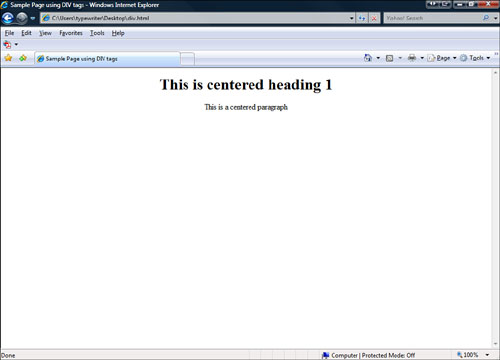
A very common tag used to structure your web page is the <div> tag. This tag acts as a divider for your web page sections. These divided sections can then have specific formatting applied to them, which gives you greater control over minute-level formatting issues. For example, this code uses the <div> tag for formatting:
<html>
<head>
<title>Sample Page using DIV tags</title>
</head>
<body>
<div style="text-align:center;">
<h1>This is centered heading 1</h1>
<p>This is a centered paragraph</p>
</div>
</body>
</html>
This code aligns the text to the center of the browser for all text in the <div> tag. It does not matter whether the text is a heading or just normal text. The preceding code produces the web page shown in Figure 13.4.
For some of the clearest and most complete information on the <div> tag, consult http://www.w3schools.com/tags/tag_DIV.asp.
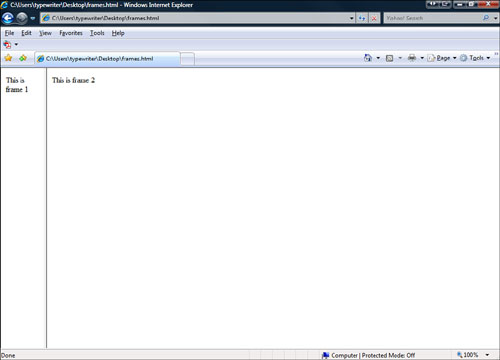
Frames are another way to create structure on your page. Frames essentially create multiple web pages that are displayed within one web page. Just as a table contains cells of content, a web page that uses frames is divided similarly but each cell acts as a separate web page.
caution
Theoretically, frames sound like an ideal way to create web pages; however, they’ve proven to be problematic and are generally seen as bad design and structure these days. Use tables, <div tags>, and cascading style sheets (more on those to come) to achieve better results. Regardless, you should be aware of frames because other developers use them, but just keep in mind that there are better ways to structure a page.
To use frames you need to create several web pages and use a set of tags on one page to create a site that uses frames. The following instructions show you how to create a few pages and then create a single HTML document that displays them all at once. To create example web pages that use frames, follow these steps:
1. Create a web page containing this code:
<html>
<head>
<title>Frame1</title>
</head>
<body>
This is frame 1
</body>
</html>
2. Save this page as frameone.html.
3. Create a web page containing this code:
<html>
<head>
<title>Frame2</title>
</head>
<body>
This is frame 2
</body>
</html>
4. Save this page as frametwo.html in the same place as frameone.html.
5. Create a web page called frames.html containing this code:
<html>
<frameset cols="90,*">
<frame src ="frameone.html" />
<frame src ="frametwo.html" />
</frameset>
</html>
6. Save this page as frames.html in the same place as frameone.html and frametwo.html.
The <layers> tag creates layers of web page elements that can be dynamically displayed and piled on top of each other. Imagine layers as stacks of pictures and documents on your desk. The top layer obscures the layers underneath. Like frames, this appears to be a good idea, but the <layers> tag does not work correctly in all browsers. This leads to problems because you don’t know what browsers people will be using when they visit your site.
A cascading style sheet, or CSS, is a file that contains the formatting for how HTML elements are displayed on any web page that refers to it. A CSS is a file that sits on the web server and contains that information. A CSS keeps your web site organized, consistent, and much easier to maintain.
The word “cascading” might throw you off, but all it means is that the style sheet can control the formatting for your whole document from one place. Using a CSS means you have all the control in formatting down to a very detailed level or you can let the CSS take care of it. So, for example, if you want all your body text to be regular text you can let the CSS define that, but if you have a single word that you want to italicize you can still do that by using a tag around the text. There is a priority to formatting, which means that the formatting at the level closest to the code takes priority over formatting furthest from the code. The following list shows you the priority of formatting:
1. Browser default
2. External Style Sheet (CSS)
3. Internal formatting (in the <head> tag)
4. Specifically applied formatting
So in the preceding list, because the italics is specifically applied (4), it overrides all the other formatting (1,2,3).
The format of an external style sheet (separate file) or an internal one (contained in the HTML file) is the same. This can be in a separate style sheet or in the <head> tag of a particular web page. The format is simply
tag {property: value}
These are the different parts:
![]() Tag—This is the HTML tag to which you want to apply a tag.
Tag—This is the HTML tag to which you want to apply a tag.
![]() Property—This is the property (text color, size, or special formatting) of the text you want to apply to the tag.
Property—This is the property (text color, size, or special formatting) of the text you want to apply to the tag.
![]() Value—This is the value of the property (red, bold, underlined) you want applied to the tag.
Value—This is the value of the property (red, bold, underlined) you want applied to the tag.
So, for example, if you want all <H1> tags to be red,
![]() Tag—h1
Tag—h1
![]() Property—color
Property—color
![]() Value—red
Value—red
Put it together in code and it looks like this:
h1 {color: red}
This changes all your <H1> tags so that the text is red. If you want the color to be blue instead, just change the reference to
h1 {color: blue}
All your <H1> heads are now blue.
This section covers how to create the files and links in HTML documents to use a CSS. A linked style sheet enables you to control the formatting on multiple documents from one centralized place. If you are using a CSS to control the formatting on several pages and want to make a change to all the pages at once you just need to change the CSS.
To link to an external style sheet, you need to put a link in the <head> area of your web page. This link takes this structure:
<link rel="stylesheet" type="text/css" href="site.css" />
In this case, a link to a file (with the type of text/css) named "site.css" is the name of your CSS.
To practice creating a CSS, follow these steps:
1. Create a text file containing this code:
h1 {
color:red;
}
h2 {
color:blue;
}
h3 {
color:green;
}
2. Save this page as site.css.
3. Create a web page called example.html containing this code:
<html>
<head>
<title>CSS Example</title>
<link rel="stylesheet" type="text/css" href="site.css" />
</head>
<body>
<h1>This is heading 1.<h1>
<h2>This is heading 2.<h2>
<h3>This is heading 3.<h3>
</body>
</html>
4. Save this page as example.html in the same location as site.css.
5. Open example.html in a browser and you will see colored text.
This is just a taste of how cascading style sheets work. You can get quite a bit more information on formatting and building complex web pages at the following websites:
![]() W3C School (http://www.w3schools.com/css/default.asp)—This is one of the best tutorial sites on the Internet. Not only can you find an amazing CSS tutorial here but many other tutorials, including HTML and JavaScript. Bookmark this site!
W3C School (http://www.w3schools.com/css/default.asp)—This is one of the best tutorial sites on the Internet. Not only can you find an amazing CSS tutorial here but many other tutorials, including HTML and JavaScript. Bookmark this site!
![]() The CSS Tutorial (http://www.csstutorial.net/)—A clear, simple CSS tutorial.
The CSS Tutorial (http://www.csstutorial.net/)—A clear, simple CSS tutorial.
![]() CSS Tutorial (http://www.echoecho.com/css.htm)—A well written and complete CSS tutorial.
CSS Tutorial (http://www.echoecho.com/css.htm)—A well written and complete CSS tutorial.
Scripts are small pieces of code made from a few lines of text. Scripting is adding that programming code to a website. Scripting is more complex than HTML tags. Some examples are JavaScript, VBScript, or PERL. To some, scripting might seem like a scary word. You might be asking yourself, “I don’t know how to program.” Using scripts within your HTML is by no means a cake walk, but it is also not impossible. A number of different scripting languages are used on the Web (JavaScript, Perl, VBScript), and they can make your web pages fantastically interactive and fun. The keys when experimenting with scripting are to do your research, back up your work, and test as much as you can.
Here are some basic scripting resources on the Internet:
![]() tizag.com—This site has many tutorials for beginners. You can learn to script in JavaScript, PHP, Perl, Ajax, ASP, and VBScript.
tizag.com—This site has many tutorials for beginners. You can learn to script in JavaScript, PHP, Perl, Ajax, ASP, and VBScript.
![]() Web-Wise-Wizard.com—This site has an easy-to-follow JavaScript tutorial.
Web-Wise-Wizard.com—This site has an easy-to-follow JavaScript tutorial.
![]() webmonkey.com—As mentioned previously, this is a great beginner site brought to you by Wired magazine with excellent scripting tutorials.
webmonkey.com—As mentioned previously, this is a great beginner site brought to you by Wired magazine with excellent scripting tutorials.
Now that you understand how to create a web page with HTML, you’ll probably be surprised to know that there are sites out there that offer website templates for free, complete with fully formed pages and cascading style sheets. I recommend starting with these templates but then applying what you’ve learned in this chapter to enhance your site. Web templates can save you a lot of time (and money), but they can also introduce complications that you don’t need, such as formatting or images you don’t like.