Chapter 10. Mapping Technologies
As we’ve discussed throughout this book, one of the most powerful features of Microsoft Dynamics CRM is its extendibility. Because it is so flexible, we have a number of options when adding features/enhancements. Mapping integration is one of the most popular requests for integration.
We focus on two Microsoft technologies in this chapter (Live Search Maps and Microsoft MapPoint), but have also included Google integration (Google Maps). This list is by no means exhaustive and can be extended to your favorite mapping application if you like.
While we have an entire chapter on this subject, this is a relatively easy integration to perform and provides great value to users. As is explained further in this chapter, we have seen both sales and service individuals use these features for planning visits, locating accounts by radius, and mapping distances.
These solutions make use of inline frames (IFrame) integration, which enables you to restrict cross-frame scripting for security purposes and configure formatting and scrolling options. Because the proposed IFrame solutions in this chapter are all custom created, you can have a lot of say in the final look and feel of the solution.
Note
When working with IFrames, it is important to note that they load asynchronously and may not be completely loaded before the CRM form is loaded. In addition, IFrames typically require an external connection (either to the intranet server or the Internet) and can present challenges when a user is in an offline mode.
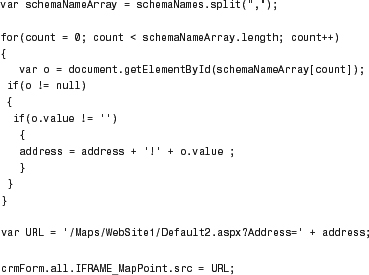
When working with integrated IFrames, there are two ways to pass information to the IFrame: either with the HttpRequest.QueryString property if using ASPX, or with the window.location.search property in JavaScript if using an HTML page. Either can be used to contextually display information based on what is passed to it from Microsoft Dynamics CRM.
Microsoft Live Search Maps
Also known as MSN Maps or Bing Maps, Microsoft Live Search Maps is part of Microsoft’s Virtual Earth framework and provides mapping technology. Another way to think of Live Search Maps is as a website that offers extensibility options while utilizing Microsoft’s Virtual Earth as the underlying platform.
Note
Microsoft Virtual Earth can be licensed separately and offers a greater set of capabilities than the Microsoft Live Search Maps application. Therefore, developers seeking to do more than simple address lookup mapping should look at the Microsoft Virtual Earth product.
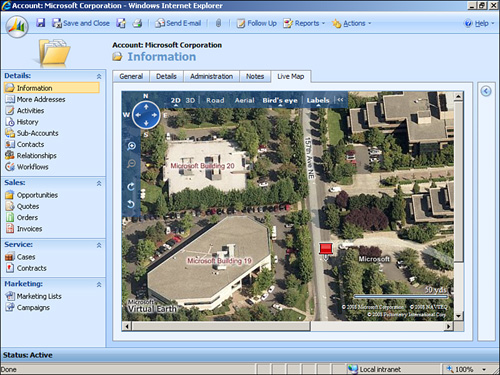
Figure 10.1 shows the Microsoft account in Microsoft Dynamics CRM with a new tab called Live Map that has the Live Search Maps integrated.
Figure 10.1 Microsoft Live Map integration.
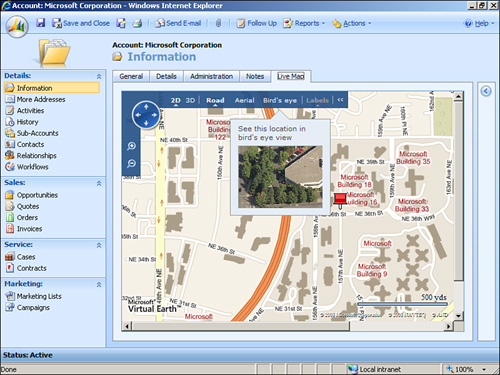
We can easily scroll or change the orientation on the map once it is loaded, and we can change the view options available across the top. Figure 10.2 has the same location, but Bird’s Eye is selected.
Figure 10.2 Microsoft Live Maps integration with Bird’s Eye selected.
To create a Live Search integration, complete the following steps:
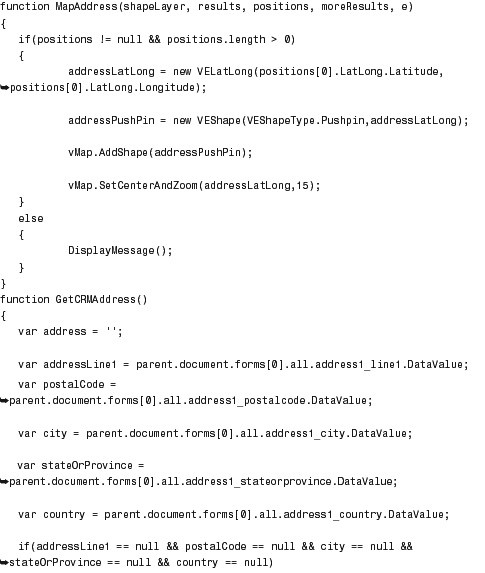
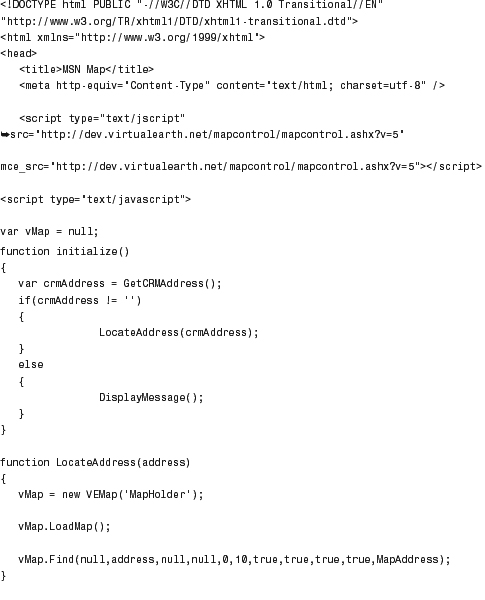
1. Use the following code to create a new web page with an .htm extension:
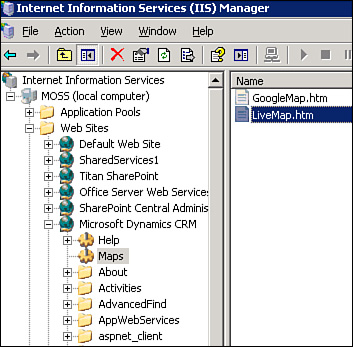
2. Save the HTM into a new folder where the CRMWeb is served (normally in C:Program FilesMicrosoft Dynamics CRM ServerCRMWeb or in C:InetPubwwwroot). In this example, we’ve created a new directory called Maps, as shown in Figure 10.3. (Be sure the directory is configured in Internet Information Services [IIS] as a virtual directory.)
Figure 10.3 New IIS virtual directory for MSN Maps.
3. Navigate to the customization screen for accounts in Microsoft Dynamics CRM, and add a new tab, section, and IFrame.
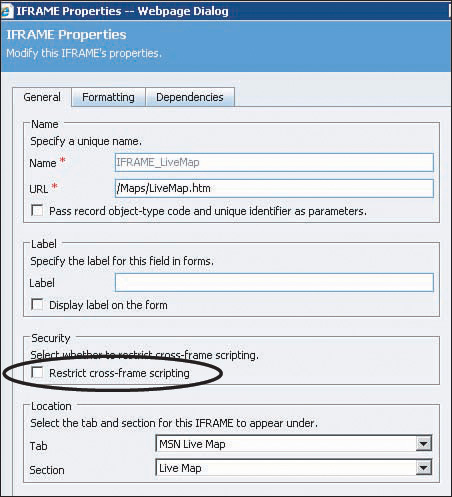
Be sure to configure the IFrame, as shown in Figure 10.4, by adding a name and the URL to the page you just created. In addition, be sure to unselect Restrict Cross-Frame Scripting in the Security section.
Figure 10.4 IFrame Properties page for Live Search integration.
4. Display the Formatting tab and select Automatically Expand to Use Available Space.
5. Save and publish the account.
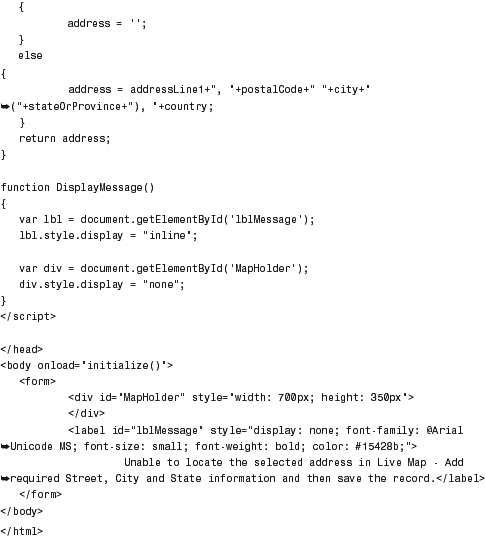
This example will work with as many or as few of the parameters supplied. For example, if you have only a city, it will show the city. If there is no data entered on the saved form, the error message Unable to Locate the Selected Address in Live Map - Add Required Street, City and State Information and then Save the Record will display. (You can easily customize this on the HTML page by modifying the label tag with the ID of lblMessage.)
MapPoint Integration
MapPoint is an extendable product and technology that enables users to create complex mapping and data scenarios. It is significantly more sophisticated than the other mapping technologies in that it has geographic information system (GIS) integration with latitude and longitude options. We have included it within its own section because the application, MapPoint 2009, can be used without an Internet connection, which is a common scenario where users don’t have access to call the MapPoint web services.
We will review two different options:
• Windows-based usage of MapPoint 2009 (without Internet connection)
• MapPoint web service integration (Internet connection required)
MapPoint 2009
With this option, we can leverage the MapPoint 2009 software development kit (SDK) to display Microsoft Dynamics CRM data within the application.
Note
It is important to note that MapPoint is a compiled .NET application and not a web application.
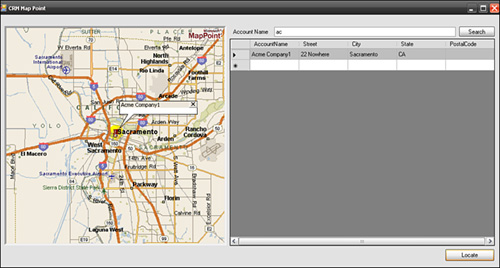
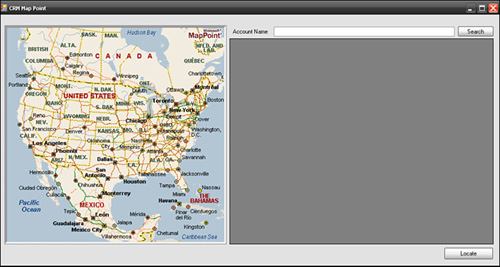
In the example, we modify a MapPoint user interface control and create a text box that shows the Microsoft Dynamics CRM accounts based on the account name, add a Search button, and a data grid to show the resulting/matching accounts and finally include a Locate button that locates the selected address on the MapPoint map.
The Search button includes the business logic to fetch the Microsoft Dynamics CRM accounts using a fetch query based on the user input to retrieve all the accounts in Microsoft Dynamics CRM that match the account name entered in the text box. Figure 10.5 shows the final custom application.
Figure 10.5 MapPoint 2009 with custom CRM integration for accounts.
To deploy the Windows-based usage of MapPoint 2009, complete the following steps:
1. On a computer that has MapPoint 2009 installed, create a new Windows application and reference the MapPoint assemblies.
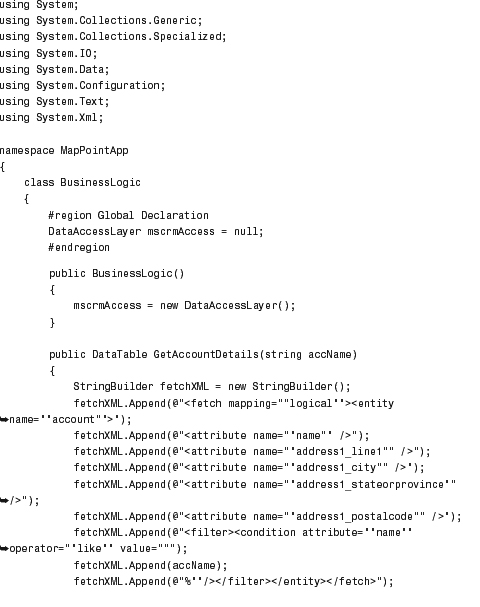
2. Create two class files: one for Business Logic and one for Data Access.
For the Business Logic page, use this code:
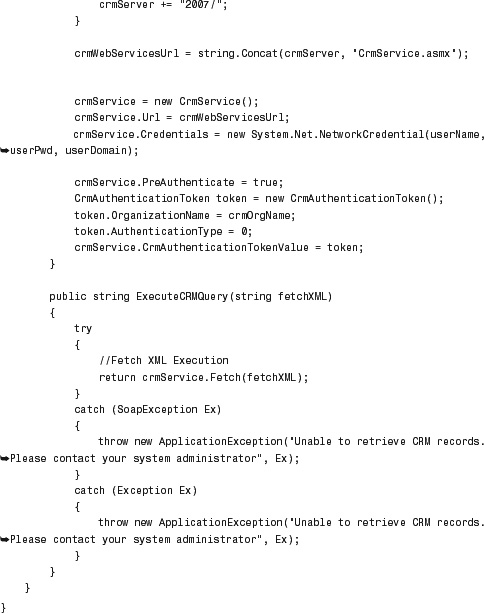
For the Data Access layer, use this code:
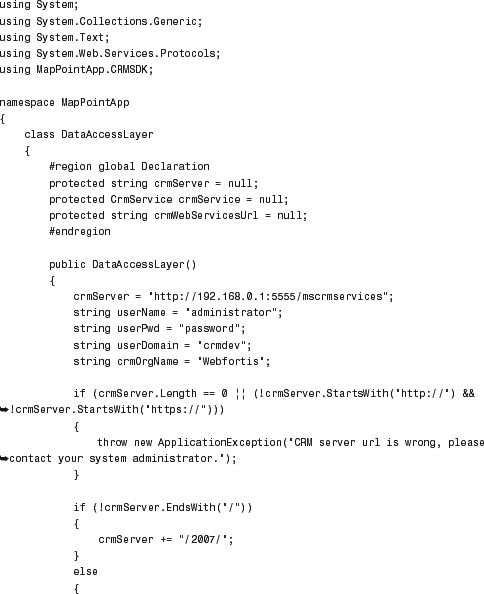
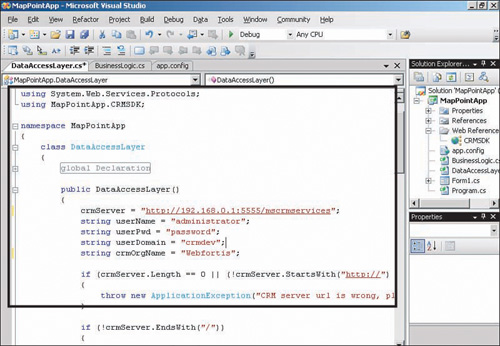
Be sure to change the section in the Data Access layer with your server, username, user password, domain, and organization, as shown in Figure 10.6.
Figure 10.6 Server-specific credentials.
3. Create a new form within the solution with the following code:

4. The resulting solution will look similar to Figure 10.7 and will allow you to enter CRM account information and search for matches.
Figure 10.7 Custom MapPoint form.
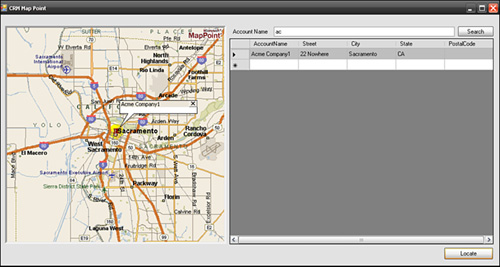
To use the form, enter all or part of a CRM account and click Search. The grid will display the resulting matches from CRM (as shown in Figure 10.8), and when you select a row and click Locate, the location will display (see Figure 10.9).
Figure 10.8 Searching for accounts in CRM through MapPoint.
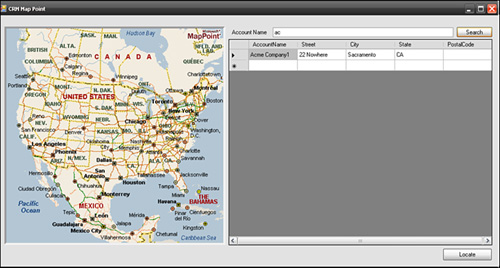
Figure 10.9 Mapped CRM account.
MapPoint Web Services
MapPoint web services integration makes use of the MapPoint web service application programming interfaces (APIs).
When working with Microsoft Dynamics CRM accounts, there are already longitude and latitude parameters for addresses. (Most organizations don’t use these attributes, however). When working with MapPoint web services, we can pass an address from Microsoft Dynamics CRM to MapPoint web services via the FindAddress service and receive back the longitude and latitude parameters. (Locations and thumbtacks in MapPoint require longitude and latitude values for address.)
Unlike Microsoft Live Search, MapPoint web services is not a free service; however, you can get a free developer account, which will allow you start to create some integrations. To sign up for an account, navigate to https://mappoint-css.partners.extranet.microsoft.com/MwsSignup/Eval.aspx.
Note
With the developer account for MapPoint web services, you will get full access to the MapPoint web services APIs and a staging environment that you can use to build applications for proof-of-concept purposes.
For our example, we’re going to create a custom web application that we’ll integrate into the Microsoft Dynamics CRM account form via an IFrame to show the map, and we’ll pass the address values from Microsoft Dynamics CRM to MapPoint web services.
To deploy a MapPoint web services application, complete the following steps:
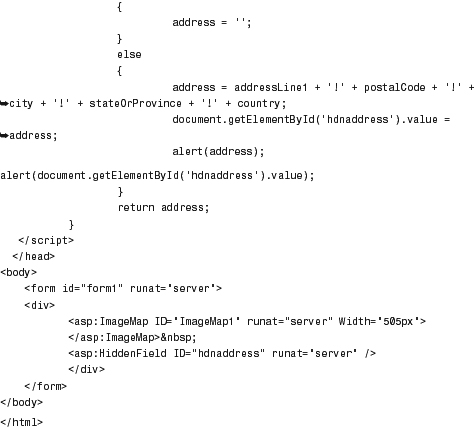
1. Using Visual Studio, create an ASPX page with the following code:
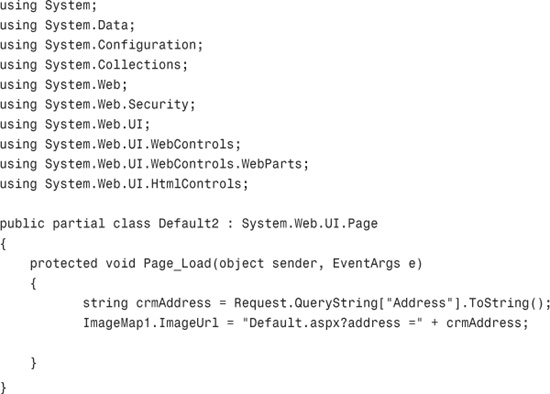
And the following code-behind:
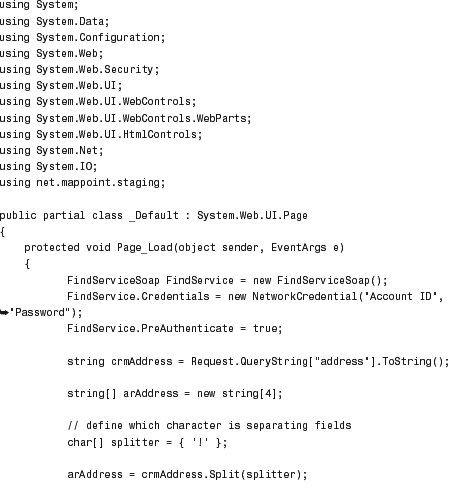
2. Create another ASPX page with no code on it, but with the following code in the code-behind (CS) page:
Note
Be sure to change the account ID and the password in the previous code, as shown here:

Use the account ID and password that you created when signing in to the developer access portal at https://mappoint-css.partners.extranet.microsoft.com/MwsSignup/Eval.aspx.
This aspect of the code is important in that it initializes the application to make use of the methods and classes in the web service.
Note
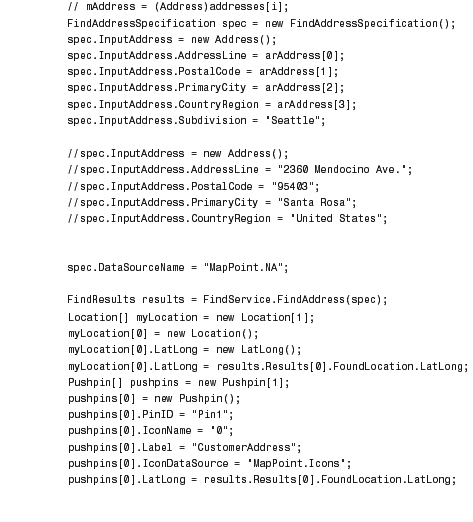
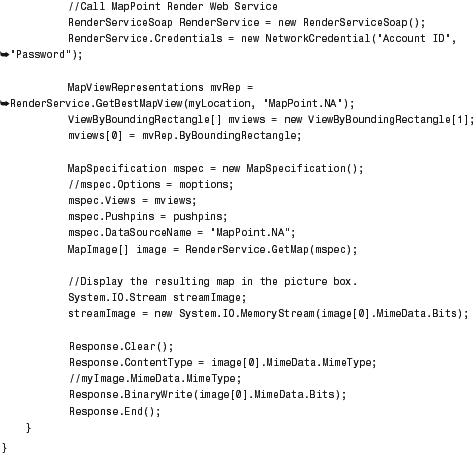
The FindAddress service mentioned previously is contained within this code via the following snippet:
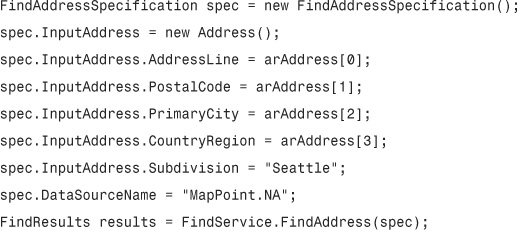
This is where the address information retrieved from Microsoft Dynamics CRM is used to return the longitude and latitude parameters with reference to the selected Microsoft Dynamics CRM account.
Note
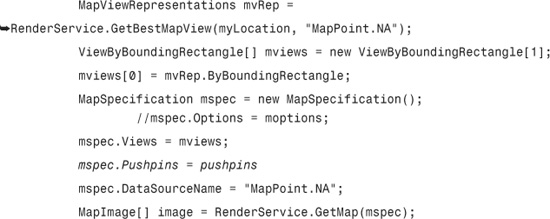
The MapPoint web service provides a Render Server API to automatically zoom based on the geography covered by address and location via the following snippet:

Use the account ID and password that you created when signing into the developer access portal at https://mappoint-css.partners.extranet.microsoft.com/MwsSignup/Eval.aspx.
Note
The image map control is what’s used to show the map with the selected address and location, as shown here:

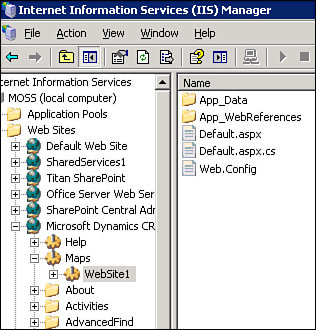
3. Save the solution into a new folder where the CRMWeb is served (normally in C:Program FilesMicrosoft Dynamics CRM ServerCRMWeb or in C:InetPubwwwroot). In this example, we’ve created a new directory called Maps, as shown in Figure 10.10. (Be sure the directory is configured in IIS as a virtual directory.)
Figure 10.10 New IIS virtual directory for MapPoint web services integration.
4. Navigate to the customization screen for accounts in Microsoft Dynamics CRM, and add a new tab, section, and IFrame.
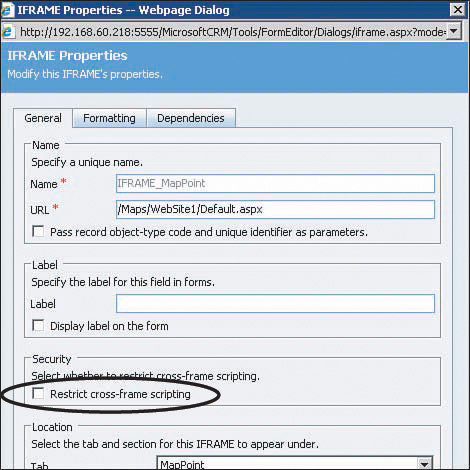
Be sure to configure the IFrame, as shown in Figure 10.11, by adding a name and the URL to the page you just created. In addition, be sure to unselect Restrict Cross-Frame Scripting in the Security section.
Figure 10.11 IFrame properties for MapPoint web services integration.
5. For the Account form, add the following code to the OnLoad event:

Google Maps Integration
Similar to how Microsoft Live Search maps are created, Google uses an integrated HTML page to show its mapping technology. One main difference, however, is the requirement for a Google API key. This is a required step and is dependent on the URL of your site. The key can be obtained from http://code.google.com/apis/maps/signup.html, after agreeing to various terms and conditions.
Note
You must have a Google account to create the Google API key. Currently, both of these services are free.
To obtain a Google API key, complete the following steps:
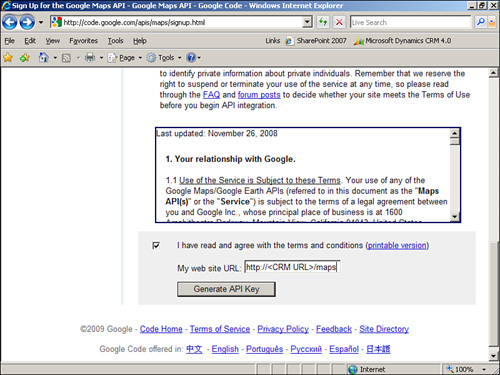
1. Navigate to http://code.google.com/apis/maps/signup.html and agree to the terms and conditions, and enter the URL for your website. Because we’ll be using a virtual directory called Maps in this example, we’ll include it in the URL. Select Generate API Key to continue, as shown in Figure 10.12.
Figure 10.12 Google API key terms and URL.
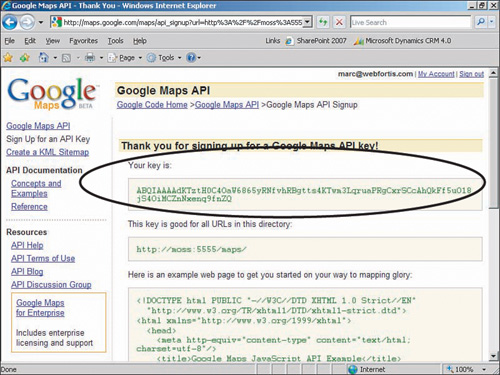
2. You will be asked to sign in to Google accounts, and you will then receive your Google Maps API key, as shown in Figure 10.13.
Figure 10.13 Generate a Google Maps API key.
3. Create a new HTML page with the following code:

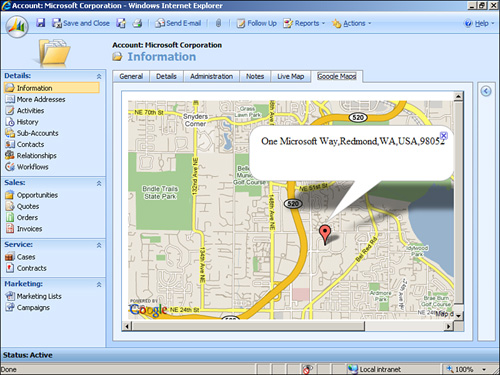
Figure 10.14 shows Microsoft Dynamics CRM with Google Maps integration.
Figure 10.14 Google Maps integration.
Summary
In this chapter, you learned how to integrate several mapping technologies with Microsoft Dynamics CRM 4.0.
Although a majority of the functionality shown in this chapter relies on an Internet connection, utilizing MapPoint 2009 does not depend on an Internet connection.
It is important to note that what we have illustrated barely skims the surface of what can you can do with mapping technologies. The following is just a partial list of other possibilities:
• Select a list of accounts from Microsoft Dynamics CRM and use mapping technology to map the most efficient path to visit them.
• Using the preceding example and enhanced services from MapPoint web services, include traffic conditions.
• Capture mapping information for all site visits with notes reflecting who, what, and why.
• Show drive times to capture miles driven from the office to the account (for expense reporting).
• Show mapping information that includes GIS metric information, such as densities, crime rates, and related metric data.

