Chapter 3. Extending Microsoft Dynamics CRM 4.0
Extending Microsoft Dynamics CRM means many things. To some, it is simply using built-in features of Microsoft Dynamics CRM, such as onChange events (JavaScript events available on CRM forms) to format data a certain way after it has been input. To others, it is building complex systems that interact with the CRM platform for internal applications (such as backend human resources or enterprise resource planning [ERP]/accounting systems) via the creation of plug-ins and/or usage of middleware applications for managing synchronization (usually BizTalk or Scribe applications).
This chapter covers both options, but first we review what it means to extend Microsoft Dynamics CRM and examine some necessary factors you must consider before performing any of the included customizations.
As mentioned in Chapter 1, “Extending Microsoft Dynamics CRM Explained,” extending Microsoft Dynamics CRM can be accomplished via any of the following:
• Custom logic via plug-in development
• Source-to-source integration (web services integration)
• Custom application integration using IFrames
• CRM JScript to extend across various forms
• Workflow
While a large portion of this chapter addresses how you can make modifications to Microsoft Dynamics CRM when you know the user base, browser version, and requirements, it is important to consider what it means when these environmental variables are unknown, or when the application needs to cross domains or be available to a wide array of users. If this is your situation, it is worthwhile to consider an xRM platform approach.
This chapter also includes customization examples that relate both to the client side and to the server end. And to show what it means to extend Microsoft Dynamics CRM with other internal applications (such as other CRM systems or other line-of-business applications), we also delve into some sophisticated models of integration within this chapter.
Limitations and Licensing Considerations
Microsoft Dynamics CRM 4.0 is licensed on either a per-named user or per-device model. (This is somewhat dissimilar from some of Microsoft’s ERP offerings that have a licensing model of concurrency.) Therefore, each and every user who accesses Microsoft Dynamics CRM 4.0 must be identified and set up in Microsoft Dynamics CRM as a valid user with a valid role. End-user licensing is referred to as client access licenses (CALs). Figure 3.1 shows how users are administered in Microsoft Dynamics CRM 4.0.
Figure 3.1 Microsoft Dynamics CRM administration of users.
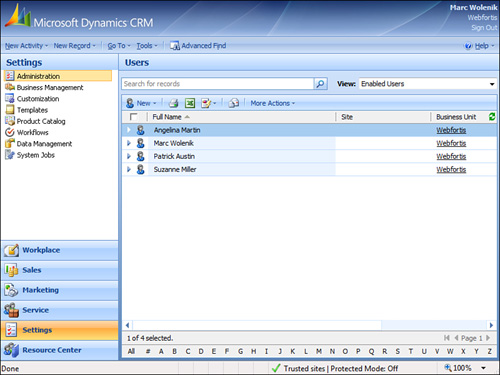
Figure 3.2 shows the device model that is commonly used in call center and manufacturing organizations, where multiple users may use the same computer (but not at the same time).
Figure 3.2 Microsoft Dynamics CRM with a single-device CAL.
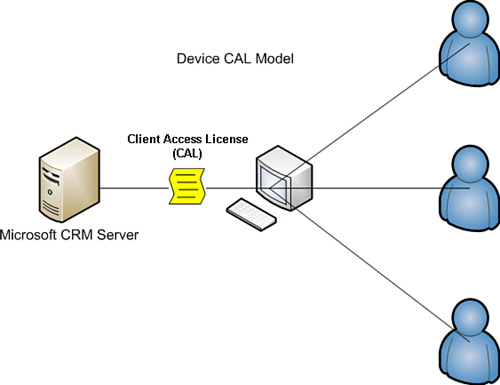
In Figure 3.2, it is important to remember that all three users listed will need to be added to Microsoft Dynamics CRM as valid users (as shown in Figure 3.1). However, instead of purchasing three separate CALs, one for each user, only one CAL must be purchased.
Note
Be careful when considering your licensing requirements and evaluating the device CAL. If at any point any of the users access another computer that has not been identified as the device computer, the organization may be out of compliance.
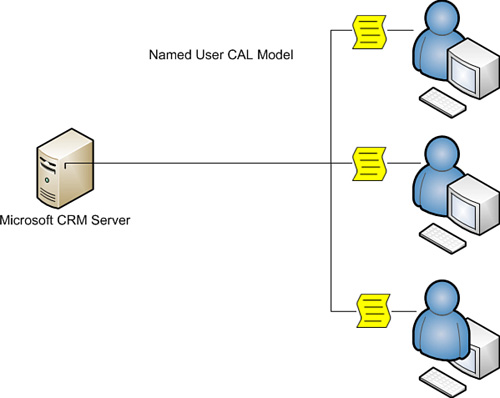
Contrast Figure 3.2 with Figure 3.3, which shows three figures, and therefore requires three CALs.
Figure 3.3 Microsoft Dynamics CRM with three named-user CALs.
Note
Microsoft Dynamics CRM 4.0 is not offered with fewer than five user CALs (either device or named user). The examples provided thus far are for illustrative purposes.
The end result from both of these examples is the following:
• From a licensing perspective, you will have either one CAL (a device CAL) or three named-user CALs.
• From a CRM administration perspective, you will have three users set up and configured with valid roles in Microsoft Dynamics CRM.
This example is included to show the extension of Microsoft Dynamics CRM when a valid user is required (which is often the case when building components that integrate with Microsoft Dynamics CRM).
A frequent mistake that amateur integrators make is to just take advantage of an existing user CAL and use that CAL as the hard-coded authentication/integration credentials. Although this is not necessarily a problem (and several of our examples include such a method), it is important to realize that Microsoft recognizes such usage as a method of access, and it may therefore place the organization in license-compliance risk. This is especially true if the system is designed to perform any level of integration with any application that delivers data outside of the domain.
In addition, it is important to remember that Microsoft Dynamics CRM CALs are instance based, and with multiple on-premise servers (such as with a server farm), only the single-user CAL is required, regardless of the number of actual CRM servers.
As stated previously, Microsoft has positioned Microsoft Dynamics CRM as a platform and has therefore developed a licensing model for it that enables access to it without requiring a license for every user. But, a license is required if data is going to be accessed across the organizational domain; this method of access is referred to as using the connector model or connector licensing.
External Connector License
The Microsoft External Connector license allows organizations to extend Microsoft Dynamics CRM data both across disparate applications and across the domain.
Although it is nothing more than a licensing mechanism, it is important to understand and is included within the context of this book because it is a necessary license when performing several of the integration options mentioned.
Note
Although the External Connector license is purchased separately, there is no configuration made to Microsoft Dynamics CRM that reflects the existence of this license.
The External Connector license is available in two different formats for Microsoft Dynamics CRM:
• Full External Connector
• Limited External Connector
The intention of the Limited External Connector is to allow interaction on a read-only level with the Microsoft Dynamics CRM data, whereas the Full External Connector allows full read/write on the Microsoft Dynamics CRM data. (The cost of the license reflects the restriction levels; the Limited External Connector is approximately one-third the cost of the Full External Connector.)
Connection Options
Finally, it is appropriate to mention that the method of access is completely optional to the end user. There are three ways to interact with Microsoft Dynamics CRM data:
• Microsoft Dynamics CRM web services
• SQL Server CRM filtered views
• SQL Server CRM tables
Note
Although all three options are included, it is recommended to use only the first two options listed here.
Any direct interaction directly with the SQL Server CRM tables is highly cautioned against and may place the modified records (if not the entire system) into an unstable state, and should be performed only by an experienced CRM partner.
Microsoft Dynamics CRM web services allow applications to consume CRM business rules and data directly from the CRM web server. In some cases, this is the preferred method, and creating a connection directly to the SQL Server database is impractical.
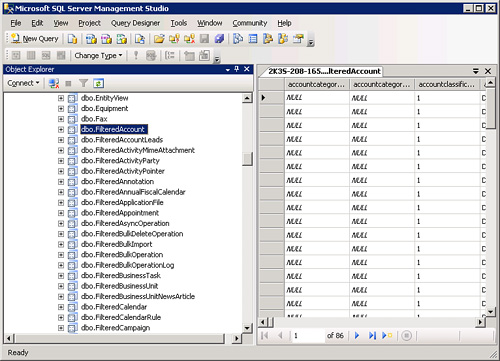
SQL Server CRM filtered views (see Figure 3.4) are similar to CRM web services in that they’re designed to be used by end users who are performing integrations, because they enforce security roles, which are important when considering integration applications that can be used by a variety of users in an organization. In addition, the views can be used for read-only access, but should not be used for write access.
Figure 3.4 Microsoft Dynamics CRM SQL filtered views.
Note
It is important to remember that Microsoft Dynamics CRM can have user roles that are disproportionate from their Active Directory roles, and therefore a low-level CRM user may be a system administrator in Active Directory (and vice versa).
Although our discussion references all the methods listed previously, be sure to understand the implications of using one versus the other.
Customization Options by CRM Version
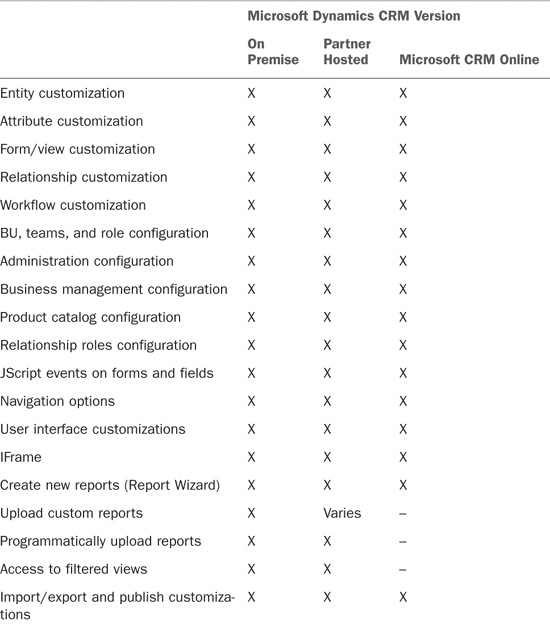
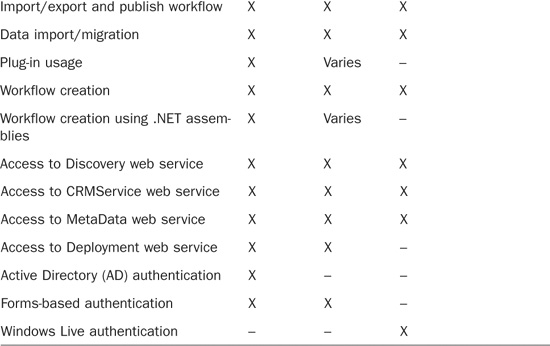
Because Microsoft Dynamics CRM comes in three different versions (On Premise, Partner Hosted, and Microsoft Hosted [CRM Online]), some limitations apply to what you can do within each version when considering customization.
Table 3.1 shows customization options by CRM version.
Table 3.1 Microsoft Dynamics CRM Customization Options
Customizing Navigation
Microsoft Dynamics CRM enables you to easily perform navigation customizations by editing the site map. The site map is an XML file that is read and parsed by Microsoft Dynamics CRM when it is first loaded and can be used to change what and how information displays in the navigation pane.
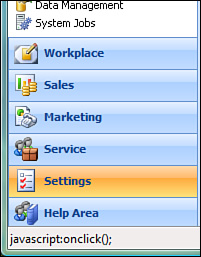
Figure 3.5 shows a configuration that was made to the Resource Center that renames it from Resource Center to Help Area.
Figure 3.5 Microsoft Dynamics CRM configured navigation option.
The site map consists of three primary elements:
• The Area element, which is used for the primary areas on the navigation pane (Workplace, Sales, Marketing, Service, Settings, and Resource Center).
• The Group element, which divides the Area elements into subareas. The workplace area has six default groups: My Work, Customers, Sales, Marketing, Service, and Scheduling. These are optionally shown, however, because users select which ones they will see.
• The SubArea element, which has the actual content links. All the links in the default site map point to the CRM application, with the exception being the Resource Center. In addition, the SubArea element can link to either CRM items or point to any hyperlink.
Note
A common use of the SubArea Resource Center element is to point to your organization’s intranet site, instead of the Microsoft Internet site, for CRM resources.
You also have the option to edit the localized titles using the locale ID (LCID), to add descriptions to the primary elements, and to set the privilege level to view the subarea.
To edit the site map, it must be first exported, then modified, and then reimported.
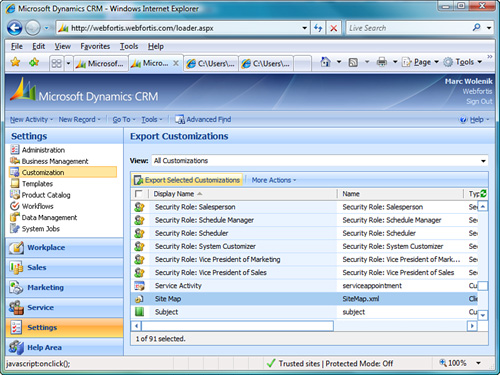
To export the site map, navigate to Settings, Customizations, and then select Export Customizations. Locate the site map (see Figure 3.6) and select Export Selected Customizations. Save the resulting customizations.zip file to your desktop.
Figure 3.6 Microsoft Dynamics CRM configured navigation option.
When you are editing the site map, we highly recommend an environment that performs schema validation. Although Microsoft Dynamics CRM will perform validation on the schema during the upload, the editing environment will prevent you having to rework any applied edits.
A free application that supports schema validation is XML Notepad 2007, which you can download from http://www.microsoft.com/downloads/details.aspx?familyid=72d6aa49-787d-4118-ba5f-4f30fe913628&displaylang=en. In addition, you can use the Microsoft demonstration tool available from http://www.microsoft.com/downloads/details.aspx?FamilyID=634508DC-1762-40D6-B745-B3BDE05D7012&displaylang=en. This application has a built-in site map editor that enables you to modify the site map without having to work with it by hand.
In the preceding example in which we changed the Resource Center to Help Area, we’re using the Title element as follows:
Navigate to the Area element for ResourceCenter, and edit it from this

To this

A number of other options can be performed when working with the site map:
• Changing the shown icon
• Changing the order of the areas
• Adding or removing areas
• Adding groupings
In addition, you can apply security roles to areas of the site map to create an “adaptive UI” and show only the areas and links that users have permission to view.
Note
Changes to the site map are global in nature.
Before making any modifications to the site map, be sure to make a backup copy of the XML output in case you need to restore your changes.
Form Events
Two events are global in nature for all forms: the onLoad event and the onSave event.
The onLoad event fires after the form has completed loading, and is commonly used to send an alert to the user, disable fields, or modify field values.
The onSave event fires when the Save or Save and Close buttons are accessed, and it is important to note that it fires regardless of whether data on the form has been changed. This event is commonly used to validate an entry because the onSave event can cancel the save operation.
In addition to the form events, the onChange event is available for every field on a CRM form. To fire the onChange event, the field that has the event attached to it must have its value changed, and it must lose the focus (by the user selecting or tabbing elsewhere on the form).
These events are utilized by writing JavaScript, and our first two examples at the end of this chapter show these events in action.
IFrames
One of the easiest ways to perform an integration to an existing Microsoft Dynamics CRM deployment (both hosted or On Premise) is to use IFrames.
IFrames are “inline frames or windowless inline floating frames” and provide an easy mechanism for integrating data, because they can exist free form or easily pass data through them to the underlying source.
Note
Although this is one of the easiest ways to extend Microsoft Dynamics CRM, it does have one major limitation: You must have a connection to the underlying application. Therefore, if you’re working offline or remotely and your application requires a VPN to access (because it is on your local intranet), you should consider an alternative solution.
In addition, there is no built-in CRM reporting on any of the IFrame application data.
Note
Microsoft Dynamics CRM Online supports the creation of IFrames, but it doesn’t support the hosting of the underlying page. Therefore, you must leverage your own (or someone else’s) hosting services for an integration with CRM Online.
To create an IFrame, open the Form Designer, select Add an IFrame, and complete the information required. Figure 3.7 shows the basic information of a sample IFrame.
Figure 3.7 Microsoft Dynamics CRM IFrame creation example.
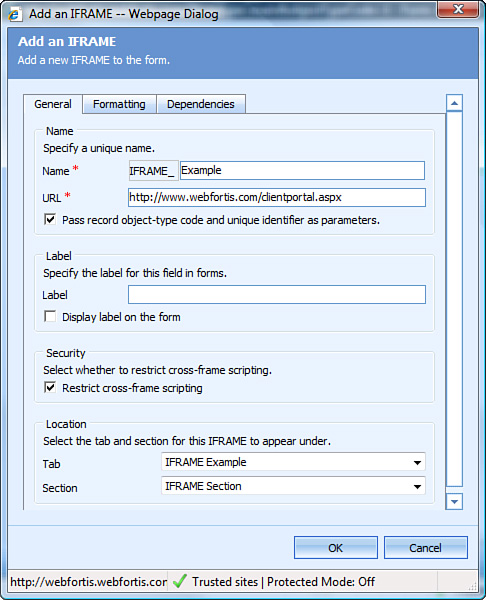
You want to pay special attention to two areas:
• Pass Record Object-Type Code and Unique Identifier as Parameters
• Restrict Cross-Frame Scripting
The first option (Pass Record Object-Type Code and Unique Identifier as Parameters) is actually six parameters in Microsoft Dynamics CRM 4.0 (only two in the previous version):
1. typename
2. type
3. id
4. orgname
5. UserLCID
6. OrgLCID
The typename is the name of the entity (Account, Contact, and so on). For custom entities, the customization prefix is prepended (normally new_; but if you’ve changed the customization prefix, which is always a good practice, that will be your prefix, followed by the entity name. For example, if we create a new entity called ProjectDescriptions, the typename will equal new_ProjectDescriptions or wf_ProjectDescriptions).
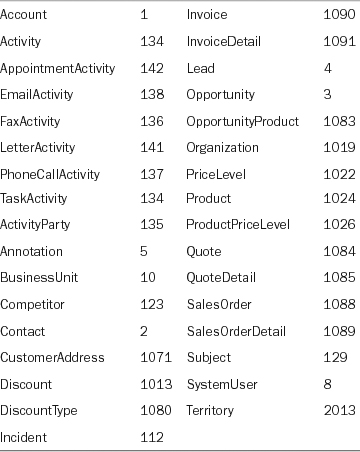
The type is an integer that uniquely identifies the entity. Table 3.2 shows the object codes for CRM.
Table 3.2 Microsoft Dynamics CRM Object Type Codes
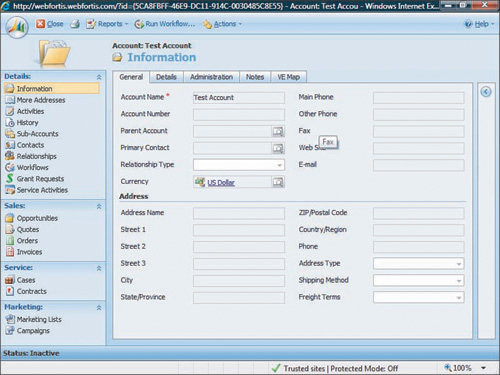
The id is the ObjectId, which is the unique identifier or GUID. This value is displayed in the URL of every form in the system (and is null until the form is created).
Figure 3.8 shows a GUID of a sample account in the address bar.
Figure 3.8 Microsoft Dynamics CRM GUID sample.
Note
Alternative methods of obtaining the GUID include adding a JavaScript onLoad event similar to "alert(document.location)" or a separate page that uses document.write to list out the query strings and their values.
The orgname is the unique name of the organization, the UserLCID is the language code in use by the current user, and the OrgLCID is the language code that represents the base language for the organization.
Both the UserLCID and the OrgLCID are four-digit codes. For a complete reference of language codes, see Appendix A, “Locale ID (LCID).”
Note
As counterintuitive as it sounds, best practices usually call for using the entity name (for example, Account, Contact) rather than the type code. The reason for this is that entity codes may differ between one Microsoft Dynamics CRM installation and another.
Consider this illustration of the effect that passing these parameters has. When the URL referenced in Figure 3.7 is called without Pass Record Object-Type Code and Unique Identifier as Parameters being selected, the following URL is called from the form:
http://www.webfortis.com/clientportal.aspx
When the Pass Record Parameters option is selected, the following URL is called from the form:
http://www.webfortis.com/clientportal.aspx?type=1&typename=account&id={5CA8FBFF-
46E9-DC11-914C-0030485C8E55}&orgname=Webfortis&userlcid=1033&orglcid=1033
The page that is being displayed in the IFrame (in this case, the clientportal.aspx) can easily read the variables using the HttpRequest.QueryString. (If you are using an HTM page, the parameters can be accessing using the window.location.search property in JavaScript.)
Table 3.2 shows the object codes for CRM.
You can readily see how powerful and easy it is to create specific information related to the selected record on the underlying application using this information.
For an example of how this data is referenced in an application, see the last example in this chapter and see Chapter 5, “SharePoint Integration.”
The second option, Restrict Cross-Frame Scripting, is selected by default to help protect the integrity of the CRM application. The effect of this selection is to basically place the application in the IFrame in restricted mode (as defined in Internet Explorer).
This option is unselected when you want to have a level of interaction between the application that is in the IFrame and CRM.
Note
The restriction also applies to applications contained within the IFrame that may need to read from the CRM application.
An example of this is a custom application that performs a background check on an account for credit-worthiness. When the credit check comes back, the custom application could reference a Boolean value on the account form and set the value of Background Check Cleared equal to true.
Note
The CRM Outlook laptop client has higher security restrictions in place, and in some cases it is not possible to programmatically update fields as described. Be sure to thoroughly test your solution in all environments before rolling out to production.
For more information about IFrames, be sure to thoroughly review the IFrame documentation on MSDN at http://msdn2.microsoft.com/en-us/library/ms535258.aspx.
We’ve included an example of how an underlying application might work using an IFrame with parameters; see the third example in the Examples section of this chapter.
Examples
The following examples represent some possibilities for customization or extending Microsoft Dynamics CRM when you don’t need to worry about security outside of your domain.
Example One: Formatting the Phone Number
When entering a phone number into the system, no formatting logic/mask is applied to the entered number. Not having a formatting mask is helpful if you need to enter a phone number and an extension (such as 916-712-5451, ext: 001), but a properly formatted phone number adds to both human and integrated system readability.
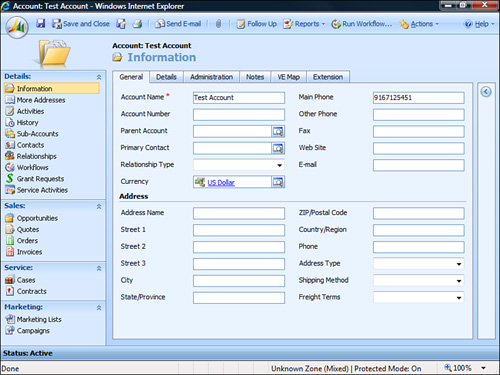
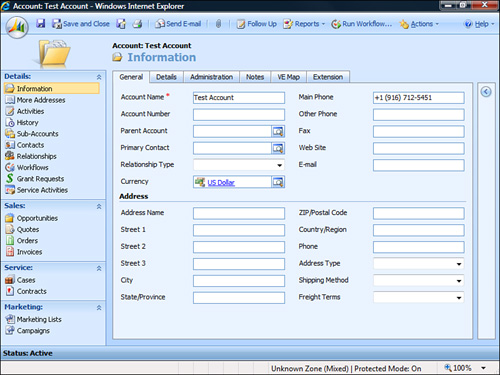
Figure 3.9 shows a standard CRM Account form with a freely entered telephone in the Main Phone field.
Figure 3.9 Microsoft Dynamics CRM with regular phone entry.
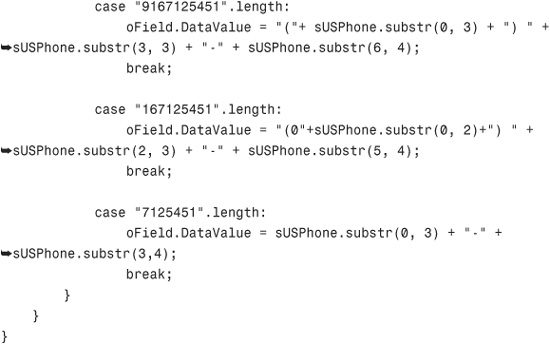
To add formatting to this field, place the following code in the Account form onLoad event. (Be sure the event is enabled.)
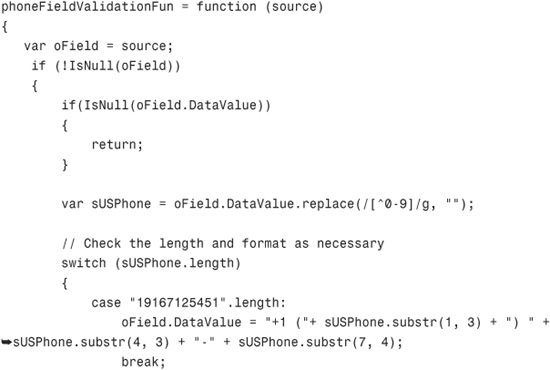
Now place the following code for each phone field (using the onChange event):
phoneFieldValidationFun(event.srcElement);
Applying the preceding code to the onChange event of the fields that need to be formatted with phone numbering will properly format the phone number entry, as shown in Figure 3.10.
Figure 3.10 Microsoft Dynamics CRM with formatted phone entry.
This example clearly shows how to format data simply and easily on data entry. It would be a trivial matter to apply error handling and formatting for other fields by modifying the example shown.
Example Two: Validating Data Across the CRM Application
It is common to be working with Microsoft Dynamics CRM and need to query/validate entered data against another entity’s data. A common example is when a Parent Customer or Primary Contact is selected for the Contact or Account records, but it could be used in a number of situations. Other common scenarios include the following:
• Populating data on the account for invoice quantities and/or amounts (if you wanted to use CRM to show total orders/amounts)
• Updating subordinate records such as Opportunities, Quote, Orders, or Invoices with information entered on the Account level
• Modifying Account data based on case status
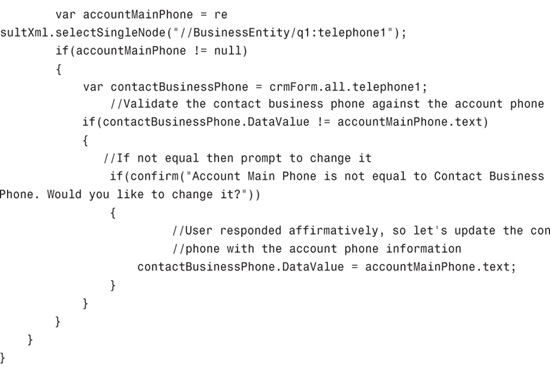
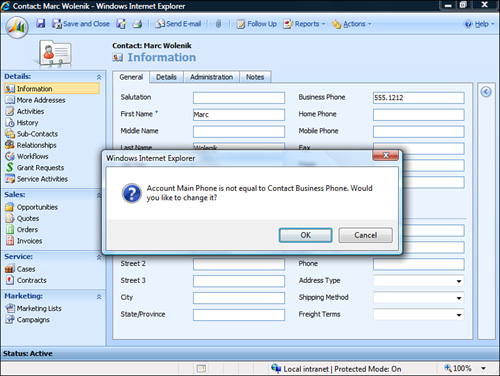
This example shows how to check the related Account record of the Contact and validate phone numbers. If they differ, the system prompts the user as to whether the user wants to update the Contact record with the main phone number from the Account.
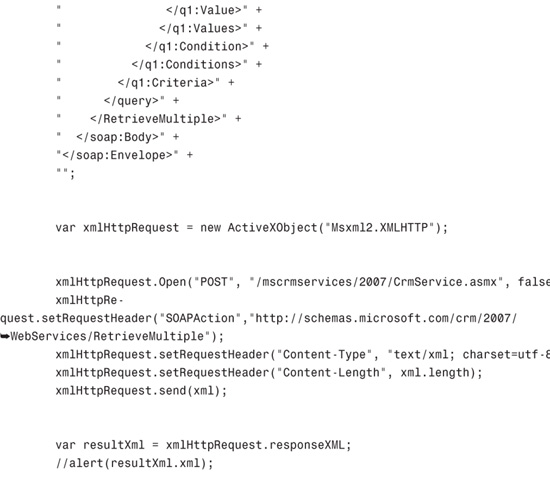
Place the following code on the Parent Customer field of the Contact entity using the JavaScript onChange event to call an asynchronous event to query the CRM database and update/validate a value based on a user selection:
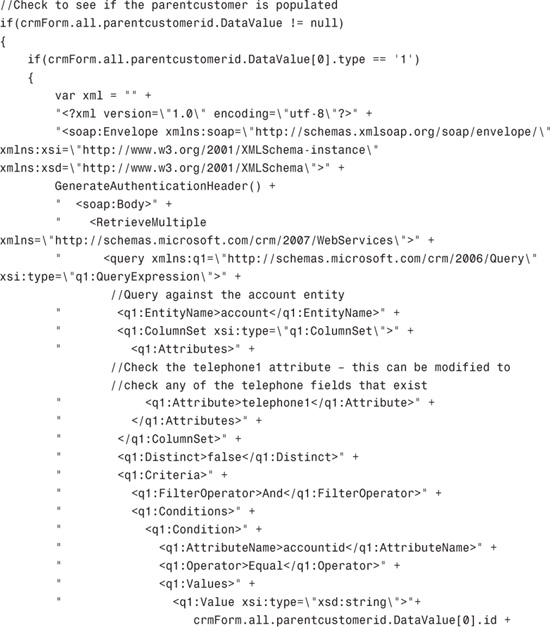
Figure 3.11 shows what happens when you try to set the Parent Customer of a Contact record. The code checks the Business Phone of the Contact against the Main Phone of the Account and prompts for updating of the Contact record.
Figure 3.11 Microsoft Dynamics CRM with validation across multiple entities.
This example can easily be applied across other entities within the CRM system and is a common request to extend functionality internally.
Example Three: Extending a Form for IFrame Integration
As mentioned previously, there are several considerations when working with IFrames, including the fact that IFrames load asynchronously and are shared across all clients. This example checks whether the user is working offline, and if not, sets the target of the IFrame dynamically.
Note
It is important to note that when working with dynamically created IFrames, parameters are not passed to the new URL automatically and the query string parameters need to be appended before setting the src property.
To follow this example, create a new IFrame on the Contact entity, and set the URL on the IFrame URL equal to about:blank. This will open the IFrame to a blank page by default.
Modify the onLoad event for the form and add the following code:
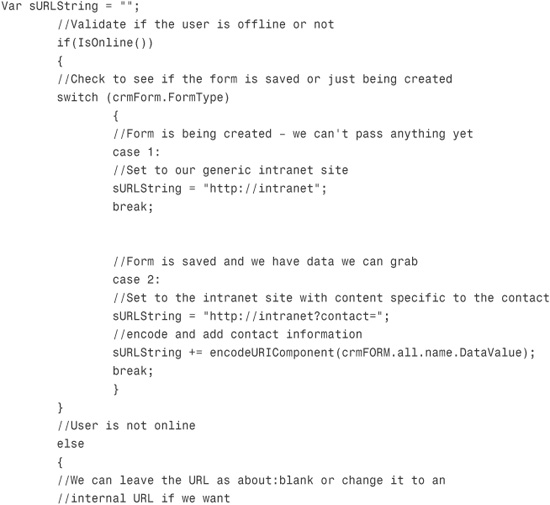
If the user is online, the intranet site is displayed.
Summary
This chapter covered considerations that need to be given when performing customizations on Microsoft Dynamics CRM.
Our example of IFrame modification is probably the most common example of an internal integration. Because of the out-of-the-box functionality with CRM and its capability to pass parameters to an underlying application, it is incredibly easy to develop an extended platform for Microsoft Dynamics CRM without too much effort.
One consideration that is important when working with IFrames is that they must call an underlying application and, therefore, are limited to both Internet/LAN connectivity (depending on the application location).
Finally, our examples of manipulating data across the CRM application illustrated the flexibility inherent to the application at performing updates using JScript.
Extending Microsoft Dynamics CRM is not limited to the examples provided within this chapter, but the goal is to look at how to make customizations where a number of variables are known, such as your user base, browser version, and requirements.

