
12. Maintaining Compatibility and Accessibility
An Introduction to Accessibility
It’s amazing to think that despite the fact that the World Wide Web is in its infancy, access to it has become such an integral part of our lives. Access to the Web is quickly becoming not just a convenience, but a necessity.
This sense of necessity has largely driven the need for computer applications and sites to be accessible to people who might have hearing loss, low vision, or other disabilities. In fact, in 1998, Congress enacted the Workforce Investment Act, which consisted (in part) of an amendment to the Rehabilitation Act of 1973. That amendment was titled Section 508, and it has become synonymous with accessibility in the world of technology.
Government agencies and most educational institutions are required to abide by Section 508 requirements. Section 508 specifies requirements not only for sites, but also for multimedia, video, telecommunication products, and more. It is far-reaching legislation that affects most web designers.
Accessibility doesn’t just refer to the ability of people with vision problems to experience a site via a screen reader. It also applies to proper color choice so that those with various types of color blindness can read your site and so on. It even prohibits design techniques that can cause screen flicker beyond a certain frequency. All in all, 16 rules comprise Section 508 standards.
Designing for Accessibility
There are many points to consider when designing your site to be accessible. Expression Web 3 provides some user interface elements that are designed to keep you in compliance with accessibility requirements. Many other techniques require attention to detail and a touch of common sense when developing your site.
Note
![]()
Section 508 is not the only standard for accessibility, but it’s the only government-enforced standard. The W3C has devised the Web Content Accessibility Guidelines (WCAG) in an effort to enhance the accessibility of sites. Expression Web 3 recognizes both Section 508 and WCAG.
Accessible Hyperlinks
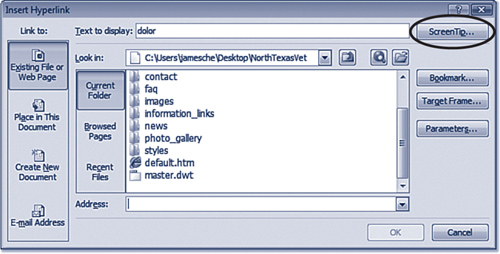
When creating a hyperlink in Expression Web 3, you’ll have the option of also specifying a ScreenTip by clicking the ScreenTip button in the Insert Hyperlink dialog, as shown in Figure 12.1.
Figure 12.1 Configuring ScreenTips for hyperlinks is important for accessibility. Expression Web 3 makes it easy.
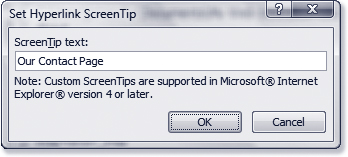
When you click the ScreenTip button, the Insert Hyperlink ScreenTip dialog is displayed, as shown in Figure 12.2. Enter the text for the ScreenTip and click OK. When a user hovers over the hyperlink with his mouse, the text configured as the ScreenTip will pop up next to the mouse. Additionally, the text you enter will be read by a screen reader for those with visual disabilities.
Figure 12.2 Enter the text for your ScreenTip. It will then be available to a screen reader for those with visual disabilities.
![]() For more information on inserting hyperlinks, see “Creating Hyperlinks,” p. 55.
For more information on inserting hyperlinks, see “Creating Hyperlinks,” p. 55.
Note
![]()
The ScreenTip feature in Expression Web 3 is implemented using the title attribute of the hyperlink.
Accessible Tables
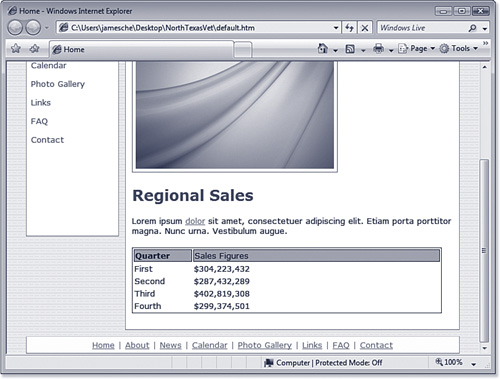
When creating a table, it’s often tempting to describe the table in the site’s text and then present the data without headers. However, Section 508 requires that all tables containing data must also contain header information. The table shown in Figure 12.3 is compliant with Section 508 guidelines.
Figure 12.3 All data tables must have header information. This table meets that requirement.
Layout tables have no special requirements to meet Section 508 requirements.
![]() For more information on creating tables and using layout tables, see Chapter 5, “Using Tables and Layout Tables.”
For more information on creating tables and using layout tables, see Chapter 5, “Using Tables and Layout Tables.”
Accessible Frames
Frames pages are a challenge for screen readers because a screen reader sees a frames page as two or more separate pages. You should follow a few general guidelines to make frames pages more accessible.
Make sure each <frames> tag in the frameset contains a title attribute that clearly defines the purpose of the page. For example, the following <frames> tags will aid in accessibility:
<frame title="Site Navigation" name="navframe" src="nav.htm" />
<frame title="Main Site Content" name="main" src="main.htm" />
You should also be sure you include a proper DOCTYPE declaration on your frameset page. The following DOCTYPE declaration should be used on a frameset that conforms to the XHTML 1.0 standard:
<!DOCTYPE html PUBLIC "-//W3C//DTD XHTML 1.0 Frameset//EN"
"http://www.w3.org/TR/xhtml1/DTD/xhtml1-frameset.dtd">
Finally, make sure you include a <noframes> section in your frameset.
![]() For more information on using frames, see Chapter 6, “Using Frames.”
For more information on using frames, see Chapter 6, “Using Frames.”
Other Accessibility Considerations
There’s no possible way to cover all the accessibility topics in this chapter. However, in addition to the common issues we’ve already discussed, there are some general considerations to keep in mind as you develop a site.
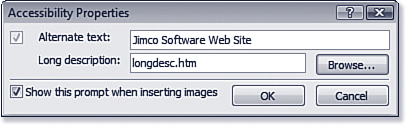
Be sure to always provide some alternative representation for images, navigation elements, Adobe Flash animations, and any element implemented with client script. Expression Web 3 provides user interface elements for ensuring that you meet the necessary requirements in this area. For example, when you insert an image onto a page, Expression Web 3 displays the Accessibility Properties dialog shown in Figure 12.4.
Figure 12.4 The Accessibility Properties dialog serves as a reminder to enter attributes required for accessibility.
Another item web designers often overlook is that a site should be viewable without the application of any style sheets. For example, consider a site with white text inside a table styled with a black background using a style sheet. Because Internet Explorer uses white as a background color by default, the text for such a site would not be visible to anyone without CSS support. Not only is that a counterproductive design, but it also falls outside the Section 508 requirements.
The bottom line is that you should always think about accessibility when designing your sites. Many accessibility rules are based on common sense. However, no matter how much effort you put into making your sites accessible, you are bound to miss something. Thankfully, Expression Web 3 provides an Accessibility Checker feature so you can locate accessibility problems and correct them before you deploy a site.
Using the Accessibility Checker
The Expression Web 3 Accessibility Checker allows you to run reports on how well your site holds up to accessibility standards. The Accessibility Checker can check one or more pages (or your entire site) against WCAG and Section 508 requirements and provide a comprehensive report of the results.
Checking Accessibility
To access the Accessibility Checker, select Tools, Accessibility Reports to display the dialog shown in Figure 12.5.
Figure 12.5 The Accessibility Checker is a flexible tool for finding accessibility problems in your site.
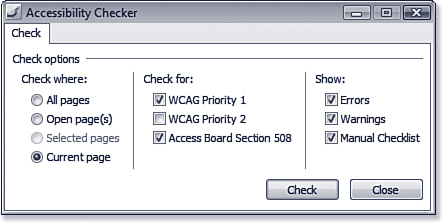
The Check Where section of the Accessibility Checker dialog lets you check all pages, all open pages, selected pages, or the current page for accessibility problems. The Check For section allows you to choose which standard(s) you would like to check your pages against. You can choose WCAG Priority 1, WCAG Priority 2, and Section 508 requirements.
Note
![]()
Priority 1 results are problems that must be corrected for a page to remain compliant with accessibility standards. A priority 2 result should be corrected for maximum accessibility, but not doing so will not cause your page to fail validation.
The Show section provides a series of check boxes that control how much information is displayed in the accessibility report. The following options are available:
• Errors—Represents problems that cause the page to fail accessibility requirements. Any errors must be corrected if the site is to fall within accessibility standards.
• Warnings—Represents areas of a page that might be problematic based on the content. You should review these areas for possible accessibility problems.
• Manual Checklist—Lists the general requirements for the selected standards. These are somewhat similar to reminders that are designed to ensure you are aware of the requirements imposed by the selected standards. Because the items on this list cannot be checked automatically, you will want to check them manually.
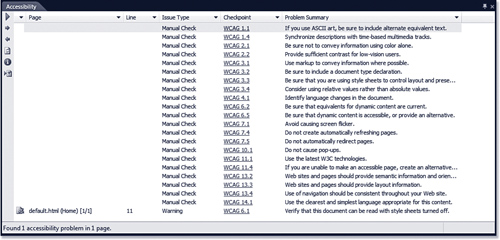
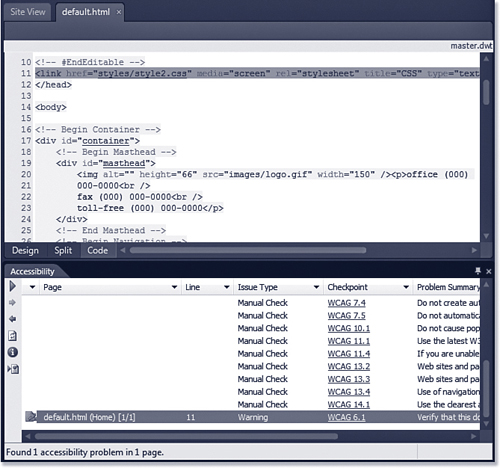
After you’ve made your choices in the Accessibility Checker, click Check to check the page(s). When the check is complete, Expression Web 3 displays the results in the Accessibility panel, as shown in Figure 12.6.
Figure 12.6 The Accessibility Checker’s results are displayed in the Accessibility panel.
Working with the Accessibility Panel
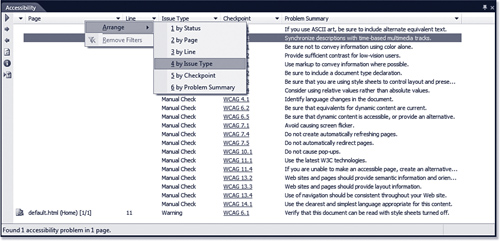
When many items are displayed in the Accessibility panel, arranging the listing can be convenient. You can easily arrange the list any way you want by right-clicking inside the panel and selecting Arrange to access the menu shown in Figure 12.7. Selecting an item on the menu arranges the list by that category.
Figure 12.7 Arranging a list is a convenient way to organize the results.
Additional options are available by right-clicking a particular item. For example, for additional details on an item, right-click the item and select Problem Details. Expression Web 3 will display the Problem Details dialog with details on that item (see Figure 12.8). This is useful not only to get a better understanding of the problem, but also to provide hints on how to correct the issue.
Figure 12.8 The Problem Details dialog can provide helpful hints on how to resolve issues that appear in the Accessibility report.

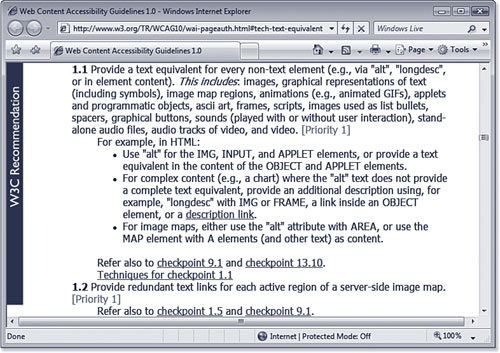
If a particular item appears because of a WCAG checkpoint, additional information on that specific item can be obtained by either clicking the WCAG link in the Checkpoint column (shown previously in Figure 12.6) or by right-clicking the item and selecting Learn More from the menu. Doing so will open your browser and take you to the W3C site, where you can read about the specific requirement, as shown in Figure 12.9.
Figure 12.9 Expression Web 3 provides direct links to W3C documentation on particular items in the Accessibility panel.
To correct a problem or warning displayed in the Accessibility panel, double-click the entry. Expression Web 3 will open the applicable page and select the code that caused the error or warning, as shown in Figure 12.10, so that it can be easily corrected.
Figure 12.10 Locating problems in code is easy. Just double-click the item in the Accessibility panel to open the page and highlight the offending code.
Generating Accessibility Reports
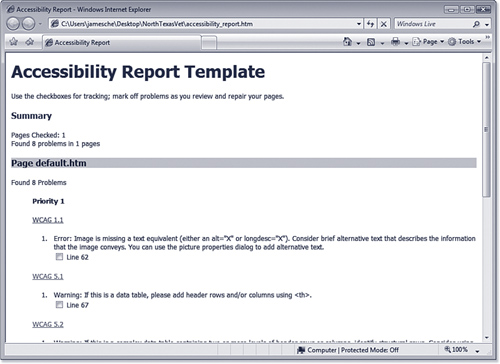
In some cases, saving the results of the Accessibility Checker can be convenient. Perhaps you are not the person responsible for correcting all the errors and warnings, or maybe you want to correct the problems over time. Expression Web 3 lets you simply generate an HTML report of the Accessibility Checker’s results.
To generate an HTML report, click the Generate HTML Report button, as shown in Figure 12.11. Expression Web 3 will create a new page for the report, as shown in Figure 12.12. If you’d like to keep the results for later, save the page to a desired location.
Figure 12.11 Generating an HTML report of the results of an accessibility check is as simple as clicking a button.
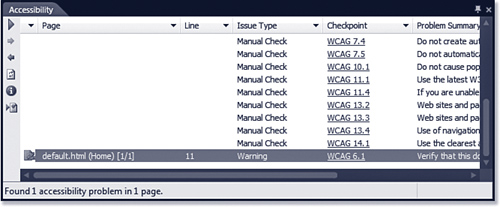
Figure 12.12 The HTML report that Expression Web 3 generates contains details on all results and includes links to appropriate documentation for each result.
Not all of us are required to abide by Section 508, but all of us should. Considering the effort web designers take to ensure that their sites render correctly in all browsers, it only makes sense that equal effort should go into ensuring that your sites are accessible to those with disabilities.
Designing for Compatibility
Here’s a trivia question for you: What was the name of the first web browser? For many of you, Mosaic probably came to mind. Although Mosaic is commonly thought of as the first browser, it was not. The first web browser was invented by Tim Berners-Lee in 1989, and it was called WorldWideWeb.
WorldWideWeb was nothing like what comes to mind when we think of a web browser today. It didn’t have the capability to render graphics. Even so, it was an extraordinary accomplishment, and—as history can testify—it transformed the way we access information.
Note
![]()
I can remember opening a page on Mosaic 2.0 and being amazed as a picture was unveiled before my eyes. Perhaps unveiled is a poor word choice because that image took about 15 minutes to download at 2400 baud.
In 1993, NCSA Mosaic 1.0 was released, but it also lacked the capability to display images. That capability wasn’t made available until 1994, when Mosaic 2.0 was released.
In 1994, Netscape Communications released Netscape 1.0. A year later, Microsoft released Internet Explorer 1.0, and the race was on. By 1997, Microsoft had released Internet Explorer 4.0, which contained a solid implementation of the Document Object Model (DOM), allowing web developers to begin using JavaScript to manipulate pages. In the meantime, Netscape had released version 3.0 and the Netscape 3.0 Gold Edition, which contained a what-you-see-is-what-you-get (WYSIWYG) web design tool called Netscape Composer. Add Microsoft’s FrontPage 97 (another WYSIWYG web design tool available at the time) into the mix and the stage was set for a compatibility nightmare.
What Is Browser Compatibility?
The concept of browser compatibility can be traced directly to the browser wars of the 1990s. As Netscape and Microsoft battled it out for browser superiority, web developers became casualties of that war. Code that looked great in one browser looked entirely different on another browser. The design divergence wasn’t limited to Microsoft versus Netscape design decisions. Pages that looked great in one version of a particular browser might fall apart on a different version of the same browser.
As the war heated up, it became clear that web designers would not get relief from browser developers. Instead, it was up to web designers to “fix” the problem. Web development hacks began to pop up in forums frequented by designers. If you were a web developer during this painful period, you no doubt remember how difficult it was to keep up with all the latest techniques.
Note
![]()
Recent browsers and design tools are almost entirely standards-compliant, but plenty of people are still using older browser versions. Keep that in mind when designing your site. See the “Should You Design for Older Browsers?” sidebar for my take on how to deal with this situation.
A few years ago, I could have easily filled an entire book on compatibility issues. Fortunately, that is no longer the case. Today’s web design tools and web browsers are more standards-compliant. The hacks that web designers used in the past are often no longer necessary. To avoid compatibility issues, today’s web designer can focus on the standards and be fairly certain that her site will appear as expected for most people.
Compatibility Features in Expression Web 3
Expression Web 3 has many features designed to help you create standards-compliant sites. The most important feature offered by Expression Web 3 is its capability to create standards-compliant code automatically. Because of that, you are free to work on your site without worrying about what’s going on under the hood. However, what if you’re working on a site that was originally created in another application? Fortunately, Expression Web 3 offers features to help you identify and correct inherited code problems as well.
Identifying Code Problems
Expression Web 3 has a few ways of notifying you when a code problem exists. Among these are the Status Bar, marking invalid code in Code View, and compatibility reports.
Tip
![]()
The icon indicating incompatible code will appear only when in Code View or Split View. The Code Error icon will appear in all views when a code error is present.
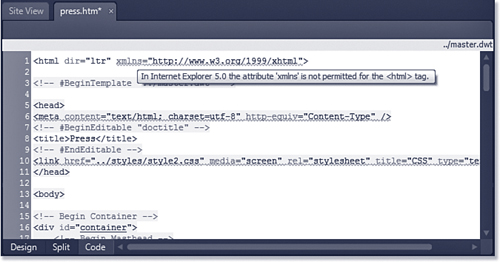
The Status Bar will display an icon when it finds incompatible code or a code error (see Figure 12.13). For example, if an HTML table is missing the closing </table> tag, Expression Web 3 will inform you that a code error has been detected. Other errors can be subtler, such as improperly closed tags in an XHTML-compliant document.
Figure 12.13 In Code View, icons will appear on the Status Bar when a code problem is found. (Both code errors and code incompatibilities.)
![]()
![]() For more information on identifying and correcting code errors in Code View, see Chapter 4, “Using Page Views.”
For more information on identifying and correcting code errors in Code View, see Chapter 4, “Using Page Views.”
Note
![]()
XHTML is the latest standard in Web design. The current XHTML standard is almost identical to the HTML 4.01 standard with the addition of XML formatting and elements.
A full discussion of XHTML is beyond the scope of this book. For more information on XHTML, read Special Edition Using HTML and XHTML, available from Que Publishing.
To determine whether code problems exist, Expression Web 3 uses several methods to determine the formatting and layout rules applicable to the current page.
doctype
The doctype declaration is a statement contained within the first line of code in a page. It defines the rules that are applicable to the document. The following doctype specifies that a document should follow the XHTML 1.0 Transitional rules:

Tip
![]()
Most doctype declarations contain a URL to the definition file (.dtd file) that defines the rules for the document type. Expression Web 3 does not read the definition file to determine the rules of the document, but your web browser will often format the document differently if the URL is missing.
Expression Web 3 displays the current doctype in the Status Bar. In Figure 12.13 (shown previously), the status bar indicates that the doctype is set to XHTML 1.0 Transitional.
![]() For more information on using Code Snippets, see Chapter 3, “Creating Pages and Content.”
For more information on using Code Snippets, see Chapter 3, “Creating Pages and Content.”
The Schema
If there is no doctype declaration in your document, Expression Web 3 will use the schema of the document to determine whether problems exist. The schema is defined in Expression Web 3 and can target a standard (for example, HTML 4.01 or XHTML 1.0) or a browser (for example, Internet Explorer 5.0 or Internet Explorer 7.0).
Caution
![]()
Expression Web 3 will not alter the code it creates based on doctype or schema settings. Specifying a doctype or setting a schema only affects the rules Expression Web 3 uses to flag certain code as invalid or incompatible.
Needless to say, if you decide you want to design your page to be compatible with an older schema such as the Internet Explorer 5.0 schema, you’re going to have a tough time. Much of the code Expression Web 3 creates when you format page elements is CSS code, and older schemas will cause Expression Web 3 to complain heavily about such code.
Another drawback to using older schemas is that Expression Web 3 will continue to create code that uses CSS elements and other features that likely aren’t compatible with older schemas. If you insist on using older schemas, you should prepare yourself to do a fair amount of code editing and hand coding to replace the code that Expression Web 3 generates.
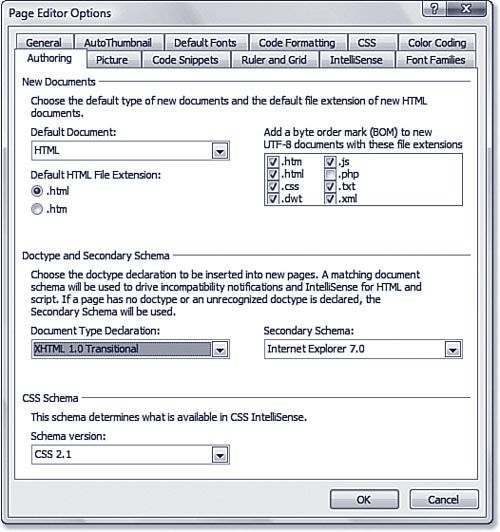
To alter the doctype and schema settings, select Tools, Page Editor Options, and click the Authoring tab. The doctype and schema can be set using the doctype and Secondary Schema drop-down, as shown in Figure 12.14. Note that you can also select the CSS schema in this dialog, but doing so affects only what is displayed in IntelliSense.
Figure 12.14 The doctype and schema are configured in the Page Editor Options dialog.
doctype Not Added to Page
![]()
If you’ve selected a specific doctype in the Page Editor Options dialog but there isn’t a doctype on the page when you check Code View, don’t worry; it’s not a bug.
The doctype that you select in the Doctype drop-down in the Page Editor Options dialog controls what gets added to new pages you create. It will not affect existing pages. If you want to add a doctype to an existing page, you must do it manually.
Marking Invalid Code
When Expression Web 3 encounters invalid or incompatible code, it underlines the code in red. If you hover your mouse over the underlined code, a ScreenTip will inform you of the problem, as shown in Figure 12.15.
Figure 12.15 Expression Web 3 makes finding code errors fast and easy by highlighting them in Code View.
![]() For more information on working in Code View, see Chapter 4, “Using Page Views.”
For more information on working in Code View, see Chapter 4, “Using Page Views.”
Tip
![]()
You can quickly display the Page Editor Options dialog by clicking the doctype, schema, or CSS schema displayed in the Status Bar.
When Expression Web 3 encounters a code error (such as mismatching tags), it highlights the offending code in yellow. Just as with underlined code, you can hover the mouse over the highlighted code for details of the problem.
Using Reports to Find Problems
Expression Web 3 has three reporting options specifically designed to aid in locating problems with code:
• Accessibility Reports—Also called the Accessibility Checker, this report will locate any code problems affecting the accessibility of your site.
• Compatibility Reports—This report will analyze your page code and show problems with code that doesn’t comply with the standards you’ve specified.
• CSS Reports—This report will report on CSS usage and show any problems with CSS code in your site.
CSS reports are covered in-depth in Chapter 18, “Managing CSS Styles.” Therefore, we won’t go into any detail on the reports here.
To access compatibility reports, select Tools, Compatibility Reports to display the Compatibility Checker dialog, as shown in Figure 12.16. You’ll have the option of checking all pages, all open pages, selected pages, or the current page using the Check Where options. Pages can be checked against selected HTML/XHTML standards using the Check HTML/XHTML Compatibility With drop-down, and CSS code can be checked against a CSS standard specified in the Check CSS Compatibility With drop-down.
Figure 12.16 The Compatibility Checker makes it easy to find problems in your code.
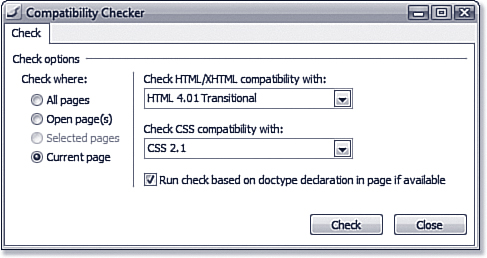
If you have a doctype declaration on your pages, you can check the Run Check Based on Doctype Declaration in Page if Available check box and the Compatibility Checker will check your pages based on the doctype. When you use this option, the setting in the Check HTML/XHTML Compatibility With drop-down is ignored if a doctype declaration is on your page.
It’s important to realize that checking the Run Check Based on Doctype Declaration in Page if Available check box does not automatically negate the setting in the Check HTML/XHTML Compatibility With drop-down. In fact, you might find yourself in a situation where you have inherited a site that contains some pages with a doctype declaration and some pages without one. In such cases, it’s often convenient to check against the doctype in the page when present, but check other pages against a particular standard in preparation for adding a doctype later. It’s in these types of situations that the flexibility of the Compatibility Checker is truly appreciated.
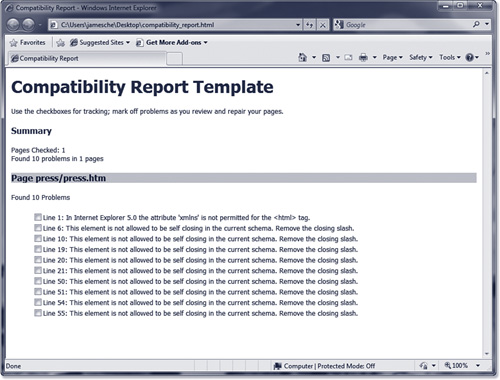
The results of the Compatibility Checker are disabled in the Compatibility pane, as shown in Figure 12.17. Each column in the Compatibility pane can be sorted by clicking the column header. Double-clicking an item in the list will take you to the code that is causing the problem so you can correct it. As you make corrections, you can use the buttons along the left edge of the Compatibility pane to refresh the results, rerun the compatibility reports, and navigate between compatibility errors. You also can generate an HTML report of all compatibility issues (shown in Figure 12.18) by clicking the Generate HTML Report button.
Figure 12.17 The Compatibility pane displays the results of a compatibility check in an easy-to-filter view.
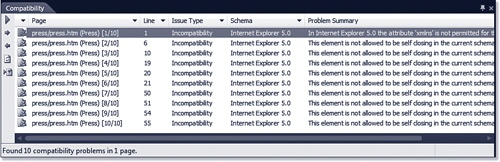
Figure 12.18 To save the results of the Compatibility Checker, generate an HTML report that can be reviewed later.
Code View Errors and Compatibility Checker Don’t Match
![]()
If you see one problem in the Compatibility Checker, but in Code View, Expression Web 3 is highlighting many errors that don’t show up in the Compatibility pane, it’s likely that you are using a standard in the Compatibility Checker that does not match the standard chosen in the Page Editor Options dialog. You can avoid this kind of problem by always including a doctype declaration on your pages.
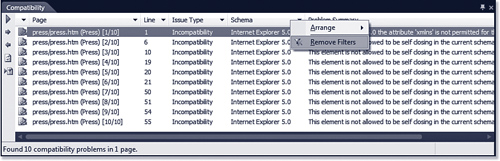
By clicking the small arrow at the right edge of a column in the Compatibility pane, the results can be filtered using either the drop-down menu that appears or by selecting Custom from the menu and entering filtering criteria in the Custom AutoFilter dialog. After a particular column has been filtered, the arrow at the right edge of that column will change to blue. To remove the filter you’ve applied, right-click the column header and select Remove Filter, as shown in Figure 12.19.
Figure 12.19 Filters can be removed using the context menu that appears when you right-click a column header.
Lagniappe (lan yap’) n., a gift or bonus
Seeing Color
Many of us take for granted that everyone sees color the same way we do. In fact, many people do not. There are many forms of color blindness, and each of them can affect the way your site appears. However, because most of us see color accurately, ensuring our site appears correctly to those with a form of color blindness is a tough job. Vischeck can make it a lot easier.
Vischeck (www.vischeck.com/vischeck/) offers a site where you can enter a URL and generate a view of what the URL looks like to people with various forms of color blindness. You can also upload an image file and Vischeck will provide a view of that image as it appears to someone with color blindness.
If you’d prefer, you can download a plug-in from Vischeck (free of charge) that allows you to run Vischeck’s algorithm on images from within Adobe Photoshop or another image-editing application that supports Photoshop plug-ins.
Choosing colors for your site is a critical task. You can avoid selecting colors in a vacuum by using Vischeck to ensure that your color choices make your site accessible.