
18. Managing CSS Styles
Expression Web 3’s CSS Tools
In the previous chapter, we covered the basics of CSS. In this chapter, we put that knowledge to use and cover the CSS toolset in Expression Web 3 in-depth. As you’ll soon see, Expression Web 3’s CSS toolset is powerful and easy to use.
Expression Web 3 has several tools for managing and applying CSS styles. We’ll cover them all in detail, but first, let’s look at a brief overview of each one.
Apply Styles Panel
The Apply Styles panel is a convenient way to apply styles to elements in a page (see Figure 18.1). However, it’s also a quick way to remove styles, add new styles, and modify existing styles. Styles are applied using the Apply Styles panel simply by clicking a style entry in the panel.
Figure 18.1 The Apply Styles panel makes applying styles, editing styles, and removing styles easy.
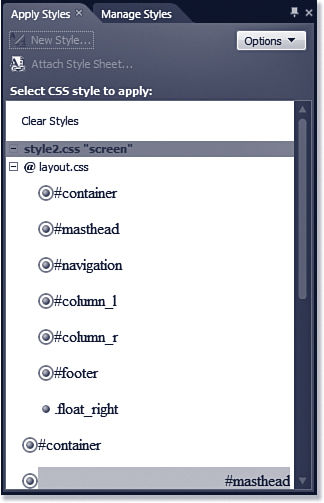
The Apply Styles panel uses color-coding for different CSS elements and even lets you select all instances of a particular CSS element on a page.
Tip
![]()
By default, the Apply Styles panel is located in the lower-right of the Expression Web 3 window.
Manage Styles Panel
The Manage Styles panel is similar in functionality to the Apply Styles panel (see Figure 18.2).
Figure 18.2 The Manage Styles panel is a quick way to locate CSS code for a particular style or to select a style for manipulation via the CSS Properties panel.

The primary difference is that simply clicking a style in the Manage Styles panel doesn’t apply the style to the selected page element. You can apply a style by right-clicking the style and selecting Apply Style from the menu, but the Manage Styles panel is more often used to select a style so you can edit the CSS code or change CSS properties using the CSS Properties panel.
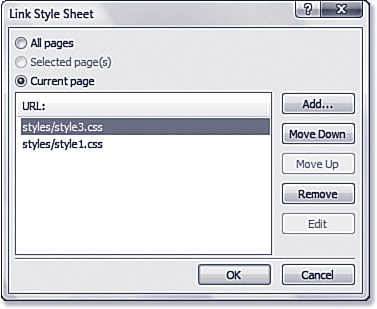
Link Style Sheet Dialog
The Link Style Sheet dialog is more than just a method of adding style sheet links to one or more pages (see Figure 18.3). It also allows you to arrange the order in which style sheets are applied to a page.
Figure 18.3 Linking style sheets is accomplished using the Link Style Sheet dialog. You can adjust the order of linked style sheets as well.
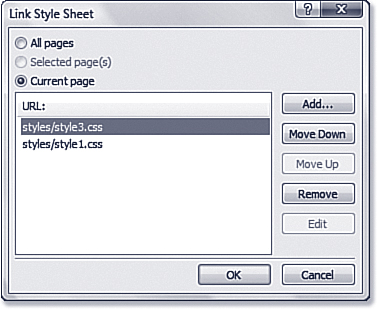
The Link Style Sheet dialog also provides you with an Edit button you can use to quickly open a selected style sheet for editing.
Note
![]()
To access the Link Style Sheet dialog, select Format, CSS Styles, Manage Style Sheet Links.
CSS Properties Panel
The CSS Properties panel provides a grid view of CSS styles applied to a page or page element (see Figure 18.4). The grid is context-sensitive, which means the CSS properties it displays are based on what is currently selected on the active page.
Figure 18.4 The CSS Properties panel appears to be a simple tool at first, but it’s actually extremely powerful.
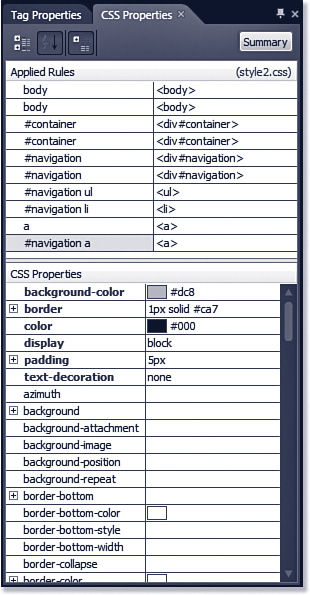
The CSS Properties panel can display CSS properties in categories or in alphabetical order. It displays all rules that apply to the active selection and even shows you where each style is defined.
CSS Reports
CSS reporting in Expression Web 3 is implemented using two separate dialogs: the CSS Reports dialog shown in Figure 18.5 and the CSS Reports panel shown in Figure 18.6.
Figure 18.5 Expression Web 3 provides CSS reports for style usage as well as style errors. CSS report properties are configured in the CSS Reports dialog.
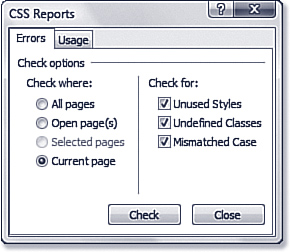
Figure 18.6 Results of CSS reports are displayed in the CSS Reports panel. From here, you can easily access CSS code in your pages and CSS files.
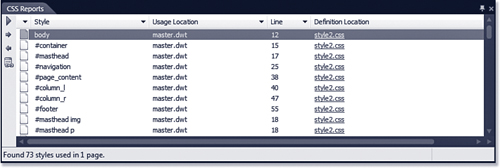
The CSS reporting feature can be filtered using the Custom AutoFilter dialog, as shown in Figure 18.7. It’s a powerful way to examine CSS usage, unused CSS styles that need to be cleaned up, and any CSS errors in your site.
Figure 18.7 You can filter the results of CSS reports using the Custom AutoFilter dialog. Many filter options are available.
Note
![]()
You access the CSS Reports dialog by selecting Tools, CSS Reports.
Style Builder
The Style Builder lets you easily build complex CSS styles quickly without knowing CSS (see Figure 18.8). Styles can be saved into a page or a style sheet.
Figure 18.8 The Style Builder is a powerful way to quickly create and modify CSS styles.
Note
![]()
We’ll cover CSS reports in more detail later in this chapter.
Styles are broken down into multiple categories, and the options available in the Style Builder change according to the category chosen.
Tip
![]()
The Style Builder is a feature that refers to the New Style dialog and the Modify Style dialog.
Working with Styles
Perhaps the easiest way to learn how to use all the previously mentioned tools to manage styles is to use one of the site templates provided by Expression Web 3. These templates contain numerous predefined styles so you can use all the CSS features available in Expression Web 3.
Tip
![]()
The master.dwt file is an Expression Web 3 Dynamic Web Template and is used as a template for other pages in the site.
Create a new site in Expression Web 3 using the Organization 3 site template. When Expression Web 3 has finished building the site, open the master.dwt file to explore some of the styles.
![]() For more information on Dynamic Web Templates, see Chapter 19, “Using Dynamic Web Templates.”
For more information on Dynamic Web Templates, see Chapter 19, “Using Dynamic Web Templates.”
![]() For more information on creating sites, see Chapter 2, “Creating, Opening, and Importing Sites.”
For more information on creating sites, see Chapter 2, “Creating, Opening, and Importing Sites.”
After you’ve opened master.dwt, click some of the page elements. As you do, notice that the CSS Properties, Apply Style, and Manage Styles panels change based on your selection. The selected style is highlighted in the top of the CSS Properties panel and in the Manage Styles panel. The lower part of the Apply Styles panel displays the selected style along with a preview.
No Styles Appear in Panel
![]()
To see styles in the panels, you must have styles applied to the page that is currently active in Expression Web 3. You should link a style sheet, import a style sheet, or define some styles directly in the page first. You will then be able to manage those styles using the CSS panels in Expression Web 3.
Let’s take an in-depth look at each of the tools we briefly covered earlier.
Note
![]()
If you previously closed the master.dwt file, open it again so you can use it as you work through the rest of this chapter.
Using the Manage Styles Panel
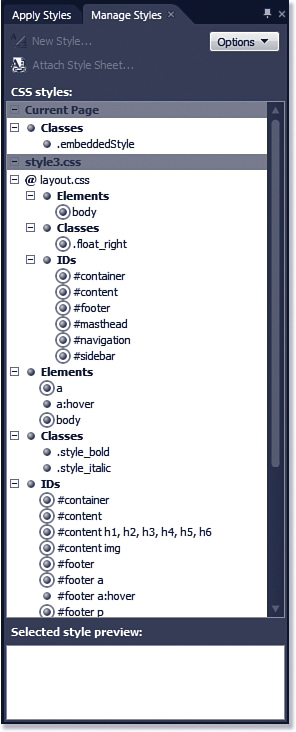
The Manage Styles panel shows a list of styles from the current page and from linked style sheets. As shown in Figure 18.9, each style sheet linked to the active page will have an expandable section inside the Manage Styles panel, as will any embedded style sheets.
Figure 18.9 The Manage Styles panel sections off each style sheet. In this case, there is one linked style sheet and one embedded style sheet.
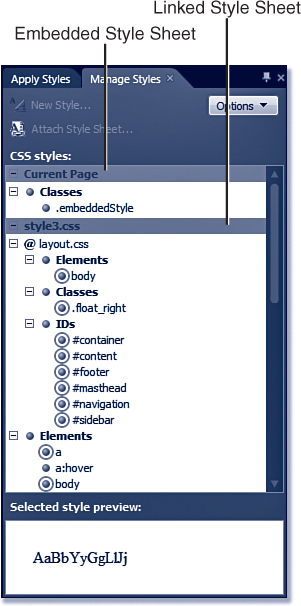
You might notice that @layout.css appears under the style3.css style sheet in the Manage Styles panel. The layout.css style sheet is an imported style sheet inside style3.css. By using an imported style sheet, common styles can be created once in a single style sheet and then imported into other style sheets using the @import directive.
Tip
![]()
The Manage Styles panel displays imported style sheets with an @ character in front of them. Clicking the plus sign next to an imported style sheet will display all the styles defined in the imported CSS file.
The following code appears at the top of style3.css and imports all the styles defined in layout.css into the style3.css style sheet:
@import url("layout.css");
Each style in the Manage Styles panel is represented by a colored dot. The four colors to represent styles are as follows:
• Red—Represents a CSS ID
• Green—Represents a CSS class
• Blue—Represents a selector
• Yellow—Represents an inline style
Tip
![]()
The colored dots for styles in use are circled in gray. Unused styles do not display a circled colored dot.
![]() For more information on CSS classes, style sheet links, and other terminology related to CSS, see Chapter 17, “Creating Style Sheets.”
For more information on CSS classes, style sheet links, and other terminology related to CSS, see Chapter 17, “Creating Style Sheets.”
CSS IDs
In the previous chapter, we covered CSS classes. This chapter introduces the CSS ID. A CSS ID is almost exactly like a CSS class except an ID refers to a single instance of a particular selector. A CSS class can be used by any number of selectors.
A CSS ID is defined in a style sheet using the # prefix. For example, the following CSS code defines the sidebar CSS ID from the style3.css style sheet:

To specify that a particular page element should take the formatting of this ID, you use the id attribute:
<div id="sidebar">
To control the appearance of HTML elements within a block element defined as a particular ID, simply specify the selector after the ID name. For example, the following CSS code formats all <h1> elements within the sidebar div defined previously:
![]()
CSS IDs are a powerful formatting technique because they provide a convenient way of formatting specific portions of your pages.
The Options button in the Manage Styles panel displays the Options menu, allowing you to choose which styles appear in the list and how they are displayed.
The following items on the Options menu control how styles are categorized:
• Categorize by Order—When this item is selected, styles are categorized in the order in which they appear in the style sheet. Note that each style sheet is still listed separately.
• Categorize by Element—When this item is selected, styles for HTML elements are arranged in alphabetical order. (CSS IDs and classes will still be arranged in the order in which they appear in the style sheet.) Inherited styles for a particular HTML element will appear nested under the element, as shown in Figure 18.10.
Figure 18.10 When Categorize by Element is selected, each HTML element will be listed with inherited styles nested underneath.

• Categorize by Type—When this item is selected, each type of style (elements, classes, and IDs) will be listed in a nested structure, as shown in Figure 18.11.
Figure 18.11 When Categorize by Type is selected, each type of style acts as a top-level member of a nested hierarchy.
The following items on the Options menu control the styles that are displayed in the Manage Styles panel:
• Show All Styles—When this item is selected, styles from all style sheets will be displayed in the list. The colored dots for used styles will be circled in gray.
• Show Styles Used in Current Page—When this item is selected, only styles used in the current page are visible.
• Show Styles Used on Selection—When this item is selected, only styles used on the current selection are visible. If nothing is selected in the active document, the Manage Styles panel will be empty.
Selected Styles Don’t Display Preview
![]()
If you’ve selected a page element you know has a style applied to it, but don’t see the preview of the selected style in the panel, make sure you have selected the page element in Design View. If you select a page element in Code View, the style preview will not work.
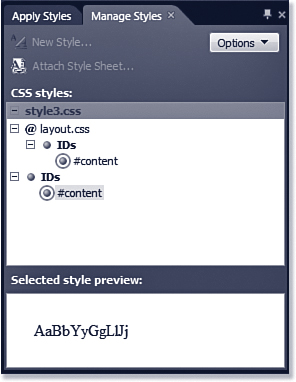
The Show Styles Used on Selection menu item is a powerful way of identifying where certain styles originate. If you select the div with an ID of content on the master.dwt page, the Manage Styles panel will appear, as shown in Figure 18.12. This allows you to tell at a glance that the content CSS ID is defined in both the layout.css and style3.css CSS files.
Figure 18.12 Using the Manage Styles panel, you can find out exactly where certain styles originate. In this case, the content CSS ID is defined in both layout.css and style3.css.
This capability is even more powerful when a particular element is being influenced by CSS styles that are actually applied to higher-level elements or when an element is taking on CSS styles from multiple places. Suppose you have a paragraph that unexpectedly appears in a blue font and you need to track down the CSS style that is causing that to happen.
Note
![]()
The Manage Styles panel can be categorized by Order (the default), Element, or Type. In Figure 18.12, I’ve categorized it by Type.
Without the Manage Styles panel, locating a source of formatting could be fairly difficult because of inheritance and the cascading rules for CSS. Using the Manage Styles panel, you can simply click inside the paragraph and immediately locate the CSS code that’s causing the blue text.
Tip
![]()
You can right-click a style in the Manage Styles panel and select Go to Code to immediately open the CSS file where a style is defined. Double-clicking the style will also take you directly to the style.
The final two items on the Options menu are Separate Grouped Selectors and Display Selected Style Preview.
By default, Expression Web 3 will group selectors affected by a particular style. For example, in Figure 18.11 (shown previously), the #content CSS ID is followed by several HTML heading selectors. The CSS code that defines this #content ID is as follows:
![]()
Note
![]()
Right-clicking a style in the Manage Styles panel provides additional capabilities such as modifying styles or creating new styles. These capabilities are shared by the Apply Styles panel; we cover them in detail later in this chapter.
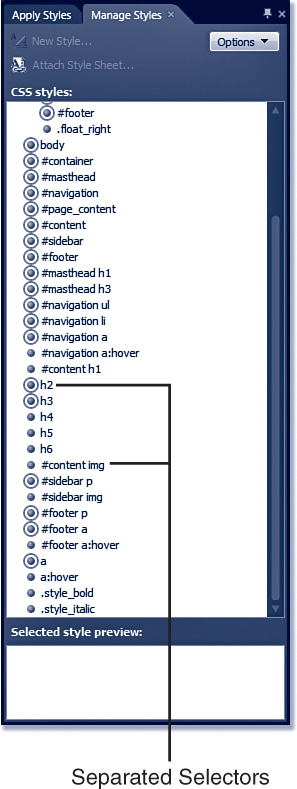
The Separate Grouped Selectors option will break the selectors out of the group so they appear as separate items, as shown in Figure 18.13.
Figure 18.13 When the Separate Grouped Selectors menu option is checked, HTML selectors that are grouped with a particular CSS element are shown as separate items.
The Display Selected Style Preview menu item toggles the Selected Style Preview portion of the Manage Styles panel.
Using the Apply Styles Panel
The Apply Styles panel is similar in functionality and design to the Manage Styles panel. However, as its name indicates, it is intended primarily for applying styles to page elements.
Tip
![]()
The Selected Style Preview portion of the Manage Styles panel shows a preview of only the formatting affected by the selected style. What you see in the actual page might differ due to formatting caused by the specific HTML element or by direct formatting, and so on.
Similar to the Manage Styles panel, the Apply Styles panel uses color-coded dots to indicate different types of styles. It also breaks out style sheets and embedded styles into collapsible sections. You can easily apply any style to a page simply by clicking the name of the style in the Apply Styles panel.
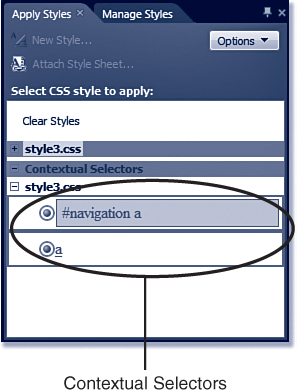
As you click an area of a page, the styles applied to the area will be highlighted in the Apply Styles panel. If the area you’ve clicked is an HTML selector styled in a style sheet, the selector and any associated styles will appear at the bottom of the Apply Styles panel in the Contextual Selectors section, as shown in Figure 18.14.
Figure 18.14 The Contextual Selectors section of the Apply Styles panel displays styles that are defined using HTML selectors.
Hovering over a style in the Apply Styles panel reveals an arrow button at the right edge of the style name. Clicking that button displays a menu, which provides many ways of interacting with the style (see Figure 18.15).
Figure 18.15 Working with styles using the Apply Styles panel is similar to using the Manage Styles panel. The menu shown here is available in both panels.

The following menu items are available when you click the arrow button next to a style:
• Apply Style—Applies the selected style to the current selection.
Tip
![]()
You can also access the menu by right-clicking a style or style sheet in the Apply Styles panel.
• Go To Code—If the selected style is in an external style sheet, Expression Web 3 opens the style sheet and scrolls to the CSS code for the style. If the selected style is an embedded or inline style, Expression Web 3 switches to Split View and displays the corresponding CSS code in the page.
• Select All x Instances—Selects all instances of the selected style in the current page. The x will be replaced with the number of actual instances of the selected style. If the selected style is unused, the menu item will display Select All: Not Currently Used and will be disabled.
• New Style—Opens the Style Builder so a new style can be created. The new style is not based on the selected style.
• New Style Copy—Opens the Style Builder so a new style can be created. The new style is based on the selected style.
• Modify Style—Opens the Style Builder so the selected style can be modified.
• Delete—Deletes the currently selected style. If multiple styles apply to the selected page element, this menu item will be disabled. When deleting a style, Expression Web 3 will prompt you for confirmation before the style is deleted.
• Remove Link—This menu item is enabled only when you right-click the name of a linked style sheet. When clicked, it removes the link to the selected style sheet.
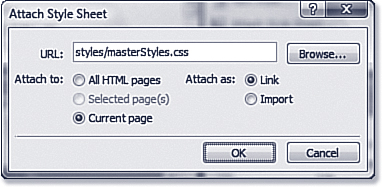
• Attach Style Sheet—Opens the Attach Style Sheet dialog so a style sheet can be attached.
• Manage Style Sheet Links—Opens the Link Style Sheet dialog so existing style sheet links can be configured. The Link Style Sheet dialog will also allow you to attach new style sheets.
• Remove Class—Removes the application of the selected CSS class from the selected page element. Removing the class does not alter the CSS code; it only removes the class assignment from the currently selected page element. This menu item is available only when a CSS class is applied to the currently selected page element and when the currently selected style in the Apply Styles panel is a CSS class.
• Remove ID—Removes the application of the selected CSS ID from the selected page element. Removing the ID does not alter the CSS code. This menu item is available only when the selected page element is styled using a CSS ID and when the currently selected style in the Apply Styles panel is a CSS ID.
Caution
![]()
A CSS ID should be applied only once per page. If you attempt to apply a CSS ID to a second element in a page, Expression Web 3 will display a warning.
• Remove Inline Style—Removes inline styles applied to the currently selected page element. This menu item is available only when an inline style is applied to the currently selected page element and when the currently selected style in the Apply Styles panel is an inline style.
Cannot Remove CSS Elements
![]()
Before you can remove a CSS class, ID, or inline style, you must select the page element from which you want the style removed. Removing a style doesn’t really remove the style from the style sheet where it exists; it simply removes the application of that style from any selected page elements.
First, select one or more instances of the style on the page; you will then be able to remove the style from those instances.
Using the CSS Properties Panel
The Apply Styles and Manage Styles panels focus on working with one or two styles. The CSS Properties panel, on the other hand, is more of an all-in-one tool that makes it easy to manage all the styles applied to your page.
The CSS Properties pane is divided into two sections, as shown in Figure 18.16. The top section is called the Applied Rules section, and it shows all the CSS rules that apply to the selected page element. Rules are displayed in the order in which they are applied to the page.
Figure 18.16 The CSS Properties pane is among Expression Web 3’s most powerful CSS tools.
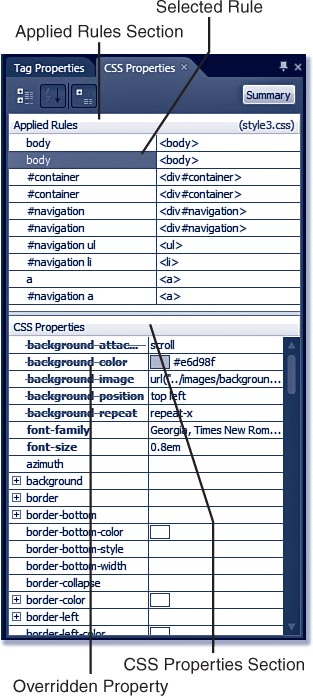
The bottom part of the CSS Properties pane displays the CSS style properties for the selected rule. Properties defined for the selected rule appear in bold blue text, and overridden properties appear with a red line through them.
When a rule is selected in the CSS Properties pane, Expression Web 3 will display where the rule is defined in the Applied Rules header of the CSS Properties panel. If the rule is defined in a linked style sheet, the name of the style sheet will be displayed as a link to open the style sheet when clicked. (Note that in Figure 18.16, style3.css appears as a link that can be clicked to open the CSS file where the rule is defined.) If the link is defined in an embedded style sheet, Expression Web 3 will display (Current Page) as the location where the rule is defined.
Note
![]()
Inline styles displayed in the Applied Rules section of the CSS Properties panel will not display anything in the title bar to indicate where the rule is defined because they are always defined on the element itself.
As shown in Figure 18.17, a series of four buttons appears at the top of the CSS Properties panel:
• Show Categorized List—When this button is selected, the CSS properties will be displayed in collapsible categories.
• Show Alphabetized List—When this button is selected, the CSS properties will be displayed in alphabetical order.
• Show Set Properties On Top—When this button is selected, CSS properties explicitly set for the selected rule will always be displayed at the top of the list.
• Summary—This button will cause the CSS Properties panel to display a summarized list of all properties applied to the selected page element regardless of which CSS rule is selected in the panel.
Figure 18.17 The series of buttons at the top of the CSS Properties panel make adjusting the display easy.
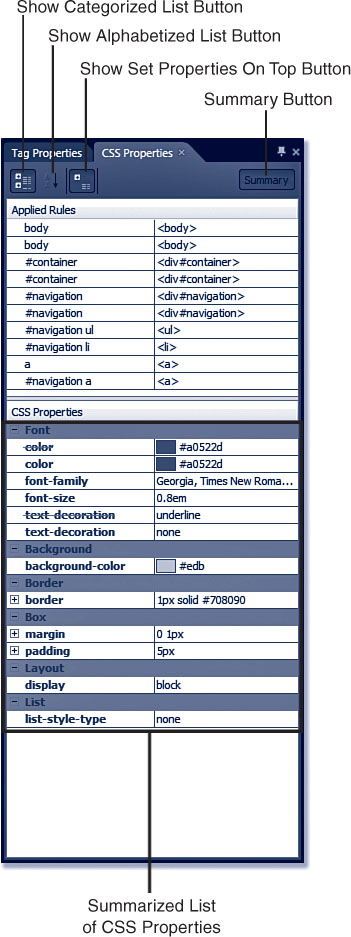
The Summary button is one of the most powerful CSS tools available in Expression Web 3 because it makes it easy to find out exactly what is affecting the formatting of a selected page element. In Figure 18.17, you can see that the selected element has two properties for text-decoration, but one of them has a line through it, indicating it has been overridden. By hovering over the overridden property, you can easily determine which other property is overriding it. As you define your CSS styles, you’ll find yourself using this feature often because it lets you easily track down CSS properties that don’t seem to be taking effect when they ought to.
Modifying CSS properties using the CSS Properties panel couldn’t be easier. You don’t have to know CSS code and syntax to modify properties because most of the properties listed will expand to display the valid values in a drop-down list. To modify a property, simply select the new value from the list, as shown in Figure 18.18.
Figure 18.18 Changing CSS properties is accomplished using the drop-down menu of valid property assignments.
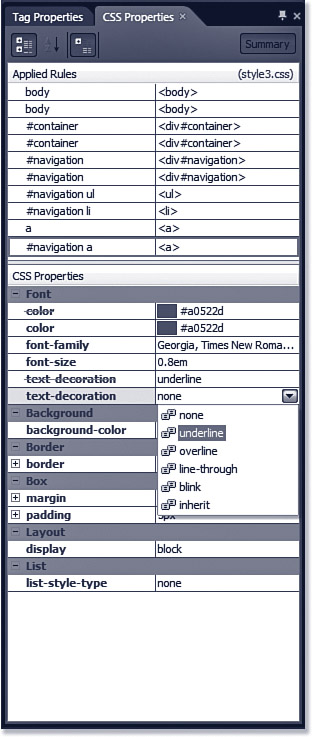
As you select properties in the panel, the rule to which that property applies is automatically highlighted. This enables you to ensure that you are changing the correct property.
Caution
![]()
Keep in mind that a modification to a style sheet linked to the current page will also modify that same style in other pages that link to the same style sheet.
When you modify a style that exists in a CSS file, Expression Web 3 will automatically open and edit the CSS file. You then will be prompted to save those changes to the CSS file when the page it is linked to is saved.
Using the Style Builder
The Style Builder is a common name for the New Style and Modify Style dialog boxes. When creating a new style, the New Style dialog is displayed; when modifying an existing style, the Modify Style dialog is displayed. Both dialogs are the same, but the options available are different based on whether you are creating a new style.
Tip
![]()
The styles that can be edited in the Style Builder are the same styles that are available in the CSS Properties panel. The Style Builder is just a different interface into the same CSS properties.
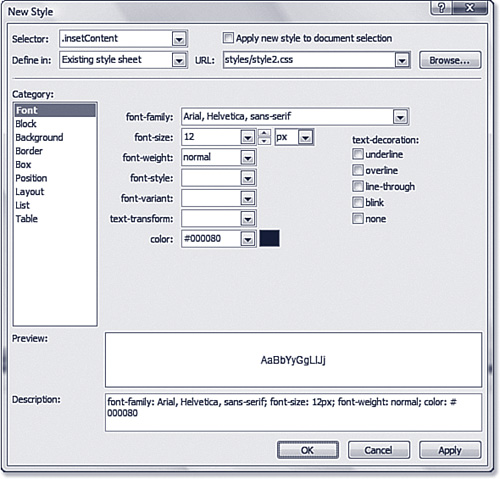
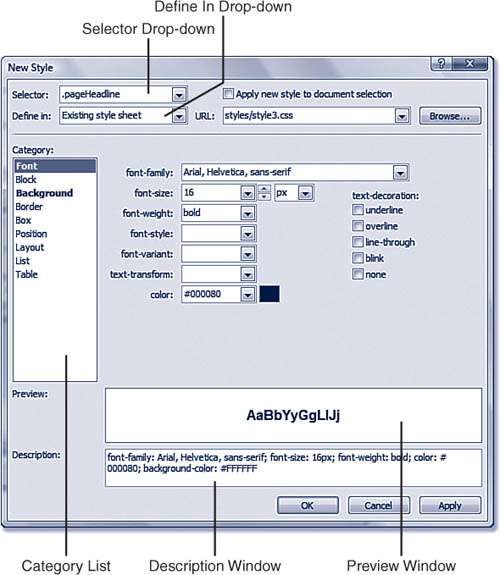
In Figure 18.19, a new style is being created. Note that the Define in drop-down is set to Existing Style Sheet and the style3.css style sheet is selected. You can also choose to add the new style to a new style sheet or to the current page. When adding styles to the current page, they are added to an embedded style sheet.
Figure 18.19 The Style Builder is a comprehensive dialog for creating new styles or modifying existing styles without having to write CSS code.
Tip
![]()
When creating new CSS classes and IDs, be sure to append a .to CSS class names and a # to CSS IDs.
The Selector drop-down contains a list of all the HTML selectors, but you also can enter a CSS class name or ID into the text box portion of the drop-down to create a new CSS class or ID.
To configure a particular category of CSS property, select the category from the Category list, as shown in Figure 18.19; then configure the style as desired. Categories for which style properties have been configured appear in bold text. After you’ve finished configuring a style, click OK to add it or apply your modifications. If the Apply New Style to Document Selection check box is checked when creating a new style, the style will automatically be applied to the selected element in the page. Otherwise, the style will simply be added to the style sheet as specified.
Tip
![]()
The Define in drop-down, Apply new style to document selection check box, and URL text box are disabled when modifying an existing style.
Using the Attach Style Sheet and Link Style Sheet Dialogs
Styles sheets can easily be added to the current page or to all pages using the Attach Style Sheet and Link Style Sheet dialogs. To access the Attach Style Sheet dialog, select Format, CSS Styles, Attach Style Sheet. To access the Link Style Sheet dialog, select Format, CSS Styles, Manage Style Sheet Links.
The Attach Style Sheet dialog is used to either attach a style sheet link to one or more pages or to import styles from a style sheet into one or more pages (shown in Figure 18.20).
Figure 18.20 CSS style sheets are attached or imported using the Attach Style Sheet dialog. You can add style sheets to the current page, pages selected in the Folder List, or to all pages.
Imported styles are added to a page using the CSS @import directive. For example, if a style sheet located at styles/style1.css is imported via the Attach Style Sheet dialog, the following CSS code is added to the page:

Tip
![]()
Imported style sheets are useful when you want to compartmentalize a specific set of CSS styles that can be applied easily to a page or series of pages. In fact, many of the Expression Web 3 templates use imported CSS style sheets to apply common formatting.
The Link Style Sheet dialog is specifically designed to be used with linked external style sheets (see Figure 18.21). Not only can you add and remove style sheet links using this dialog, but you can also arrange the order of style sheets.
Figure 18.21 The Link Style Sheet dialog provides a clean interface for linking style sheets and arranging their order.
The CSS tools in Expression Web 3 comprise a powerful CSS feature set that has not been seen in any previous Microsoft web development platform. Not only can you easily create styles and modify existing styles, but you also can investigate the source of formatting on a page using the CSS Properties panel. By using these tools together, you can take control of CSS in your site.
Tip
![]()
Linked style sheets are applied in the order in which they appear in the Link Style Sheet dialog, so a duplicate style in a style sheet lower in the list will override any previous instances of that style.
CSS Reports
Using CSS makes your site much easier to maintain, but if you don’t keep your CSS code maintained as well, it can become unwieldy. Fortunately, Expression Web 3’s CSS reporting feature can help you identify CSS problems quickly.
To access CSS reports, select Tools, CSS Reports to display the CSS Reports dialog, as shown in Figure 18.22. You have the option of checking all pages, all open pages, pages that are currently selected, or only the current page.
Figure 18.22 The CSS reporting feature is a powerful tool for finding problems in your CSS code.
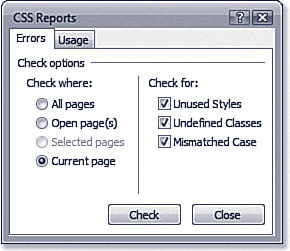
Checking for CSS Errors
The Errors tab, shown previously in Figure 18.22, allows you to easily locate the following types of errors in your CSS code:
• Unused Styles—Styles that exist in a style sheet but are not used
• Undefined Classes—Styles that are used but not defined in a style sheet
• Mismatched Case—A mismatch in case between a CSS class or ID in a page and the case used in a style sheet
After choosing the errors you want to check, click the Check button to run the report. Results are displayed in the CSS Reports panel, as shown in Figure 18.23.
Figure 18.23 The CSS reports panel displays CSS report results, so you can easily locate and correct errors.
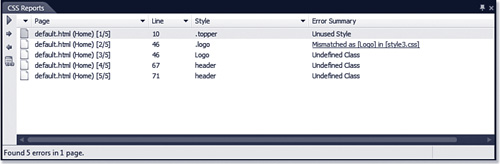
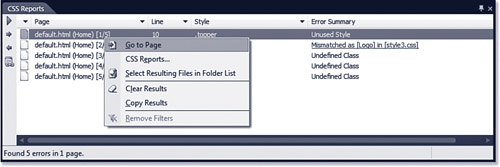
To locate an error displayed in the CSS Reports panel, double-click the error or right-click the error and select Go to Page, as shown in Figure 18.24. Expression Web 3 will open the page containing the error, and the offending code will be highlighted so you can easily correct it without having to dig through the code.
Figure 18.24 Easily locate a CSS error by double-clicking the error or using the right-click menu.
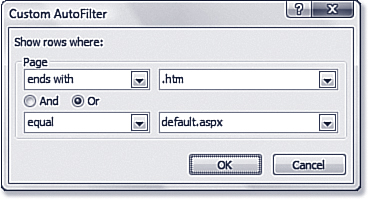
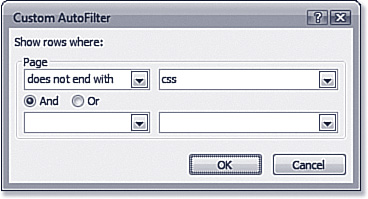
As with other panels, the CSS Reports panel can be sorted by clicking a column header. It can also be filtered by clicking the small black arrow at the right edge of a column and selecting Custom to display the Custom AutoFilter dialog, as shown in Figure 18.25.
Figure 18.25 The CSS Reports panel can be filtered using the Custom AutoFilter dialog. In this case, CSS files are filtered out of the report.
Checking CSS Usage
The Usage tab in the CSS Reports dialog allows you to run a report that shows how CSS is used in a page (see Figure 18.26). The following options are available:
• Class Selectors—When this item is checked, CSS reports will show which CSS class selectors are in use.
• ID Selectors—When this item is checked, CSS reports will show which CSS ID selectors are in use.
• Element Selectors—When this item is checked, CSS reports will show all HTML element selectors.
Figure 18.26 The Usage tab enables you to run reports that detail how CSS is being used in your site.

Tip
![]()
The Element Selectors option will generate a lot of output. Use it only if you absolutely need a report of all your HTML selectors.
Lagniappe (lan yap’) n., a gift or bonus
Arranging CSS Styles
As you’ve seen, you have plenty of choices to make when it comes to using CSS in your site. One of the choices with the greatest impact is whether to define a style in an external or an embedded style sheet. Invariably you will end up needing to move some of your CSS classes or IDs from an embedded style sheet to an external style sheet, and vice versa. You might also want to move classes or IDs from one external style sheet to another.
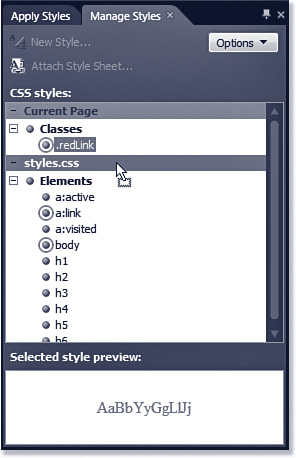
Moving CSS classes and IDs is fast and easy using the Manage Styles panel in Expression Web 3. In Figure 18.27, an embedded CSS class called .redLink exists in the current page. The styles.css external style sheet is also linked to the page. To move the .redLink CSS class from the embedded style sheet in the current page to the styles.css external style sheet, simply drag the .redLink class to the styles.css header, as shown in Figure 18.27.
Figure 18.27 CSS IDs and classes can be moved from a page to an external style sheet and vice versa by dragging and dropping the style in the Manage Styles panel.
You can also drag and drop HTML elements. When an HTML element is dropped onto a style sheet, Expression Web 3 will create a CSS entry for the selector.
Using this method, you can quickly and easily manage your CSS content with minimal effort.