
System Preferences allows you to customize various parts of Mac OS X, such as the appearance of your desktop, your computers date and time, the way CDs and DVDs start up when you insert them, or use speech recognition to convert a spoken voice into commands or electronic text. For those of you with a Mac laptop, you can manage power usage for your computer. Universal Access preferences make it easier for a person with a disability, such as difficulty seeing or hearing or controlling a mouse, to use a computer. If you have an ink device attached to your computer, you can use Ink Preferences to improve the recognition of ink to text.
You can access System Preferences from the Dock or the Apple menu. Many applications also have their own preferences, which you can access from the application menu within the application. System Preferences are organized into categories by default. Each category contains a set of icons, which you can open to set customization options in preference panes for different aspects of the Macintosh operating system.
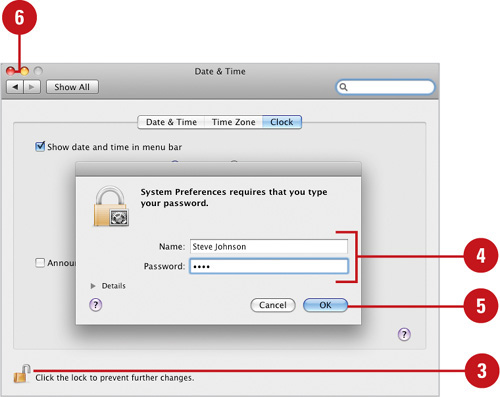
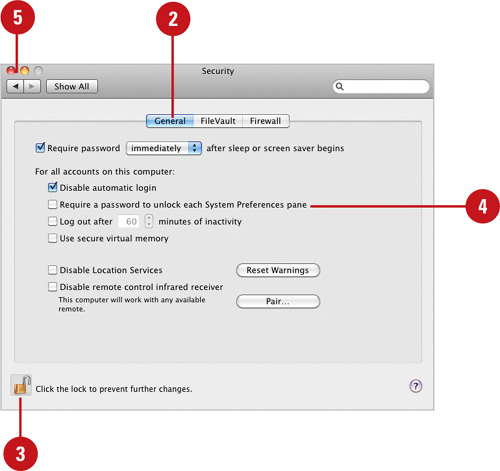
Some System Preference panes are locked for security reasons. If preference settings are all grayed out, the preference pane is locked to prevent non- administrators from making changes. Check the Lock icon at the bottom of System Preferences. If the Lock icon is locked, you need an administrator name and password to unlock it and make changes. If you log in as an administrator, the Lock icon is unlocked, unless you set a security option to have the preference panes stay locked. When you close the preference pane, it locks automatically.
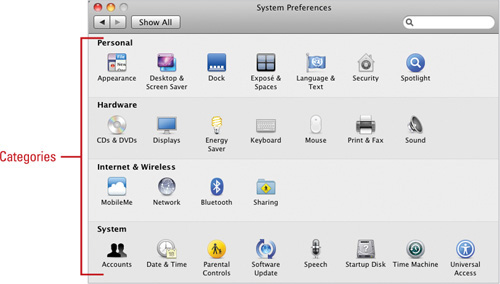
System Preferences allow you to customize system wide settings for various aspects of Mac OS X and your computer. The System Preferences window is organized alphabetically or by categories: Personal, Hardware, Internet & Network, and System. Each category contains preference areas that you can change to customize the way Mac OS X works. Only an administrator can change system settings that affect everyone who uses the computer.
Appearance. Change the look and feel of buttons, selected items, and scroll bars. See page 100.
Desktop & Screen Saver. Change the desktop background or select a visual screen effect to hide your desktop. See pages 102-103.
Dock. Change the location of the Dock, adjust the size of icons, set magnification, or hide the Dock. Sees page 88-89 in Chapter 4.
Expose’ & Spaces. Set keyboard shortcuts or mouse positions to show or hide all your windows at one time, or create unique spaces for projects. See page 92-93 in Chapter 4.
Language & Text. Change your computer to read or write with other languages and substitute text. See pages 106-109.
Security. Protect your computer and the information on it, and adjust firewall settings to protect your computer from access over the Internet. See page 409 in Chapter 16.
Spotlight. Select the categories and priority order you want used in Spotlight searches. See pages 64-65 in Chapter 3.
CDs & DVDs. Set startup options when you insert a CD or DVD. See pages 113 and 316.
Displays. Set the screen size, resolution, color settings, and arrange multiple screens. See page 454-455 in Chapter 18.
Energy Saver. Set the computer to sleep and conserve power, and schedule automatic shutdown and startup. See page 110-111.
Ink. Set the computer to write text using a graphics tablet and stylus, recognize the ink, and turn it into words. (Available only if a graphics tablet or ink device is installed.) See page 128.
Keyboard. Change the speed of your keyboard, and customize universal keyboard shortcuts or application shortcuts. See page 453 in Chapter 18.
Mouse. Change the speed of your mouse, primary mouse button, or scroll wheel zoom. See pages 452 in Chapter 18.
Print & Fax. Add a printer, monitor print jobs, set up to receive faxes, and share printers and a fax modem with other users. See pages 198-199 in Chapter 8.
Sound. Change computer sound volume, effects, and sound input or output devices. See pages 114-115.
MobileMe. Create an online MobileMe account and set access options. See page 346 in Chapter 13.
Network. Create and manage network and Internet connection settings. See page 410 in Chapter 16.
Bluetooth. Control how to send and receive files between your computer and other Bluetooth devices. (Available if Bluetooth is enabled). See pages 413-415 in Chapter 16.
Sharing. Set services for Personal File Sharing, Personal Web Sharing, and Printer Sharing; and share your Internet connection with others. See pages 404-407 in Chapter 16.
Accounts. Set up accounts, access privileges, and log in and out settings to share your computer with others. See pages 387-388 in Chapter 15.
Date & Time. Set your computer’s date, time, and time zone, or use a network time server. See pages 104-105.
Parental Controls. Set limits on computer use, including content, Mail & iChat, and time, and create logs. See pages 392-393 in Chapter 15.
Software Update. Set a schedule or options to check for updates automatically on the Internet. See pages 432-433 in Chapter 17.
Speech. Set the computer to speak the text on the screen or use spoken commands to control your computer. See pages 116-119.
Startup Disk. Select the disk or drive you want to use to start up your computer. See page 112.
Time Machine. Set options to back up everything on your computer. See page 477 in Chapter 20.
Universal Access. Set options for the visual or hearing impaired to make it easier to use the computer keyboard, mouse, and screen. See pages 120-127.
In addition to the System Preferences included with Mac OS X, you can add other System Preferences developed by other companies, known as third-party system preferences. To install a third-party preference, download or drag the preference to your hard disk, double-click its icon, and then follow the on-screen instructions. To uninstall a third-party preference, use the method provided by the developer, or hold down the Control key, click the Preference icon in the System Preferences window, click Uninstall, and then follow the on-screen instructions.
System Preferences are organized into categories by default. Each category contains a set of icons, which you can open to set customization options in preference panes for different aspects of the Macintosh operating system. You can also view the icons in the System Preferences window alphabetically, depending on your preference. Simply click a preference icon to open it, and then make the changes you want. The preferences take effect when you quit or close System Preferences.
 Click the Apple menu, and then click System Preferences or click the System Preferences icon in the Dock.
 To change preference organization, click the View menu, and then click Organize By Categories or Organize Alphabetically.
 To open a preference, click the icon.
 To switch to another preference, click the View menu, and then click the one you want to open.
 When you’re done, click the System Preferences menu, and then click Quit System Preferences, or click the Close button.
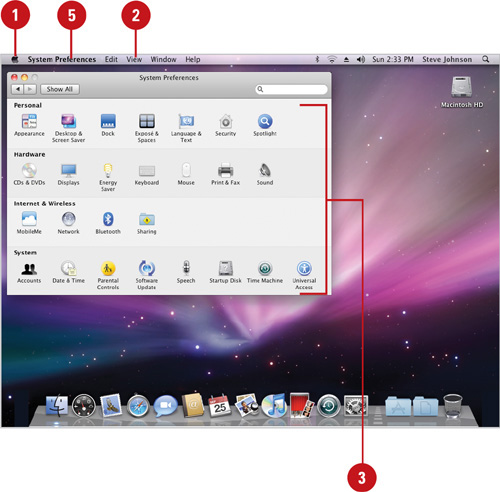
Some preference panes are locked for security reasons. If preference settings are all grayed out, the preference pane is locked to prevent non-administrators from making changes. Check the Lock icon at the bottom of System Preferences. If the Lock icon is locked, you need an administrator name and password to unlock it and make changes. If you log in as an administrator, the Lock icon is unlocked, unless you set a security option to have the preference panes stay locked. When you close the preference pane, it locks automatically.
- Click the System Preferences icon in the Dock.
- Click the Security icon, and then click the General tab.
- If settings are grayed out, click the Lock icon, type an administrator name and password, and then click OK.
- Select the Require a password to unlock each secure system preference pane check box.
- Click the Close button.
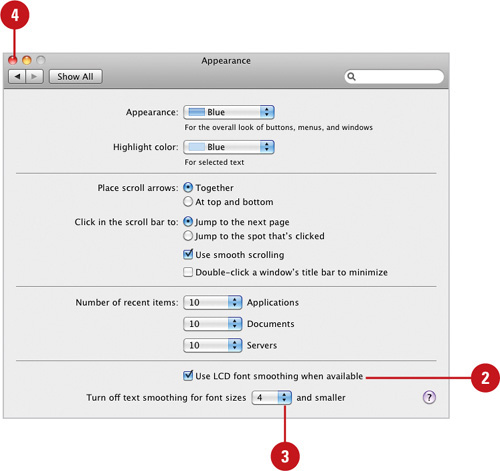
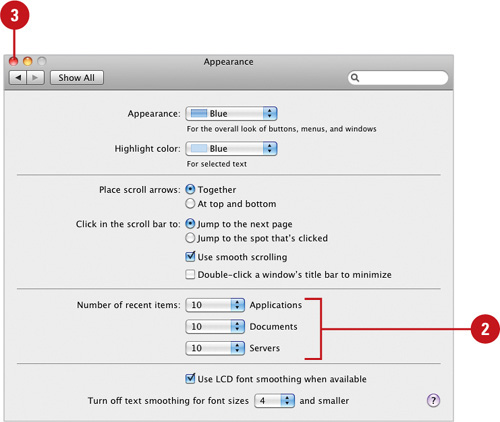
The Appearance pane in System Preferences allows you to change the look and feel of Mac OS X in a few areas. You can change the color scheme for buttons, menus, and windows, and the highlight color for text and lists. Or if you’re not comfortable using the scroll bars, you can change the way scroll bars work and the placement of the scroll arrows. If your text looks blurry or jagged, you can adjust the font smoothing, known as anti-aliasing, style to fix it (after you log out and back in). As you open files and applications, Mac OS X keeps a list in the Recent Items submenu in the Apple menu. In the Appearance pane, you can set the number of recent items that appear in the menu.
- Click the System Preferences icon in the Dock, and then click the Appearance icon.
- Click the Appearance pop-up, and then select a color. If you select Other, the Color Picker palette appears so you can select a color.
- Click the Highlight Color pop-up, and then select a color.
- Click the At top and bottom or together option to set the placement of scroll arrows.
- Click the Jump to the next page or Jump to here option to select an operation when you click in the scroll bar.
 Select the Use smooth scrolling check box to avoid slight jumping when you click inside the scroll bar.
 Select the Double-click a window’s title bar to minimize check box to make it easier to minimize a window instead of using the small yellow Minimize button.
 Click the Close button.
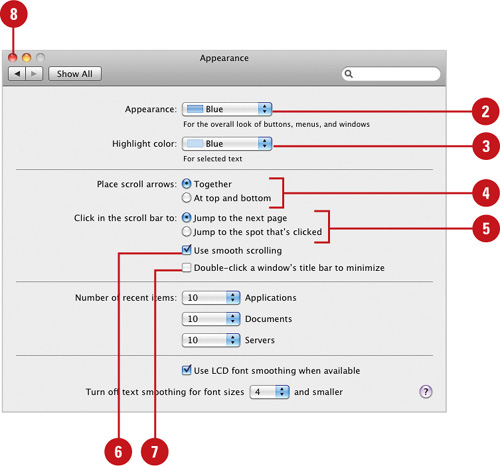
- Click the System Preferences icon in the Dock, and then click the Appearance icon.
- Select the Use LCD font smoothing when available check box to enable font smoothing, which reduces jagged edges for some fonts (New!).
- Click the Turn Off Text Smoothing For Font Sizes pop-up, and then select a font size.
All text in the font size or smaller is not smoothed, which makes it easier to read.
- Click the Close button.
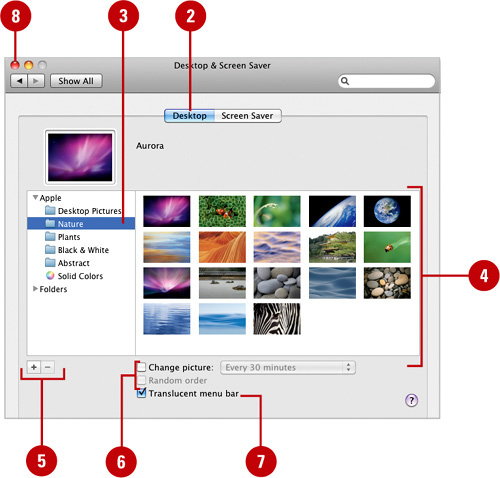
The desktop background, or wallpaper, is a picture that serves as your desktop’s backdrop, the basic surface on which icons and windows appear. You can select a background picture from the ones provided with Mac OS X (which includes Apple Background, Nature, Abstract, or Solid Colors) or select one of your own in the Desktop & Screen Saver pane in System Preferences. You can select pictures in a variety of formats (such as JPEG, PICT, GIF, TIFF, PDF, or PSD) from your own Pictures folder, another folder you select, or even an iPhoto folder (Photo Library, Last Import, or iPhoto album), and then select options to display them on the screen. When you select a picture from a folder, you can display all the pictures at certain intervals in alphabetical or random order. In addition, you can turn on or off the translucent menu bar effect (New!).
- Click the System Preferences icon in the Dock, and then click the Desktop & Screen Saver icon.
- Click the Desktop tab.
- Click an image category folder in the left column.
- Select a thumbnail.
- If you want to use your own folder of pictures, click the Add (+) button, select the folder, and then click Choose.
To remove one of your own added folders, select the folder, and then click the Remove (-) button.
- To show all the pictures in a folder, select the Change picture check box, select an interval from the pop-up, and then select the Random order check box or clear it for random order.
- Select the the Translucent menu bar check box (New!) to enable the menu effect or clear the check box disable it.
- Click the Close button.
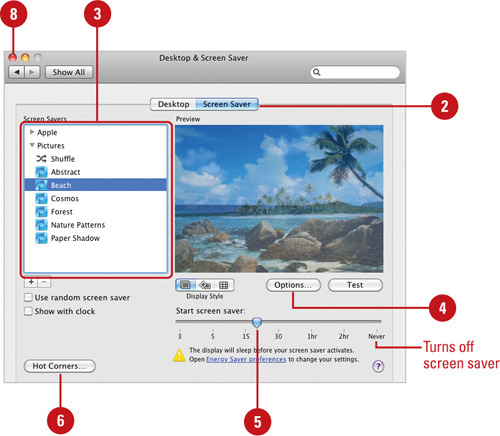
In the past, you needed a screen saver (a continually moving display) to protect your monitor from screen burn in. Those days are gone with the emergence of new display technology. Screen savers are more for entertainment than anything else. When you leave your computer idle for a specified wait time, a screen saver displays a continuous scene, such as an aquarium, until you move your mouse to stop it. If a security option is set in the Security pane in System Preferences, your computer requires a password when you wake from a screen saver. You can select a screen saver from the ones provided with Mac OS X, or select a folder with pictures (all saved in the same format) or a published slideshow from a MobileMe account online or RSS feed, which gets downloaded to your computer.
- Click the System Preferences icon in the Dock, and then click the Desktop & Screen Saver icon.
- Click the Screen Saver tab.
- Select a screen saver, using any of the following methods:
Click an Apple screen saver.
Click Pictures Folder, and then select one, or click Shuffle to shuffle through screen saver pictures (New!).
Select the Use random screen saver check box to use different screen savers each time.
Select the Show with clock check box to show the clock.
- Click Options, select the check boxes you want, and then click OK.
- Drag the slider to determine when the screen saver starts.
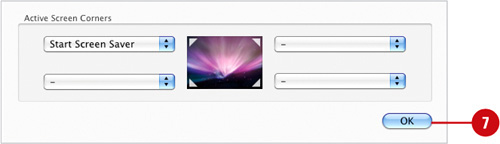
- To activate the screen saver with your mouse pointer, click Hot Corners, specify the options you want in the corner you want it.
- Click OK.
- Click the Close button.
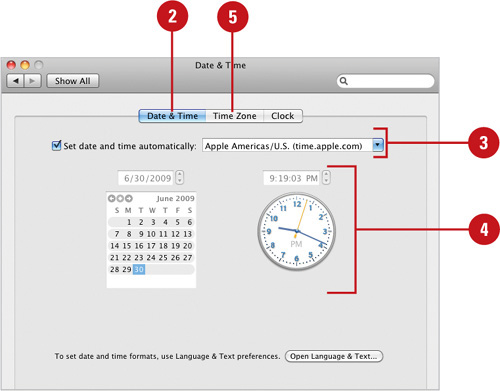
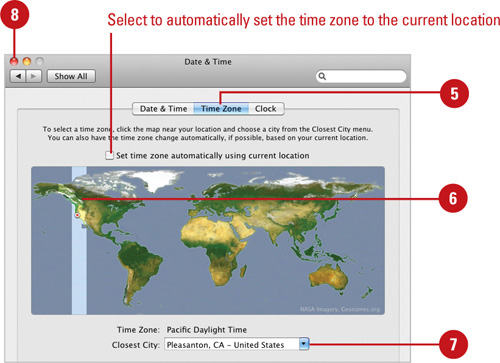
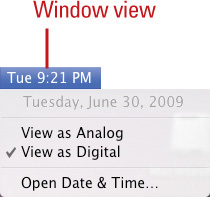
The date and time you set on your computer is very important. When you save a file or send and receive an e-mail, your computer uses the date and time you set in the Date & Time preference pane. You can set the date and time manually, or if your computer is connected to the Internet, you can have a time server set it automatically. If you have an Internet connect, such as DSL or cable, use the time server, otherwise you should set it manually. To make sure your files and e-mail times are not off by a few hours, you need to set your time zone, either manually or automatically (New!). When you travel, Snow Leopard can automatically change your time zone using Wi-Fi (New!). You can also set the date and time to display as a digital (12:05 PM) or analog (round face with hands) clock in the menu bar, or have the computer speak, announcing the time at certain intervals.
- Click the System Preferences icon in the Dock, and then click the Date & Time icon.
- Click the Date & Time tab.
- To set the time automatically over the Internet, select the Set date & time automatically check box, and then use the pop-up to select a time server.
- To set the date and time manually, use any of the following methods:
Select the individual date and time fields, and then enter a number, or use the up and down arrows.
Click a date in the calendar and drag the hands on the clock.
- Click the Time Zone tab.
To automatically set the time zone, select the Set time zone automatically using current location check box (New!).
- Click the part of the map closest to your location.
- Click the Closest City pop-up, and then select the closest city to your location.
- Click the Close button.
- Click the System Preferences icon in the Dock, and then click the Date & Time icon.
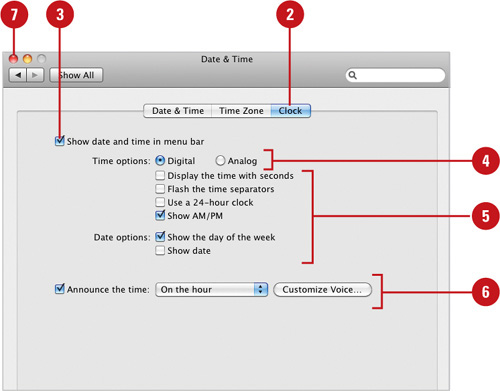
- Click the Clock tab.
- Select the Show date and time in menu bar check box.
- Select the view as (Digital or Analog) option you want.
- Select or clear the following check boxes:
Display the time with seconds. Check to add seconds to the time (Menu bar).
Flash the time separators. Check to show a blinking colon.
Use a 24-hour clock. Check to show military time (18:00 instead of 6:00 PM).
Show AM/PM. Check to show AM or PM.
Show the day of the week. Check to show the day of the week (Menu bar).
Show the date. Check to show the date (Menu bar) (New!).
- To speak the time, select the Announce the time check box, click the pop-up, and then select an interval.
To change the computer voice, click Customize Voice.
- Click the Close button.
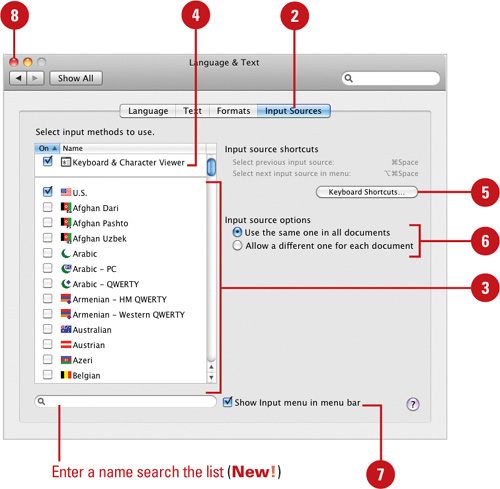
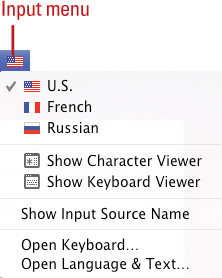
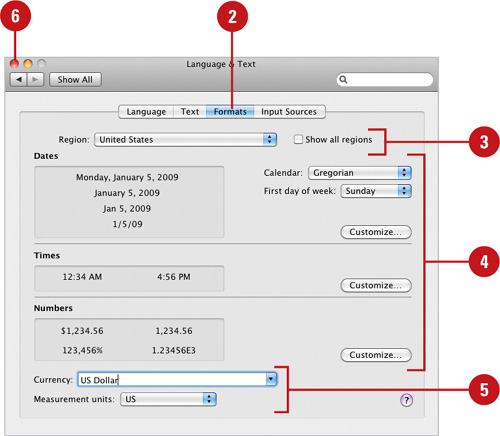
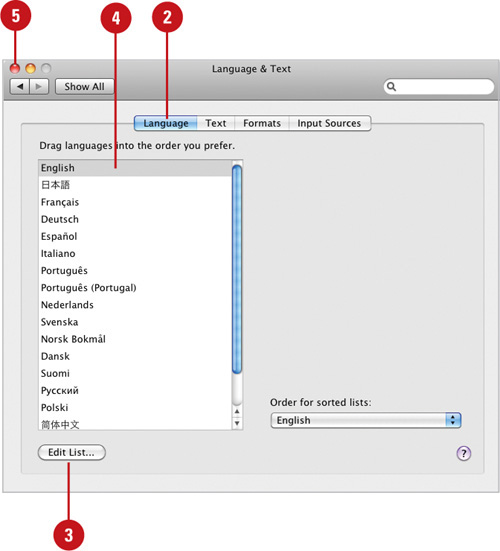
The Language & Text pane (New!) in System Preferences gives you options to use different languages for menus, dialogs, and the keyboard, as well as write text in other languages. The language you write can be different from the language for menus, dialogs, and the keyboard. The Language tab allows you to select a language that you use in application menus and dialogs, and write in an application. The Formats tab allows you to select international formats for dates, times, numbers, and measurement units. The Input Sources tab provides you with a list of languages that you can select a keyboard layout, which lets you type in other languages. If you’re not familiar with the keyboard layout, you can use the Keyboard Viewer to show you what keys to press to display the keys you want in the input menu language. To make language selection easier, you can add the Input menu to the menu bar.
- Click the System Preferences icon in the Dock, and then click the Language & Text icon.
- Click the Input Sources tab.
- Select the check box next to the language(s) you want to use.
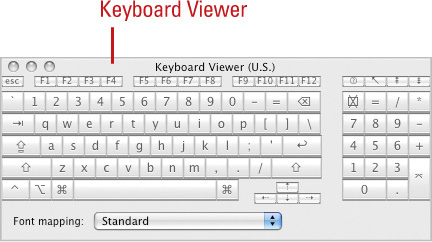
- To see what the characters look like on your keyboard, select the Keyboard Viewer check box.
The Keyboard Viewer is available on the menu bar in the Input Menu.
- Click Keyboard Shortcuts, select the keyboard shortcut or text matching options you want, and then click OK.
- Select an option to use the same or different input sources (New!).
- To change input menu languages from the menu bar, select the Show input menu in menu bar check box.
- Click the Close button.
- Click the System Preferences icon in the Dock, and then click the Language & Text icon.
- Click the Formats tab.
- Click the Region pop-up, and then select a region. If necessary, select the Show all regions check box to display your region.
- Click Customize, specify the formats you want for Dates, Times, and Numbers, and then click OK.
- Select a Currency and Measurements Units from the pop-ups.
- Click the Close button.
- Click the System Preferences icon in the Dock, and then click the Language & Text icon.
- Click the Language tab.
A list of available languages on your computer appears.
- To add or remove languages, click Edit List, select or clear the check boxes, and then click OK.
- Drag the language you want to the top of the list.
If an application can’t support the first language, it tries to use the second one, and so on.
- Click the Close button.
Changes take place the next time you launch the Finder or an application.
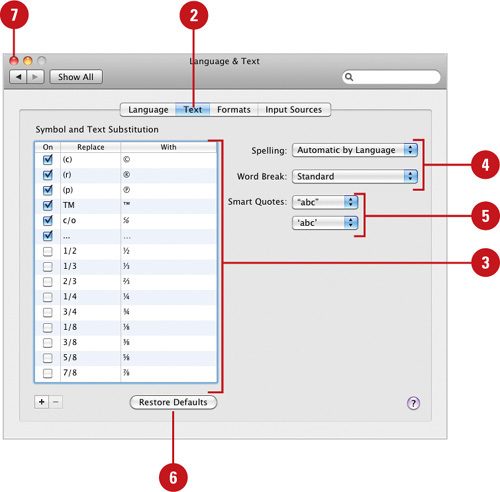
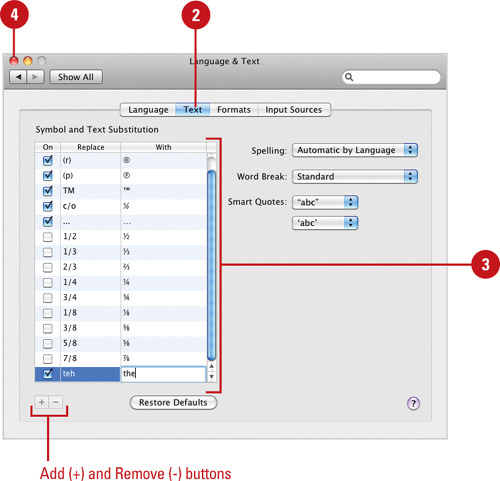
The Language & Text pane (New!) in System Preferences gives you options to automatically correct common spelling errors and insert symbols as you type. Snow Leopard comes with a list of common text and symbol entries you can edit or remove. You can add words and phrases that you misspell, or add often-typed words and save time by just typing their initials. You can use text substitution to quickly insert symbols. For example, you can type (c) to insert ©. You can also set options to check spelling and select text by language, and automatically change double or single quotation marks.
- Click the System Preferences icon in the Dock, and then click the Language & Text icon.
- Click the Text tab.
- Select the check boxes you want to use for symbol and text substitution.
- Select language and selection settings for the following options:
Spelling. Allows you to check your spelling. Select Automatic by Language or a specific language.
Word Break. Specifies how a word is highlighted when it’s double-clicked. Select Standard or a specific language.
- Select Smart Quote settings for the following options:
First. Select a quote style when you type double quotation marks.
Second. Select a quote style when you type single quotation marks.
- To restore setting, click Restore Defaults.
- Click the Close button.
- Click the System Preferences icon in the Dock, and then click the Language & Text icon.
- Click the Text tab.
- Do one of the following:
Add. Click the Add (+) button, type a misspelled word or an abbreviation, press Tab, type the replacement text, and then press Return.
Edit. double-click an entry, make a change, and then press Return.
Remove. Select an entry, click Remove (-) button.
- Click the Close button.
To correct spelling errors or insert symbols automatically, continue typing until text substitution makes the required correction.
See examples of text substitution in the following table.
Table . Examples of Text Substitution
Type of Correction | If You Type | AutoCorrect Inserts |
|---|---|---|
Common typos | can;t | can’t |
Common typos | windoes | windows |
Superscript ordinals | 2nd | 2nd |
Stacked fractions | 1/2 | ½ |
Smart quotes | ″ ″ | “ “ |
Em dashes | Madison--a small city in Wisconsin--is a nice place to live. | Madison—a small city in Wisconsin—is a nice place to live. |
Symbols | (c) | © |
Symbols | (r) | ® |
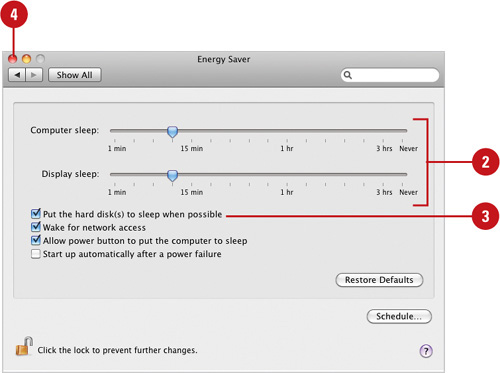
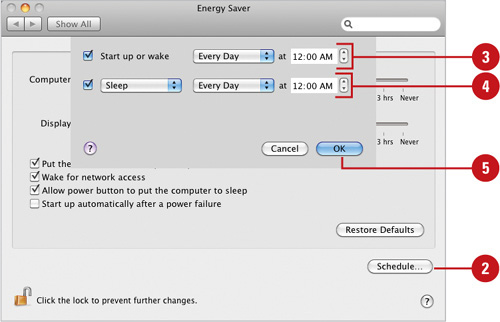
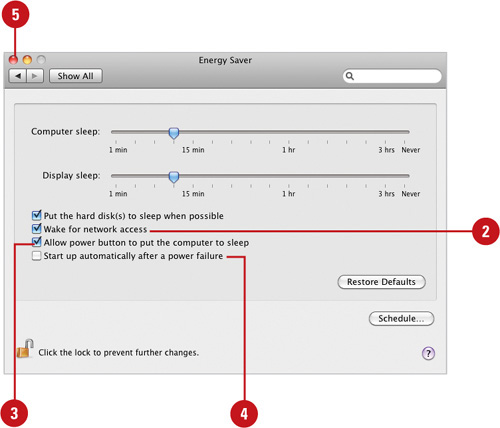
When you’re not using your computer, you can save energy by putting it to sleep. When you put your computer to sleep, the power mode is set to low and the screen goes black to save energy. Your computer is still running, so it takes less time for it to wake up. You can use the Sleep command on the Apple menu to put your computer right to sleep, or you can put your computer and display to sleep automatically when it has been idle for a specific amount of time or when you schedule it at a regular time interval. You can also set the hard disk to sleep whenever possible to save more energy. If you have a Mac laptop, such as a MacBook, it automatically goes to sleep when you close the lid. You move your mouse or press a key to wake it up. If a security option is set in the Security pane in System Preferences, your computer requires a password when it wakes from a sleep. You can also schedule a computer restart or shutdown, at a regular time interval, or a restart after a power failure.
- Click the System Preferences icon in the Dock, and then click the Energy Saver icon.
- Drag the slider to set a time interval for Computer sleep and Display sleep.
- To conserve energy, select the Put the hard disk(s) to sleep when possible check box.
- Click the Close button.
- Click the System Preferences icon in the Dock, and then click the Energy Saver icon.
- Click Schedule, and then click Details, if necessary.
- Select or clear the Start up or waker check box. If so, select an interval from the pop-up, and then set a time.
- Select or clear the bottom check box. If so, select an operation from the first pop-up menu, select an interval from the second pop-up, and then set a time.
- Click OK, and then click the Close button.
- Click the System Preferences icon in the Dock, and then click the Energy Saver icon.
- Select or clear the Wake for network access check box.
- Select or clear the Allow power button to sleep the computer check box.
- Select or clear the Start automatically after a power failure check box.
- Click the Close button.
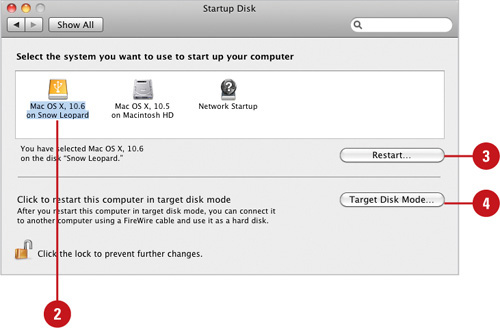
Instead of starting from your local hard disk, you can start your computer from a CD or DVD, a network volume, another disk or disk partition (a single hard disk separated into two distinct areas), or another operating system, such as Microsoft Windows XP, Vista, or 7. Starting your computer with Windows is useful when you want to use applications that are not compatible with Mac OS X. When you start your computer in Windows, you need to use the Startup Disk Control Panel in the Apple menu to switch back to your Mac OS X startup disk. If Windows is not available in the Startup Disk preference pane, you need to have an Intel-based Mac and use Boot Camp Assistant to set up your computer. You can also restart you computer in Target Disk Mode, which allows you to connect to another computer using a FireWire cable and use it as a hard disk.
- Click the System Preferences icon in the Dock, and then click the Startup Disk icon.
- Click the icon of the system folder you want to use as the startup disk.
- To restart your computer, click Restart.
- To restart your computer in order to connect to another computer using a FireWire cable, click Target Disk Mode, read the dialog for instructions, and then click Restart.
See Also
See Chapter 19,“Working with Mac OS X Along with Windows,” on page 465 for information on starting your computer with Microsoft Windows XP, Vista, or 7.
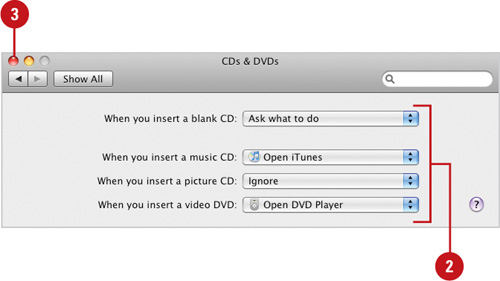
When you insert a CD or DVD into your computer, Mac OS X automatically performs an operation, such as opening iTunes and playing an audio CD. You can change what happens when you insert a CD or DVD in the CDs & DVDs preference pane in System Preferences. You can have Mac OS X open a dialog to ask you what to do, ignore it, run a script, or open an application, such as iTunes, iPhoto, iDVD, or Finder, to burn or play a disc. If you ignore a CD or DVD, the disc doesn’t show up on the desktop or in a Finder window.
- Click the System Preferences icon in the Dock, and then click the CDs & DVDs icon.
- Click the pop-ups for each type of CD or DVD, and then select a startup option:
Ask what to do. A dialog appears that asks you what to do with the disc.
Open an application. Select Open Finder, Open application name or click Open An Application to select one.
Mac OS X automatically opens the application you select.
Run Script. Select and schedule a script to run.
Ignore. Nothing happens.
- Click the Close button.
The Sound pane in System Preferences allows you to adjust input, output and alert volumes, change input and output sound devices, change alert sounds, and play Front Row, an entertainment system, and user interface sound effects, such as when you drag an icon to the Trash. You can use an input device, such as a microphone, to record your voice or give spoken commands on an output device, such as built-in or external speakers, to play music, words, and other sounds. If your computer has two stereo speakers, you can adjust the sound balance between them. If you don’t want to hear sound from your speakers, you can turn on Mute, just like on your TV or stereo. If you use applications with volume controls, such as iTunes, the volume can only be equal to or less than the computer’s output volume. To make volume control easier, you can add output volume to the menu bar.
- Click the System Preferences icon in the Dock, and then click the Sound icon.
- Click the Sound Effects tab.
- To change an alert sound, click a sound from the list.
- Drag the Alert volume slider to adjust the alert volume, which is relative to the output volume.
- To play Finder related sounds, select the Play user interface sound effects check box.
- If you have volume keys on your keyboard, clear the Play feedback when volume keys is changed check box to disable the feedback option and use the volume keys.
- To play sounds from Front Row, select the Play Front Row sound effects check box.
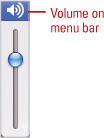
- To change output volume from the menu bar, select the Show volume in menu bar check box.
 Click the Close button.
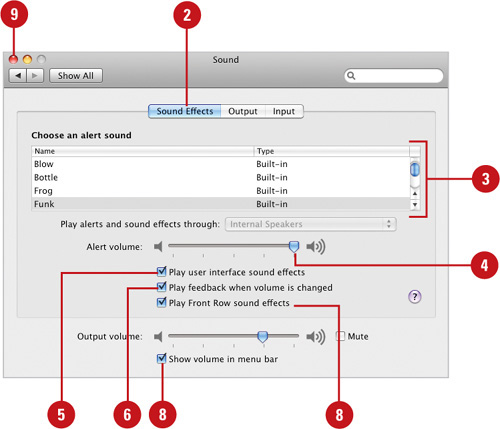
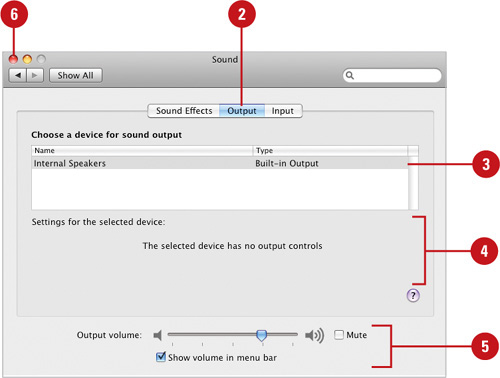
- Click the System Preferences icon in the Dock, and then click the Sound icon.
- Click the Output tab.
- Select a device for sound output.
Options vary depending on the output sound device.
- Drag the Balance slider to adjust the sound for the left and right speakers.
- Drag the Output volume slider to increase or decrease the volume, or select the Mute check box to turn speaker sound off.
- Click the Close button.
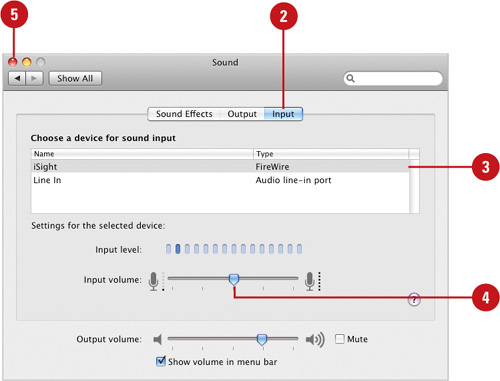
- Click the System Preferences icon in the Dock, and then click the Sound icon.
- Click the Input tab.
- Select a device for sound input.
Options vary depending on the input sound device.
- Drag the Input volume slider to increase or decrease the volume.
The Input level meter displays the sound level coming from the selected sound device.
- Click the Close button.
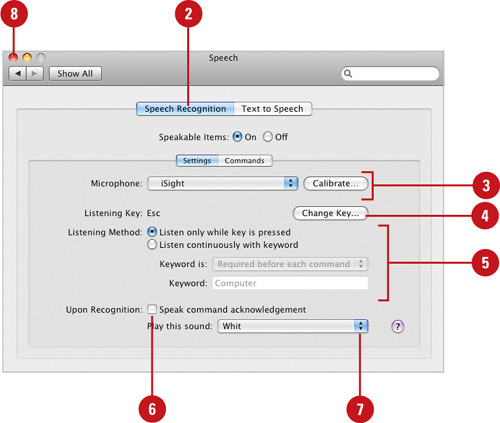
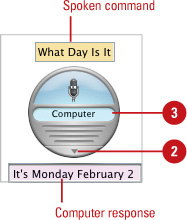
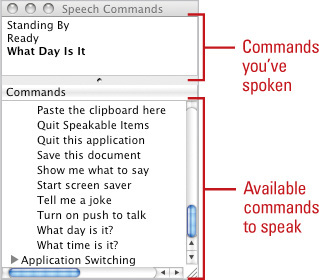
The Speech pane in System Preferences allows you to initialize and customize speech recognition on your computer. Speech recognition is the ability to convert a spoken voice into commands or electronic text. However, Apple’s speech recognition only does half the job; it only executes commands listed in the Speakable Commands window, which you can add or remove in groups, such as menu bar commands. You need another program, such as iListen (www.macspeech.com) to convert voice to text. After you turn on speech recognition, the Feedback window (a small circle microphone) appears, displaying the Esc key in the middle. Press and hold or press the Esc key, which you can change, to turn listening on and off. Now you can speak your commands.
- Click the System Preferences icon in the Dock, and then click the Speech icon.
- Click the Speech Recognition tab, and then click the Settings tab.
- Click the Microphone pop-up, and then select a microphone attached to your computer. Click Calibrate to improve recognition results, if necessary.
- To change the listening key, click Change Key, enter a new key, and then click OK.
- Click an option to listen while the listening key is pressed or while listening is turned on (by pressing the listening key).
If you select the second option, you can type a name and use the Name pop-up to specify whether the name must be spoken before each command.
- Select the Speak command acknowledgement check box to have your computer repeat the command it heard.
- Click the Play this sound pop-up to select a sound to play when your computer recognizes a spoken command.
- Click the Close button.
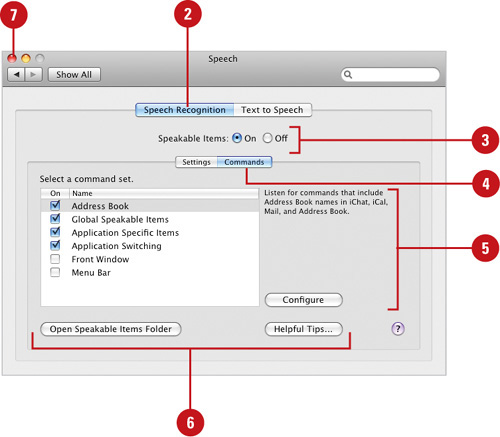
- Click the System Preferences icon in the Dock, and then click the Speech icon.
- Click the Speech Recognition tab.
- Click the On option to display the Feedback window. To remove the window later, click the Off option.
- Click the Commands tab.
- Select or clear the check boxes with the groups of commands you want to enable or disable. If available, click Configure to specify other options.
- Click a button or select the options you want:
Helpful Tips. Click to display tips about speakable items.
Open Speakable Items Folder. Click to open the Speakable Items folder.
- Click the Close button.
- Hold down the listening key or press it to turn listening on.
- To display a list of commands, click the Feedback window triangle, and then click Open Speech Commands Window.
- Say the name if necessary, and then say a command.
Recognized commands appear above the Feedback window, while feedback appears below.
- Release or press the listening key to turn listening off.
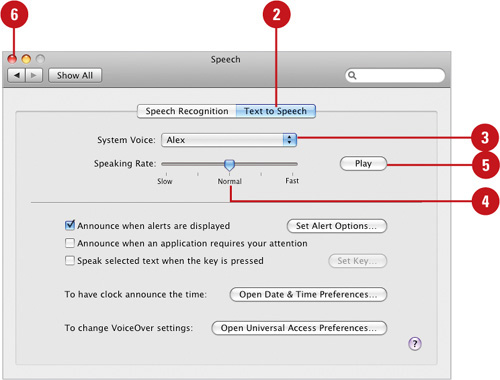
Your Macintosh can speak to you as well as listen. Mac OS X can read aloud what appears on your screen, such as typed text, alert messages, window items, menus, and other interface items. It speaks using a synthesized voice, such as Pipe Organ, Cellos, or Junior. Some voices, such as Pipe Organ, are based on a song and sing the voice. Alex is a new synthesized English voice that uses advanced Apple synthesis to deliver a more natural speaking voice at a faster rate. You can use the Speech pane in System Preferences to select a default voice, set talking alert options for when alerts appear on the screen, and other spoken options for the user interface. Instead of just showing you, the Mac can tell you when an application needs your attention, such as when your printer is out of paper, or read buttons, icons, tabs, dialog options, and selected text in e-mails and documents when you point to it as well as read select text when you press a keyboard shortcut.
- Click the System Preferences icon in the Dock, and then click the Speech icon.
- Click the Text to Speech tab.
- Click the System Voice pop-up, and then select one of the voices from the list.
Click Show More Voices at the bottom of the pop-up to display more voices from which to choose. Click Show Fewer Voice at the bottom of the pop-up to reduce the list.
The computer speaks so you can hear the voice, and a description of the voice appears on the right.
- To change the speed at which the voice speaks, drag the Speaking Rate slider.
- To hear the select speaking voice at the current rate, click Play.
- Click the Close button.
- Click the System Preferences icon in the Dock, and then click the Speech icon.
- Click the Text to Speech tab.
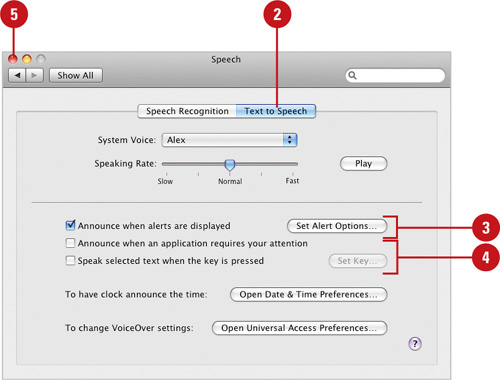
- Select the Announce when alerts are displayed check box, click Set Alert Options, specify the following alert options, and then click OK.
Voice. Reads the contents of an alert dialog. Use the pop-up to select an alert voice.
Phrase. Speak a certain phrase when an alert appears. Use the pop-up to select a phrase.
Delay. Drag to set the delay between the alert and the computer speaking.
Play. Click to display a sample of the alert.
- Select the other spoken items options you want:
Announce when an application requires your attention. Check to verbally announce when an application needs your attention, such as your printer is out of paper.
Speak selected text when the key is pressed. Check to read any text you select when you press a key combination. In the dialog, press a keyboard shortcut or stop speaking selected text, and then click OK.
- Click the Close button.
Universal Access preferences make it easier for a person with a disability, such as difficulty seeing or hearing or controlling a mouse, to use a computer. You can set options to use VoiceOver so you can hear descriptions of screen items, have the screen flash when alert sounds occur, switch the screen to black and white for more visual contrast, zoom in on the screen to make images larger to see, use Sticky Keys or Slow Keys to help control the keyboard, and use Mouse Keys to make mouse functionality available on the numeric keypad.
- Click the System Preferences icon in the Dock, and then click the Universal Access icon.
- Click the Seeing tab.
- Click the VoiceOver On or Off option.
- Click the Zoom Screen, Window, or Off option (New!).
Click Options to customize the way zoom works.
- Click the Black on White or White on Black option.
- Select or clear the Use grayscale check box.
- Drag the slider to enhance the contrast as necessary.
- Click the Hearing tab.
- Select or clear the Flash the screen when an alert sound occurs check box.
 Click the Close button.
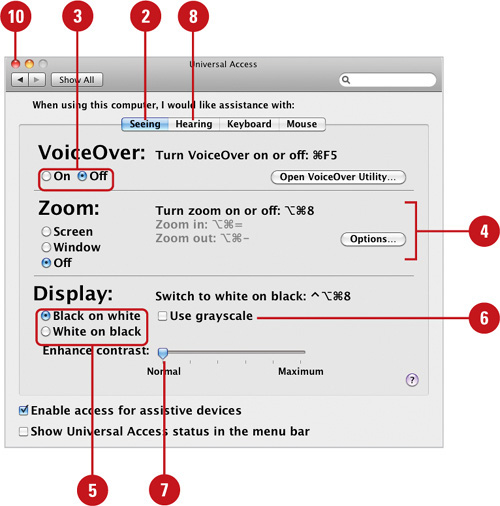
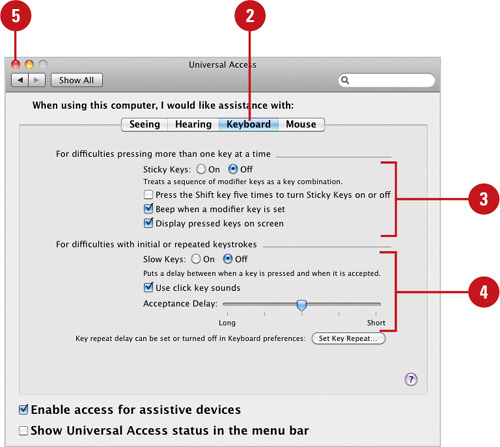
- Click the System Preferences icon in the Dock, and then click the Universal Access icon.
- Click the Keyboard tab.
- To press a group of modifier keys as a sequence, select the On option (Sticky Keys), select or clear the Beep when a modifier key is set check box, and then select or clear the Display pressed keys on screen check box. If so, white symbols appear when you press a modifier key.
- To make the keyboard respond more slowly, click the On option (Slow Keys), drag the Acceptance delay slider, and then select or clear the Use click key sounds check box.
- Click the Close button.
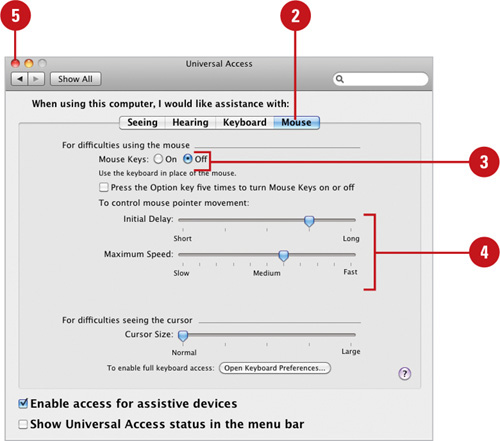
- Click the System Preferences icon in the Dock, and then click the Universal Access icon.
- Click the Mouse tab.
- Click the On option (Mouse Keys).
Press 5 on the numeric keypad to click an item on the screen. Press 0 to press and hold, and then press 5 again to release, press and hold.
- Set the slider options you want:
Initial Delay. Sets how the pointer moves when you press a key.
Maximum Speed. Sets the maximum pointer speed.
Cursor Size. Sets the cursor size.
- Click the Close button.
VoiceOver is a screen reader utility for Mac OS X that speaks the text in documents and windows. When you open accessible applications in VoiceOver, the application automatically speak text. For example, iChat speaks new text messages as they arrive.
When you move around your screen or within documents using VoiceOver, a dark rectangle appears, known as the VoiceOver cursor, to indicate the screen focus area for what to speak. You can use your mouse and keyboard with VoiceOver to move and configure the VoiceOver cursor.
VoiceOver uses advanced Apple synthesis to deliver a more natural speaking voice at a faster rate. Mac OS X Leopard introduces a new synthesized English voice named Alex, which you can also customize to suit your needs.
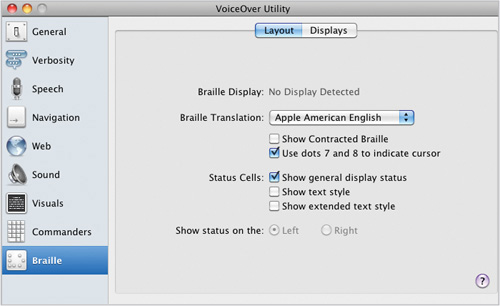
VoiceOver also supports Braille (with greater display device support, including Bluetooth (New!)) and note-takers. If you have a supported Braille display connected to your computer, VoiceOver detects and configures it and can translate output into standard, Grade 2 contracted Braille for use in supported devices. A Braille display shows one line of screen content in a row of Braille cells.
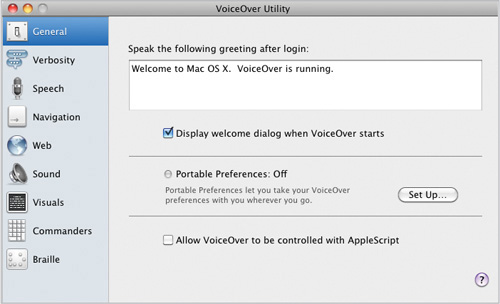
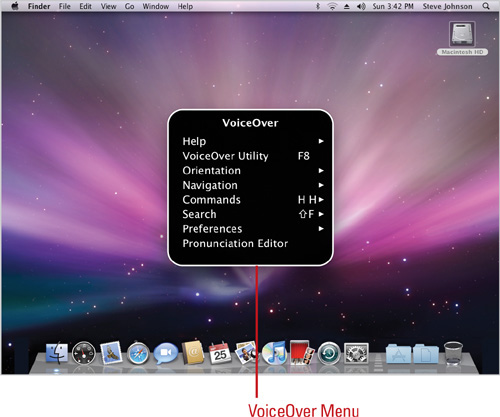
Before you can use VoiceOver, you need to turn it on in the Universal Access pane of System Preferences or use the keyboard shortcut ![]() +F5. In addition to turning on VoiceOver, it’s a good idea to use the VoiceOver utility to customize VoiceOver so it works the way you want. You can set options in the following areas: General, Verbosity, Speech, Navigation, Web, Sound, Visual, Commanders (New!), and Braille. If you have an MobileMe account, you can use VoiceOver syncing to automatically update your VoiceOver preferences on all your Macs.
+F5. In addition to turning on VoiceOver, it’s a good idea to use the VoiceOver utility to customize VoiceOver so it works the way you want. You can set options in the following areas: General, Verbosity, Speech, Navigation, Web, Sound, Visual, Commanders (New!), and Braille. If you have an MobileMe account, you can use VoiceOver syncing to automatically update your VoiceOver preferences on all your Macs.
General
Speech
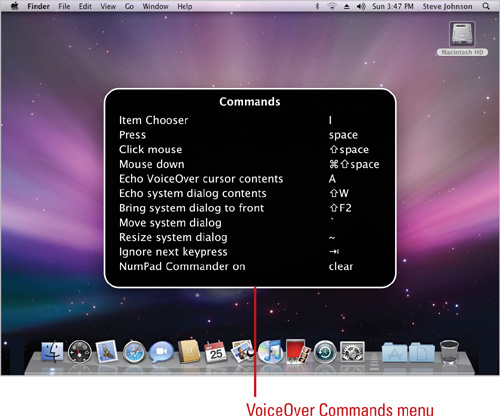
The easiest way to use VoiceOver is to use the VoiceOver keys, the Control and Option keys together. These are known as VO keys. When used together, the Control and Options keys allows you to control VoiceOver and move the VoiceOver cursor. However, it’s easy to get lost. If you do get lost in VoiceOver and you’re not sure where the focus is located, you can use the F1 through F6 keys with the VO keys to hear information about items where the VoiceOver cursor, keyboard, or mouse pointer is focused. If you are not sure what a key on the keyboard does in VoiceOver, you can use keyboard help to learn the names of the keys. After you start keyboard help, simply, press any key to hear its name. If you like to use the numeric pad on your extended keyboard, you can use NumPad and Keyboard Commanders (New!) to program the keys with VoiceOver commands. If you prefer using menus instead of VO keyboard shortcuts, you can use one of the VoiceOver menu’s to get help with or execute a command. The oversized white-on-black menu makes it easy to use.
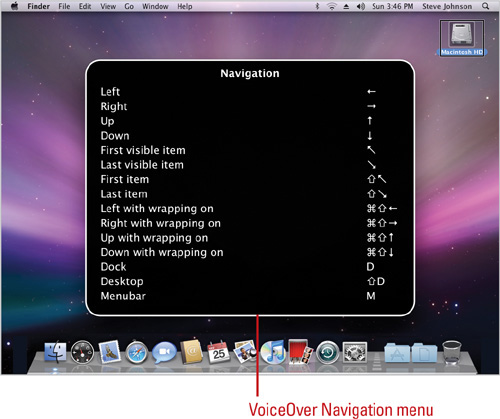
In VoiceOver, you can navigate sequentially through a document or application or skip through by object. You can also create up to 10 hot spots to monitor an object or area in an accessible window and get notification when something changes. If you can’t find what you’re looking for, you can perform smart searches for objects and text in the current window.
When you’re browsing the Web, VoiceOver can begin reading a Web page immediately when the page is loaded (New!). It also allows you to intelligently navigate around Web pages, including tables, to important parts using Web spots (New!).
If you use a trackpad, you can control VoiceOver by touching the pad (New!). The surface of the trackpad acts as the active window with each corner representing absolute window coordinates. VoiceOver guides you through the process using voice commands.
Braille
Commanders
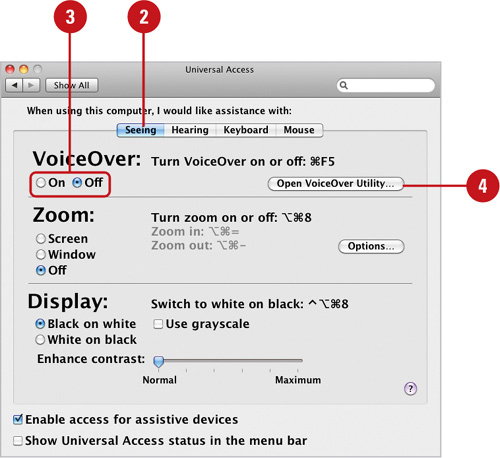
Before you can use VoiceOver, you need to turn it on in the Universal Access pane of System Preferences. In addition to turning on VoiceOver, you can also open the VoiceOver utility, which you can use to set a variety of different options. You can set options in the following areas: General, Verbosity, Speech, Navigation, Web, Sound, Visual, NumPad, and Braille.
- Click the System Preferences icon in the Dock, and then click the Universal Access icon.
- Click the Seeing tab.
- Click the VoiceOver On or Off option.
- Click Open VoiceOver Utility.
- Select a category on the left, and then select the options you want.
General. Enter a login greeting and select a portable preference option.
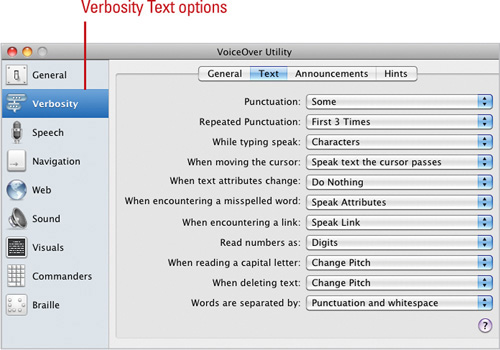
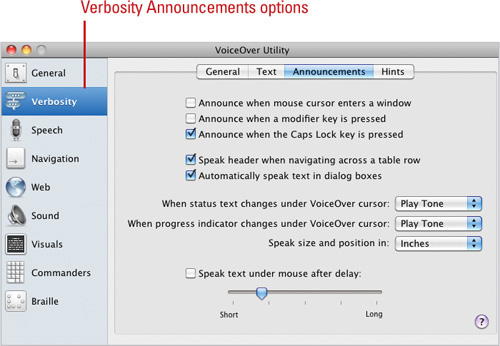
Verbosity. Specify text and announcement options. Also includes general and instructional hint options (New!).
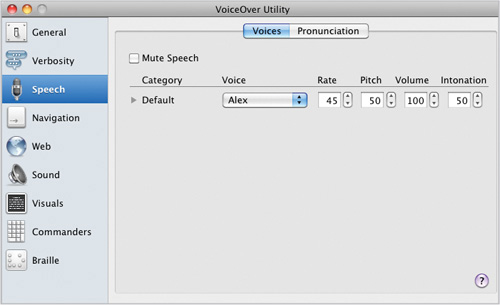
Speech. Specify voice and pronunciation options. You can mute speech or customize the voice rate, pitch, or volume.
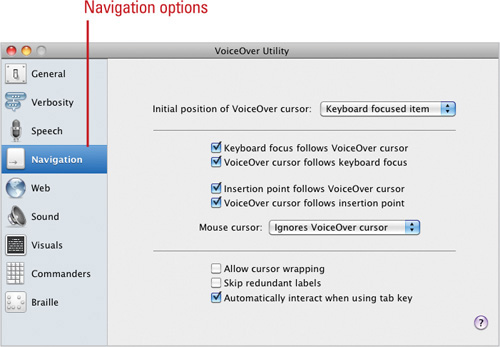
Navigation. Specify mouse and keyboard options. You can change VoiceOver cursor tracking options.
Web. Specify Web navigation options, either DOM (Document Object Model) or Group (such as paragraph to paragraph).
Sound. Mute sounds and enable positional audio.
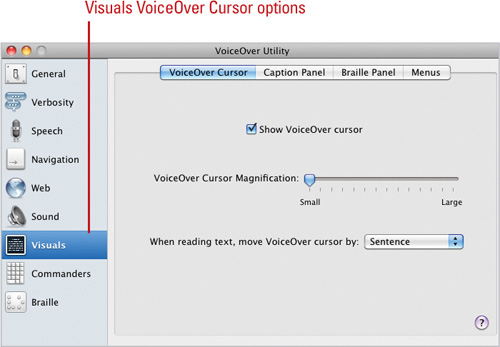
Visuals. Specify VoiceOver cursor, Caption and Braille panel, and menu options.
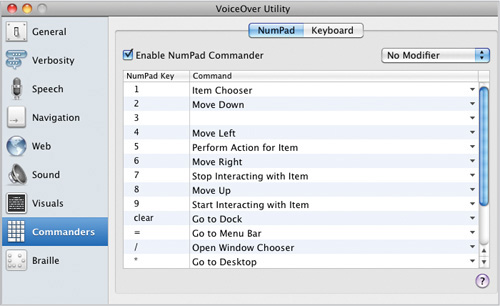
Commanders. Enable NumPad Commander and Keyboard Commander (New!), and customize commands.
Braille. Specify display and input options.
- Click the Close button.
The easiest way to use VoiceOver is to use the VoiceOver keys, the Control and Option keys together. These are known as VO keys. When used together, the Control and Option keys allows you to control VoiceOver and move the VoiceOver cursor. If you’re not sure what a keyboard key does, you can enable keyboard help, where you can press any key to hear its name as well as the name of the VoiceOver command. In addition to the VO keys, you can also use the standard keyboard shortcuts that work within Mac OS X. You can quickly turn VoiceOver on and off using a keyboard shortcut, ![]() +F5. If your using a menu instead of a VO keyboard shortcut, you can use one of the VoiceOver menu’s to get help with or execute a command. The oversized white-on-black menu makes it easy to use. In VoiceOver, you can create up to 10 hot spots to monitor an object or area in an accessible window and get notification when something changes.
+F5. If your using a menu instead of a VO keyboard shortcut, you can use one of the VoiceOver menu’s to get help with or execute a command. The oversized white-on-black menu makes it easy to use. In VoiceOver, you can create up to 10 hot spots to monitor an object or area in an accessible window and get notification when something changes.
- To start or stop VoiceOver, press
 +F5.
+F5. - Use the following keyboard shortcuts for help with VoiceOver.
Important
On a portable computer where function keys are used of other things, you need to press the Fn key first.
VoiceOver menu. VO+F7; use arrow keys to navigate
Item Chooser menu. VO+I
Windows Chooser menu. Lists all open windows: VO+F2 twice
Program Chooser menu. Lists all open programs: VO+F1 twice.
VoiceOver Help. VO+?; Help for an item: VO+H
Command menu. Command menu for an item: VO+H+H
Select a menu. Return
Stop an action or close a menu. Esc
Keyboard help. Hear key names on keyboard: VO+K
VoiceOver Utility. VO+F8
- Use the following common commands for VoiceOver.
What’s on the screen. Under mouse: VO+F5; keyboard highlight: VO+F4; VoiceOver cursor box: VO+F3
Read everything. VoiceOver cursor: VO+A; In window, Dock, or desktop, VO+Shift+W
Pause/resume speech. Press and release Control; press again to resume. Repeat phrase: VO+Z
Show/Hide caption panel. VO+Command+F10
Show/Hide Braille panel. VO+Command+F9
NumPad Commander on/off. VO+Clear
Navigation. VO+arrow keys; visible area top or bottom: VO+Home or VO+End
Links on a Web page. VO+U
Text in a document. Read all text: VO+A; read sentence: VO+S; read line: VO+L
Search. Find text: VO+F; find hyperlink: VO+Command+L; find graphic: VO+Command+G
- Use the following commands to create and use hot spots.
Create Hot Spot. Select item, and then press VO+Shift+[number key]
Go to Hot Spot. Press VO+[number key]
Hear Hot Spot. Press VO+Command+[number key]
Watch for Hot Spot Changes. Press VO+Command+Shift+[number key]
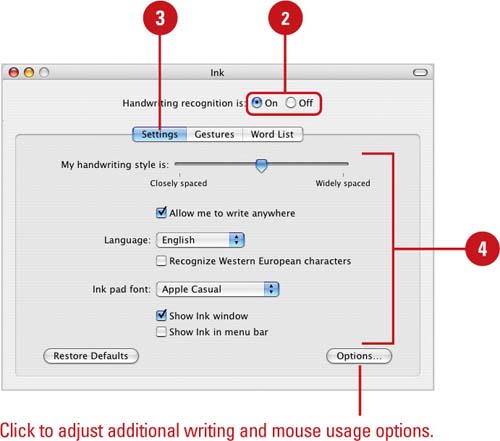
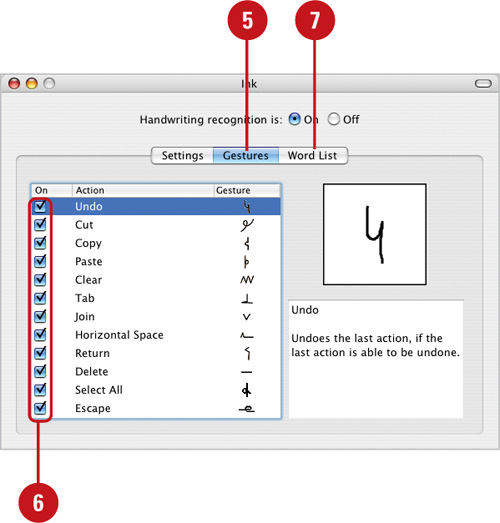
If you have an ink device on your computer, you can use System Preferences to improve the recognition of ink to text. You can adjust Ink Preferences to your writing style, either widely or closely spaced, and to see how quickly your writing pen cursor changes back into a clicking device. You can improve recognition by adding words it may not know, such as names (like a custom dictionary for spell checking). As you write, Ink recognizes certain gestures or shapes, which get performed as commands, such as Undo, or pressed as keys, such as Delete or Space. The Gestures tab provides a list of gestures that you can turn on and off.
- Click the System Preferences icon in the Dock, and then click the Ink icon.
- Click the On or Off option to turn handwriting recognition on or off.
- Click the Settings tab.
- Specify the options you want:
My handwriting style is. Drag slider to set spacing.
Allow me to write anywhere. Check to use Anywhere mode.
Language. Click to select a ink writing language.
Ink pad font. Click to select a default recognition font.
Show ink window. Check to use Ink Pad mode.
Show ink in menu bar. Check to add the Ink menu commands to the menu bar.
- Click the Gestures tab.
- Select or clear the check boxes to turn gesture actions on and off.
- Click the Word List tab.
- Use the buttons to add or change uncommon words you use.
- Click the Close button.