Mac OS X comes with a word processing application, called TextEdit, you can use to create basic documents. TextEdit is designed especially for working with text, so it’s a snap to create and edit letters, or any other word-based communication. TextEdit contains all the tools and features you need to produce interesting documents that say exactly what you mean, and have the look to match.
TextEdit is a versatile word-processing application. You can use TextEdit to view, create, and edit documents containing multi-lingual text, graphics, movies, and other document files. If you are working with HTML code (document as they appear in a Web browser), TextEdit makes the perfect editor. If you have speakers connected to your Macintosh, you can hear documents read aloud by your computer. When you’re done working with a document, you can save it in multiple formats, such as plain text, Rich Text Format (RTF), Microsoft Word, and Portable Document File (PDF).
Tools, such as the Spelling Checker and Dictionary, help you present your thoughts accurately, clearly, and effectively. When your text is complete, you can quickly add formatting elements, such as bold type and special fonts, to make your documents look professional. Each document contains simple styles that have common design elements. Apply the existing styles for headings, titles, body text, and so forth. Then modify the styles, or create your own to better suit your needs. Make sure you get the look you want by adding emphasis using italics, boldface, and underline, changing text alignment, adjusting line and paragraph spacing, setting tabs and indents, creating bulleted or numbered lists, and adding tables. When you’re done, your document is sure to demand attention and convey your message in its appearance.
A document is a file you create using a word processing program, such as a letter, memo, or resume. When you start TextEdit, a blank document appears in the work area, known as the document window. You can type information to create a new document and save the result in a file, or you can open an existing file (using the Sidebar and List or Column view) in various formats, and save the document with changes. You can also add pictures, movies, and files in your documents.
 Click the Applications folder in the Dock, and then click the TextEdit icon.
If TextEdit is already open, click the File menu, and then click New.
 To change the file format, click the Format menu, and then click Make Plain Text or Make Rich Text.
 Type your text.
 Press Return when you want to start a new paragraph.
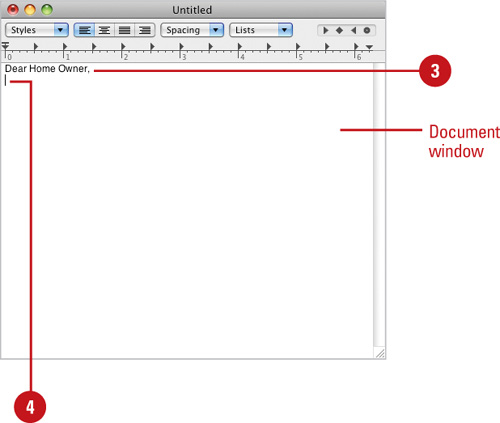
 When you’re done, save and close the document.
See Also
See “Saving and Closing a Document” on page 190 for information on saving a document.
See “Setting Up Page Options” on page 204 for information on selecting paper size, orientation, and printer scaling and format.
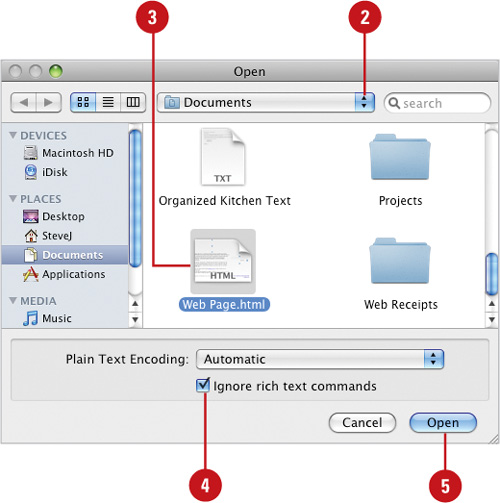
- Select the hard drive and the folder in which you want to open the file.
- Click the document you want to open.
- If the document contains one or more languages, click the Plain Text Encoding pop-up, and then select Unicode (for multiple languages) or a specific language.
- If you want to open a HTML document or create a plain text document, select the Ignore rich text commands check box.
 Click Open.
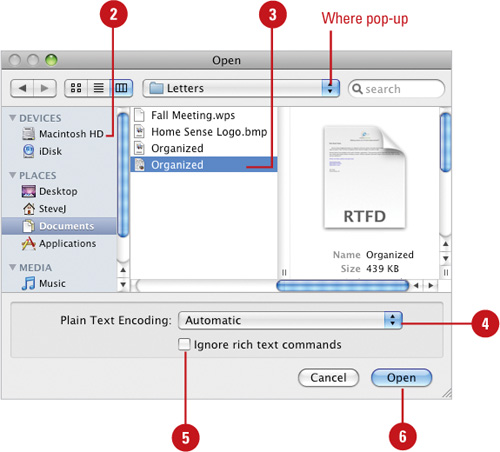
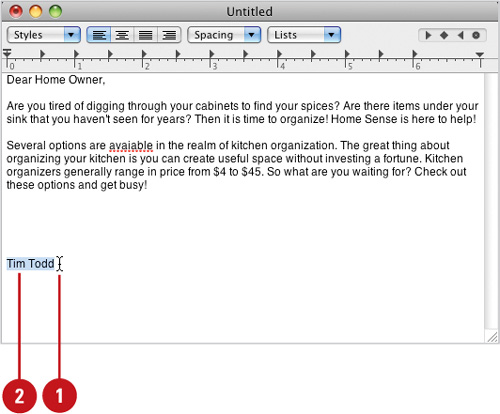
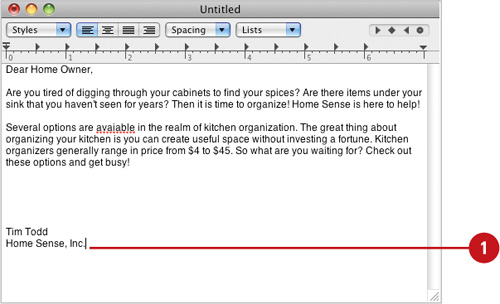
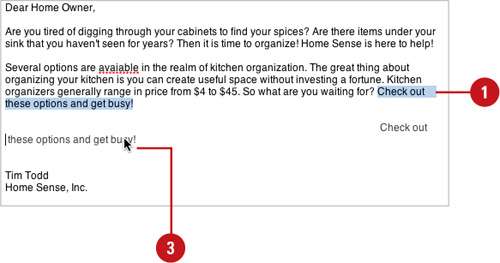
One of the advantages of using a word processing program is that you can edit a document or change the contents without re-creating it. In the TextEdit work area, the mouse pointer changes to the I-beam pointer, which you can use to reposition the insertion point (called navigating) and insert, delete, or select text. Before you can edit text, you need to highlight, or select, the text you want to modify. Then you can delete, replace, move (cut), or copy text within one document or between documents even if they’re different programs. When you cut or copy an item, it’s placed on the Clipboard, which stores only a single piece of information at a time. You can also move or copy selected text without storing it on the Clipboard by using drag-and-drop editing.
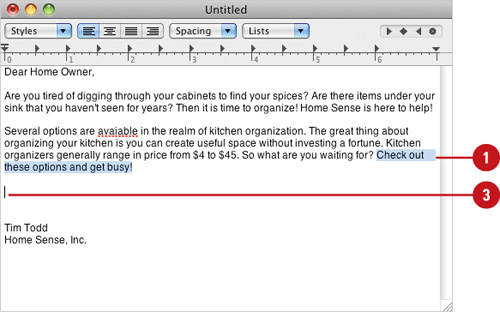
- Select the text you want to move or copy.
- Point to the selected text, and then click and hold the mouse button.
If you want to copy the text to a new location, also press and hold the Option key. A plus sign (+) appears in the pointer box, indicating that you are dragging a copy of the selected text.
- Drag the selected text to the new location, and then release the mouse button (and the Option key, if necessary).
- Click anywhere in the document to deselect the text.

Although typing information into an document or e-mail through the keyboard is fast and efficient, you may find that you need to enter information in handwritten form, known as ink. Programs that accept ink, such as TextEdit or Mail, provide handwriting recognition to help you convert handwriting into text. Before you can insert handwritten text into a document, you need to have an ink device, or a handwriting tablet, such as Wacom, attached to and installed on your computer. With handwriting recognition turned on in the Ink pane in System Preferences, you can write in two ink modes: Anywhere or Ink pad. Anywhere mode is useful for writing in a word processing document. As you write in Anywhere mode, your ink strokes appear in a yellow lined translucent overlay. As the Mac recognizes the writing, it converts the ink to text, inserts it in the open document, and erases it from the overlay. When you need to use the mouse, you need to turn off Anywhere mode. Ink pad provides a floating window in which you can use the stylus to write ink and to perform commands as the mouse. Using ink can be tricky at first, but over time you’ll get the hang of it.
- Open a program, such as TextEdit, that accepts ink.
- Turn on handwriting recognition (Ink icon in System Preferences).
The Ink toolbar appears.
- Write your text in the yellow lined overlay. After recognition, the text that you write appears in the document.
- To turn Anywhere mode off to use the mouse, click the On/Off button on the Ink toolbar.
- When you’re done, turn off handwriting recognition, and close any open documents.

See Also
See “Setting Ink Preferences” on page 128 for information on turning handwriting recognition on and off, as well as other options.
- Turn on handwriting recognition (Ink icon in System Preferences).
The Ink toolbar appears.
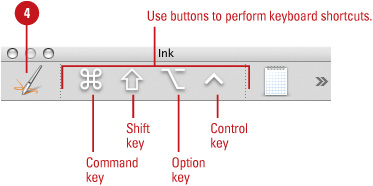
- Click the Show Ink Pad button on the Ink toolbar.
- Click the A button to input text, or click the Star button to create a drawing.
- Write your text or draw with the pen in the Ink Pad window.
- Use the Ink toolbar buttons (Command, Shift, Option, or Control) to perform keyboard shortcuts.
 Click Send to have your text or drawing pasted into the open document behind it.
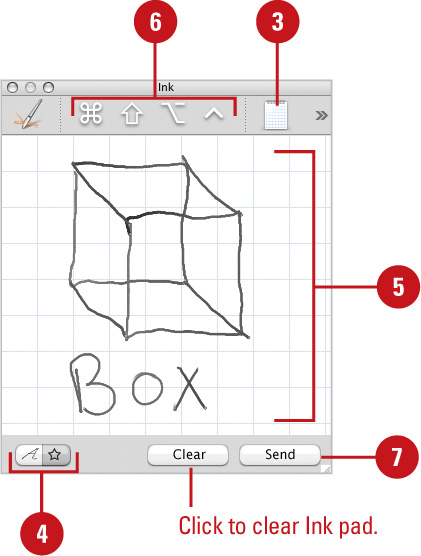
 When you’re done, turn off handwriting recognition, and close any open documents.
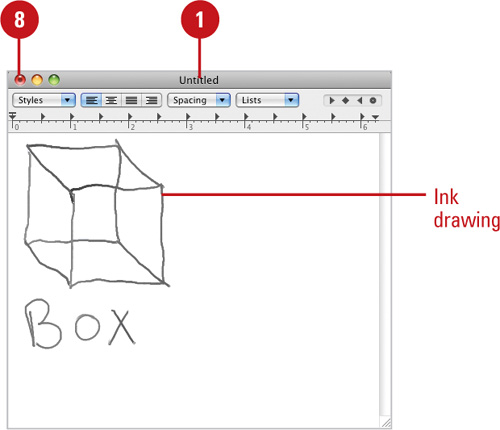
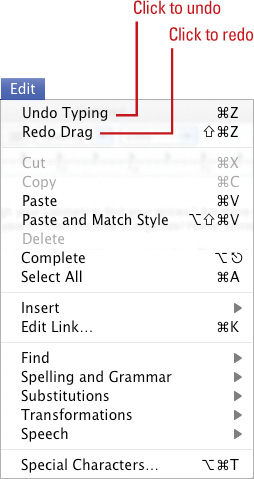
Everyone makes mistakes and changes their mind at some point, especially when creating or revising a document. With TextEdit you can instantly correct typing errors by pressing a key. You can also reverse more complicated actions, such as typing an entire word, formatting a paragraph, or creating a chart. If you need to undo several actions, you can use the Undo command multiple times. With the Undo command, if you change your mind, you can just as easily use the Redo command to restore the action you reversed.
Click the Edit menu, and then click Undo to reverse your most recent action, such as typing a word or formatting a paragraph.
Click the Edit menu, and then click Redo to restore the last action you reversed.
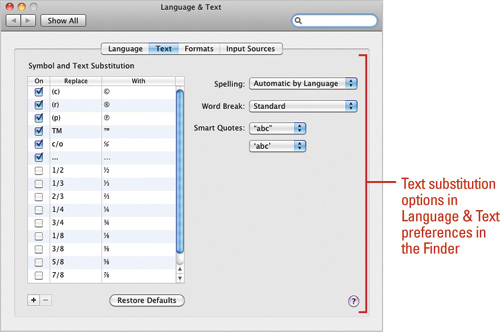
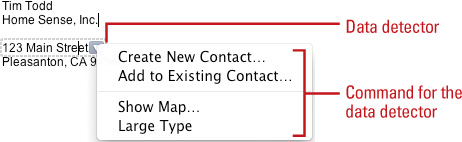
Text substitution (New!) allows you to correct words and phrases that you misspell or insert symbols. For example, you can type “teh” to change to “the” or type (c) to insert ©. You can add words, phrases, and symbols to the Symbol and Text Substitution list in Language & Text preferences. In TextEdit, you can use Smart Copy/Paste to adjust text formatting during a copy and paste, Smart Dashes to automatically replace a sequence of dashes to typographical dashes, Smart Quotes to replace quotes and apostrophes to typographical ones, and Smart Links to convert URLs into links. TextEdit also uses data detectors (New!) to analyze what you type to detect specialized text, such as dates and addresses, so you can take smart actions, such as create a contact, create an iCal event, or map an address depending on the type of information.
- Click the Edit menu, point to Substitutions, and then select or deselect any of the following options:
Show Substitutions. Opens the Substitutions dialog where you can enable or disable text substitution options (ones listed below), open the Language & Text preferences dialog, or make text replacements.
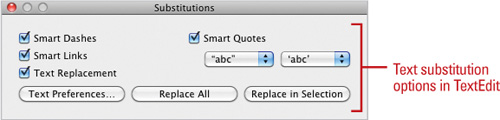
Smart Copy/Paste. Adjusts the formatting for text when you copy and paste.
Smart Quotes. Replaces quotes and apostrophes to typographical ones
Smart Dashes. Replaces a sequence of dashes to typographical dashes
Smart Links. Converts URLs into links
Data Detectors. Analyzes text, such as dates and addresses, in order to take smart actions.
Text Replacement. Replaces text using the list in Language & Text preferences.
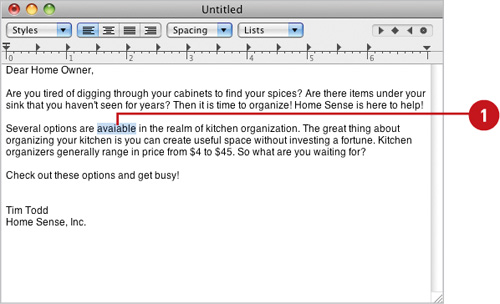
As you type, a red wavy line appears under words not listed in TextEdit’s dictionary (such as misspellings or names) or duplicated words (such as the the). You can correct these errors as well as grammatical problems as they arise or after you finish the entire document. For common spelling errors, such as “teh,” TextEdit can automatically correct the mistake (New!) as you type. TextEdit uses symbol and text substitution options in Language & Text preferences (New!) to make the correction. Before you print your final document, use the Spell and Grammar Checker to ensure that your document is error-free.
- Select the spelling and grammar commands to enable the options.
Check Spelling. Click the Edit menu, point to Spelling and Grammar, and then click Check Spelling While Type.
Correct Spelling. Click the Edit menu, point to Spelling and Grammar, and then click Correct Spelling Automatically (New!).
Check Grammar. Click the Edit menu, point to Spelling and Grammar, and then click Check Grammar With Spelling.
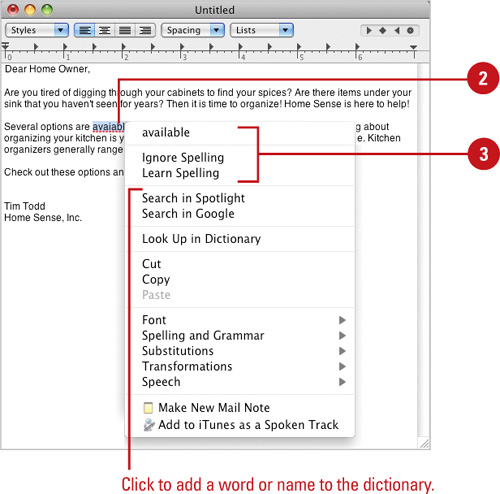
- Control-click a word with a red dotted underline.
- Click a substitution, or click Ignore Spelling to skip any other instances of the word.
- Click at the beginning of the document or select the text you want to correct.
- Click the Edit menu, point to Spelling and Grammar, and then click Show Spelling and Grammar.
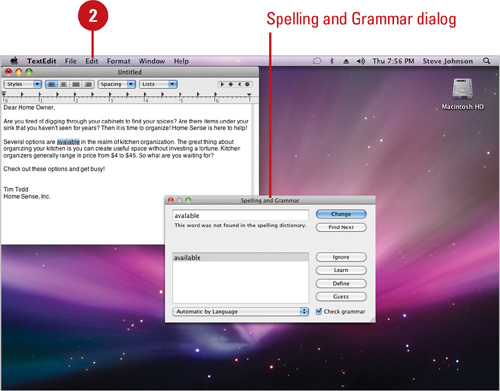
As it checks each sentence in the document or your selection, TextEdit selects misspelled words or problematic sentences and provides appropriate alternatives.
- If necessary, click the Language pop-up, and then select a language.
- To check grammar, select the Check grammar check box.
- Select an option:
Click a suggestion, and then click Change to make a substitution.
If no suggestion is appropriate, click in the document and edit the text yourself. Click Find Next to continue.
Click Ignore to skip the word.
Click Learn to add the word to the dictionary.
Click Define to look up the word in the dictionary.
Click Guess to suggest possible corrections.
The Spell Checker will beep when the process is done.
- Click the Close button to return to the document.

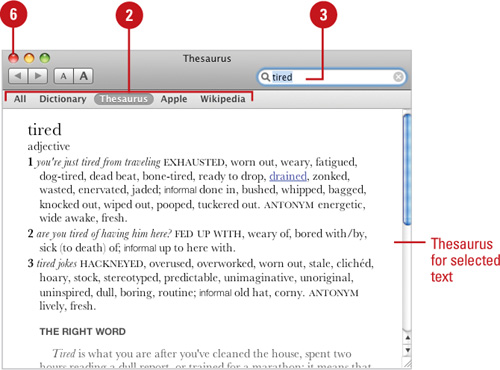
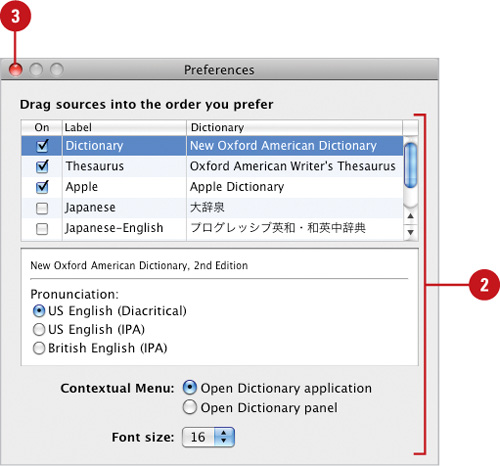
The Dictionary application, located in the Applications folder, gives you the ability to search for words and definitions as a stand-alone program or from any application, such as TextEdit. Within an application, you can view words in a Dictionary panel or open the Dictionary application. You can also use the Dictionary widget in Dashboard to look up and find the definitions you need. Dictionary provides several different sources for you to reference, including English and other language dictionaries, an Apple terms dictionary, a thesaurus (second edition) (New!), and Wikipedia, which is a free online encyclopedia. You can select which sources you want to use as well as set parental controls to limit access to some works for specific users.
- Start the Dictionary application as a stand-alone program or in another application:
Stand Alone. Click the Applications folder in the Dock, and then click the Dictionary icon.
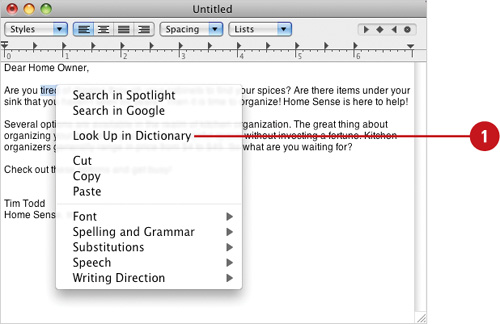
In an Application. Hold down the Control key and click the word you want, click Look Up in Dictionary from the menu to display the word in the Dictionary application or panel.
You can also point to the word you want, press Control+
 +D to display the Dictionary panel. Click More to view the complete entry. Click the pop-up to change the source.
- Select the source you want to search: All, Dictionary, Thesaurus Apple, Wikipedia, etc.
- Type a word or phrase, if necessary. Dictionary searches for matches as you type.
- Double-click the item you want to view.
- Click a link to find out about an item.
- Click the Close button.
- Select or specify the various options you want to use:
Sources. Select the check boxes for the dictionaries and thesaurus’ you want to use, and then select the reference resource you want to set additional options.
Pronunciation. If available, select the pronunciation option you want.
Contextual Menu. Click the Open Dictionary application or Open Dictionary panel option.
Font Size. Click the up and down arrows to set the font size.
- Click the Close button.
- Quit Dictionary.
Did You Know?
You can set parental controls for dictionary use. As the administrator, click the System Preferences icon in the Dock, click the Parental Control icon, enter your administrator password, select the user you want to set limits, click Content, select the check box next to Dictionary, and then click the Close button.
You can view recent dictionary searches. To see previously viewed words, use the Back and Forward buttons. To skip to a specific word, hold down the Back or Forward buttons to see a menu of recent words, and then click the one you want.
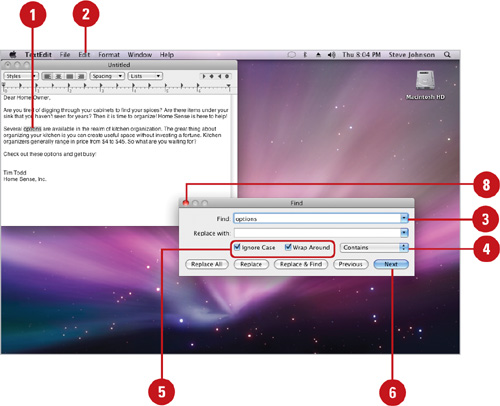
The Find and Replace commands make it easy to locate or replace specific text or formulas in a document. For example, you might want to find each reference to a individual or company name in a long report to verify that it’s properly used. Or you might want to replace all references to a special character in your document with another one. If you only know part of a word you want to find, you can use the Contains pop-up to help you locate what you’re looking for. If you are looking for a case sensitive text with upper and lower case characters, turn off the Ignore Case option. To make sure you check the entire document no matter where you start, turn on the Wrap Around option.
- Click at the beginning of the document, or select the text you want to find.
- Click the Edit menu, point to Find, and then click Find.
- Type the text you want to find.
- Click the Contains pop-up, and then select a search option: Contains, Starts With, or Full Word.
- Select other options:
Ignore Case. Check to ignore upper and lower case characters.
Wrap Around. Check to wrap back to the beginning of the document.
- Click Next until the text you want to find is highlighted.
You can click Next repeatedly to locate each instance of the text.
- If a message box appears when you reach the end of the document, click OK. Otherwise, the computer will beep when the Find is complete.
- When you’re done, click the Close button.
- Click at the beginning of the document, or select the text you want to replace.
- Click the Edit menu, point to Find, and then click Find.
- Type the text you want to find.
- Type the text you want to replace.
- Click the Contains pop-up, and then select a search option: Contains, Starts With, or Full Word.
- Select or clear the Ignore Case and Wrap Around check boxes.
- Click Next to begin the search and find the next instance of the search text.
- Click one of the Replace buttons:
Replace All. Click to substitute text throughout the entire document.
Replace. Click to substitute the replacement text.
Replace & Find. Click to substitute the replacement text and find the next instance.
You can click Next to locate the next instance of the search text without making a replacement.
 If a message box appears when you reach the end of the document, click OK. Otherwise, the computer will beep when the process is done.
 When you’re done, click the Close button.
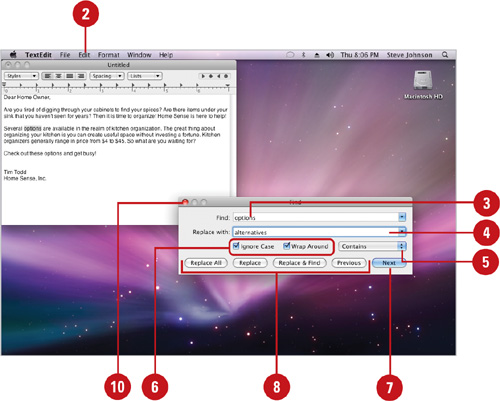
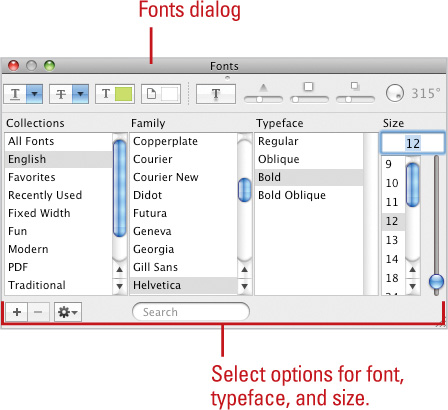
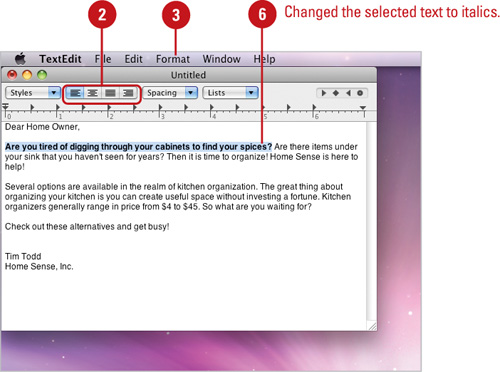
When you are working with Rich Text Format (RTF) and Word Format documents, you can change the format or the appearance of text and graphics in a document so that the document is easier to read and more attractive. A quick and powerful way to add emphasis to parts of a document is to format text using bold, italics, underline, or color. For special emphasis, you can combine formats, such as bold and italics. In addition, you can change the font style and size. A font is a set of characters with the same typeface or design that you can increase or decrease in size, such as Arial or Times New Roman. Font size is measured in points; one point is 1/72 of an inch high.
- Select the text or click in the paragraph you want to format.
- Click an alignment button: Left, Center, Justify, and Right.
- Click the Format menu, and then point to Font.
- Select any of the formatting commands to open a dialog and style text:
Show Fonts. Click to change multiple text formatting options at the same time.
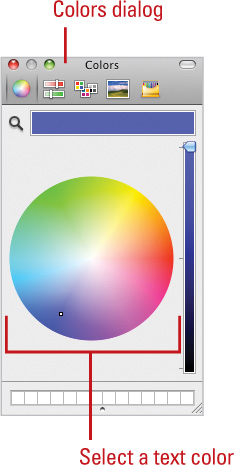
Show Color. Click to change text color.
- Select any of the formatting menu individual commands: Bold, Italic, Underline, Outline, Bigger (font size), or Smaller (font size).
- Click in the document to unselect the newly formatted text.
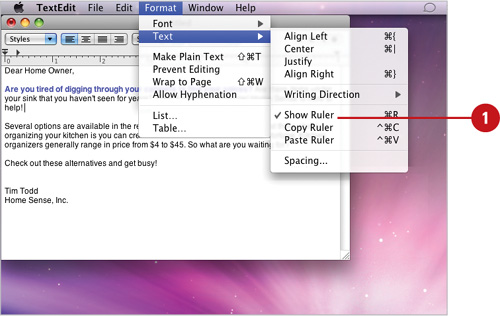
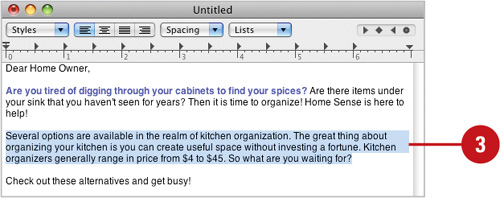
The TextEdit ruler does more than just measure. The horizontal ruler above the document shows the length of the typing line and lets you quickly adjust left and right margins, indents, and set tabs. You can hide the ruler to get more room for your document. When you press Return to start a new paragraph, TextEdit continues to use the same ruler settings. As you work with a document, ruler settings change. Instead of resetting ruler settings each time, you can copy and paste them.
- Click in the line to place the insertion point or select the lines with the ruler settings you want to copy.
- Click the Format menu, point to Text, and then click Copy Ruler.
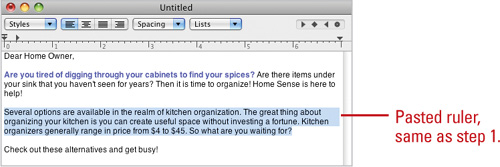
- Click in the line to place the insertion point or select the lines in which you want to paste the ruler.
- Click the Format menu, point to Text, and then click Paste Ruler.
Tabs set text or numerical data alignment in relation to the edges of a document. A tab stop is a predefined stopping point along the document’s typing line. Default tab stops are set every half-inch on the ruler, but you can set multiple tabs per paragraph at any location. Each paragraph in a document contains its own set of tab stops. The default tab stops do not appear on the ruler, but the manual tab stops you set do appear. Once you place a tab stop, you can drag the tab stop to position it where you want. If you want to add or adjust tab stops in multiple paragraphs, simply select the paragraphs first.
- Select the text or click in the paragraph you want to format.
- Drag a tab stop from the tab stop palette above the ruler or one already on the ruler where you want to set it.
- To move a tab, drag the tab stop to position it where you want.
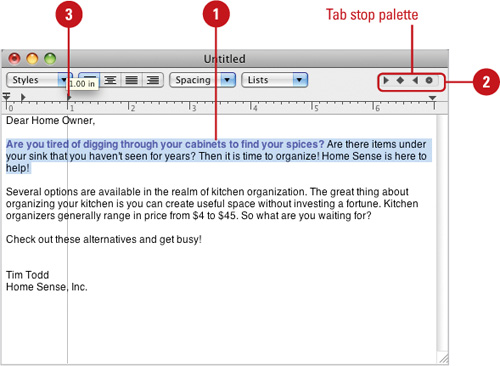
- To clear a tab stop, drag it off the ruler.
See Also
See “Setting Up Page Options” on page 204 for information on changing the paper size.
When you indent a paragraph, you move its edge in from the left or right margin. You can indent the entire left or right edge of a paragraph or just the first line. The markers on the ruler control the indentation of the current paragraph. The ruler has three markers. The top rectangle, called the paragraph indent marker, controls where the first line of the paragraph begins. The bottom triangle, called the left indent marker, controls where the remaining lines of the paragraph begin. The triangle on the right side of the ruler, called the right indent marker, controls where the right edge of the paragraph ends.
Select the text or click in the paragraph you want to format.
To change the left indent of the first line, drag the Paragraph Indent marker.
To change the indent of the second and subsequent lines, drag the Left Indent marker (under the Paragraph Indent marker).
To change the left indent for all lines, drag the Left Indent marker, and the Paragraph Indent marker to the same point.
To change the right indent for all lines, drag the Right Indent marker.
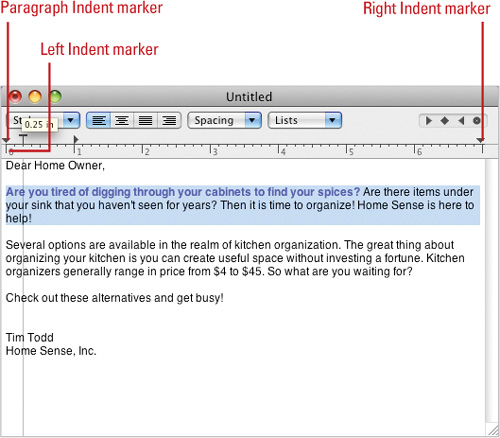
As you drag a marker, the dotted guideline helps you position the indent accurately.
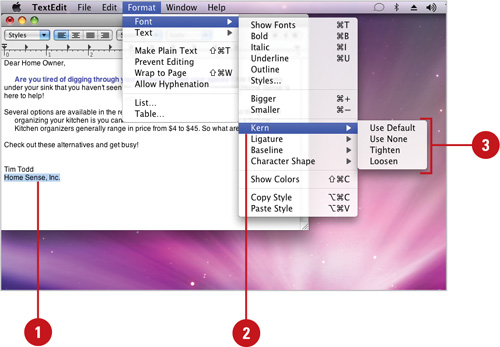
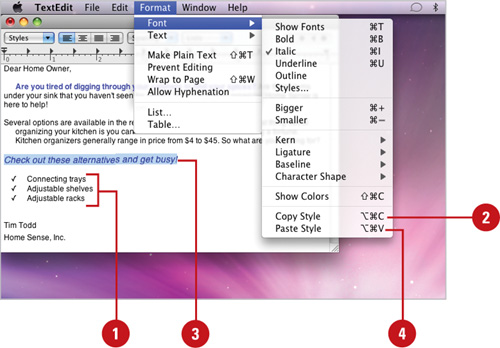
Kerning is the amount of space between each character that you type. Sometimes the space between two characters is larger than others, which makes the word look uneven. You can expand or condense the spacing to create a special effect for a title, or re-align the baseline, which is the position of characters to the bottom edge of the text—this is helpful for positioning the copyright or trademark symbols.
- Select the text you want to format.
- Click the Format menu, point to Font, and then point to Kern.
- Click any of the following options:
Use Default. Uses default kerning.
Use None. Removes kerning.
Tighten. Moves the characters together slightly; you can repeat the command.
Loosen. Moves the characters slightly apart; you can repeat the command.
- Select the text you want to format.
- Click the Format menu, point to Font, and then point to Baseline.
- Click any of the following options:
Superscript. Moves the text above the level of normal text.
Subscript. Moves the text below the level of normal text.
Raise. Moves the text up only a little bit; you can repeat the command.
Lower. Moves the text down only a little bit; you can repeat the command.

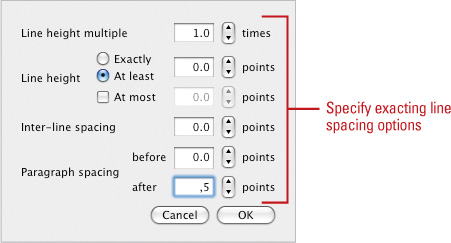
The lines in all TextEdit documents are single-spaced by default, which is appropriate for letters and most documents. But you can easily change your document line spacing to double or you can specify to allow extra space between every line. This is useful when you want to make notes on a printed document. Sometimes, you’ll want to add space above and below certain paragraphs, for headlines, or indented quotations to help set off the text. To set specialized line spacing settings, use the Other command on the Spacing pop-up. You can select options for line height, inter-line spacing, and paragraph spacing. Line height is the distance from the top of a line to the top of the line below it; inter-line spacing is the distance from the bottom of a line to the top of the line below it; and paragraph spacing is the distance from the bottom of a paragraph to the top of the first line in the paragraph below it.
- Select the text you want to change.
- Click the Spacing pop-up on the ruler, and then select a spacing option:
Click Single or Double to apply a single line space or double line spacing.
Click Other, specify the exacting options you want, and then click OK.

Did You Know?
You can insert and remove a page break. Click the Format menu, and then click Wrap To Page (if necessary) so the page break can be visible. Click to place the insertion point where you want the page break, press Control+Q, and then press Control+L. To remove a page break, place the insertion point below the page break, and then press Delete.
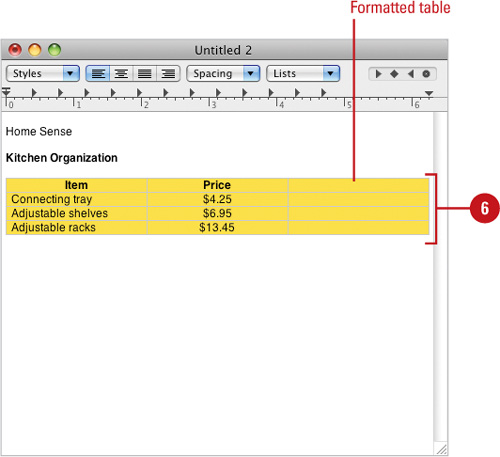
The best way to draw attention to a list is to format the items with bullets or numbers. You can even create multi-level lists. For different emphasis, change any bullet or number style to one of TextEdit’s many predefined formats. For example, switch round bullets to check boxes or Roman numerals to lowercase letters. You can also customize the list style or insert a picture as a bullet. If you move, insert, or delete items in a numbered list, TextEdit sequentially renumbers the list for you. A table neatly organizes information into rows and columns. The intersection of a column and row is called a cell. Enter text into cells just as you would anywhere else in TextEdit, except that pressing the Tab key moves you from one cell to the next. You can format a table just like you format any other text in TextEdit.
- Select the text you want to change or click the place the insertion point where you want to start a list.
- Click the Lists pop-up on the ruler, and then select the numbered or bulleted list option you want.
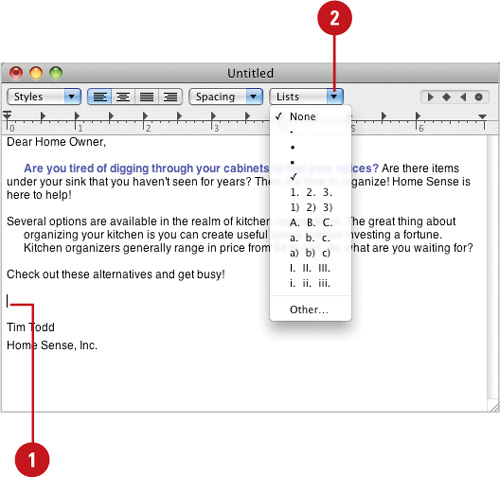
- For a new list line, type a list item, and then press Return.
To add to an existing list, place the insertion point at the end of the line, and then press Return.
- To indent a list, place the insertion point at the beginning of the line, and then press Tab.
To go back to the previous indent level, hold down the Shift key and press Return.
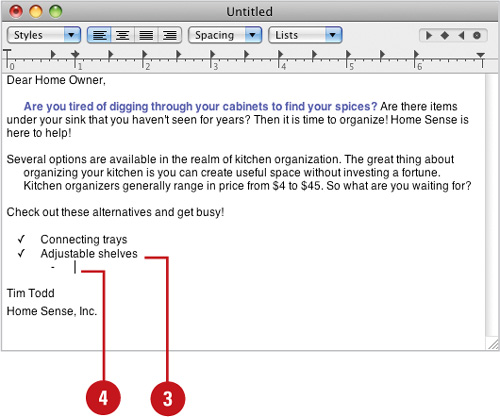
- To finish a list, press Return twice.
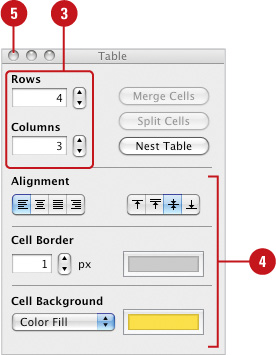
- Click the Format menu, and then click Table.
- Type the number of rows and columns you want or use the arrow buttons.
- Set any of the following table options:
Alignment. Left, Center, Justified, Right, or Top, Baseline, Middle, or Bottom.
Cell Border. Use the arrow button to set the pixel border.
Cell Background. Click the pop-up to select None or Color Fill. Click the color box, click a color, and then click the Close button.
- Click the Close button in the Table dialog box.
- To adjust the height or width of a row or column, position the pointer over a cell border, and then drag the border.
Did You Know?
You can merge cells in a table. Select the cells you want to merge, click the Format menu, point to Text, click Table, click Merge Cells, and then click the Close button.
You can create a table in a table. Select the cell you want to insert a table, click the Format menu, point to Text, click Table, click Nest Table, and then click the Close button.
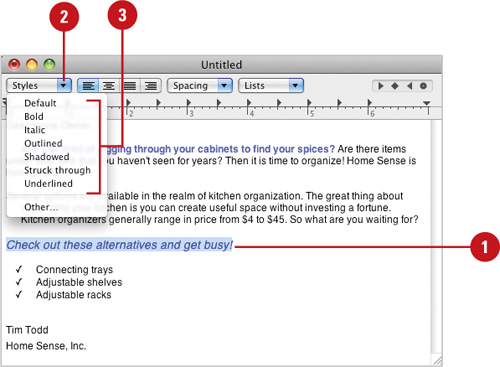
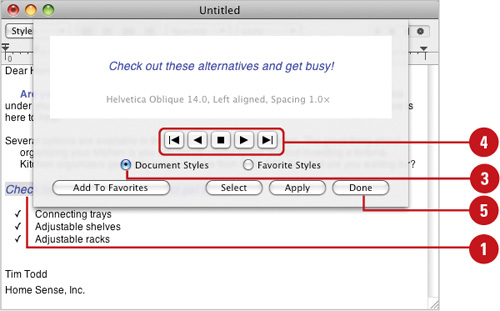
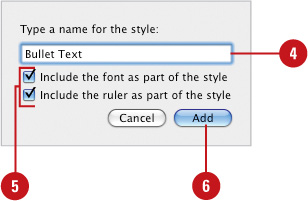
When you want to apply multiple groupings of formatting, such as font type, size and color, use a style. A style is a collection of formatting settings saved within a document or favorites list that you can apply to text. TextEdit keeps track of all the styles in the current document. If you want to save a style for use in all documents, you can add it to a favorites list. TextEdit provides a few basic favorite styles. But you can add your own to create the exact look you want. If you need a quick way to apply a single instance of formatting, you can copy and paste it.
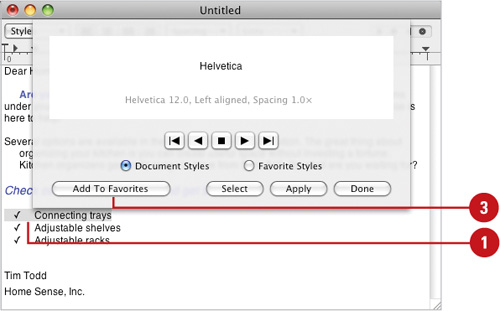
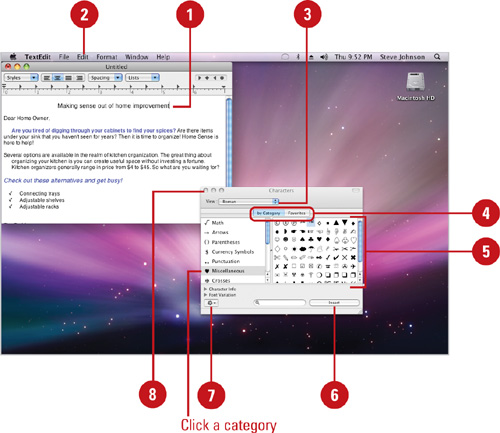
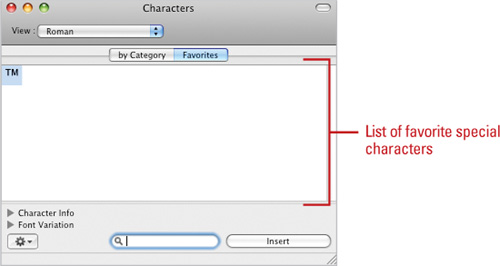
When you need to insert special characters such as ©, ™, or ® that don’t appear on your keyboard, you can use a special accessory called Special Character to do the job. Special Character is available in Mac applications and displays all the characters that are available for each of the fonts on your computer.
- Click in the text to place the insertion point where you want to insert a special character.
- Click the Edit menu, and then click Special Characters.
- Click the View pop-up, and then select a character set.
- Click the By Category tab, and then select a category. To select from your favorites, click the Favorites tab, and then select a symbol.
- Click the special character you want to insert.
- Click Insert.
- To add the character to a favorites list, click the Action button, and then click Add To Favorites.
- Click the Close button.
See Also
See “Making Text Substitutions” on page 171 for information on quickly inserting symbols using text substitution while you type.
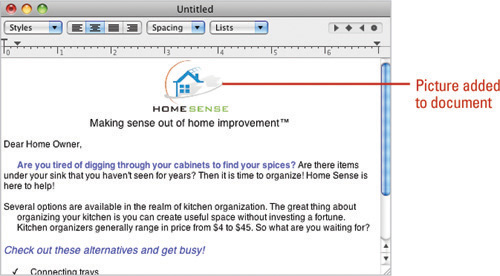
If you have a picture, movie, or another file, (such as another text file, spreadsheet, or PDF), you can place them within a TextEdit document. Before you can add a picture, movie, or files to a TextEdit document, the file needs to be converted to the Rich Text Format (RTF). Pictures and movies appear in the document as embedded graphics, while files appear as embedded icons. With embedding, a copy of the file becomes part of the TextEdit file. If you want to edit the embedded file, you make changes in the TextEdit file, and the original file remains intact. You can double-click the embedded graphics or icons to open and view the files.
- Click the Format menu, and then click Make Rich Text.
- Switch to the Finder, and then open the folder containing the picture, movie, or file you want to add.
- Display the picture, movie, or file icon in the Finder and the TextEdit document on the screen where you can view them both.
- Drag the picture, movie, or file icon from the Finder to the document window where you want to place it.
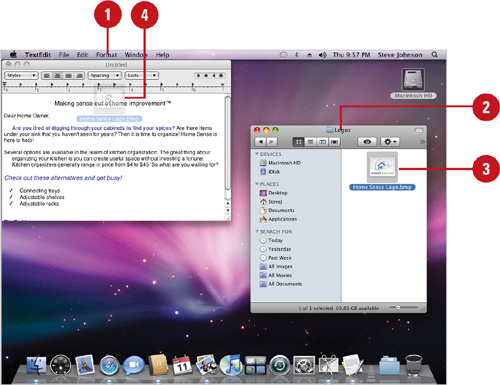
The image is placed in your document.
- Close the Finder window.
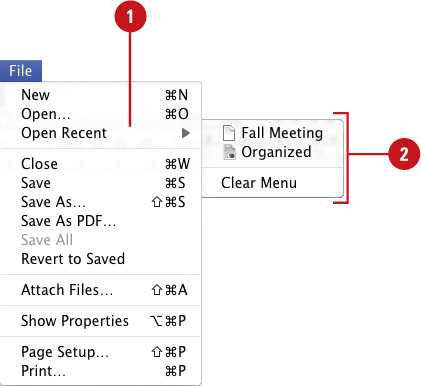
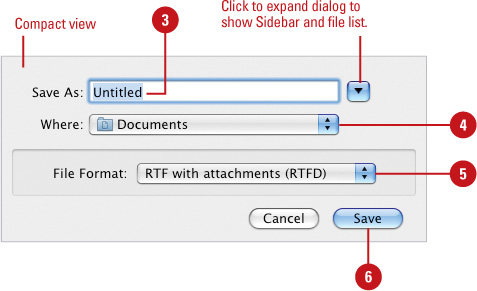
Saving your files frequently ensures that you don’t lose work during an unexpected power loss. The first time you save, specify a file name and folder in the Save As dialog. The next time you save, the program saves the file with the same name in the same folder. If you want to change a file’s name or location, you can use the Save As dialog again to create a copy of the original file. The Save As dialog appears in a compact view (useful for saving in the same place) and an expanded view (useful for saving in a different location or creating a new folder). Expanded view includes the Sidebar, and List and Column view. To conserve your computer’s resources, close any file you are not working on.
- For plain text only, click the Format menu, and then click Make Rich Text.
- Click the File menu, and then click Save As.
- Type a name for the file, or use the suggested name.
- Select the hard drive and folder in which you want to save the file.
- To change the format of a file, click the File Format pop-up, and then click Rich Text Format (RTF) or one of the Word formats.
- Click Save.
Did You Know?
TextEdit can save documents as a PDF file (New!). Click the File menu, click Save As PDF, type a name, navigate to a folder in which you want to save the file, and then click Save. See “Previewing Images and PDF’s” on page 151 for more information on working with PDF (Portable Document File) files.
- For plain text only, click the Format menu, and then click Make Plain Text.
- Click the File menu, and then click Save As.
- Type a name for the file, or use the suggested name.
- Select the hard drive and folder in which you want to save the file.
- Click the Plain Text Encoding pop-up, and then select an encoding format.
- Click Save.


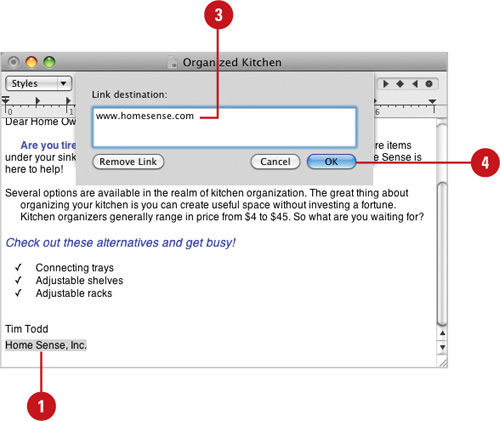
You can use TextEdit to create and edit HTML code documents. You can open an existing HTML file or create a new one using plain text or RTF Rich Text Format. If you want to add graphics to your RTF document, you cannot save it as an HTML file. However, you can save it as a Web archive file. In addition, you can insert a link to an URL address into a document.
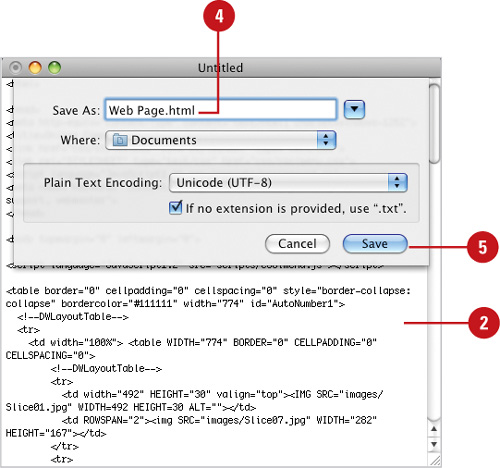
- For plain text only, click the Format menu, and then click Make Plain Text.
- Write the HTML code.
- Click the File menu, and then click Save As.
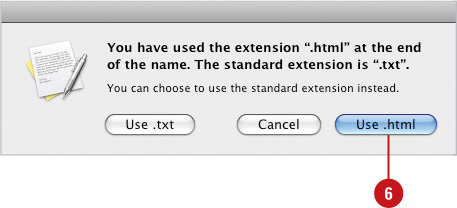
- Add the .html extension at the end of the file name.
- Click Save.
- Click Use .html.
Did You Know?
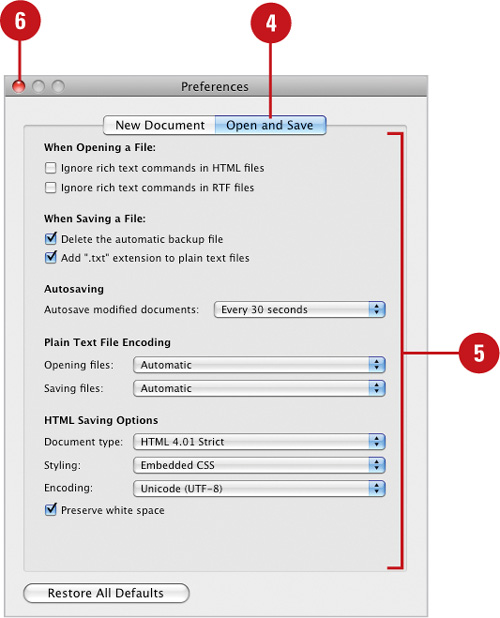
You can set preferences to save HTML files. Click the TextEdit menu, click Preferences, click the Open and Save tab, select a document type, a setting for cascading style sheets (CSS), and an encoding. If you want to include code to preserve blank areas, select the Preserve White Space check box, and then click the Close button.
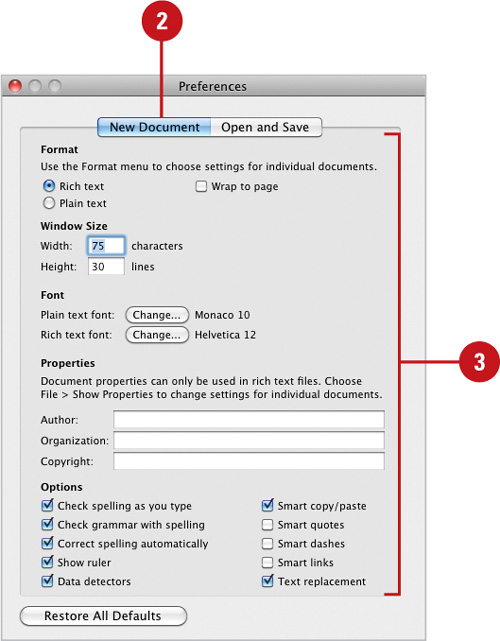
TextEdit preferences help you configure some of the more common features of the program. You can set preferences for new documents, default fonts, rich text processing, default plain text encoding, editing, and saving. These preference areas allow you to turn features on and off as well as customize the way TextEdit works.
- Click the TextEdit menu, and then click Preferences.
- Click the New Document tab.
- Select or specify the various options you want to use:
Format. Select options for document format and text wrapping.
Window Size. Specify the width and height you want.
Font. Click Change to select the default fonts you want.
Properties and Options. Enter document properties and check or clear to enable or disable the editing options.
- Click the Open and Save tab.
- Select or specify the various options you want to use:
When Opening a File. Check or clear to ignore or allow rich text commands.
When Saving a File. Check or clear the options you want.
Autosaving. Click the pop-up to select a auto saving interval.
Plain Text File Encoding. Click the Open or Save pop-ups to select a text encoding default.
HTML Saving Options. Click the pop-ups to select a default HTML type, styling, and encoding.
- Click the Close button.