Print and Save a Web Page
The Internet is a global collection of more than a billion computers (and growing) linked together to share information. The Internet’s physical structure includes telephone lines, cables, satellites, and other telecommunications media. Using the Internet, computer users can share many types of information, including text, graphics, sounds, videos, and computer programs. The World Wide Web (also known as the Web or www) is a part of the Internet that consists of Web sites located on different computers around the world.
The Internet has its roots in the Advanced Research Projects Agency Network (ARPANET), which the United States Department of Defense started in 1969. In 1986, the National Science Foundation formed NSFNET, which replaced ARPANET. NSFNET expanded the foundation of the U.S. portion of the Internet with high-speed, long-distance data lines. In 1991, the U.S. Congress expanded the capacity and speed of the Internet further and opened it to commercial use. The Internet is now accessible in almost every country in the world. The World Wide Web was developed in Switzerland in 1991 to make finding documents on the Internet easier. Software programs designed to access the Web, known as Web browsers, use point-and-click interfaces. The first such Web browser, Mosaic, was introduced at the University of Illinois in 1993. Since the release of Mosaic, Microsoft Internet Explorer, Netscape, and AOL have become some of the most popular Web browsers.
Universities and large companies are most likely connected to the Internet via high-speed wiring that transmits data very quickly. Home computer owners usually rely on a modem and the phone lines already in place. In some areas, however, several faster connection options are becoming available and affordable. There are DSL (Digital Subscriber Lines), wires that provide a complete digital connection; cable modems, which use cable television lines; and wireless, which doesn’t use wires or phone lines. DSL and cable modems, also known as broadband connections, are continually turned on and connected to an Ethernet network so you don’t need to establish a connection using a dial-up modem. Data travels more slowly over phone wires than over digital lines and cable modems. Wireless provides a mobile connection to the Internet using an AirPort connection anywhere there is a wireless base station, such as a router or a network hub. Whether you use a phone line, a DSL line, a cable modem, or a wireless device, Mac OS X can help you establish a connection to the Internet.
Before you start the process to set up an Internet connection, you need to select an ISP (Internet Service Provider), which is a company that sets up an Internet account for you and provides Internet access. ISPs maintain servers connected directly to the Internet 24 hours a day. You pay a fee, sometimes by the hour, but more often a flat monthly rate. To connect to the Internet, you need to obtain an Internet account and connection information from your ISP or your system administrator. Each type of Internet connection requires certain connection information, including:
ISP Phone Number. A number to create a dial-up connection.
Account Name. A user name for the Internet account.
Password. A security password for the Internet account.
If your ISP needs it, you may also need the following information:
IP Address. An IP (Internet Protocol) address is a unique identifier of your computer on the Internet.
Subnet Mask. A filter that helps your computer differentiate between computers on a local network and the Internet.
Router. A device address that sends and receives information over the Internet.
Domain Name Server (DNS). A computer that translates a Web site name into an IP address.
Proxy. A computer your Macintosh uses to access the Internet.
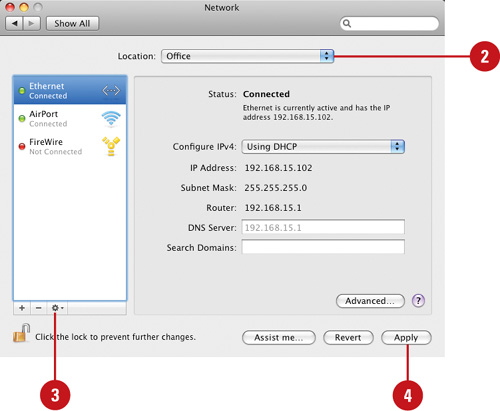
When you have the connection information from your ISP or network administrator, you can use the Network pane in System Preferences to set up, configure, and display status for all your network connections, such as Modem, Ethernet, and AirPort.
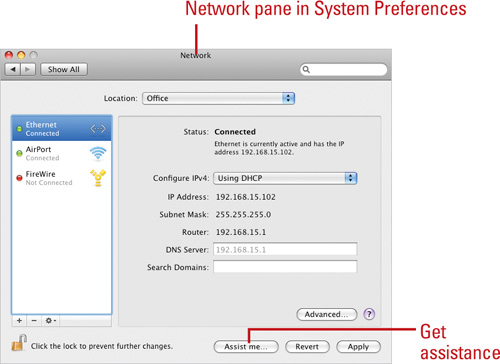
At the bottom of the Network pane is the Assist Me button. When you click the Assist Me button, it starts the Network Setup Assistant, which asks you a series of questions to help you set up your Internet Connection.

If you have a mobile computer, such as a MacBook, you can set up multiple connections for different locations. Setting up multiple connections allows you to connect to the Internet at home using a dial-up connection, at the office using an ethernet connection, or on the road using a wireless connection.
If you have a dial-up modem or AirPort card, you can use the Internet Connect application located in the Applications folder to help you quickly create an Internet connection to different configurations in your current location.
When you connect to the Internet, you can access Web sites and information on the Internet, but other users on the Internet can also access information on your computer. You can prevent this by activating a firewall, another security layer of protection. A firewall is a security system that creates a protective barrier between your computer or network and others on the Internet. The firewall monitors all communication between your computer and the Internet and prevents unsolicited inbound traffic from the Internet from entering your private computer. The firewall discards all unsolicited communication from reaching your computer unless you specifically allow it to come through. If your computer is directly connected to the Internet, you should activate a firewall. If you are sharing an Internet connection on your network to provide Internet access on multiple computers, you should activate the firewall on the computer connected to the Internet only to avoid creating network communication problems. For more information and instructions on setting up a firewall, see “Configuring an Internet Firewall,” on page 409 in Chapter 16.
If you have an Internet connection and work on a network, you can share the Internet connection with other computers on your local area network. For more information and instructions on sharing an Internet connection, see “Sharing an Internet Connection,” on page 408 in Chapter 16.
If you have a dial-up modem installed on your computer, you can set up and use a modem connection to access the Internet or another computer. You only need to set up a dial-up connection once. After you set up the dial-up connection, you can use the Show Modem Status menu to easily connect and disconnect from the Internet or network, and show modem connection information. When you are connected, the Finder displays a connection icon and connects information in the menu.
 Click the System Preferences icon in the Dock, and then click the Network icon.
 Click Modem in the list.
If a modem is not in the list, click the Add (+) button, click Modem from the Interface pop-up, and then click Create.
 Click Advanced.
 Click the PPP tab, and then specify your user name, password, and ISP phone number.
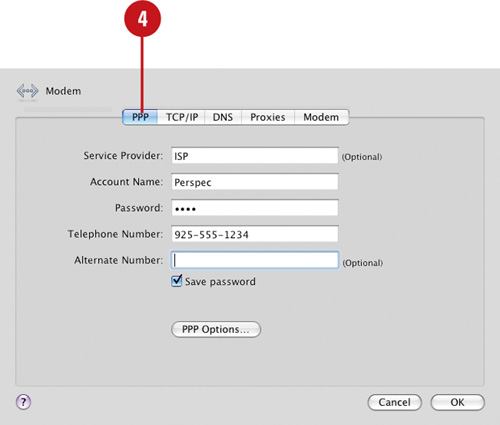
Specify PPP Options to redial a busy connection, automatically connect when starting TCP/IP applications, and automatically disconnect if you select Log Out from the Apple menu.
 Click the TCP/IP and DNS tabs, and then specify any settings provided by your ISP, such as IP Address, Subnet Mask, Router, and DNS Servers.
 Click the Proxies tab, and then specify any settings provided by your ISP.
 Click the Modem tab, and then specify any settings specific to your computer’s modem.
 Click OK.
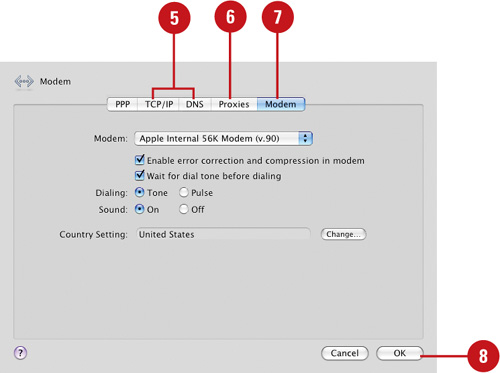
 Click Apply.
If you have a DSL or cable modem, you can set up and use an ethernet connection to access the Internet. In addition to connecting to the Internet, you also use ethernet to connect to a local area network (LAN). When you set up an ethernet connection using a cable modem or on a corporate network, some settings are typically configured automatically by a BOOTP (boot protocol) or DHCP (Dynamic Host Configuration Protocol). If your network supports ones of these services, you can use the Configure IPv4 pop-up in the TCP/IP area to select a protocol. If your ISP uses PPPoE (Point to Point Protocol over Ethernet), you need to specify your account and password. Check with your ISP or network administrator to determine if this applies to you.
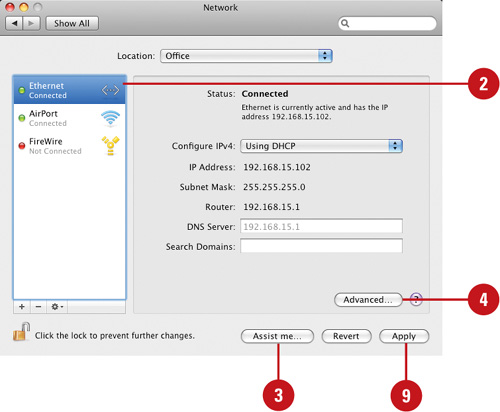
- Click the System Preferences icon in the Dock, and then click the Network icon.
- Click Ethernet in the list.
- If you want assistance, click Assist Me, and then follow the instructions.
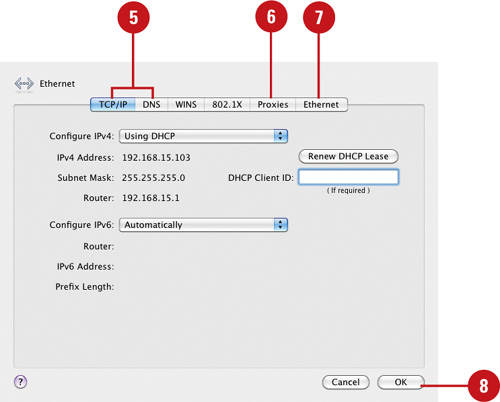
- Click Advanced, if needed.
- Click the TCP/IP and DNS tabs, and then specify any settings provided by your ISP, such as IP Address, Subnet Mask, Router, and DNS Servers.
- Click the Proxies tab, and then specify any settings provided by your ISP.
- Click the Ethernet tab, and then select a configuration (automatic or manual) and specify settings.
- Click OK.
- Click Apply.
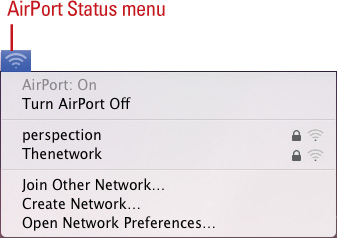
If you have an AirPort card on your computer and are within range of a wireless base station, such as a router or network hub, you can set up and use an AirPort connection to access the Internet. AirPort is Apple’s 802.11b-based wireless networking device that enables you to connect to the Internet without using network wires or phone lines. AirPort networks are identified by a network name. You can join a specific network or select one of the detected AirPort networks. You can join a wireless network quickly with the AirPort status menu, which includes signal strength for all visible wireless networks (New!).
- Click the System Preferences icon in the Dock, and then click the Network icon.
- Click AirPort in the list.
- Click Turn AirPort On, if needed.
- Click the Network Name pop-up, and then select a wireless network and enter a password.
- Select or clear the Ask to join new networks check box.
- Click Advanced, if needed.
- Click the AirPort tab, and then specify the options you want, such as add or remove a network.
- Click the TCP/IP and DNS tabs, and then specify any settings provided by your ISP, such as IP Address, Subnet Mask, Router, and DNS Servers.
- Click the Proxies tab, and then specify any settings provided by your ISP.
 Click the Ethernet tab, and then select a configuration (automatic or manual) and specify settings.
 Click OK.
 To show the AirPort status menu, select the Show AirPort status in menu bar check box.
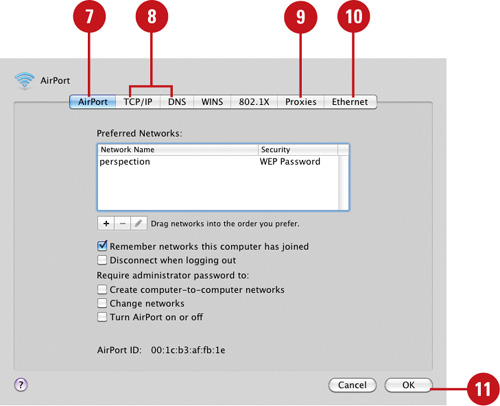
 Click Apply.
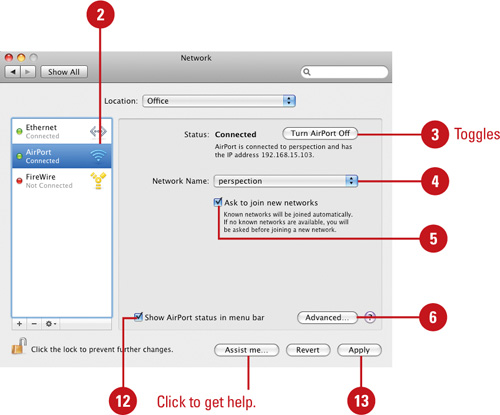
If you have a mobile computer, such as a MacBook, you can set up multiple connections. For example, you can use a laptop to access the Internet at home using a dial-up modem, go to work and connect to a network using ethernet, or relax at a coffee shop and browse the Web using AirPort. Each set of network connections is called a network port configuration. You can create different port configurations with unique priorities for different locations, which makes switching from one location to another easier. You can quickly access different locations using the Location submenu on the Apple menu.
- Click the System Preferences icon in the Dock, and then click the Network icon.
- Click the Location pop-up, and then select one of the following options:
Automatic. Default location.
A location name. Switches to the location name.
New Location. Creates a new location, such as “home”.
Edit Location. Changes settings for a location.
- Select the network you want to disable or enable, click the Action button, and then click Make Service Inactive or Make Service Action.
- Click Apply.
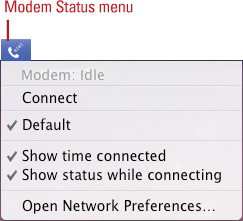
After you set up your connection in the Network Preferences pane, you can also use the pane to connect to the Internet. This is not always convenient, so Mac OS X provides status menus on the right side of the menu bar. The status menus makes it easy to quickly log into different configurations in your current location for dial-up modem, PPPoE for ethernet, Bluetooth, and AirPort connections. You can use the Network Preferences pane to enable the menus.
Modem. Click the Modem icon on the menu, and then click a command:
Connect.
Show time connected, Show status while connecting, or Open Network Preferences.
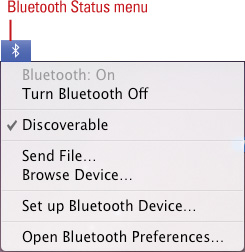
Bluetooth. Click the Bluetooth icon on the menu, and then click a command:
Turn Bluetooth On or Off.
Discoverable, Send File, Browse Device, Set Up Bluetooth Device, or Open Bluetooth Preferences.
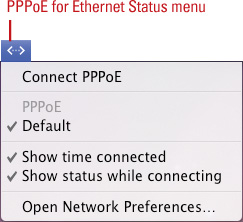
PPPoE for Ethernet. Click the PPPoE icon on the menu, and then click a command:
Connect PPPoE.
Show time connected, Show status while connecting, or Open Network Preferences.
AirPort. Click the AirPort icon on the menu, and then click a command:
Turn AirPort On or Off.
Join Other Network, Create Network, or Open Network Preferences.
A Web site contains Web pages linked together to make searching for information on the Internet easier. Web pages are documents that contain highlighted words, phrases, and graphics, called hyperlinks (or simply links) that open other Web pages when you click them. Some Web pages contain frames. A frame is a separate window within a Web page that lets you see more than one Web page at a time. Web browsers are software programs that you use to “surf the Web,” or access and display Web pages. Browsers make the Web easy to navigate by providing a graphical, point-and-click environment. Safari 4.0 is a browser from Apple that is built into Mac OS X Snow Leopard. Microsoft Internet Explorer, Mozilla Firefox, and Netscape Navigator are other popular browsers. With a Web browser, you can display Web pages from all over the world, use links to move from one Web page to another, play audio and video clips, search the Web for information, bookmark Web pages for easy access, and print text and graphics on Web pages.

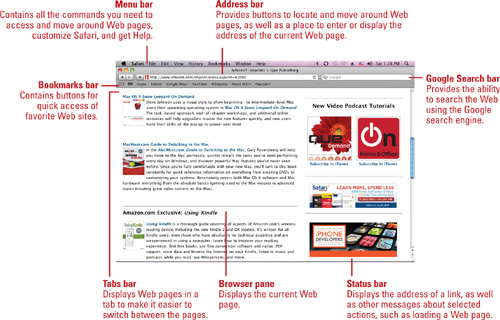
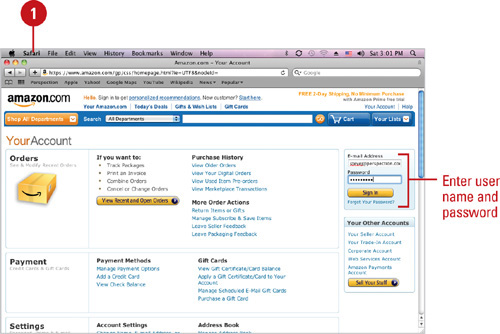
Safari is a Web browser that you use to search the World Wide Web. You can start the Safari application using the Safari button in the Dock or the Safari icon in the Applications folder. After you start Safari, you might need to enter a user name and password when you use a dial-up modem to establish a connection to the Internet. After you establish a connection to the Internet, you are ready to explore Web pages on the Internet. The elements of the Safari window allow you to view, print, and search for information on the Internet. You can customize the Safari window display to conform to the way you work. The View menu allows you to turn on and off different display elements.
- Click the Safari icon in the Dock.
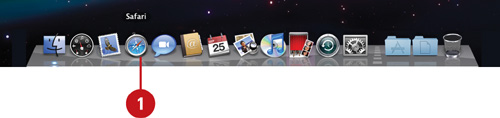
- If necessary, click Connect to dial your ISP. You might need to type your user name and password before Safari connects to the Internet.
The Safari window opens.
The first time you start Safari, the application imports your bookmarks from Microsoft Internet Explorer, Netscape Navigator, and Mozilla.
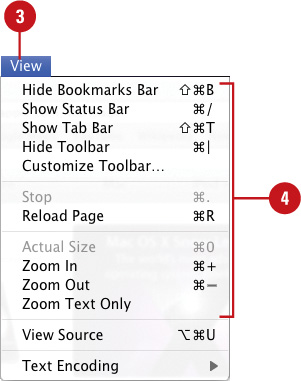
- Click the View menu.
- Click the menu item with the element you want to show or hide in the Safari window.
Bookmarks Bar
Status Bar
Tab Bar
Toolbar
Customize Toolbar
To change the display view, select one of the zoom commands: Actual Size, Zoom In, Zoom Out, or Zoom Text Only.
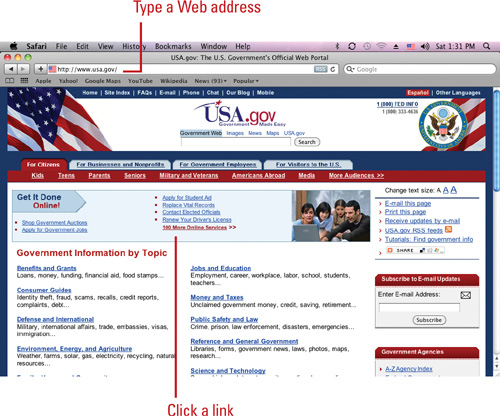
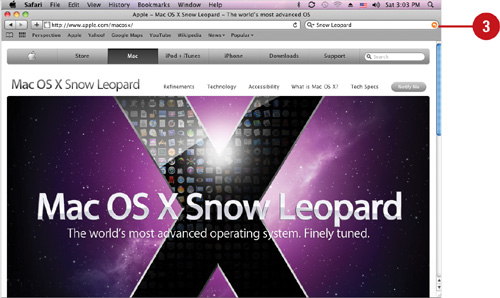
A Web address (also known as a URL) is a unique place on the Internet where you can locate a Web page. With Safari, you can browse sites on the Web with ease by entering a Web address or by clicking a link on a Web page to access a new site. When you type a Web address in the Address bar, Safari tries to find a recently visited page that matches what you’ve typed so far. If Safari finds a match, it fills in the rest of the address. As Safari opens the Web page, the Address box shows a blue-shaded progress bar as the page loads. If the page opens too slowly or if you decide not to access it, you can stop it. If a Web page loads incorrectly or you want to update page information, you can reload, or refresh the page. As you browse the Web, you can move backward or forward one location at a time to show sites you’ve previously visited in this session. Safari also stores information about Web sites you visit and information you’ve entered, which other users can view. You can prevent this by using Private Browsing, which clears the history list, Downloads window, AutoFill information, searches, and cookies are deleted. It’s as if you never used Safari.
Use any of the following methods to display a Web page:
In the Address box, type the Web address, and then press Return.
If you have recently entered the Web page address, Safari remembers it and tries to complete the address for you. The suggested match is highlighted. Click the correct address in a list of possibilities or continue to type until the address you want appears in the Address list.
Click any link on the Web page, such as a picture or colored, underlined text. The mouse pointer changes to a hand when it is over a link.
Browse Privately. Click the Safari menu, click Private Browsing, and then click OK. To skip the confirmation, Option-click the Private Browsing command.
To turn it off, click the Safari menu, and then click Private Browsing.
To move back or forward one Web page at a time, click the Back button or the Forward button on the Address bar.
To stop a page from loading, click the Stop button on the Address bar during the load, or click the View menu, and then click Stop.
To reload a page, click the Reload button on the Address bar, or click the View menu, and then click Reload.
To go to the Home page, click the History menu, and then click Home.

Did You Know?
You can open a Web page on your hard disk or network server. Click the File menu, click Open File, type the complete path and file name of the Web page, and then click Open.
You can open a Web page from a document in another application. Select the Web address, click the application menu (such as TextEdit), point to Services, and then click Open URL.
When you open a Web page, it opens in the same window you are using. If you want to view more than one page at a time in a single window, you can open Web pages in separate tabs or new windows. You can also bookmark a set of tabs for easy access in the future or revert to the tabs that were open the last time you used Safari. Before you start opening Web pages in tabs, you can set tab browsing options to specify the way you want to use tabs in Safari. When you open a page in a tab, the Tab bar appears (below the Bookmarks bar) with the name of the Web page along with a box you can use to close the tab. You can also use the View menu to show the Tab bar. If you select a Web page from the History or Bookmarks menu, the page opens in the current tab. When you use the Back and Forward buttons in the Address bar, Safari displays Web pages previously viewed in the current tab.
- Click the Safari menu, and then click Preferences.
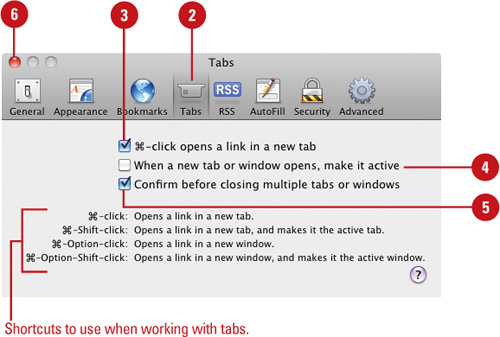
- Click Tabs.
- Select the
 -click opens a link in a new tab check box to open a link in a new tab; clear it to open a link in a new window.
 - Select the When a new tab or window opens, make it active check box to open new tabs in front of the current tab.
- Select the Confirm when closing multiple tabs or windows check box to get a warning alert when you close a Safari window.
- Click the Close button.
To show or hide the Tab bar, click the View menu, click Show/Hide Tab Bar.
To open a Web page in a tab, click the File menu, click New Tab, type the Web address, and then press Return.
To open a link or bookmark in a tab, hold down
, and then click the item.To open a bookmark collection in the Bookmarks bar in tabs, hold down the Control key, click the collection in the Bookmarks bar, and then click Open In Tabs.
To open a folder of bookmarks in the Bookmarks Library in tabs, click the Bookmarks menu, click Show All Bookmarks, hold down the Control key, click the folder in the right pane, and then click Open In Tabs.
To switch between Web page tabs, click the tab in the Tab bar.
To close a tab, point to the tab, and then click the Close box on the tab.

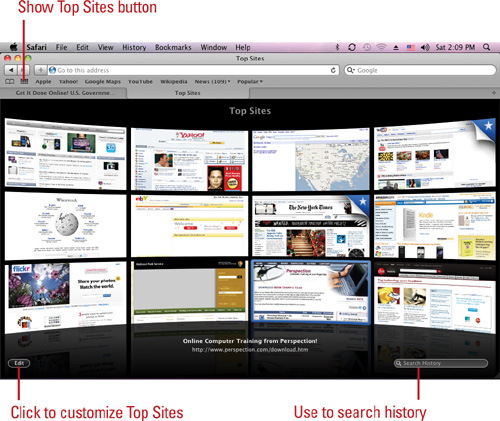
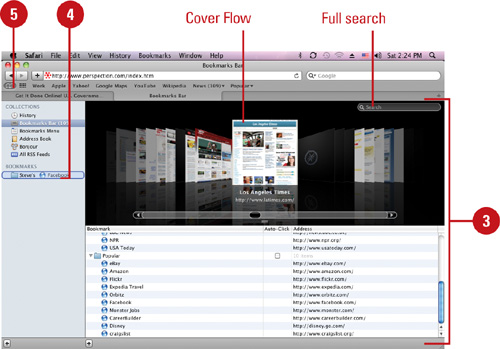
Top Sites (New!) is a visual preview of your favorite Web sites. Safari tracks the sites you visit the most and ranks your favorites, displaying up to 24 thumbnail previews. Simply, click the Show Top Sites button to view and select a Web site to visit. If you don’t see a site, you can use the Search History box to visually find it using Cover Flow (New!). You can also add or remove sites, mark or unmark sites as permanent, rearrange sites, and change the view to customize Top Sites.
View Top Sites. Click the Show Top Sites button, and then click a thumbnail to visit the page, or use one of the navigation buttons.
Search Top Sites. In Top Sites, click in the Search History box, type keywords to search or drag the slider to flip through Web pages. When you’re done, click the Close (x) button in the Search History box to exit.
Add Sites. In Top Sites, click Edit, type the URL site address in Address bar, drag it to the window, and then click Done.
Remove Sites. In Top Sites, click Edit, click the Never include as top site button (the X button), and then click Done.
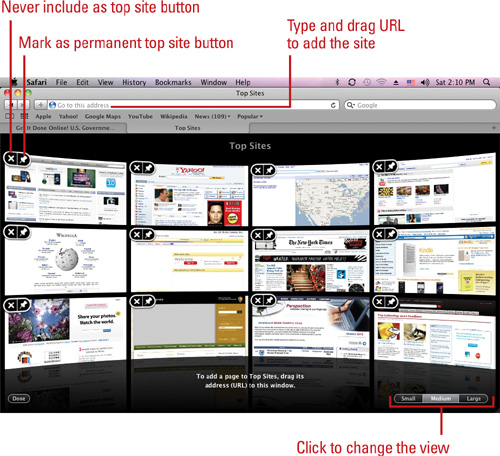
Mark as Permanent Site. In Top Sites, click Edit, click the Mark as permanent top site button (the Pin button), and then click Done.
Arrange Sites. In Top Sites, click Edit, click Small, Medium, or Large, and then click Done.
Change View. In Top Sites, click Edit, drag a thumbnail to another location, and then click Done.
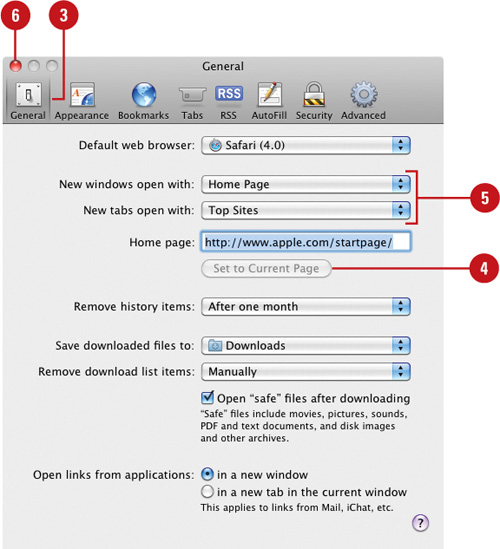
Your home page in Safari is the page that opens when you start the program. When you first install Safari, the default home page is the startpage for the Apple Web site. If you want a different page to appear when you start Safari and whenever you click the Home button, you can change your home page. You can select one of the billions of Web pages available throughout the Internet. When you open a new window or tab in Safari, you can specify the default page that you want to view, such as home page, Top Sites (New!), empty page, same page, or bookmarks.
- Open the Web page you want to be the new home page.
- Click the Safari menu, and then click Preferences.
- Click General.
- Click Set to Current Page.
- To specify the page that appears when you open a new window or tab, do any of the following:
New Window. Click the New windows open with pop-up, and then select a page option.
New Tab. Click the New tabs open with pop-up, and then select a page option.
- Click the Close button.
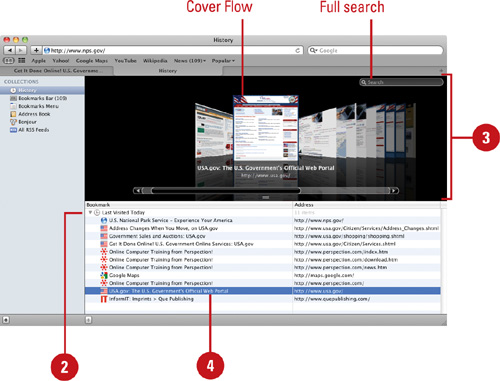
Sometimes you run across a great Web site and simply forget to add it to your Bookmarks list. With Safari there’s no need to try to remember all the sites you visit. The History list keeps track of where you’ve been for a week organized by the date. Safari deletes Web pages from the History list older than a week. If you no longer need the pages in the History list, you can clear the entire list. To view the History list, click the History menu, and then point to a day or click Show All History. When you show all history or bookmarks, you can visually browse and search sites using Cover Flow (New!).
- Click the History menu, and then click Show All History.
To quickly open a Web page, click the History menu, point to a date if desired, and then click a Web page.
- Click the Expand arrow to display the bookmarks you want to view.
- Scroll through the list in Cover Flow or use the Search box to locate the one you want.
- Double-click the Web page.
Did You Know?
You can delete individual entries in the History list. Click the History menu, click Show All History, click History in the Collections column, select the entry you want to remove, press Delete, and then click the Close button.
You can clear the entire History list. Click the History menu, and then click Clear History.
You can clear the entire History list automatically on a regular basis. Click the Safari menu, click Preferences, click General, click the Remove History Items pop-up, select the interval option you want, and then click the Close button.
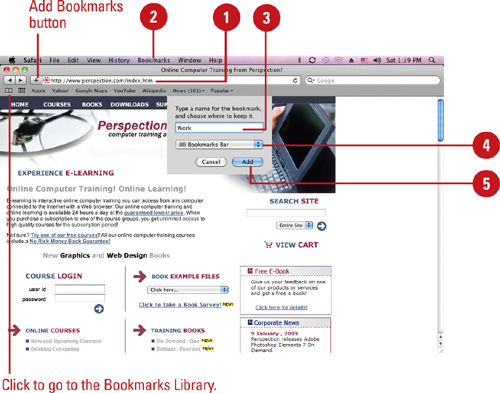
Rather than memorizing URLs or keeping a handwritten list of Web pages you want to visit, you can use the Bookmarks Library to store and organize the addresses. When you display a Web page or a set of tabs that you want to display again at a later time, you can add the Web page or tab set to your Bookmarks Library. After you add the bookmark to the Bookmarks Library, you can quickly return to it by using the Bookmarks bar or Bookmarks menu to select it. If you have bookmarks in other browsers, such as Internet Explorer, Netscape Navigator, and Mozilla Firefox, you can import the bookmarks in the Bookmarks Library using the Import Bookmarks command on the File menu.
- Open the Web site you want to add to your Bookmark list.
- Click the Bookmarks menu, and then click Add Bookmark or Add Bookmark For These X Tabs.
- Type the name for the bookmark, or use the default name supplied.
- Click the pop-up, and then select a bookmark location, either the Top Sites (New!), Bookmarks Bar, Bookmarks Menu, or a collection of bookmarks in folders.
- Click Add.
- To quickly return to a bookmark, use the Bookmarks bar or Bookmarks menu.
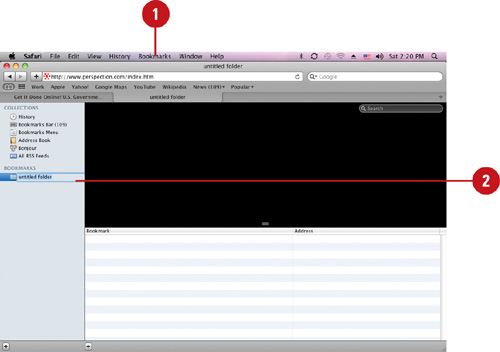
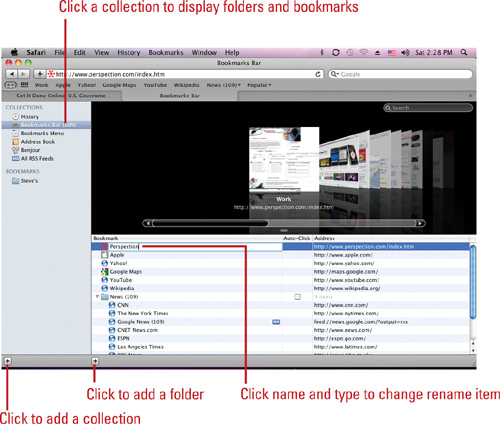
If your list of bookmarks grows long, you can use the Bookmarks Library to delete bookmarks you don’t visit anymore or move bookmarks into folders to make them easier to find. The Bookmarks Library shows your collections of bookmarks in the left column, and the Cover Flow (New!) display at the top and the names and addresses of bookmarks and folders at the bottom in the right column. You also use the Bookmarks Library to work with Web sites from cards in your Address Book, RSS Feeds, and History and Bonjour Web sites. Safari uses Bonjour to find any Web sites on your local network or subnet. Before you can work with the Address Book and Bonjour, you need to enable the options in the Bookmarks pane of Safari preferences.
- Click the Bookmarks menu, and then click Add Bookmark Folder.
The Bookmarks Library opens, displaying a new untitled folder with the name selected.
- Type a name for the folder, and then press Return.
- Display the bookmarks you want to move in the folder in the right column.
- Drag the bookmarks to the folder.
- Click the Bookmarks Library button on the Bookmarks bar to close it.
The folder appears on the Bookmarks bar with a triangle next to the name.
Did You Know?
You can add Rendezvous Web sites to the Bookmarks bar or menu. Click the Safari menu, click Preferences, click Bookmarks, select the Include Bonjour check box where appropriate, and then click the Close button.
You can view a list of Bonjour Web sites. Click the Bookmarks Library button on the Bookmarks bar, and then click Bonjour in the Collections pane.
Show and hide Bookmarks Library. Click the Bookmarks menu, and then click Show All Bookmarks or Hide All Bookmarks.
Create a collection. Click the Add button (+) at the bottom of the Collections column.
Rename a collection. Double-click the name, type a new name, and then press Return.
Add a folder to a collection. Select a collection, and then click the Add button (+) at the bottom of the Bookmark column.
Rename a bookmark or folder. Control-click the name, click Edit Name, type a new name, and then press Return.
Remove a collection, folder, or bookmark. Select the item, and then press Delete.
Move or rearrange a collection, folder, or bookmark. Locate the item, and then drag its icon to the location or icon where you want to place it. To copy it, hold down the Option key as you drag the icon.
A feed delivers frequently updated Web content to your browser on a continuous basis. A feed, also known as RSS (Really Simple Syndication) feed, XML feed, syndicated content, or Web feed, is usually offered on a subscription basis and typically free of charge. A feed can deliver text content in the form of news headlines or blogs, or digital content in the form of pictures, audio, and video. When audio content is delivered usually in the MP3 format, it’s referred to as a podcast. When you visit a Web site, Safari checks for available feeds. If it discovers a feed, Safari puts an RSS icon at the right end of the address bar. You can view an individual feed or subscribe to one to get content automatically. When you subscribe to a feed, Safari checks the Web site and downloads new content so you always stay updated with the latest site content.
- Click the Safari menu, and then click Preferences.
- Click the RSS button on the toolbar.
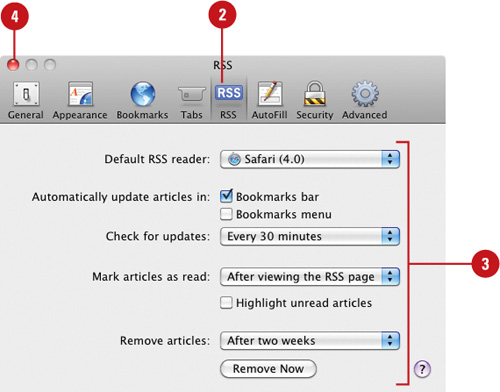
- Specify any of the following options:
Default RSS Reader. Select a default reader, such as Safari or Mail.
Update Articles. Select the Bookmarks Bar and/or Bookmarks Menu check boxes to specify where to be notified of automatic updates.
Mark as Read. Click After viewing the RSS page or After clicking them option.
Select or clear the Highlight unread articles check box.
Check Updates. Select an interval: Never, Every Day, Every Hour, or Every 30 minutes.
Remove Articles. Select an interval or click Remove Now.
- Click the Close button.
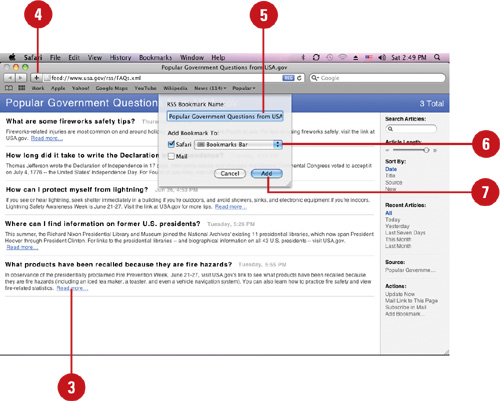
- Visit a Web site with a feed.
The RSS button appears in the Address bar.
- Click the RSS button.
If multiple feeds are available, a list of feeds appears. You can click the RSS button again to close it.
- If available, click the feed you want to see.
- Click the Add (+) button on the toolbar to add an individual or folder bookmark.
A bookmark folder shows the total number of new articles.
- Type the name for the bookmark, or use the default name supplied.
- Click the pop-up, and then select Bookmarks Bar, Bookmarks Menu, or a collection of bookmarks in folders.
- Click Add.
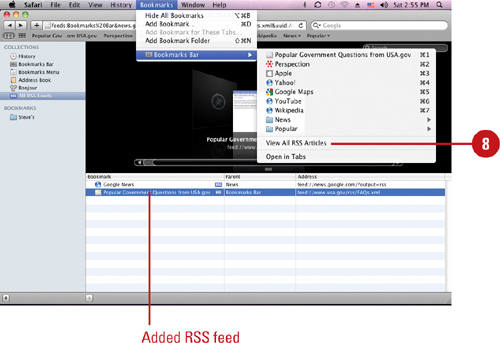
- To view all RSS articles, click the Bookmarks menu, point to Bookmarks Bar, and then click View All RSS Articles.
Safari can use information in your Address Book or data you previously entered in an online form to automatically complete online forms you need to fill out in the future. AutoFill is a service that helps you complete online forms and log in to Web sites with a user name and password. You use the AutoFill pane of the Safari preferences to select, modify, or delete which information AutoFill uses to complete a form or log in. When you use AutoFill to automatically fill in information, Safari highlights the data in yellow so you can see the changes. If you no longer need the AutoFill service, you can keep Safari from automatically completing forms and log ins. If you run out of room in a text field, you can now resize text fields on any Web page by dragging the corner of the field to make more room and reflow the Web page.
- Click the Safari menu, and then click Preferences.
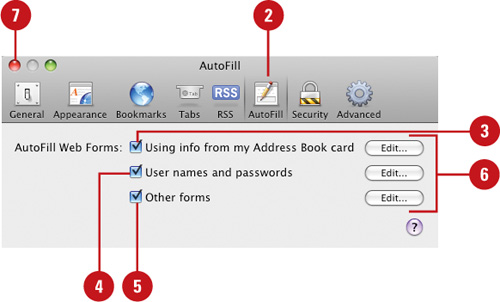
- Click AutoFill.
- Select or clear the Using info from my Address Book card check box to enable or disable AutoFill from information in your Address Book.
- Select or clear the User names and passwords check box to enable or disable AutoFill from Web site log in information you’ve entered.
- Select or clear the Other forms check box to enable or disable AutoFill based on data from other online forms.
- For any of the selected check boxes, click Edit to view or remove information stored by AutoFill.
- Click the Close button.
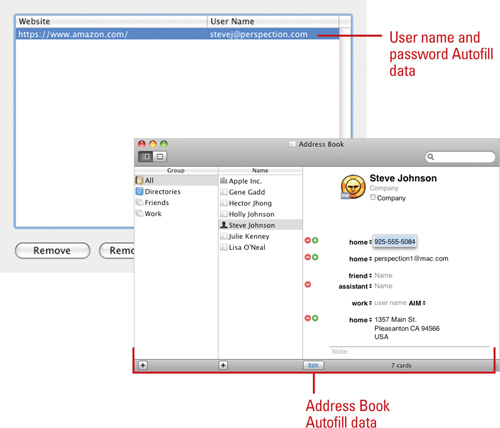
- Select AutoFill data and options in the AutoFill pane of Safari preferences; click the Safari menu, click Preferences, and then click AutoFill.
- Use any of the following methods to fill out forms using AutoFill:
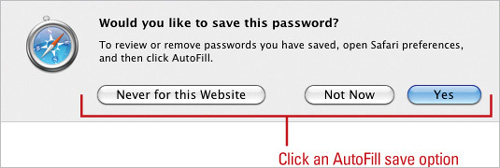
Complete user name and password in a log in. Display a log in screen, enter a user name and password, and then click Yes to save the log in information so you don’t have to do it again; click Not Now to defer saving the log in information until later; and click Never for this website to not save log in information for this Web site.
Complete a Web form. Open the Web page, and then click the AutoFill button in the Address bar.
Complete individual boxes in a form. Open the Web page, select a text box, and then start typing. If AutoFill retrieves a match, it completes the text. If several items match, a list appears, where you can select the one you want to use.
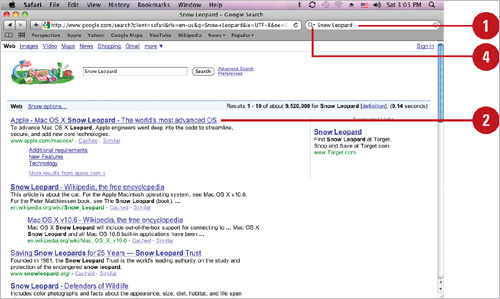
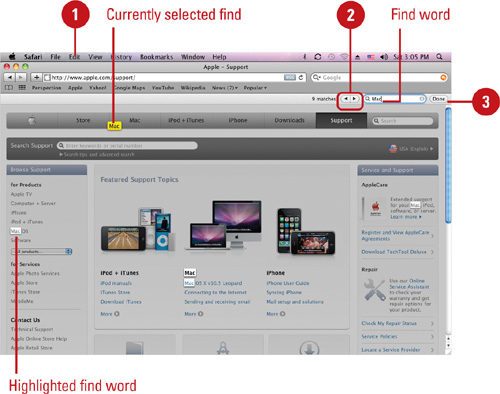
You can find all kinds of information on the Web. The best way to find information is to use a search engine. A search engine is a program you access through a Web site and use to search through a collection of Internet information to find what you want. Safari comes with the Google search engine built-in to the program. When performing a search, the search engine compares keywords with words that it finds on various Internet Web sites. Keywords are words or phrases that best describe the information you want to retrieve. If the search engine finds your keywords in the stored database, it lists links to the matched sites. When you open a link from the results, you can use the SnapBack button to quickly return to your search results. In addition, you can search within a Web page to display the found count and highlight matching terms within a page.
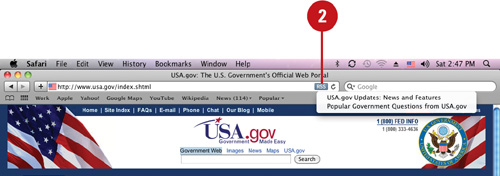
- Click the Google Search box, type a word or phrase you want to find, and then press Return.
- Click a link in the list of search results to open a Web page.
- To return to the last page of Google search results, click the SnapBack button in the Google Search box.
- To repeat a previous search, click the magnifying glass in the Google Search box, and then select the search term you want.
Web pages are designed for viewing on a computer screen, but you can also print all or part of one. Before you print, you should preview the page to verify that it looks the way you want. When you are ready to print, Safari provides many options for printing Web pages. If the Web page consists of frames, you can print the specific frame you want to print. You can also use the Print dialog to create a PDF of a Web page or send a Web page as a PDF fax or PDF mail attachment.
- Open the Web page you want to print, click the File menu, and then click Print.
- Click the Printer pop-up, and then select from the available printers.
- Click the Presets pop-up, and then select from the available preset options.
- Click the Expand/Collapse button to expand the dialog.
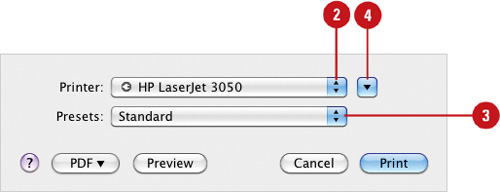
- Click the Print Options pop-up, and then select from the available print options, such as Safari.
- Choose the various print options you want.
- Click the following options to finalize your print: PDF, Supplies, Cancel, or Print.

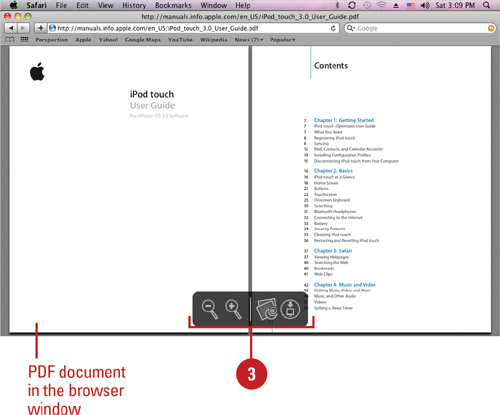
In Safari, you can display a PDF file in the browser window along with a toolbar and sidebar to make it easier to view the file. When you point to the middle of an open PDF page, near the bottom, of the Safari window, a toolbar with PDF tools appears. You can use the tools to zoom in and out to view the screen, open the PDF in Preview, and save the PDF to the Downloads folder. When you no longer want to use the toolbar, simply move the pointer off it.
- Open the Web page with the link to the PDF you want to view.
- Click the link for the PDF file.
- Use any of the following PDF tools:
View Toolbar. Point to the middle of the PDF page, near the bottom.
If you move the pointer off the toolbar, it disappears.
View Sidebar. Click the triangle at the left of the toolbar.
Move Pages. Click the arrow buttons in the toolbar or click a page in the sidebar.
Zoom In or Out. Click the Zoom In (+) or Zoom Out (-) buttons.
Open PDF in Preview. Click the button on the toolbar to open the PDF in the Preview application.
Save PDF to Download Folder. Click the button on the toolbar to quickly save the file to the Downloads folder in the Home folder.
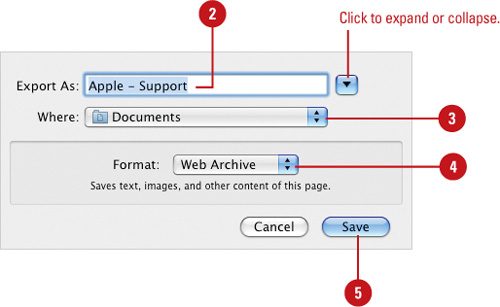
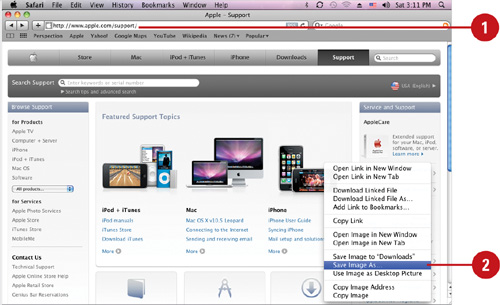
You can save a Web page, and view it later from your local hard drive or use it as source for HTML (HyperText Markup Language) code, which instructs the browser how to display the Web page. When you save a Web page, Safari can save only the HTML text content of the current page, or all the elements on the page, which includes text and images. Before you save a Web page you can view the HTML code to determine if you need it.
- Open the Web page you want to save, click the File menu, and then click Save As.
- Type a name for the file, or use the suggested name.
- Select the hard drive and folder in which you want to save the file.
- Click the Format pop-up, and then select a Web format: Web Archive.
Page Source. Saves only the source text of this page.
Web Archive. Saves text, images, and other content on this page.
- Click Save.
Did You Know?
You can view the HTML code of a Web page. Open the Web page, click the View menu, and then click View Source. When you are done viewing, click the Close button.
See Also
See “Saving and Closing a Document” on page 190 for more information on using the Save As dialog.
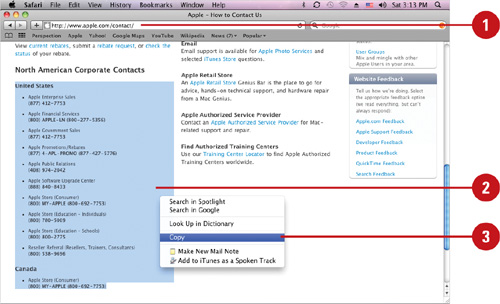
If you find information on a Web page that you want to save for future reference or share with others, you can copy and paste it to another document or save it on your computer. When you copy information from a Web page, make sure you’re not violating any copyright laws.
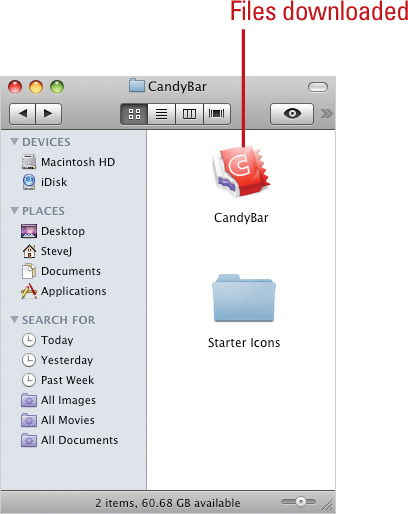
There are thousands of sites on the Internet offering all sorts of files you can download to your computer, from trailers to the latest game demos. You can download files from any Web site by finding the file you want, and then clicking the download link. Safari automatically downloads the file to the location specified in the General pane of Safari preferences. During the downloading process, the Downloads window appears, displaying progress and status information. You can stop downloading a file, view a downloaded file in the Finder, and clear the Downloads window when it gets too full.
- Open the Web page that you want to download a file.
- Click a download link, or Control+click the link pointing to the actual file, and then click:
Download Linked File to download the file to the Downloads folder.
Download Linked File As to specify a download location.
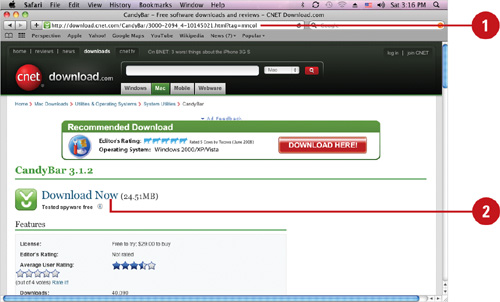
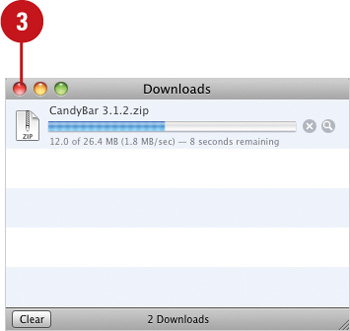
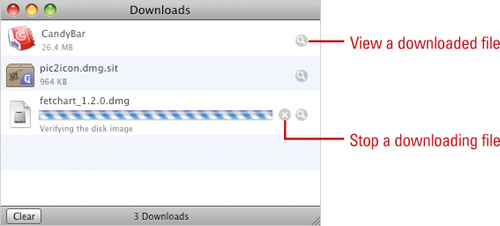
The Downloads window appears, displaying the estimated time to download the file, along with the estimated transfer time.
- When the download is complete, click the Close button.
You may need to Quit Preview.
Did You Know?
You can access a site with lots of files to download. Try these sites to find plenty of files to download: http://www.download.com and http://www.shareware.com
- If necessary, click the Window menu, and then click Downloads.
The Downloads folder is located in the Home folder. You can click the Go menu, click Home, and then double-click the Downloads folder.
- Perform any of the following operations.
Stop a downloading file. Click the Stop icon to the right of the file name; to restart the download, click the icon again.
View a downloaded file. Click the Magnifying Glass icon to the right of the file name.
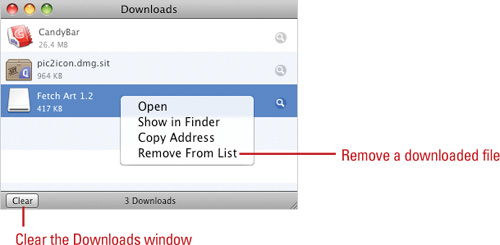
Clear the Downloads window. Click the Clear button. Clearing the window does not clear files that are being downloaded.
Remove a downloaded file. Control-click the file name, and then click Remove From List.
- Click the Close button.
See Also
See “Setting Safari Preferences” on page 252 for information on selecting the download file location and specifying when to remove downloaded items from the Downloads window.
Safari preferences help you configure some of the more common features of the program. You can set preferences for General and Advanced options, Appearance, Bookmarks, Tabs, AutoFill, and Security. These preference areas allow you to turn features on and off as well as customize the way Safari works. General, Appearance, and Advanced preferences are covered here, while Bookmarks, Tabs, AutoFill, and Security preferences are covered throughout this chapter.
- Click the Safari menu, and then click Preferences.
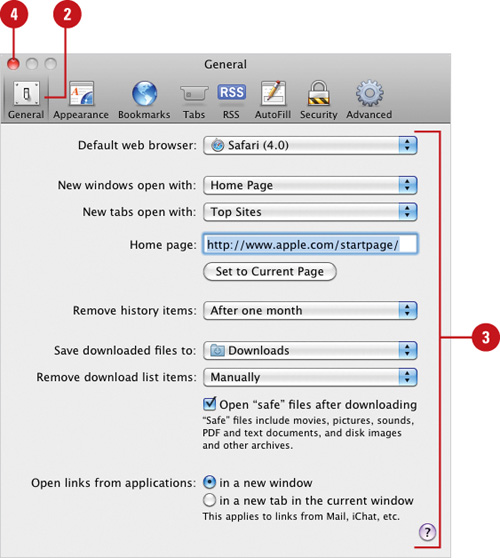
- Click General.
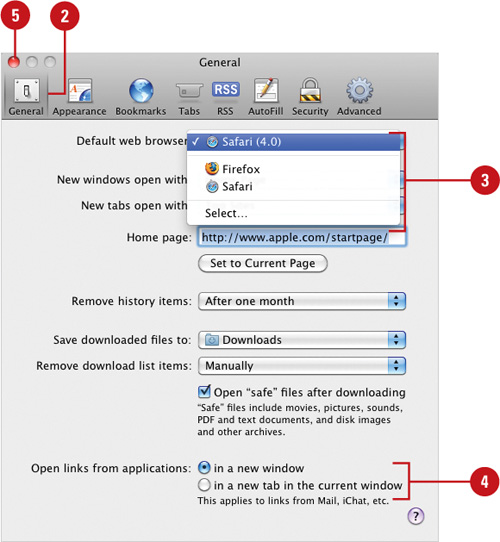
- Select or specify the various options you want to use:
Default Web Browser. Select a default browser.
New Windows open with or New tabs open with (New!). Click the pop-up, and then click Home Page, Same Page, Empty Page, or Bookmarks.
Home page. Specify a Web address.
Remove history items. Click pop-up to specify an interval.
Save downloaded files to. Click the pop-up, and then select Desktop or Choose Other to specify another location.
Remove download list items. Click the pop-up, and then click Manually, When Safari Quits, or Upon Successful Download.
Open “Safe” files after downloading. Check to automatically activate safe downloaded files, such as movies, pictures, sounds, PDF and text documents.
Open links from applications. Select an option to open links in a new window or current tab.
- Click the Close button.
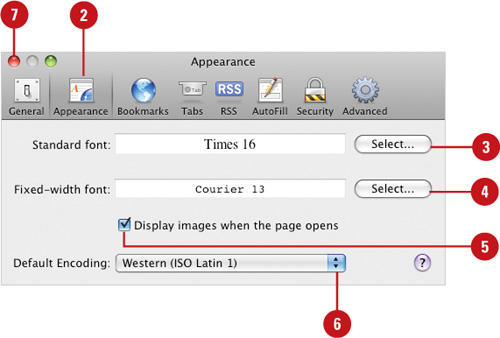
- Click Appearance.
- For the Standard Font, click Select to choose a font for Web pages that don’t specify one.
- For the Fixed-Width Font, click Select to choose a fixed-width font for Web pages when you need to align text in a specific way.
- Select or clear the Display images when the page opens check box.
- Click the Default Encoding pop-up, and then select a character encoding set, which tells your browser how to interpret and display characters in a Web page.
- Click the Close button.
- Click the Safari menu, and then click Preferences.
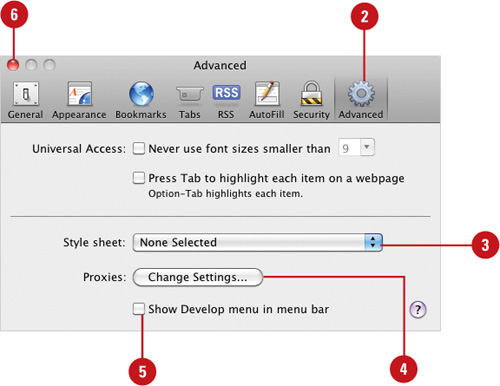
- Click Advanced.
- Click the Style Sheet pop-up, and then click None Selected or select a style sheet, which specifies a uniform format for the appearance of Web pages.
- Click Change Settings to modify settings for a proxy server. Setting typically required when you use an Internet firewall. See your ISP or network administrator for settings.
- Select the Show Development menu in menu bar check box to use Web development related-commands (New!).
- Click the Close button.
When you browse the Internet, you can access and gather information from Web sites, but Web sites can also gather information about you and store documents as databases (New!) without your knowledge. When you visit a Web site, the site creates a file on your computer, known as a cookie, which stores information, such as your Web site preferences or personal information, including your name and e-mail address. Not all cookies are harmful; many cookies save you time re-entering information on a return visit to a Web site. Safari’s Security options allow you to block or permit cookies; however, when you block cookies, you might not be able to access all Web site features. You can also get a warning when you visit a fraudulent sites (New!).
- Click the Safari menu, and then click Preferences.
- Click Security.
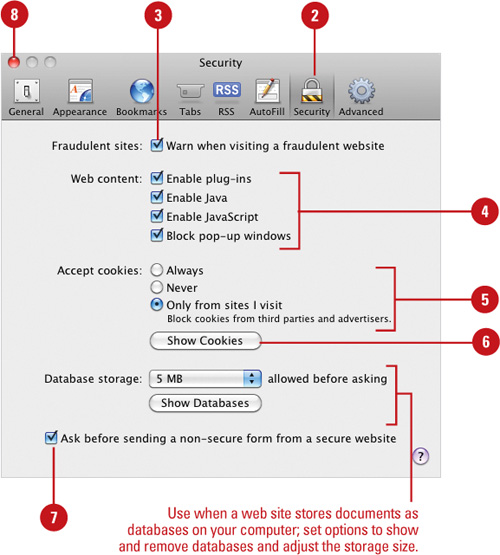
- Select the Warn when visiting a fraudulent website check box to get a warning message (New!).
- Select the Web Content check boxes you want to enable:
Enable plug-ins. A software module that provides additional functionality outside of HTML.
Enable Java. A programming language for writing interactive Web pages.
Enable JavaScript. A simple programming language for displaying simple interaction, such as image mouse rollover, or opening windows.
- Click the Accept Cookies option you want: Always, Never, or Only from sites you navigate to.
- To show the cookies on your computer and delete any you want to remove, click Show Cookies.
- Select or clear the Ask before sending a non-secure form to a secure website check box to enable or disable the option.
- Click the Close button.
When you open or close a Web page, some pages display pop-up windows to advertise products and services or request login and other information. Pop-up windows can be extremely annoying. Most of the time you end up closing them. To avoid the continual borage of pop-up windows, you can block them in Safari. When you set Safari to block pop-up windows, the program only stops pop-up windows that appear when you open or close a page, but not when you click a link.
- Click the Safari menu, and then click Preferences.
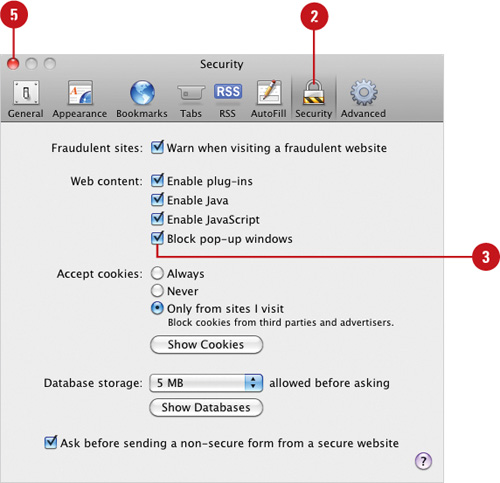
- Click Security.
- Select the Block pop-up windows check box.
- Click Block to confirm the option selection to block pop-up windows.
- Click the Close button.
Did You Know?
You can check security when browsing secure Web sites. When you enter sensitive information on the Web, you can make sure it’s secure. To check security, look for the lock icon in the upper-right corner of the Safari window, or make sure the Web sites address begins with “https,” not “http.”
Mac OS X comes with Safari as the default Web browser. If you prefer to use another browser, you can remove Safari from your computer, install another browser, such as Microsoft Internet Explorer, Mozilla Firefox, or Netscape Navigator, and set it as your default Web browser program. When you click links in other applications, such as Mail messages, or double-click a Web Internet Location file icon, your default browser launches and opens the Web page in a new window or tab in the current window.
- Click the Safari menu, and then click Preferences.
- Click General.
- Click the Default Web Browser pop-up, and then select a Web browser.
- In the Open Links From Applications area, click the In a new window or In a new tab in the current window option.
- Click the Close button.
See Also
See “Downloading Files Safely from the Web” on page 250 for information on adding or removing applications.