Mac OS X was designed from the ground up for sharing, and it really doesn’t matter what you want to share. For example, you might want to set up a simple home-based network to share files between family members, or even hook your Macintosh into a major network using a combination of Windows, Unix, and Mac machines. In Chapter 16, “Managing Files Using a Network,” you’ll learn how to set up a functional network using a variety of methods; however in this chapter you’ll learn how to create user accounts, manage those accounts, and even protect your information from being accessed by unauthorized individuals, using Snow Leopard’s File Vault application. In addition, Snow Leopard lets multiple users log in and switch between accounts with the click of a button.
Correctly setting up user accounts is important to the security of your computer, so each account is assigned its own name, and individual password. Take care when setting up accounts that you don’t give the user more privileges (access) than needed to perform their job. Also, when setting up accounts and passwords, make sure to be accurate in your typing of passwords. Passwords are case-sensitive, and if forgotten, data can be lost forever. When setting up accounts, you can have shared files that can be available for all users on your computer or network.
When Macs were new, they didn’t share very well; however, a lot has changed since then. OS X was designed for multi-users, and Snow Leopard has continued that tradition with the inclusion of easy user swapping and tighter file security. Think of a user account as a file drawer within a large file cabinet. A specific individual owns each file drawer, and they have access to that drawer through a unique key. That key gives them access to the contents of their drawer, and no other. Controlling the file cabinet is one person, who has a master key that gives her access to all of the file drawers; including her own. Individuals can do anything they please within their own drawer; including throwing away or adding files, but they can’t access the other drawers. A User Account is a file drawer that holds all of the user’s folders, files, applications; anything they select to add or subtract from their account.
The interesting thing is that on a Mac, the user account is more than just a file drawer; it’s the whole user environment. Users create their own world—including desktop, fonts, and folders. For example, one user logs in and sees a background picture of her dog, while another user, logging in on the same computer, has a background of a beach in the Bahamas. In addition, users are assigned privileges that define where they can go, and what they can access. Let’s say one user has access to the accounting system; including all the applications and files, and another user is locked out; all determined by the Administrator. The Administrator holds all the keys to all the accounts; they’re the ones that set up the other user accounts and decide who can do what. If you’re the owner of the computer, you’re the Administrator. It’s up to you to decide who does what on your computer.
When you turn on your Macintosh for the first time, it’s set up for instant access. You were asked during the initial setup to name your computer and assign a password. By default, the password protection system is not activated, so the next time you start up your Macintosh, you are granted access without having to select your account and type in your password. Before setting up User Accounts, it’s a good idea to first activate password login, and then set up any additional accounts. When active, the login window appears every time you start up your computer and contains a list of all those with valid user accounts.
 Click the System Preferences icon in the Dock, and then click the Accounts icon.
 If the screen is locked, click the Lock icon, type your password, and then click OK.
 Click Login Options.
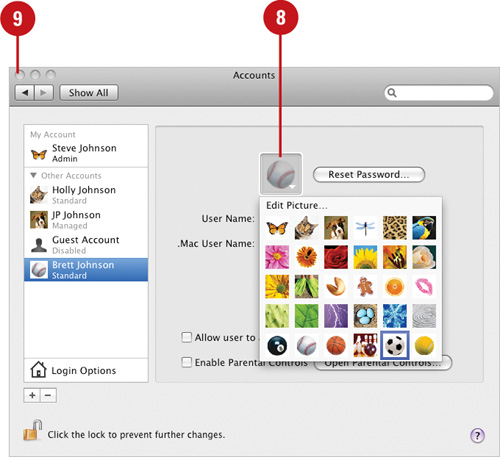
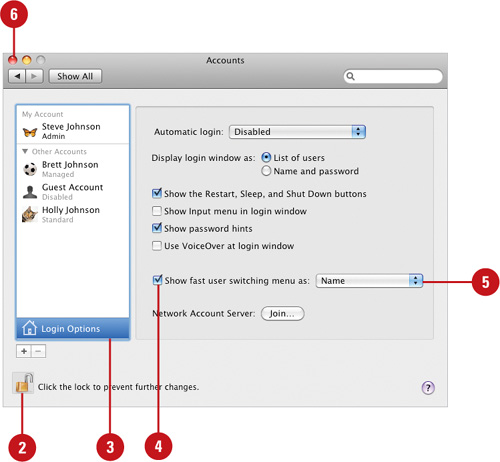
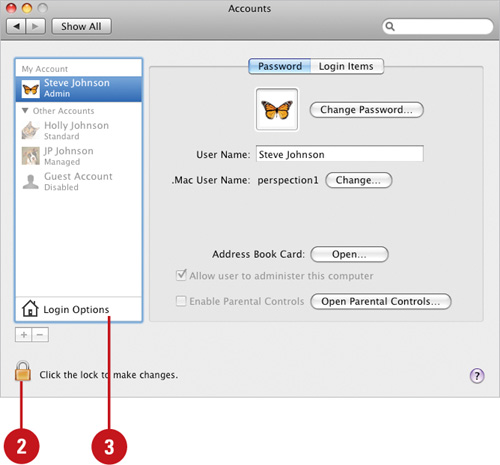
 Click the Automatic login pop-up, and then select Disabled or a user.
When you select a user, your computer automatically starts with this user account.
 Click the List of users or Name and password options.
 Select or clear the following settings to show options in the Login window:
Show the Restart, Sleep, and Shut Down buttons.
Show Input Menu in login window.
Show password hints.
 Select or clear the Use VoiceOver at login window check box.
 Select the Show fast user switching menu as check box if there is more than one user, and then use the pop-up to select a view.
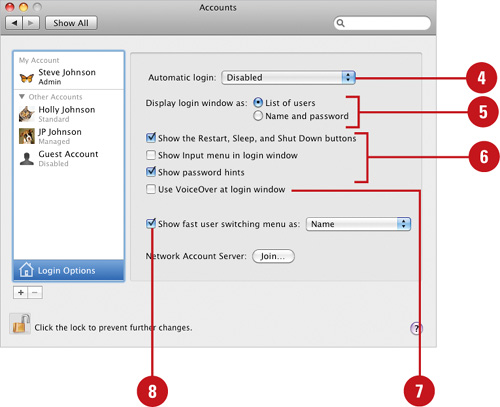
 Click the Close button.
Setting up user accounts involves careful consideration as to who is this person, and what they’ll be able to access and do on the computer. Mac OS X makes the process of setting up accounts easy; but don’t let the ease fool you into thinking it’s unsecured. Mac OS X creates a tight wall of protection around each account. When you create a standard account, the security settings are set to their default values. Which means the account user has access to their own personal Home folder, and they are able to access applications on the hard drive. They don’t have access to any other account, nor are they able to modify or delete any files or applications on the hard drive.
- Click the System Preferences icon in the Dock, and then click the Accounts icon.
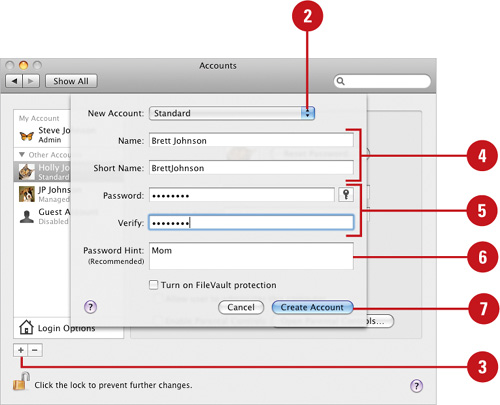
- Click the New Account pop-up, and then select an account type.
- Click the Add (+) button.
- Type a name for the new account, and then type a Short Name for the Account (used by the server).
- Type and verify the password for the account.
- Type a Hint for the password (optional).
- Click Create Account.
- Click the picture icon, and then select a picture for the account, or drag a picture file from a window or the desktop.
- Click the Close button.
The Account has been added.
Things change quickly in the computer world; an account for an employee that was valid a week ago is now invalid due to the employee quitting. Deleting user accounts is easy, and if planned correctly does not mean that the user’s data and files are deleted. You can specify to hold all of the deleted account information in a temporary holding area; where it can be accessed for as long as necessary.
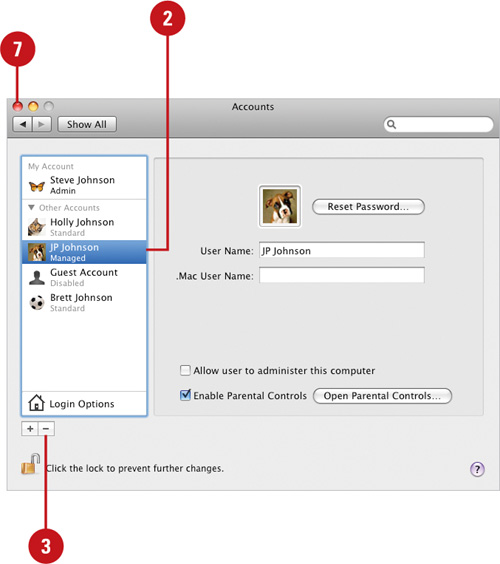
- Click the System Preferences icon in the Dock, and then click the Accounts icon.
- Select an account from the available users.
- Click the Delete (-) button.
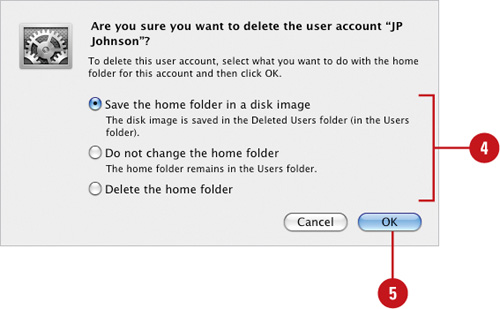
- Select from the following options:
Save the home folder in a disk image. Click to save the home if you want the user back later.
Do not change the home folder. Click to deactivate the account and keep the home folder.
Delete the home folder. Permanently delete the home folder.
- Click OK.
- Type your password, and then click OK to delete the account.
- Click the Close button.
As the Administrator, you have one additional area where you can control what users have access to is the File Info. The File Info window lets you, as the Administrator, decide who has access to which files and folders on your computer. For example, you could create a folder on the hard drive and give every user account access, or you could select one file within that folder and restrict access. In fact, you can give users the ability to read a file, but not modify, or let them read and modify the file. Since handling individual files would be a bit time consuming (computers typically hold thousands of files), your Macintosh helps out by assuming users do not have access to the hard drive’s files and folders (it’s up to you to give them access), and you can apply general access settings to all the files and folders nested within a folder (this saves you time).
- Open the hard drive and then select a folder, application, or file.
- Click the File menu, and then click Get Info.
- If the screen is locked, click the Lock icon, type your password, and then click OK.
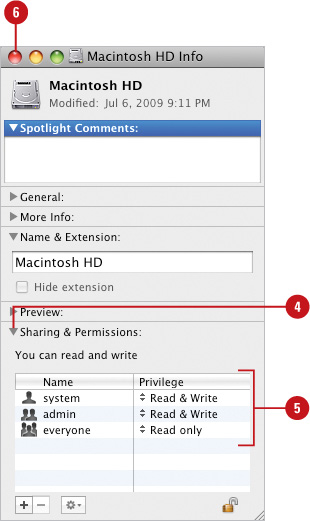
- Click the expand button (triangle) for Sharing & Permissions.
- Click the Privilege pop-ups to the right of system, admin, and everyone, and then select what type of access you want assigned to the selected item.
Read & Write
Read Only
Write Only (Drop Box)
No Access
- Click the Close button.
Once you have set up a user account, it’s up to you to decide exactly what that particular user can and cannot have access to. For example, you might create a user account for a graphic designer and give them access to all the design applications such as Adobe Photoshop and Illustrator; however, you don’t want them messing around with the accounting programs, so you deny access to those specific applications. Once the access privileges are set for an account, they can be changed at a later date, but the Administrator is the only person authorized to change them.
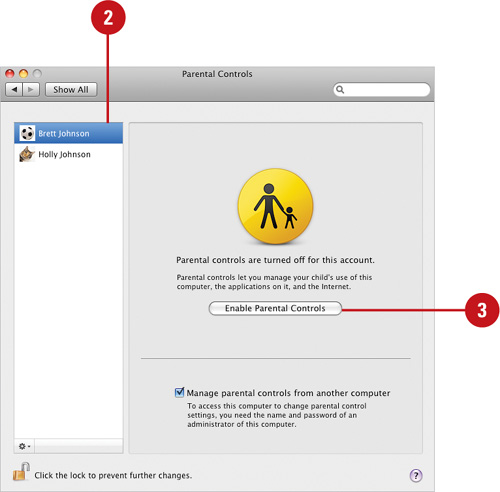
- Click the System Preferences icon in the Dock, and then click the Parental Controls icon.
- Select the account you want to modify.
- Click Enable Parental Controls, if necessary.
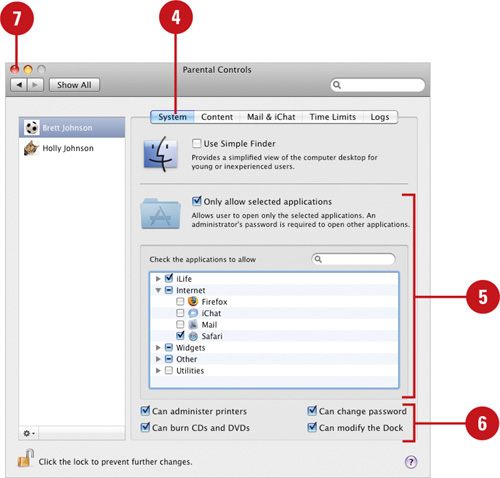
- Click the System tab.
- Select the Only allow selected applications check box, and then select the check boxes for the application you want this user to access.
- Select to restrict the user’s ability to perform certain functions such as Can administer printers, Can change password, Can burn CDs or DVDs, or Can modify the Dock.
- Click the Close button.
See Also
See “Using Simple Finder” on page 94 for information on limiting the available items in the Finder. Great for kids!
After you have set up a user account as the Administrator, you can enable and set parental controls. Parental Controls help you manage how your children use the computer. Parental Controls allows you to set limits on your children’s Web access, Mail and iChat usage, the amount of time spent logged on the computer, and which games and programs they can use. You can set different settings for each user account on your computer, so you can adjust the level you want for each child. You can also review activity reports on a periodic basis to see what your children are doing on the computer.
- Click the System Preferences icon in the Dock, and then click the Parental Controls icon.
- Select the account you want to modify, and then click Enable Parental Controls, if necessary.
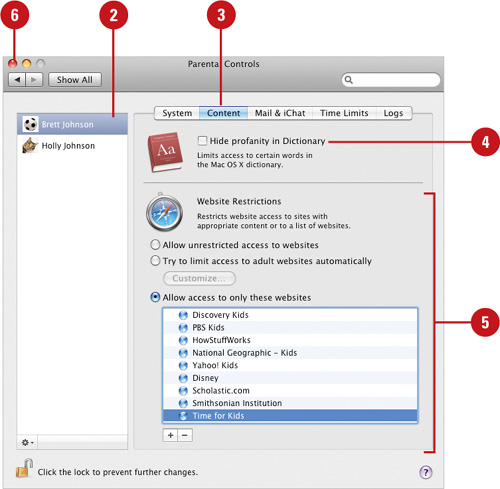
- Click the Content tab.
- Select or clear the Hide profanity in Dictionary check box.
- Select one of the following options:
Allow unrestricted access to websites.
Try to limit access to adult websites automatically. Click Customize to specify sites.
Allow access to only these websites. Click the Add (+) and Remove (-) buttons to add and delete items from the allowable Web site list.
- Click the Close button.
- Click the System Preferences icon in the Dock, and then click the Parental Controls icon.
- Select the account you want to modify, and then click Enable Parental Controls, if necessary.
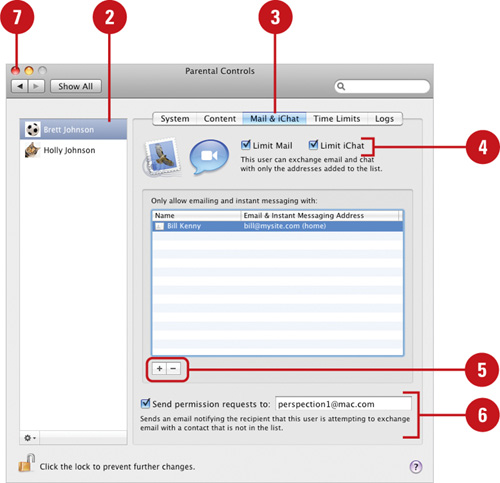
- Click the Mail & iChat tab.
- Select or clear the Limit Mail and Limit iChat check boxes.
- Click the Add (+) and Remove (-) buttons to add and delete addresses from the allowable list.
- Select the Send permission requests to check box, and then type an e-mail address.
- Click the Close button.
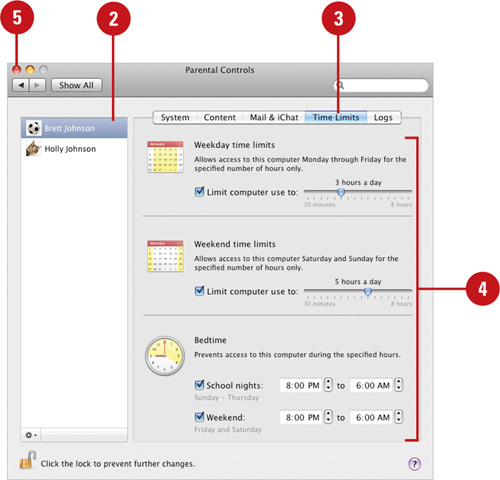
- Click the System Preferences icon in the Dock, and then click the Parental Controls icon.
- Select the account you want to modify, and then click Enable Parental Controls, if necessary.
- Click the Time Limits tab.
- Specify options for the following time limits:
Weekday time limits.
Weekend time limits.
Bedtime.
- Click the Close button.
When you first turn on your computer, it begins by access the operating system and performing a standard start up. A normal start up involves performing a system check, and then if login is activated, opening the login window and requiring you to select your account and type in your password. At that point, Mac OS X opens your desktop and it’s off to work. However, there is a way that you can alter the start up procedure, by specifying Start Up, and/or Log In items. Start Up items are applications or scripts that you decide to launch every time your computer is turned on. Log In items are specified by individual users, and launch whenever their account is accessed. For example, you might have a Start Up item (a script) that accesses the company network. In addition, you have a Log In item (a file) that launches your personal day planner, when you log in. The network script launches each time the computer is turned on, but the day planner only launches when you log in to your account. The individuals who own accounts on your computer set up log in items. In fact, log in items are one of the few things the Administrator cannot do—the user must set them up.
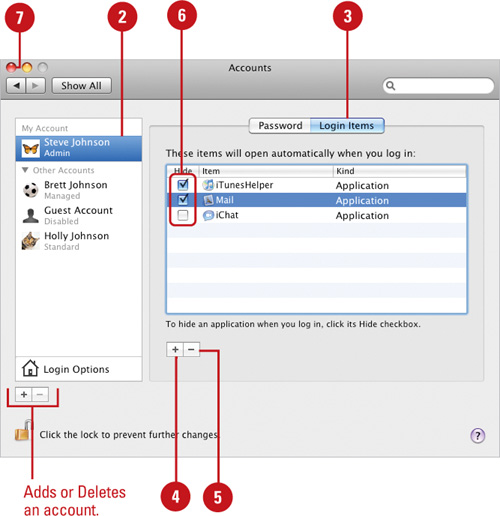
- Click the System Preferences icon in the Dock, and then click the Accounts icon.
- Select your account (Administrator only).
- Click the Login Items tab.
- Click the Add (+) button to locate a particular application or file you want opened every time you log in.
- If necessary, click the Remove (-) button to remove an item from the startup list.
- Select the Hide check box to open the application or file but hide it until you’re ready to work.
- Click the Close button.
Did You Know?
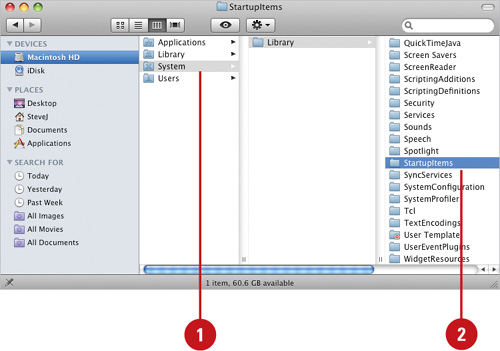
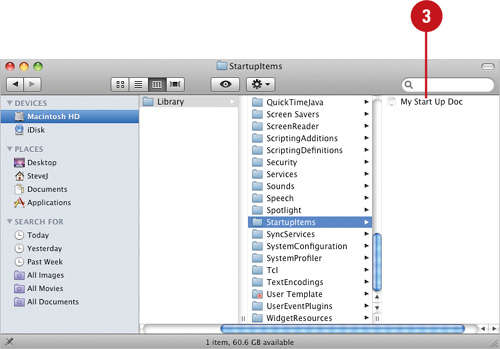
If you don’t want to drop an application into the Startup Items folder, create an alias of the application (or file), and place the alias into the folder. That way, you still have access to the original item, and if you no longer want the item in the Startup Items folder, all you have to do is move it to the trash.
You can create Startup commands. Since Start Up items load every time your computer is running; it’s a great way to perform routine maintenance and security. For example, you can create a script that instructs the system to perform hard drive diagnostics every seven days. Since the items are placed within the Startup Items folder, it doesn’t matter who logs into the computer; the functions load and perform as instructed.
See Also
See “Creating Aliases” on page 90 for information on how to create and use an alias.
One of the advantages to having multiple users and owning Mac OS X, is the ability to quickly switch between users. For example, one of your users wants to quickly check her e-mail. Before Leopard, you would have to close out all your files, log out, and then let her log in, but not any more. Mac OS X allows more than one user access to your computer, and lets you switch back and forth on the fly without closing anything. Think of a large box, and each side of the box represents a user account, along with their personalized desktop, specific folders and applications. To access a new account you simply rotate the box to display another face. That’s exactly how it looks when you switch users using Fast User Switching. As you watch, the screen rotates to another face on the box displaying another user, and your account is still active. When she’s finished checking her e-mail, all you have to do is switch back. It’s that simple, and on systems with multiple users, this one feature can save you a lot of wasted time.
- Click the System Preferences icon in the Dock, and then click the Accounts icon.
- If the screen is locked, click the Lock icon, type your password, and then click OK.
- Click the Login Options button.
- Select the Show fast user switching menu as check box.
- Click the pop-up, and then select a user view option: Name, Short name, or Icon.
- Click the Close button.
See Also
See “Switching Users” on page 22 for information on switching between different users.
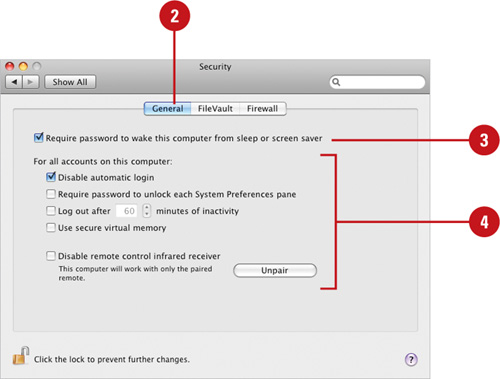
The Security pane in System Preferences allows you to set options that prevent others from using your computer, such as requiring a password to unlock and change system preferences or wake your computer from sleep or screen saver, logging you out automatically if you’re inactive for a certain amount of time (make sure you save all documents to complete logging you out), and disabling automatic login all together. The Security pane also lets you turn on or off FileVault, which protects your Home folder using encryption (secrets codes) from unauthorized users. Your files are encrypted using your login password. If you forget your login password and don’t have the master password (a safety net password that lets you unlock any FileVault account), your files are lost forever.
- Click the System Preferences icon in the Dock, and then click the Security icon.
- Click the General tab.
- Select or clear the Require password after sleep or screen save begin check box, click the pop-up, and then select a delay interval (New!).
- Select or clear the check boxes related to all user accounts:
Disable automatic login.
Require password to unlock each System Preferences pane.
Log out after X minutes of inactivity.
Use secure virtual memory.
Disable Location Services.
Disable remote control infrared receiver.
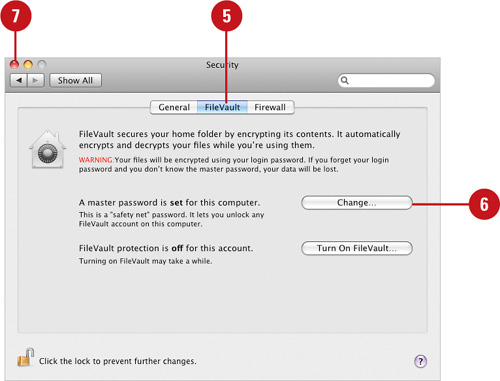
- Click the FileVault tab.
- To set or change a master password (something you never want to forget), click Set Master Password or Change, type the information, and then click OK.
- Click the Close button.
System Administrators are the ones that control the computer; they’re the ones that set up other user accounts, and they are the ones, that tell you what you can and cannot access on that particular computer. The System Administrator knows all... sees all. However, what if the System Administrator forgets their password? Well first of all, don’t tell anyone and don’t worry, because you have two possible ways to get back to work. Your operating system has an Administrator password, and a Master password. If you know the master password, you have no problems whatsoever. However, if you set up a master password, turned on FileVault, and then forgot your Master password... well, not even Mac OS X can help you out of that situation, you’re data is lost forever. If you didn’t set up the master password, don’t despair because OS X gives you another way to reset your Administrator password—by using the original install DVD. It’s fairly straight forward, but understand others that have an install DVD can perform the same operation, and gain access to your information. It is therefore recommended that you create a Master password, and use FileVault to secure your sensitive documents.
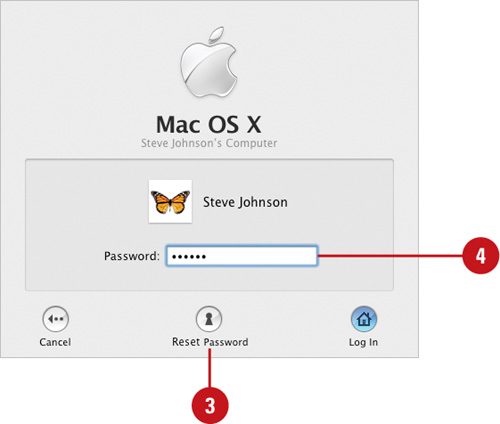
- Restart your computer, and then hold down the C key (instructs Mac to start up from the DVD).
Click the arrow button to the open installer screen to display menus.
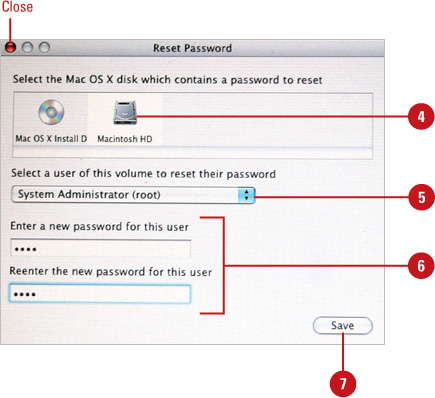
- Click the Utilities menu, and then click Reset Password.
- Select the hard drive you want to reset.
- Click the Account pop-up, and then select the name of your account.
- Type and verify a new Administrator password.
- Click Save, and then close the window.
- Click Mac OS X Installer, click Quit Mac OS X Installer, and then click Restart to restart your computer.
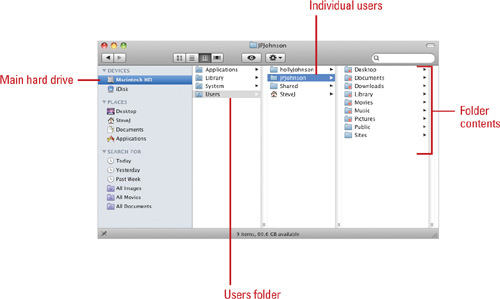
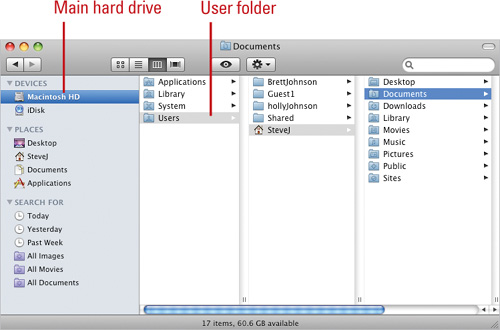
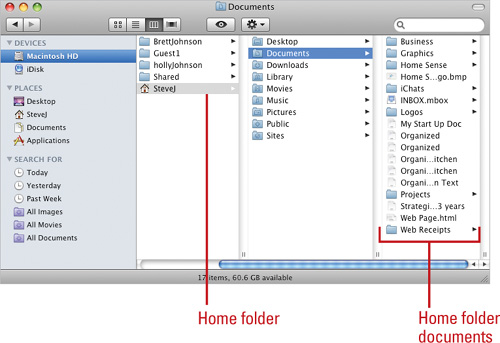
In a further attempt to organize, as well as secure your computer, each user account is assigned a Home folder. The Home folder is where all your account stuff is stored. That means all of your files, images; anything that you’ve created within your personal account, is stored in this folder. When users sign on to their accounts, they have the ability to add or delete files to their Home folder; however, they cannot access the Home folder of any other user, and they cannot add folders or delete files from any place else but their own Home folder. This gives you a tremendous degree of control over users, and prevents them from accidentally (or purposely) deleting or reading sensitive data. For example, users cannot create folders on the main hard drive, nor can they delete applications from the Applications folder. The other areas of the computer are effectively locked out.
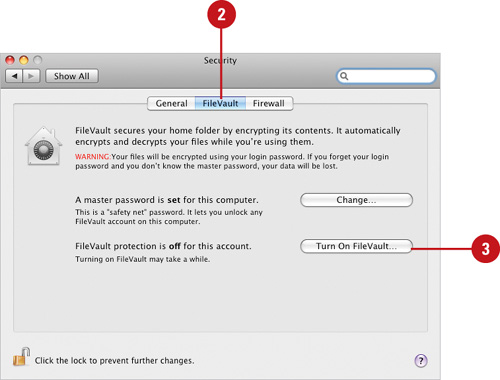
Leopard’s FileVault feature finally gives you total security over your sensitive files and applications. Macintosh computers have always had security, but there were ways to get around it. That was before Leopard came up with FileVault. FileVault gives you the ability to encrypt the files in your Home folder using password encryption (your log in password). It’s so strong, that if you forget your password and don’t know the master password, no one is able to open the files—they are lost forever. It’s theorized that breaking the FileVault encryption would take a password-guessing program over 100 trillion years to figure it out. Therefore, if you decide to use FileVault, please don’t forget your password. After you set FileVault, the security encryption and decryption happens on the fly, so you don’t have to worry about doing anything; simply use your files normally. If someone else tries to access them, FileVault keeps them out.
- Click the System Preferences icon in the Dock, and then click the Security icon.
- Click the FileVault tab.
- Click Turn On FileVault (all other uses must be logged off the computer).
- Read the alert message if users are logged in, and then click OK.
- Type your password, and then click OK.
- Another alert message appears, please read it carefully, select the secure check box options you want, and then click Cancel or Turn On FileVault.
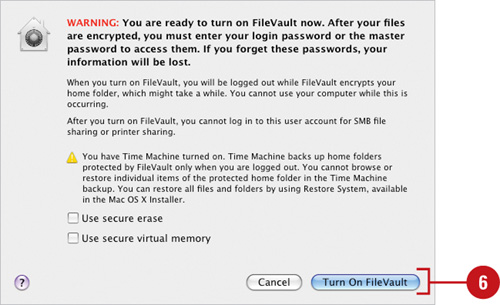
Snow Leopard then goes through a creation procedure that can take 10 minutes or more to complete.
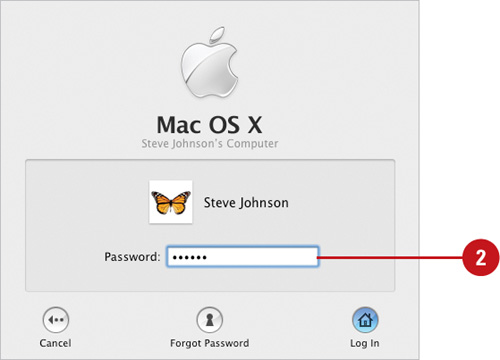
- When the process is complete, you are brought back to the Login window.
When you set up a user account, that person has access to the files in his Home folder. Depending on the level of access, he can open applications, possibly read or access information on the hard drive, but he won’t have access to any sensitive areas, or anyone else’s Home folder. What if you want to give a file to another co-worker, but you can’t drop it into their folder, and the co-worker can’t access your Home folder. That’s where Macintosh comes to the rescue with shared folders.
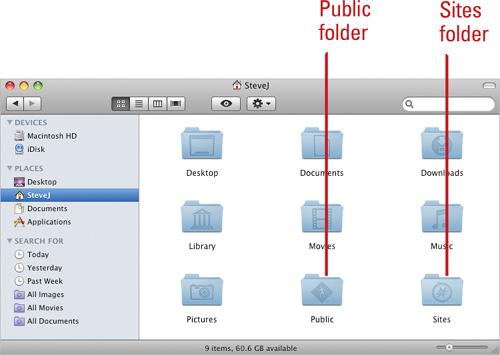
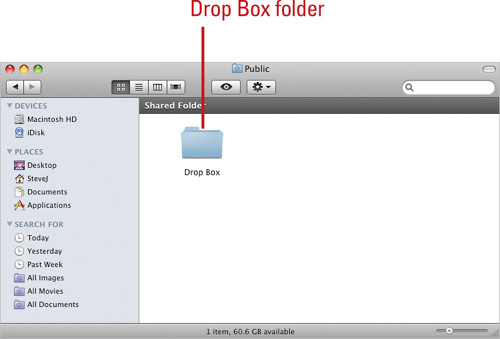
When you open your Home folder you’ll see two folders named Public and Sites. The Public folder contains a nested folder named Drop Box. The Drop Box folder is a place where anyone can drop items for you to use. As another user, I can place things into your Drop Box, and you can place things in my Drop Box, but I can’t see what’s in your Drop Box, nor can I change any items. In other words, files check in but they don’t check out.
The Sites folder is a place where you can create a Web site, and anyone can open the Sites folder, and launch your site. You can even publish it out to the Internet or on a Local Network. As a user with an account on this system, I can launch your Web site, but I can’t modify or place any items within the Sites folder.
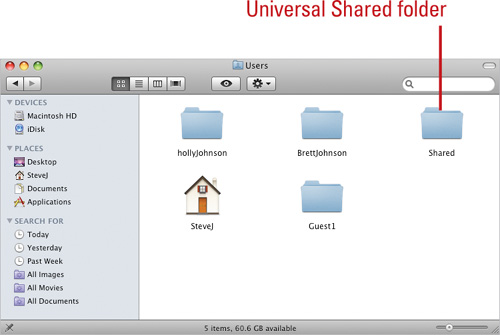
Finally, there is a Shared folder, located in the Users folder. The Shared folder is the only folder (other than your own Home folder) where you have full access to the files it contains.