Computer systems are composed of more than just a computer (that’s why they’re called systems). A computer houses a hard drive, and is connected to a keyboard, mouse, and video display. All of these hardware devices are required to operate your computer. For most users that’s just the start, you’ll probably have one or more printers, a scanner; maybe even a second monitor. Then of course, there are digital cameras, fax machines... you get the idea.
Computers are made up of a group of hardware devices, and like a conductor at a symphony, Snow Leopard helps you work with those devices, by making the installation, management, and removal easy. In addition, Snow Leopard can help you manage color between devices, help you install MIDI (audio) devices, and even make Internet communications easy. If the worst of the worst problems occur (a system crash), there are steps you can perform to bring your computer system back on line, and you don’t even have to be a techie.
Years ago, hardware installation required all kinds of techniques and special skills. A hardware device such as a printer, could take hours to set up. There were all kinds of cabling problems, and even after it was installed, there were numerous settings to complete before you could use the device. Today, many devices are plug-and-play. You can now go out to your local computer store, pick up a FireWire hard drive, plug it in to your computer, and immediately begin using it. The same is true for many other devices, such as card readers and digital cameras. Even if the device requires the installation of a driver (printers and scanners usually do), a double-click on the install application and answering a few simple questions is typically all that’s needed.
 Insert the install CD or DVD into your computer (assuming the device is not plug-and-play) or navigate to the installer on your computer or network.
 Launch the installation application.
 Follow the instructions for installing the device (some devices may require a reboot of the system).
 When the installation is finished, follow the on-screen instructions to end the process.
Did You Know?
You can purchase a power strip (also known as a surge protector) to help with all those power plugs. If you install several hardware devices that require their own external power supplies, such as printers and scanners, you can invest in a power strip, and to protect against power spikes, make sure it’s a surge-protected power strip.
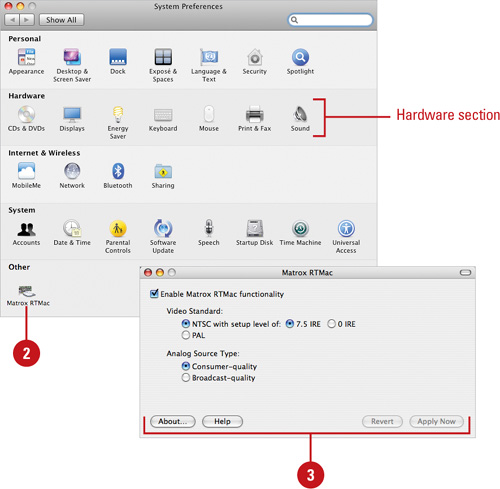
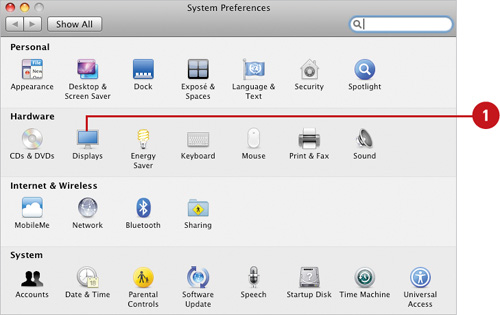
Most hardware devices have settings that control how the device operates. For example, all ink-jet printers have settings that control the type of paper used, how the inks are applied to the paper and, if your printer has more than a single paper tray, which tray is used for the current printing process. Snow Leopard uses the System Preferences panel to display all of the available hardware settings for the major components of the operating system. In addition, when you install specific hardware devices such as a third-party mouse or video-control board, you’ll see an icon for controlling the device in the System Preferences.
- Click System Preferences icon in the Dock.
The Hardware section holds the icons to the standard hardware devices for Mac OS X.
- Click an icon to view or modify the hardware settings of the selected device.
- When you’re finished viewing or modifying the settings, select the following options:
About. Provides information on the manufacturer of the device; including the hardware version and Web site (if any).
Help. Gives you access to the Help dialog for the selected device.
Revert. Puts the settings back to their previous selections.
Apply Now. Applies the changes to the settings.
Close. Closes the pop-up.
When you use any computer, a mouse is an important part of the computing experience. Computers communicate with the user through a series of Graphical User Interfaces or a G.U.I. (pronounced Gooey). The user communicates with the computer through several devices, such as: a touch screen, a keyboard, a drawing tablet and a mouse. Using a mouse requires a bit of hand-to-eye coordination: You see something on the screen (a button perhaps), and you move the mouse pointer over the object and click. Apple understands the importance of the mouse, and gives you ways to control its movement and sensitivity through preferences located in System Preferences. If you have a Bluetooth wireless mouse, you can set it up a new device, check battery levels, and select other Bluetooth-related options.
- Click System Preferences icon in the Dock, and then click the Mouse icon.
- Drag to adjust the following options:
Tracking Speed. Controls the speed of the mouse as you drag across your mouse pad.
Scrolling Speed. Controls the scrolling speed of the mouse.
Double-Click Speed. Controls the speed at which you must double-click your mouse.
- To use the scroll wheel on your mouse, select the Zoom using scroll wheel while holding check box, click the pop-up, and then select a shortcut key. To set additional zoom options, click Options.
- To set Bluetooth wireless options, click Set Up Bluetooth Mouse, and then follow the on-screen instructions.
 Click the Close button.
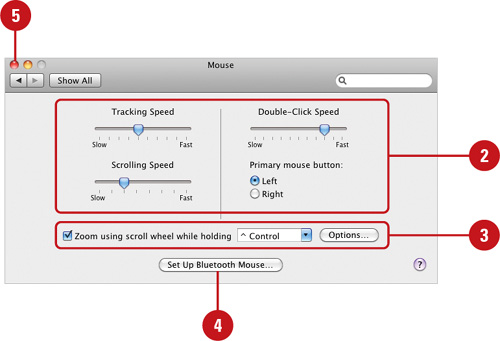
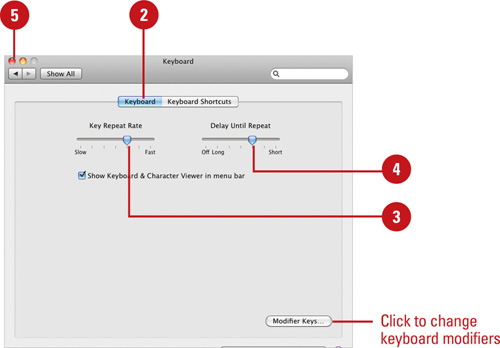
Your keyboard is another one of those wonderful devices that help us communicate with a computer. Keyboards have what is called a tactile feel (the way the keys bounce back when they’re pressed). Although you can’t control the tactile feel of a keyboard, you can control how the keyboard’s repeat functions work through System Preferences. Keyboard shortcuts allow you to quickly perform a task by pressing keys on your keyboard. You can change or disable many global keyboard shortcuts, the same shortcuts in all applications, to avoid conflicts or customize to suit your own work preferences (New!).
- Click System Preferences icon in the Dock, and then click the Keyboard icon.
- Click the Keyboard tab.
- Drag the Key Repeat Rate slider to adjust the speed at which a repeating key is typed.
- Drag the Delay Until Repeat slider to adjust the length of time you have to hold down a key before it begins repeating.
- Click the Close button.
- Click System Preferences icon in the Dock, and then click the Keyboard icon.
- Click the Keyboard Shortcuts tab.
- Click the category (New!) with the shortcuts you want to customize.
- To disable a shortcut, clear the check box next to the description.
- To change a key combination, click the characters, hold down the new shortcut key combination you want.
 Click the Close button, and then restart any application that uses it.
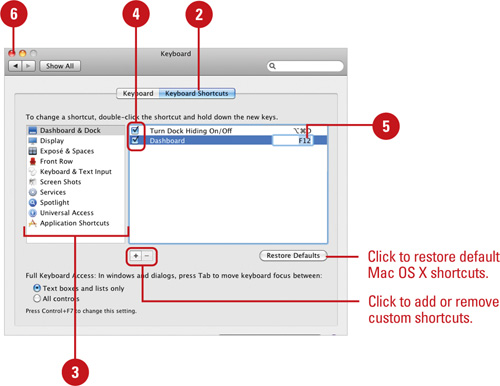
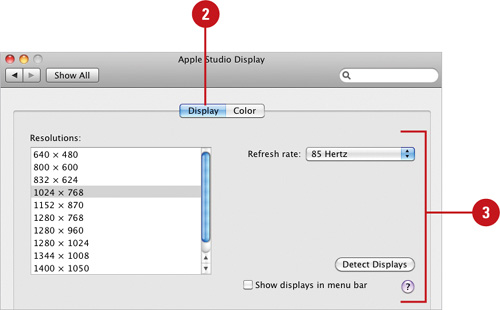
Your monitor is the main interface between you and your computer. A monitor displays all your programs and mouse movements. Without a monitor, you would in fact be attempting to operate your computer with your eyes closed. Apple, in a effort to give you the best possible view of its wonderful operating system interface, gives you the ability to modify how your monitor displays data, through options located in System Preferences.
- Click System Preferences icon in the Dock, and then click the Displays icon.
- Click the Display tab.
- Select from the following options:
Resolutions. Select a display resolution from the options.
Colors. Click the pop-up, and then select the number of colors to display.
Refresh Rate. Click the pop-up to set a refresh rate.
Detect Displays. Searches for any additional displays attached to the computer.
Show Displays In Menu Bar. Check to display the Displays icon on the Apple menu bar.
Number Of Recent Modes. Click the pop-up, and then select how many recent modes to display.
Brightness. Changes the brightness of the monitor (a Mac laptop feature).
Automatically Adjust Brightness As Ambient Light Changes. Automatically adjusts the brightness of the monitor to compensate for external lights (a Mac laptop feature).
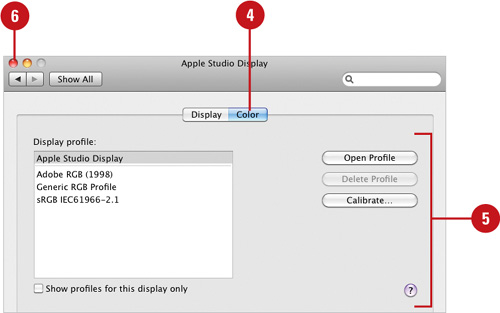
- Select from the following color options:
Show Profiles For This Display Only. Check to display profiles for the current monitor.
Open Profile. Click to open a profile.
Delete Profile. Click to delete a profile.
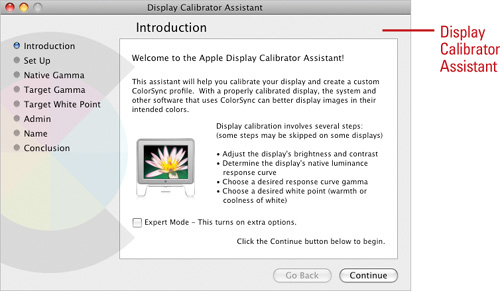
Calibrate. Click to calibrate the color of the monitor.
- Click the Close button.
Have you ever wondered what the exact color value of an item on your monitor would be if measured using RGB (red, green, and blue) values? Or how about the hexadecimal value of a color (useful if you design Web pages)? Color is an important part of any designer’s life, and the Digital Color meter lets you accurately sample colors from your monitor. Since the cursor determines the sampled color, you’ll need to learn a few shortcut keys to lock, print, and save the color information.
- Click the Applications folder in the Dock, click the Utilities folder, and then click the Digital Color Meter icon.
- Click the Color pop-up, and then select a color space to measure.
- Drag the Aperture Size slider left or right, to decrease or increase the area used for the taking of a screen shot.
- Move the mouse over the monitor to measure the color directly underneath the cursor.
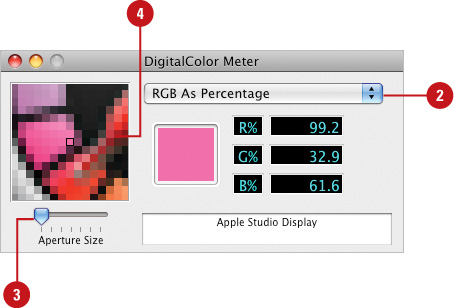
- To hold a color into the color swatch box, press
 +Shift+H.
 - To lock the screen shot of the current image, press +L.
 Click the Image menu, and then click Save As TIFF to save the current locked screen shot as a TIFF image.
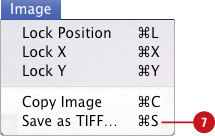
 Click the Color menu, and then click Copy Color As Text or Copy Color As Image to save the held color in clipboard memory. The color can then be copied into another program.
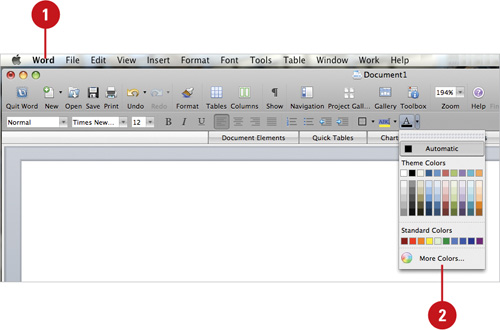
The world of color on a computer is a very subjective place to live. For example, you might be using a new Macintosh Studio Display, and someone else might be using a Sony LCD monitor. What this means to you is, a color displayed on your hardware device (monitor) might look slightly different on another computer using a different monitor. In addition, it’s possible that two people, owning the same monitor, may have them adjusted differently. While creating consistent color output is a difficult thing, Mac OS X gives you a stable color picking system, which helps to stabilize colors systems. The Macintosh Color Picker is accessed through an application, such as TextEdit, MS Word or Photoshop, or any application that lets you select colors.
- Open an application, such as MS Word or TextEdit.
- Display the Colors window.
In MS Word, select a button, such as text color, and then click More Colors.
In TextEdit, click the Format menu, point to Font, and then click Show Colors.
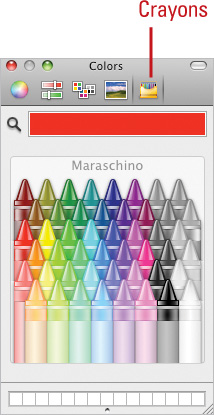
- Click a palette, and then select a color from the available color profiles:
Color Wheel. Drag the scroll bar vertically to adjust the brightness, and then click inside the ball, to select a color.
Color Slider. Select a color mixing method from the pop-up, and then drag the sliders to select a color.
Color Palettes. Select a pre-designed color palette from the pop-up, and then select the color from the available list.
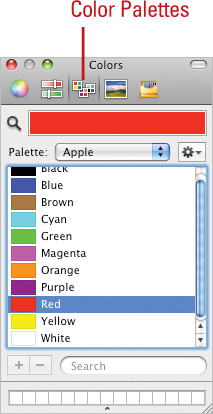
Image Palettes. Displays a spectrum of colors. Click in the spectrum to select a color.
Crayons. Select a color from the available crayons.
- Click the Close button.

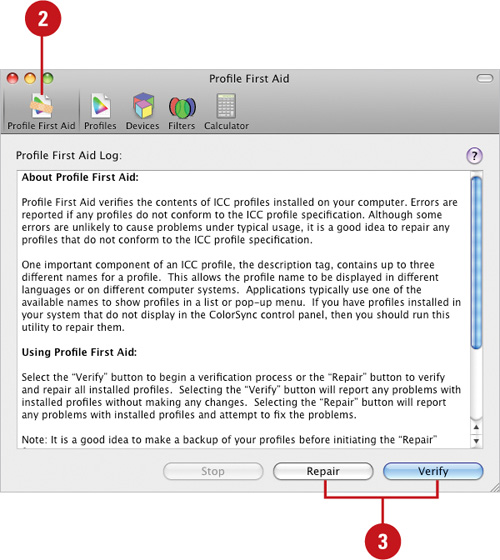
The ColorSync utility gives the designer the ability to match up colors between devices, and to check on and repair the device color profiles present on the computer. As you might have figured out by now, computer monitors are not the best at maintaining color accuracy; especially between monitor and print. The ColorSync utility strives to maintain a color standard between devices, by acting as a translator between different devices. The original scanned image, your monitor, and the output printing device are all examples of where color needs to be synced, and it is achieved though the ColorSync utility.
- Click the Applications folder in the Dock, click the Utilities folder, and then click the ColorSync Utility icon.
- Click Profile First Aid.
- Click Verify (to view) or Repair (to fix) the color profiles installed on your computer.
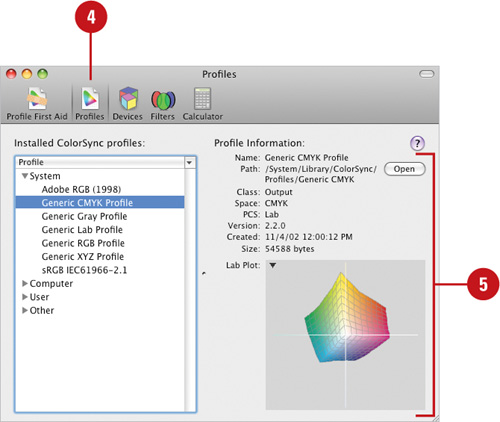
- Click Profiles.
- View a gamut grid of the color profiles installed for your computer (click the user option to view color profiles created by you).
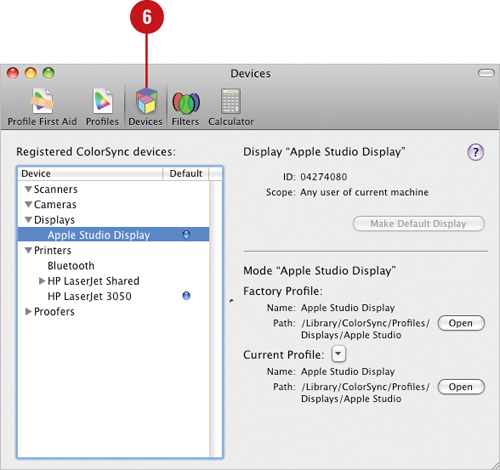
- To select and assign color profiles to all installed devices, click Devices.
- To view information on the currently installed filters, click Filters.
- Click Add (+) or Remove (-) button to add a new filter, or delete the selected filter.
 Click the Down Arrow icon, point to any of the following commands, and then select the option you want:
Duplicate Filter.
Add Color Management Component.
Add Image Effects Component.
Add PDF Retouch Component.
Add Domain Information.
Add Comments.
 Click the Close button.
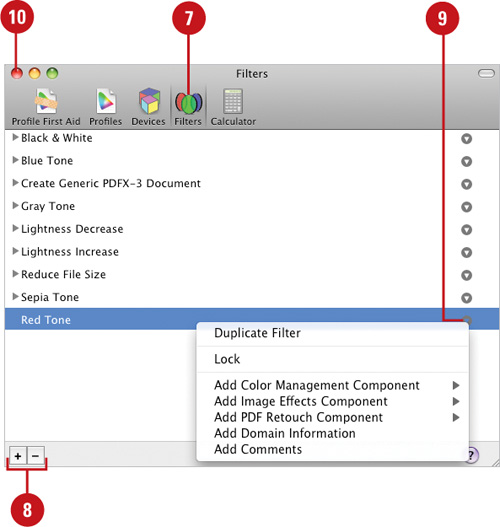
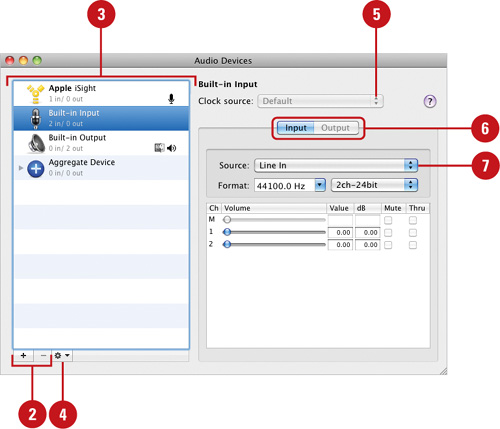
Macintosh computers were born to work with music, and as the years advanced they got better and better. The Audio MIDI (Musical Instrument Digital Interface) Setup utility is designed to help you setup all your input and output sound equipment, such as microphones, speakers, and multichannel audio interfaces, either built-in or external (New!). In most cases, the default settings work the best. However, if you do work a lot with audio, Apple has made the process of adding, monitoring, and adjusting external devices, such as electronic keyboards and speakers, a snap. If you have multiple audio devices, you can combine them together, known as aggregating devices, to add capacity. For example, if you have an two 6 channel audio devices, you can combine them to work as a single 12 channel audio device.
- Click the Applications folder in the Dock, click the Utilities folder, and then click the Audio MIDI Setup icon.
- To create an aggregate device, click the Add (+) button.
To remove an aggregate device, select it, and then click the Remove (-) button.
- Select the audio device you want to configure.
- To use the selected device for sound input or sound output, or to play system sounds, click the Actions button, and then select an option.
- If you’re using an audio device that sends its own timing messages, click the Clock source pop-up, and then select an option.
- Click the Input or Output tab, if available.
- If you prefer a different source option, click the Source pop-up, and then select an option.
The Mac automatically selects the appropriate source option for you.
- Based on your audio device, click the Sample Rate and Bit Depth pop-ups (under Format), and then select an appropriate setting.
- To set the volume for each channel, drag the Volume sliders.
- To configure surround sound (multichannel) speakers, click Configure Speakers, select the options you want, click Apply, and then click Done.
Select Stereo or Multichannel device type, and then select a surround sound version for multichannel.
Select the device channel for each speaker.
To test the speaker connection, click a speaker to play a sound.
 Click the Close button.
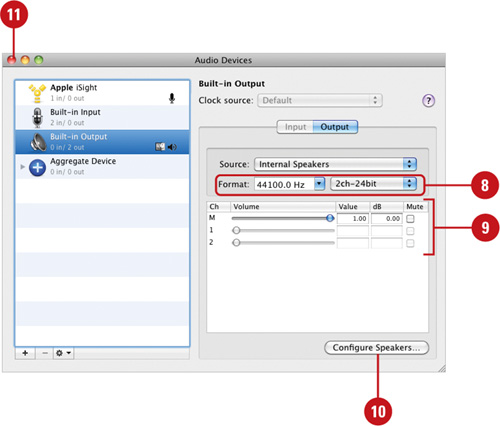

Whenever you add hardware devices to your computer, the possibility exists that a problem will occur. Problems can fall into several categories: The device doesn’t work, the device doesn’t work the way you expect, or the computer refuses to boot. Apple’s built-in management systems make hardware problems a rare event. However, a few careful steps on your part can help to make problems almost non-existent.
Not all hardware devices are compatible with your particular version of Macintosh. For example, you could purchase a video driver board, which works fine in a G4 model, but won’t function in a G5 or later. Make sure the user’s manual lists your model of Macintosh.
Many hardware devices require installation software to operate. Even though OS X has been in the market for a couple of years, there are still hardware devices with accompanying installation software that is not compatible with the OS X operating system. In addition, the Snow Leopard operating system changed the rules on computer architecture; therefore, make sure the software is not just OS X compatible, but is also Snow Leopard compatible.
Software changes (almost on a weekly basis), when you purchase a piece of hardware, that box may have been sitting on the shelf for months. Make sure you access the device’s Internet site, and determine if you have the latest version of the software. It’s easy and it’s free.
If you haven’t purchased an Intel-based Mac (yet), you probably will in the future. Be advised that some of your hardware devices may not work with the new architecture. Many times it’s the software for the device. Some hardware manufacturers can take months to develop the software necessary to operate your hardware devices on the new computers, and some have no plans to upgrade at all. When you purchase new hardware, check the manufacturer’s Web site, and see if they plan on supporting future Macintosh computers.
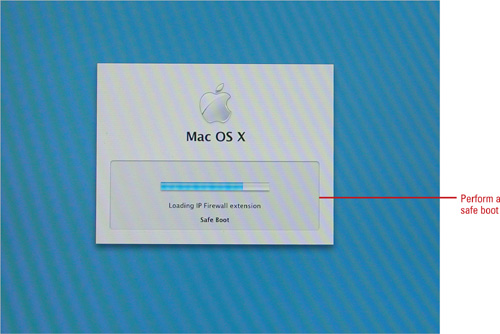
Sometimes you install a hardware device, and your Macintosh refuses to startup. Many times it’s because you just installed a new hardware device. Unfortunately, when you disconnect the device your Mac still won’t startup. The reason is because the software that runs the device is still installed. When this happens you can attempt a fix by performing a "Safe" boot.
First, you’ll need to power down your computer. After your computer has shut off, go ahead and press the power button. After you hear the startup tone, immediately press and hold the Shift key. You’ll release the Shift key when you see the gray Apple and progress indicator (looks like a spinning gear).
The Safe Mode takes awhile to boot (several minutes). That’s because Safe Mode performs a system check before starting. Then, you’ll use the hardware device’s installation CD to remove the installed hardware. After that is done, restart your computer the normal way (without holding the Shift key).
If removing the device software does not solve the problem, your glitch may be caused by something more serious. You can attempt a reinstall of the OS X operating system, but before doing that, go online and check out the Apple Web site and search for help on your problem. When there is no solution but to start over, or get a new device, you’ll need to remove the hardware device and the software that controls it.
Installing hardware can be relatively easy: you insert the installation CD or DVD and follow the onscreen instructions. However, when you remove a hardware device, the software that ran the device is still on your computer. It’s important to remove any software that is no longer needed for two reasons: it takes up space on your hard drive, and it could cause problems in the future with the installation of other hardware devices.
- Startup your computer.
- Use the third-party software’s installer CD or DVD to remove the recently installed software.
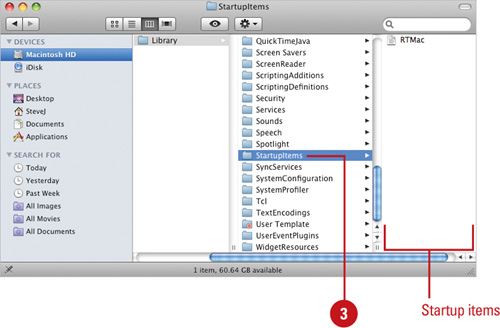
- If you are uncertain about which software was installed last, perform the following steps:
Open the Startup Items folder, located in the Systems folder, and temporarily remove one or more items.
Perform a restart and see if the problem goes away.
- If the problem still exists, perform the additional steps:
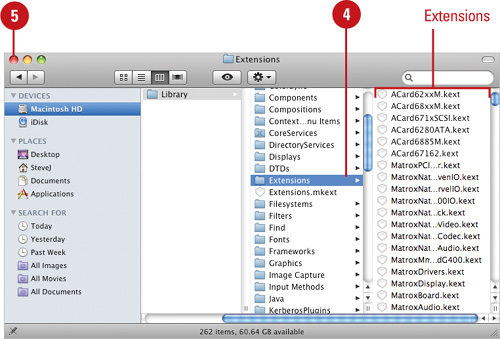
Open the Extensions folder, located in the Systems/Library/ Extensions folder.
View files by Date Modified.
Temporarily move into a folder any relevant, recently modified, third-party .kext files, and then restart the computer.
Add back the moved .kext files one at a time and restart, until the problem reoccurs.
- Click the Close button.