If you have an Intel-based Mac computer, you can install and run Microsoft Windows XP (Service Pack 2 or later), Windows Vista, or Windows 7 on your computer. All you need is Boot Camp Assistant, related drivers, and your Microsoft Windows installation disc.
The Boot Camp Assistant helps you set up a Windows partition on your computer’s hard drive and then start the Windows operating system installation. After you complete the initial installation, you need to install Boot Camp drivers to complete the installation and start your Mac in either Windows or Mac OS X. The Boot Camp drivers, available on your Mac OS X Snow Leopard installation disc, allow you to use your Apple keyboard to emulate a standard PC keyboard, an Apple Remote (if your computer is equipped with one) to control iTunes and Windows Media, Bluetooth wireless devices, an iSight camera, and AirPort wireless network connectivity, and change brightness and contrast controls for built-in displays. After you finish the Windows installation and Boot Camp driver update, you can use Windows on your Mac.
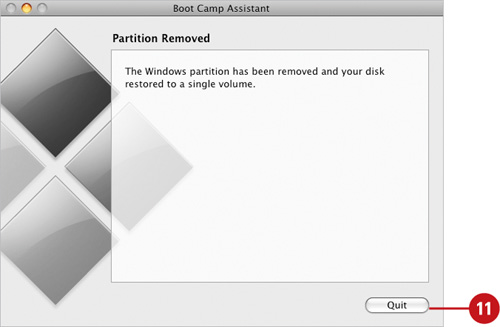
If you no longer want to run Microsoft Windows on your Mac computer, you can remove it using Boot Camp Assistant. When you remove Windows, the Boot Camp Assistant removes the Windows software and restores your hard disk back to a single partition.
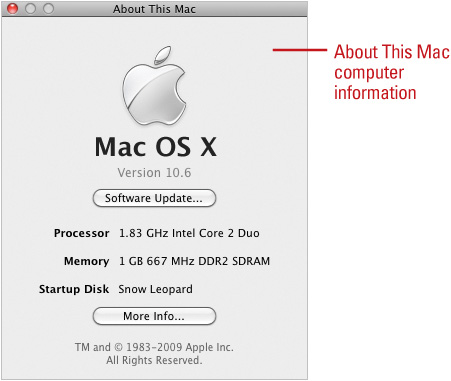
Before you can install Microsoft Windows XP (Service Pack 2 or later), Windows Vista, or Windows 7 on your Mac, you need to meet the minimum hardware requirement for your Mac, create a partition on your hard disk for the Windows software, and have a single-full Windows (32-bit version) installation disc. You can use the About This Mac command on the Apple menu to check your hardware configuration and Boot Camp Assistant to create a partition for the Windows software. Before you install Windows on your Mac computer, it’s critical to make a back up of the important files on your computer; better safe than sorry.
 Before you can install and set up Windows on your Mac, your computer needs to meet the following minimum requirements:
An Intel-based Mac computer.
A USB keyboard and mouse, or a built-in keyboard and touch pad.
Mac OS X version 10.5 or later; the lastest version of the Mac OS X is recommended.
At least 10 GB of free space on the installation disk.
Internal disk with a single partition, formatted as a Mac OS X Extended (Journaled) volume.
2 GB or more of RAM when running Windows 7 or Vista on a Mac Pro computer.
A licensed copy of Windows XP Home Edition or Professional, Windows Vista, or Windows 7.
 Click the Applications folder in the Dock, click the Utilities folder, and then click the Boot Camp Assistant icon.
 Read the Introduction screen, and then click Print Installation & Setup Guide to have this important document handy during your Windows installation.
 Click Continue.
 If your computer has more than one internal disk, select the disk you want to use, select the partition option you want, and then click Continue.
 Use the default size (recommended), or specify the size you want. Either, drag the divider to set the size of the partition or click Divide Equally or Use 32 GB.
The partition must be at least 5 GB and leave at least 5 GB of free space on the Mac OS X partition.
 Click Partition, and then wait for the completion of the partition.
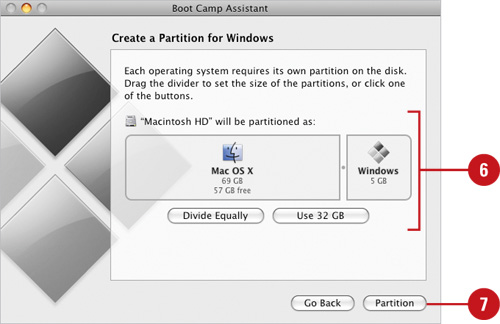
 Click Quit and Install Later to perform the Windows install at another time, or go to the next page and follow the instructions to start the installation.
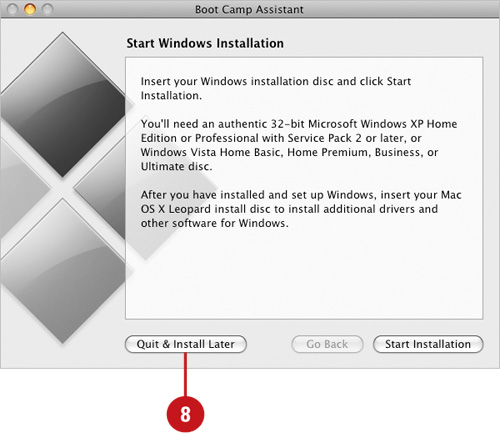
Did You Know?
You can upgrade from Boot Camp beta. If you already installed Boot Camp beta on your computer, all you need to do is update the Boot Camp drivers for Windows. You don’t need to repartition your hard disk or reinstall Windows. Simply, restart your Mac using Windows, insert the Mac OS X Snow Leopard disc, and then follow the on-screen instructions as needed to update the drivers.
After you create a partition on your Mac computer for the Windows software, you can start the Microsoft Windows XP (Service Pack 2 or later), Windows Vista, or Windows 7 installation on your Mac with a single-full Windows (32-bit version) installation disc. During the Windows installation, you need to reformat the new Windows partition, so you can boot (startup) from Windows. You can reformat the Windows partition with the NTFS (XP, Vista, or 7) or FAT (XP only) format. NTFS provides reliability and security, while FAT provides compatibility, which allows you to read and write file on the Windows partition from Mac OS X. After you complete the Windows installation, you need to update Boot Camp drivers on your Mac computer, which are available on your Mac OS X Snow Leopard installation disc, to install Mac-specific drivers for graphics, networking, audio, AirPort wireless connectivity, Bluetooth, iSight camera, Apple keyboards, Apple Remote, and brightness control for built-in displays.
- Create a partition on your Mac computer for the Windows software; see “Preparing a Mac for Windows Software” on page 466 for specific details.
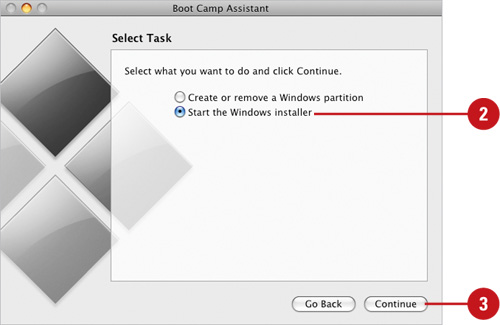
- If you quit Boot Camp Assistant without installing Windows, click the Applications folder in the Dock, click the Utilities folder, click the Boot Camp Assistant icon, and then click the Start the Windows installer option.
- Click Continue.
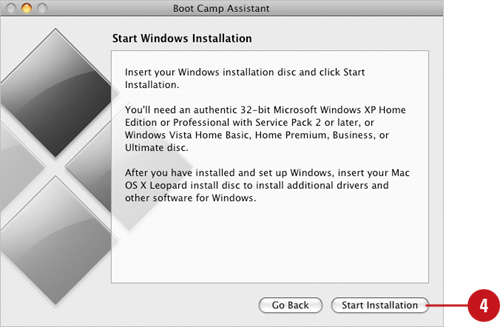
- Insert your Windows installation disc, and then click Start Installation.
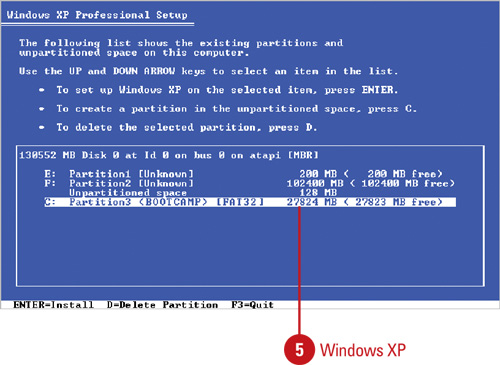
- Follow the Windows installation instructions until you need to decide where to install Windows.
Windows XP. Select C:Partition3 <BOOTCAMP> [FAT32], and then select an NTFS or FAT format partition option.
Windows 7 or Vista. Click Disk 0 Partition 3 BOOTCAMP, click Drive option (advanced), click Format, and then click OK.
- Finish the Windows installation, and then eject the Windows Installation disc.
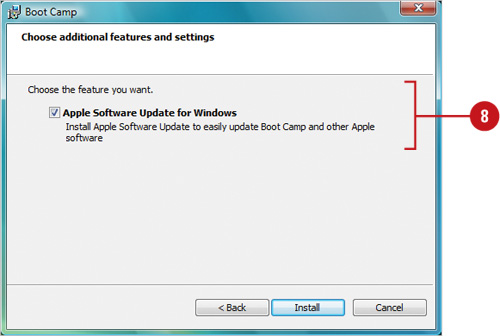
- Insert your Mac OS X Snow Leopard installation disc.
If the installer doesn’t automatically start, double-click the setup.exe file on the disc to start installing drivers.
- Follow the on-screen instructions. Don’t click Cancel in any of the dialog boxes; click Continue. Click Finish, and then click Yes to restart.
 After your computer restarts, follow the instructions in the Found New Hardware Wizard to update your software drivers (Windows XP only).
Did You Know?
You can upgrade Windows XP to Windows 7 or Vista. Restart your Mac using Windows, insert your Windows 7 or Vista installation or upgrade disc, follow the on-screen instructions, insert the Mac OS X Snow Leopard disc, and then follow the on-screen instructions as needed to update the drivers.
After you install Microsoft Windows and Boot Camp drivers, you can start up your Mac computer in either Mac OS X or Windows. You can set the default operating system you want to use on a regular basis using Startup Disk preferences on the Mac or the Boot Camp Control Panel on Windows, and then use quick controls to directly restart your computer in the other operating system or select an operating system while starting your Mac computer.
- Start up using either of the following:
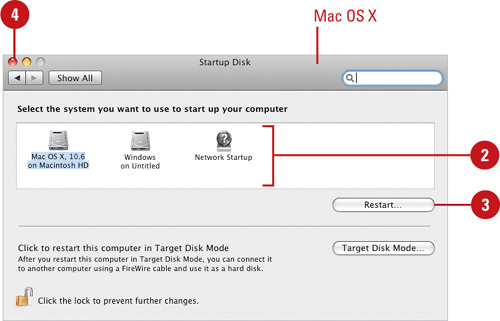
In the Mac OS X. Click the Apple menu, click System Preferences, and then click Startup Disk.
In Windows. Click the Start button on the taskbar, click the Boot Camp icon in the notification area on the taskbar, and then click Boot Camp Control Panel. Click Continue to access the system utility.
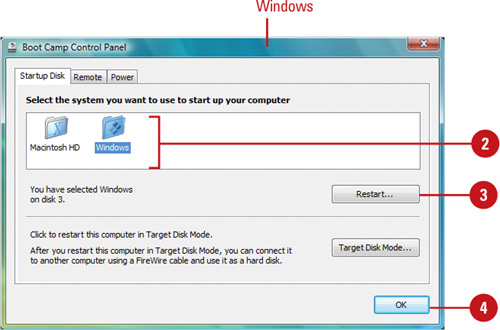
- Select the startup disk with the operating system you want to use by default.
- To start up that operating system now, click Restart.
- Click the Close button (Mac) or OK (Win).
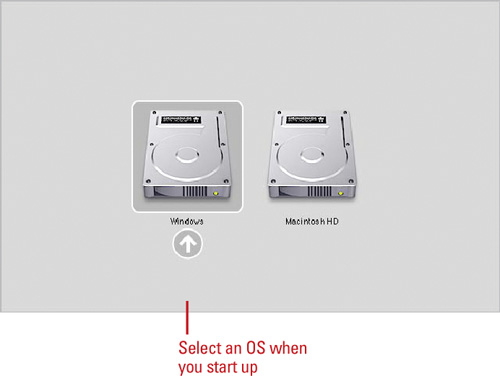
Select an OS when you startup. As your computer starts up, hold down the Option key until disk icons appear, select the startup disk with the operating system you want, and then click the arrow below the icon.
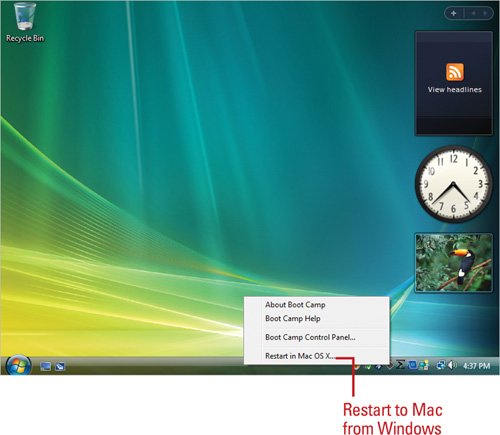
Restart to Mac from Windows. In Windows, click the Boot Camp icon in the notification area, click Restart in Mac OS X, and then click OK.
Restart to Windows from Mac. In Mac OS X, click the Apple menu, click Restart, click Restart, hold down the Option key until disk icons appear, select Windows, and then click the arrow below the icon.
After you finish the Windows installation and Boot Camp driver update, you can use Windows on your Mac. The Boot Camp drivers allow you to use your Apple keyboard to emulate a standard PC keyboard, use function keys, eject discs using the Eject key on the keyboard, change the volume using the Volume Down or Up keys, right-click using an Apple Mighty Mouse or trackpad, use an Apple Remote (if your computer is equipped with one) to control iTunes and Windows Media, use Bluetooth wireless devices, attach and use an iSight camera, and connect to a wireless network using AirPort. In addition, you can work with files between your Mac OS X and Windows disks. Due to HFS+ support, you can now access files (read-only) on your Mac from Windows (New!) for review or save with a different name to make changes.
Disable remote control. In Windows, click the Boot Camp icon in the notification area, and then click Boot Camp Control Panel, click the Remote tab, select the Disable remote control infrared receiver check box, and then click OK.
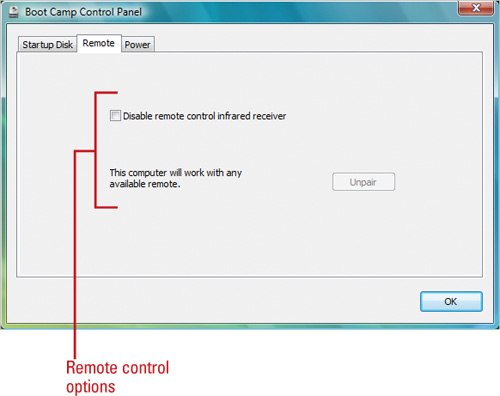
Pair or Unpair a remote control. A Mac computer can only use one remote at a time. Use a remote, you need to pair it with the computer. Hold the remote close to the computer (3 to 4 inches) and point the remote at the front, press and hold down Menu and Next buttons on the remote for 5 seconds until a chain link symbol appears.
If you want to change remotes, you need to unpair the current one first. In Windows, click the Boot Camp icon in the notification area, and then click Boot Camp Control Panel, click the Remote tab, click Unpair, and then click OK.
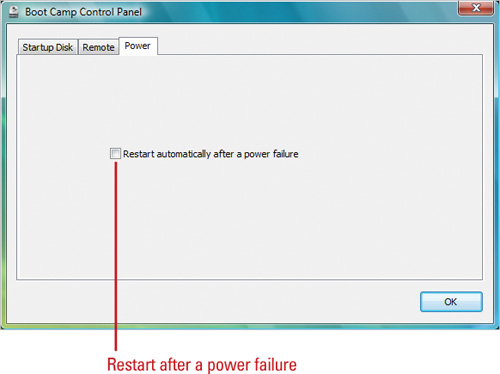
Restart after a power failure. In Windows, click the Boot Camp icon in the notification area, and then click Boot Camp Control Panel, click the Power tab, select the Restart automatically after a power failure check box, and then click OK.
Use a Bluetooth Device. In order to use a Bluetooth wireless device with Windows, you need to pair the device with your computer.
In Windows, open the Bluetooth Devices control panel, click the Devices tab, click Add, and then follow the wizard instructions.
Use the following numeric passkeys: Wireless Mighty Mouse, enter four zeros: 0000. Apple Wireless keyboard, enter six to sixteen digits.
Copy Files Between Mac OS X and Windows. If you installed Windows XP on a partition formatted with FAT, you can open and save files on your Windows disk, or copy files between your Mac OS X disk and Windows disk.
If you installed Windows XP, Vista, or 7 on a partition formatted with NTFS, you can open files on your Windows disk from Mac OS X, or copy files from Windows to Mac OS X. However, you cannot copy or save any files to the protected Windows disk.
Use the Apple Keyboard with Windows. Refer to the table for specific keyboard commands you can use on your Apple keyboard to emulate a standard PC keyboard.
You can also use the Eject key and Volume Down and Up keys on the Apple keyboard to perform commands not available on the standard PC keyboard.
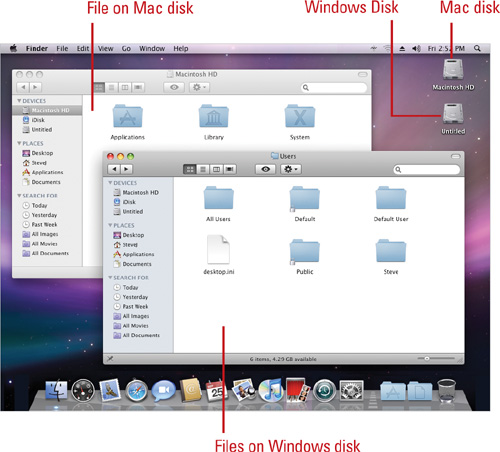
Table . Apple Keyboard with Windows
PC Key Command | Apple External | Built-in Mac |
|---|---|---|
Control+Alt+Delete | Control-Option-Delete | Control-Option-Delete |
Alt | Option | Option |
AltGr | Control-Option | Control-Option |
Backspace | Delete | Delete |
Delete | Delete | Fn-Delete |
Enter | Return | Return |
Enter (num keypad) | Enter | Enter |
Insert | Help | Fn-Enter |
Num lock | Clear | Fn-F6 |
Pause/Break | F16 | Fn-Esc |
Print Screen | F14 | Fn-F11 |
Print active window | Option-F14 | Option-Fn-F11 |
Scroll/Lock | F15 | Fn-F12 |
If you no longer want to run Microsoft Windows on your Mac computer, you can remove it using Boot Camp Assistant. When you remove Windows, the Boot Camp Assistant removes the Windows software and restores your hard disk back to a single partition. All the information on the Windows partition is erased, so it’s critical to make a back up of the important files on your computer before you start the removal process.
- Start your Mac computer in Mac OS X.
- Click the Applications folder in the Dock, click the Utilities folder, and then click the Boot Camp Assistant icon.
- Click Continue.
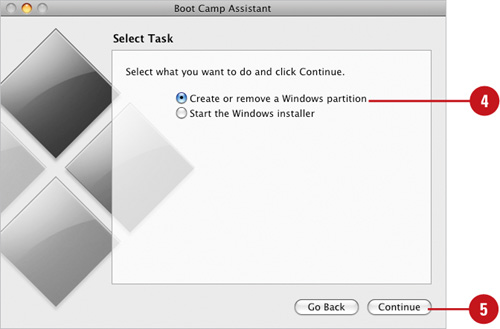
- Click the Create or remove a Windows partition option.
- Click Continue.
- Enter your name and password, and then click OK.
- Click Restore.
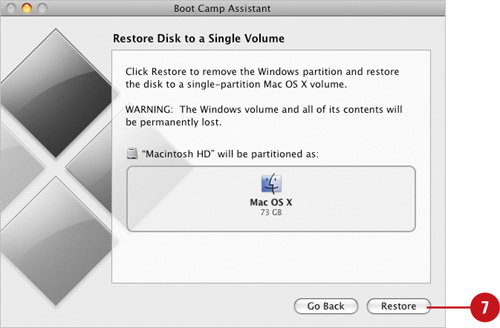
- When you’re done, click Quit.
- Start your Mac computer in Mac OS X.
- Click the Applications folder in the Dock, click the Utilities folder, and then click the Boot Camp Assistant icon.
- Click Continue.
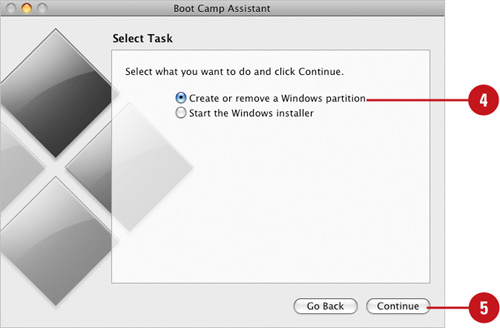
- Click the Create or remove a Windows partition option.
- Click Continue.
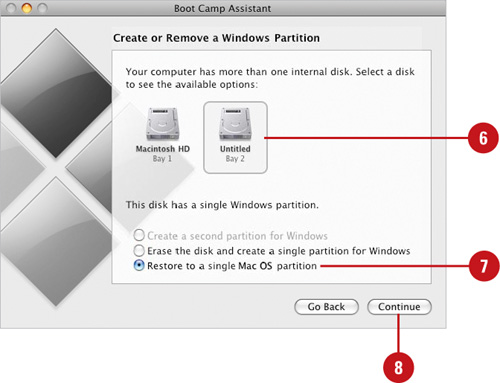
- Select the disk with the Windows software.
- Click the Restore to a single Mac OS partition option.
- Click Continue.
- Enter your name and password, and then click OK.
 Click Restore.
 When you’re done, click Quit.