
Chapter 13. Continuous Integration
The principle of continuous integration applies as well to testing, which should also be a continuous activity during the development process.
Grady Booch et. al., Object-Oriented Analysis and Design with Applications
With continuous integration, your software is proven to work (assuming a sufficiently comprehensive set of automated tests) with every new change — and you know the moment it breaks and can fix it immediately.
Jez Humble and David Farley, Continuous Delivery
Software entropy, like its counterpart in thermodynamics, is the principle that the degree of disorder in a system tends to increase over time. There may be no way out of entropy in physics — the second law of thermodynamics forbids it. Is there a way to stem entropy in software?
Our best current defense against the ruinous effects of code chaos is Continuous Delivery. The term comes from the first principle behind the Agile Manifesto, which places customer satisfaction through the “early and continuous delivery of valuable software” as the highest priority. A related term that precedes the Agile Manifesto by about a decade is Continuous Integration, coined by Grady Booch, and refined by Kent Beck, Martin Fowler, Jez Humble, David Farley, and others. In a team with more than one developer, the frequent integration of code is even more vital, and therefore should be done frequently.1
For continuous integration to exist, there must be automated tests. How else would we know that new changes have been “integrated” with existing code; for no amount of manual effort can “continuously” test software as it grows. This point is vital enough to be emphatically restated.
Important
There is no continuous integration without automated tests.
To get even more value out of the unit tests we’ve written thus far, we can run them as part of a continuous integration build process. This can be done using a wide variety of tools. In this penultimate chapter, we’ll set up a Continuous Integration server using GitHub actions.
Core Concepts
Continuous Integration is the first phase in a software maturity continuum which evolves to Continuous Deployment and culminates in Continuous Delivery. CI is the first evolutionary step towards Continuous Delivery.
Figure 13-1 shows the general overview of Continuous Integration, Deployment, and Delivery.
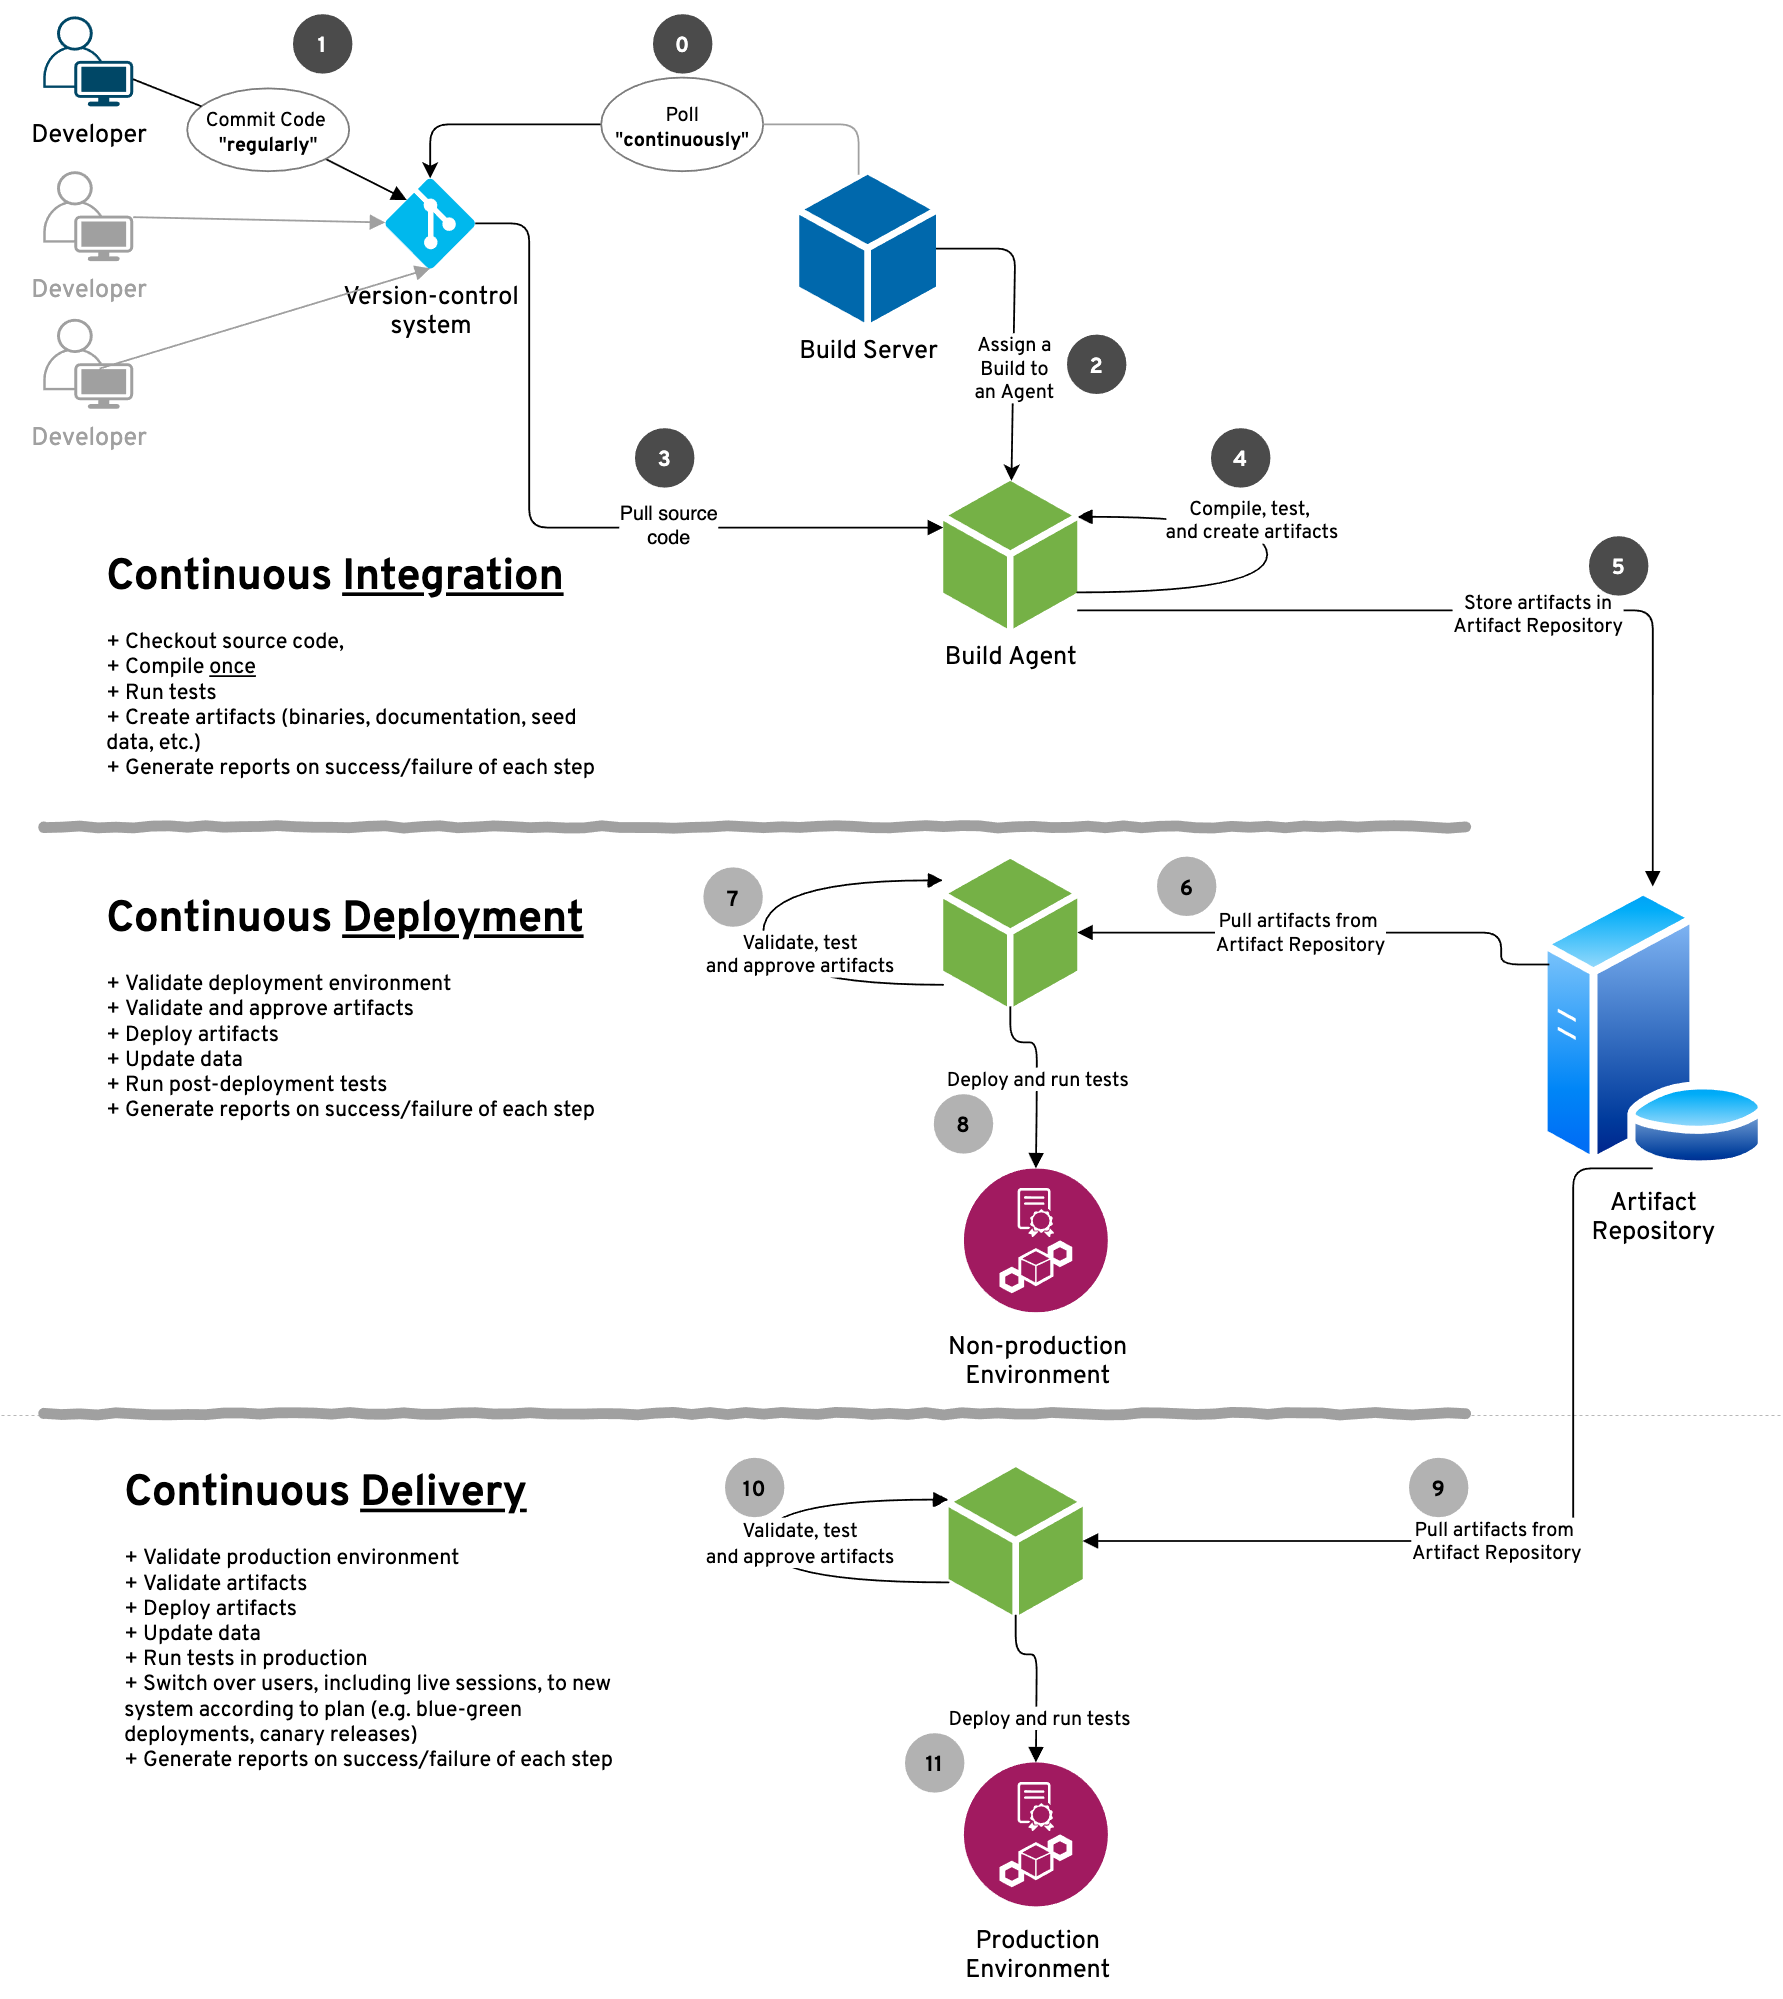
Figure 13-1. Continuous Integration and Continuous Deployment are evolutionary precursors to Continuous Delivery
Version Control
Continuous Integration requires that all code that’s needed to build the software be stored in a Version Control system.
A version control system must provide, at minimum, the following features:
-
Store current (latest) revisions of files and folders in any arbitrary structure and depth.
-
Storing these files and folders under a unified “repository” and not merely as disparate elements.
-
Store old (historic) revisions of files and folders — including those that have been subsequently deleted, renamed, moved, or otherwise modified.
-
Discrete and chronological versioning of all revisions — up to an including the current revision — of all these files and folders, so that it’s easy and unambiguous to track the history of any one file over time.
-
Ability to push (commit) changes to the code repository in a deterministic manner. (That is: a push should be accepted or rejected based on clear rules.)
-
Ability to query the code repository to detect any fresh changes.
-
Provide a command-line-interface (CLI) for the “push code”, “pull code”, and “query changes” features.
In addition, the following features are highly desirable:
-
Store multiple independent branches in the code repository, where branches can be created (forked), deleted, and rejoined (merged) with other branches.
-
Ability to resolve conflicts (which happen when two or more incompatible changes are made to the same file/folder).
-
Provide all these features in the CLI, without the need to resort to a graphical user interface (GUI). This facilitates automation.
-
Support or provide a GUI for users who need/prefer it. This facilitates widespread adoption.
In common practice, each member of a development team regularly commits their code to one (or more) shared code repositories. Each person may commit code several times during a typical workday, leading to dozens (or even scores) of CI builds running daily.
A version control system like Git provides all the features listed above and many others. Git can be used as a distributed version control system with no centralized repository — individual developers sharing code with each other in a peer-to-peer fashion. Git’s “patch” feature can be used to share changes with other team members using any existing, out-of-band mechanism, e.g. shared network folders, or even e-mail.
For the purpose of enabling CI, it’s much more common to have a centralized Git server to which all developers connect. This centralized Git server contains the definitive and canonical code repositories. All other team mambers are expected to push code to and pull code from this centralized Git server.
With a centralized Git server, it’s fairly common (bordering on universal) to use a PAAS provider 2 instead of installing and maintaining a Git server of one’s own. With the ready availability of PAAS Git providers, including several that offer a generous “zero-price” tier — such as GitHub, GitLab, and Bitbucket — makes this an irresistible option.
In this book, we’ll use Github as our version control system.
Build Server and Agent
To automatically run the build, we need a computer to run the build. In reality, there are multiple processes that need to run:
-
A Build Server process to regularly monitor the version control system and detect any changes
-
A Build Agent process to run a build whenever there are changes
-
There may be multiple Build Agent processes to either run builds concurrently, or to run them on different operating systems, or to build them with different sets of dependencies
-
Typically, the Build Server conscripts one Build Agent for each build that needs to run. The Build Agents are independent of (and therefore, unaware of the existence of) other Build Agents.
In this book, we’ll use the Build Server and Build Agents provided by GitHub Actions. We will use declarative programming to indicate which Build Agents we need and what should be installed on it. This declarative style is common in CI/CD systems — like GitHub Actions — which provide cloud-based Build Agents.
If the Build Agents are independent of each other, how do they share artifacts? This is where an Artifact Repository comes in.
Artifact Repository
To share build artifacts between Build Agents, an Artifact Repository is used. In principle, an Artifact Repository is a shared file system that each Build Agent can access. Advanced features provided by an Artifact Repository may include versioning of each build artifact, seamless back-up of artifacts for recoverability, and fine-grained read/write privileges (i.e. allowing specific Build Agents or other processes read-only or read-write access, as needed).
The Artifact Repository is similar to the Version Control system insomuch as both are used to store and version files and folders. They two could even share the same underlying implementation. The key difference is in what they are used to store. The Version Control system is used to store source files that are authored and managed directly by the developers crafting the software. The Artifact Repository, in contrast, stores files generated by the act of building the software. Many of these files are binaries — executable programs, libraries, and data files. However, other generated files are not binary: API and code documentation, test results, and even source files generated during the build process. Regardless of whether the files are binary (i.e. not meant for human eyes) or human-readable, storing them in the Artifact Repository ensures they are kept separate from the source files — the fountainhead of the software system.
Tip
Transpilers are one kind of program that generate new source files, often in a different language, from given source files. The generated source code may be stylized for readability (e.g. JavaScript generated from CoffeeScript) or minimized for size or other considerations (e.g. minification of CSS or JavaScript files before loading in a web browser). https://martinfowler.com/bliki/TransparentCompilation.html
We do not need an Artifact Repository in this chapter, because we do not have any artifacts to share between different builds. However, GitHub does provide a mechanism to store build artifacts using the same code repository that stores the source code.
Deployment Environment
After a successful CI build has run in a Build Agent, the build artifacts thus generated need to be deployed into a Deployment Environment. This allows these artifacts to be tested (mostly automated tests but also people) and released to end users (mostly people but also automated systems).
The deployment of build artifacts to one or more Deployment Environment is a key step in achieving Continuous Deployment and Continuous Delivery.
In this chapter, we’ll focus on the first phase: Continuous Integration. Continuous Deployment and Continuous Delivery — deploying the packaged software in an environment and ensuring that it is delivered to the end users — are out of scope of this book.
Putting it all together
We’ll use Github Actions to add continuous integration to our project. This requires us to set up and verify a Github account, and possibly change some configuration information (e.g. 2-factor authentication and/or SSH keys). These steps aren’t directly relevant to the act of setting up a CI pipeline and more properly belong in a book on Github. The remainder of this chapter focuses on the steps to get our code working in a continuous integration pipeline.
Here are the steps to build a CI pipeline for our code.
-
Create and/or verify our Github account
-
Create a new project in Github
-
Push our code repository to Github
-
Prepare the source code for CI build scripts
-
Create a CI build script for each language (Go, Javascript, and Python)
-
Push the build scripts to Github
Create Github account
To create a CI pipeline using Github actions, we need a Github account. If you already have a Github account, great! You may skip this section.
If you don’t have a Github account, create one by visiting https://github.com. You do not need to pay anything for a free account, which is enough for our needs. (A free Github account is sufficient for many individual developers, as it allows unlimited public and private repositories and 2000 Github actions minutes per month.
Tip
Every minute (or fraction thereof) of activity using Github Actions counts towards your monthly quota, which is 2000 minutes for the free Github plan.]
All you need to create a Github account is a valid e-mail address. It’s strongly recommended that you set up two-factor authentication, which can be done in a variety of ways. See Github’s documentation for more details.
Verify Github account
Make sure you can log into your Github account. If you decide to use the SSH protocol to interact with Github, you’ll need to generate and add an SSH key. If you have other projects on Github and you regularly push and pull code to them, you probably don’t need to do much by way of verifying your Github account.
Tip
Using SSH allows you to designate specific devices — such as your development computer — as trusted by Github. This means you can forgo specifying your username and personal access token at each visit.
If you haven’t used your Github account in a while, you may want to fork a repo to verify your account is in pristine working condition. Go to https://github.com/saleem/tdd-book-code and use the “Fork” option to fork the repo. See Figure 13-2.
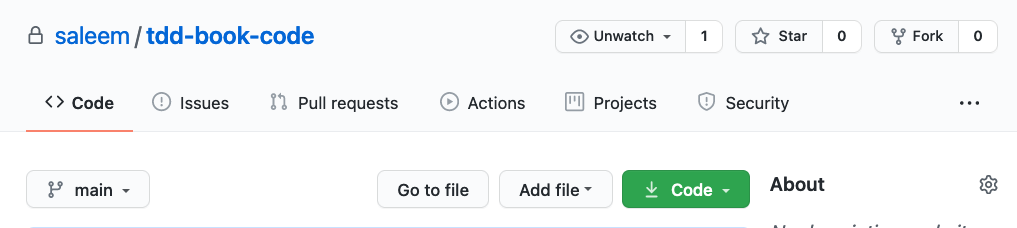
Figure 13-2. Fork a repository, like the one containing the code for this book, to verify that your Github account is working as expected.
Of course, you’ll use your hand-written (and highly cherished) code for the rest of this chapter — not the pre-fabricated and intellectually unsatisfying code you forked from this book’s Github site! The purpose of forking is to verify that your Github account is working correctly.
Push code repository to Github
Up until the end of the preceding chapter, we regularly committed our code to our local Git repository. Now is the time when wen push our code repository to Github. The conceptual difference between these two actions is shown in Figure 13-3.
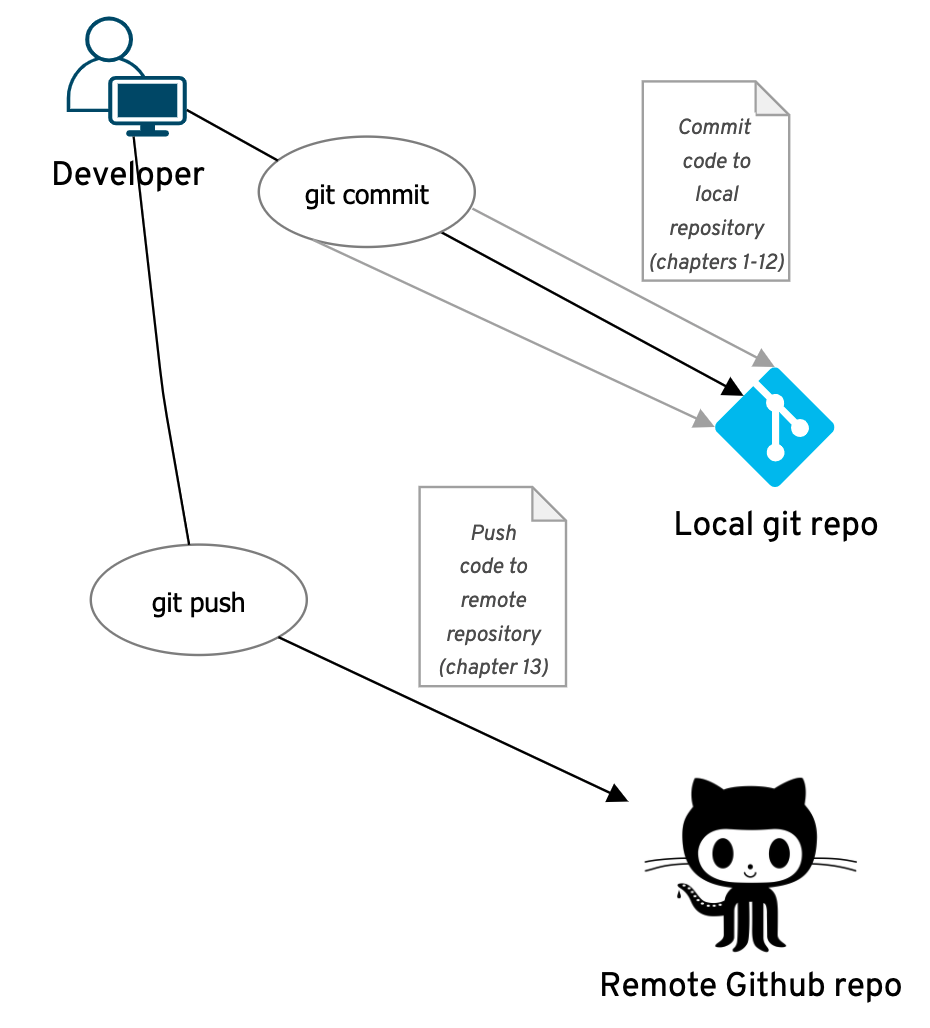
Figure 13-3. Difference between committing code to a local repository and pushing code to a remote repository.
We first create a project in Github which will house all the code in our local code repo. To do this, we click the “New Repo” button. This starts a short (two screen long) workflow to create a new repository.
Figure 13-4 shows the first screen. This is where we enter the repository name. We use tdd-book-code for the name, which is the same name as our TDD Project Root folder. This makes things easier for us to remember. We also have the choice to make the repository private, which means non one else can see it; or leave it public, which means we can collaborate on it with others. Do not select any of the options under the “Initialize this repository with” heading. We already have a repository with several files in it.
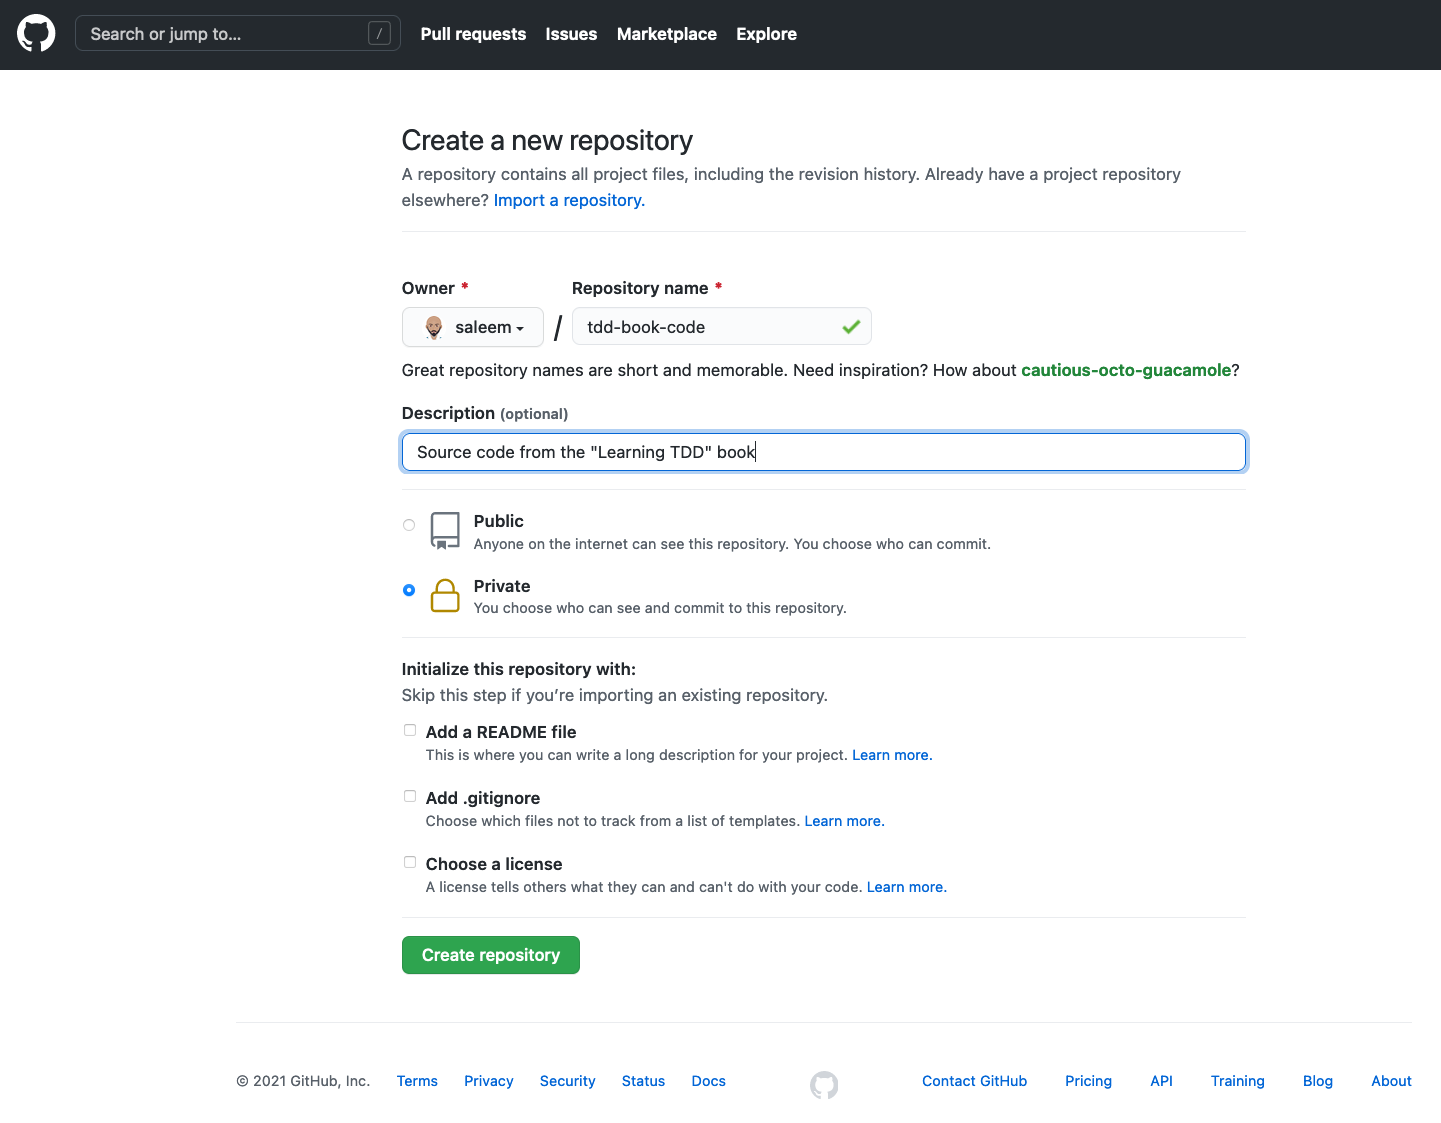
Figure 13-4. First step of creating a new repository on Github.
The second screen shows the quick setup guide. We will use the instructions under the section …or push an existing repository from the command line, as shown in Figure 13-5.

Figure 13-5. Second step of creating a new repository on Github.
The command-line instructions in this section are already configured for your Github user name — you can simply copy and paste the three lines of code verbatim. Leave the browser screen as it’s shown in Figure 13-5 and use the commands in a shell window to push your code to Github.
Figure 13-6 shows the results of the three commands for my Github repo. Notice that the first two commands silently succeed. The third command — git push -u origin main — produces some output on the screen.
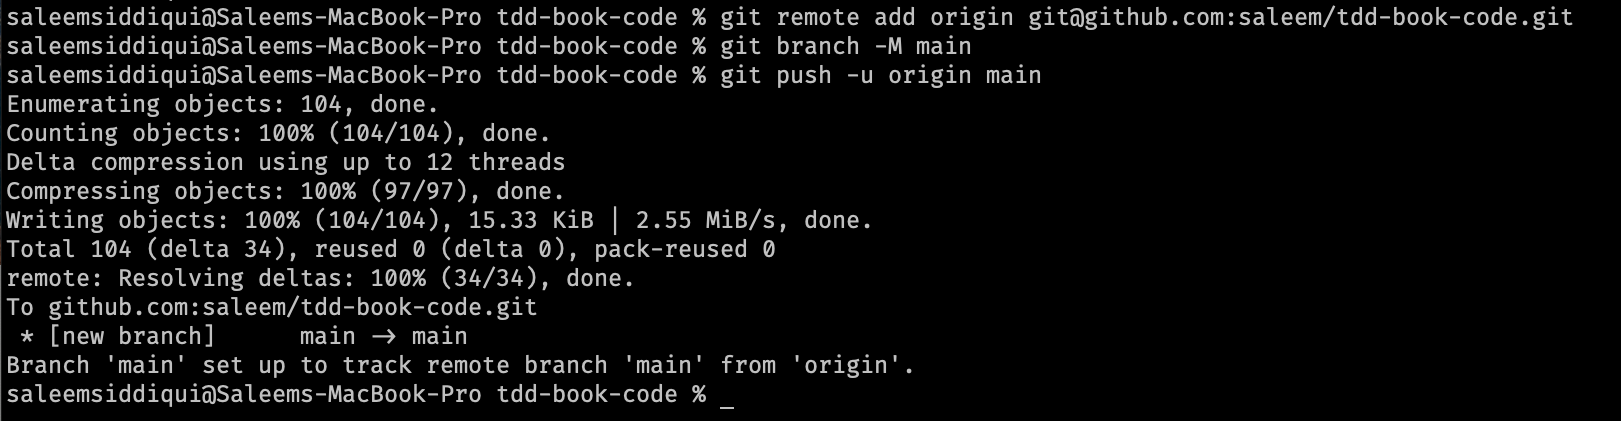
Figure 13-6. Pushing code from our local git repository to the Github repository.
After you’ve successfully pushed your code to Github, simply refresh the browser window that previously showed the commands (shown in Figure 13-5). The contents of that browser page should change, showing you the code you just pushed, as seen in Figure 13-7.

Figure 13-7. Code after it’s been pushed to the Github repository.
Voila: our code is ready to be spruced up with the awesomeness that’s continuous integration!
Prepare for CI build scripts
Our code has different folders with source code for the three languages. Here’s the complete folder structure under the TDD PROJECT ROOT folder.
tdd-book-code
├── go
│   ├── go.mod
│   ├── money_test.go
│   └── stocks
│       ├── bank.go
│       ├── money.go
│       └── portfolio.go
├── js
│   ├── bank.js
│   ├── money.js
│   ├── portfolio.js
│   └── test_money.js
└── py
    ├── bank.py
    ├── money.py
    ├── portfolio.py
    └── test_money.py
Our CI build scripts will be in a new folder, actually, a new subfolder in a new folder. It needs to be named .github/workflows. Pay attention to the . in the front! It’s imperative that this folder be created exactly as named.
Important
The continuous integration scripts using Github workflows must be in a folder named .github/workflows under the TDD PROJECT ROOT.
To create this folder all at once, type the following command in the shell, from the TDD PROJECT ROOT
mkdir -p .github/workflows
This will create both the .github folder and the workflows folder underneath it, all at once.
Our CI scripts will be in YAML format. Our YAML scripts for Go, Javascript, and Python will follow a similar structure, which is shown in the following code fragment.
name:Nameofscripton:push:branches:[main]jobs:build:name:Buildstrategy:matrix:...platform:[ubuntu-latest,macos-latest,windows-latest]runs-on:${{matrix.platform}}steps:-name:Setuplanguage-specificenvironment...-name:Checkoutcodeuses:actions/checkout@v2-name:Testrun:...shell:bash

A meaningful name for the entire script

The script runs on each
pushto themainbranch
There is only one
jobin each script, named “Build”
Uses a
matrixbuildstrategy, allowing us to build on multiple OSes and language versions
We signal our intent to use the “latest” versions of Ubuntu, macOS, and Windows OSes in the
matrix.platformvariable
The previously defined
matrix.platformvariable is used here to run the build
There will be exactly three steps in our Build job for each CI script

First step: language-specific environment configuration will be done here

Second step: this is how we’ll check out code, regardless of language

Third step: language-specific commands will
runthe tests here
We specify that the bash shell should be used for the preceding commands in the third step
Important
YAML — a recursive and defiant acronym for “YAML Ain’t Markup Language" — is a data serialization standard widely used for configuration files like our continuous integration scripts. Its official website is https://yaml.org
The script structure is dense but packs a lot of punch! Let’s analyze its various components.
The first line is the name of the script. The property name is used in many places in this script. Names can be anything we want; therefore, it’s best to name it something that will describe the purpose of the script well. We’ll name each script after the language for which it is intended.
Next we describe when the script should run. The on: {push: {branches: [ main ]}} section dictates that the script should run on every push to the main branch.3
Next we define our jobs section. There is exactly one job in each script: build. We chose “Build” as the name of this job. We choose a “matrix strategy” for our builds. A matrix strategy is a powerful feature provided by GitHub actions: it allows us to run the same build on multiple operating systems, language compilers, etc. This is immensely helpful to ensure that our code builds and runs on a variety of environments, not just the one we are currently using. If you have ever heard any rendition of the “it works on my machine” joke, you know how important this feature is!
Our matrix comprises two dimensions: operating systems and language compilers. We’ll choose the three popular families of operating systems for each language, viz Ubuntu, macOS, and Windows. The compiler dimension will vary for each language. The runs-on property ensures that our build will run on each of these three operating systems.
Figure 13-8 shows the general formulation of the matrix.
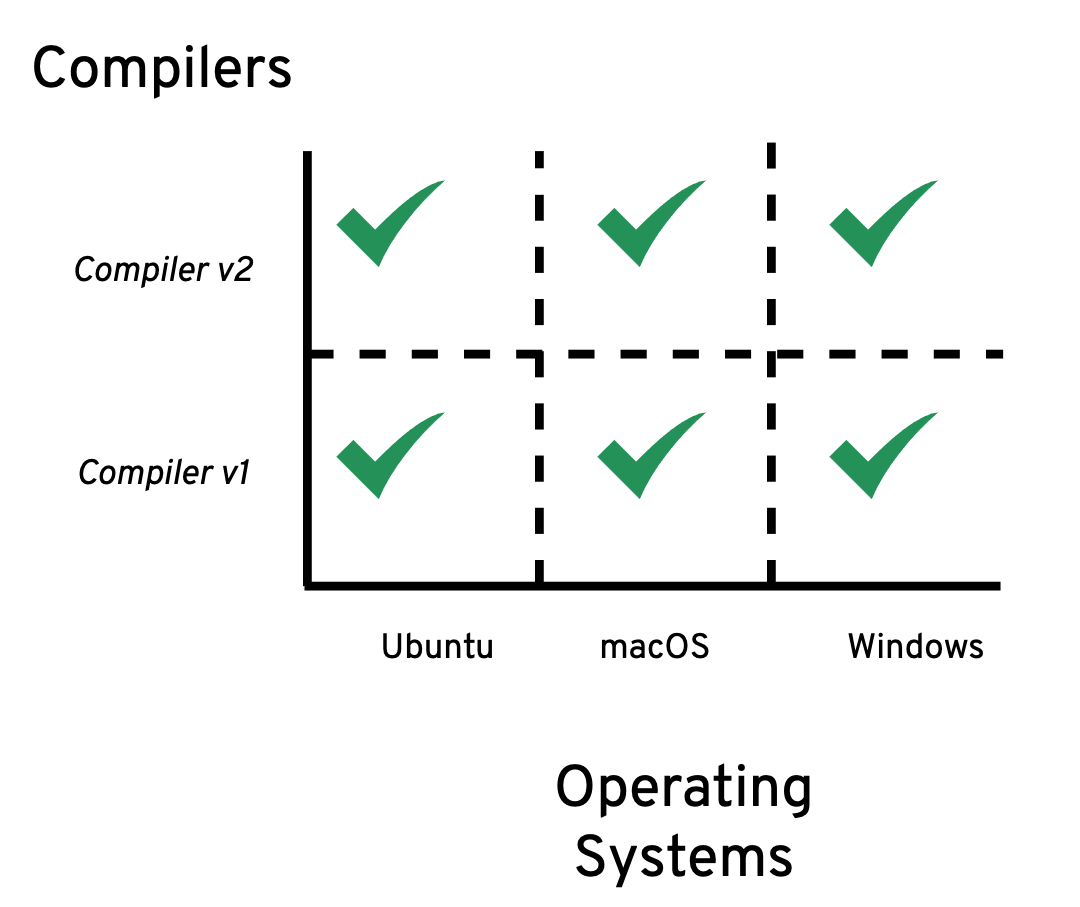
Figure 13-8. General Build Strategy Matrix.
The last section lists the steps in our Build process. Each CI script will have three steps, the first and last of which are language specific.
-
The first step will set up the build environment needed by that language.
-
The second step, checking out the code from the GitHub repository, is identical for all three build scripts. This step uses the
checkoutaction provided by GitHub Actions. -
The last step runs the tests for the specific language. This step will look familiar to us: it will include commands to run the tests for each language that we have used throughout this book.
Important
There are many readily available GitHub Actions written by an active community of developers. We’ll use several of these actions in our CI build scripts. See https://github.com/actions for details.
With this overview of the structure of CI build script and YAML behind us, let’s get to the business of writing the specific build scripts for each of our three languages.
Go
For Go, we will choose to support versions 1.15 and 1.16 of the language. Even though we have consistently used Go 1.16 to build the code in this book, it’s valuable to support two versions of the language. Go’s release history states that the two most recent major releases are supported.
For the first build step, we’ll use the setup-go action published by GitHub Actions to set up our Go environment.
For the third build step, we’ll do four different tasks:
-
Set the
GO111MODULEenvironment variable toon -
Set the
GOPATHenvironment variable to an empty string -
Switch to the
godirectory under TDD_PROJECT_ROOT -
Run our tests with the tried and tested
go test -v ./...command 4
All these tasks are familiar to us. We encountered the first two back in Chapter 0 - Introduction & Setup. The other two we’ve used throughout our work.
With these special considerations for Go understood, we create a file named go.yml in the .github/workflows folder. Here are the full contents of that file.
name:GoCIon:push:branches:[main]jobs:build:name:Buildstrategy:matrix:go-version:[1.15.x,1.16.x]platform:[ubuntu-latest,macos-latest,windows-latest]runs-on:${{matrix.platform}}steps:-name:SetupGo${{matrix.go-version}}uses:actions/setup-go@v2with:go-version:${{matrix.go-version}}-name:Checkoutcodeuses:actions/checkout@v2-name:Testrun:|export GO111MODULE="on"export GOPATH=""cd gogo test -v ./...shell:bash
Name of the Go CI script
The two versions of Go we support
We use version v2 of the pre-fabricated
setup-goactionThis refers to the
go-versionproperty defined aboveThe run tasks are run in succession using the pipe
|operatorSetting
GO111MODULEto “on”Clearing out
GOPATHby setting it to an empty stringSwitching to the
gofolderRunning all our Go tests
That’s it: our CI build script for Go is ready.
JavaScript
We have targeted our JavaScript code for Node.js versions 14 and 16. We’ll use the latest minor releases of these versions in our matrix.
For the first build step, we’ll use the setup-node action published by GitHub Actions to set up our Node.js environment.
For the third build step, we’ll use our familiar node js/test_money.js command to run all the JavaScript tests.
We create a file named js.yml in the .github/workflows folder incorporating the aforementioned configuration details. Here are the full contents of that file.
name:JavaScriptCIon:push:branches:[main]jobs:build:name:Buildstrategy:matrix:node-version:[14.x,16.x]platform:[ubuntu-latest,macos-latest,windows-latest]runs-on:${{matrix.platform}}steps:-name:SetupNode.js${{matrix.node-version}}uses:actions/setup-node@v2with:node-version:${{matrix.node-version}}-name:Checkoutcodeuses:actions/checkout@v2-name:Testrun:nodejs/test_money.jsshell:bash
Name of the JavaScript CI script
The two versions of Node.js we support
We use version v2 of the pre-fabricated
setup-nodeactionThis refers to the
node-versionproperty defined aboveRunning all our JavaScript tests
With this configuration changes saved, our CI build script for JavaScript using Node.js is ready to be used.
Python
The two most recent release of Python are 3.8 and 3.9. We’ll target the latest minor release number for both of these, i.e. 3.8.x and 3.9.x.
For the first build step, we’ll use the setup-python action published by GitHub Actions to set up our Python environment.
For the third build step, we’ll use the by-now familiar python py/test_money.py -v command to run all the Python tests.
Let’s create a file named py.yml in the .github/workflows folder with these configuration details. Here’s how that file looks in its entirety.
name:PythonCIon:push:branches:[main]jobs:build:name:Buildstrategy:matrix:python-version:[3.8.x,3.9.x]platform:[ubuntu-latest,macos-latest,windows-latest]runs-on:${{matrix.platform}}steps:-name:SetupPython${{matrix.node-version}}uses:actions/setup-python@v2with:python-version:${{matrix.python-version}}-name:Checkoutcodeuses:actions/checkout@v2-name:Testrun:pythonpy/test_money.py-vshell:bash
Name of the Python CI script
The two versions of Python we support
We use version v2 of the pre-fabricated
setup-pythonactionThis refers to the
python-versionproperty defined in <2> aboveRunning all our Python tests
Our CI script for Python is now ready to be put to use.
Committing our changes
With the continuous integration scripts written and saved in the .github/workflows folder, we can now commit them en masse to GitHub and watch them run.
gitadd.gitcommit-m"feature: continuous integration scripts using GitHub Actions"gitpush-uoriginmain
Add all the new files in the
.github/actionsfolderCommitting our changes
Push our changes to GitHub
This is where the magic happens!
Open up a web browser and go to your project on GitHub. Navigate to the “Actions” tab of your project.
Tip
You can bookmark the “Actions” tab of your project, if you like: it ends in “/actions”. For the GitHub repository accompanying this book , the Actions tab is directly accessible at https://github.com/saleem/tdd-book-code/actions.
You should see something similar to what’s shown in Figure 13-9.
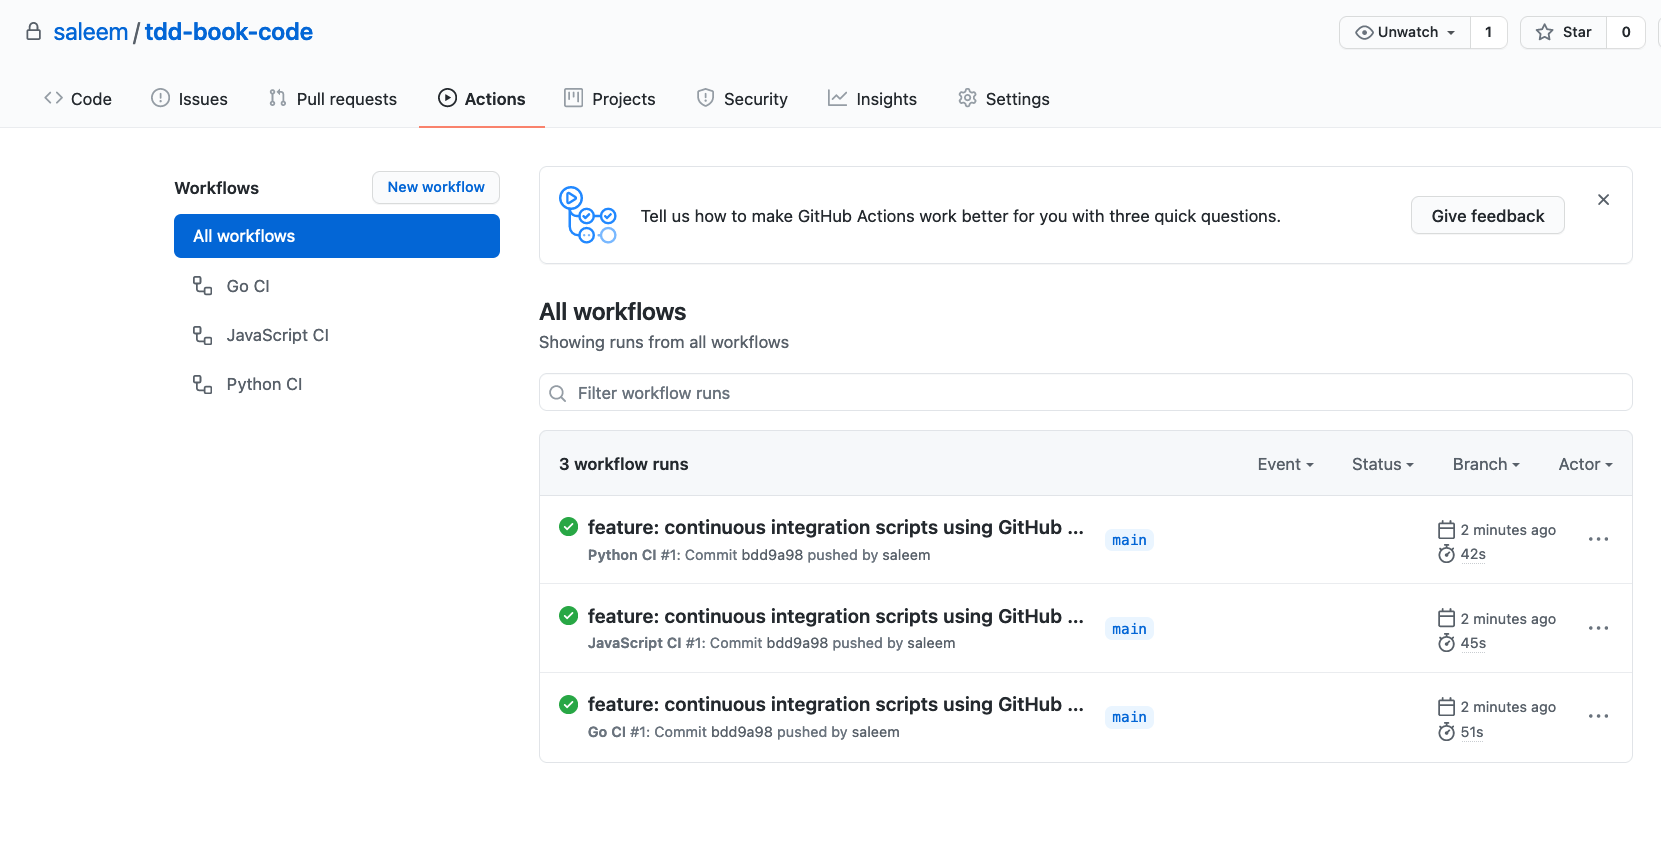
Figure 13-9. All Builds on the Actions tab in our GitHub project.
Voila! Through GitHub Actions, we have run the CI scripts for each language, and unless we made any typos in our YAML files, things should be all green. We can navigate to different builds and examine the details — the layout is self-explanatory. For example, Figure 13-10 shows what we see when we click on “Go CI” on the left and then click on the first (and currently, the only) entry in the list of commits.
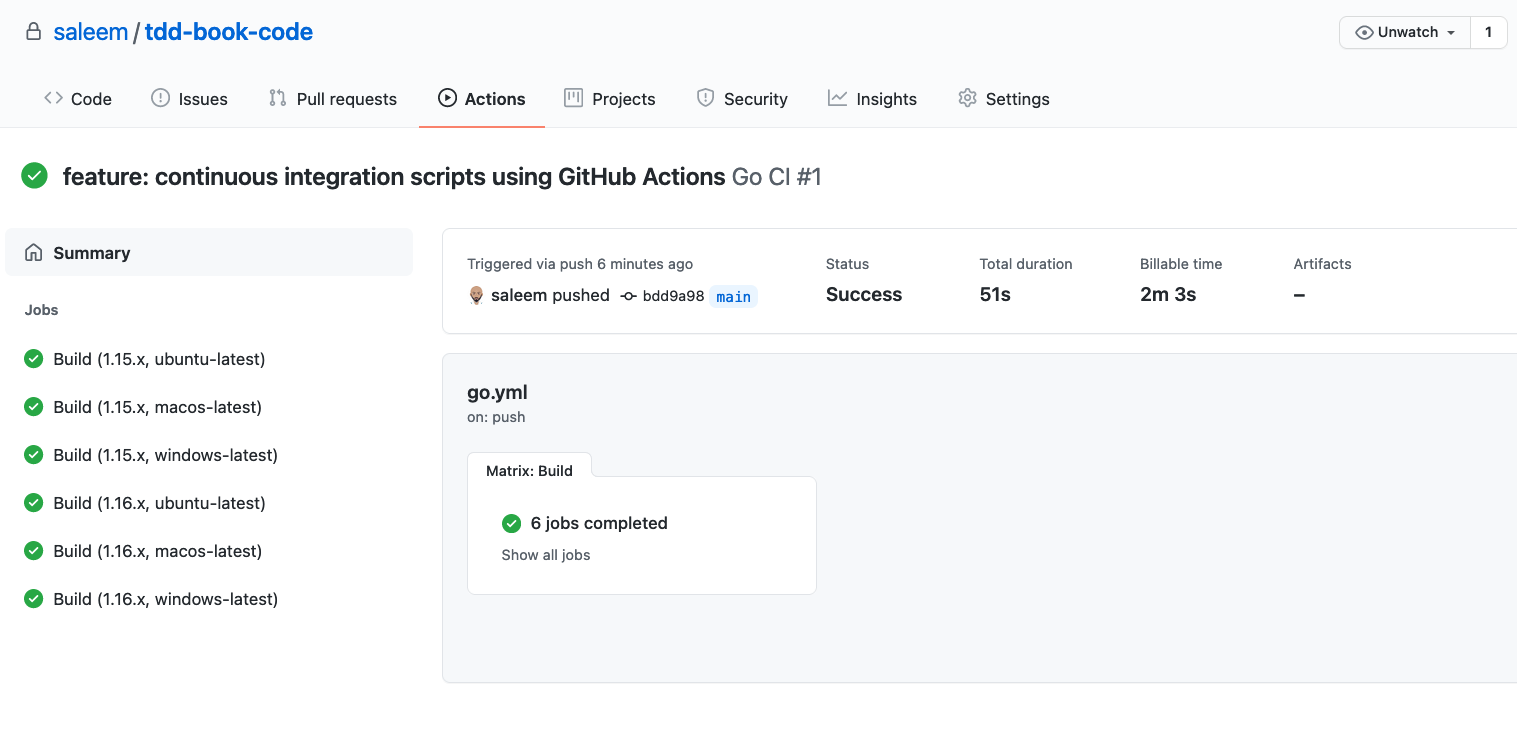
Figure 13-10. Go Builds for our GitHub project.
Notice that there are six jobs that ran from this one commit. This is because of our strategy matrix. We have tested our Go code for each version of Go (1.15 and 1.16) on each operating system (Ubuntu, Windows, and macOS).
The JavaScript builds are shown in Figure 13-11. Again, we have six different jobs, corresponding to the two versions of Node.js (14 and 16) and the three operating systems.

Figure 13-11. JavaScript Builds for our GitHub project.
The Python builds are similar, as shown in Figure 13-12. Yet again, we have six different jobs, corresponding to the two versions of Python (3.9 and 3.8) and the three operating systems.

Figure 13-12. Python Builds for our GitHub project.
Pretty comprehensive, isn’t it!
We can also drill down into the details of any of these eighteen builds to see exactly what happened at each step of any one build. That’s a lot of information. To illustrate a sample, Figure 13-13 shows some details emitted by the build that ran our Go tests using Go version 1.16 on the Windows operating system.

Figure 13-13. Details of the the Go v1.16 build on Windows OS.
What’s more: not only have we successfully built and tested all our code once, we’ve also ensured that it will be built and tested every time we push a change to the main branch of our GitHub repository. That’s continuous integration in a nutshell — and our code is better for it.
Where We Are
We’re at end of our journey of writing code to solve the “Money” problem. Chairete, nikomen!5
We have covered a lot of ground. We have written code, written tests, deleted and refined both, and added continuous integration. We deserve a collective pat on the back!
There’s something more we deserve and need: a look behind on our journey. That’s what we’ll do in Chapter 14, the final chapter.
1 Martin Fowler defines Continuous Integration as “a software development practice where members of a team integrate their work frequently, usually each person integrates at least daily - leading to multiple integrations per day.” https://martinfowler.com/articles/continuousIntegration.html
2 PAAS stands for “Platform As A Service”; this is a good primer: https://azure.microsoft.com/en-us/overview/what-is-paas/
3 The single-line representation of a YAML dictionary requires curly braces. Alternately, we can use multiple lines with indentation, as we’ll do in the actual YAML files. For a basic tutorial on YAML, see https://docs.ansible.com/ansible/latest/reference_appendices/YAMLSyntax.html.
4 Recall that the three dots in go test -v ./... are to be typed in literally; they do not represent any omitted code!
5 “Rejoice, we win!" — words made famous by Philippides after the battle of Marathon.