1
GETTING STARTED
This chapter will get you started with your BBC micro:bit. It will also set the stage for the experiments and projects you’ll find in the following chapters. I’ll give our Mad Scientist (that’s you!) some ideas about what to do with your micro:bit, and I’ll help you start programming your micro:bit. You’ll learn how to use Blocks code and MicroPython.
Mad Scientists are generally too busy and distracted to type in huge amounts of code, so all the code used in this book is available to download. This chapter explains how to get and use the code.
A TOUR OF THE MICRO:BIT
Let’s take a quick look at the micro:bit and what’s on it.
The Top
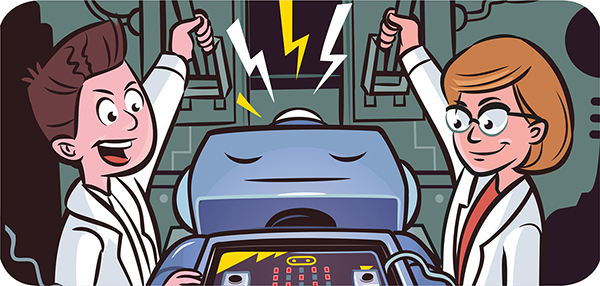
Figure 1-1 shows the top of a micro:bit.

Figure 1-1: The micro:bit
At the top of the board is a micro USB socket, which you’ll use to connect the micro:bit to a computer. You’ll write programs for your micro:bit on a computer, so you’ll have to transfer the programs to the micro:bit using a USB connection. The USB socket can also power up the micro:bit.
On the left and right are two buttons labeled A and B, respectively. We can program these buttons to trigger some action, like flashing an image on the LEDs or making a doorbell sound.
Between the two buttons is a grid of 25 LEDs arranged as 5 rows and 5 columns. This is the micro:bit’s display. Even though it has only 25 LEDs, this display can show scrolling text messages, small images, patterns—a whole load of things!
At the bottom edge of the micro:bit is a gold-plated (yes, real gold!) strip called the edge connector. This strip has five holes labeled 0, 1, 2, 3V, and GND. These large connectors allow you to connect things to the micro:bit using alligator clips. For example, you might connect a speaker to get the micro:bit to make sound or a motor to get it to move. The much smaller connectors, the slits between the holes, can be used only with a special adapter. In this book, we’ll use the large connectors for everything except the two robot projects, which require an adapter to connect to a motor controller.

The Bottom
Now let’s turn the micro:bit over and see what we have on the underside (Figure 1-2).
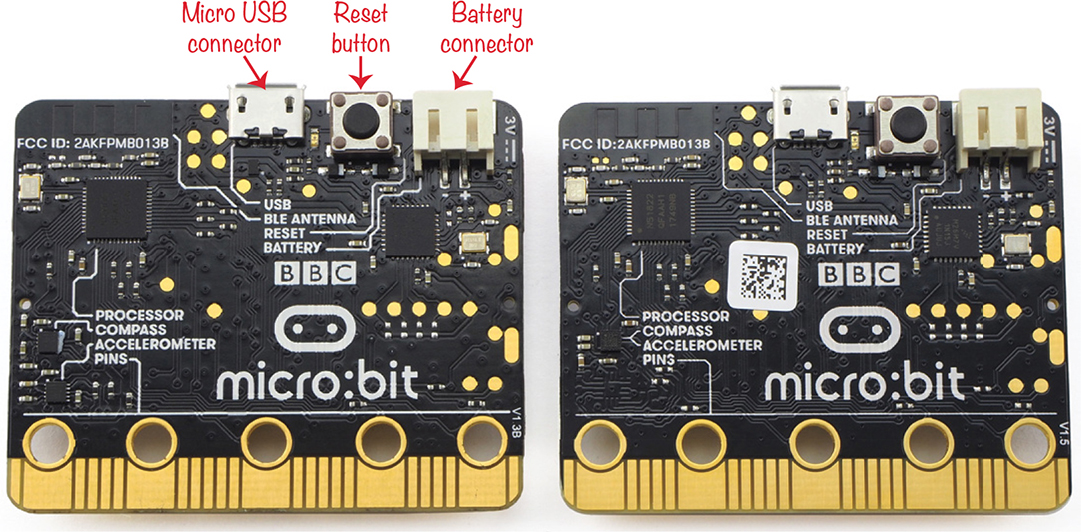
Figure 1-2: The micro:bit’s underside, version 1.3B (left) and 1.5 (right)
At the time of writing, there are two versions of the micro:bit in circulation. Both work in the same way, and it doesn’t matter which version you have for this book. The latest version (1.5) just has a slightly simplified design. You can see the difference in the bottom left of the boards shown in Figure 1-2.
The leftmost connector is the micro USB connector. Immediately to the right of that is a push switch. This is the micro:bit’s reset button. Pressing this button will cause the micro:bit to restart whatever program is installed on it. To the right of the reset button is the battery connector, which allows you to connect a 3V battery pack to your micro:bit.
Now we’ll take a closer look at each section, starting with how to power your micro:bit.
Power and the Micro:bit
You can power the micro:bit through the USB connector or with batteries, depending what you want to do with it.
Using USB
The USB connection will provide the micro:bit with 5V (5 volts) of power when you plug it into your computer. However, the micro:bit needs only 3.3V, not 5V, and too much voltage would damage the micro:bit. Therefore, it has a USB interface chip that converts this 5V to the 3.3V that the micro:bit expects.
When the micro:bit is plugged in via USB, you can use the 3V connector on the edge connector to provide power to low-current electronic devices, like external LEDs or speakers designed to work with the micro:bit.
NOTE The reason this connection is labeled 3V rather than 3.3V is partly that there isn’t much space for another number but also that protection circuitry reduces the 3.3V to a voltage close to 3V.
The connection labeled GND is the ground or 0V power connection. When you power your micro:bit, current flows out of the 3V connection, and it needs to return to the micro:bit in order to complete the circuit—the GND connection is where the current returns.
Using Batteries
Once you’ve programmed your micro:bit, you may want to move it away from your computer, in which case you’ll need batteries. You can use a AAA battery pack, like the one shown in Figure 1-3. Simply plug the ends of the battery pack wires into the 3V socket on the underside of the micro:bit.

Figure 1-3: Battery packs for the micro:bit
The appendix lists some places you can buy these battery packs. A built-in switch is useful because you can power the micro:bit down without unplugging the battery pack, a task that can be a bit tricky.
Don’t use rechargeable AAA batteries because their voltage is generally too low to power a micro:bit. These batteries can also allow dangerously high currents if the flow of electricity is accidentally short-circuited. If you want to use rechargeable batteries, one option is a USB battery backup like the one shown on the left of Figure 1-4.

Figure 1-4: Using rechargeable batteries with the micro:bit
These rechargeable batteries allow you to power your micro:bit through its USB port. The lower-capacity, cheaper backup batteries are often more suitable to power a micro:bit than are the more expensive versions. The micro:bit uses so little current that these more advanced units, which tend to turn off if they think the battery hasn’t been used in a while, can be fooled into thinking nothing is connected.
The item on the right of Figure 1-4 is the Monk Makes Charger for micro:bit. This uses a lithium polymer (LiPo) battery that automatically recharges whenever you connect the charger to your computer with a USB cable. When you want to run the micro:bit on batteries, you just unplug the USB cable to the charger.
You can find out more about the options for powering your micro:bit in the appendix.
WARNING The earliest versions of the micro:bit were susceptible to damage when used with USB batteries and power supplies. If you have any board other than a V1.3B or V1.5, you should avoid using any power supply except your computer USB port or a 3V battery pack.
The early micro:bits don’t have a version number on them. Flip your micro:bit over and look at the bottom right corner on the underside near connector 0. If it says V1.3B or V1.5, then using USB battery packs and power supplies will be fine. If you don’t see a version identifier here, don’t use these power supplies.
In either case, steer away from power supplies and USB batteries described as high power.
You can read the micro:bit Foundation’s full safety advice at https://microbit.org/guide/safety-advice/.
Connecting Electronics with Input/Output Pins
One especially fun thing about the micro:bit is that you can use the connections to attach electronic gadgetry of your own creation. In this book, you’ll build projects that use these connectors to control motors, lights, and a loudspeaker. You’ll also use them as inputs to gather data from sensors that measure light, sound, and temperature.
The 3V and GND connections are there to supply power. The connections labeled 0, 1, and 2 are usually referred to as input/output pins, and you’ll be attaching electronics to these.
NOTE You might wonder why we call them pins when they look nothing like pins. The term pin comes from the chip on the circuit board that the micro:bit connects to. The chip does have a pin—a tiny leg-like connection—for each of these three pins.
The pins 0, 1, and 2 can be used for:
![]() Digital output—turning an external LED on and off, for example
Digital output—turning an external LED on and off, for example
![]() Analog output—controlling the brightness of an LED, for example
Analog output—controlling the brightness of an LED, for example
![]() Pulse generation—to control a servo motor, for example
Pulse generation—to control a servo motor, for example
![]() Digital input—to detect when an external button has been pressed, for example
Digital input—to detect when an external button has been pressed, for example
![]() Analog input—to measure temperature using an analog temperature sensor, for example
Analog input—to measure temperature using an analog temperature sensor, for example
![]() Touch input—to detect that you have touched the pin or a wire connected to a pin
Touch input—to detect that you have touched the pin or a wire connected to a pin
Digital and Analog Inputs
When you use a pin as a digital output, you can write commands in your programs to turn the output on (set it to 3V) or turn it off (set it to 0V), but only on or off—nothing in between. This is also the case with digital inputs: they can only ever be on or off. When your program code reads a digital input, if the voltage at the input is nearer 3V than 0V, then the input counts as being on; otherwise, it’s off.
Analog inputs, however, can be somewhere between on and off. Analog inputs on a micro:bit can be any value between 0 and 1,023, depending on the voltage at the pin.
Making an Analog Signal: Pulse Width Modulation
A micro:bit, like all other electronics, can work only with digital on or off signals. To get analog signals between 0 and 3V, electronic devices simulate the analog signal by providing a rapid series of digital pulses. The longer the pulse, the more power is delivered to whatever is connected to the analog output. This is known as pulse width modulation, or PWM. Figure 1-5 shows PWM in action.

Figure 1-5: Analog outputs on the micro:bit delivering different amounts of power
If the output is connected to an LED and the pulse is at 3V only 5 percent of the time, the LED will appear to glow dimly. In contrast, if the pulse is at 3V for 90 percent of the time, the LED will appear to be at almost full brightness.
Interestingly, in both cases, the LED would actually be flashing at 50 times a second, but the human eye can’t see a light flash that quickly. Instead, we just register a relatively dim or bright light.
If the three pins 0, 1, and 2 are not enough for your project, you can use an adapter to access the many pins between the three numbered ones.
Built-In Peripherals
The writing on the underside of the micro:bit gives us some clues about other things the micro:bit can do. Two areas at the bottom left are labeled compass and accelerometer.
The compass is actually a magnetometer, meaning it measures the strength of magnetic fields. You can use it as a compass, but you can also use it to detect the presence of magnets.
The accelerometer measures forces acting on the accelerometer chip. Because gravity is a constant force pulling down on everything, you can, by measuring the forces acting in different directions, use the accelerometer to detect when the micro:bit is being tilted and by how much, as well as when it is being shaken or in free fall.
Also on the underside, you will see the words BLE Antenna. The micro:bit includes BLE (Bluetooth Low Energy) hardware that allows your micro:bit to communicate wirelessly with other micro:bits or Bluetooth-enabled phones.
Note that the technology for micro:bit-to-micro:bit communication is not actually Bluetooth; it just uses the same frequency. Chapter 10 is devoted to this feature of the micro:bit.
HARDWARE ESSENTIALS
There are a few things you’ll need for nearly all the experiments and projects in this book. They include:
Micro:bit
Micro USB cable To connect your micro:bit to a computer (Make sure this is a standard micro USB data cable and not a charging cable, which lacks the necessary connections for communication. You can’t use a charging cable to load programs onto the micro:bit.)
Alligator clip cables Ideally, these should be no longer than 4 to 5 inches to avoid getting tangled up.
3V AAA battery pack with two AAA batteries
USB power supply You’ll need this only for some projects. (See earlier warning.)
Each project or experiment will have a list of all the items you need, and the appendix at the end of the book gives more information about how to acquire these supplies.
This book tries to keep project construction straightforward and, apart from the roving robot in Chapter 6, no soldering is required. For most projects, you just need alligator clip cables to connect things together. When making connections using alligator clips, it’s best to clip the cable in vertically so the teeth of the clip look like Figure 1-6, as this makes it much less likely that the cables will come loose.

Figure 1-6: Securely attaching alligator clips
PROGRAMMING THE MICRO:BIT
Mad Scientists aren’t known for their patience, so let’s make our micro:bit do something. First, we’ll program our micro:bit.
One of the nice things about a micro:bit is that to get started with it, you just need a USB cable and a computer with a browser and internet connection. You can use a computer running on Windows, macOS, or Linux. As long as your device has a modern browser, such as Chrome, it will work fine.
We’ll first connect up the micro:bit. Then we’ll make a small program using two methods: the drag-and-drop Blocks code and MicroPython, which you need to type out.
Connecting your Micro:bit
Start by connecting your micro:bit to your computer with a micro USB cable. Nearly all micro USB cables will work fine, but remember that charging-only cables don’t have the necessary data connections and won’t work. If you have trouble programming your micro:bit using the following instructions, try using a different USB cable.
Once you connect your micro:bit, your operating system should react as if you’d just plugged in a USB flash drive. To transfer a program onto the micro:bit, find the micro:bit in your filesystem just like you’d find a flash drive or some other plug-in. Then copy a file called a hex file into the micro:bit folder icon, and, hey presto!, your program will be installed. Loading a program onto your micro:bit is also known as flashing.
Let’s make a hex file and flash it to our micro:bit.
Programming with Blocks: Hello World
You can build programs for the micro:bit through the micro:bit website without downloading any software. We’ll make a program that scrolls some text across the LED display on the micro:bit. Open your browser and navigate to https://makecode.microbit.org, and you should see a window something like Figure 1-7.

Figure 1-7: The https://makecode.microbit.org web page
This is the editor that you build programs in. On the left is an image of a micro:bit that works like a virtual micro:bit, running whatever programs you write.
The section in the middle is a list of categories such as Basic, Input, and Music. Within each of these categories, you’ll find blocks that you can drag onto the working area on the right. Each block is an instruction for your micro:bit. By dragging these blocks around and connecting them, you’ll write code using the Blocks language.
You’ll notice that when you open the editor, there are already two blocks in the editing section: on start and forever. Any blocks inside the on start block will run once when the micro:bit first powers up, when a new program is uploaded, or when the micro:bit resets because you pressed the reset button. Whatever blocks are inside the forever block will run over and over again, until you stop the program.
For our first program, we don’t need the forever block, so select it and press DELETE to remove it from your program. Next, you need to add a show string block to your program—string is programming speak for text. To do this, click the Basic category, drag the show string block into the programming area, and place it inside the on start block, as shown in Figure 1-8. If you have sound on your computer, you will hear a satisfying click as the blocks snap together.
Now click inside the text bubble and type Hello World. You can also type different text—whatever you want to see displayed.

Figure 1-8: Blocks code for displaying Hello World
As soon as you drag the show string block into place, the virtual micro:bit on the left of the display should scroll your message across its display to show you what your program does.
Now let’s transfer your program to the real micro:bit. Connect your micro:bit using a USB cable and click Download at the bottom left of the web page.

This will download the file from the editor in the same way as any other file that you might download from the internet. Where the file is saved will depend on your operating system and browser, but usually it’s in a folder called Downloads. Find this folder, click into it, and you should find a file called microbit.hex. Using the File Manager (or Finder on a Mac) select this file and drag it onto the micro:bit where it appears in your filesystem (Figure 1-9).

Figure 1-9: Dragging a file onto your micro:bit
As soon as you release your mouse button, the file should start installing itself onto the micro:bit. You’ll know this is happening because the LED on the back of the micro:bit will start blinking. When the blinking ends, the micro:bit will reset itself and run the program, scrolling the text across its display. If you miss seeing the message, press the reset button on the back of the micro:bit to see it again.
Adding Graphics
To display our message, we added a show string block to the on start block. The on start block is a special type of block called an event block that runs the code connected to it whenever a particular event happens. In this case, the event is the start of the program.
Let’s make our program a bit more complicated by adding a new event that will detect when button A is pressed. To do this, click the Input category and drag an on button A pressed block into the program area. Next, drag a show leds block from the Basic category into the on button A pressed block. The squares in the show leds block represent each LED in the LED display. You can select which LEDs should light up by clicking them so they turn white. The result should look something like Figure 1-10.

Figure 1-10: Adding an LED pattern to the program
The show icon block has a number of ready-made LED images if you want to choose one of those. Click Download again and copy the new hex file onto your micro:bit. Once the new program has been uploaded, you can test it by pressing button A. When you do so, the selected LEDs in the show leds block should light up on your micro:bit, as in Figure 1-11.
Figure 1-11: Displaying an LED pattern on an actual micro:bit
Saving and Sharing
The https://makecode.microbit.org website remembers all your projects. Give your project a name by entering the name in the Save area next to the Download button, and your project will be saved. Whenever you change your program, it should automatically save, but to make sure, you can save manually by clicking the floppy-disk Save icon. Note that when you click Save, the hex file will also be downloaded, but you can just click Cancel if you’re not ready to flash the program onto your micro:bit.
Note that your stored programs are actually kept in your browser cache, so if you delete your cache, you will lose your programs.
To switch between programs and start new ones, click Home at the top of the page.
To publish a program so others can see it, click Share next to Projects. This will ask you to confirm that you wish to publish your project. Click Share again, and you’ll see a link like the one in Figure 1-12.

Figure 1-12: Sharing a project
You can give that URL to anyone, and when they put it in their browser, they’ll get a copy of your program to use. Note that because this is just a copy of your program, there’s no risk that they’ll spoil your original copy of the code.
Finding Blocks
The show string and show leds blocks we’ve used so far were pretty easy to find, but the Blocks editor contains a lot of blocks, and it keeps the ones you don’t use as often hidden. This way, you don’t see a confusing array of choices when you start out on your micro:bit adventure.
These blocks are hidden in two ways. First, you may have noticed that when you select one of the block categories, such as Basic, an item labeled . . . more appears (see Figure 1-13).

Figure 1-13: Extra blocks in the more section
In the case of the Basic category, the more section contains blocks such as clear screen and show arrow. If you click through the other categories, you’ll see that they all have a more section, some with quite a few extra blocks.
Incidentally, hovering your mouse over a block will open a little information box telling you what the block does. Investing a little time in getting familiar with the various blocks will give you exciting ideas about what you can to do with your micro:bit.
The second place to find hidden blocks is in the Advanced category, just after Math (Figure 1-14). Selecting this category will reveal a host of other categories containing more advanced features of the Blocks language, starting with Functions. Again, spend a little time familiarizing yourself with the blocks. Don’t worry if it’s not obvious what some of them do. If you’re interested in a block that does a particular thing, you may find the search field useful for finding the block you want.

Figure 1-14: The Advanced blocks category
The categories in the Advanced section that you’ll use frequently are Text and Pins. In some chapters, you’ll also be using Functions and Arrays.
Programming with MicroPython: Hello World
Blocks code is great for getting started with programming, because you can accomplish some really impressive things with just a few blocks. However, many people prefer writing a program in text rather than dragging blocks around. Typing lines of text is also more like regular programming.
MicroPython is an implementation of the Python 3 programming language that includes everything you need to program your micro:bit with Python. In fact, many of the blocks in Blocks code have direct equivalents in MicroPython, so switching from programming in Blocks to MicroPython is fairly straightforward. Python is a popular first programming language and is often taught in schools for that reason.
Downloading the MicroPython Editor
We’ll use the Mu editor app (https://codewith.mu), which has lots of features. It can be downloaded straight onto your computer. Mu also lets you flash your program directly to a micro:bit without having to drag the hex file around. The nice thing about Mu is that you don’t need internet access to flash the program once Mu has been downloaded.
Download Mu from https://codewith.mu/#download. There are several versions of Mu, so it’s important that you get the right one for your computer. The download page will offer you different versions for different operating systems. If you’re a Windows user, download the version under Windows Installer that’s labeled 64-bit (Figure 1-15). If you’re a macOS user, there’s just one version.

Figure 1-15: Downloading Mu
Run the installer and accept the license agreement and all the default options.
The first time you run Mu, it will offer you a choice of modes. Make sure to select the BBC micro:bit mode (Figure 1-16).

Figure 1-16: Selecting the right version of Mu
Mu will present you with a blank editor window where you’ll type your first program.
Writing the Program
Let’s give Mu a go! Add the following code in the Mu window:
display.scroll("Hello World")
It should look something like Figure 1-17.
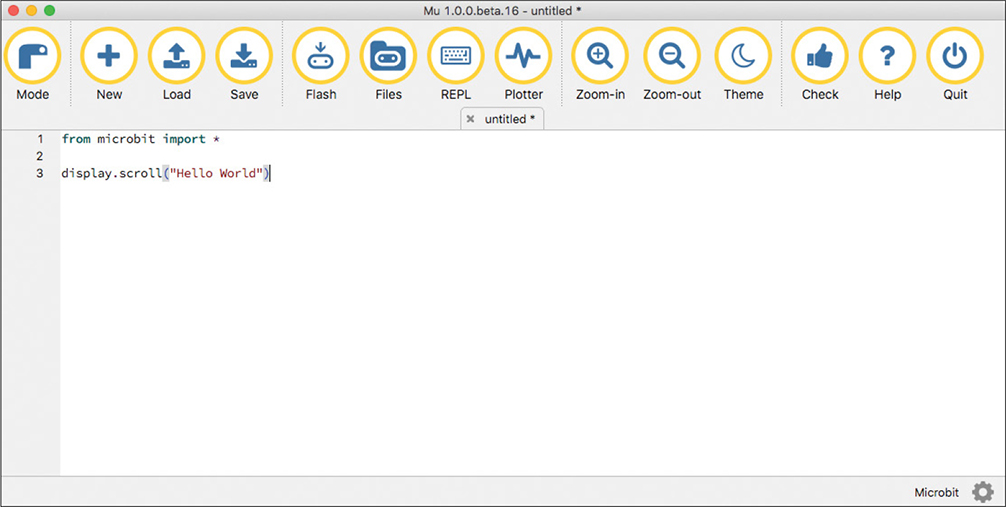
Figure 1-17: Writing a MicroPython program in Mu
Save the program by clicking Save at the top of the Mu window. You’ll be prompted to enter a name for your program: call it hello.py.
Now, with your micro:bit connected to your computer, click Flash at the top of the Mu window. This should start the process of loading the hex file to the micro:bit, just as though you were dragging over a file produced by the Blocks editor. Once the flashing is complete, the Hello World message should scroll across the display.
Let’s take a closer look at the code. Here’s the first line:
You’ll find this line at the start of pretty much every MicroPython micro:bit program, because this is what tells MicroPython to include all the built-in code that makes it compatible with the micro:bit’s display and other hardware. This code isn’t automatically included because MicroPython can be used on a lot of different boards, not just the micro:bit. The line actually means: from the microbit library, import everything (* means everything). You could also enter import microbit, but then you’d have to prefix everything with microbit, which is a lot of extra typing.
The only other line of code in our minimal program displays a message on the display:
This line uses the command display.scroll, which tells the micro:bit to scroll something across its display. Then you add a set of parentheses, inside of which we have some text enclosed in quotation marks. You use parentheses to add extra information to a command. In this case, the extra information (also called an argument) is the text you want to display. You also have to enclose the text in double quotes to show that the program should treat it as text, not as more programming commands.
If, when you flash the program onto a micro:bit, you see something other than Hello World (or nothing at all), you probably have an error in your code. When using a text-based programming language, you have to be precise in what you type. For example, misspelling a word such as display or scroll will cause an error when you run the program. Errors in programming are called bugs. Bugs only show up when the program tries to run on the micro:bit. If you get any bugs, you can carefully compare the code you wrote to the code in the book to make sure it all matches. But there’s another way to find and fix bugs—you can use the REPL.
The REPL
The REPL (Read-Eval-Print-Loop) is a command line interface to MicroPython on the micro:bit—that is, it’s an area that lets you send Python commands directly to the micro:bit, without having to put them into a program first. If you entered the line 1 + 2 here, the REPL would respond with 3. Similarly, if MicroPython encounters a problem when it tries to run, it can report this problem to you in the REPL without you having to wait for the micro:bit to try to display something.
To experiment with the REPL, let’s deliberately introduce an error into our program by misspelling scroll so that it only has one l. Delete an l and click Flash again. The program will upload despite being faulty, but this time, the micro:bit display will say: AttributeError: 'MicroBitDisplay' object has no attribute 'scrol'. It takes a long time to scroll out this message, so to get a clearer view of it, click the REPL button at the top of the Mu window and then click the reset button on the back of your micro:bit. You should then see the error message in full in the REPL (bottom of Figure 1-18).

Figure 1-18: Catching errors using the REPL in Mu
The >>> prompt in the REPL indicates that you can type Python commands here to run immediately on the micro:bit. Try typing the following after the >>> prompt and hitting ENTER at the end of the line (this time spell scroll correctly):
Your micro:bit’s display should immediately scroll out the message, without your needing to upload a program. You don’t need to repeat the import command, because MicroPython has already executed import—it did so before it encountered the misspelled scroll.
NOTE When you were typing in your Hello World program, you may have noticed Mu trying to help by guessing what you were typing. For example, if you type display and then pause, a list of options (clear, get_pixel, is_on, off, on, scroll, set_pixel, and show) will appear. You can click on the one you want to save yourself some typing.
Adding Graphics
Let’s now add some graphics to the program, just like we did with the Blocks code. We again need to detect when button A has been pressed and then display the graphics pattern. This is a little trickier in MicroPython because this language doesn’t have the same concept of events that you find in the Blocks code. Instead, we have to write a loop that repeats the commands contained within it until told to stop. In our program, these commands will check for a button press and, if that event has happened, perform the necessary action. In other words, rather than being told that button A has been pressed, the program has to keep checking whether it’s been pressed. Here is the code:
display.scroll("Hello World")
while True:
if button_a.was_pressed():
display.show(Image.CHESSBOARD)
The while True line of code marks the start of the loop that will continue until something stops it, like you unplugging your micro:bit or pressing the reset button or CTRL-C at the REPL. Whenever you make a loop, make sure to indent any lines of code that should run in that loop. Luckily, Mu recognizes when you have started a loop and helpfully indents the next line for you.
The first line within the loop is an if statement. This uses the button_a.was_pressed function to check whether the button has been pressed since last time was_pressed was used. If it has, then the lines indented below the if statement will be run. You’ll notice that the next line is indented even more, which means this line should only run if the if line is true (so if the button was indeed pressed). In this case, this line of code tells the display to show a ready-made graphic that belongs to the Image library. I’ve chosen the CHESSBOARD image. We’ll talk about if commands more later in “if Blocks” on page 29.
In Python, indentation is very important, and remembering to indent can be a big cause of frustration when first learning the language. Lines that are indented within, for example, a while or an if command must be indented by exactly the same amount. In Mu, this is four spaces. As you practice coding in Python, knowing when to indent will become easier and easier.
PROGRAMMING CONCEPTS
Here we’ll go over some key ideas in programming that are worth understanding, particularly when you want to modify some project code or start making your own projects. These ideas are the same whether you’re using the Blocks editor or MicroPython, so we’ll cover how to execute each concept both ways, first in Blocks code and then in the MicroPython equivalent.
Variables
A variable is a name associated with a value or multiple values. When you want to use the value, you can call the name in your code. Let’s illustrate this idea with some examples.
The Blocks Code
One of the main categories in the Blocks editor is Variables. Start a new project by clicking New Project from the Blocks editor’s home page. Delete the forever block (we don’t need it) and then from the Variable category, click Make a Variable.... When prompted for a new variable name, enter counter. Drag the set counter to 0 block into the programming area and click it onto the on start block.
Next, from the Input category, add an on button A pressed block. Inside this block, add a change counter by 1 block from the Variables category and then a show number block from the Basic category. Finally, from the Variables category, drag out a counter block and click it into the 0 in the show number block to replace the 0.
Once you’ve done this programming, your code should look like the following.

You can try out this program in the virtual micro:bit on the left of the editor by clicking button A. You should see the number displayed increase by 1.
Let’s have a look at what’s going on here. In the on start block, you make a variable called counter and give it an initial value of 0. When the on button A pressed block is activated, the change block changes the value of the counter variable by adding 1 and then shows the value of the counter variable on the display.
In this case, our counter variable contains a number, but we can also set variables to hold text and even collections of data.
The MicroPython Code
The MicroPython version of the program we just wrote looks like this:
counter = 0
while True:
if button_a.was_pressed():
counter += 1
display.scroll(str(counter))
We import the usual micro:bit library, and then make a counter variable and give it an initial value of 0. We make a while loop that ensures that if button A is pressed, 1 is added to counter. To add 1, we use +=, which is equivalent to the change counter block.
When we want to display the new value, we have to convert the numeric value into a text string with str(counter), because the display command works only with strings.
Note that it’s perfectly okay to use one command inside another. So here, we use the str command inside the display.scroll command by putting it inside parentheses. When you do this, the innermost command (str in this case) is run first and supplies a value to the next command (in this case display.scroll).
Arithmetic
In the previous example, you saw how we could add a number to a variable. As well as addition, we can use all the usual arithmetic options in programs, including subtraction, multiplication, and division.
The Blocks Code
Say we wanted to keep doubling a number instead of counting by ones. We could alter the previous program so that the starting number for counter is 1 and the on button A pressed block multiplies counter by 2, as shown here.

Now, instead of using a change counter by 1 block, we use a set counter to block and, inside that, use a multiply block (×). In the first part of the multiply block, we place the variable counter, and in the second part, we put the number 2. Now every time button A is pressed, counter is given the value of 2 times its old value.
When we use blocks, math like this rapidly becomes quite complicated, as we need to nest blocks inside of blocks inside of other blocks. If we have a program that needs to do a lot of arithmetic, it may be better to code the project using MicroPython.
The MicroPython Code
In MicroPython, we use arithmetic symbols such as +, -, * (multiply by), and / (divide). You can also use brackets to change the order of the math operations, as you do in math class. Here’s how we would rewrite the doubling Blocks program we just made:
counter = 1
while True:
if button_a.was_pressed():
counter = counter * 2
display.scroll(str(counter))
The key line here is counter = counter * 2. The = symbol after the variable name means that whatever follows the equal sign will be assigned to the variable as its new value. In this case, that’s counter * 2 (counter times 2). You could also use the shorthand form counter *= 2, just as we did earlier when doing addition.
if Blocks
Programs can be thought of as a series of steps that the micro:bit will carry out. Sometimes you’ll need your program to make decisions and execute particular steps based on those decisions. The blocks in the Logic category allow your programs to make decisions.
We’ll make a variation of our counting-by-1 example that counts up to 10 and then goes back to 0 to start the counting process over.
The Blocks Code
Try making the following Blocks program.

First, we add an if block after the change counter by 1 block. Onto the if block, we drop a comparison block that compares the value of counter to 10. If the counter value is greater than (>) 10, the program runs the blocks inside the if block. In this case, the if block contains a single block that sets counter back to 0. If counter is not greater than 10, then it continues to show the number on the display.
There are other variants of the if block that let you carry out one action if a condition is true and another action if the condition is false. You’ll learn more about these in later chapters.
The MicroPython Code
We’ve already used if in MicroPython when we checked whether a button had been pressed. Here, we’re not just using it to see whether a condition is true or false. Instead, we’re comparing the variable counter to the value 10. The MicroPython version of the Blocks code looks like this:
counter = 0
while True:
if button_a.was_pressed():
counter += 1
if counter > 10:
counter = 0
display.scroll(str(counter))
Take a good look at the indentation of this program: we have an if inside another if, which is itself inside a while. See if you can figure out how this code works, using the explanation of the Blocks version as a guide.
Strings
Remember that a string is a series of characters (numbers, letters, or punctuation), often a word. You used a string in your very first Hello World program in Figure 1-8 to display the message Hello World.
The Blocks Code
Most of the blocks for strings can be found in the Text category. The simplest of these is a block with a pair of quotes and a gap where you can add your own text to make a string. You can use this block to assign a string, rather than a number, to a variable. Here we set the message variable to a string. This program will display the string’s length.

We use an on start block, inside which we set the value of the variable message to some text. In the show number block, you can see a length of block and, inside that, the message variable. The length of block supplies the number of characters in the string message to show number, which then scrolls that number across the display.
The Text category has other blocks that let you do things, like join together two strings, chop out a section of a string, and convert a string into a number.
The MicroPython Code
In MicroPython, string values are distinguished from other program code by being enclosed in double quotes, just as in Blocks code. We would write the previous Blocks program like this in MicroPython:
message = "This text is in a variable."
while True:
display.scroll(str(len(message)))
This works in the same way as the Blocks code. Notice that we use the str command to convert the length of the string len into a string itself so that it can be displayed.
Arrays and Lists
So far, we’ve used variables that contain just a single piece of data, whether that’s a number or string. But sometimes you need to keep a collection of values in a variable, often to access each value in turn, like a sequence of notes that make up a tune (as you’ll see in Chapter 2).
In Blocks code, a collection of values is called an array, and in MicroPython, it’s called a list. The idea is the same for both, however.
The Blocks Code
The Blocks editor has an Array category that contains array-related blocks. The most important are set list to, set text list to, and get value at. The first two allow you to create a list containing numbers or strings, respectively, and get value at lets you access a particular element of an array.
The following small program creates a variable called colors and assigns it to an array of four strings. Then it picks a random item from that array to display. Note that the array of block has + and - buttons that allow you to adjust the number of items in the array when you create it.

We add an on button A pressed block. Inside it, we add a show string block, inside which we add a get value at block. We then add pick random (found in the Math category) to choose any number from 0 to 3. Altogether, this means that when button A is pressed, the pick random block selects a random number between 0 and 3 and fetches the array element at that position, and then the show string block displays that element. Note that in both Blocks and MicroPython programming, array numbering starts at 0 rather than 1, so if the number 0 is randomly chosen, the first element of the array will be displayed.
The MicroPython Code
This is how you would write the previous Blocks program in MicroPython:
import random
numbers = ["orange", "yellow", "green", "blue"]
while True:
if button_a.was_pressed():
display.scroll(numbers[random.randint(0, 3)])
In MicroPython, we use square brackets, [ and ], to enclose the elements of a list, and we separate the list elements with commas. We also use square brackets to access a particular element of a list using its position. In this case, the random.randint command, which returns a number between 0 and 3, is enclosed within the square brackets.
Programming Wrap-Up
This has been a very quick introduction to programming the micro:bit. All the code for this book is available for download, so you don’t have to master programming before you start doing experiments and making projects. As you progress through this book, you’ll be introduced to new blocks and MicroPython language features, which I’ll explain as they come up.
For more information on MicroPython for the micro:bit, see https://microbit-micropython.readthedocs.io. If you’re new to Python, you might find my book Programming micro:bit: Getting Started with MicroPython (McGraw-Hill, 2018) a useful accompaniment to this book.
DOWNLOADING THE CODE
Some of the programs in this book are long and complex, and typing them out might not be something that a Mad Scientist such as yourself is eager to do. If you don’t want to make the programs yourself, you can just download them and flash them to your micro:bit.
Downloading the Blocks Code
All the Blocks code is published on GitHub at https://github.com/simonmonk/mbms/. When you click a link for the Blocks code, the project will open in your browser.
Scroll down the GitHub page until you will see something like Figure 1-19. You’re looking for a list of links to all the Blocks code programs.

Figure 1-19: Links to the Blocks code for all the programs in this book
To open one of the programs, just click the link. For example, Figure 1-20 shows the result of clicking the link for the musical doorbell project.
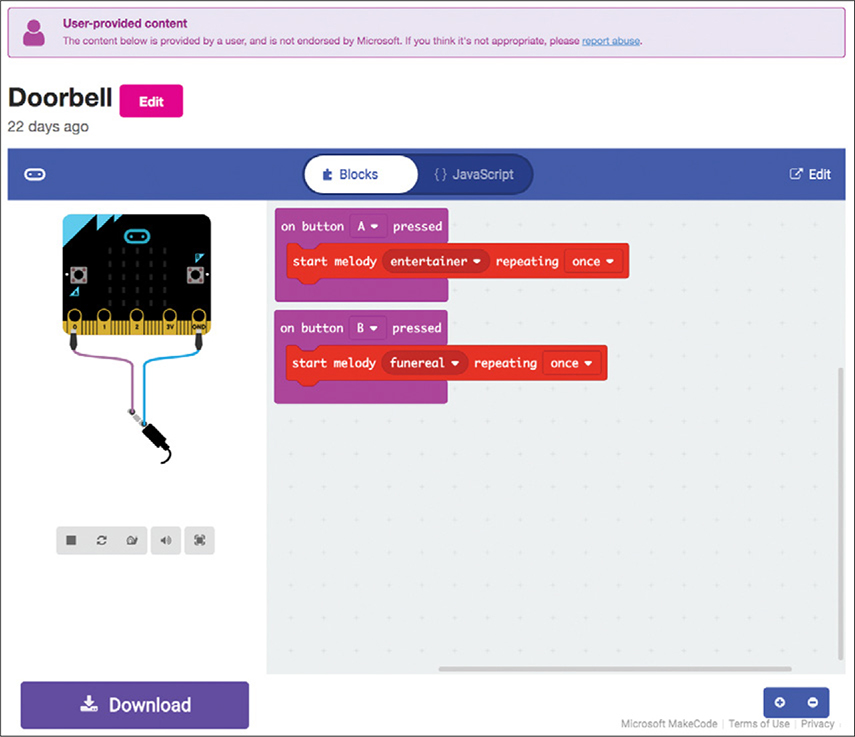
Figure 1-20: Following a link to the Blocks code for the musical doorbell project
You’ll notice that Figure 1-20 does not look like the normal Blocks editor window. That’s because you’re to just view the code here and flash it onto your micro:bit to use. If you want to edit the code, or just see the code in its more familiar editor, click the Edit button at the top right. This will make a copy of the original program for you, and then you’ll be able to edit this copy.
Downloading the MicroPython Code
You can download the MicroPython programs from https://github.com/simonmonk/mbms/.
If you’re used to using the Git software, you can clone the entire project onto your computer. For non-Git-experts, here’s a step-by-step guide for getting all the code.
- Visit https://github.com/simonmonk/mbms/ and then click the green Clone or download button and select Download ZIP, as shown in Figure 1-21.

Figure 1-21: Downloading the code for this book
- Find the ZIP file you just downloaded (mbms-master.zip) in your downloads folder and extract all the files from it.
The process of extracting the files will vary, depending on whether you use Windows, macOS, or Linux. On macOS and most Linux distributions, a ZIP file will automatically extract when you open it. If you’re a Windows user, be aware that while Windows will let you look inside the ZIP file without extracting it into separate files, you won’t be able to use the files unless you extract them. To extract the files in Windows, right-click the archive file in File Explorer and select the option Extract All (Figure 1-22).

Figure 1-22: Extracting the ZIP archive file in Windows
The extracted files will be contained in a directory called mbms-master. Within this directory, you’ll find another directory called python, and within this, you’ll find all the MicroPython programs for the book as separate files, each with the file extension .py.
- Unfortunately, you can’t just double-click a program to open it in Mu. To open a program, first open Mu and go to Load. Then find the MicroPython program you want to open. As a shortcut, I suggest you move all the MicroPython programs from the python folder that you just downloaded into the folder where Mu normally expects to find its programs. By default, this is a directory within your home directory called mu_code. Now when you click the Load button in Mu, you’ll see all the MicroPython programs straight away.
SUMMARY
Now that we’ve looked at some of the basics of the micro:bit, it’s time to get started with some proper Mad Scientist experimentation and project work. We’ll begin with making and detecting sounds using a micro:bit.