5
Working with Functions
In this chapter you will
- Create your own functions
- Learn to make decisions with
whileanddo-while - Send and receive data between your Arduino and the Serial Monitor window
- Learn about
longvariables
You can make your Arduino sketches easier to read and simpler to design by creating your own functions. You can also create modular code that you can reuse in subsequent projects. In addition to these topics, this chapter will introduce a way to have the Arduino make decisions that control blocks of code, and you’ll learn about a type of integer variable called the long. You’ll also use your own functions to create a new type of thermometer.
A function consists of a set of instructions, packaged as a unit and given a name, that we can use anywhere in our sketches. Although many functions are already available in the Arduino language, sometimes you won’t find one to suit your specific needs—or you may need to run part of a sketch repeatedly to make a function work, which is a waste of memory. In both of these situations, you might wish you had a better function to do what you need to do. The good news is that there is such a function—the one you create yourself.
Project #9: Creating a Function to Repeat an Action
You can write simple functions to repeat actions on demand. For example, the following function will turn the built-in LED on (at 1 and 3) and off (at 2 and 4) twice:
void blinkLED()
{
1     digitalWrite(13, HIGH);
    delay(1000);
2     digitalWrite(13, LOW);
    delay(1000);
3     digitalWrite(13, HIGH);
    delay(1000);
4     digitalWrite(13, LOW);
    delay(1000);
}
Here is the function being used within a complete sketch, which you can upload to the Arduino:
// Project 9 - Creating a Function to Repeat an Action

#define LED 13
#define del 200

void setup()
{
  pinMode(LED, OUTPUT);
}

void blinkLED()
{
  digitalWrite(LED, HIGH);
  delay(del);
  digitalWrite(LED, LOW);
  delay(del);
  digitalWrite(LED, HIGH);
  delay(del);
  digitalWrite(LED, LOW);
  delay(del);
}

void loop()
{
1   blinkLED();
  delay(1000);
}
When the blinkLED() function is called in void loop() at 1, the Arduino will run the commands within the void blinkLED() section. In other words, you have created your own function and used it when necessary.
Project #10: Creating a Function to Set the Number of Blinks
The function we just created is pretty limited. What if we want to set the number of blinks and the delay? No problem—we can create a function that lets us change values, like this:
void blinkLED(int cycles, int del)
{
  for ( int z = 0 ; z < cycles ; z++ )
  {
    digitalWrite(LED, HIGH);
    delay(del);
    digitalWrite(LED, LOW);
    delay(del);
  }
}
Our new void blinkLED() function accepts two integer values: cycles (the number of times we want to blink the LED) and del (the delay time between turning the LED on and off). So if we wanted to blink the LED 12 times with a 100-millisecond delay, then we would use blinkLED(12, 100). Enter the following sketch into the IDE to experiment with this function:
// Project 10 - Creating a Function to Set the Number of Blinks

#define LED 13

void setup()
{
  pinMode(LED, OUTPUT);
}

void blinkLED(int cycles, int del)
{
  for ( int z = 0 ; z < cycles ; z++ )
  {
    digitalWrite(LED, HIGH);
    delay(del);
    digitalWrite(LED, LOW);
    delay(del);
  }
}

void loop()
{
1   blinkLED(12, 100);
  delay(1000);
}
You can see at 1 that the values 12 and 100—for the number of blinks and the delay, respectively—are passed into our custom function blinkLED(). Therefore, the LED will blink 12 times with a delay of 100 milliseconds between blinks. The display then pauses for 1,000 milliseconds, or 1 second, before the loop() function starts all over again.
Creating a Function to Return a Value
In addition to creating functions that accept values entered as parameters (as void blinkLED() did in Project 10), you can create functions that return a value, in the same way that analogRead() returns a value between 0 and 1,023 when measuring an analog input, as demonstrated in Project 8 (see page 91 in Chapter 4).
Up until now, all the functions we’ve seen have started with the word void. This tells the Arduino that the function returns nothing, just an empty void. But we can create functions that return any type of value we want. For example, if we wanted a function to return an integer value, we would create it using int. If we wanted it to return a floating point value, it would begin with float. Let’s create some useful functions that return actual values.
Consider this function that converts degrees Celsius to Fahrenheit:
float convertTemp(float celsius)
{
  float fahrenheit = 0;
  fahrenheit = (1.8 * celsius) + 32;
  return fahrenheit;
}
In the first line, we define the function name (convertTemp), its return value type (float), and any variables that we might want to pass into the function (float celsius). To use this function, we send it an existing value. For example, if we wanted to convert 40 degrees Celsius to Fahrenheit and store the result in a float variable called tempf, we would call convertTemp() like so:
float tempf = convertTemp(40);This would place 40 into the convertTemp() variable celsius and use it in the calculation fahrenheit() = (1.8 * celsius) + 32 in the convertTemp() function. The result is then returned into the variable tempf with the convertTemp() line return fahrenheit;.
Project #11: Creating a Quick-Read Thermometer That Blinks the Temperature
Now that you know how to create custom functions, we’ll make a quick-read thermometer using the TMP36 temperature sensor from Chapter 4 and the Arduino’s built-in LED. If the temperature is below 20 degrees Celsius, the LED will blink twice and then pause; if the temperature falls between 20 and 26 degrees, the LED will blink four times and then pause; and if the temperature is above 26 degrees, the LED will blink six times.
We’ll make our sketch more modular by breaking it up into distinct functions that will be reusable, as well as making the sketch easier to follow. Our thermometer will perform two main tasks: measure and categorize the temperature, and blink the LED a certain number of times (as determined by the temperature).
The Hardware
The required hardware is minimal:
- One TMP36 temperature sensor
- One breadboard
- Various connecting wires
- Arduino and USB cable
The Schematic
The circuit is very simple, as shown in Figure 5-1.
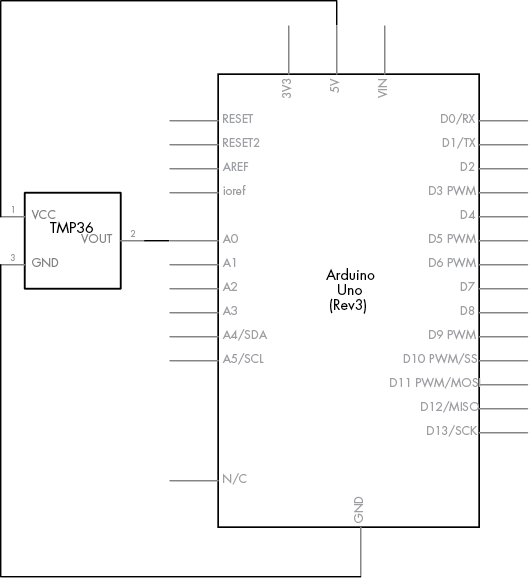
Figure 5-1: Schematic for Project 11
The Sketch
We’ll need to create two functions for the sketch. The first one will read the value from the TMP36, convert it to Celsius, and then return a value of 2, 4, or 6, corresponding to the number of times the LED should blink. We’ll start with the sketch from Project 8 for this purpose and make minor adjustments.
For our second function, we’ll use blinkLED() from Project 9. Our void loop will call the functions in order and then pause for 2 seconds before restarting.
Enter this code into the IDE:
// Project 11 - Creating a Quick-Read Thermometer That Blinks the Temperature

#define LED 13

int blinks = 0;

void setup()
{
  pinMode(LED, OUTPUT);
}

int checkTemp()
{
  float voltage  = 0;
  float celsius  = 0;
  float hotTemp  = 26;
  float coldTemp = 20;
  float sensor   = 0;
  int result;
  // read the temperature sensor and convert the result to degrees Celsius

  sensor = analogRead(0);
  voltage = (sensor * 5000) / 1024; // convert raw sensor value to millivolts
  voltage = voltage - 500;          // remove voltage offset
  celsius = voltage / 10;           // convert millivolts to Celsius

  // act on temperature range
  if (celsius < coldTemp)
  {
    result = 2;
  }

  else if (celsius >= coldTemp && celsius <= hotTemp)
  {
    result = 4;
  }
  else
  {
    result = 6;    // (celsius > hotTemp)
  }
  return result;
}

void blinkLED(int cycles, int del)
{
  for ( int z = 0 ; z < cycles ; z++ )
  {
    digitalWrite(LED, HIGH);
    delay(del);
    digitalWrite(LED, LOW);
    delay(del);
  }
}

1 void loop()
{
  blinks = checkTemp();
  blinkLED(blinks, 500);
  delay(2000);
}
Because we use custom functions, all we have to do in void_loop() at 1 is call them and set the delay. The function checkTemp() returns a value to the integer variable blinks, and then blinkLED() will blink the LED blinks times with a delay of 500 milliseconds. The sketch then pauses for 2 seconds before repeating.
Upload the sketch and watch the LED to see this thermometer in action. As before, see if you can change the temperature of the sensor by blowing on it or holding it between your fingers. Be sure to keep this circuit assembled, since we’ll use it in the projects that follow.
Displaying Data from the Arduino in the Serial Monitor
So far, we have sent sketches to the Arduino and used the LEDs to show us output (such as temperatures and traffic signals). Blinking LEDs make it easy to get feedback from the Arduino, but blinking lights can tell us only so much. In this section, you’ll learn how to use the Arduino’s cable connection and the IDE’s Serial Monitor window to display data from the Arduino and send data to the Arduino from your computer’s keyboard.
The Serial Monitor
To open the Serial Monitor, start the IDE and click the Serial Monitor icon on the toolbar, shown in Figure 5-2. It appears as a new tab in the IDE with the output window, and should look similar to Figure 5-3.
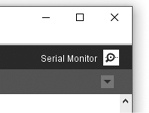
Figure 5-2: The Serial Monitor icon on the IDE toolbar
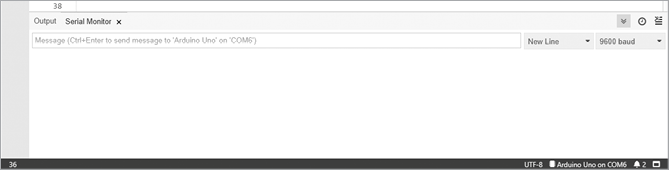
Figure 5-3: Serial Monitor
As you can see in Figure 5-3, the Serial Monitor displays an input field at the top, consisting of a single row and a Send button, and an output window below it, where data from the Arduino is displayed. When the Autoscroll box is checked (the chevron button next to the clock icon), the most recent output is displayed, and once the screen is full, older data rolls off the screen as newer output is received. If you uncheck Autoscroll, you can manually examine the data using a vertical scroll bar.
Starting the Serial Monitor
Before we can use the Serial Monitor, we need to activate it by adding this function to our sketch in void setup():
Serial.begin(9600);The value 9600 is the speed at which the data will travel between the computer and the Arduino, also known as baud. This value must match the speed setting at the bottom right of the Serial Monitor, as shown in Figure 5-3.
Sending Text to the Serial Monitor
To send text from the Arduino to the Serial Monitor to be displayed in the output window, you can use Serial.print():
Serial.print("Arduino for Everyone!");This sends the text between the quotation marks to the Serial Monitor’s output window.
You can also use Serial.println() to display text and then force any following text to start on the next line:
Serial.println("Arduino for Everyone!");Displaying the Contents of Variables
You can also display the contents of variables in the Serial Monitor. For example, this would display the contents of the variable results:
Serial.println(results); If the variable is a float, the display will default to two decimal places. You can specify the number of decimal places as a number between 0 and 6 by entering a second parameter after the variable name. For example, to display the float variable results to four decimal places, you would enter the following:
Serial.print(results,4);Project #12: Displaying the Temperature in the Serial Monitor
Using the hardware from Project 8, we’ll display temperature data in Celsius and Fahrenheit in the Serial Monitor window. To do this, we’ll create one function to determine the temperature values and another to display them in the Serial Monitor.
Enter this code into the IDE:
// Project 12 - Displaying the Temperature in the Serial Monitor

float celsius    = 0;
float fahrenheit = 0;

void setup()
{
  Serial.begin(9600);
}

1 void findTemps()
{
  float voltage = 0;
  float sensor  = 0;

  // read the temperature sensor and convert the result to degrees C and F
  sensor  = analogRead(0);
  voltage = (sensor * 5000) / 1024;  // convert the raw sensor value to
                                     // millivolts
  voltage = voltage - 500;           // remove the voltage offset
  celsius = voltage / 10;            // convert millivolts to Celsius
  fahrenheit = (1.8 * celsius) + 32; // convert Celsius to Fahrenheit
}

2 void displayTemps()
{
   Serial.print("Temperature is ");
   Serial.print(celsius, 2);
   Serial.print(" deg. C / ");
   Serial.print(fahrenheit, 2);
   Serial.println(" deg. F");
   // use .println here so the next reading starts on a new line
}

void loop()
{
  findTemps();
  displayTemps();
  delay(1000);
}
A lot is happening in this sketch, but we’ve created two functions, findTemps() at 1 and displayTemps() at 2, to simplify things. These functions are called in void loop(), which is quite simple. Thus, you see one reason to create your own functions: to make your sketches easier to understand and the code more modular and possibly reusable.
After uploading the sketch, wait a few seconds and then display the Serial Monitor. The temperature in your area should be displayed in a similar manner to that shown in Figure 5-4.
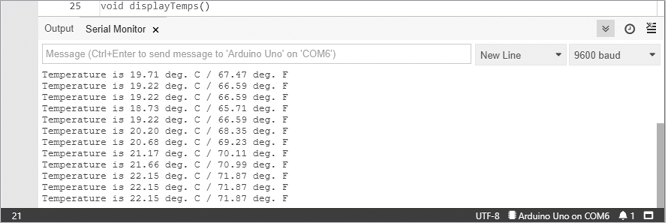
Figure 5-4: Result from Project 12
Debugging with the Serial Monitor
You can use the Serial Monitor to help debug (locate and fix errors in) your sketches. For example, if you insert Serial.println(); statements in your sketch containing brief notes about their location in the sketch, then you can see when the Arduino passes each statement. For example, you might use the line:
Serial.println("now in findTemps()");inside the function findTemps() to let you know when the Arduino is running that function.
Making Decisions with while Statements
You can use while statements in a sketch to repeat instructions, as long as (while) a given condition is true.
while
The condition is always tested before the code in the while statement is executed. For example, while ( temperature > 30 ) will test whether the value of temperature is greater than 30. You can use any comparison operator, or Boolean variable, within the parentheses to create the condition.
In the following sketch, the Arduino will count up to 10 seconds and then continue with its program:
int a = 0; // an integer
while ( a < 10 )
{
    a = a + 1;
    delay(1000);
}
This sketch starts by setting the variable a to 0. It then checks that the value of a is less than 10 (while ( a < 10 )), and, if so, adds 1 to that value, waits 1 second (delay(1000)), and checks the value again. It repeats the process until a has a value of 10. Once a is equal to 10, the comparison in the while statement is false; therefore, the Arduino will continue on with the sketch after the while loop brackets.
do-while
In contrast to while, the do-while structure places the test after execution of the code within the do-while statement. Here’s an example:
int a = 0; // an integer
do
{
    delay(1000);
    a = a + 1;
} while ( a < 100 );
In this case, the code between the curly brackets will execute before the conditions of the test (while ( a < 100 )) have been checked. As a result, even if the conditions are not met, the loop will run once. You’ll decide whether to use a while or a do-while statement when designing your particular project.
Sending Data from the Serial Monitor to the Arduino
To send data from the Serial Monitor to the Arduino, we need the Arduino to listen to the serial buffer—the part of the Arduino that receives data from the outside world via the serial pins (digital 0 and 1) that are also connected to the USB interface to your computer. The serial buffer holds incoming data from the Serial Monitor’s input window.
Project #13: Multiplying a Number by Two
To demonstrate the process of sending and receiving data via the Serial Monitor, let’s dissect the following sketch. This sketch accepts a single digit from the user, multiplies it by 2, and then displays the result in the Serial Monitor’s output window. After you have uploaded the sketch, when you open the Serial Monitor window, select No Line Ending in the window’s drop-down menu. When entering data in the Serial Monitor, you need to press CTRL-ENTER to send the data to the Arduino (not just ENTER).
// Project 13 - Multiplying a Number by Two

int number;

void setup()
{
  Serial.begin(9600);
}
void loop()
{
  number = 0;     // set the variable to zero, ready for a new read
  Serial.flush(); // clear any "junk" out of the serial buffer before waiting
1   while (Serial.available() == 0)
  {
    // do nothing until something enters the serial buffer
  }
2   while (Serial.available() > 0)
  {
    number = Serial.read() - '0';
// read the number in the serial buffer and
// remove the ASCII text offset for zero: '0'
  }
  // Show me the number!
  Serial.print("You entered: ");
  Serial.println(number);
  Serial.print(number);
  Serial.print(" multiplied by two is ");
  number = number * 2;
  Serial.println(number);
}
The Serial.available() test in the first while statement at 1 returns 0 if the user has not yet entered anything into the Serial Monitor. In other words, it tells the Arduino, “Do nothing until the user enters something.” The next while statement at 2 detects the number in the serial buffer and converts the text code into an integer. Afterward, the Arduino displays the number from the serial buffer and the multiplication results.
The Serial.flush() function at the start of the sketch clears the serial buffer just in case any unexpected data is in it, readying it to receive the next available data. Figure 5-5 shows the Serial Monitor window after the sketch has run.
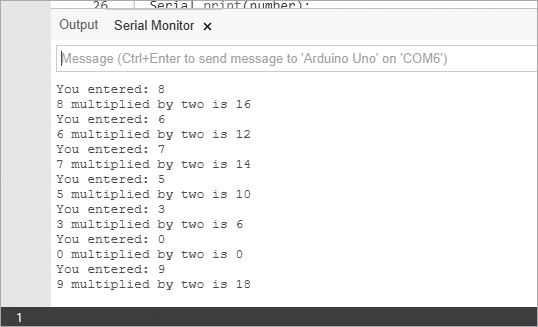
Figure 5-5: Sample input and output for Project 13
Although you can now enter numerical data into the Serial Monitor for the Arduino to process, it currently only accepts inputs of one digit. Even without this restriction, using integer variables limits the range of numbers available. We can use long variables to increase this range, as discussed next.
long Variables
To use the Serial Monitor to accept numbers with more than one digit, we need to add some new code to our sketch, as you’ll see shortly. When working with larger numbers, however, the int variable type can be limiting because it has a maximum value of 32,767. Fortunately, we can extend this limitation by using the long variable type. A long variable is a whole number between −2,147,483,648 and 2,147,483,647, a much larger range than that of an int variable (−32,768 to 32,767).
Project #14: Using long Variables
We’ll use the Serial Monitor to accept long variables and numbers larger than one digit. This sketch accepts a number of many digits, multiplies that number by 2, and then returns the result to the Serial Monitor:
// Project 14 - Using long Variables

long number = 0;
long a = 0;

void setup()
{
  Serial.begin(9600);
}

void loop()
{
  number = 0;     // zero the incoming number ready for a new read
  Serial.flush(); // clear any "junk" out of the serial buffer before waiting
  while (Serial.available() == 0)
  {
    // do nothing until something comes into the serial buffer-
    // when something does come in, Serial.available will return how many
    // characters are waiting in the buffer to process
  }
    // one character of serial data is available, begin calculating
  while (Serial.available() > 0)
  {
    // move any previous digit to the next column on the left;
    // in other words, 1 becomes 10 while there is data in the buffer
    number = number * 10;
    // read the next number in the buffer and subtract the character 0
    // from it to convert it to the actual integer number
    a = Serial.read() - '0';
    // add this value a into the accumulating number
    number = number + a;
    // allow a short delay for more serial data to come into Serial.available
    delay(5);
  }
  Serial.print("You entered: ");
  Serial.println(number);
  Serial.print(number);
  Serial.print(" multiplied by two is ");
  number = number * 2;
  Serial.println(number);
}
In this example, two while loops allow the Arduino to accept multiple digits from the Serial Monitor. When the first digit is entered (the leftmost digit of the number entered), it is converted to a number and then added to the total variable number. If that’s the only digit, the sketch moves on. If another digit is entered (for example, the 2 in 42), the total is multiplied by 10 to shift the first digit to the left, and then the new digit is added to the total. This cycle repeats until the rightmost digit has been added to the total. Don’t forget to select No Line Ending in the Serial Monitor window.
Figure 5-6 shows the input and output of this sketch.

Figure 5-6: Sample input and output from Project 14
Looking Ahead
The ability to create your own functions is an important skill that will simplify your sketches and save you time and effort. You’ll make good use of this knowledge in the next chapter, where you’ll learn how to do more things with math on the Arduino, including making a game.