
6
Network Tapping

Today, nearly all devices are connected to a network. This allows them to communicate with other devices locally, such as when connecting to printers, and over the internet, such as when visiting a website or using an online application. Although these connections provide a lot of utility, they also allow black hats to find those devices. By exploiting the way networks run, attackers can see your traffic, pretend to be a legitimate device, or even determine how traffic moves on the network.
In this chapter, you’ll learn more about how we create wired computer networks, as well as some details about the devices that make up a network. You’ll learn how adversaries steal traffic on these networks and gain access to network devices. You’ll also learn how to defend against network attacks using firewalls and intrusion detection systems (IDSs). We’ll conclude this chapter by configuring your device’s firewall.
This chapter focuses on wired networks only. In Chapter 8, we’ll talk about wireless networks, which have their own set of challenges. Even if you use a wireless network, your traffic will almost certainly flow through a wired network eventually.
The Basics of Network Design
Networks allow two or more devices to communicate with each other, either wirelessly or using cables. You can imagine the link between devices as somewhat similar to the power lines connected to your home. The lines, some of them attached to poles, connect the power station to your house. The power station most likely is connected to another station, which is connected to another one, until it reaches the place where the power is being generated, such as a dam. In the same way, your computer is connected to other devices in a chain until it reaches another device on the other side of the network.
Networks are made up of more than just cables. They also include devices, such as routers and switches, that help move traffic and navigate the connections. Routers provide the main connections between two different networks. In Chapter 2, we discussed the difference between public and private networks. A router is the device that directs traffic between these two types of networks. A switch works within a network, directing traffic between the devices connected to it. Together, these two devices transport your traffic from one point to another. Figure 6-1 shows an example of a typical rack of routers and switches that a large enterprise network might use. Smaller networks, like a small business or home network, might have one switch or use a switch/router combo.
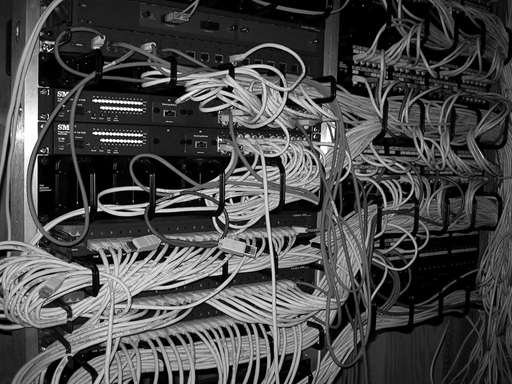
Figure 6-1: A typical network rack setup (image altered from the original created by Adrian Sampson under the Attribution 2.0 Generic [CC BY 2.0] license, https://creativecommons.org/licenses/by/2.0/)
Let’s look at the traffic flow and connections when you’re accessing a website. When you send a request to visit a website, you use the HTTP protocol. The protocol helps categorize the data, so devices understand how to interpret it. Most protocols are also given a port number, a special number assigned to the protocol so network devices recognize what type of data is being sent and how they should handle it. For HTTP, the port number is 80, or 443 if the data is encrypted. When a switch or router sees port number 80, it recognizes the packet as HTTP traffic and automatically knows how to process it without having to look at all the data inside the packet. This makes it quicker to send the packet on to its destination.
Using HTTP, you send out a request from your computer in the form of a packet. That packet includes the website request, the port number (80), your IP address, and the IP address of the website you’re visiting. This request is sent to a switch. The switch looks at the request and determines whether the destination is on the current network. Most likely it’s not, so the switch passes the packet to the router that connects your house to the internet. As mentioned in Chapter 2, this router is known as the default gateway.
Once the router receives the packet from the switch, it checks its list of all the other networks connected to it. There are many types of networks, but the most common are the local area network (LAN) and wide area network (WAN). A LAN is a small network that connects devices in the same physical area. Examples of LANs include office buildings, homes, and even airplanes. WANs connect devices across a wide geographical area. The internet is made up of many, many WANs, all linked into one giant network. The router examines the destination IP address of the packet it receives from the switch and determines whether the address is on any of the LANs or WANs it’s connected to. If the router doesn’t know where that destination IP address is located, it usually has a default network where it sends traffic.
Regardless, the router passes traffic to another router, which follows the same process. This chain continues until the packet finally reaches a router that is connected to the LAN where the destination device is located. The router then sends the packet to the switch on the LAN, which finds the destination device. There can be more than one switch on a LAN, even hundreds of them on large networks, like those maintained by Google or Amazon. Switches pass traffic between them much like routers do, except they use the MAC address instead of just the IP address. Once the destination device receives the packet, it reads the data inside, such as the website request, and responds. The entire process just described then happens again in reverse: the original source of the request now becomes the destination of the response.
This is the basis of network communication. But it can get more complicated. Other devices read network traffic, too, and might even modify it before sending it on. For example, a special type of server, called a proxy server, takes a packet from one network connection and passes it to another connection. Often, the proxy server modifies the original packet in some way, such as by changing the destination IP address from a public address to a private address. Another type of proxy reads website requests and determines whether they conform to what an organization has determined to be appropriate to view at work before sending them out to the internet to be fulfilled. Still other devices, such as firewalls and IDSs, interrupt traffic; we’ll discuss these devices later in the chapter.
Attacking Your Network
Black hats use a variety of techniques to attack your network, depending on their goals. Network attacks often focus on gaining access to the network to see traffic or steal data. This means they must connect into the network between the packets your system sends and the destination of those packets so they can see the data being sent. Adversaries also often attack the network directly. These attacks usually revolve around trying to find ways to shut down network usage so the victim can’t use their network the way they normally would.
Either way, the black hat’s primary goal is to understand the network in the first place. Adversaries use many reconnaissance techniques to learn about their victims before they start their attacks. One common method they use is to do a port scan, which involves sending requests to every possible port on an IP address and then observing how the device at that address responds. Based on these responses, the attacker can determine a lot of information about the system. For example, if an IP address responds when the black hat scans ports 80 and 443, the attacker knows those ports are open and that the server is likely running web services of some sort. An adversary can use that information to attack the server directly or to trick other systems into thinking they’re a friendly system. Port scans provide attackers with valuable information, making it much easier for them to craft different network attacks.
How Black Hats See Your Traffic
Packets provide attackers all sorts of details, including what devices they pass through, where a device is located, and what protocols a device is using, not to mention the data held within the packet. When an adversary (or anyone for that matter) intercepts traffic as it moves through the network, it’s called sniffing. Like a hound dog on a trail, adversaries pick up bits and pieces of the traffic that travels through the network and reconstruct what they need from it.
On wired networks, sniffing can be difficult for attackers to accomplish, because networks are designed to send traffic to the intended recipient only. This means that the attacker must figure out a way to circumvent that design to make the traffic come to them. You’ll see how they do this on wireless networks in Chapter 8. On wired networks, black hats can do this in a few different ways.
One method is by adding their hardware to the network. If you can connect your own physical device, the device can scan and copy that traffic as it passes through the network. So how does an attacker sneak a router or switch onto a network without anyone noticing? Although it would be difficult to do that, adversaries often use a much smaller device called a network tap, which is designed specifically for this purpose. Figure 6-2 shows an example of a network tap. The tap connects to the infrastructure already in place on a network and copies traffic that passes through it.
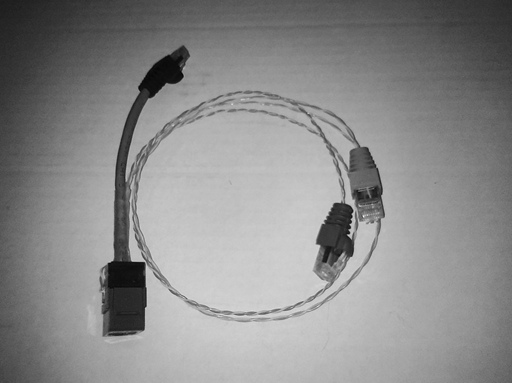
Figure 6-2: A network tap (image altered from the original created by Andrew Fresh under the Attribution 2.0 Generic [CC BY 2.0] license, https://creativecommons.org/licenses/by/2.0/)
An adversary can also use a technique called IP spoofing in which they copy the IP address of a legitimate device on the network and imitate that device. Any traffic that was supposed to go to the device with the copied IP will go to the black hat as well. IP spoofing can trick you into connecting to a device, like a printer, that is actually an attacker.
A third method is to change where the traffic is being sent by altering the network settings. For example, by changing the default gateway on a device, a black hat can decide where traffic leaving the network goes. This allows them to direct traffic to a device they control so they can capture it.
Or an adversary could turn on port mirroring at a switch. Switches have numbered physical ports, or sockets you plug cables into. Typically, a switch has between 24 and 48 ports. Port mirroring tells the switch to copy all the traffic passing into or out of one port to another port. For example, if an adversary can turn on port mirroring at a switch, they can tell the switch to copy all the traffic coming in on port 1 to, say, port 22, where they’ve plugged in a device to capture it. Changing traffic settings usually requires a high level of access to accomplish, especially without network administrators noticing.
Another method an attacker can use is physically tapping the wire that traffic is passing through. How this is done depends on the type of wire used. For example, early networks often used a cable known as coax. It consisted of two copper lines wrapped in thick insulation. A special type of network tap called a vampire tap could pierce the insulation to physically connect two metal prongs (the teeth of the device) with the two copper wires, allowing the tap to record any traffic that traveled across. Figure 6-3 shows an example of a vampire tap.

Figure 6-3: Example of a vampire tap (image modified from the original covered by the Attribution-ShareAlike 2.5 Generic [CC BY-SA 2.5] license, https://creativecommons.org/licenses/by-sa/2.5/)
Tapping fiber cables, which use pulses of light through glass tubes wrapped in insulation to send traffic, requires bending the cable and putting an unlit strain of fiber along the bend. When light goes through the bend, the unlit strand can grab some of the light, capturing the traffic.
The problem with these physical methods of traffic capture is that nearly all of them cause a loss in the signal along the cable. For example, bending the fiber cable increases the latency to the point that anyone monitoring the network would immediately realize something was wrong.
Man-in-the-Middle Attacks
Although using physical taps and changing network settings allow a black hat to see traffic in the network, making these techniques work requires a lot of setup. They’re also difficult to hide, especially when they target larger businesses with dedicated IT staff who search for these types of attacks. Instead, adversaries can use a man-in-the-middle attack, which provides the same ability to read traffic without requiring physical access to the network.
In man-in-the-middle attacks, attackers place themselves in the traffic flow between their victim and the destination they’re trying to reach. Instead of your traffic going directly to where you intended to send it—a web server, for example—it first goes to the attacker. The adversary can then read it, modify it, and pass it on to the destination. This allows attackers to capture your data and manipulate it for their own purposes. The worst part of these attacks is that they can be exceedingly difficult for the victim to detect. To the victim, everything looks like it’s running correctly, albeit likely slower than normal. Figure 6-4 provides an example of a basic man-in-the-middle attack.

Figure 6-4: An example of a man-in-the-middle attack
In this scenario, the black hat sends you a phishing email with what appears to be a legitimate link from your bank 1. When you click the link in the email, it takes you to the adversary’s fake web server, where they’ve created a page that looks like your bank’s website. You then enter your credentials on that website 2. The adversary receives the traffic you send the website and modifies it so it appears to be coming from the attacker’s computer rather than yours. The attacker then sends it to the legitimate bank site 3 and gains access to your account 4. The attacker then sends you a 404 Not Found error, so you won’t realize what happened 5.
Man-in-the-middle attacks can be executed using a variety of methods. In addition to the attack just described, adversaries could also create a proxy server and then trick the victim into connecting to the proxy. Recall that a proxy handles requests on behalf of another device, so by having the victim connect to the malicious one, the black hat can capture any traffic the victim sends to the internet. Another method of establishing man-in-the-middle sessions is changing where a victim gets their DNS information. If the adversary can trick the victim or load malware onto a system that changes the default DNS IP address, they can force the device to send all DNS queries to the malicious attacker’s server rather than the legitimate DNS server. The malicious server can then respond with any IP address it wants, effectively allowing the adversary to decide where the victim’s device sends web traffic.
Attackers can also use devices on the network to create a man-in-the-middle attack. If the black hat is able to access a device, they can change the settings to redirect traffic. IoT devices are especially susceptible to this type of attack. IoT devices are nontraditional devices connected to the internet, usually to provide some sort of enhanced feature. They include refrigerators, televisions, smart home assistants, and security cameras. These devices often have poor security, so attackers can easily take control of them. An attacker can sometimes update an IoT device’s firmware (the code that runs the device’s hardware) to include new code that allows them to capture traffic on the network. Because this method doesn’t typically impact the device’s function, it can be challenging to detect.
Denial of Service
Capturing traffic isn’t an adversary’s only option to attack a network. Black hats can also shut down the network entirely so no traffic flows out of it. This type of attack is called denial of service (DoS). The basic premise behind a DoS attack is to stop the network from running its normal operations. For example, an attacker might send so much traffic to a single web server that no one else can access the server and the web pages it hosts.
There are many different ways to cause a DoS attack. As just mentioned, one way is to overwhelm a server with traffic so the system crashes. Ping packets, which were discussed in Chapter 2, are a great way to do this as well, because an adversary can change their sizes and send them in quick succession. In a ping flood attack, an adversary’s device sends so many pings per second that the target device is unable to communicate on the network. Ping packets can fill up the system’s memory to slow down the system. Ping floods are easy to execute, because they just require a system capable of sending pings and more bandwidth than the target system. Figure 6-5 shows a diagram of a ping flood attack.
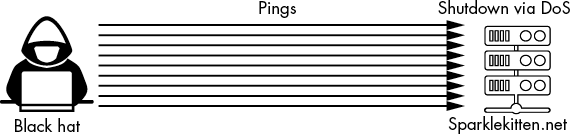
Figure 6-5: A ping flood attack
Another form of DoS attack exploits bugs in code to cause a DoS state. An example is known as the ping of death. Ping packets usually have a maximum size of 65,535 bits (a bit is the most basic unit of measurement for the size of data on a computer), but it’s possible to create a ping packet larger than that limit. If a black hat can send a larger ping packet to a device, it can cause the system receiving the ping to lock up and shut down.
Ping flood and ping of death attacks are well known and much less common today than they used to be, as most of the vulnerabilities have long since been fixed. However, they’re excellent examples of how to exploit conditions in code or network design to cause a DoS attack, and many modern DoS attacks use similar methods.
Distributed Denial of Service
A DoS attack occurs when one device attacks a single target, as in the ping of death attack. In a distributed denial-of-service (DDoS) attack, the attacker leverages multiple systems to attack a single target. By using more than one attacking system, the adversary can amplify the effect of the attack.
In the Smurf attack, an outdated example of a DDoS attack, the adversary began by spoofing their target’s IP address. Figure 6-6 shows a diagram of a Smurf attack.

Figure 6-6: An illustration of a Smurf attack
After spoofing the IP address, the attacker sent a ping to a broadcast address on a large network 1. Broadcast addresses automatically send traffic to every other device on the network 2. The ping went out to all the devices on the network individually. They then responded to the target’s IP address 3. The target was overwhelmed with responses 4, and it crashed.
A more modern example of a DDoS attack is the DNS amplification attack (Figure 6-7).
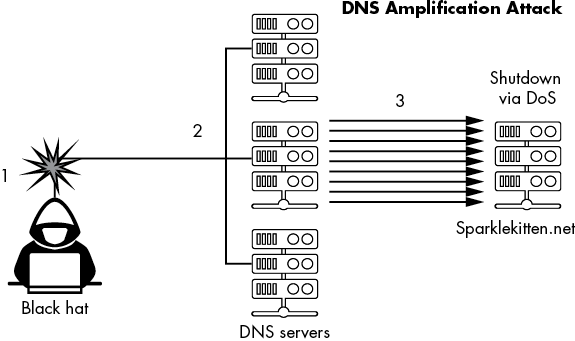
Figure 6-7: A diagram of a DNS amplification attack
Similar to the Smurf attack, the DNS amplification attack uses basic DNS requests to overwhelm a victim’s connection to the internet. The black hat crafts DNS query requests that spoof the victim’s IP address 1. These queries also include large response parameters, meaning they’ll accept the largest possible size of a response to a single query. The adversary then sends a constant stream of these queries to publicly available DNS servers 2. Although the queries are relatively small, the responses are large. The DNS servers send these large responses to the victim’s IP address 3, causing a DoS state. Attackers used this type of attack in 2016 against the security website Krebs on Security, causing one of the largest DDoS attacks seen up to that point.
One way adversaries attempt DDoS attacks is by creating a botnet. A bot, in this context, is a system that the black hat has compromised so it accepts commands from an attacker-controlled server. Compromising a device in this way usually requires installing malware or malicious firmware. Attackers can turn hundreds of thousands, sometimes millions, of devices into bots that can all receive commands at the same time. This botnet can send simultaneous requests to a server to produce a powerful DDoS attack. One of the larger botnets recorded, the Mirai botnet, is believed to have infected 600,000 IoT devices at its peak. Each of those devices could be used to send out pings, DNS queries, or other types of DoS attacks without the attacker having to directly attack their target. This makes botnets highly effective tools for shutting down a victim’s system.
Defense Against Network Attacks
Defending against network attacks requires a keen understanding of how your network is laid out and what resources are attached to it. It’s much easier for a black hat to exploit an unorganized network, because IT administrators will have a harder time ensuring the right settings and security controls are in place if they’re not sure how traffic is flowing through the network. This is especially true for large networks that might have thousands, or even tens of thousands, of systems.
One way to solve this problem is to organize your network into zones and base your security around each zone rather than each system. When a system is added to a zone, you’ll know that it needs to have a certain set of security controls in place to follow the zone’s requirements. A common type of network zone used when systems are accessible from the outside is called the demilitarized zone (DMZ). The DMZ sits between the internal private network and the external public network. It’s sort of a hybrid of the two. Typically, the administrator places systems that allow people to connect from the outside in the DMZ. For example, if you’re hosting a website on a server, you’d put the server in the DMZ. The DMZ usually has strict controls to ensure that traffic is monitored as it flows in and out, so no attacks or exploits can breach it. Figure 6-8 shows a diagram of a DMZ.
You can break up a network into as many zones as necessary to maintain security controls. For example, you might have an external network zone, a DMZ, and an internal zone that includes subzones for your database and HR systems. The only drawback to using numerous zones is managing and updating all the levels of controls for each one. Sometimes, your systems might also seem to fit into multiple zones, so you’ll have to consider carefully where to place them.
Once you’ve established your network zones, you can add controls.
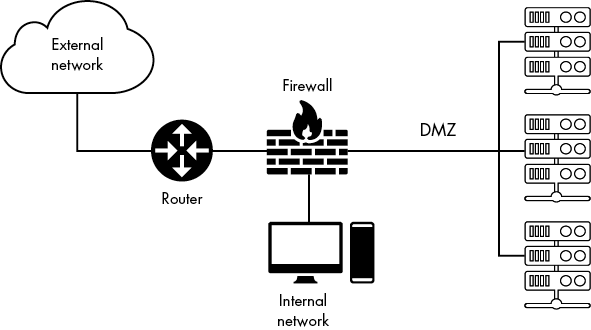
Figure 6-8: Example placement of a DMZ on a network
Firewalls
One of the most fundamental controls for a network is a firewall. At a basic level, a firewall regulates traffic in one of two ways: it either allows traffic to pass through and continue on to its destination or denies traffic and blocks it from moving on. This decision is made by matching the traffic to a set of rules to determine how it should be treated.
Many types of firewalls are available. They can be either software-based or hardware-based. Software firewalls are computer programs; typically they’re used on devices running other software, such as a server running a website or a desktop computer. Software firewalls are one of the last lines of a system’s defense. Usually, they have fewer features than a hardware firewall but are still necessary to help regulate which applications on a system are allowed to send traffic on the network. Hardware firewalls are physical devices used to view and regulate traffic that flows into the network. In general, hardware firewalls are more robust than software firewalls. Depending on the model, they offer many security features and the ability to make additional choices other than just allowing or denying the traffic.
Packet-Filtering Firewalls
Software firewalls use a packet-filtering method. They look at packets as they come into a system and determine whether or not to allow that traffic, based on a set of rules. As discussed earlier, packets contain information about the data that is being sent, including the destination and source IP addresses, and the port number they’re arriving on. Packet-filtering rules are usually based on the source IP address and the port number being used. Table 6-1 shows examples of firewall rules.
Table 6-1: Example Firewall Rules
| Rule number | Allow/deny | Protocol | Destination IP | Source IP | Port number |
| 1 | Allow | Any | 192.168.15.1 | Any | 80 |
| 2 | Allow | Any | 192.168.15.1 | 192.168.15.2 | 23 |
| 3 | Deny | Any | 192.168.15.1 | Any | 23 |
| 4 | Deny | Any | Any | Any | Any |
Each row represents a rule in the firewall. In the Protocol column, Any means it doesn’t matter what type of network protocol is used. Sometimes you’ll see the wildcard symbol (*) used in place of Any, but it means the same thing.
Notice that the second and third rules use the same port number. However, one rule allows a specific source IP, whereas the other denies any source IP. It’s important to note that when a firewall reads its rules, it goes through them one by one until it finds a matching rule. If the rules aren’t in the proper order, it can cause problems with how traffic is managed. For example, if you reversed rules 3 and 2, the rule denying traffic on port 23 from any source IP would be placed before the rule allowing traffic from a specific source IP; so when traffic came in from the IP address 192.168.15.2, the firewall would deny it, because that IP address matches the source IP of Any. For this reason, it’s essential to place rules that allow traffic, especially those that list specific IP addresses, before rules that deny it.
The fourth rule ensures that if no other rule applies to the traffic, it’s denied. We call this an explicit deny. Many modern firewalls include a “deny all” rule by default without you having to add it to the list of rules; this is known as an implicit deny.
Stateful Inspection Firewalls
Another popular form of firewall is the stateful inspection firewall, which is typically only used to regulate traffic coming into a network. Like a packet-filtering firewall, a stateful inspection firewall has rules that determine how to manage traffic based on factors like IP addresses and port numbers. In addition, the stateful inspection firewall considers the conditions to determine how to apply the rules.
In other words, when traffic comes through the stateful inspection firewall, the outside device makes a connection to the firewall. This differs from a packet-filtering firewall, which views the traffic as it passes through other devices. The firewall learns how the connection was made and certain parameters about it—for example, if it uses encryption. It also determines whether the traffic should be allowed or denied. If the traffic is allowed, the firewall monitors the traffic as it moves to see whether the state of the connection changes. This allows the firewall to track packets by certain details, such as source and destination IP address. When packets from the same location come in at a later time, the firewall can use those details to determine whether that traffic is allowed without having to completely reexamine it.
Application Firewalls
Application firewalls offer protection designed for specific types of applications, such as web servers or databases. These firewalls include special security controls that help defend against attacks targeting the applications they are protecting. The application firewall can also inspect traffic at a much deeper level, allowing it to see more information than even a stateful inspection firewall.
For example, if you’re using a web application firewall (WAF) to protect a web server, it will inspect all the HTTP requests sent to that web server. A WAF can see attempts to send malware, vulnerabilities being exploited, or even deviations from the typical web server setup. Application firewalls also have more options regarding how to handle traffic. For instance, some can send the traffic to a new IP address to be analyzed. Many application firewalls are bundled together with other security appliances, such as intrusion detection systems (discussed in the next section).
The main drawback to an application firewall is that it can be very slow and resource-intensive. Scanning a packet deeply and analyzing the data for violations takes a lot more time than simply checking the IP address and port number, the way a packet-filtering firewall does. It also requires a lot more memory and processing power, which means systems that run application firewalls are more expensive than systems that run packet-filtering firewalls. Higher levels of security controls require this trade-off. It’s also important to know that application firewalls are specific to their designated application; you can’t put a WAF in front of a database server and expect the same level of security performance.
Firewalls can’t read encrypted traffic, because the traffic is, well, encrypted. However, when traffic is encrypted on the network, the packet header, which contains the IP address and the port number, is often unencrypted. This means stateful inspection firewalls and packet-filtering firewalls work normally, whereas application firewalls would need to decrypt the data in the packet to examine it before they can decide to allow it or not.
Intrusion Detection Systems
Although firewalls are necessary to prevent many unwanted connections, they’re not always efficient at detecting attacks or finding malicious traffic hiding inside legitimate traffic. Because the firewall follows the rules as written, it might sometimes allow traffic from a black hat if that traffic matches an allow rule. To catch these attacks, you should add an IDS to your network.
IDSs are designed to detect attacks happening on the network or system, and they provide alerts to security personnel. An IDS can detect attacks that might be difficult for other security controls to handle. For example, they can detect a ping of death or Smurf attack, whereas a firewall might accept that traffic if it has a rule that allows ping traffic. Like firewalls, an IDS can be software- or hardware-based and can monitor a single system or a portion of a network. An IDS is often used in critical areas of the network, such as at the entrance to the DMZ or the internal private network.
To detect attacks, an IDS uses two different methods: signatures and heuristics. Signatures are similar to firewall rules but might include additional behavioral elements, such as the time that traffic comes in or what type of connection it’s trying to make. The main characteristic of signatures is that they’re rigid. Once you write the signature, the IDS will only look for traffic that exactly matches that signature. For example, if you write a signature that looks for specific requests to sparklekitten.net and a request comes in for sparklekitten.us, the signature won’t detect that request. Signatures can also detect known malware.
A heuristics-based IDS monitors the system or network it’s on to learn what a normal baseline level of traffic looks like. A security professional then sets the heuristic system to alert them whenever certain conditions change on the network. For example, if the number of connections to a web server normally hovers around 1,000 a minute, the security person might set a threshold of 10,000 a minute to set off an alert because this increase in traffic could indicate that either a hot sale or a potential DoS attack is occurring. Heuristic systems are very efficient at detecting new attacks, because they don’t have to rely on a signature to determine that an event is malicious. Experts must analyze malware to create malware signatures, so if the malware is brand new, it’s likely that a signature system won’t detect it. But heuristic systems also require constant fine-tuning to ensure they have a correct baseline of normal traffic. An alert shouldn’t go off whenever the system makes 10,000 connections a minute if your server does so on an average day.
Intrusion Prevention Systems
Typically, an IDS is a passive system. It can send alerts but doesn’t stop the malicious traffic. Similar to application firewalls, it can take IDSs a long time to examine data and make sure it doesn’t match a signature or heuristic characteristic. To improve their speed, many IDSs copy the traffic and analyze it after it has passed through the system. But this means the traffic has already reached its destination by the time it’s detected as malicious.
Obviously, this can be a major security issue, especially for malware that might infect the system before a security person can react to stop it. To help prevent this type of problem, security researchers created devices called intrusion prevention systems (IPSs). An IPS works similarly to an IDS in that it uses signatures or heuristics to detect malicious traffic. But instead of being passive, the device actively interacts with the traffic before it moves on to its destination to prevent it from harming its target.
Depending on the model, an IPS has several ways of handling malicious traffic. One method is to just block the traffic entirely. The IPS might do this directly, or it might change a firewall rule to block the traffic. The IPS can also send the traffic to a special security system where the security team can analyze it to learn an attacker’s technique. An IPS can also remove or quarantine malware before passing on the clean traffic. In addition to these proactive measures, IPSs send alerts, just like IDSs.
Much like application firewalls, the main drawback to an IPS is that it is much slower and requires more resources than an IDS. This makes an IPS more expensive than an IDS. Therefore, you typically see IPSs used only in critical locations, like the entrance to the DMZ, whereas an IDS might be on every server inside the DMZ, as shown in Figure 6-9.

Figure 6-9: Example placement of IDSs and IPSs on a network
IPSs and IDSs are often bundled into all-in-one appliances, which combine several different services into one system. These appliances can include a slew of security devices, including firewalls, email filters, proxy servers, and more.
Exercise: Setting Up Your Firewall
Both Windows and macOS include built-in firewalls that you can use to block traffic to specific applications coming into your system. Although both have a set of default rules that provide a good amount of security, you can also add, remove, or modify these rules. Customizing the rules can help you keep your device even more secure, especially when adding new applications to which you don’t want to allow external connections. In this exercise, you’ll configure your firewall, adding an inbound rule to secure a new application you’ve just installed.
Windows
To access the Windows firewall, enter firewall in the search bar at the bottom-left corner of the screen. The Windows Defender Firewall with Advanced Security app will appear. Click this app to open a window that displays general firewall information and settings. On the left side, click Advanced Settings to open the window shown in Figure 6-10 (you must have an administrator account to do this).
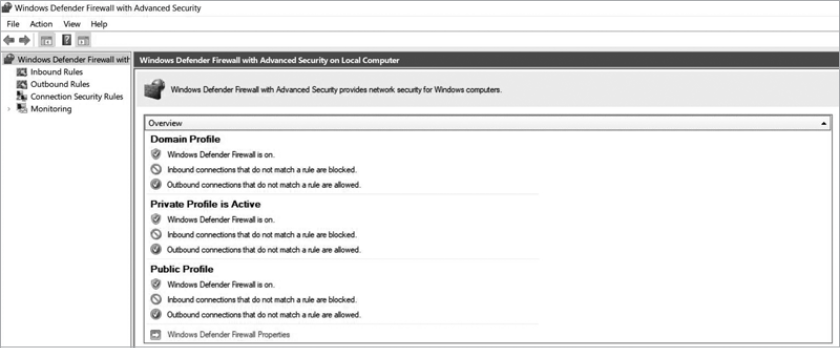
Figure 6-10: Windows Defender Firewall advanced settings
The left-hand menu shows the kinds of rules you can set. You should see submenus for inbound and outbound rules, as well as a few other options. When you click one of these menu items, the options for it will display in the middle box and the actions you can perform will appear on the far right.
For now, you should see the firewall profiles in the main box. In Windows Defender Firewall, profiles can change the firewall’s behavior depending on what type of network the system is connected to. This is very helpful for devices like laptops that might switch between different networks often. The domain profile is for devices that are remotely managed, such as in a company. The private profile is for private networks, like your home, and the public profile is for public networks, like a wireless network in a café. The options for each profile are the same by default, but you can change them. Just be careful when making any modifications, because the changes affect the entire system, not just specific applications.
Now that you’ve looked over the profiles, let’s add a new rule. Choose an application to which you want to apply a new rule. Having an application in mind helps you set the rule’s parameters. The main factors to consider are what port numbers the application uses and what type of traffic should be allowed to connect to that application. For example, if you’re installing a new game, you’ll need to open the port numbers that game uses. You’ll also need to check whether there are any particular protocols or types of traffic that must connect to the game for it to work. For most applications, you can find this information in the user manual or the website’s help section.
With an application in mind, you need to select the menu in which to add the rule. For this exercise, let’s add it to Inbound Rules. Inbound rules apply to traffic that is coming into your system, whereas outbound traffic is data you send out from your computer. Click Inbound Rules on the left to bring up the current list of rules for inbound traffic. Figure 6-11 provides a selection of those rules as an example.

Figure 6-11: List of inbound rules
This window is laid out a bit differently from Table 6-1 in the section on packet-filtering firewalls earlier in the chapter, but you can see that the same elements are present. A green check mark icon indicates that the rule is allowing traffic; rules without icons are currently disabled. To the right is the name of the rule and the group it belongs to, which categorizes the rule based on which protocols or applications it relies on. For example, in Figure 6-11, you can see several rules that deal with some of the Desktop’s core networking functions, and thus are aptly placed in the Core Networking group. The next column is the profile that the rule applies to. As you can see, some rules are active only in certain profiles. Subsequent columns deal with what the rule does, including the action (allow/deny), the application it applies to, the IP addresses it applies to, and the type of protocol it applies to.
The protocols usually relate to the type of connection used, such as TCP. If your application doesn’t use a specific protocol, it’s safe to use Any here. The next column, not shown in the figure, relates to the port numbers the rule applies to. Recall that port numbers can tell a system about the type of traffic being sent. Most applications use common port numbers, such as port 80 for web traffic. Others might use ports that are unique to that application; for example, the game Doom uses the port number 666 for its multiplayer mode. When installing a new application, you might need to add a rule to allow it to use a new port number. Let’s do that now!
On the right side of the Inbound Rules window, click New Rule. This should bring up a wizard to help you set up the rule (Figure 6-12). The first options you see are for the Rule Type. Program is used to make rules for a specific application. You could also use Port, which is for rules that affect specific port numbers; Predefined is used for connections to one of the groups created by default, such as Core Networking, and Custom creates a rule with your own parameters in place instead of limiting you to either port number or application. Select Custom to see the available options.

Figure 6-12: Rule Type options
Specify whether you’re creating a rule for all programs or for only a specific application. To do that, select This Program Path:, click Browse, then find where you saved the program on your system and select it from the menu. In Figure 6-13, I used a fake program name as an example. Feel free to do the same, or keep the All Programs option selected. Then click Next.
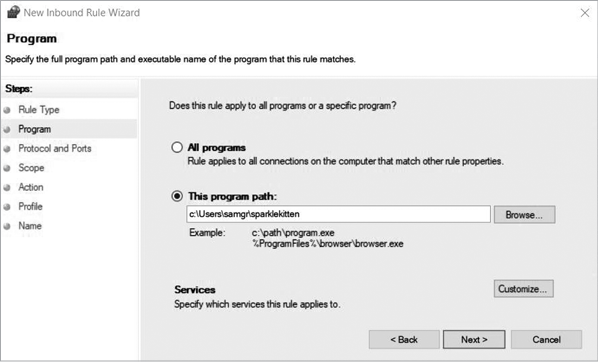
Figure 6-13: Example of program selection
Now list which ports and protocols you need for your rule. If you’re making a rule for an application, you should be able to find out which ports and protocols it uses from its company’s website or support materials. In this example, I used port 80 and the protocol TCP to represent a web service. Figure 6-14 shows the options filled in.

Figure 6-14: Example of port number selection
Click Next to specify the IP addresses the rule applies to in the Scope step. Unless you’re trying to communicate with a specific device, for example a printer, it’s generally best to leave a broad scope of addresses accessible so you don’t have to constantly add new ones. This is also a good time to rethink the rule and make sure you’re comfortable with allowing all sources of traffic in or out.
Click Next to go to the Action step and decide on the action you’ll take. You have three options: allow, allow if secure, and block. The allow if secure option lets a connection through only if it’s using a well-known security protocol that includes encryption (we’ll discuss some of those protocols in Chapter 9). In this exercise, I made the rule block the connection, as shown in Figure 6-15. This means any traffic on port 80 trying to access the specified application will be blocked, effectively isolating it from web traffic.
After selecting the action, click Next to choose your rule’s profile. Generally, you should select all three profiles so the rule works no matter what type of network you’re on. That said, you might choose a specific profile type to give your computer a different level of security. For example, you might block a connection to a public network that you’d normally allow on a private network.

Figure 6-15: Setting the connection type
Finally, click Next to name the rule. Then click Finish. You should see your new rule at the top of the list in the Inbound Rules window, as shown in Figure 6-16.

Figure 6-16: The final rule in place
Now that you’ve added a new rule, you can easily create more rules to fit your network’s needs while also keeping your device more secure. Remember that when you no longer need a rule, you can disable it rather than deleting it in case you need it in the future.
macOS
macOS includes a built-in firewall that you can activate. Although its options aren’t as robust as Windows Defender Firewall’s, it still provides great protection once it’s set up correctly. To find the firewall, click the Apple symbol in the top-left corner of your screen, and then click System Preferences. Click Security & Privacy, and then click Firewall in the top menu bar. Figure 6-17 shows the resulting dialog. If the firewall is turned off, you’ll need administrator privileges to turn it on. Click the lock at the bottom of the dialog to change the firewall settings. Click Turn On Firewall, and then click Firewall Options.
In the options dialog (Figure 6-18), you have a few choices. You can block all incoming connections to the system. Although this will increase your security, your applications won’t work properly if they can’t accept incoming connections. You can also add applications and specify whether they should accept or deny incoming connections. In Figure 6-18, Adobe Photoshop is set to allow all connections.

Figure 6-17: macOS firewall settings
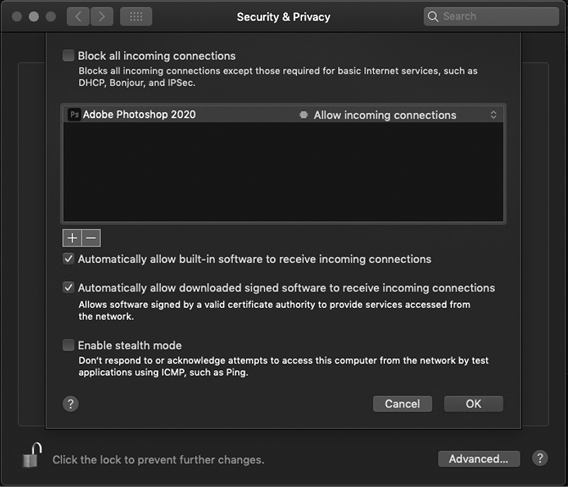
Figure 6-18: macOS Firewall options
The next option allows built-in software to accept incoming connections automatically. This means that any Apple product installed on the system will accept incoming connections by default. Apple has many processes in place that test its software for vulnerabilities, but you should be aware that there remains a chance that a black hat could exploit this firewall condition to gain access to an application.
The next option is similar but applies to downloaded signed software. Signed software is from a verified legitimate source. The last option, stealth mode, prevents your device from sending an answer when it receives certain kinds of traffic, such as a ping packet. This can be helpful for blocking an attacker from learning information about your device, including whether or not it’s actually on the network.
Unfortunately, macOS doesn’t offer as many options as Windows Defender Firewall in the GUI; you can add applications to your firewall list, but you can’t create custom rules with port numbers using the options in System Preferences. There’s also a firewall called pf that runs as part of the operating system; however, to access it, you’ll need to access the configuration file pf.conf in the etc folder. You can find a manual for it by entering the man command, man pf.conf, in a Terminal window, which brings up help documents built into the system.
I highly suggest you read the manual thoroughly before making any changes to the firewall. Unfortunately, the specifics of configuring pf are outside the scope of this book.
Now that you understand how to make rules for Windows and macOS, you can fine-tune your firewall to secure your system while you work. The important detail to remember is that creating a well-tuned firewall takes time and some trial and error. It’s also not a feature you can just set once and not think about again. Reviewing firewall rules to make sure all your applications are protected is essential to ensure you maintain your system’s security.
Conclusion
After reading this chapter, you now know that prevention is critical to protect your network’s security. Your security efforts should primarily focus on preventing an attack from occurring rather than trying to stop it once it begins. By setting up a firewall with the correct rules, you can thwart many low- and mid-level attacks just by stopping the traffic from entering your network. For high-level attacks, using an application firewall or an IDS or IPS can help detect an attack before it has a chance to reach its destination or unleash its payload. These systems can provide security experts with the crucial time they need to react before a black hat gains access.