
13
MATRICES AND VECTORS

This part of the book will deal with solving systems of equations. We can conveniently represent a set of equations using its matrix form, where we store the unknown coefficients in a matrix and the free terms in a vector.
We’ve been working with matrices and vectors with our affine transformations, but for the sake of completeness, let’s define them here. A matrix is a two-dimensional array of numbers arranged in rows and columns. Matrices are subject to some mathematical operations, including addition, subtraction, multiplication, and a few more. A vector, in this context, is a matrix with only one row or column (typically one column).
Consider the following system of equations:
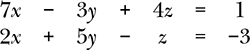
We can conveniently write this in matrix form as follows:

Note how the coefficients of the equation are represented in the 2 (rows) by 3 (columns) matrix. According to the matrix multiplication rules, these coefficients multiplied by the unknowns x, y, and z yield our two equations, each of which needs to equal its corresponding right-side term stored in the ⟨1,–3⟩ vector.
It may not be obvious now, but matrices, and by extension vectors, will greatly simplify working with systems of equations. To use them, however, we’ll need to implement new classes for both matrices and vectors.
The new Vector class will represent a uni-dimensional array of numbers (a sequence) of any length. This type of vector should not be confused with the geometric vector we implemented in Chapter 4, which was made up of two coordinates (u and v). An instance of our new Vector class with a size of 2 could look similar to the geometric vector, but they are distinct: the numbers don’t necessarily represent coordinates that define a direction. We’ll have to deal with having two classes named the same: Vector. As you’ll see, since they’re defined in different modules, it shouldn’t be any problem to disambiguate them.
There are quite a few operations we could implement for these two new classes, but we’ll be pragmatic and implement only those we need in the next chapter for solving systems of equations. For instance, we won’t need to implement the addition, subtraction, or multiplication operations, even though these are common.
Let’s begin by implementing two simple functions to help us fill newly instantiated vectors and matrices with zeros. We’ll use these functions when we instantiate a vector or matrix.
List Utils
Internally, an instance of this new Vector class will use a list of numbers to store its data. When an instance of the class is instantiated, we want to fill its internal list with zeros. This way, values that haven’t been explicitly set to some other value will be zero by default. Similarly, the Matrix class will store its data in a list of lists. We also want every position in the matrix initialized to zero.
Create a new Python file inside the utils package, name it lists.py, and enter the code in Listing 13-1.
 def list_of_zeros(length: int):
    return [0] * length


def list_of_list_of_zeros(rows: int, cols: int):
    return [list_of_zeros(cols) for _ in range(rows)]
We’ve defined two functions. The first one, list_of_zeros, takes in a length argument and creates a list of that size filled with zeros. The second, list_of_list_of_zeros, creates as many lists of zeros of size cols as the parameter rows instructs.
The funny syntax for [0] * length can be read as follows: “Create a list made up of zeros with the given length.” Give it a try in the Python console:
>>> [0] * 5
[0, 0, 0, 0, 0]
This is a neat way of initializing a list that contains the same repeating value.
The list_of_list_of_zeros function uses a list comprehension to create a list of size rows where each item is another list of size cols. The index in each iteration isn’t used, so an underscore is used:
from _ in range(rows)
Let’s try this function in the shell:
>>> from utils.lists import list_of_list_of_zeros
>>> list_of_list_of_zeros(2, 3)
[[0, 0, 0], [0, 0, 0]]
Let’s now set up the new package where we’ll add the new Matrix and Vector classes.
Setup
Let’s now create a new package in our project where we’ll add the Vector and Matrix implementations. This package will also contain the equation-solving functions that we’ll implement in the next chapters and generally in any math or equation resolution algorithm we write. Create the new package at the project’s top level and name it eqs. Add another package inside it, and name it tests. Your project’s structure should now look something like this:
Mechanics
|- apps
| |- circle_from_points
|- eqs
| |- tests
|- geom2d
| |- tests
|- graphic
| |- simulation
| |- svg
|- utils
You should just have added the eqs directory and its tests subdirectory:
Mechanics
| ...
|- eqs
| |- tests
| ...
Vectors
As we saw in the introduction of the chapter, a vector inside the eqs package will represent a sequence of numbers stored together in a list. We won’t confuse it with the Vector implementation from the geom2d package; it’s unfortunate they share a name, but remember that they are two different (although arguably related) concepts. Vectors here are a special kind of matrix; specifically, they are matrices with only one row or column. For instance, we may refer to a vector like
as a column vector, highlighting the fact that it’s a matrix with only one column. Similarly, we call a vector like
[2 –1 3]
a row vector, as it’s nothing more than a matrix with only one row.
We’ll implement matrices and vectors as separate classes (instead of using the Matrix class to represent both) just for the sake of readability. For example, to get a value from a matrix we indicate both the row and column indices. For a vector, we require just one index, so using the Matrix class to store a vector could make sense but would force us to pass two indices to get or set values when, conceptually, just one should be enough. Thus, when reading code like
m.value_at(2, 4)
v.value_at(3)
we can quickly identify that m is a matrix and v is a vector.
Implementing the Vector Class
We’ll use a list to store the vector’s data. We won’t be giving users access to this private list of numbers but instead will provide methods in the class to work with the vector. Create a new file, vector.py, inside eqs and enter the code in Listing 13-2.
from utils.lists import list_of_zeros


class Vector:

    def __init__(self, length: int):
        self.__length = length
        self.__data = list_of_zeros(length)

    @property
    def length(self):
        return self.__length
When an instance of the Vector class is initialized, we pass in a length. This length is kept in a private attribute called __length of the class and is exposed as a property using the @property decorator. This ensures the length property won’t be modified once the Vector class has been instantiated. Recall that properties are read-only attributes.
The vector’s data is stored in the __data attribute, which is initialized using our list_of_zeros function from before.
Let’s implement methods to set values in the vector. In the class, enter the new code in Listing 13-3.
class Vector:
   --snip--

   def set_value(self, value: float, index: int):
       self.__data[index] = value
       return self

   def add_to_value(self, amount: float, index: int):
       self.__data[index] += amount
       return self

   def set_data(self, data: [float]):
       if len(data) != self.__length:
           raise ValueError('Cannot set data: length mismatch')

       for i in range(self.__length):
           self.__data[i] = data[i]

       return self
Listing 13-3: Setting vector values
We’ve added three new methods. The first one, set_value, is the simplest of all: it sets a value at the specified index inside the vector. Note that if the given index is either greater than or equal to the vector’s length, or smaller than zero, we raise what we commonly refer to as an out of bounds error, namely, an IndexError. We don’t need to check for this condition ourselves as long as we’re happy with how Python handles it. Note as well that the method returns self, that is, the instance of the class itself. We’ll keep using this pattern where we return the instance when setting values in our class. This is so that we can chain “set” operations or do things like
vec = Vector(5).set_value(3, 2)
instead of having to do this less pretty equivalent:
vec = Vector(5)
vec.set_value(3, 2)
The second method we’ve defined is add_to_value, which adds the given amount to a value inside the vector. This method will be convenient when working with structures in Part V of the book, as you’ll see.
Lastly, we have set_data, which sets all the values in the vector from a source data list. To do so, it first checks that the provided list has the same length as the vector; then it copies each of the values to the private list __data.
Let’s now implement a method to retrieve values from the vector at given indices. In the vector.py file, enter the code in Listing 13-4.
class Vector:
   --snip--

   def value_at(self, index: int):
       return self.__data[index]
Listing 13-4: Getting vector values
We’re almost done with the Vector class. We could implement many more methods to do things such as add or subtract vectors, but we won’t need them for the purposes of this book. The only method we’ll need and we haven’t implemented (or overridden) yet is __eq__, which we can use to check whether two Vector instances are equal. Let’s do so now. Start by adding the following import in vector.py:
from geom2d import are_close_enough
Then enter the new code in Listing 13-5.
from geom2d import are_close_enough
from utils.lists import list_of_zeros


class Vector:
    --snip--

    def __eq__(self, other):
        if self is other:
            return True

        if not isinstance(other, Vector):
            return False

        if self.__length != other.__length:
            return False

        for i in range(self.length):
            if not are_close_enough(
                    self.value_at(i),
                    other.value_at(i)
            ):
                return False

        return True
Listing 13-5: Vector class equality
We first check whether we’re comparing the same instance against itself, in which case the result is True and we don’t need to compare anything else. Then, if the passed-in other is not an instance of the Vector class, we know the comparison can’t succeed, so we return False. If we find out we’re comparing two instances of the Vector class, we start the actual check. First we make sure the lengths of the vectors are the same (vectors with different sizes cannot be equal). If the length check succeeds, we finally check the values one by one using our are_close_enough function.
When we implement potentially computationally expensive __eq__ methods, it’s important to check the less computationally intensive conditions first. Here, for example, we do a fast check on the lengths of the vectors before checking every pair of values for equality. Whereas the pairwise value comparison needs to perform n comparisons (where n is the length of the vectors), the length comparison requires only one comparison.
Our finished Vector class should look like the one in Listing 13-6.
from geom2d import are_close_enough
from utils.lists import list_of_zeros


class Vector:

    def __init__(self, length: int):
        self.__length = length
        self.__data = list_of_zeros(length)

    @property
    def length(self):
        return self.__length

    def set_value(self, value: float, index: int):
        self.__data[index] = value
        return self

    def add_to_value(self, amount: float, index: int):
        self.__data[index] += amount
        return self

    def set_data(self, data: [float]):
        if len(data) != self.__length:
            raise ValueError('Cannot set data: length mismatch')

        for i in range(self.__length):
            self.__data[i] = data[i]

        return self

    def value_at(self, index: int):
        return self.__data[index]

    def __eq__(self, other):
        if self is other:
            return True

        if not isinstance(other, Vector):
            return False

        if self.__length != other.__length:
            return False

        for i in range(self.length):
            if not are_close_enough(
                    self.value_at(i),
                    other.value_at(i)
            ):
                return False

        return True
Listing 13-6: Vector class result
Because this class will serve as the base for the resolution of systems of linear equations, we can’t afford to have any bugs in its implementation: that would render the resolution of such systems useless. Let’s add a few tests to make sure the class is bug-free.
Testing the Vector Class
At the beginning of the chapter we created a test directory inside the eqs package. Inside that directory, create a new file named vector_test.py and enter the code in Listing 13-7.
import unittest

from eqs.vector import Vector


class VectorTest(unittest.TestCase):

    def test_length(self):
        self.assertEqual(5, Vector(5).length)

    def test_unset_value_is_zero(self):
        vector = Vector(2)
        self.assertEqual(0.0, vector.value_at(0))
        self.assertEqual(0.0, vector.value_at(1))

    def test_set_get_value(self):
        value = 10.0
        vector = Vector(2).set_value(value, 1)
        self.assertEqual(0.0, vector.value_at(0))
        self.assertEqual(value, vector.value_at(1))

    def test_add_to_value(self):
        vector = Vector(2).set_data([1, 2]).add_to_value(10, 0)
        self.assertEqual(11, vector.value_at(0))
        self.assertEqual(2, vector.value_at(1))
Listing 13-7: Vector class unit tests
This code defines a new test class, VectorTest, with four unit tests. Run all the tests to make sure they pass and our implementation is right. You can do so from the bash shell:
$ python3 -m unittest eqs/tests/vector_test.py
The first test, test_length, checks that the vector’s length property returns the right number. Then comes test_unset_value_is_zero, which ensures that we properly initialize the vector, filling it with zeros. The test_set_get _value sets the value 10.0 at index 1 and checks that the vector returns that same value when asked for the item at index 1. We also assert that the vector returns a zero for the item at index 0, just to make sure that set_value doesn’t modify any value other than the one it’s supposed to. Last, we have test_add_to_value to test the add_to_value method. The test initializes the vector with values [1, 2], adds 10 units to the item at index 0, and asserts that the value at that index is updated correctly.
You may have noticed that the test_set_get_value test may actually fail for two different reasons: an error in the implementation of the vector’s (1) set_value method or (2) value_at method. That’s mostly true, and you’d be right to point out that we broke our first rule for good testing here (see “Three Golden Rules for Unit Testing” on page 97). But it’s hard to test set_value without using the value_at method in the assertion. We could get the value by somehow accessing the vector’s private __data instead of using value_at, but it’s preferable to test a class through its public API and not access its implementation details. We want to be able to change the internal implementation of our classes without altering their behavior, and that shouldn’t break any test. If we rely on the internals of a class to test it, we couple the test to the class’s implementation.
As a rule of thumb, the private implementation of a class should always be kept secret to the outside world; only the class itself should know about it. This is called encapsulation in object-oriented parlance.
Our Vector class is now ready and tested. Let’s implement a class to represent matrices.
Matrices
Matrices add an extra dimension to vectors. Matrices are an array of numbers distributed in rows and columns.
Let’s create a new file matrix.py inside the eqs directory. Enter the initial definition for the Matrix class, as in Listing 13-8.
from utils.lists import list_of_list_of_zeros


class Matrix:

    def __init__(self, rows_count: int, cols_count: int):
        self.__rows_count = rows_count
        self.__cols_count = cols_count
        self.__is_square = rows_count == cols_count
        self.__data = list_of_list_of_zeros(rows_count, cols_count)

    @property
    def rows_count(self):
        return self.__rows_count

    @property
    def cols_count(self):
        return self.__cols_count

    @property
    def is_square(self):
        return self.__is_square
The Matrix class is initialized with the number of rows and columns. These values are saved as private attributes of the class: __rows_count and __cols_count. They are exposed as public properties: rows_count and cols _count. A matrix is square if it has the same number of rows and columns. We exposed this as a property as well: is_square. Last, we initialize the private attribute __data with a list of lists of zeros using the function that we created at the beginning of the chapter.
Setting Values
Let’s add the methods to set the matrix’s values. In the Matrix class, enter the two methods in Listing 13-9.
class Matrix:
    --snip--

   def set_value(self, value: float, row: int, col: int):
       self.__data[row][col] = value
       return self

   def add_to_value(self, amount: float, row: int, col: int):
       self.__data[row][col] += amount
       return self
Listing 13-9: Setting matrix values
Like we did with our Vector class, we’ve implemented one method to set a value in the matrix given its position (given by row and col) and one method to add a given amount to an existing value in the matrix. Following our convention of returning the instance when a value is set, both set_value and add_to_value return self.
It’ll also be handy to have a way to fill the matrix given a list of values, so after what we’ve just written, enter the method in Listing 13-10.
class Matrix:
    --snip--

   def set_data(self, data: [float]):
    ➊ if len(data) != self.__cols_count * self.__rows_count:
           raise ValueError('Cannot set data: size mismatch')

       for row in range(self.__rows_count):
        ➋ offset = self.__cols_count * row
           for col in range(self.__cols_count):
            ➌ self.__data[row][col] = data[offset + col]

       return self
Listing 13-10: Setting data to the matrix
As you can already tell, using the values in a list to set the matrix data is not as straightforward as it was for vectors. There’s a check we need to perform to make sure the data fits inside the matrix: the given data should have the same length as the number of rows times the number of columns ➊, the total number of values the matrix holds. If it doesn’t, we raise a ValueError.
Then, we iterate through the matrix’s row indices. In the offset variable we store the offset to the beginning of the current’s row data inside the input list ➋. For the row at index 0, the offset is 0 as well. For the row at index 1, the offset will be the length of a row: the number of columns in the matrix, and so forth. Figure 13-1 shows this offset. We iterate through the column’s indices and set each of the values in __data from the input data ➌.

Figure 13-1: Setting matrix data from a list
As we’ll see in Part V of the book, when we’re working with truss structures, one of the steps for computing the structure’s system of equations is accounting for the external constraints on nodes. We’ll get into all the details later, but for now it’s enough to know that this modification requires that we set a row and a column of the matrix as identity vectors. For example, if we had the following matrix,

setting the row and column with indices 0 and 1, respectively, as identity vectors would result in the following:

Let’s write two methods to do this in our Matrix class. Enter the code in Listing 13-11.
class Matrix:
    --snip--

    def set_identity_row(self, row: int):
        for col in range(self.__cols_count):
            self.__data[row][col] = 1 if row == col else 0

        return self

    def set_identity_col(self, col: int):
        for row in range(self.__rows_count):
            self.__data[row][col] = 1 if row == col else 0

        return self
Listing 13-11: Setting identity rows and columns
We implemented two new methods: set_identity_row and set_identity_col. Both are similar in implementation: they set all values in the row or column as 0 except for the position in the main diagonal, which is set to 1.
In this code, we’ve used a compact condition expression: a ternary operator. This operator’s syntax is as follows:
<expression> if <condition> else <expression>
It returns one of the two expressions depending on the condition value. In this particular case, our condition is row == col, which is True if the row and column indices are equal.
Note that if the matrix is not square, it can happen that we set a row or column as the identity vector and it ends up filled with all zeros. For example, see Figure 13-2. We have a matrix with three rows and two columns, and we set the third row (the row at index 2) as the identity. Since the matrix has only two columns, the value 1 would be outside the matrix, in the nonexistent third column.
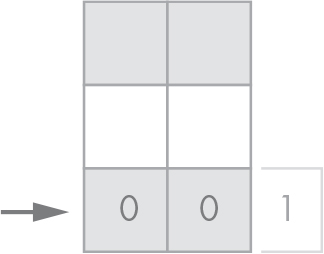
Figure 13-2: Setting an identity row in a nonsquare matrix
Let’s now add two methods to get values from the matrix.
Getting Values
We need to implement value_at to get a value at the given row and column indices. We also want another method, value_transposed_at, which pulls a value from the matrix as if the matrix had been transposed. Quick reminder: the transpose of a matrix [M] is another matrix [M]′ where [M]’s rows are swapped with its columns:

We’ll use this second method in Chapter 14 in our implementation of Cholesky’s factorization algorithm to solve linear systems of equations. We could also implement a method in our Matrix class that returned a new matrix resulting from transposing the current one and then withdraw the values from this matrix. That would be a good option indeed, but as matrices representing systems of equations are often enough very big, copying all the values into a new matrix is a computationally expensive operation. Being able to get values from the matrix as if it were transposed is a performance optimization we’ll use in our Cholesky implementation.
In matrix.py, enter the code in Listing 13-12.
class Matrix:
    --snip--

    def value_at(self, row: int, col: int):
        return self.__data[row][col]

    def value_transposed_at(self, row: int, col: int):
        return self.__data[col][row]
Listing 13-12: Getting matrix values
First we implement value_at. This method returns a value in the given row and column indices from the private data storage. Then we have value _transposed_at. As you can see, this method is similar to value_at. The only difference is that instead of being
self.__data[row][col]
this time the value pulled from the matrix is
self.__data[col][row]
This retrieves the value of that matrix as if it were transposed simply by swapping the row and col indices. This method will bring us a big performance improvement later.
One thing to keep in mind when using this method is that the row index we pass in should be no greater than the number of columns, and the column index should be no greater than the number of rows. Since we’re accessing the matrix’s data as if it were transposed, the actual number or rows is the number of columns from the original matrix. The same goes for the number of columns.
Scaling Values
Let’s implement one last useful method: scaling the matrix. The same way we can scale a vector, we can scale a matrix by multiplying all of its values by a scalar. Enter the method in Listing 13-13.
class Matrix:
    --snip--

    def scale(self, factor: float):
        for i in range(self.__rows_count):
            for j in range(self.__cols_count):
                self.__data[i][j] *= factor

        return self
Listing 13-13: Scaling a matrix
This method iterates through all the row and column indices and multiplies the value stored in every position by the passed-in factor. We return self, as this is a method that sets data.
Matrix Equality
To finish the implementation for our Matrix class, let’s include the __eq__ method to compare matrices for equality. Start by adding the following import at the top of matrix.py:
from geom2d import are_close_enough
Then enter the implementation for the __eq__ method in Listing 13-14.
from geom2d import are_close_enough
from utils.lists import list_of_list_of_zeros


class Matrix:
    --snip--

    def __eq__(self, other):
        if self is other:
            return True

        if not isinstance(other, Matrix):
            return False

        if self.__rows_count != other.rows_count:
            return False

        if self.__cols_count != other.cols_count:
            return False

        for i in range(self.__rows_count):
            for j in range(self.__cols_count):
                if not are_close_enough(
                        self.__data[i][j],
                        other.__data[i][j]
                ):
                    return False

        return True
Listing 13-14: Matrix class equality
As usual, we start by checking the references for self and other, because if we’re comparing an instance against itself, there’s no need to compare anything else, and the comparison can safely return True. Then, we make sure the passed-in object is an instance of the Matrix class; otherwise, there’s not much we can compare.
Before we start comparing values from the matrices one by one, we want to make sure we have matrices of the same size. If we detect that either the row or column lengths don’t match, we return False.
Finally, if all the previous checks haven’t returned a value, we compare the values of both matrices. As soon as we find a pair of values that aren’t equal (according to our are_close_enough function), we return False. If all values are equal, we exit the for loops and finally return True.
For reference, your matrix.py file should look like Listing 13-15.
from geom2d import are_close_enough
from utils.lists import list_of_list_of_zeros


class Matrix:

    def __init__(self, rows_count: int, cols_count: int):
        self.__rows_count = rows_count
        self.__cols_count = cols_count
        self.__is_square = rows_count == cols_count
        self.__data = list_of_list_of_zeros(rows_count, cols_count)

    @property
    def rows_count(self):
        return self.__rows_count

    @property
    def cols_count(self):
        return self.__cols_count

    @property
    def is_square(self):
        return self.__is_square

    def set_value(self, value: float, row: int, col: int):
        self.__data[row][col] = value
        return self

    def add_to_value(self, amount: float, row: int, col: int):
        self.__data[row][col] += amount
        return self

    def set_data(self, data: [float]):
        if len(data) != self.__cols_count * self.__rows_count:
            raise ValueError('Cannot set data: size mismatch')

        for row in range(self.__rows_count):
            offset = self.__cols_count * row
            for col in range(self.__cols_count):
                self.__data[row][col] = data[offset + col]

        return self

    def set_identity_row(self, row: int):
        for col in range(self.__cols_count):
            self.__data[row][col] = 1 if row == col else 0

        return self

    def set_identity_col(self, col: int):
        for row in range(self.__rows_count):
            self.__data[row][col] = 1 if row == col else 0

        return self

    def value_at(self, row: int, col: int):
        return self.__data[row][col]

    def value_transposed_at(self, row: int, col: int):
        return self.__data[col][row]

    def scale(self, factor: float):
        for i in range(self.__rows_count):
            for j in range(self.__cols_count):
                self.__data[i][j] *= factor

        return self

    def __eq__(self, other):
        if self is other:
            return True

        if not isinstance(other, Matrix):
            return False

        if self.__rows_count != other.rows_count:
            return False

        if self.__cols_count != other.cols_count:
            return False

        for i in range(self.__rows_count):
            for j in range(self.__cols_count):
                if not are_close_enough(
                        self.__data[i][j],
                        other.__data[i][j]
                ):
                    return False

        return True
Listing 13-15: Matrix class result
Our Matrix class is almost ready! We need to check for bugs. We may have made some small mistakes when writing the code. This could be problematic once we start using this class to solve systems of equations. These kinds of calculations are usually mission-critical in engineering applications. Thus, we can’t afford a single bug in our implementation. But that’s no problem for us. We know how to tackle this: let’s add some automated unit tests.
Testing the Matrix Class
In the tests folder, create a new file named matrix_test.py. Enter the initial code for the test in Listing 13-16.
import unittest

from eqs.matrix import Matrix


class MatrixTest(unittest.TestCase):

    def test_is_square(self):
        self.assertTrue(
            Matrix(2, 2).is_square
        )

    def test_is_not_square(self):
        self.assertFalse(
            Matrix(2, 3).is_square
        )
Listing 13-16: Matrix unit tests
In this file we define a new test class called MatrixTest, which inherits from TestCase. We created two tests for the is_square property, one to check if a matrix is actually square, and another to check if a matrix is not square. Run the tests; ideally they both pass, but if not, go back to the implementation of the property and ensure you have the implementation right. You can run the tests from the shell using the following command:
$ python3 -m unittest eqs/tests/matrix_test.py
You should get output similar to the following:
Ran 2 tests in 0.001s

OK
Let’s now check the methods that set or get values. After the two tests we just wrote, enter the tests in Listing 13-17.
class MatrixTest(unittest.TestCase):
    --snip--

    def test_unset_value_is_zero(self):
        matrix = Matrix(2, 2)
        self.assertEqual(0.0, matrix.value_at(0, 1))

    def test_set_get_value(self):
        value = 10.0
        matrix = Matrix(2, 2).set_value(value, 0, 1)
        self.assertEqual(value, matrix.value_at(0, 1))

    def test_add_to_value(self):
        expected = [1, 12, 3, 4]
        matrix = Matrix(2, 2)
            .set_data([1, 2, 3, 4])
            .add_to_value(10, 0, 1)
        self.assert_matrix_has_data(matrix, expected)
Listing 13-17: Testing setting and getting values
The first test ensures that values in the matrix that haven’t been set are zero upon instantiation. Then we test that both the set_value and value_at methods actually set and get matrix values. Lastly, we test the add_to_value method, making sure that it adds a given amount to an already set value.
In this last test, we’ve used an assertion method that doesn’t exist: assert _matrix_has_data. We need to implement this method ourselves inside the MatrixTest class, and we’ll use it when we need to ensure all values inside a matrix are as expected. By doing this, we can use only one assertion to check that the values in a matrix are the same as the values in a list passed in as the second parameter. Inside the test class, toward the end, enter the method definition shown in Listing 13-18.
class MatrixTest(unittest.TestCase):
    --snip--


   def assert_matrix_has_data(self, matrix, data):
       for row in range(matrix.rows_count):
           offset = matrix.cols_count * row
           for col in range(matrix.cols_count):
               self.assertEqual(
                   data[offset + col],
                   matrix.value_at(row, col)
               )
Listing 13-18: Custom assertion for matrix values
This assertion method has the same structure as set_data inside the Matrix class. This time, instead of setting values, we use assertEqual to test for equality.
We have to note that, by including an assertion method that has some logic of its own (the offset computation in this case), we introduce one more possible reason for the tests to fail: the assertion method itself being wrongly implemented. As always, if we want to be practical, we need to make trade-offs. We can use our engineering common sense to analyze the pros, cons, and alternatives. In this case, having a custom assertion to check matrix values is worth it: it facilitates the simple assertion of matrix values and makes writing new tests and checking matrix values painless. We just have to be extra sure that our logic in the assertion method is correct.
Let’s now test the set_data method. The test is in Listing 13-19.
class MatrixTest(unittest.TestCase):
    --snip--

   def test_set_data(self):
       data = [1, 2, 3, 4, 5, 6]
       matrix = Matrix(2, 3).set_data(data)
       self.assert_matrix_has_data(matrix, data)
Listing 13-19: Testing setting data from a list
In this test we’re using our custom assertion method, which makes the test quite short and concise. We create a matrix with two rows and three columns, set its data using a list with the numbers between 1 and 6, and then assert they’ve been correctly placed in their respective slots.
Moving on, our next tests should be for the methods that set identity rows and columns. Enter the tests in Listing 13-20.
class MatrixTest(unittest.TestCase):
    --snip--

    def test_set_identity_row(self):
        expected = [1, 0, 4, 5]
        matrix = Matrix(2, 2)
            .set_data([2, 3, 4, 5])
            .set_identity_row(0)
        self.assert_matrix_has_data(matrix, expected)

    def test_set_identity_col(self):
        expected = [2, 0, 4, 1]
        matrix = Matrix(2, 2)
            .set_data([2, 3, 4, 5])
            .set_identity_col(1)
        self.assert_matrix_has_data(matrix, expected)
Listing 13-20: Testing setting identity rows and columns
In these two tests we start by specifying the expected values for the resulting matrix. Then, we create a new 2×2 matrix and set its values to the list of numbers between 2 and 5. We set the identity row or column and assert that the values are as expected.
We avoided using 1 for any of the initial values in the matrix: the methods we’re testing will set one of the values inside the matrix with a 1. Imagine that our implementation of the set_identity_row method wrongly set a value in the matrix as a 1 and that it chose to set the same value that we already initialized as 1. Our tests wouldn’t be able to detect such an error because there’s no way to tell whether that 1 is the one we set ourselves in the beginning of the test or a value that the set_identity_row method set. By not using 1 as an input value, we avoid exposing our test to such a problem.
There’s one last method we implemented in our Matrix class that needs to be tested: scale. Enter the test in Listing 13-21.
class MatrixTest(unittest.TestCase):
    --snip--

   def test_scale(self):
       expected = [2, 4, 6, 8, 10, 12]
       matrix = Matrix(2, 3)
           .set_data([1, 2, 3, 4, 5, 6])
           .scale(2)
       self.assert_matrix_has_data(matrix, expected)
Listing 13-21: Testing scaling matrices
This test creates a 2×3 matrix, sets its data using the numbers from 1 to 6, and then scales everything by 2. Using the custom assert_matrix_has_data assertion we check that all values have been scaled correctly. Make sure to run the tests in the test class. From the shell, this would be as follows:
$ python3 -m unittest eqs/tests/matrix_test.py
You should get an output similar to the following:
Ran 9 tests in 0.001s

OK
Summary
In this chapter, we implemented two classes that we’ll need to work with systems of equations: Vector and Matrix. In the next chapter, we’ll use these two classes to represent systems of equations that we’ll solve using numerical methods.