6
Dynamic Designs with if Statements

In this chapter, you’ll learn how to use if statements to create OpenSCAD designs that respond differently to a variety of conditions. This powerful programming tool gives your designs the power to choose from several options and execute only certain lines of code. As a result, you can create dynamic designs that adapt to changing circumstances. For instance, you can use if statements to reconfigure a design quickly for 3D printing.
As an example project, here you will learn to use if statements to vary the length of tick marks on a ruler to indicate inch, half-inch, and quarter-inch increments depending on the position of the tick mark. You’ll also learn how to use random numbers to vary repeated shapes in order to create a more organic variety of design characteristics.
Using if Statements
An if statement uses a Boolean expression (an expression that evaluates to either true or false) to compare two values, then determines whether to execute code based on that comparison. If the Boolean expression in an if statement evaluates to true, the indicated code statements are executed. Otherwise, the statements are skipped entirely. The Boolean expression describes a condition that must be satisfied in order for the indicated statements to be added to the design.
The following shows if statement syntax:
if (<boolean expression>) {
  // code that is executed only when the boolean expression is true
}
Listing 6-1 is a variation on the skyscraper design created in Chapter 4. This new version uses if statements to decide where to place windows and doors in the skyscraper (Figure 6-1).
num_rows = 10;
num_col = 6;

building_width = num_col * 5;
building_height = num_rows * 6;

difference() {
  cube([building_width, 10, building_height]);

  for (1 z = [1:1:num_rows]) {
    for  (x = [0:1:num_col-1]) {
    2 if (z == 1) {
      3 translate([x*5+1, -1, -1]) cube([3, 3, 8]); // door
      }
      4 if (z > 1) {
      5 translate([x*5+1, -1, z*5]) cube([3, 3, 4]);  // window
      }
    }
  }
}
Listing 6-1: Using if statements to insert doors and windows depending on floor number
Figure 6-1 shows a skyscraper with doors on the first floor and windows on every subsequent floor. Two for loops in Listing 6-1 create the rows and columns of windows and doors in this design. The z variable 1 controls the vertical position of each row. Next, two if statements use those z values to decide whether to add a window or a door to the design. If z equals 1 2, a large door is added to the design 3. If z is greater than 1 4, a small window is added to the design 5.

Figure 6-1: A grid of windows on a skyscraper, with a row of doors
We’ll evolve this skyscraper design throughout the rest of the chapter. However, you might feel that a skyscraper is not a skyscraper without more details, especially on the other sides of the building. We totally agree and leave the exercise of adding more detail to this simple design as a challenge to the reader.
Defining Complex Conditions
You can use an if statement to evaluate many types of conditions by utilizing a combination of six Boolean operators and one of two logical operators. In addition, you can specify a default scenario (which is executed if the specified condition is false) by connecting an else statement with an if statement. Finally, you can connect several related conditions together by using an else if statement.
Choosing Boolean Operators
OpenSCAD uses six Boolean operators to evaluate the content of variables within a Boolean expression. Each of these operators will result in true if the comparison is valid, and false if the comparison is not valid:
<less than>greater than<=less than or equal to>=greater than or equal to==equal to!=not equal to
The symbols used for many of these Boolean operators are probably familiar to you from math class. OpenSCAD (as with most other programming languages) changes the symbols a bit so that you can easily type them on a keyboard. For instance, you’re probably used to seeing the ≤ symbol to indicate less than or equal to. However, programming languages commonly use <= instead. In the same way, >= replaces ≥, and != replaces ≠. Finally, be sure not to confuse == with =. Because the single equal sign already has a use (assigning a value to a variable), Boolean expressions use the double equal sign (==) to test whether two values are “equal to” each other. For example, Listing 6-1 tests for the equality of two values by using the equals (==) operator.
This collection of Boolean operators provides many choices for evaluating variables to determine whether a condition is true or false. You can now write a loop that generates different shapes depending on the number of times the loop has repeated. As you will see later, you can also specify that you’d like to draw a shape only if a certain condition is not true. Using Boolean operators in an if statement allows you to create dynamic designs with a relatively small number of statements.
Using Logical Operators to Combine Boolean Expressions
Additionally, you can combine multiple Boolean expressions with one of two logical operators: && (which stands for and) and || (which means or).
If you use the && operator, all conditions need to be true in order for the indicated statements to execute. If you use the || operator, at least one of multiple conditions needs to be true. For a better sense of how the && operator works, consider the following:
if (x > 10 && y <= 20) {
  translate([x, y, 0]) cube([3, 4, 3]);
}
This code segment draws a translated cube only when x is greater than 10 and y is less than or equal to 20.
Now consider this if statement that uses the || operator:
if (x > 10 || y <= 20) {
  translate([x, y, 0]) cube([3, 4, 3]);
}
A translated cube is drawn when either x is greater than 10 or y is less than or equal to 20. Only one of the Boolean expressions connected by an or operator needs to evaluate to true in order for the shape to be drawn. The cube will also be drawn if both Boolean expressions connected by the or operator are true.
Following an Expanded Order of Operations
You can construct complex Boolean expressions that involve many arithmetic, Boolean, and logical operators. As in math class, where you learn to perform multiplication before addition, even if addition comes first in the arithmetic expression, OpenSCAD evaluates expressions following a well-defined order of operations:
( )^*,/,%+,-<,>,<=,>===,!=&&||
Operators at the same level in the order of operations are performed according to the order of their occurrence in the expression as it is read from left to right. Otherwise, operators at the top of this list have a higher precedence and are calculated prior to operators at the bottom of the list, even if that means the expression is calculated from the inside out.
Making Two-Way Choices with if…else Statements
A basic if statement executes a section of code only when the Boolean condition is true. To execute alternate code when the Boolean condition is false, attach an else statement to an if statement. An if...else statement creates a two-way branch in your code, allowing you to execute different collections of statements for each truth condition.
Consider the following if...else syntax:
if (<boolean expression>) {
  // code that is executed only when the boolean expression is true
}
else {
  // code that is executed only when the boolean expression is false
}
If the Boolean expression in the if statement is true, the first group of statements is executed. If the Boolean expression in the if statement is false, the statements contained within the else section is executed. The else section of an if statement is often called the default condition, because it describes what should happen when the condition specified in the if statement is false. An else statement is an optional extension to an if statement and is appropriate for mutually exclusive branching scenarios, where there is no possibility that you want to include both sections of code in your design.
You could easily redesign Listing 6-1 by using an else statement. The skyscraper in Figure 6-1 has exactly one row of doors. All of the remaining rows will have windows. Because the for loop should sometimes draw a door and all other times draw a window, you could rewrite the if statement like this:
num_rows = 10;
num_col = 6;

building_width = num_col * 5;
building_height = num_rows * 6;

difference() {
  cube([building_width, 10, building_height]);

  for (z = [1:1:num_rows]) {
    for (x = [0:1:num_col-1]) {
      if (z == 11) {
       2 translate([x*5+1, -1, -1]) cube([3, 3, 8]); // door
      }
      else {
       3 translate([x*5+1, -1, z*5]) cube([3, 3, 4]);  // window
      }
    }
  }
}
If the Boolean expression z == 1 1 is true, OpenSCAD draws a door 2. If the Boolean expression is false, OpenSCAD draws a window 3.
Using Extended if Statements
An extended if statement attaches a condition to an else statement to create an ordered collection of related decisions. OpenSCAD evaluates the Boolean expressions in an extended if statement in order until one of the expressions evaluates to true. You can optionally include an else statement at the end of an extended if to provide a catchall default option in case all of the decisions evaluate to false.
The syntax for an extended if statement looks like this:
if (<boolean expression>) {
  // code that is executed only when the boolean expression is true
}
else if (<boolean expression>) {
  // code that is executed only when the first boolean expression is false
  // and the second boolean expression is true
}
else {
  // optional default scenario
  // code that is executed only when both boolean expressions are false
}
You can add as many else if statements as needed to describe any number of mutually exclusive design possibilities, which is particularly useful when you want to ensure that exactly one of many related outcomes should happen. Each Boolean expression in the extended if statement is evaluated in order until one is found that evaluates to true. Only the code section for that Boolean expression is executed, while the remaining sections are skipped. If no Boolean expressions are true, the code specified in the optional else section (if provided) is executed. Because the else section describes the default possibility, it must be included at the end of an extended if statement.
Listing 6-2 uses an extended if statement to draw tick marks of various sizes on a ruler (Figure 6-2). This design creates an inch-based ruler with tick marks at three repeating intervals: one inch, a half inch, and a quarter inch. Tick marks at inch intervals are the longest, followed by slightly shorter half-inch tick marks, and even shorter quarter-inch tick marks. OpenSCAD is unit-less, so this design uses basic proportionality to divide every inch on the ruler into four equal-sized “gaps.” It is intended to be resized to its exact width in your 3D-printing preparation software just prior to printing.
ruler(5);

module ruler(inches) {
1 gap_size = 1; // 1 unit per quarter inch
  total_marks = 4 * inches; // inch, half inch, quarter inch

  width = gap_size * total_marks;
  length = 4 * gap_size;
  height = 0.5 * gap_size;

  mark_width = 0.25 * gap_size;
  mark_height = 1.5 * height;

  // main ruler body
  difference() {
    cube([width, length, height]);
    translate([width-gap_size, length-gap_size, -0.5])
      cylinder(h=height+1, r=0.15*length, $fn=20);
  }

  // tick marks
  2 for(t = [1:1:total_marks-1]) {
    mark_x = gap_size * t - 0.5 * mark_width;

  3 if (t%4 == 0) { // inch marks and number labels
      translate([gap_size * t, 0.65 * length, 0])
        linear_extrude(mark_height)
          text(str(t/4), size=gap_size, halign="center");
      translate([mark_x, 0, 0])
        cube([mark_width, 0.5 * length, mark_height]);
    }
    4 else if (t%2 == 0) { // half-inch marks
      translate([mark_x, 0, 0])
        cube([0.75 * mark_width, 0.25 * length, mark_height]);
    }
    5 else { // quarter-inch marks
      translate([mark_x, 0, 0])
        cube([0.5 * mark_width, 0.125 * length, mark_height]);
    }
  }
}
Listing 6-2: Using extended if statements to differentiate tick mark sizes on a ruler

Figure 6-2: A five-inch ruler
First, a collection of variables is defined to help us organize our design 1: gap_size indicates that one OpenSCAD unit will represent the width taken by a single quarter-inch gap between tick marks, and total_marks keeps track of the total number of tick marks needed (according to the inches parameter of the ruler module). We’ll need four tick marks per inch as we’ll include marks at the inch, half-inch, and quarter-inch intervals. The other variables relate the proportionality of various features of the ruler to these two initial choices. Organizing the module variables in this manner allows you to quickly update your design in the future. For instance, you might decide to make a longer ruler in your next version. This change could easily be accomplished by making a single change: the calculation that determines the value of length variable.
The for loop 2 draws something for every needed tick mark, except for the first and last tick marks, which are meant to be inferred (as they are the beginning and end of the ruler). The t variable in the for loop keeps track of the number of tick marks being drawn, while mark_x is used to keep track of the location of each new tick mark along the x-axis. The first Boolean expression 3 tests whether the t variable is divisible by 4 (remember, % calculates the remainder). If this condition is true, the longest tick mark is added to the design to indicate an inch interval. If the t variable isn’t divisible by 4, the second Boolean expression 4 tests whether it is divisible by 2. And if it is, the second-longest tick mark is added to the design to indicate a half-inch mark. Only if the t variable isn’t divisible by either 4 or 2 will the shortest tick mark be added to the design 5 by the else statement.
Notice the careful ordering of the decisions used in this extended if statement. The for loop produces a series of numbers that are each evaluated by the extended if statement: 1, 2, 3, 4, 5, 6, 7, 8, and so on. Numbers like 4, 8, and 12 are divisible by both 4 and 2, so which condition should be executed? Extended if statements evaluate each decision in order, executing only the code contained in the if statement with the first Boolean expression that is true. Even though some numbers are divisible by both 4 and 2, the second decision 3 is evaluated only if the first expression 2 is false. Thus, only one tick mark is drawn for each value of t in the for loop. This is an example of a mutually exclusive scenario: one, and only one, of the three tick mark lengths should be drawn for each value of t.
Using Nested if Statements
Placing an if statement inside another if statement is a way to guarantee that a Boolean expression should be considered only if another Boolean expression is true. At a basic level, a nested if statement can replace the && operator:
if (x < 8 && y == 10) {
  // code that is executed only when both boolean expressions are true
}
So you could rewrite the preceding code with a nested if statement:
if (x < 8) {
  if (y == 10) {
    // code that is executed only when both boolean expressions are true
  }
}
It’s probably easiest to use the && operator for simple combinations of Boolean expressions that all need to be true for satisfying certain design conditions. However, using nested if statements can be easier when you want to test the outcome of multiple Boolean expressions that can either be true or false:
if (x < 8) {
  if (y == 10) {
    // code that is executed only when both x < 8 and y == 10
  }
  else if (y < 10) {
    // code that is executed only when both x < 8 and y < 10
  }
  else {
    // code that is executed only when both x < 8 and y > 10
  }
} else {
  if (y == 10) {
    // code that is executed only when both x >= 8 and y ==10
  }
  else {
    // code that is executed only when both x >= 8 and y !=10
  }
}
It’s usually possible to describe complex conditions using a variety of combinations of Boolean operators, logical operators, extended if statements, and nested if statements. Often, the best choice is the combination of conditions that makes the most sense to the person creating the design.
Useful Applications of if Statements
You should include an if statement whenever you want your OpenSCAD design to vary according to a specific condition. The following situations are examples of when you may want to use if statements in your projects.
Setting Up a Design Mode and Print Mode
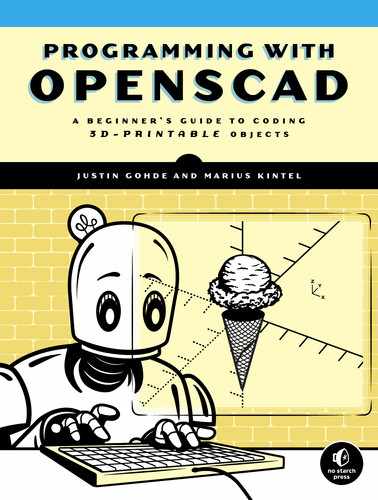
Consider the Towers of Hanoi project from Chapter 4. When designing the series of stacking discs, it was convenient to visualize the discs stacked vertically on one of the pegs. However, that configuration is not the best for 3D-printing the design, because the disks are resting on top of each other, and you wouldn’t want all the disks to be printed as one piece.
A useful technique is to create two versions of your design: one configuration for visualizing the final result and one for 3D-printing it. Use design mode to build your design in a way that is easy to visualize, and use print mode to reorganize the same design in a way that is better for 3D printing.
Listing 6-3 incorporates these two design configurations; Figure 6-3 depicts print mode.
$fn = 100;
mode = "print"; // or "design"

cube([200, 60, 10], center=true);

for (x = [-60:60:60]) {
  translate([x, 0, 5]) cylinder(h=70, r=4);
}

1 if (mode == "design") {
  for (d = [2:1:7]) {
    translate([-60, 0, 10 + (7-d)*10]) disc(d*4, 5);
  }
}
2 else if (mode == "print") {
  for (d = [2:1:7]) {
    if (d > 4) {
      translate([60*d - 350, 60, 0]) disc(d*4, 5);
    }
    else {
      translate([60*d - 200, 100, 0]) disc(d*4, 5);
    }
  }
}

module disc(disc_radius, hole_radius) {
  difference() {
    cylinder(h=10, r=disc_radius, center=true);
    cylinder(h=11, r=hole_radius, center=true);
  }
}
Listing 6-3: Using if statements to differentiate print mode and design mode
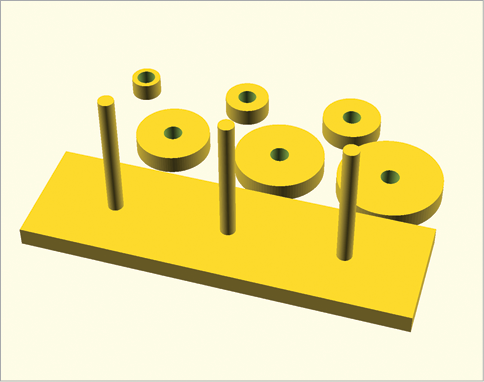
Figure 6-3: A Towers of Hanoi project set up for printing
Listing 6-3 uses a variable named mode and an extended if statement to decide whether to draw the shapes in "print" mode or "design" mode. If mode == "design" 1, the disks are displayed vertically, stacked on top of one another, which makes it easy to visualize and check for correctness. If mode == "print" 2, the discs are arranged in two horizontal rows, which is an appropriate setup for 3D printing. This differentiation allows you to quickly switch back and forth between the two configurations. When you are ready to print, all you need to do is change the value of mode to "print" to make the design change automatically.
Using Random Numbers as a Design Element
Random numbers are a fun way to add unpredictable elements to your designs, which is convenient when a design has features that you want to be similar, but not exactly the same. For instance, you could easily use random numbers to generate an entire city of skyscrapers, all with different heights, widths, and numbers of windows.
When you roll a six-sided die, you can expect that one of the six values (1, 2, 3, 4, 5, 6) on the die will be the result of the roll, but you can’t predict the exact outcome. A similar procedure happens with the rands function. You can be certain that a decimal value within a specified range will be picked without knowing exactly which value will be picked until the statement is executed.
Use the mathematical rands function to generate random numbers. The following line of code picks two random decimal numbers between 0 and 1:
number_list = rands(0, 1, 2);The first parameter you pass to rands specifies the lowest decimal number that the random number generator can choose. In this case, the lowest possible number is 0.0. The second parameter specifies the highest possible number, which is 1.0 for this example. The third parameter, 2, specifies how many numbers will be picked. The variable number_list remembers the generated list of random numbers so you can use them later.
The following code segment chooses three random numbers from 10 to 20, then stores the list of three numbers in a variable called number_list. Each random number in the list is then printed to the console window with the number_list variable, followed by the position of each number in the list within square brackets ([ ]). As with most programming languages, OpenSCAD considers the first element in a list to be in position [0]:
number_list = rands(10, 20, 3);

echo(number_list[0]);
echo(number_list[1]);
echo(number_list[2]);
Every time you preview this code, you will see a different combination of three randomly chosen decimal numbers from 10 to 20 printed to the console.
The rands function can choose any decimal number within the range you provide, but sometimes it’s convenient to restrict a design to working only with integers (that is, numbers without decimals). If your design needs to pick a random integer within a certain range, the mathematical round function can be used to map randomly generated decimals to integers. The round function examines the decimal extension of a number to decide whether the decimal number should be “rounded up” or “rounded down” according to whether the decimal extension is >= 0.5 or < 0.5, respectively:
number_list = rands(9.5, 20.49, 3);

echo(round(number_list[0]));
echo(round(number_list[1]));
echo(round(number_list[2]));
Every time you run this code, you will see a different combination of three integers from 10 to 20 printed to the console because of the use of the mathematical round function in each echo statement. Notice that the first two parameters of the rands function have been changed to 9.5 and 20.49 in order to ensure that each integer in the original range (that is, 10, 11, 12, 13, 14, 15, 16, 17, 18, 19, or 20) is picked an approximately equally likely number of times. Because we wouldn’t want to allow for a random choice of 20.5 and have it rounded up to 21, we use 20.49 as the highest possible value that can be generated. This produces a slightly lower possibility of 20 being randomly generated as compared to the other integer values in the range, but the difference is very small.
Random numbers are a useful way to generate design elements only a certain percentage of the time. For instance, you could modify your skyscraper design from the preceding chapter so that 50 percent of the time, the skyscraper includes a water tower on top of the roof.
Listing 6-4 draws the same simple skyscraper from Listing 6-2. This new version of the design sometimes includes a water tower to the top of the building (Figure 6-4).
num_rows = 10;
num_col = 6;

building_width = num_col * 5;
building_height = num_rows * 6;

difference() {
  cube([building_width, 10, building_height]);

  for (z = [1:1:num_rows]) {
    for (x = [0:1:num_col-1]) {
      if (z == 1) {
        translate([x*5 + 1, -1, -1]) cube([3, 3, 8]);
      }
      else {
        translate([x*5 + 1, -1, z*5]) cube([3, 3, 4]);
      }
    }
  }
}

1 draw_tower = rands(0, 1, 1);

2 if (draw_tower[0] < 0.5) {
   translate([building_width/6, 5, building_height])
     watertower(building_width/4);
}

module watertower(width) {
  $fn = 20;
  cylinder(h=5, r=width/2);
  translate([0, 0, 5]) cylinder(h=5, r1=width/2, r2=0);
}
Listing 6-4: if statements and random numbers to sometimes draw a water tower
After drawing a basic building, the design generates a list with a single random number between 0 and 1 1. This list is stored in the draw_tower variable. An if statement 2 tests the randomly generated number and draws a water tower on top of the skyscraper only if the number generated is less than 0.5. That means the skyscraper will have a water tower approximately 50 percent of the time, and no water tower the other 50 percent of the time.
Figure 6-4: A skyscraper with a water tower
Next, let’s use random numbers to create a city block of randomly sized skyscrapers (Figure 6-5):
1 use <skyscraper.scad>

num_buildings = 5;

2 width_list = rands(10, 30, num_buildings);
length_list = rands(20, 30, num_buildings);
height_list = rands(20, 100, num_buildings);

window_row_list = rands(2.5, 10.49, num_buildings);
window_col_list = rands(2.5, 10.49, num_buildings);

watertower_list = rands(0, 1, num_buildings);

for (n=[0:1:num_buildings-1]) {
3 width = width_list[n];
  length = length_list[n];
  height = height_list[n];

4 window_rows = round(window_row_list[n]);
  window_cols = round(window_col_list[n]);

  watertower = round(watertower_list[n]);

  translate([0, n*30, 0]) {
  5 skyscraper(width, length, height, window_rows, window_cols, watertower);
  }
}
Figure 6-5: A row of randomly sized skyscrapers, some with a water tower
The skyscraper module is imported from skyscraper.scad 1 to keep the design small and manageable. Next, lists of random numbers (of size num_buildings) are generated for each parameter of the skyscraper module 2. A for loop then draws a number of skyscrapers according to the value indicated by the num_buildings variable. For each new skyscraper, variables are assigned random numbers from the appropriate spot in each list 3. Decimals are rounded to integer values 4 for parameters where decimal values wouldn’t make sense (you wouldn’t want half of a window to be drawn). Finally, this collection of randomly generated values specifies the various parameters 5 of each new skyscraper. Every time you preview or render this design, each building will be rendered differently, because the random values used to generate each skyscraper will be different. This technique is useful for making repeated computer-generated designs appear more organic and natural.
Summary
This chapter introduced the concept of creating conditional branches with if statements that allow you to create designs that adapt to changing circumstances. Each section of an if statement executes only when a specific condition is true, allowing you to generate designs with varying characteristics. This variety allows you to describe complex designs concisely.
When utilizing if statements to create dynamic designs, keep these concepts in mind:
ifstatements use a Boolean expression to evaluate whether a condition is true or false.ifstatements execute only if their Boolean expression istrue.- All expressions in OpenSCAD are evaluated according to an order of operations, which means that a complex Boolean expression can be evaluated from the inside out.
- A nested
ifstatement is anifstatement placed inside anotherifstatement. - To indicate what should happen when a Boolean expression is
false, extend anifstatement with anelsestatement. - You can combine several mutually exclusive decisions in one extended
ifstatement. - An
elsestatement allows you to provide a default collection of statements that execute when none of the Boolean conditions in an extendedifstatement are true. - You can use
ifstatements with random numbers to generate an organic naturalness to your design. ifstatements can help you organize your design into modes (like"print"or"design"), making it easy to change important configuration details.