Chapter 2
Setting Up an Android Development Environment
- Setting up your development environment
- Importing and building the sample application
- Running the application on an Android emulator
- Installing and running the application on an Android device
An Android application is developed and tested on a computer running Windows, Mac OS X, or Linux and then installed on an Android device for further testing, or for real-world use. This chapter walks you through the tools you need to have on your computer and helps you start using them. We use our sample Tic-Tac-Toe application in this chapter as well.
Android applications are mostly developed in Java. (If you're a glutton for punishment — as some of us freely admit that we are — you can develop Android applications in C or C++ instead, but we don't cover that topic in this book.) Also, if you're a Java purist, you can just use a text editor and the command line interface (CLI) to do your development.
Nowadays, however, most folks like to make their lives a little easier (or at least that's the story the software tool developers want developers to believe), so they use an integrated development environment (IDE) for their Java development. The most widely accepted IDE in the Java developer community is Eclipse. Also, the Open Handset Alliance (in particular, Google) has provided a set of tools that can be integrated into Eclipse that significantly helps with Java development for Android. These tools include the Android SDK Starter Package, the Android SDK Components, and the Eclipse plug-in for Android.
In this chapter, we show you how to install these tools in the order you need to do so. Because installing add-ons to Eclipse is often tricky, we also show you how to verify whether you have installed them correctly. Then we show you how to import and run the source code of the Tic-Tac-Toe application. If you're ready, “Read on, MacDuff!”
Setting Up Java
Your first task in setting up Java is to verify whether you have Version 1.5 or higher of the Java Development Kit (JDK). To do this, you work from the command line interface inside a cmd (Windows), Terminal (Mac), or shell (Linux) window. In order to bring up such a window interface, do as follows:
- Windows: Choose Start
 Run. In the dialog box that opens, enter cmd as the name of the program you want to run.
 - Mac OS X: Open the Terminal application by double-clicking its icon (you can find the Terminal application in the path Applications/Utilities on your hard drive).
- Linux: A window running a Linux shell is usually already on your screen because that's how Linux users primarily interact with their computers.
In this window, enter javac -version at the command prompt. Note: You enter javac (not java, which invokes the Java runtime) to invoke the Java compiler. If you see a message similar to the following, you're good to go:
javac version “1.6.0_22”
If your Java version starts with 1.5, that's also fine. However, if you have an earlier version, you don't have the correct JDK installed on your machine. If you get an error message, that probably means one of two things. It could mean that the JDK is installed but not in your system's path, which are the directories in which the system looks to find programs. It could also mean that the JDK isn't even installed (this is most likely to happen with only Windows and Linux; Macs come pre-installed with Java, and you only have to update the installation).
If the JDK is not on your path, you need to add it as described here: http://www.java.com/en/download/help/path.xml. Again, this problem is unlikely to occur on a Mac because Macs come pre-installed with Java. However, if the problem does occur, follow the instructions for Linux on the link provided.
If the JDK is old, or not installed, you have to download the JDK. Go to www.oracle.com/technetwork/java/javase/downloads/index.html and follow the instructions there. You might be asked to set up an account or log in, but this step is optional.
 Be sure to select Development Kit during the installation process because only the Java Runtime Environment (JRE) is installed (by default) and it isn't enough.
After you successfully install the JDK, add to your PATH environment variable the bin subdirectory of the directory in which the Java software has been installed. Incidentally, and especially if you've installed Java in the past, note that after Oracle's purchase of Sun Microsystems, part of the download site and process changed — and might also change later. This information was current only at the time this book was written.
On Mac OS X, Java and the JDK are preinstalled by Apple, so you shouldn't have to do anything. If the version is too old or you want to upgrade to the latest version, choose Software Update from the Apple menu and begin the Java upgrade from there.
After you handle the necessary installations, try the verification step again to make sure that everything is up to snuff.
Setting Up Eclipse
As we say in the introduction to this chapter, the most widely accepted IDE in the Android developer community is Eclipse. You can download Eclipse from
http://eclipse.org/downloads
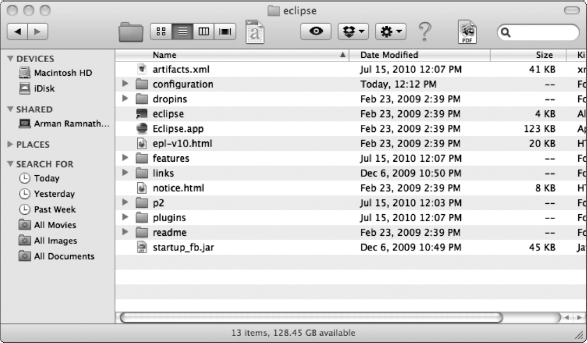
Select for your platform the latest version of the Eclipse IDE for Java Developers. (At the time this book was written, the latest version was Helios.) Then complete the download of the package. It's in ZIP format, so extract the files into a suitably named directory. After you extract the files, you see something like what is shown in Figure 2-1.
Figure 2-1: Executables in the Eclipse Install directory.
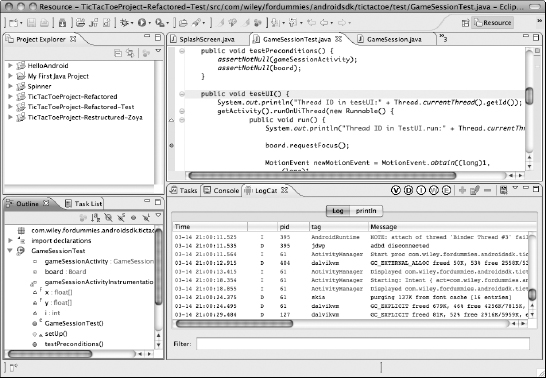
To verify that Eclipse has been installed correctly, simply navigate to the installed directory, locate the Eclipse.exe program, and double-click to run it. If the program starts up, give it a location in which to store its workspaces and then open the Eclipse Workbench. If the Resource perspective (see Figure 2-2) opens, you're ready to work with Eclipse.
Figure 2-2: The Eclipse Resource perspective.
While you're at it, create a shortcut (an alias on the Mac) for Eclipse on your desktop so that you don't have to navigate to its location every time you need to start it up.
Setting Up Android Development Components
We now show you how to install the Eclipse components needed for Android development. These components are discussed in-depth in the following sections.
Android SDK Starter Package and the Android SDK Components
Follow these steps to download and install the Android SDK Starter Package and the Android SDK Components:
- Download the Android SDK Starter Package from http://developer.android.com/sdk/index.html.
- Like the Eclipse package, the starter package is a ZIP file, so go ahead and extract it into a directory.
Make a note of the directory path because you will need it later.
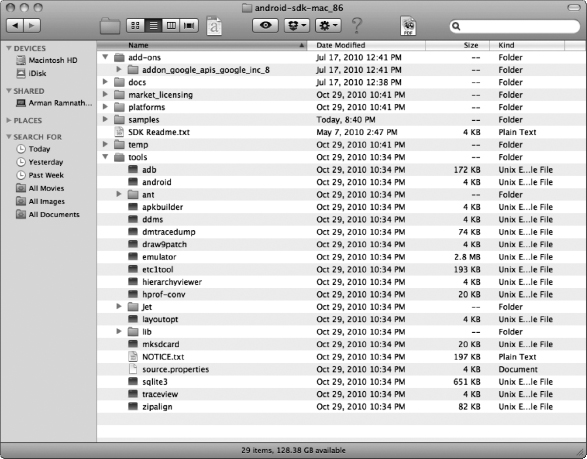
- If you're on Windows, look for the program named SDK Manager.exe in the installation directory and run this program. On Mac and Linux, look for the program named android in the tools directory (see Figure 2-3) and run this program. If you're doing this for the first time, you see a list of packages (see Figure 2-4).
Figure 2-3: Android SDK directory (Macintosh).
- Select Accept All.
The SDK components are installed. Note that this installation may take a while, so be patient.
You can also selectively get and install packages by selecting only the packages you really want (see Figure 2-4).Figure 2-4: Android SDK Components.
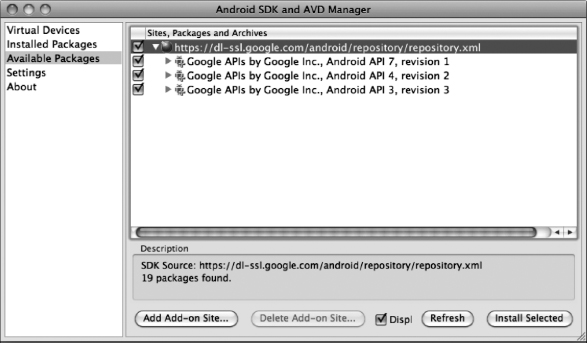
This part of the process has no separate verification step, so just hang in there for now!
Eclipse plug-in for Android
Google provides an Eclipse component (known as a plug-in) for Android development. This Android Development Tools (ADT) plug-in adds powerful extensions that help you create and debug Android applications easily.
Specifically, the ADT plug-in:
- Gives you access to other Android development tools from inside the Eclipse IDE
For example, ADT lets you take screen shots, manage port forwarding for remote debugging, set breakpoints, and view threads and process information directly from Eclipse.
- Provides the New Project Wizard, which helps you quickly create and set up all the basic files you need for a new Android application
- Automates and simplifies the process of building your Android application
- Provides an Android code editor that helps you write valid XML code for the various configuration files needed by your Android application
- Lets you export your project into a signed installable (known as an APK, for Android PaCKage), which can be distributed to users.
You can read more about the ADT plug-in at http://developer.android.com/guide/developing/eclipse-adt.html.
Here's how to install the ADT:
- Start Eclipse.
- (Optional) If you're prompted to provide a workspace directory, identify a directory where you want Eclipse to place all your code (or pick the default).
- Choose HelpInstall New Software.
- In the Work With entry field, type https://dl-ssl.google.com/android/eclipse and then click Add.
- In the Add Repository dialog box that opens, name the site (Android Development Tools, for example) and then click OK. You see Developer Tools listed in the pane beneath it, as shown in Figure 2-5.
Figure 2-5: Installing the ADT plug-in.
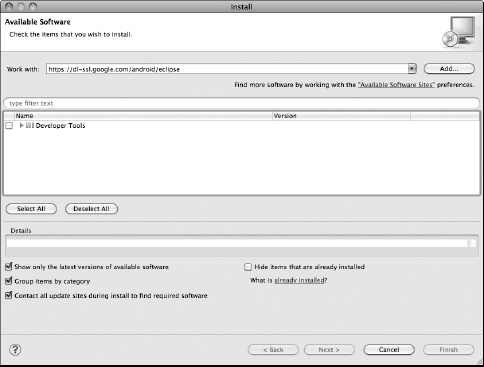
- Select all the tools and proceed with the installation by clicking Next.
The installation continues. It takes some time, so be patient.
- When you're asked whether you want to restart Eclipse, do it.
To easily verify that everything has been installed correctly, run a sample program on an emulator from a template that ADT provides. The next section shows you how.
Verifying the Development Environment
In this section we show you how to verify that the development environment has been installed correctly by creating and starting an emulator and then running a sample program on it.
Creating an emulator
The first part of verifying the development environment is to create an emulator that serves as a (virtual) device on which the test application will run. Follow these steps:
- From the Eclipse menus, choose WindowAndroid SDK and AVD Manager. Note: You might have to set the path to the Android SDK directory (Figure 2-2).
- Select Virtual Devices and then click the New button.
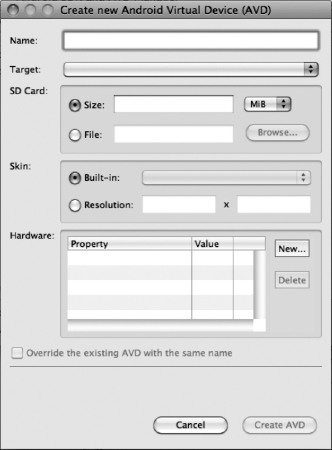
- In the dialog box that opens (see Figure 2-6), enter a name for the virtual device. The name must consist of alphabetic characters (a–z, A–Z), numbers (0–9), the underscore (_), the hyphen (-), and the period (.).
- Set the target to an Android version. In our example, we have set it to Android 3.1 – API Level 12. You may leave the other parameters (such as the SD card size, skin, and so on) alone.
- Click the Create AVD button.
The device is created and you see the Virtual Devices screen again.
- From the list of devices, select the device you just created and click Start.
The device starts running. Stay patient; starting a new device takes time.
Figure 2-6: Creating an emulator.
Creating and running a sample program
ADT has a simple program example you can use to ensure that your development environment is set up correctly.
- From the Eclipse menu, choose FileNewProject.
- From the New Project screen, open Android and select Android Project.
- Enter a project name and then select an Android version (we have used Android 3.1) as the build target.
- Enter a name for the application (any string is allowed, we used Hello Android), the package (you must follow the Java rules for naming packages, we used com.wiley.androidfordummies. Hello Android), and the main activity (we used HelloActivity).
 You must follow the Java rules for naming classes.
 - Click Finish.
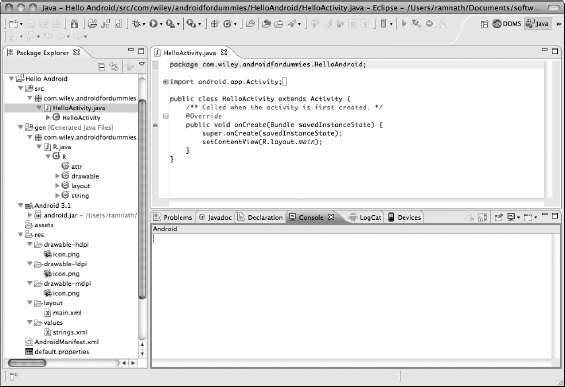
An Android project is created (see Figure 2-7).
Figure 2-7: Eclipse project for the Hello World Android test program.
- Right-click the project you just created and choose Run AsAndroid Application.
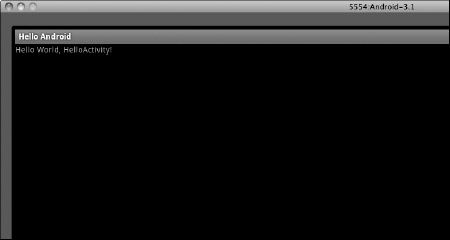
Be patient (again). After a while, you see a screen similar to the one shown in Figure 2-8, with the name you gave your main activity in place of the displayed string “Hello World HelloActivity.” Note: If you get an error (for example, something like “Unable to open class file …R.java: No such file or directory,” try restarting Eclipse).
Figure 2-8: The Hello World Android program running in the emulator.
If you completed all the steps in this section, your installation was successful.
Understanding the files in the sample project
Before we discuss our Tic-Tac-Toe example, we want to walk you through the purpose of the various files created in the hierarchy of the sample project (refer to Figure 2-7):
- The name of the project — in this case, HelloAndroid — is the top level in the project hierarchy.
- The src directory is where all the application source code — the code you will write — is located. For the simple HelloAndroid application, the ADT plug-in generated the code for you. You can see that this code is inside the package you specified for this application.
- We step out of order here, for just a moment, to say that the res directory contains resources used by the sample program. These resources include an XML file that specifies the layout of its screen (main.xml) and string constants (strings.xml) used by the program. Also, in the various drawable directories (drawable-hdpi, drawable-mdpi, and drawable-ldpi) are icons used by the program for Android devices with high (hdpi), medium (mdpi), and low (ldpi) density screens, respectively.
- When an application runs, the Android framework doesn't use XML files directly from the res folder. Instead, it generates code in the form of a resource (R) class, in which these values are embedded. This class is placed in the gen directory, which is the place for source code generated by the ADT plug-in specific to your application.
- Under Android 2.2 are the Android support libraries (covered in Chapter 1), in the form of JAR files.
- The critically important AndroidManifest.xml file describes the single externally visible component of the sample application — its main activity. If this application had additional services or activities, they would be described here.
- The default.properties file is another auto-generated file. You will see that it contains an entry for the target Android version you specified.
Importing, Running, and Debugging Tic-Tac-Toe
So far, we've walked you through setting up your development environment. That was the complicated part. The rest, as they say, is downhill from here!
Running on an emulator
The next steps are to install and run the sample Tic-Tac-Toe application, both on the emulator and then on an actual Android device. To do this, first copy the Tic-Tac-Toe project from this book's companion website (www.dummies.com/go/android3sdkprogramming) into a suitable directory. Then follow these steps:
- From the Eclipse menu, choose FileImport.
- Open the General tree and select Existing Projects into Workspace.
- Set the Root directory (see Figure 2-9) by browsing to the location where you saved the Tic-Tac-Toe project.
Figure 2-9: Importing Tic-Tac-Toe into Eclipse.
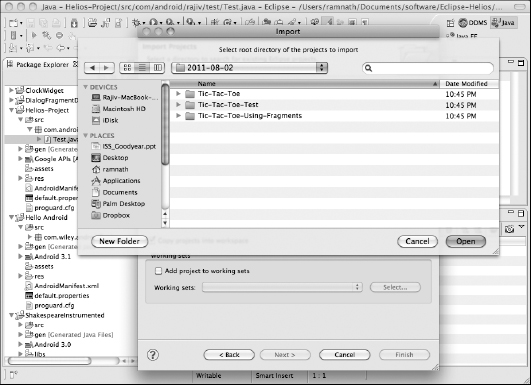
- Select the Copy Projects into Workspace check box (refer to Figure 2-9).
- Click Finish.
The Tic-Tac-Toe project is imported into your Eclipse workspace.
- Right-click the newly imported project and choose Android ToolsFix Project Properties.
This step cleans up configuration information in your project so it can run in the Eclipse environment it is in.
- Run Tic-Tac-Toe, just as you ran the template program.
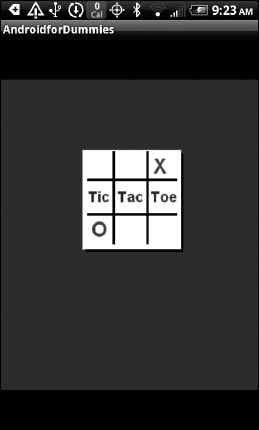
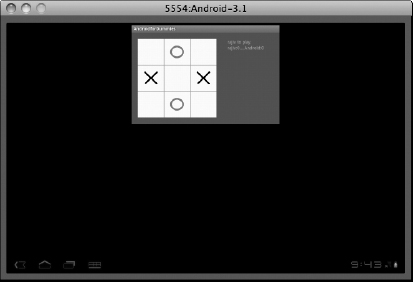
Voilà! Tic-Tac-Toe appears on the emulator (see Figure 2-10). Knock yourself out playing the game!
Figure 2-10: Playing Tic-Tac-Toe on the emulator.
Setting up debugging and running on an Android device
Testing and debugging on a physical device are straightforward tasks although they require a few more configuration steps. You start by declaring your application as “debuggable” in its manifest:
- In Eclipse, view the manifest.
- On the Applications tab, set the Debuggable field to true.
Alternatively, if you prefer to edit the XML directly, add android:debuggable=”true” as an attribute to the <application> element in the AndroidManifest.xml file.
- Turn on USB debugging from the Home screen of your device by pressing the Menu button, choosing ApplicationsDevelopment, and then selecting the USB Debugging check box.
- Set up your system to detect the device:
- Mac OS X: Don't do anything.
- Windows: Install the adb USB driver for the Android debugger.
 We don't go into the details because the Windows USB driver documentation at http://developer.android.com/sdk/win-usb.html is quite clear.
 - Linux: Add a rules file that contains a USB configuration for every type of device you use for development.
You can verify that your device is connected by running the command adb devices from your SDK tools/ directory. If your device is properly connected, you see your device name listed.
After declaring your application as debuggable, you install and run the program, running or debugging as usual from Eclipse. You see the Device Chooser dialog box (see Figure 2-11), which lists available emulators and connected devices. Select the device on which you want to install and run the application, and you will see the Tic-Tac-Toe splash screen appear (see Figure 2-12). That's it!
Figure 2-11: Device Chooser dialog box in Eclipse.
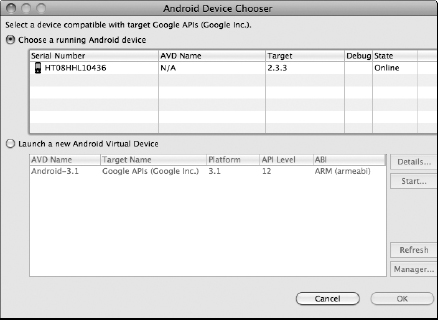
Figure 2-12: Tic-Tac-Toe splash screen on an HTC EVO device.