
BONUS CHAPTER 6
Using the Compact Material Editor
Materials are used to dress, color, and paint objects. Just as materials in real life can be described as scaly, soft, smooth, opaque, or blue, materials applied to 3D objects can mimic properties such as color, texture, transparency, shininess, and so on. In this chapter, you learn the basics of working with materials and all the features of the Material Editor.
Cross-Reference
The Material Editor can be opened in two different modes: Slate and Compact. The Slate Material Editor is covered in Chapter 15, “Using the Slate Material Editor.” In this chapter, Material Editor refers to the Compact Material Editor.
Working with the Compact Material Editor
The Material Editor is the interface with which you define, create, and apply materials. You can access the Material Editor by choosing Rendering ![]() Material Editor
Material Editor ![]() Compact Material Editor, clicking the Material Editor button on the main toolbar, or using the M keyboard shortcut.
Compact Material Editor, clicking the Material Editor button on the main toolbar, or using the M keyboard shortcut.
Note
The Material Editor toolbar button and the M keyboard shortcut open the Material Editor using the last version that was opened, either Slate or Compact.
Using the Material Editor controls
At the top of the default Material Editor window is a menu of options including Modes, Material, Navigation, Options, and Utilities. The menu commands found in these menus offer the same functionality as the toolbar buttons, but the menus are often easier to find than the buttons with which you are unfamiliar.
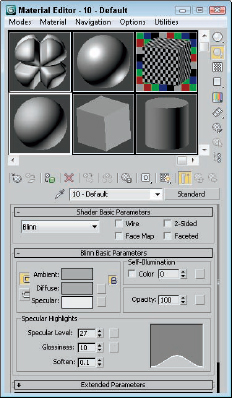
Below the menus are six sample slots that display a preview of some available materials. Surrounding these slots are button icons for controlling the appearance of these sample slots and interacting with materials. Figure 1 shows the Material Editor.
The button icons to the right and below the sample slots control how the materials appear in the editor. These buttons are defined in Tables 1 and 2.
FIGURE 1 Use the Material Editor window to create, store, and work with materials.
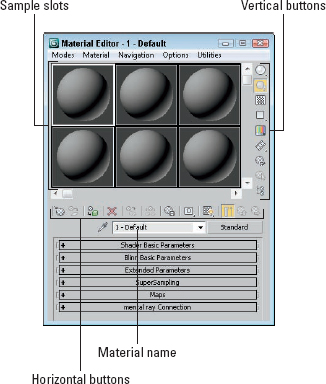
TABLE 1 Material Editor Buttons—Vertical
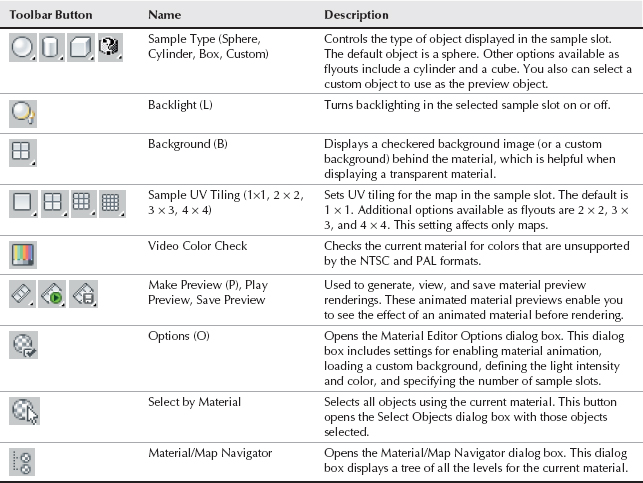
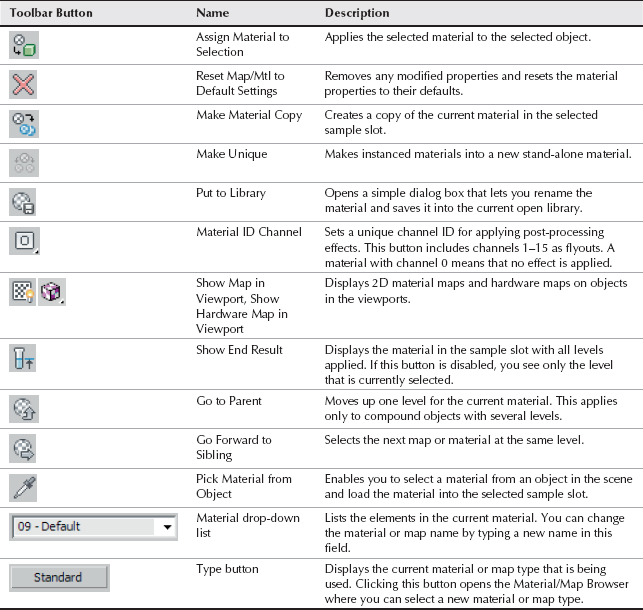
TABLE 2 Material Editor Buttons—Horizontal

Below the material name and type button is where the rollouts for the current material are opened. These rollouts change depending on the material type.
Cross-Reference
The Material Effects Channel IDs are used with the Rendering Effects dialog box to apply specific effects, such as glow and blur, to a material. To learn more about these effects, see Chapter 46, “Using Atmospheric and Render Effects.”
Using the sample slots
The Material Editor includes 24 sample slots that display materials and map examples. Each of these sample slots contains one material or map. Only one sample slot can be selected at a time: The selected slot is outlined with a white border. Click one of the material slots to select it.
Note
Sample slots cannot be empty; they always contain some kind of material.
Sample slots are temporary placeholders for materials and maps. An actual scene can have hundreds of materials. By loading a material into a sample slot, you can change its parameters, apply it to other objects, or save it to a library for use in other scenes. When a file is saved, all materials in the Material Editor are saved with the file.
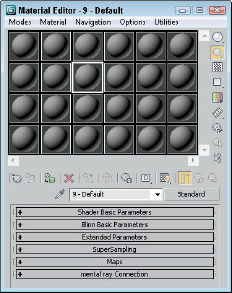
Twenty-four slots are available, but the default layout displays only six. You can access the other 18 slots using the scroll bars. You also can change the number of displayed slots. To change the number of slots, choose Options ![]() Cycle Sample Slots, or press the X key, or right-click any of the material slots and select 2×3, 3×5, or 4×6 from the pop-up menu. These options also are available in the Options dialog box (keyboard shortcut O). Figure 2 shows the Material Editor with 24 sample slots displayed.
Cycle Sample Slots, or press the X key, or right-click any of the material slots and select 2×3, 3×5, or 4×6 from the pop-up menu. These options also are available in the Options dialog box (keyboard shortcut O). Figure 2 shows the Material Editor with 24 sample slots displayed.
FIGURE 2 You can set the number of sample slots in the Material Editor to display 6, 15, or 24 slots.
The 24 default sample slots that are by default a dull gray are loaded from the medit.mat file in the matlibs subdirectory. To load your own custom default materials, save them into this file.
Magnifying a sample slot
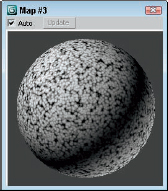
The Material ![]() Launch Magnify Window menu command (also found in the right-click pop-up menu) opens the material in a magnified window. You also can open this window by double-clicking the sample slot. You can resize the window to view the material at any size, and you can set it to automatically update when changes are made. If the Auto option is disabled, you can update the material by clicking the Update button. Figure 3 shows the magnified window. This window is great for seeing the intricate details of a material.
Launch Magnify Window menu command (also found in the right-click pop-up menu) opens the material in a magnified window. You also can open this window by double-clicking the sample slot. You can resize the window to view the material at any size, and you can set it to automatically update when changes are made. If the Auto option is disabled, you can update the material by clicking the Update button. Figure 3 shows the magnified window. This window is great for seeing the intricate details of a material.
FIGURE 3 Open materials in a magnified window by double-clicking them.
Using different sample objects
You can change the Sample Type object displayed in the sample slots to be a sphere, cylinder, or box using the Sample Type button at the top right of the Material Editor window.
The Options button (the seventh button from the top in the vertical column of buttons at the right) opens the Material Editor Options dialog box (also opened with the keyboard shortcut O), where you can designate a custom sample object. The sample object must be contained in a .max file. To create a sample object, create and save a Max scene with a single object that fits inside a 100-unit cube.
The scene also can include custom lights and cameras. The object must have Mapping Coordinates enabled. You can enable them by selecting the Generate Mapping Coordinates option for primitive objects or by applying the UVW Map modifier. To make the object available, click the File Name button and select the option to Load Camera and/or Lights in the Material Editor Options dialog box. After the object loads, its name appears on the button in the Options dialog box. You can then select the custom object from the Object Type flyout button. Figure 4 shows the Material Editor with several different object types loaded, including a custom object.
FIGURE 4 You can load a custom sample object to be displayed in the sample slots.
Dragging materials
When you right-click the active sample slot, a pop-up menu appears. From this menu, you can select several commands. The Drag/Copy command is a toggle setting. This option also lets you drag and drop materials between the various sample slots. When the Drag/Copy option is enabled, it leaves a copy of the material when it's dragged to another slot. This option also allows you to drag a material to an object in the viewports. Dropping a material onto an object automatically assigns the material to that object.
The Drag/Rotate pop-up menu command (also found in the Options menu) lets you rotate the material object in the sample slot when you drag with the mouse. Dragging the object rotates it about its X-axis and Y-axis, and dragging from the corner of the sample slot rotates it about its Z-axis. This feature is useful for looking at how maps are applied. Pressing and holding the Shift key constrains the rotation about a single axis. The Material ![]() Reset Sample Slot Rotation menu command resets the material object to its original orientation.
Reset Sample Slot Rotation menu command resets the material object to its original orientation.
You also can drag materials from the sample slots back and forth among the Material/Map Browser, the Asset Browser Utility, and any rollouts where you can specify maps, such as the Environment Map button (found in the Environment dialog box, accessed via Rendering ![]() Environment) and the Projector and Shadow Map buttons (found in the rollouts for a selected light).
Environment) and the Projector and Shadow Map buttons (found in the rollouts for a selected light).
Naming materials
Every material has a name that appears beneath the sample slots in a drop-down list. This same name appears in the Material Editor's title bar. You can rename a material by typing a new name in the material name drop-down list. This name appears in the Material/Map Navigator dialog box and in the Track View. As you create materials, give each one a unique name that is easy to identify. When a material is saved to a Library with the Put to Library button, a dialog box opens that enables you to rename the material. You can see the name of any of the materials in the sample slots by moving the mouse over the top of the sample slot; the material name appears as a tooltip.
Note
If you drag a material from one sample slot to another, a copy is made with the same name as the original. If one of these materials is changed and then applied to the scene, a warning dialog box appears, stating that a material with the same name already exists in the scene. It also gives you the option of replacing or renaming the material.
Getting new materials
You load new materials into the sample slots by clicking the Get Material button (the leftmost button on the horizontal toolbar), choosing the Material ![]() Get Material menu command, or pressing the G key. This opens the Material/Map Browser where you can select a new material by double-clicking it. The new material loads into the selected sample slot.
Get Material menu command, or pressing the G key. This opens the Material/Map Browser where you can select a new material by double-clicking it. The new material loads into the selected sample slot.
Caution
The Material/Map Browser holds materials and maps. If you select a material map, a 2D map is loaded into the sample slot. A 2D map cannot be applied directly to an object in the viewport. You can tell the difference between maps and materials because maps are flat 2D bitmaps and materials are shown on an object like a sphere.
Assigning materials to objects
When you select a material, you can apply it to the selected object in the viewports with the Assign Material to Selection button (the third button from the left on the horizontal toolbar under the sample slots) or with the Material ![]() Assign to Selection menu command. Alternatively, you can drag a material from its sample slot and drop it on an object.
Assign to Selection menu command. Alternatively, you can drag a material from its sample slot and drop it on an object.
When you assign a material to an object in the scene, the material becomes “hot.” A hot material is automatically updated in the scene when the material parameters change. Hot materials have white corner brackets displayed around their sample slots. You can “cool” a material by clicking the Make Material Copy button (the fifth from the left) or choosing Material ![]() Make Material Copy menu command. This detaches the sample slot from the material in the scene to which it is applied, so that any changes to the material aren't applied to the object.
Make Material Copy menu command. This detaches the sample slot from the material in the scene to which it is applied, so that any changes to the material aren't applied to the object.
Whenever a material is applied to an object in the scene, the material is added to a special library of materials that get saved with the scene. Materials do not need to be loaded in one of the sample slots to be in the scene library. You also can load materials into the scene library that aren't applied to an object using the Put Material to Scene button (the second button from the left) or the Material ![]() Put to Scene menu command. You can see all the materials included in the scene library in the Material/Map Browser by selecting the Scene radio button.
Put to Scene menu command. You can see all the materials included in the scene library in the Material/Map Browser by selecting the Scene radio button.
In addition to the scene library, you also can put materials into a separate material library. The Put to Library button (the seventh from the left) or the Material ![]() Put to Library menu command places the current selected material into the default library. This library can be saved to load and reuse on other scenes with the Save button in the Material/Map Browser. Clicking the Get Material button opens the Material/Map Browser, where you can see the current library by clicking the Material Library radio button.
Put to Library menu command places the current selected material into the default library. This library can be saved to load and reuse on other scenes with the Save button in the Material/Map Browser. Clicking the Get Material button opens the Material/Map Browser, where you can see the current library by clicking the Material Library radio button.
Picking materials from a scene
Another useful option is obtaining a material from an object in the scene. Clicking the eyedropper button to the left of the Material Name or choosing the Material ![]() Pick from Object menu command changes the cursor to an eyedropper. You can then click an object in one of the viewports, and the object's material is loaded into the current sample slot.
Pick from Object menu command changes the cursor to an eyedropper. You can then click an object in one of the viewports, and the object's material is loaded into the current sample slot.
Selecting objects by material
If you want to select all the objects in your scene with a specific material applied (like the shiny gold material), then select the material in the sample slots and click the Select by Material button in the vertical set of buttons, or choose the Utilities ![]() Select Objects by Material menu command. This command opens the Select Objects dialog box with all the objects that have the selected material applied. Clicking the Select button selects these objects in the viewport.
Select Objects by Material menu command. This command opens the Select Objects dialog box with all the objects that have the selected material applied. Clicking the Select button selects these objects in the viewport.
Previewing materials and rendering maps
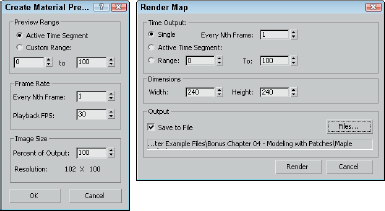
The Material ![]() Make Preview menu command, along with the Make Preview button and the P keyboard shortcut, opens the Create Material Preview dialog box, shown in Figure 5. Using this dialog box, you can create a preview of an animated material. The dialog box lets you specify the Preview Range and Frame Rate, as well as the Image Size, which is a percentage of the default resolution.
Make Preview menu command, along with the Make Preview button and the P keyboard shortcut, opens the Create Material Preview dialog box, shown in Figure 5. Using this dialog box, you can create a preview of an animated material. The dialog box lets you specify the Preview Range and Frame Rate, as well as the Image Size, which is a percentage of the default resolution.
Cross-Reference
Animated materials are covered in Chapter 21, “Understanding Animation and Keyframes.”
After you create a material preview, you can view the preview with the Material ![]() View Preview menu command. This opens the default media player and plays the animated preview. To save the preview as a file, use the Material
View Preview menu command. This opens the default media player and plays the animated preview. To save the preview as a file, use the Material ![]() Save Preview menu command. Preview files are saved as .avi files.
Save Preview menu command. Preview files are saved as .avi files.
The Utilities ![]() Render Map menu command (also found in the right-click pop-up menu) opens the Render Map dialog box, shown in Figure 5. This option is available only if the selected material has a map applied. The Render Map dialog box lets you select the Range of frames to include and the Dimensions of the rendered image. You can click the Files button to open a File dialog box where you can name the render map and specify the file type. The Render button renders the current map as a bitmap or an animation to the Rendered Frame Window and to the file (if selected).
Render Map menu command (also found in the right-click pop-up menu) opens the Render Map dialog box, shown in Figure 5. This option is available only if the selected material has a map applied. The Render Map dialog box lets you select the Range of frames to include and the Dimensions of the rendered image. You can click the Files button to open a File dialog box where you can name the render map and specify the file type. The Render button renders the current map as a bitmap or an animation to the Rendered Frame Window and to the file (if selected).
Note
You can save render maps as .avi, .bmp, .cin, .eps, .flc, .hdr, .jpeg, .png, .mov, .sgi, .rgb, .rla, .rpf, .tga, .jpg, and .dds files.
FIGURE 5 The Create Material Preview and Render Map dialog boxes offer two ways to render a material.
Setting Material Editor options
You open the Material Editor Options dialog box by clicking the Options button to the right of the sample slots, selecting Options from the Options menu, right-clicking the pop-up menu, or by just pressing the O key. Figure 6 shows this dialog box.
FIGURE 6 The Material Editor Options dialog box offers many options for controlling the Material Editor window.

The Material Editor Options dialog box includes options that control how the materials are displayed in the sample slots. These options are as follows:
- Manual Update: Doesn't update any changes in the sample slot until the slot is clicked.
- Don't Animate: Causes materials not to animate when an animation is played or the Time Slider is dragged. It does, however, update these materials to the current frame.
- Animate Active Only: Animates only the active sample slot if it contains an animated material. This option isn't available when the Don't Animate option is selected.
- Update Active Only: Updates only the active sample slot when changes are made to the material.
- Antialias: Enables anti-aliasing for all sample slots. Aliasing is a negative staircase-type effect that occurs for pixel-based images when adjacent pixels along the edges of an image are different colors. Anti-aliasing is a process for eliminating this distracting effect and smoothing the edges.
- Progressive refinement: Causes materials to be rendered progressively. This causes the material to appear quickly as blocky sections and then slowly in more detail. This gives you a rough idea of how the material looks before the rendering is finished.
- Simple Multi Display Below Top Level: Displays several different areas for only the top level when a Multi/Sub-Object material is applied.
- Display Maps as 2D: Displays stand-alone maps in 2D and not on the sample object. This feature helps you to know when you're looking at a map versus a material.
- Custom Background: Enables you to use a custom background behind the sample slots. You can load the background using the button to the right of the option. Once changed, the new background is used in all sample slots where the background is enabled.
- Display Multi/Sub-object Material Propagation Warning: Lets you to disable the warning screen that appears when you apply a Multi/Sub-object Material to an instanced object.
- Auto-Select Texture Map Size: Automatically scales Real-World textures on the sample sphere so that they appear correctly.
- Use Real-World Map Size for Geometry Samples: Causes all textures displayed within the sample slots to use Real-World mapping coordinates. This option is available when the Auto-Select Texture Map Size option is disabled.
This dialog box also offers options to adjust the color and intensity of the Top and Backlights used to render the materials in the sample slots. The intensity of these lights is determined by the Multiplier values. Use the Ambient Light Intensity value to control the brightness of the Ambient light in the sample slots; use the lock icon to set the color to the same as the Diffuse color. The Background Intensity value sets the brightness of the background: A value of 0 produces a black background, and 1 produces a white background. The Render Sample Size option scales the maps applied to the sample object for all slots. By scaling the map, you can match it up with the scale of an object in the scene. The Render Sample Size value lets you define the size of the sample slot object using the default units. Changing this value doesn't change the object size in the sample slots, but it's used as a reference to the texture size. The Default Texture Size value sets the initial size of Real-World textures. This value applies only to Real-World textures and is ignored by textures using other mapping methods. You can reset all these options to their default values using the Default buttons on the right.
The Custom Sample Object button is for loading a custom sample object (as discussed earlier). The Slots option is used to specify the number of sample slots.
Resetting materials
The Reset Material/Maps to Default Settings button (the fourth from the left) lets you reset the selected material to its default settings. If you apply the selected material to a material in the scene, a dialog box appears that lets you reset just the sample slots or both the sample slots and the material applied to objects in the scene.
The Utilities ![]() Reset Material Editor Slots menu command is used to reset all sample slots to the default material. You also can set all unused material sample slots to the default material using the Utilities
Reset Material Editor Slots menu command is used to reset all sample slots to the default material. You also can set all unused material sample slots to the default material using the Utilities ![]() Condense Material Editor Slots menu command. This replaces all materials that aren't applied to a scene object. It also moves all used materials to the top of the Material Editor sample slots. Both the Reset and Condense commands can be restored to their previous set of materials using the Utilities
Condense Material Editor Slots menu command. This replaces all materials that aren't applied to a scene object. It also moves all used materials to the top of the Material Editor sample slots. Both the Reset and Condense commands can be restored to their previous set of materials using the Utilities ![]() Restore Material Editor Slots menu command.
Restore Material Editor Slots menu command.
Removing materials and maps
If you accidentally apply an unwanted material to an object, you can replace the material with another material by dragging the new material onto the object. If you want to view the object color within the viewport, open the Display panel in the Command Panel, and in the Display Color rollout, select the Object color option for Wireframe and Shaded. The Material Color options display the material color in the viewports.
If you apply a material or map to an object that doesn't look just right and tweaking it won't help, you can always return to square one by removing the material or any mappings that have been applied to the object. The tool to remove materials and maps is the UVW Remove utility. You can access this utility by clicking the More button in the Utility panel found in the Command Panel and selecting UVW Remove from the list of utilities.
This utility includes a single rollout that lists the number of objects selected. It also includes two buttons. The UVW button removes any mapping coordinates from the selected objects, and the Materials button removes any materials from the selected objects. This button restores the original object color to the selected objects. Alternatively, you can select the Set Gray option, which makes the selected object gray when the materials are removed.
Using the Fix Ambient utility
Standard material types always have their Ambient and Diffuse colors locked together. If you have older files with unlocked Diffuse and Ambient colors, the Fix Ambient utility can be used to locate and fix all materials in the scene with this condition. To access this utility, open the Utilities panel, click the More button, and select the Fix Ambient utility. Clicking the Find All button opens a dialog box that lists all materials in the scene with unlocked Diffuse and Ambient colors.
Tutorial: Coloring Easter eggs
Everyone loves spring with its bright colors and newness of life. One of the highlights of the season is the tradition of coloring Easter eggs. In this tutorial, you use virtual eggs—no messy dyes and no egg salad sandwiches for the next two weeks.
To create your virtual Easter eggs and apply different colors to them, follow these steps:
- Open the Easter eggs.max file from the Bonus Chapter 6 directory on the CD.
This file contains several egg-shaped objects.
- Open the Material Editor by choosing Rendering
 Material Editor (or press the M key).
 - Increase the number of sample slots by right-clicking the active material and selecting 5×3 Sample Windows from the pop-up menu (or press the X key).
- Select the first sample slot, and click the Diffuse color swatch in the rollout below it. From the Color Selector that appears, drag the cursor around the color palette until you find the color you want and then click Close.
- In any viewport, select an egg and then click the Assign Material to Selection button in the Material Editor, or you can simply drag the material from its sample slot to the viewport object.
- Repeat Steps 4 and 5 for all the eggs.
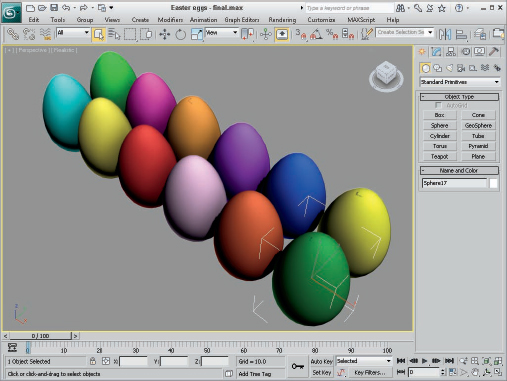
Figure 7 shows the assortment of eggs that we just created.
FIGURE 7 These eggs have been assigned materials with different Diffuse colors.
Summary
Materials can add much to the realism of your models. Learning to use the Compact Material Editor enables you to work with materials. This chapter covered the following topics:
- Working with the Material Editor buttons and sample slots
- Naming materials and applying to objects
- Setting Material Editor options
- Removing materials from objects